Hopkins TRIALBLAZER 27512VA User manual

1⁄4Amp Fuse
Fusible do 1⁄4ampère
Fusible 1⁄4amp
Chassis Ground
Châssis mise à la terre
Tierra al Chasis
Toaccessorywireor battery+12V
Au fil d’accessoireou à la borne positive
de batterie
Cable de accesorio a bateria 12+ Voltios
Electronic Deer Alert
Model #27512VA
Background:
Collisions with deer are getting worse every year. Trailblazer has been
specially designed to produce sounds deer and other animals can hear
at a distance. Together with safe driving, it may help save your life
and property.
WARNING - No device can guarantee you will never hit an animal.
Driving at safe speeds and staying alert, especially at dawn and dusk
are always important safety habits.
The Trailblazer Sound:
Trailblazer is designed to give off an unusual but effective sound. Please
don’t think there is anything wrong with your engine!
Installing the Trailblazer:
HAVE SOMEONE INSTALL IT FOR YOU
If your are not comfortable working on your car, have your dealer or an
installer of car stereos or alarm systems do it for you.
DO IT YOURSELF
Trailblazer may be connected in several ways. Using the dash-mounted
on/offswitch supplied is the easiest. The best place to mount Trailblazer
is facing forward inside the vehicle’sfront grille. Use the supplied cable
ties to secure it in place. KEEP AWAY FROM HOT SURFACES!
Option 1 - Dash Mounted Switch
1. After mounting Trailblazer inside the front grille, run the black wire
through the firewall toward the driver’scompartment.
2. Find a convenient spot within easy reach to mount the switch.
3. Connect the black wire from Trailblazer to one wire from the switch
using the supplied wire nut.
4. Connect the other wire from the switch to any chassis ground.
5. Attach the red wire from Trailblazer to any constant fused source of
+12V. The use of a 1⁄4amp fuse (purchased separately) is recommended.
Option 2 - Headlamp Connection
Trailblazer may also be installed to turn ON automatically whenever the
vehicle’shigh beam headlights come on.
CAUTION: DO NOT USE THIS CONNECTION WITH HID (HIGH
INTENSITY DISCHARGE) LAMPS. PERSONAL INJURY AND DAMAGE
TO YOUR VEHICLE MAY OCCUR.
1. Connect the red wire to the headlight connector as shown. Strip off
about 11⁄2"of insulation and DO NOT TWIST the wires.
NOTE: This is the terminal which shows +12V when the high beams
are on.
2. Attach the black lead to any chassis ground.
Système d’Alerte de Cerfs Électronique
Modèle N° 27512VA
Faits:
Le nombre de collisons avec les cerfs augmente tous les ans. Le
Trailblazer a été conçu spécialement pour produire des sons que les cerfs
et autres animaux peuvent entendre de loin. Associé à une conduite
prudente, le Trailblazer peut sauver votre vie et vos biens.
AVERTISSEMENT - Aucun appareil ne peut entièrement prévenir les
collisions avec les animaux. Conduire à une vitesse raisonnable et
rester alerte, surtout à l’aube et au crépuscule, restent des facteurs
importants pour votre sécurité.
Le bruit du Trailblazer:
Le Trailblazer est conçu pour émettre un bruit inhabituel mais efficace.
Ne pensez pas que votre moteur a un problème!
Installation du Trailblazer:
FAITES-LE INSTALLER
Si vous préférez ne pas toucher à votre voiture, faites installer le
Trailblazer par votre concessionnaire ou un installateur d’autoradios ou
d’alarmes de voitures.
INSTALLEZ-LE VOUS-MEME
On peut connecter le Trailbalzer de plusieurs manières. L’utilisation de
l’interrupteur marche/arrêt sur le tableau de bord est la plus simple. Le
meilleur endroit pour l’installation du Trailblazer est derrière la calandre
tourné vers l’avant. Utilisez les attaches de câbles fournies pour le fixer.
RESTEZ LOIN DES SURFACES CHAUDES!
Option 1 - Interrupteur Monté Sur le Tableau de Bord
1. Après avoir fixé le Trailblazer à l’intérieur de la calandre, passez le fil
noir dans le tablier vers l’intérieur du véhicule.
2. Cherchez un endroit pratique et à portée de main pour monter
l’interrupteur.
3. Connectez le fil noir du Trailblazer à l’un des fils de l’interrupteur à
l’aide du serre-fils fourni.
4. Connectez l’autre fil de l’interrupteur à n’importe quelle partie du
châssis mise à la terre.
5. Fixer le fil rouge provenant de l’avertisseur Trailblazer®àune source
constante de +12 volts à fusible. L’utilisation d’un fusible de 4 ampères
(vendu séparément) est recommandée.
Option 2 - Connexion aux Phares
Le Trailblazer peut également être installé pour se mettre automatiquement
en marche lorsque les feux de route du véhicule sont allumés.
AVERTISSEMENT : N’UTILISEZ PAS CETTE CONNEXION AVEC DES
PHARES A HAUTE INTENSITE. IL EXISTE UN RISQUE DE BLESSURE
ET D’ENDOMMAGEMENT DE VOTRE VEHICULE
1. Connectez le fil rouge au connecteur des phares comme illustré.
Mettez-le à nu sur environ 4 cm et NE TORSADEZ PAS les fils.
REMARQUE : Ceci est la borne qui fornit les +12V lorsque les feux
de route sont allumés.
2. Attachez le fil de sortie noir à n’importe quelle partie du châssis mise
àla terre.
TM

TWOYEAR LIMITED WARRANTY
Hopkins Manufacturing Corporation warrants to the original consumer/
purchaser that this product shall be free of defects in material and
workmanship under normal use and circumstances for a period of two (2)
years from the date of original purchase for use. When the original
consumer/purchaser returns the product prepaid to Hopkins Manufacturing
Corporation, 428 Peyton, Emporia, KS 66801-1157 U.S.A. within the
warranty period, and if the product is defective, Hopkins Mfg. Corp. will at
its option repair or replace such.
This warranty shall constitute the sole liability of Hopkins Mfg. Corp.
concerning the product. Hopkins Mfg. Corp. expressly disclaims all other
warranties INCLUDING, WITHOUT LIMITATION, THE WARRANTIES OF
MERCHANT ABILITY AND FITNESS FOR A PARTICULAR PURPOSE.
NO PERSON, FIRM, OR CORPORATION IS AUTHORIZED TO ASSUME
FOR HOPKINS MFG. CORP. ANY OTHER LIABILITY IN CONNECTION
WITH THE SALE AND USE OF THE PRODUCT. Hopkins Mfg. Corp. and
agents and distributors will bear no liability whatsoever for incidental or
consequential damages or charges of any kind.
Some states do not allow the exclusion or limitation of incidental or
consequential damages, so the above disclaimer regarding incidental or
consequential damages may not apply to you.
Mail defective product with proof of purchase to: Hopkins Manufacturing
Corporation, 428 Peyton, Emporia, KS 66801-1157 U.S.A. within ten (10)
days after date of purchase.
This warranty is void if the product has been damaged or tampered with or
if the product or any such parts have been opened. In all cases of damage
during shipment, a claim must be filed with the shipping carrier and not with
Hopkins Mfg. Corp.
This warranty gives you specific legal rights; you may also have other rights
which vary from state to state.
OUT OF WARRANTY REPAIRS
If the warranty period has expired or if you are not the original owner of the
vehicle the product was installed in, Hopkins Mfg. Corp. will at its option either
(1) replace this product with a functionally similar (but not necessarily identical)
refurbished product or (2) repair the original product and return it to the original
consumer/purchaser after payment of repair/replacement charges has been
received.
Red wire
Fil rouge
Cable rojo
Headlight connector
Connecteur du phare
Coneccion de las luces altas
Hopkins Manufacturing Corporation
428 Peyton, P.O. Box 1157
Emporia, KS 66801-1157 U.S.A.
1-800-524-1458 • Fax: 1-800-444-6779
www.hopkinsmfg.com • www.nvisionsafety.com
©2006 Hopkins Mfg. Corp. Printed in U.S.A. 310-0288-311 Rev. C 5-06
Alerta de Venados Electronica
Modelo #27512VA
Fondo:
Cada dia los accidentes con venados son peores. El Trailblazer ha sido
especialmente diseñado para producir sonidos, que venados y otros
animales pueden escuchar a distancia. En conjunto con manejar de una
manera segura, este ayudara para proteger su vida y proteger sus
propiedades.
ADVERTENCIA - Ningun elemento le puede garantizar que nunca va
chocar con un animal. Manejar de una manera sugura y estando
alerta, especialmente al amanecer y al anocher, son siempre los
habitos mas seguros.
El Sonido del Trailblazer:
Trailblazer esta diseñado para producir un sonido inusual pero efectivo.
Por favor no piense que algo anda mal con su motor!
Instalando El Trailblazer:
HAGA QUE ALGUIEN MAS LO INSTALE POR USTED
Si no se siente agusto al trabajar in su carro, haga que el concecionario o
una persona que instale radios o sistemas de sonido en automoviles, lo
hada por usted.
HAGALO USTED MISMO
Trailblazer puede ser instalado de diferente maneras. La forma mas facil
es usando el switch do encendido/apagado que se beinda con la unidad.
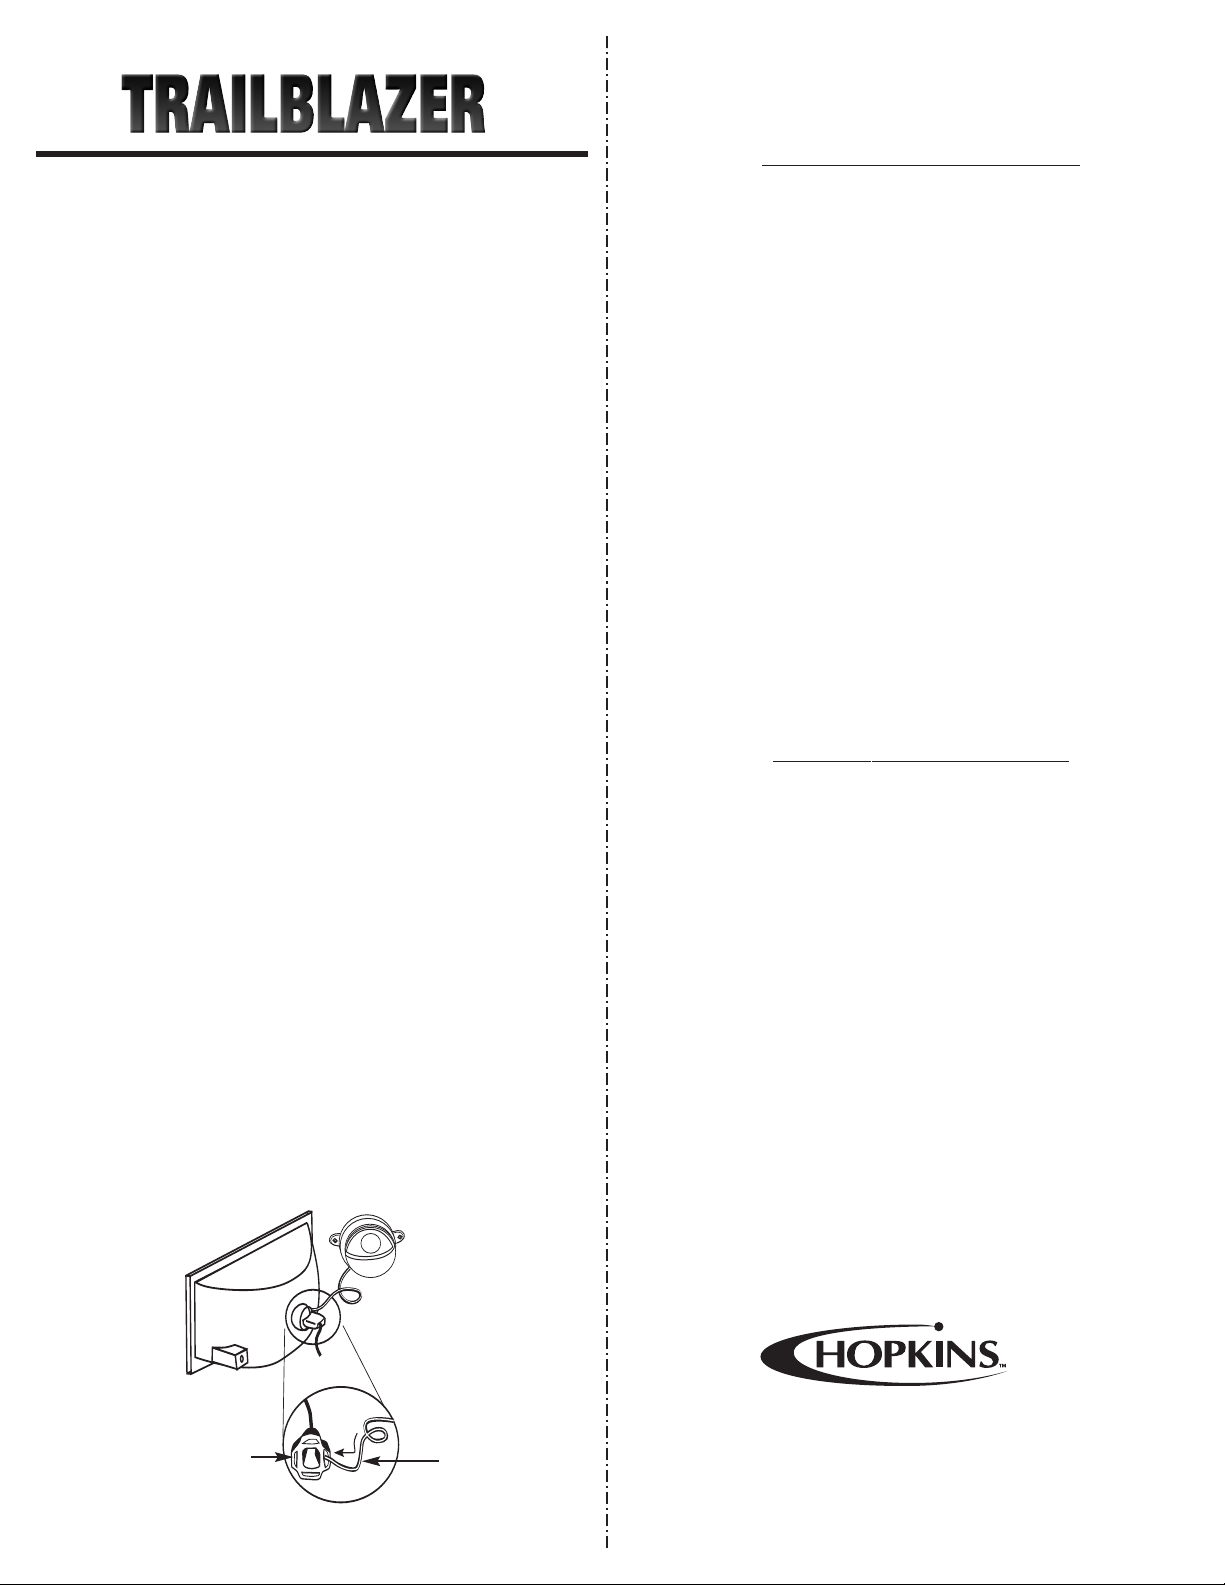
El mejor lugar para montar el Trailblazer,es adentro de la rejilla frontal
de su vehiculo, con el Trailblazer apuntando hacia adelante. Use los
pequeños sunchos que se proveen, para asegurar la unidad.
MANTENGASE ALEJADO DE SUPERFICIES CALIENTES.
Opción 1 - SwitchEn el Panel de Instrumentos
1. Despues de instalar el Trailblazer en la rejilla frontal, pase el cable
negro atravez de la pared de incendio en el area del conductor.
2. Busque un lugar conveniente, de facil acceso, para ubicar el switch.
3. Conecte el cable negro del Trailblazer a algun cable del switch
haciendo uso de la tuerca que se provee.
4. Conecte el otro cable del switch a cualquier negativo del chasis.
5. Conecte el cable rojo del Trailblazer a cualquier fuente constantemente
fundida de +12V.Se recomienda el uso de un fusible de 1⁄4amperios
(se vende por separado).
Opción 2 - Connection a las Luces
El Trailblazer puede ser instalado para que se encienda automaticamente
cuando las luces altas del vehiculo se enciendan.
ADVERTENCIA: NO USE ESTA CONNECION CON LUCES DE
DESCARGA DE ALTA INTENSIDAD. PUEDEN OCURRIR LESIONES
PERSONALES Y DAÑOS A SU VEHICULO.
1. Connecte el cable rojo a la coneccion de las luces tal como se indica
en la figura. Pele alrededor de 1 1⁄2"del aislamiento y NO TUERZA los
cables. Este es el terminal que muestra 12+ voltios cuando las luces
altas se encienden.
2. Connecte el cable negro a cualquier negativo del chasis.
TM
Table of contents
Popular Security System manuals by other brands

DIEL
DIEL ME 200 E Installation and instruction manual

Grace Engineered Products
Grace Engineered Products SAFESIDE R-3W2 Installation and operating instructions

Bewator
Bewator Bewacard BC615 Installation and user manual

Xirgo
Xirgo XT1520 product manual

Sealite
Sealite TRIDENT-1400 Installation & service manual

GARDINER TECHNOLOGY
GARDINER TECHNOLOGY 2897PDF Quick start user guide