Horizon Educational EDUSTAK JUNIOR User manual

EDUSTAK JUNIOR
BuildYourselfFuelCellStackKit–FCSU‐32
User ManualUser Manual
EDUSTAKJUNIORUserManualrev.1.1
©2013HorizonLtd.Allrightsreserved.

Contents
1. Introductions…………………………………………….………………………………………………………………
2. Safety information……………………………………………..……………………………………………………..
3
Part
lists
2
3
3
.
Part
lists
……………………………………………..………………………………………………………………………….
4. EDUSTAK JUNIOR specifications……………………………………………..…………………. …………………………………………
5. O
p
eration
g
uide ……………………………………………..…………………. ………………………………………..
5
6
7
p
g
6. Disassembly guide ……………………………………………..……………………………………………………..
7. Assembly guide ………………………..………………………………………………………………………………….
7
13
16
8. Leakage testing……………………………………………..………………………………………………………............
9. FAQ ……………….. ………………………………………………………………………………………………..……
23
27
10. Troubleshooting ……………………………………………………………………………………………………. 31
1
EDUSTAKJUNIORUserManualrev.1.1
©2013HorizonLtd.Allrightsreserved.

1 1 Foreword
1. Introduction
1
.
1
Foreword
ThankyouforchoosingHorizonFuelCellTechnologies’EDUSTAKJUNIOR.Wehopeyouwillenjoytouseit!
PleasereadalltheseinstructionsbeforeoperatingtheEDUSTAKJUNIORforthefirsttime,andshallkeepall
manuals for future reference
manuals
for
future
reference
.
IfyoustillhaveanyquestionsaboutoperatingorusingyourEDUSTAKJUNIOR.pleasecontactHorizon.
CopyrightbyHorizon2013.Allrightsreserved.Nochangespermittedwithoutpriornotice.
1 2 Production disclaimer
1
.
2
Production
disclaimer
Anyunauthorizedservice,modificationmayadverselyaffectthesafety,durability,andperformanceofthe
systemandshallimmediatelyvoidanywarrantyonthesystem.Misuse,neglect,orimproperservicingofthis
equipmentmayresultinthekitdamage.Donotoperatethiskitifitisdamaged.Failuretoobserveinstructions
contained in this manual will void any limited warranties and could result in suspension or denial of service
contained
in
this
manual
will
void
any
limited
warranties
and
could
result
in
suspension
or
denial
of
service
,
legalaction,orboth.
TheEDUSTAKJUNIORhasnotbeentestedatenvironmentaltemperatureextremes.Therefore,noguaranteeof
performanceismadeforoperationatambienttemperatureslessthan5°Candgreaterthan40°C.
1.3 Contact details
HorizonFuelCellTechnologies
5th Floor,Building19,No.2SuideRoad
Shanghai China
Shanghai
,
China
Tel:+862152709082*841
Email:[email protected]
EDUSTAKJUNIORUserManualrev.1.1
©2013HorizonLtd.Allrightsreserved.
2

2. General Information
General Safety Instructions
General
Safety
Instructions
•ReadtheusermanualbeforeoperatingtheEDUSTAKJUNIOR,andkeepitclosetothedeviceatalltimes.
•EDUSTAKJUNIORanditsfuelcartridgemustnotbestoredattemperaturesover40℃(313K)andmustnot
be operated at temperatures over 40
℃
(313 K) Protect from heat and direct sunlight
be
operated
at
temperatures
over
40
℃
(313
K)
.
Protect
from
heat
and
direct
sunlight
.
•OperatetheEDUSTAKJUNIORinawell‐ventilatedspace.
•WhentheEDUSTAKJUNIORisnotusedforalongtime,ensuretostoreitinacool,drystorage.
•DonotsmokeinthevicinityoftheEDUSTAKJUNIORoritsfuelcartridge.Protectfromheatandignition
sources Hydrogen is highly flammable!
sources
.
Hydrogen
is
highly
flammable!
•Afteranaccidentorintheeventofdamagetothefuelcartridgepotentiallyposesafirehazard.Keepaway
fromignitionsourcesandensuregoodventilation.
•KeepallEDUSTAKJUNIORanditsfuelcartridgesoutofreachofchildren,evenwhencartridgeisemptyor
only partly full
only
partly
full
.
•Theareasurroundingthefuelcartridgeshallbekeptclearandfreeofcombustiblematerials,gasolineand
otherflammablevaporsandliquids.
•Thisapplianceisnottestedforusewithmedicaldevices.
•
Save these instructions and review frequently during use
Save
these
instructions
and
review
frequently
during
use
.
EDUSTAKJUNIORUserManualrev.1.1
©2013HorizonLtd.Allrightsreserved.
3

HYDROSTIK PRO SAFETY INFORMATION:
2. General Information
HYDROSTIK
PRO
SAFETY
INFORMATION:
•RemovetheHYDROSTIKPROfromthepressureregulatorimmediatelyafteruse.
•DONOTtrytodisassemble,openorrepairthecartridgeswhenbrokenorwornout!
•
DO NOT store cartridges under direct sunlight
•
DO
NOT
store
cartridges
under
direct
sunlight
.
• Keepitawayfromfire.FireHazard!
• Keepitinasafe,dryandcoolplace.
• Keepitawayfromtemperaturesabove50˚Cwhilefilling,storageandusing.
•
Provide adequate ventilation and refrain from placing items on or around the appliance
•
Provide
adequate
ventilation
and
refrain
from
placing
items
on
or
around
the
appliance
duringoperation.Refrainfromplacingtheapplianceinenclosuresorcausingtheappliancetonotventfreely.
• Keepawayfromalkalineandacidicenvironment.
•Thisisnottoy– keepawayfromchildren.
•
The HYDROSTIK PRO cartridge must be placed horizontally when it is being charged otherwise the cartridge
•
The
HYDROSTIK
PRO
cartridge
must
be
placed
horizontally
when
it
is
being
charged
otherwise
the
cartridge
cancrack!
•HYDROSTIKPROcontentsareflammable.Donotdisassemble.
•AvoidcontactwithHYDROSTIKPROcontents.
•
Remove the HYDROSTIK PRO from the pressure regulator immediately after use
•
Remove
the
HYDROSTIK
PRO
from
the
pressure
regulator
immediately
after
use
.
•Whenusingtheappliance,basicsafetyprecautionsshouldalwaysbefollowedtoreduceriskoffire,or
personalinjury.
•Hydrogenshallbestored,handledandusedwithcautionsolifeandhealtharenotjeopardizedandtherisk
of property damage is minimized
of
property
damage
is
minimized
.
EDUSTAKJUNIORUserManualrev.1.1
©2013HorizonLtd.Allrightsreserved.
4

3. Part List
a. EDUSTAK JUNIOR*
b. HYDROSTIK PRO**
c. Manometer
d
.
Electronic
PCB
card
d
.
Electronic
PCB
card
e. Blower fan
f. Air pump
g. HYDROATIK PRO base
h
Purging
valve
with
tube
abcd
h
.
Purging
valve
with
tube
i. Screws
j. Three port connector
k. 3 silicon tubes
l. Clamp with tube
m. Pressure regulator
n. HYDROSTIK PRO support
o. Wires
efgh
ijklmno
*TheEDUSTAKJUNIORisalreadyassembledwhenyoureceiveitforthefirsttime.
**TheHYDROSTIKPROcontainsnohydrogenwhenyougetitforthefirsttime,youhavetofullychargeitwith
therefillin
g
stationHYDROFILLPRO
(
soldse
p
aratel
y)
orh
y
dro
g
enchar
g
in
g
tube
(
soldse
p
aratel
y)
.
g ( py)yg gg (py)
5
EDUSTAKJUNIORUserManualrev.1.1
©2013HorizonLtd.Allrightsreserved.

4. EDUSTAK JUNIOR Specifications
Type of fuel cell PEM
Number of cells 10
Rated Power 4W
Performance
6V @ 0 7A
Performance
6V
@
0
.
7A
Reactants Hydrogen and Air
External temperature 5 to 35ºC
Max stack temperature 55ºC
H2 Pressure 0.45-0.55bar
Hydrogen purity ≧99.995﹪dry H2
Humidification self-humidified
Cooling
Air (integrated cooling fan)
Cooling
Air
(integrated
cooling
fan)
Dimension 125mm*60mm*95mm
Weight 510 g
Flow rate at max output* 0.05 L/min
Start up time ≦30S at ambient temperature
Efficiency of stack 40% @ at full power
Low voltage shut down 5V
Over current shut down
1A
* The flow rate may change with the power output.
** The specification is subject to change without notice.
Over
current
shut
down
1A
Over temperature shut down 50ºC
EDUSTAKJUNIORUserManualrev.1.1
©2013HorizonLtd.Allrightsreserved.
6

5. Operating Guide
Usingadvices
InordertoreachthebestperformancesfromyourEDUSTACKJUNIOR,andtoguaranteehislifespan;we
stronglyrecommendtorespectthefollowingadvises:
●Strictlyfollowtheuser’smanual.
●MakesuretheEDUSTAKJUNIORhaspassedtheleakagetestingbeforeoperation.
●Operateitinawell‐ventilated,dryarea.
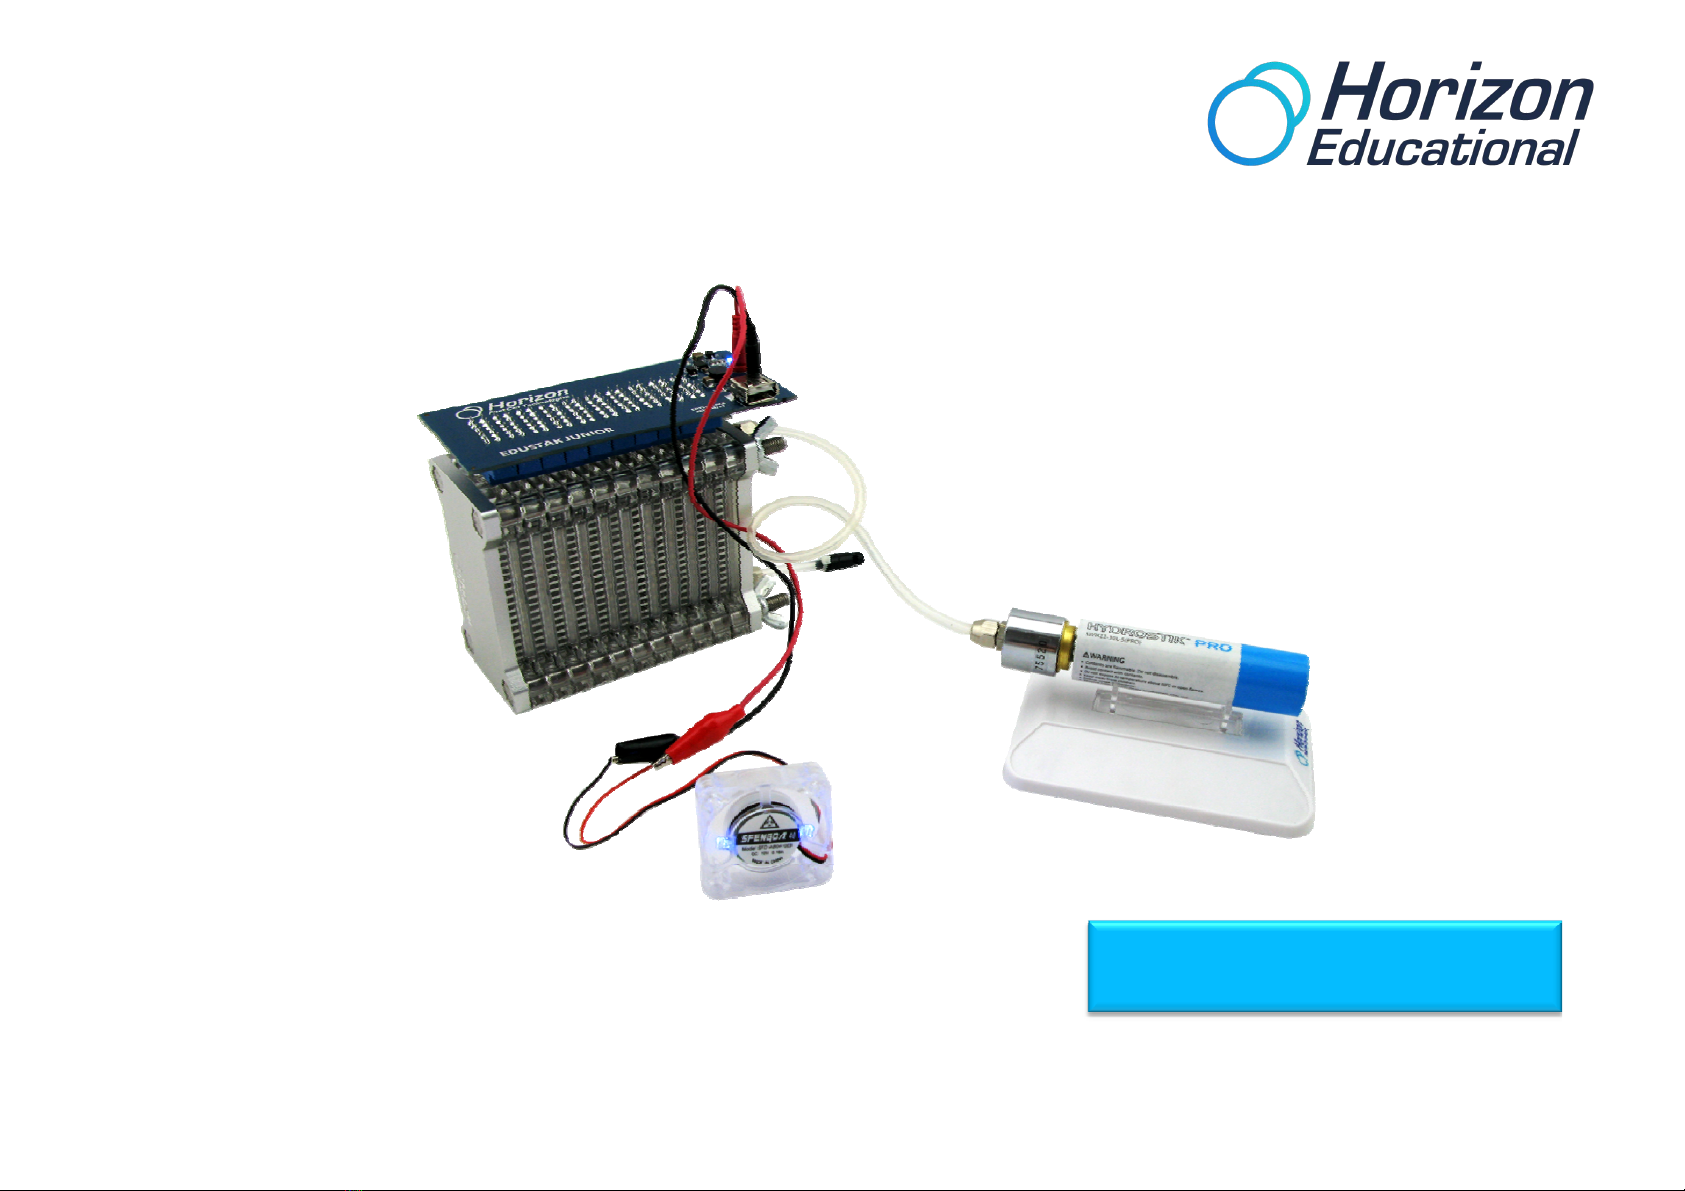
●HYDROSTIKPROshouldbeconnectedtothepressureregulatortightlywhenoperation.
●MakesuretorespectthepolaritywhenyouconnecttheEDUSTAKJUNIORtoaload.
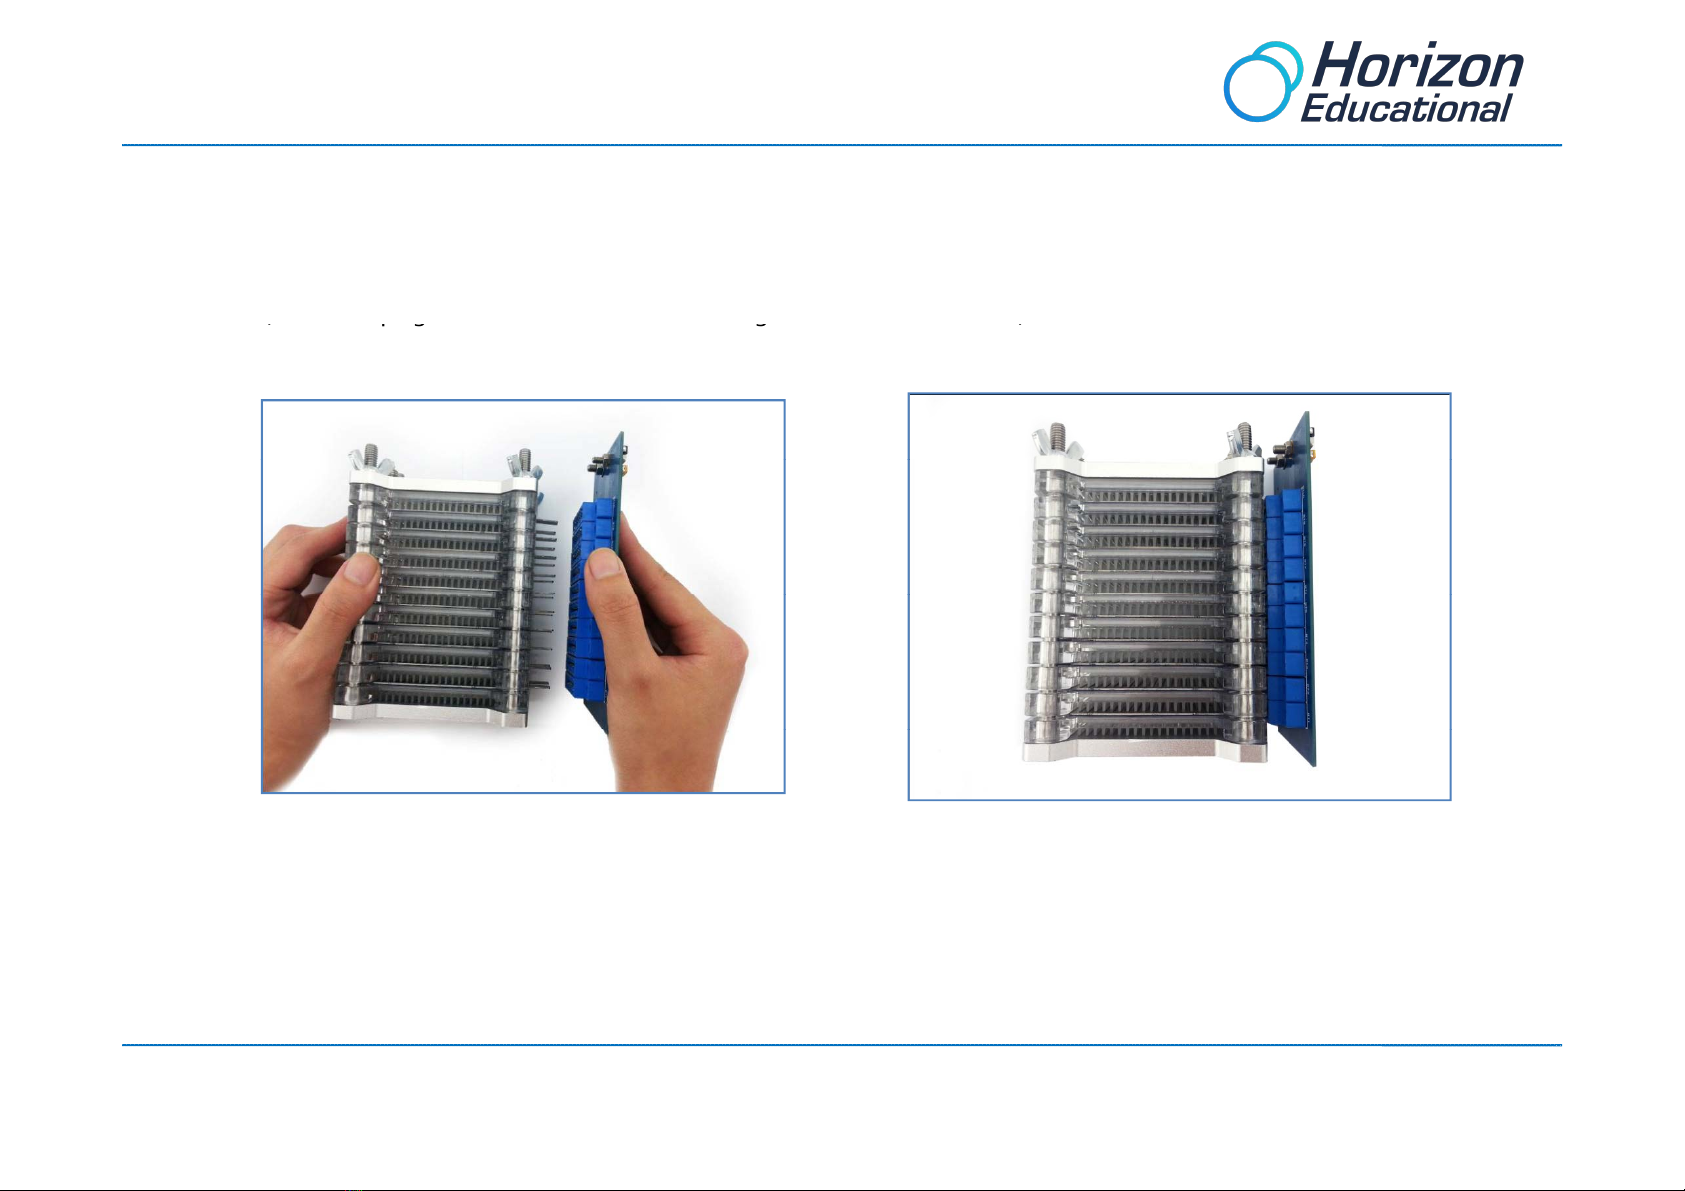
●TheEDUSTAKJUNIORPCBisnotallowedtocontactthemetalpartsincaseshortingcircuitoccurs.
●Operateitunderambienttemperature.Keepitawayfromthestrongdirectsunlight.
●Manuallyusethepurgingvalvetopurgethesystemevery3minutesforgoodperformance.
●EDUSTAKJUNIORisnotacellphonecharger,butitcouldbeusedasademonstrationdevice.
●Afteryouhavefinishedusingthesystem,disconnecttheHYDROSTIKPROfromthepressureregulator
immediately.storeitintheziplockbagforstorage.
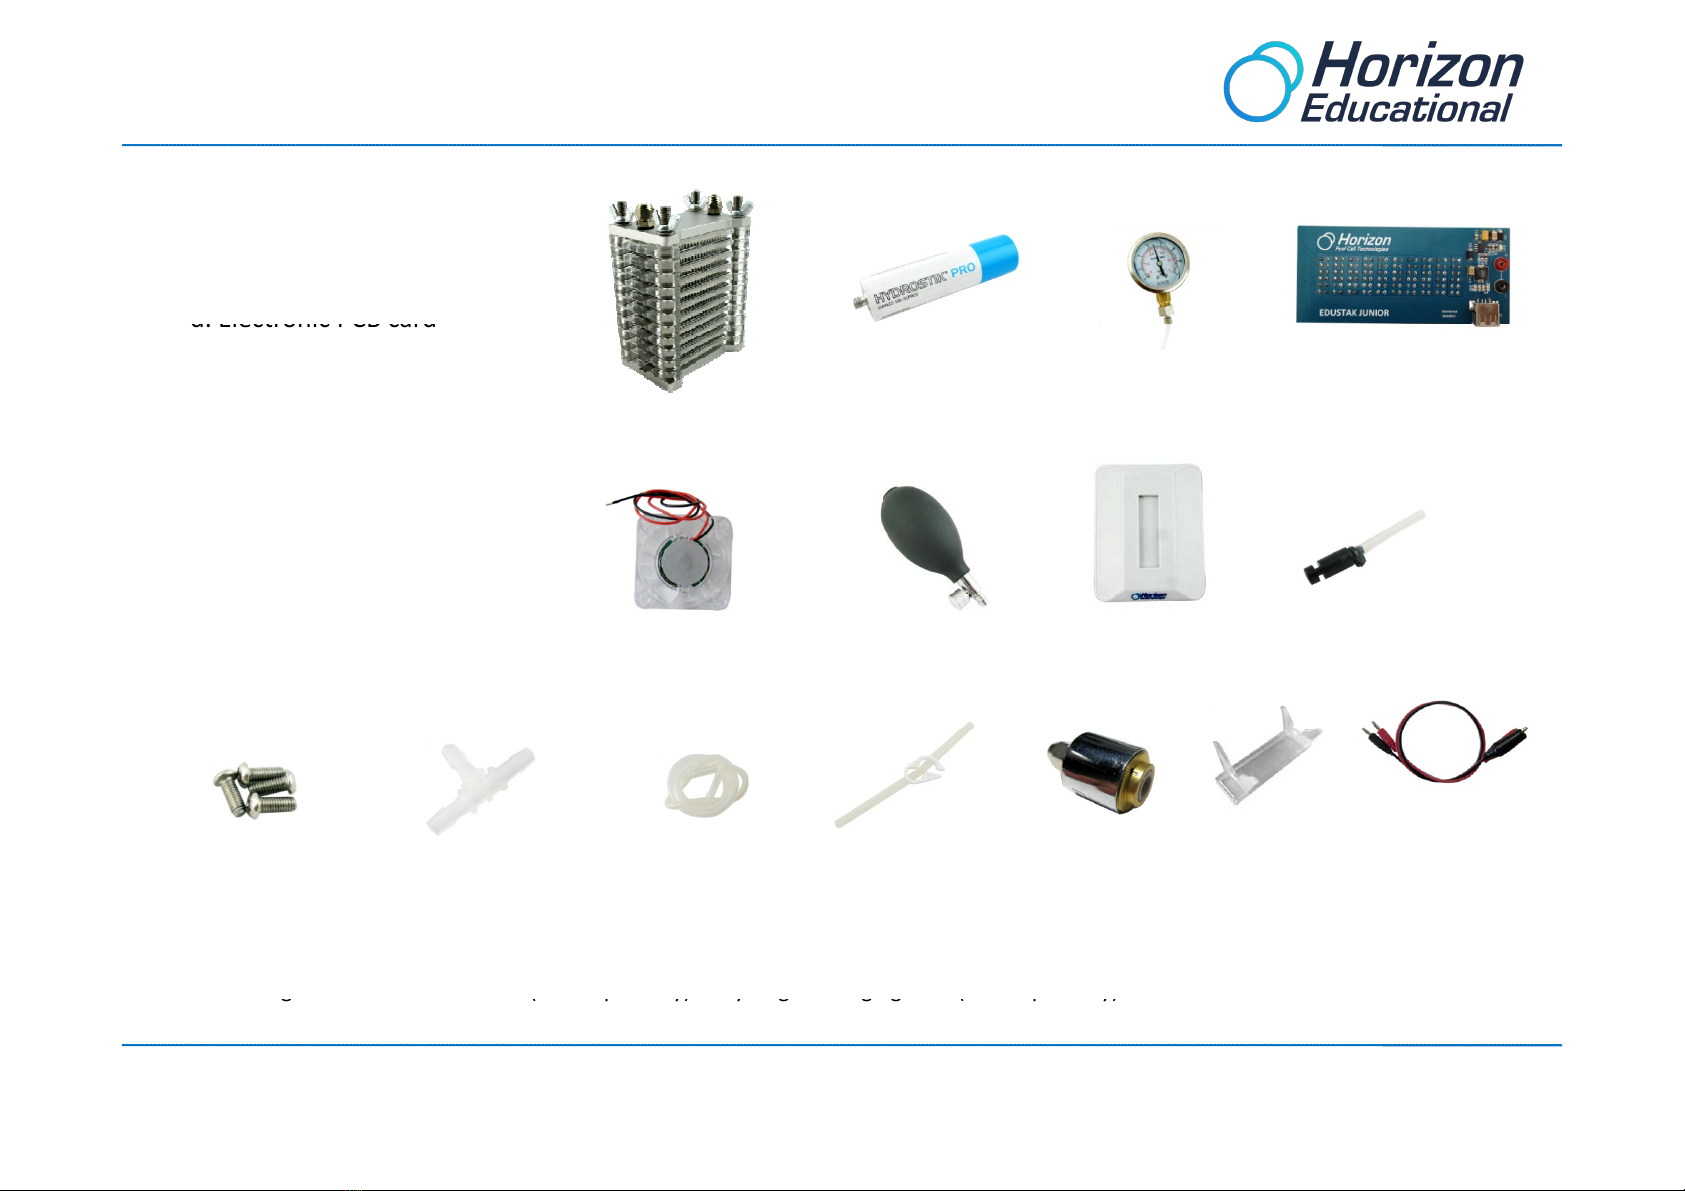
●Ifleakagehappensafterseveralassemblies,placetheEDUSTAKJUNIORintothepurifiedwaterwithoutthe
electricalPCBcard.Usetheairpressurebulb toinjectairintothestack.Observewherethebubblescomefrom
andthenadjustthestackassembly.Butthestackmustnotbetestedandoperatedwiththewatervaporinside.
Thestackmustbedry.
●Avoidstrongcollision.
EDUSTAKJUNIORUserManualrev.1.1
©2013HorizonLtd.Allrightsreserved.
7

5. Operating Guide
Note: The EDUSTAK JUNIOR is already assembled when you receive it for the first time
Note:
The
EDUSTAK
JUNIOR
is
already
assembled
when
you
receive
it
for
the
first
time
,
which could be directly tested.
Step 1: Clips the EDUSTAK JUNIOR and the electronic PCB card directly together. Ensure the connection in the good
sense
(
electronic
p
lu
g
s in the same side than the win
g
nuts on the EDUSTAK.
)
(pg g )
8
EDUSTAKJUNIORUserManualrev.1.1
©2013HorizonLtd.Allrightsreserved.

5. Operating Guide
Step 2: Unscrew the pressure regulator bolt, and pass it around the longest silicon tube. Connect one tube end to the main
part of the pressure regulator. Ensure the connection in tight and then, screw the bolt on the pressure regulator. Do the
same operation between the other end of the tube and the upper nozzle of the EDUSTAK JUNIOR close to the PCB card.
Ste
p
3: Unscrew the lower nozzle bolt
,
and
p
ass it around the
p
ur
g
in
g
valve tube. Connect it to the lower nozzle of the
p
,p pgg
EDUSTAK JUNIOR and then screw the bolt.
Make sure all the tube connections are tight.
EDUSTAKJUNIORUserManualrev.1.1
©2013HorizonLtd.Allrightsreserved.
9

5. Operating Guide
Step 4:
Put the HYDROSTIK PRO support on its base Ensure both part meet perfectly Place the HYDROSTIK PRO onto its
Step
4:
Put
the
HYDROSTIK
PRO
support
on
its
base
.
Ensure
both
part
meet
perfectly
.
Place
the
HYDROSTIK
PRO
onto
its
support and lightly screw the pressure regulator onto the HYDROSTIK PRO nozzle. Stop to screw it as soon as both part meet
together. On the opposite, the hydrogen will go out of the HYDROSTIK PRO.
Ste
p
5: Plu
g
the two crocodiles
p
incers into the sockets located on the electric card.
p
gp
Ensure to respect the polarity shown by the color code.
EDUSTAKJUNIORUserManualrev.1.1
©2013HorizonLtd.Allrightsreserved.
10

5. Operating Guide
Step 6:Connect the crocodiles pincers to the blower fan wires. Ensure to respect the polarity shown by the color code.
Now your system is ready to work.
EDUSTAKJUNIORUserManualrev.1.1
©2013HorizonLtd.Allrightsreserved.
11

5. Operating Guide
Step 7: Finish to screw the pressure regulator to the HYDROSTIK PRO. As soon as it will be done, the blower
fan will start and the LEDs on it will light on.
EDUSTAKJUNIORUserManualrev.1.1
©2013HorizonLtd.Allrightsreserved.
12

6. Disassembly Guide
Note: If you wish to disassemble the stack by yourselves do the following guide
Note:
If
you
wish
to
disassemble
the
stack
by
yourselves
,
do
the
following
guide
.
Step 1: Start by unscrew the right closest corner wing nut (1) only on the half of the available length. Do the same
with the left opposite (2) corner wing nut, then with the closest left one and finish by the bottom right corner. After that,
restart the operation in the same order and fully unscrew the wing nut. Put off the washers.
1 - 5
2 - 6 3 - 7
4
8
4
-
8
EDUSTAKJUNIORUserManualrev.1.1
©2013HorizonLtd.Allrightsreserved.
13

6. Disassembly Guide
Step 2: Hang the system and remove the long screw from their position. Your cell is disassembled.
EDUSTAKJUNIORUserManualrev.1.1
©2013HorizonLtd.Allrightsreserved.
14

6. Disassembly Guide
Now you have disassembled the EDUSTAK JUNIOR you get the following parts from the EDUSTAK
Now
you
have
disassembled
the
EDUSTAK
JUNIOR
,
you
get
the
following
parts
from
the
EDUSTAK
.
a. Upper end plate
b. Low end plate
c
Single
cell
(
10
pcs)
acd
b
c
.
Single
cell
(
10
pcs)
d. Sealing (11pcs)
e. Plastic plate (11pcs)
f. Plastic cell
g. Screw rods
h. Wing nuts
i. Washers
j. Bolts
efgh
ij
Note: For any manipulation of dismounted elements, be sure not to insert elements
which could disturb the system sealing, damage MEAs and/or create short-circuit.
EDUSTAKJUNIORUserManualrev.1.1
©2013HorizonLtd.Allrightsreserved.
15

7. Assembly Guide
Note: Now you may assemble the EDUSTAK JUNIOR please do the following guide
Note:
Now
you
may
assemble
the
EDUSTAK
JUNIOR
,
please
do
the
following
guide
.
Tools maybe needed during the assembly.
Step 1: Pass the screw rods through the basis of the low end plate. Return the basis and put it on a plane area.
Note: Pay close attention to the direction of the low end plate.
The side of the plate with the Horizon logo should face downwards.
EDUSTAKJUNIORUserManualrev.1.1
©2013HorizonLtd.Allrightsreserved.
16

7. Assembly Guide
Step 2: Insert the plastic plate with the rubber sealing ring facing downwards on the screw and ensure the grooves are putted
on the upper side.
Note: Pay close attention to the “+” and “-” on the plastic plate. Make sure all the plastic plate should face the same
direction.
Sealing ring
EDUSTAKJUNIORUserManualrev.1.1
©2013HorizonLtd.Allrightsreserved.
17

7. Assembly Guide
Step 3: Add a rubber seal in the corresponding groove and ensure it is deeply inserted.
Note: Pay close attention to the direction of the rubber seal. The round side of the rubber seal
should be facin
g
u
p
wards.
gp
EDUSTAKJUNIORUserManualrev.1.1
©2013HorizonLtd.Allrightsreserved.
18

7. Assembly Guide
Step 4: Put the first single cell on it. Ensure the white nozzles are on the upper side.
Note: Pay close attention to the direction of the single cell. Ensure to put the two ends of the cell
in the same side than the side of the plastic plate without the raised edge.
EDUSTAKJUNIORUserManualrev.1.1
©2013HorizonLtd.Allrightsreserved.
19
Table of contents
Popular Science Education Product manuals by other brands

Oregon Scientific
Oregon Scientific SG318 SmartGlobe Infinity user manual

TeacherGeek
TeacherGeek Wind Turbine Stand Build guide

Evil Mad Scientist
Evil Mad Scientist 2575 installation guide

Bioline
Bioline ISOLATE RNA Mini Kit product manual

Opitec
Opitec Solar Carousel manual

laerdal
laerdal Neonatal Intubation Trainer Directions for use