Horizon Fitness intelliSTOP N60 User manual

LEBEN MIT DEM TIER
horizont group gmbh
Division agrartechnik
Postfach 13 29
34483 Korbach
Homberger Weg 4-6
34497 Korbach
GERMANY
Telefon: +49 (0) 56 31 / 5 65-1 00
Telefax: +49 (0) 56 31 / 5 65-1 20
www.horizont.com
BETRIEBSANWEISUNG
Elektrozaungerät
de
OPERATING INSTRUCTION
Electric Fencer
en
MODE D‘EMPLOI
Électrificateur de Clôture
fr
GEBRUIKSAANWIJZING
Schrikdraadapparaat
nl
BRUGSANVISNING
Spændingsgiver
da
MANUAL DE INSTRUÇÕES
Cerca Eléctrica
pt
ISTRUZIONI D’USO
Recinto Elettrico
it
85042E - 07/07
intelliSTOP N60
Type 10617
230V AC

2
3
Fig. 1 Ersatzteile / Spare parts / Pièces détachées / Peças
Pezzi di ricambio / Reservedele / Reserve onderdelen
Fig. 2 Ersatzteile / Spare parts / Pièces détachées / Peças
Pezzi di ricambio / Reservedele / Reserve onderdelen
98271
schwarz, black, noir,
preto, nero
sort, zwart
97999
rot, red, rouge,
vermelho, rosso,
rød, rood
98270
blau, blue, bleu,
azul, azzurro,
blå, blauw
87926
89224
83403
89474
60188
90764
94581
97690
84719
88148
94581
97683
90429
60181
97929
84741
89474
94581
90817
89976
1
2
Z2
Z1
98435
3

4
5
de
Betriebsanweisung des Elektrozaungerätes intelliSTOP N60
in Verbindung mit den Errichtungs- und Sicherheitshinweisen für Elektrozaungeräte
SECURA ANIMAL oder SECURA SECURITY ( www.horizont.com)
Montage und Anschluss:
Die Aufstellung erfolgt an einem nicht feuergefährdeten Ort, der vor Witterungseinflüssen
geschützt ist. Das Gerät ist senkrecht anzubringen.
Die Erdleitung wird an die Klemme mit dem Erdungszeichen ( ), die Zaunleitung an die
Klemmen mit den Blitzzeichen ( oder ) angeschlossen.
Das Anschlusskabel darf bei Temperaturen unter 5°C nicht berührt werden.
Bei Wegführung der Zaunzuleitung von einem Gebäude muss eine Blitzschutzanlage
installiert werden.
Inbetriebnahme: Die Netzversorgung herstellen, nach einigen Sekunden hört man ein
gleichmäßiges Ticken, das Gerät ist in Betrieb. Die Kontrollampe (1) und die Zaunspan-
nungsanzeige (2) leuchten im Rhythmus der elektrischen Impulse auf - (Seite 3 / Fig. 2).
Die Kontrollampe (1) zeigt das ordnungsgemäße Arbeiten des Elektrozaungerätes an. Wenn
diese Lampe nicht leuchtet oder Dauerlicht zeigt, ist das Gerät defekt.
Die 6 Lampen (2) zeigen die Zaunspannung in 1000V-Stufen an. Zur Hütesicherheit sollten
min. 3 Lampen ( 3000V ) aufleuchten, andernfalls ist die Spannung zu gering.
Mögliche Ursachen: mit Zaun: starker Bewuchs am Zaun, schlechte Isolatoren,
Kurzschluss an Metallpfählen oder Zaun zu lang.
ohne Zaun: Gerät ist defekt, siehe Service
Das Gerät hat zwei Zaunausgänge: (Z1) = max. (Z2) = reduziert (Seite 3 / Fig. 2)
Beide Ausgänge können gleichzeitig getrennte Zäune betreiben. Ein Kurzschluss am klei-
nen Zaunausgang beeinflusst den starken Ausgang kaum, wobei ein Defekt am starken
Ausgang den schwachen Ausgang zusätzlich reduziert.
Bei Anschluss von zwei Zäunen ( + ) wird nur der reduzierte Zaunausgang ange-
zeigt.
Überprüfung der Erdung (3): In ca. 50m Entfernung vom
Weidezaungerät mit einem in den Boden geschlagenen
Metallstab gegen den Weidezaundraht (kein Kunststoff)
einen Kurzschluss verursachen.
Das Weidezaungerät sollte nun nur noch maximal 1 Lam-
pe (feuchter Boden) bzw. maximal 2 Lampen (trockener
Boden) zum Aufleuchten bringen, im anderen Fall
(siehe Bild) ist die Anzahl der Erdpfähle zu erhöhen.
Service: Reparaturen dürfen nur von qualifizierten Personen durchgeführt wer-
den. Es sind nur die vom Hersteller vorgeschriebenen Ersatzbauteile zu verwen-
den. Wenn die Anschlussleitung dieses Gerätes beschädigt wird, muss sie durch
eine besondere Anschlussleitung ersetzt werden, die vom Hersteller oder seinem
Kundendienst erhältlich ist.
en
Operating instruction for electric fence controller intelliSTOP N60
in connection with SECURA ANIMAL or SECURA SECURITY safety hints
(www.horizont.com)
Installation and connection:
The installation is to be made at a location protected from weather and where there is no
risk of fire. The controller must be mounted in the vertical position. The earth lead must be
attached to the earth terminal ( ), the fence lead either to the fence terminal ( or ).
The power supply cable must not be handled when the temperature is below 5°C.
If the fence lead is conducted away from the building a lightning protection must be
installed.
Operating and control:
Plug the mains cable in a 230 V supply socket. After a few seconds a slight tic-tac can be
heard. The control lamp (1) and the fence voltage level (2) flashes with the pulses.
If the control lamp (1) flashes with the the pulses energizer operates properly. If this lamp is
not or steady illuminated the energizer is faulty.
The 6 controllamps (2) indicate the fence voltage in 1000V steps. At least 3 lamps should
flash (3000V) to ensure sufficient voltage and fencing.
Possible reasons, when the voltage is too low:
with fence: heavy vegetation on the fence, insulator flash-over or fence too long.
without fence: the energizer is faulty, see service.
The energizer has two fence terminals: (page 3 / fig. 2)
(Z1) = max output (Z2) = reduced output
Both outlets can operate separate fences at the same time. A short in the Z2 fence has no
strong influence on Z1 but a short or a deviation in Z1 means a further reduction of Z2.
By operating with two fence systems ( Z1 + Z2 ) the indication lamps show the reduced
output only.
Testing grounding (3):
Produce with a metal stake against the fence wire (no
plastic) a short circuit (ca. 50m distance to fencer).
Max. 1 lamp (wet ground) or 2 lamps (dry ground) may
shine.
Otherwise drive in more stakes (see picture).
Service:
Servicing is only to be made by qualified service personell. Only by the manufacturer
commanded replacement parts must be used. If the supply cord of this energizer is
damaged this cord must be replaced by a special supply cord which is recommended
by the manufacturer.

6
7
fr
Mode d’emploi pour électrificateur intelliSTOP N60
en relation avec les conseils de sécurité SECURA ANIMAL ou SECURA SECURITY
(www.horizont.com)
Installation et raccordements: Installez l‘électrificateur à un endroit qui ne présente pas des
risques des intempéries et d‘incendie, l’électrificateur doit être monté en position verticale.
Le fils de terre et de ligne doivent être raccordés aux bornes correspondantes de
l’appareil.
Ne touchez pas le câble quand la température tombe au-dessous de 5°.
Si le fil de ligne s’éloigne du bâtiment, un système parafoudre s’impose.
Mise en service et contrôle:
Raccorder au secteur. Quelques secondes après on entend un tic-tac régulier, l’appareil
est en marche. Toutes les lampes temoin (1 + 2) clignotent au rythme des impulsions élec-
triques. L’impulsion de la lampe de contrôle (1) montre le bon fonctionnement de l’appareil.
Lumière permanente ou lampe “éteinte” indiquent pas de tension électrique ou bien defect
de l’électrificateur.
Les 6 lampes (2) de contrôle de la clôture montrent la tension sur la ligne. La tension est
indiquée par tranche de 1000V. Si moins de 3 lampes (3000 Volts) s’allument il faut contrôler
la ligne et l’appareil.
Causes possibles:
Avec clôture: Végétation trop abondante ou court-circuit de la clôture
sur un piquet métallique.
Sans clôture: L'appareil est défectueux. Au dessous de 3000V pour certains types
d’animaux la sécurité de gardiennage n’est pas garanti.
La clôture peut être branchée sur l’une des 2 bornes de l’appareil selon la puissance voulue :
(Z1) = puissance maximale (Z2) = puissance réduite (page 3 / fig. 2)
Les 2 bornes peuvent être employées en même temps avec 2 clôtures différentes. Un court
circuit sur la clôture reliée à Z2 a peu d’influence sur Z1 mais un court-circuit sur Z1 entraîne
une réduction de puissance sur Z2.
Lorsque les 2 lignes de clôture (Z1 et Z2) fonctionnent ensemble, les lampes indicatrices
montrent uniquement la puissance réduite.
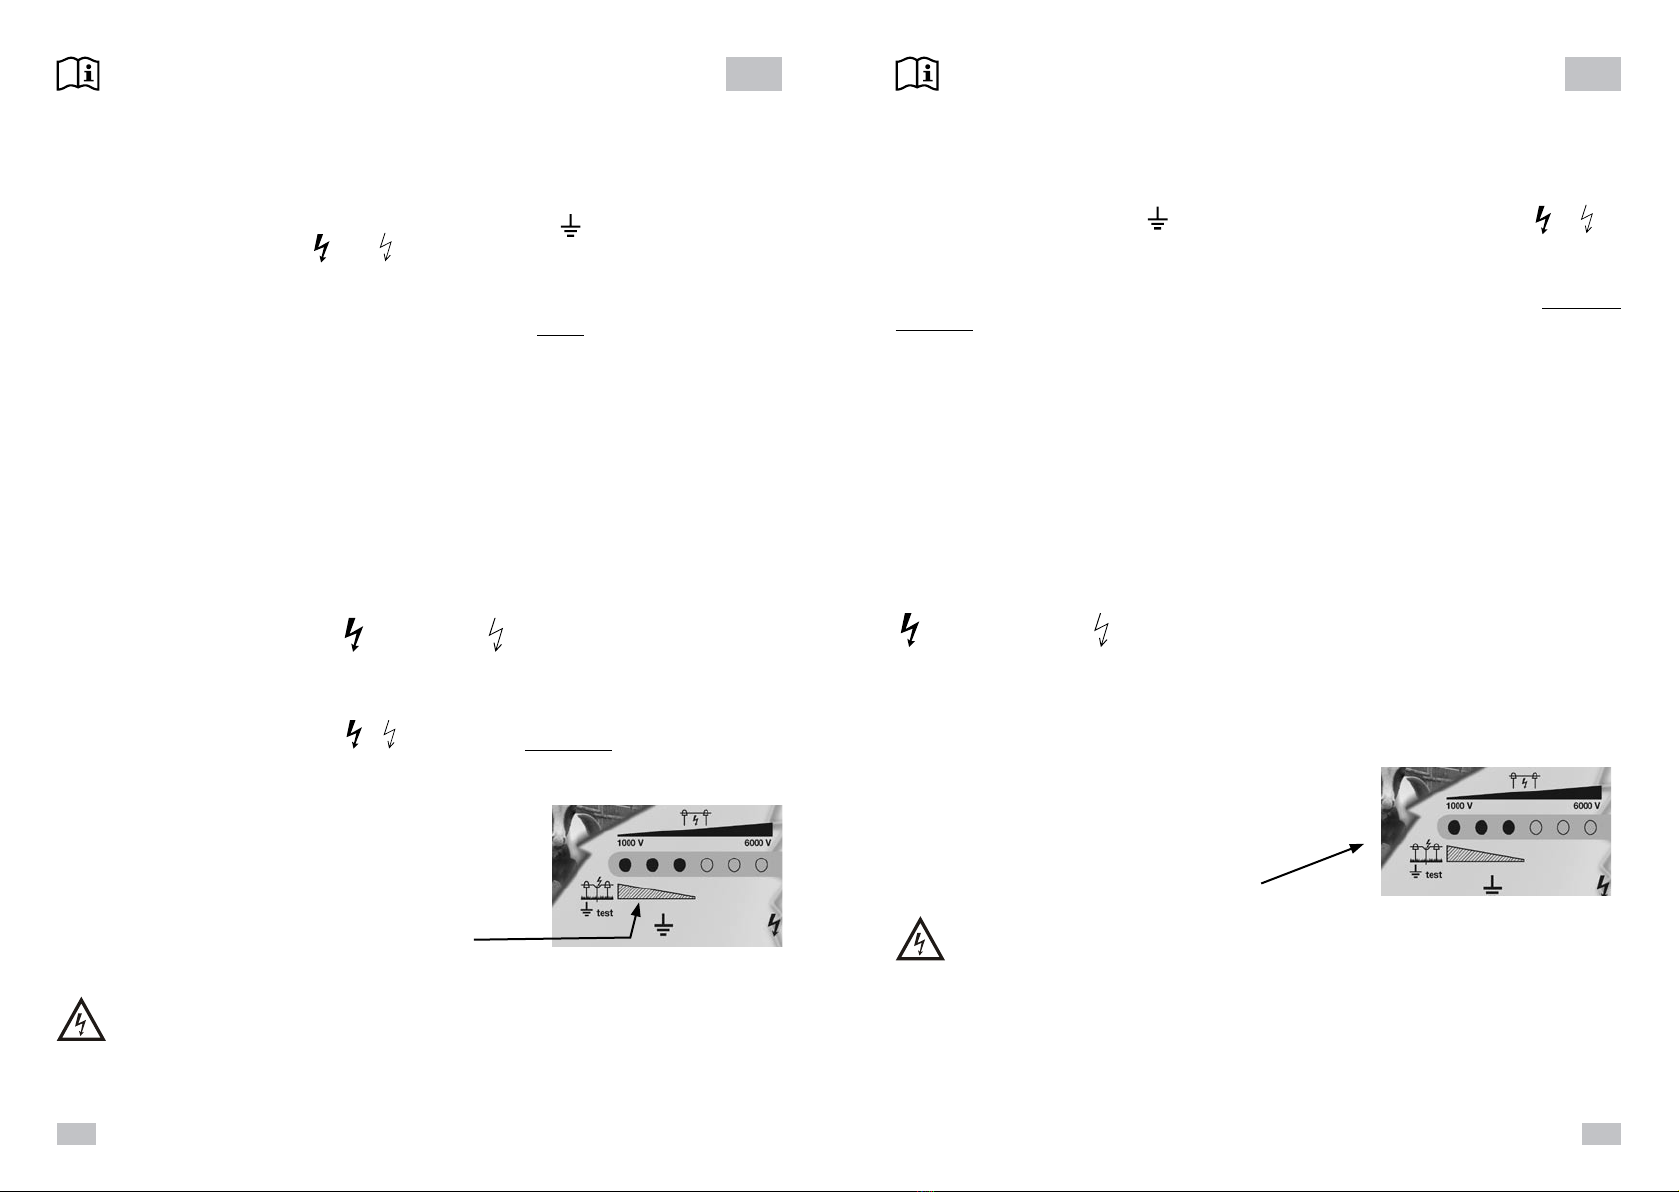
Vérification de la prise de terre (3):
Provoquez un court-circuit à une distance d‘environ
50m de l‘électrificateur avec un piquet en acier fiché
dans la terre en l‘appuyant contre la clôture.
Maintenant il ne devrait luire qui 1 lampe au maximum
(terre mouillée) ou 2 lampes au maximum (terre sèche)
sinon (voir image)
il faudrait ficher des piquets supplémentaires.
Service: Les réparations ne doivent être faites que par des personnes qualifiées.
Utiliser uniquement les pièces détachées et composants du fabricant.
Si le câble d‘alimentation est endommagé, il doit être remplacé par un câble ou un
ensemble spécial disponible auprès du fabricant ou de son service après vente.
pt
Manual de instruções para a cerca eléctrica intelliSTOP N60
em ligação com os conselhos de segurança SECURA ANIMAL ou
SECURA SECURITY (www.horizont.com)
Instalação e conexão: A instalação deve ser feita em um local protegido da chuva e onde
não haja risco de fogo. O eletrificador deve ser montado na posição vertical. A estaca de
aterramento deve ser enterrada no solo, o mais profundo possível em um local úmido, e
conectado ao terminal ( ) terra no eletrificador.
Conecte o cabo de conexão da cerca ao terminal da cerca ( ou )
Se o cabo de ligação ao cercado for conduzido para for a de um edifício deve ser
instalado um sistema de protecção contra relâmpagos.
Funcionamento e controlo:
Ligue o cabo de ligação à corrente na tomada de energia eléctrica. Após alguns segundos
deverá ouvir um ligeiro tic-tac. A lâmpada de controlo (1) e o nível de voltagem do cercado
(2) piscam na sequência dos impulsos – página 3 / fig. 2.
Se a lâmpada de controlo (1) pisca na sequência dos impulsos o aparelho está a funcionar
correctamente. Em caso contrário o aparelho tem uma falha.
As seis lâmpadas de controlo (2) indicam a voltagem do cerado em passos de 1000V.
Pelo menos três lâmpadas devem estar a piscar (3000V) para assegurar um nível de volta-
gem suficiente no cercado.
Causas possíveis para uma baixa voltagem no cercado:
com o aparelho ligado ao cercado: forte vegetação no cercado, isoladores defeituosos
ou cercado demasiado longo;
sem o aparelho ligado ao cercado: o aparelho tem uma falha, ver serviço.
O aparelho tem dois terminais de saída para o cercado (página 3 / fig. 2):
(Z1) = máxima descarga de energia (Z2) = descarga de energia reduzida.
Poderá operar dois cercados em simultâneo aproveitando estes dois terminais. Uma falha
no Z2 não tem grande influência no Z1 mas uma falha ou desvio no Z1 significa uma re-
dução de potência no Z2.
Ao utilizar o aparelho com dois cercados (Z1 + Z2) as lâmpadas de indicação most-
ram apenas a descarga de energia reduzida.
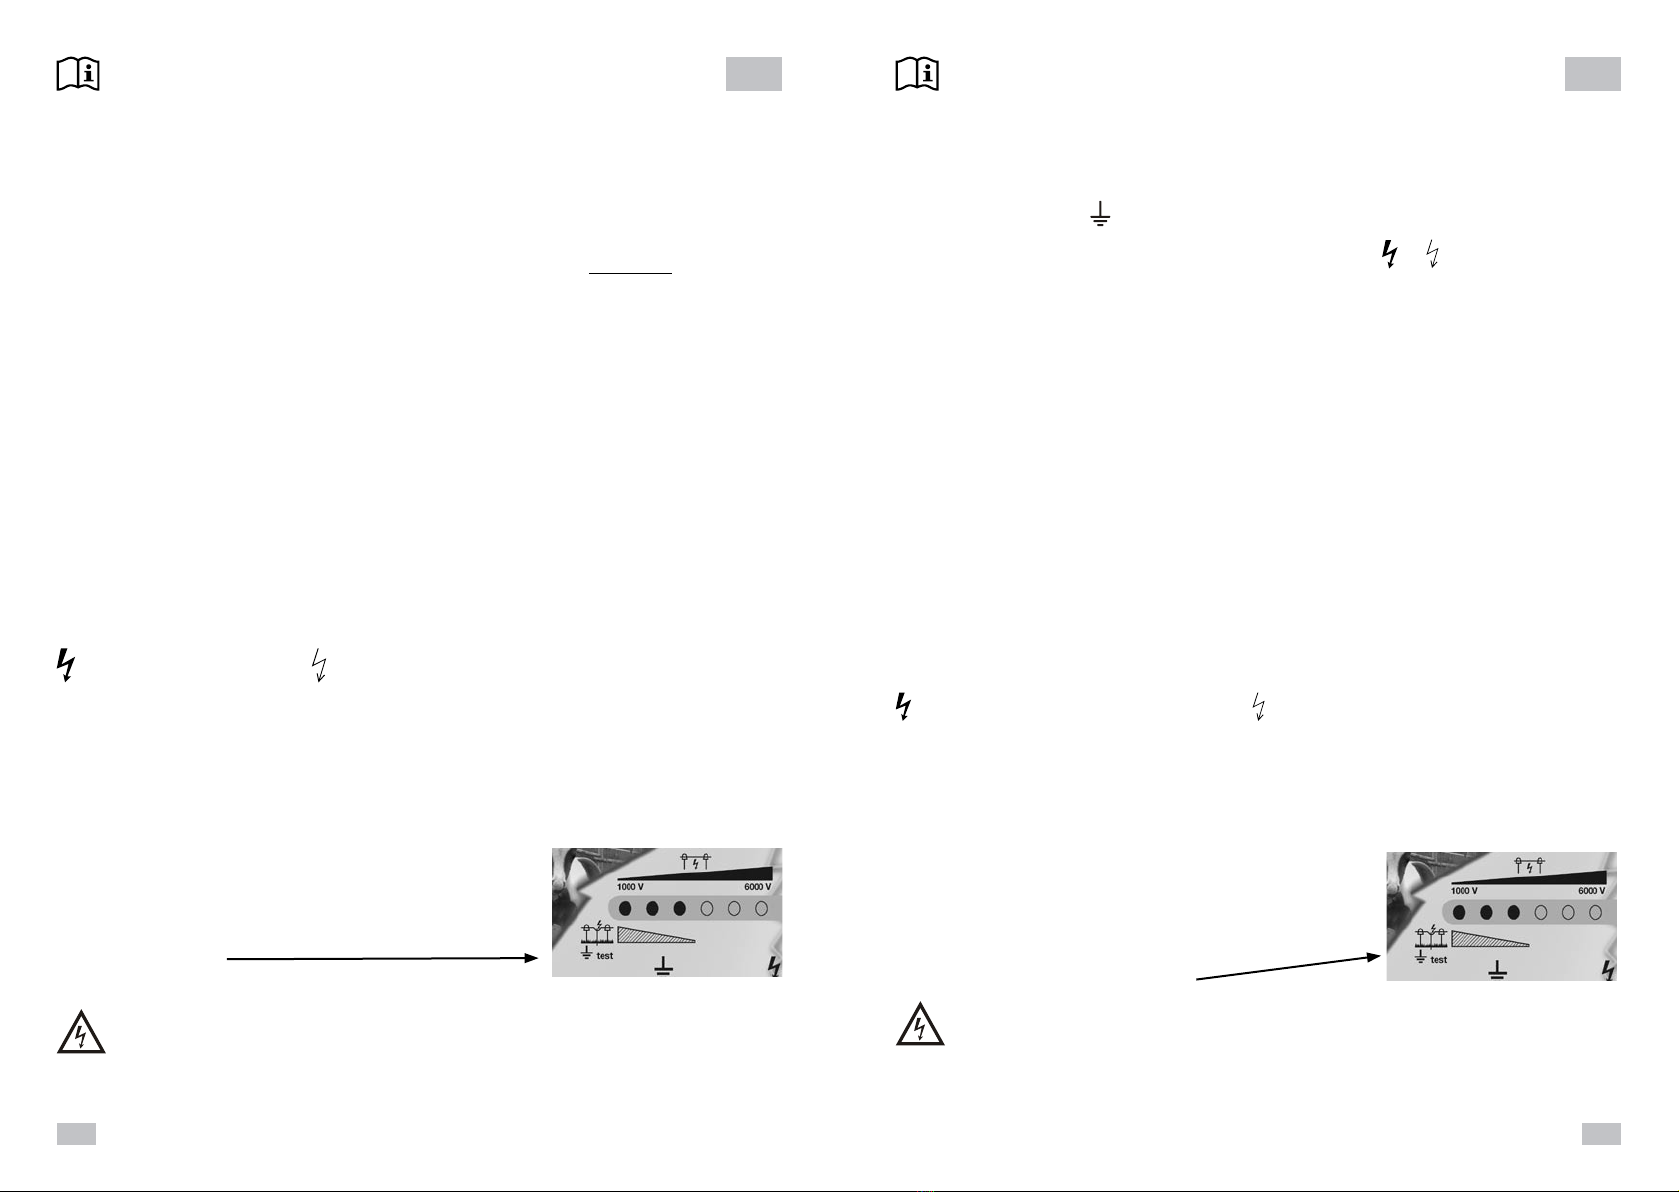
Teste da terra (3): Faça um curto-circuito com uma
estaca de metal contra o fio do cercado (não pode ser
plástico) a 50m de distância do aparelho. No máximo
1 lâmpada (terreno húmido) ou 2 lâmpadas (terreno
seco) deverão brilhar. Em caso contrário coloque mais
estacas.
Serviços: Os serviços de reparo devem ser realizados por pessoas certificadas.
Devem-se utilizar apenas peças de reposição do fabricante. Se o cabo de ligação
deste aparelho se danificar deverá ser substituído por um cabo especial recomen-
dado pelo fabricante. Dirija-se ao local onde adquiriu o aparelho.

8
9
da
Brugsanvisning for spændingsgiver intelliSTOP N60
I relation til sikkerhedsanvisninger for spændingsgivere SECURA ANIMAL
eller SECURA SECURITY (www.horizont.dk) - (www.horizont.com)
Montage og tilslutning:
Skal opsættes/monteres på et sted, der er beskyttet mod vejrliget og uden for brandfare.
Apparatet skal monteres i lodret position. Jordspydet bankes i jorden på et fugtigt sted.
Jordkablet kobles til terminalen markeret med ( ) og kablet til hegnet på terminalen mær-
ket lyn signaturen ( eller ).
Ved montering i en bygning, skal der anvendes lyn beskyttelsesanlæg.
Ibrugtagning:
Tilkoble apparatet til 230 volt og efter nogle sekunder kan man hører en regelmæssig tikken,
apparatet er i funktion. Ved forkert polarisering kommer apparatet ikke i gang.
Kontrollampen (1) og spændingskontrollen (2) blinker i regelmæssig takt med den elektriske
impuls (side 3 / Fig. 2).
Kontrollampen (1) viser om apparatet arbejder som det skal. Lyser lampen ikke eller lyser
den konstant, er apparatet defekt.
De 6 LED´s (2) viser spændingen i trin på 1.000 volt. Ved en sikker spænding skal der min.
3 lamper lyse (3.000 volt), modsat er spændingen ikke tilstrækkelig.
Mulige årsager:
med tilkoblet hegn: kraftig bevoksning på hegnet,
dårlige isolatorer, kortslutning på stålpæle eller hegnet er for langt.
uden hegn tilkoblet: apparatet er defekt, sendes til service
Apparatet har 2 hegnsudgange: (Z1) = maks. (Z2) = Reduceret. (side 3 / Fig. 2).
Ved tilkobling af 2 indhegninger: en til maks. og en til reduceret, er det kun spændingen på
den reducerede udgang, der vises på LED displayet.
Test af jordforbindelse (3):
Gøres ved at kortslutte en strømførende hegnstråd
(ikke af kunststof) til jorden med et metalspyd ca. 50
meter fra jordforbindelsen til apparatet. Maks. 1 lampe
(fugtig jord) eller 2 lamper (tør jordbund) må lyse.
Lyser flere skal der flere jordspyd.
Service: Reparation må kun udføres af kvalificerede personer.
Der må kun anvendes de reservedel, der anvises af producenten.
Sker der skader på tilkoblingskablet, skal dette udskiftes med et fra producenten.
Istruzioni per l’uso del recinto elettrico intelliSTOP N60
Rispondente alle norme costruttive e di sicurezza per gli apparecchi
elettrificatori di recinzioni SECURA ANIMAL e SECURA SECURITY (www.horizont.com)
Montaggio e collegamento:
Il montaggio deve essere effettuato presso un luogo escluso dal rischio di incendi e protetto
da influssi atmosferici. L’apparecchio deve essere montato in verticale. Il cavo di terra vie-
ne collegato al morsetto con il simbolo di messa a terra ( ), mentre il cavo del recinto ai
morsetti con il simbolo del fulmine ( o ).
Il cavo di collegamento non deve essere toccato in caso di temperature inferiori a 5°C.
Nel caso in cui il cavo del recinto parta da un edificio è necessario installare un impi-
anto parafulmine.
Avviamento e controlli: (page 3 / fig. 2)
Collegare la centralina alla rete 230 V. Dopo alcuni secondi un tic-tic-tac leggero può esse-
re sentito. La lampada di controllo (1) ed i flash del Livello di tensione della recinzione (2)
lampeggiano. Se la lampada di controllo (2) lampeggia significa che lo stimolatore funziona
correttamente. Se questa lampada non è costante lo stimolatore è difettoso.
Le 6 lampade di controllo (2) indicano la tensione della recinzione : ogni luce = 1000V.
Almeno 3 lampade dovrebbero lampeggiare (3000V) per accertare la tensione e la recinzi-
one sufficienti.
Cause possibili quando la tensione è troppo bassa:
a) con recinzione: la vegetazione provoca dispersione dalla recinzione,
o recinzione troppo lunga.
b) senza recinzione: lo stimolatore è difettoso, contattare l’assistenza.
L’apparecchio è dotato di due uscite del recinto:
(Z1) = max. (Z2) = ridotto (Pagina 3 / Fig. 2)
Entrambe le prese possono fare funzionare recinzioni separate allo stesso tempo. Uno short
nella recinzione Z2 non ha influenza forte su Z1 ma uno short o una deviazione in Z1 signi-
fica una riduzione ulteriore di Z2.
Nel caso in cui si collegano due recinti viene visualizzata solo l’uscita del recinto ridotta
Controllo della messa a terra (3): Provocare un corto
circuito a ca. 50m di distanza dalla centralina del recinto
da pascolo con un’asta di metallo piantata nel terreno
contro il filo del recinto da pascolo (niente plastica). La
centralina a questo punto dovrebbe far accendere solo
massimo 1 spie (terreno umido) o massimo 2 spie (terre-
no asciutto), altrimenti (vedi figura)
è necessario aumentare il numero di pali per la messa a terra
Assistenza: Gli interventi di riparazione possono essere eseguiti solo da persona-
le qualificato. Devono essere impiegati solo pezzi di ricambio prescritti dalla casa
costruttrice. Quando si danneggia il cavo di collegamento di questo apparecchio è
necessario sostituirlo con un cavo di collegamento speciale disponibile presso la
casa produttrice o il sevizio clienti.
it

10
11
Gebruiksaanwijzing van het schrikdraadapparaat intelliSTOP N60
in samenhang met de veiligheidsinstructies voor elektrische afrasteringen
SECURA ANIMAL en SECURA SECURITY (www.horizont.com)
Installatie en aansluiting:
Montage op een plaats beschermd van weersinvloeden en waar er geen risico is op brand. Het
apparaat moet in een verticale positie worden opgehangen. De aardepen moet in de grond wor-
den gestoken zo diep mogelijk bij voorkeur op een vochtige plaats.
De aardingsdraad moet op de aansluitklem met aanduiding ( ) worden aangesloten.
Sluit de afrasteringdraad aan op de aansluitklem met aanduiding ( en )
Als het schrikdraadapparaat in of aan een gebouw is gemonteerd, moet deze worden uit-
gerust met een bliksembeveiliger.
Operationeel maken:
Sluit het schrikdraadapparaat aan op de netspanning. Na enkele seconden hoort men een gelijk-
matig tikken: het apparaat is operationeel. Het controlelampje (1) en de afrasteringspanningsindi-
cator (2) lichten op in het ritme van de elektrische impuls. (fig. 2 / bladzijde 3) Het knipperen van
het controlelampje (1), geeft aan dat het schrikdraadapparaat goed functioneert. Als dit lampje
niet brandt of constant brandt, is het apparaat defect. De afrasteringspanningsindicator (2) geeft
de afrasteringspanning aan in stappen van 1000V. Voor een voldoende zekere functionering van
de afrastering moeten er minimaal 3 lampjes (3000V) branden, anders is de afrasteringspanning
onvoldoende. Mogelijke oorzaken:
Met afrastering: veel begroeiing, slechte isolatoren,
kortsluiting of de afrastering is te lang.
Zonder afrastering: het apparaat is defect.
Breng het apparaat ter reparatie naar de dealer.
Het apparaat heeft 2 spanningsuitgangen: (Z1) = max. (Z2) = gereduceerd (fig. 2 / blad. 3)
Beide uitgangen kunnen gelijktijdig verschillende afrasteringen voeden. Een kortsluiting aan de
gereduceerde uitgangen heeft nagenoeg geen invloed op de sterke uitgang. Maar een storing
aan de sterke uitgang zal de spanning van de gereduceerde uitgang evenredig afnemen.
Als beide uitgangen aangesloten zijn op een afrastering, wordt alleen de gereduceerde uitgang
weergeven op de spanningsindicator.
Controle van de aarding (3):
Op ca. 50m van het schrikdraadapparaat kortsluiting
veroorzaken, met behulp van een metalen pen die in
de grond is geslagen. Op het schrikdraadapparaat mag
maximaal 1 lampje (vochtige bodem) respectievelijk ma-
ximaal 2 lampjes (droge bodem) gaan branden.
Branden er meer lampjes, dan moet een aantal aardpen-
nen verhoogd worden.
Service: Reparaties mogen uitsluitend door gekwalificeerd personeel uitgevoerd wor-
den. Hierbij mag alleen gebruik gemaakt worden van door de producent voorgeschreven
onderdelen.
nl Technische Daten - Technical data - Données techniques - Dados técnicos
Dati tecnici - Tekniske data - Technische gegevens :
intelliSTOP N60, Type 10617
TECHNISCHE ÄNDERUNGEN VORBEHALTEN !
SUBJECT TO TECHNICAL ALTERATIONS !
SOUS RÉSERVE DE CHANGEMENTS TECHNIQUES !
SUJEITO A ALTERAÇÕES TÉCNICAS !
INFORMAZIONI SOGGETTE A MODIFICHE !
DER TAGES FORBEHOLD MOD TEKNISKE ÆNDRINGER !
TECHNISCHE VERANDERING VOORBEHOUDEN !
CEE: max. Zaunlänge - max. fence line length - longueur électrifée
comprimento máximo do cercado - lungh. max recinzione
max. hegnslængde - max. afrasteringlengte
max. 100 km max. 100 km
3
~ 8000V ~8000V ~ 2400V ~ 2800V ~ 1500V
~ 8500V ~8500V ~ 4800V ~ 7000V ~ 4500V

12
horizont group gmbh
Division agrartechnik
Postfach 13 29
34483 Korbach
Homberger Weg 4-6
34497 Korbach
GERMANY
Telefon: +49 (0) 56 31 / 5 65-1 00
Telefax: +49 (0) 56 31 / 5 65-1 20
www.horizont.com