will hear one beep as the machine shuts down. Note that there is a one minute fan delay on shut-
down.
11.2. Arrow Buttons
HORIZON-DEHUMIDIFIERS
HORIZON-DEHUMIDIFIERS
Do not install dehumidifier in a corrosive environment. Some liquid vapor
barriers dry via“solvent evaporation”. Insure barrier is completely dry and area is
thoroughly ventilated before installing dehumidifier.
WARNING!
1) Place dehumidifier on level surface
If after unit is positioned
If the unit is handled in such a manner that the compressor did not remain in the upright position,
place on level surface and wait a minimum of 2 hours before turning the unit“on”.
NOTE: XG90 dehumidifier can’t sit directly on floor unless the unit is feeding directly into a sump
next to it. Elevation is required to allow gravity flow of condensate water to drain.
WARNING!
2) Drain Line
3) Plug unit into 15 amp grounded outlet.
Key functions
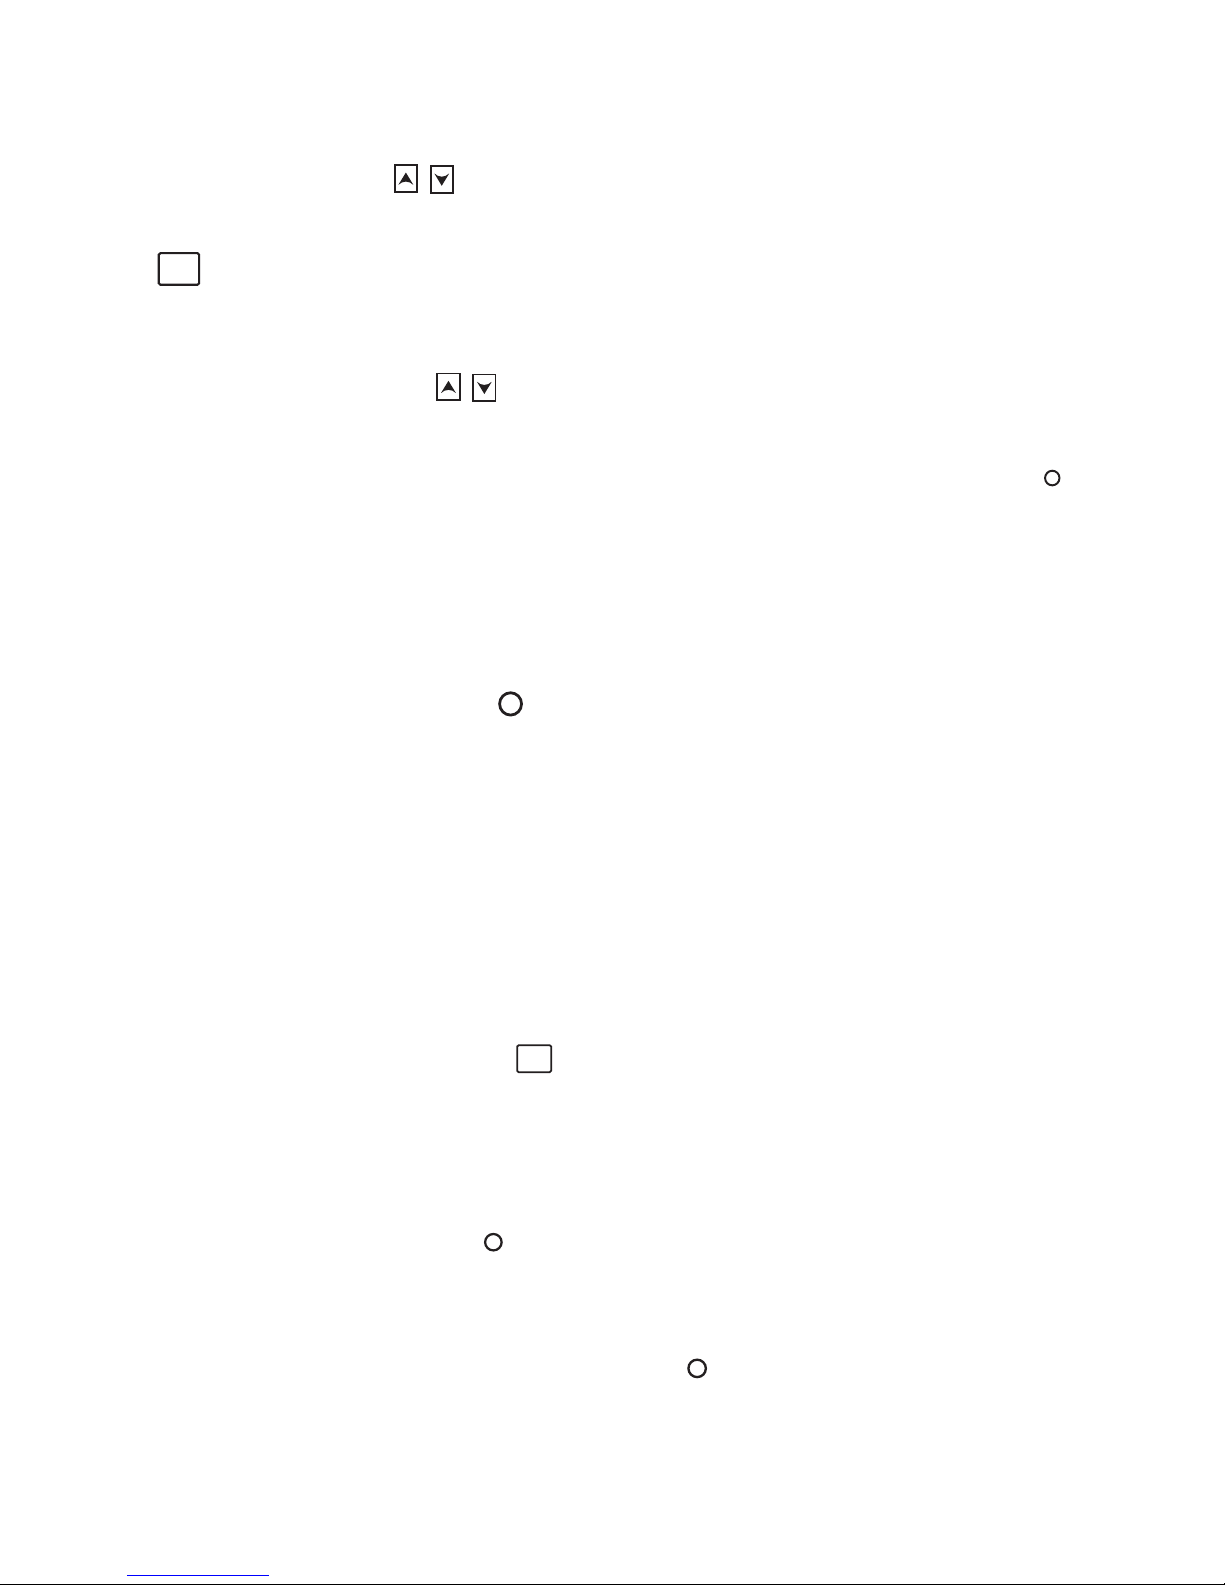
1. Power Key
indicator light must be on to show unit is plugged in and has power to it. Press the on/off
button, and the machine will start running (Two Beeps). Press this key again, the machine will stop
running (Single Beep). The display will read room humidity levels except while you’re adjusting the
setpoint humidity level. NOTE: When unit is turned off, the fan will run for 1 minute prior to shutting off.
2. Increase Humidity button
Press this button to set indoor humidity , according to this sequence: 60%, 65%, 70%, 75%.
When the indoor humidity is lower than the set humidity, the machine will stop automatically. When
indoor humidity is higher than setpoint, the unit will operate.
3. Decrease Humidity button
Press this button to set indoor humidity , according to this sequence: 60%, 55%, 50%,45%,
40%. When the indoor humidity lower than set humidity, the machine will stop working automatically.
When the indoor humidity is higher than setpoint, unit will operate.
4. Continuous Mode button
Press either the increase or decrease humidity buttons. Once you hear an audible beep, press both
buttons simultaneously to put the dehumidifier into“continuous”mode.”
The indicator light on will illuminate green indicating the unit is in continuous mode.
The unit will continue to operate regardless of humidity level until the user manually changes the
humidity setting, turns the unit off or presses again and the unit will return to normal
humidistat control operation.
NOTE: The humidity levels shown on the unit display are approximate only. (+/- 5%).
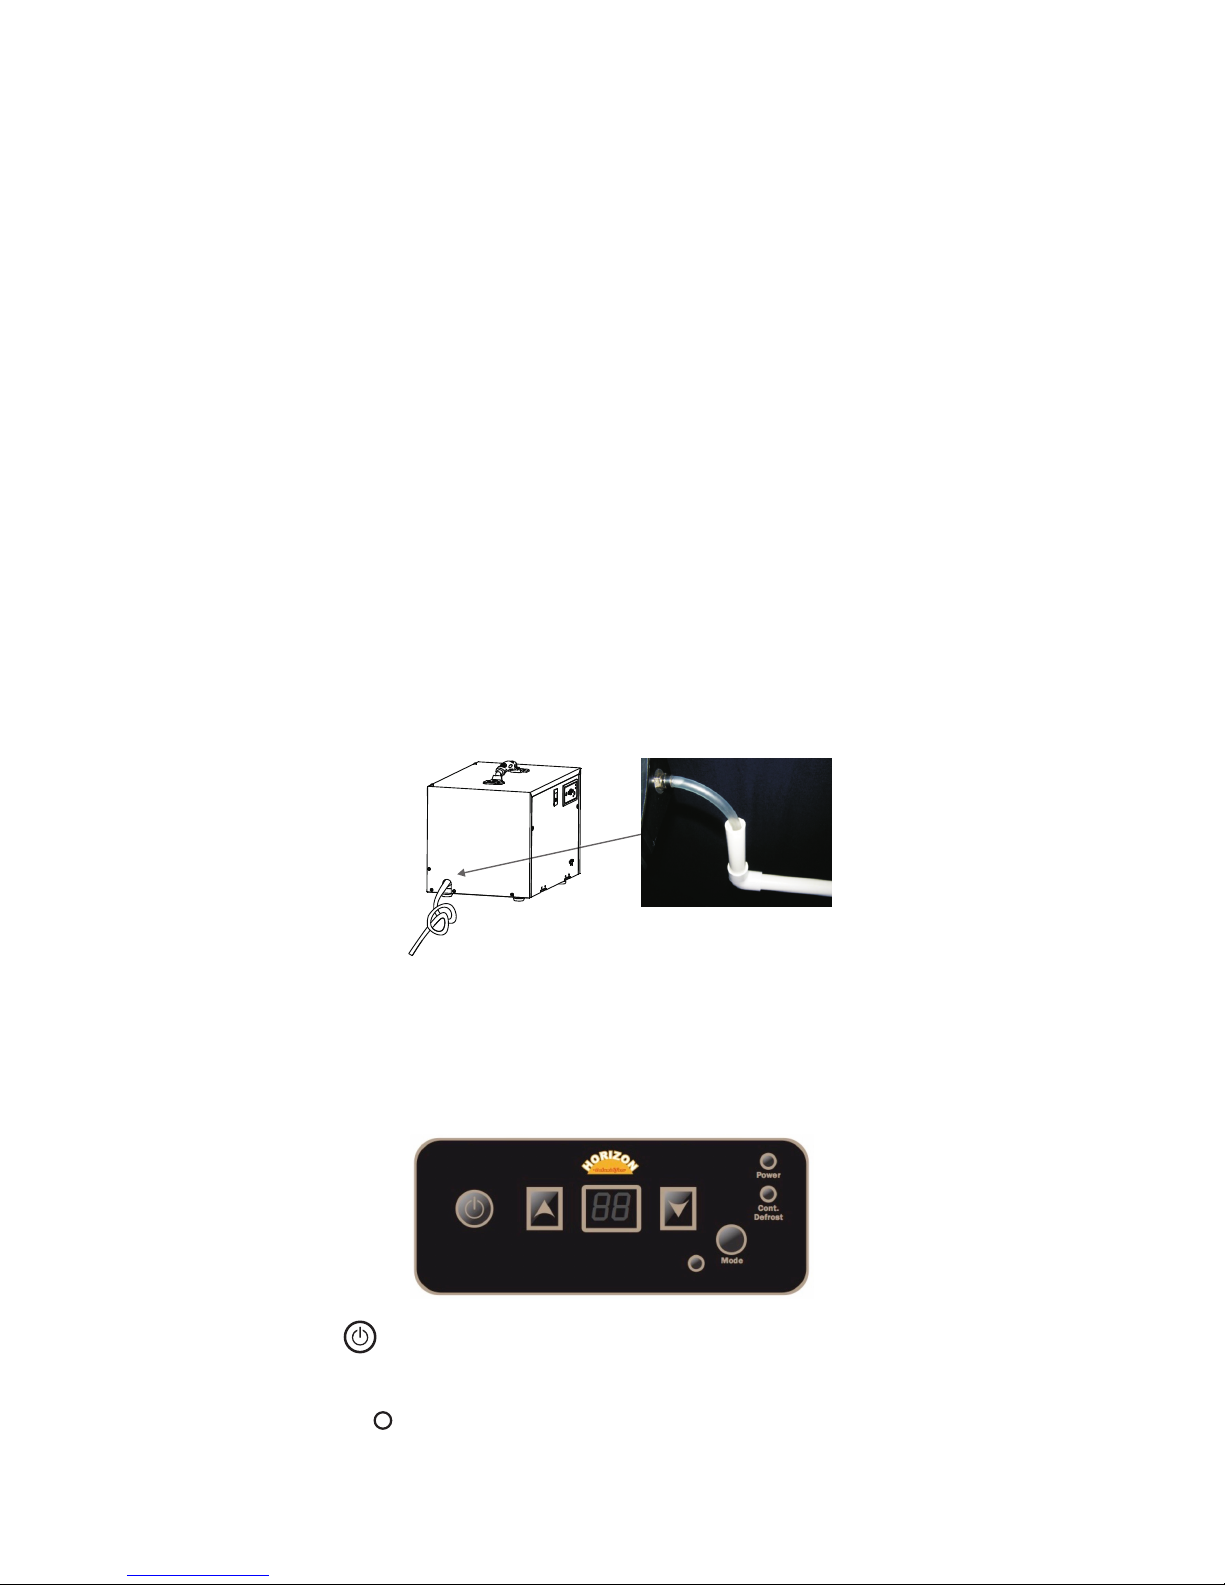
Drain line should be routed to a suitable drain on outside. Drain line must flow down to a drain
without any loops, dips or valleys.
Recommended Drain Option – Transition to PVC Pipe
Cut a piece of ¾”OD PVC approximately 6”long and insert into a ¾”elbow then attach to a ¾”
OD length of PVC to drain. (Note: Keep the length of PVC drain pipe to a minimum).
Insert the open end of the tubing into the ¾”pipe so that it does not extend into the elbow fitting.
For proper flow, a minimum downward slope of 1”per 10’run is required. (Note: If a proper downward
angle is not possible then it is recommended to use a Titan XP90 with the integrated condensate pump
or utilize an external condensate pump provided by others.)
Support the PVC tubing so that it maintains a smooth downward flow to drain.
Test drain before leaving.
Drain Tube – 12 inches Long. 12 mm OD.
88
Power
De hu mi di fie rsDe hu mi di fie rs
Comp Cont.
Defrost
Power
88
88
Cont.
Defrost
HORIZON-DEHUMIDIFIERS
HORIZON-DEHUMIDIFIERS
Do not install dehumidifier in a corrosive environment. Some liquid vapor
barriers dry via“solvent evaporation”. Insure barrier is completely dry and area is
thoroughly ventilated before installing dehumidifier.
WARNING!
1) Place dehumidifier on level surface
If after unit is positioned
If the unit is handled in such a manner that the compressor did not remain in the upright position,
place on level surface and wait a minimum of 2 hours before turning the unit“on”.
NOTE: XG90 dehumidifier can’t sit directly on floor unless the unit is feeding directly into a sump
next to it. Elevation is required to allow gravity flow of condensate water to drain.
WARNING!
2) Drain Line
3) Plug unit into 15 amp grounded outlet.
Key functions
1. Power Key
indicator light must be on to show unit is plugged in and has power to it. Press the on/off
button, and the machine will start running (Two Beeps). Press this key again, the machine will stop
running (Single Beep). The display will read room humidity levels except while you’re adjusting the
setpoint humidity level. NOTE: When unit is turned off, the fan will run for 1 minute prior to shutting off.
2. Increase Humidity button
Press this button to set indoor humidity , according to this sequence: 60%, 65%, 70%, 75%.
When the indoor humidity is lower than the set humidity, the machine will stop automatically. When
indoor humidity is higher than setpoint, the unit will operate.
3. Decrease Humidity button
Press this button to set indoor humidity , according to this sequence: 60%, 55%, 50%,45%,
40%. When the indoor humidity lower than set humidity, the machine will stop working automatically.
When the indoor humidity is higher than setpoint, unit will operate.
4. Continuous Mode button
Press either the increase or decrease humidity buttons. Once you hear an audible beep, press both
buttons simultaneously to put the dehumidifier into“continuous”mode.”
The indicator light on will illuminate green indicating the unit is in continuous mode.
The unit will continue to operate regardless of humidity level until the user manually changes the
humidity setting, turns the unit off or presses again and the unit will return to normal
humidistat control operation.
NOTE: The humidity levels shown on the unit display are approximate only. (+/- 5%).
Drain line should be routed to a suitable drain on outside. Drain line must flow down to a drain
without any loops, dips or valleys.
Recommended Drain Option – Transition to PVC Pipe
Cut a piece of ¾”OD PVC approximately 6”long and insert into a ¾”elbow then attach to a ¾”
OD length of PVC to drain. (Note: Keep the length of PVC drain pipe to a minimum).
Insert the open end of the tubing into the ¾”pipe so that it does not extend into the elbow fitting.
For proper flow, a minimum downward slope of 1”per 10’run is required. (Note: If a proper downward
angle is not possible then it is recommended to use a Titan XP90 with the integrated condensate pump
or utilize an external condensate pump provided by others.)
Support the PVC tubing so that it maintains a smooth downward flow to drain.
Test drain before leaving.
Drain Tube – 12 inches Long. 12 mm OD.
88
Power
De hu mi di fiersDe hu mid if ie rs
Comp Cont.
Defrost
Power
88
88
Cont.
Defrost
a. •Use the up and down arrow buttons to set the desired humidity setpoint on the display screen.
HORIZON-DEHUMIDIFIERS
HORIZON-DEHUMIDIFIERS
Do not install dehumidifier in a corrosive environment. Some liquid vapor
barriers dry via“solvent evaporation”. Insure barrier is completely dry and area is
thoroughly ventilated before installing dehumidifier.
WARNING!
1) Place dehumidifier on level surface
If after unit is positioned
If the unit is handled in such a manner that the compressor did not remain in the upright position,
place on level surface and wait a minimum of 2 hours before turning the unit“on”.
NOTE: XG90 dehumidifier can’t sit directly on floor unless the unit is feeding directly into a sump
next to it. Elevation is required to allow gravity flow of condensate water to drain.
WARNING!
2) Drain Line
3) Plug unit into 15 amp grounded outlet.
Key functions
1. Power Key
indicator light must be on to show unit is plugged in and has power to it. Press the on/off
button, and the machine will start running (Two Beeps). Press this key again, the machine will stop
running (Single Beep). The display will read room humidity levels except while you’re adjusting the
setpoint humidity level. NOTE: When unit is turned off, the fan will run for 1 minute prior to shutting off.
2. Increase Humidity button
Press this button to set indoor humidity , according to this sequence: 60%, 65%, 70%, 75%.
When the indoor humidity is lower than the set humidity, the machine will stop automatically. When
indoor humidity is higher than setpoint, the unit will operate.
3. Decrease Humidity button
Press this button to set indoor humidity , according to this sequence: 60%, 55%, 50%,45%,
40%. When the indoor humidity lower than set humidity, the machine will stop working automatically.
When the indoor humidity is higher than setpoint, unit will operate.
4. Continuous Mode button
Press either the increase or decrease humidity buttons. Once you hear an audible beep, press both
buttons simultaneously to put the dehumidifier into“continuous”mode.”
The indicator light on will illuminate green indicating the unit is in continuous mode.
The unit will continue to operate regardless of humidity level until the user manually changes the
humidity setting, turns the unit off or presses again and the unit will return to normal
humidistat control operation.
NOTE: The humidity levels shown on the unit display are approximate only. (+/- 5%).
Drain line should be routed to a suitable drain on outside. Drain line must flow down to a drain
without any loops, dips or valleys.
Recommended Drain Option – Transition to PVC Pipe
Cut a piece of ¾”OD PVC approximately 6”long and insert into a ¾”elbow then attach to a ¾”
OD length of PVC to drain. (Note: Keep the length of PVC drain pipe to a minimum).
Insert the open end of the tubing into the ¾”pipe so that it does not extend into the elbow fitting.
For proper flow, a minimum downward slope of 1”per 10’run is required. (Note: If a proper downward
angle is not possible then it is recommended to use a Titan XP90 with the integrated condensate pump
or utilize an external condensate pump provided by others.)
Support the PVC tubing so that it maintains a smooth downward flow to drain.
Test drain before leaving.
Drain Tube – 12 inches Long. 12 mm OD.
88
Power
De humid if ie rsDe humid if ie rs
Comp Cont.
Defrost
Power
88
88
Cont.
Defrost
The setpoint can be any number between 35-90%. Creating a setpoint means that when the
indoor humidity is lower than the set point, the machine will stop automatically. Conversely, when
the indoor humidity is higher than the set level, the unit will operate.
12.3. Continuous Mode
HORIZON-DEHUMIDIFIERS
HORIZON-DEHUMIDIFIERS
Do not install dehumidifier in a corrosive environment. Some liquid vapor
barriers dry via“solvent evaporation”. Insure barrier is completely dry and area is
thoroughly ventilated before installing dehumidifier.
WARNING!
1) Place dehumidifier on level surface
If after unit is positioned
If the unit is handled in such a manner that the compressor did not remain in the upright position,
place on level surface and wait a minimum of 2 hours before turning the unit“on”.
NOTE: XG90 dehumidifier can’t sit directly on floor unless the unit is feeding directly into a sump
next to it. Elevation is required to allow gravity flow of condensate water to drain.
WARNING!
2) Drain Line
3) Plug unit into 15 amp grounded outlet.
Key functions
1. Power Key
indicator light must be on to show unit is plugged in and has power to it. Press the on/off
button, and the machine will start running (Two Beeps). Press this key again, the machine will stop
running (Single Beep). The display will read room humidity levels except while you’re adjusting the
setpoint humidity level. NOTE: When unit is turned off, the fan will run for 1 minute prior to shutting off.
2. Increase Humidity button
Press this button to set indoor humidity , according to this sequence: 60%, 65%, 70%, 75%.
When the indoor humidity is lower than the set humidity, the machine will stop automatically. When
indoor humidity is higher than setpoint, the unit will operate.
3. Decrease Humidity button
Press this button to set indoor humidity , according to this sequence: 60%, 55%, 50%,45%,
40%. When the indoor humidity lower than set humidity, the machine will stop working automatically.
When the indoor humidity is higher than setpoint, unit will operate.
4. Continuous Mode button
Press either the increase or decrease humidity buttons. Once you hear an audible beep, press both
buttons simultaneously to put the dehumidifier into“continuous”mode.”
The indicator light on will illuminate green indicating the unit is in continuous mode.
The unit will continue to operate regardless of humidity level until the user manually changes the
humidity setting, turns the unit off or presses again and the unit will return to normal
humidistat control operation.
NOTE: The humidity levels shown on the unit display are approximate only. (+/- 5%).
Drain line should be routed to a suitable drain on outside. Drain line must flow down to a drain
without any loops, dips or valleys.
Recommended Drain Option – Transition to PVC Pipe
Cut a piece of ¾”OD PVC approximately 6”long and insert into a ¾”elbow then attach to a ¾”
OD length of PVC to drain. (Note: Keep the length of PVC drain pipe to a minimum).
Insert the open end of the tubing into the ¾”pipe so that it does not extend into the elbow fitting.
For proper flow, a minimum downward slope of 1”per 10’run is required. (Note: If a proper downward
angle is not possible then it is recommended to use a Titan XP90 with the integrated condensate pump
or utilize an external condensate pump provided by others.)
Support the PVC tubing so that it maintains a smooth downward flow to drain.
Test drain before leaving.
Drain Tube – 12 inches Long. 12 mm OD.
88
Power
De hu mi di fie rsDe hu mi di fie rs
Comp Cont.
Defrost
Power
88
88
Cont.
Defrost
HORIZON-DEHUMIDIFIERS
HORIZON-DEHUMIDIFIERS
Do not install dehumidifier in a corrosive environment. Some liquid vapor
barriers dry via“solvent evaporation”. Insure barrier is completely dry and area is
thoroughly ventilated before installing dehumidifier.
WARNING!
1) Place dehumidifier on level surface
If after unit is positioned
If the unit is handled in such a manner that the compressor did not remain in the upright position,
place on level surface and wait a minimum of 2 hours before turning the unit“on”.
NOTE: XG90 dehumidifier can’t sit directly on floor unless the unit is feeding directly into a sump
next to it. Elevation is required to allow gravity flow of condensate water to drain.
WARNING!
2) Drain Line
3) Plug unit into 15 amp grounded outlet.
Key functions
1. Power Key
indicator light must be on to show unit is plugged in and has power to it. Press the on/off
button, and the machine will start running (Two Beeps). Press this key again, the machine will stop
running (Single Beep). The display will read room humidity levels except while you’re adjusting the
setpoint humidity level. NOTE: When unit is turned off, the fan will run for 1 minute prior to shutting off.
2. Increase Humidity button
Press this button to set indoor humidity , according to this sequence: 60%, 65%, 70%, 75%.
When the indoor humidity is lower than the set humidity, the machine will stop automatically. When
indoor humidity is higher than setpoint, the unit will operate.
3. Decrease Humidity button
Press this button to set indoor humidity , according to this sequence: 60%, 55%, 50%,45%,
40%. When the indoor humidity lower than set humidity, the machine will stop working automatically.
When the indoor humidity is higher than setpoint, unit will operate.
4. Continuous Mode button
Press either the increase or decrease humidity buttons. Once you hear an audible beep, press both
buttons simultaneously to put the dehumidifier into“continuous”mode.”
The indicator light on will illuminate green indicating the unit is in continuous mode.
The unit will continue to operate regardless of humidity level until the user manually changes the
humidity setting, turns the unit off or presses again and the unit will return to normal
humidistat control operation.
NOTE: The humidity levels shown on the unit display are approximate only. (+/- 5%).
Drain line should be routed to a suitable drain on outside. Drain line must flow down to a drain
without any loops, dips or valleys.
Recommended Drain Option – Transition to PVC Pipe
Cut a piece of ¾”OD PVC approximately 6”long and insert into a ¾”elbow then attach to a ¾”
OD length of PVC to drain. (Note: Keep the length of PVC drain pipe to a minimum).
Insert the open end of the tubing into the ¾”pipe so that it does not extend into the elbow fitting.
For proper flow, a minimum downward slope of 1”per 10’run is required. (Note: If a proper downward
angle is not possible then it is recommended to use a Titan XP90 with the integrated condensate pump
or utilize an external condensate pump provided by others.)
Support the PVC tubing so that it maintains a smooth downward flow to drain.
Test drain before leaving.
Drain Tube – 12 inches Long. 12 mm OD.
88
Power
De hu mi di fiersDe hu mid if ie rs
Comp Cont.
Defrost
Power
88
88
Cont.
Defrost
••Continuous Mode can be used when you want your dehumidifier to run constantly for testing
purposes, To switch into continuous mode, set the humidity below 36%. At this point the
HORIZON-DEHUMIDIFIERS
HORIZON-DEHUMIDIFIERS
Do not install dehumidifier in a corrosive environment. Some liquid vapor
barriers dry via“solvent evaporation”. Insure barrier is completely dry and area is
thoroughly ventilated before installing dehumidifier.
WARNING!
1) Place dehumidifier on level surface
If after unit is positioned
If the unit is handled in such a manner that the compressor did not remain in the upright position,
place on level surface and wait a minimum of 2 hours before turning the unit“on”.
NOTE: XG90 dehumidifier can’t sit directly on floor unless the unit is feeding directly into a sump
next to it. Elevation is required to allow gravity flow of condensate water to drain.
WARNING!
2) Drain Line
3) Plug unit into 15 amp grounded outlet.
Key functions
1. Power Key
indicator light must be on to show unit is plugged in and has power to it. Press the on/off
button, and the machine will start running (Two Beeps). Press this key again, the machine will stop
running (Single Beep). The display will read room humidity levels except while you’re adjusting the
setpoint humidity level. NOTE: When unit is turned off, the fan will run for 1 minute prior to shutting off.
2. Increase Humidity button
Press this button to set indoor humidity , according to this sequence: 60%, 65%, 70%, 75%.
When the indoor humidity is lower than the set humidity, the machine will stop automatically. When
indoor humidity is higher than setpoint, the unit will operate.
3. Decrease Humidity button
Press this button to set indoor humidity , according to this sequence: 60%, 55%, 50%,45%,
40%. When the indoor humidity lower than set humidity, the machine will stop working automatically.
When the indoor humidity is higher than setpoint, unit will operate.
4. Continuous Mode button
Press either the increase or decrease humidity buttons. Once you hear an audible beep, press both
buttons simultaneously to put the dehumidifier into“continuous”mode.”
The indicator light on will illuminate green indicating the unit is in continuous mode.
The unit will continue to operate regardless of humidity level until the user manually changes the
humidity setting, turns the unit off or presses again and the unit will return to normal
humidistat control operation.
NOTE: The humidity levels shown on the unit display are approximate only. (+/- 5%).
Drain line should be routed to a suitable drain on outside. Drain line must flow down to a drain
without any loops, dips or valleys.
Recommended Drain Option – Transition to PVC Pipe
Cut a piece of ¾”OD PVC approximately 6”long and insert into a ¾”elbow then attach to a ¾”
OD length of PVC to drain. (Note: Keep the length of PVC drain pipe to a minimum).
Insert the open end of the tubing into the ¾”pipe so that it does not extend into the elbow fitting.
For proper flow, a minimum downward slope of 1”per 10’run is required. (Note: If a proper downward
angle is not possible then it is recommended to use a Titan XP90 with the integrated condensate pump
or utilize an external condensate pump provided by others.)
Support the PVC tubing so that it maintains a smooth downward flow to drain.
Test drain before leaving.
Drain Tube – 12 inches Long. 12 mm OD.
88
Power
De hu mi di fiersDe hu mi di fiers
Comp Cont.
Defrost
Power
88
88
Cont.
Defrost
light
should illuminate green on the display board to indicate you have successfully switched to con-
tinuous mode.
a. •When set to continuous, the dehumidifier will run constantly, regardless of the humidity level un-
til you turn the unit offor switch back to normal humidistat operation. If you would like to switch
back to normal humidistat operation, simply move the setpoint above 36%.
4. Sensor Mode Button
※Horizon Remote Control※
HORIZON-DEHUMIDIFIERS
The Horizon Remote Control connects to your Titan Series Dehumidifier via a 25’ CAT 5 cable.
The remote control contains an integrated sensor which gives you multiple options for remotely controlling your unit, in addition to monitoring the
conditions surrounding the dehumidifier.
One application for the remote control is to install the dehumidifier in one room with the conditioned air ducted into a second room that contains the
remote. For example, the dehumidifier could be installed in a laundry room and ducted into a living room. The remote would then be mounted in the living
room so the remote sensor can control the humidity and provide easy controls for the user.
Another useful application for the remote control is if the dehumidifier is in area that’s difficult to access on a regular basis. For instance, if your
dehumidifier is installed in your crawl space, the remote could be mounted in your living space or garage. This provides you with an easy way to monitor the
dehumidifier
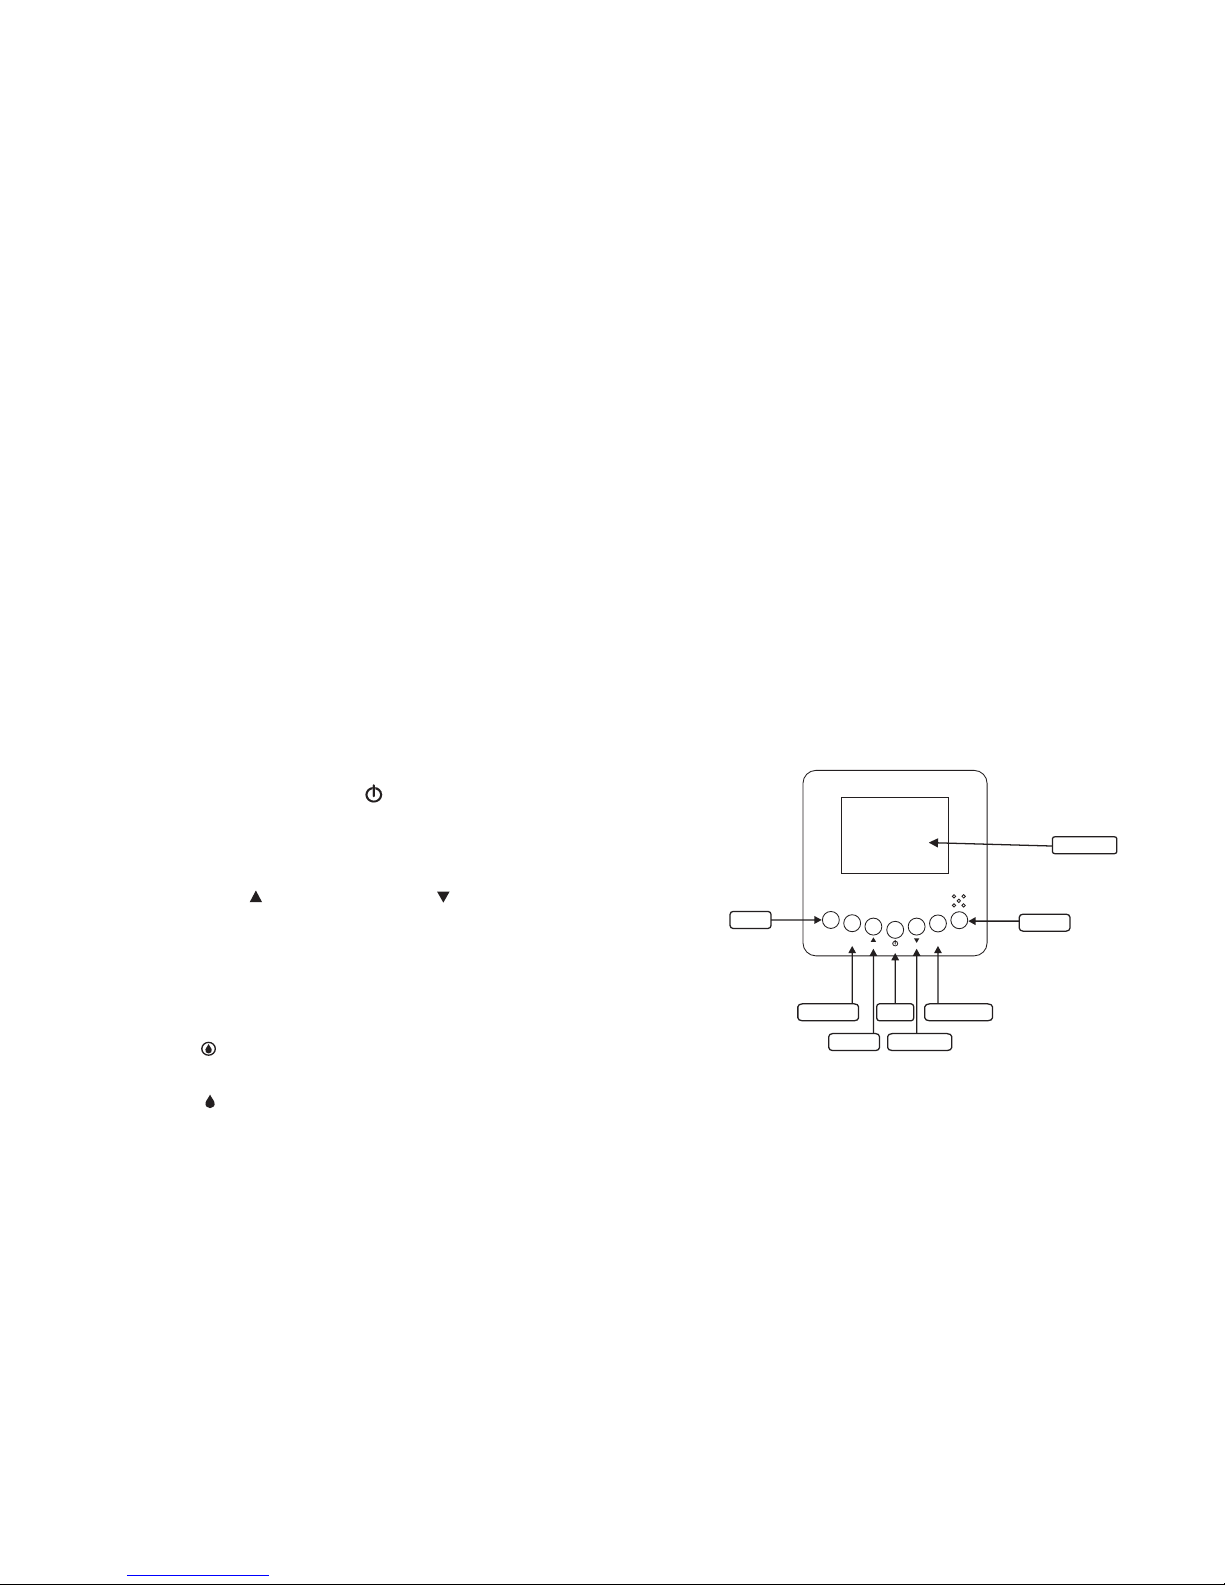
Mode
Temperature
MT c P
Up Button Down Button
LCD Monitor
On/Off
Drain Pump
Continuous
1. On/Off (Power)Button
Press the on/off button and the machine will start running (two
beeps). Press the button again to turn the machine off.
2. Up Button / Down Button
Use the Up and Down arrow buttons to adjust the humidity level.
3. Mode
Use the Mode button to switch between dehumidification and a
ducted application.
The symbol on the display board indicates that the sensor on the
remote control is being utilized.
The symbol on the display board indicates that the sensor on the
dehumidifiers is being utilized.
4. Temperature
Press the temperature button to display the current temperature on the
screen.
Press the button again to turn off the display.
5. Continuous
Press this button to switch the unit into continuous mode. will appear on the display to indicate continuous mode.
6. Drain Pump
Use this button if the unit will not be in use for an extended period of time. Pressing the drain pump button will remove water from the pump reservoir, so
the unit can be safely moved or stored.
Use this button if you want to drain the unit manually. Shutting the unit down for the season would be a great example of when you may want to manually
drain the unit. If shutting down for an extended period, it is recommended that you turn the unit “off” and let it sit for 1 hour to allow the coils to drain. Then
press the “P” button to drain the pump reservoir. If the unit will be sitting in an area that could freeze, it is best to use a wet/dry vacuum to drain the reservoir as
much as possible to avoid potential freezing issues. Alternatively, you could do pump maintenance at the end of the season and leave the reservoir completely
dry after you service the pump.”
※Instructions
T
M
P
C
※Horizon Remote Control※
HORIZON-DEHUMIDIFIERS
The Horizon Remote Control connects to your Titan Series Dehumidifier via a 25’ CAT 5 cable.
The remote control contains an integrated sensor which gives you multiple options for remotely controlling your unit, in addition to monitoring the conditions surrounding the
dehumidifier.
One application for the remote control is to install the dehumidifier in one room with the conditioned air ducted into a second room that contains the remote. For example, the
dehumidifier could be installed in a laundry room and ducted into a living room. The remote would then be mounted in the living room so the remote sensor can control the humidity
and provide easy controls for the user.
Another useful application for the remote control is if the dehumidifier is in area that’s difficult to access on a regular basis. For instance, if your dehumidifier is installed in
your crawl space, the remote could be mounted in your living space or garage. This provides you with an easy way to monitor the dehumidifier
Mode
Temperature
MT c P
Up Button Down Button
LCD Monitor
On/Off
Drain Pump
Continuous
1. On/Off (Power)Button
Press the on/off button and the machine will start running (two beeps). Press the
button again to turn the machine off.
2. Up Button / Down Button
Use the Up and Down arrow buttons to adjust the humidity level.
3. Mode
Use the Mode button to switch between dehumidification and a ducted
application.
4. Temperature
Press the temperature button to display the current temperature on the screen.
Press the button again to turn off the display.
5. Continuous
Press this button to switch the unit into continuous mode. will appear on the
display to indicate continuous mode.
6. Drain Pump
Use this button if the unit will not be in use for an extended period of time. Pressing the drain pump button will remove water from the pump reservoir, so the unit can be safely
moved or stored.
The symbol on the display board indicates that the sensor on the remote
control is being utilized.
The symbol on the display board indicates that the sensor on the
dehumidifiers is being utilized.
Use this button if you want to drain the unit manually. Shutting the unit down for the season would be a great example of when you may want to manually drain the unit. If
shutting down for an extended period, it is recommended that you turn the unit “off” and let it sit for 1 hour to allow the coils to drain. Then press the “P” button to drain the pump
reservoir. If the unit will be sitting in an area that could freeze, it is best to use a wet/dry vacuum to drain the reservoir as much as possible to avoid potential freezing issues.
Alternatively, you could do pump maintenance at the end of the season and leave the reservoir completely dry after you service the pump.”
※Instructions
T
M
P
C
1. The“Comp” indicator light provides compressor status. Green
indicates the compressor is running. Red indicates the compressor will energize after
its protection time is completed. If the light is off, the compressor is off.
2. The“unit”indicator light on red indicating the unit is in “unit” mode.
3. The“Remote”indicator light on red indicating the unit is in “Remote”
mode.
4. Press this button to Select the Working Mode Between”Unit” and “Remote”
*The Button only valid to act when the Remote Control been connected.
*In “Unit” mode, the machine will utilize it built-in humidity sensor. In this mode, the remote control will allow you to remotely monitor room
conditions where the dehumidifier is located.
*In “Remote” mode, the machine will utilize the sensor on the remote control unit. In this mode, the inlet and outlet of the dehumidifier can be
ducted and the unit will run based on the conditions of the area where the remote control is located.
Drain
88
Power
De hu mi di fi er sDe hu mi di fi er s
Comp Cont.
Defrost
Senser Location
Unit
Remote
Comp
Unit
Remote
Senser Location
Senser Location
••Press this button to switch the dehumidifier between “unit” and “remote” mode.
••When the indicator light on, the remote sensor is being used
# • When the indicator light is off, the unit sensor is being used
••This button is only active when a Horizon Remote has been connected to unit.The unit must be
powered on to adjust.
13.NOTE: The humidity levels displayed are approximate only. (+/-5%).
Indicator Lights
1. Humidity Display Screen
HORIZON-DEHUMIDIFIERS
HORIZON-DEHUMIDIFIERS
Indicator Lights
LED humidity display
This LED indicator shows two functions
1. When the power supply is on, the Led indicator shows indoor humidity.
2. When you set humidity, the LED indicator shows the set humidity.
88
Power Indicator Light
This indicates the unit has been plugged in ready to operate. Please make sure this light is “off”
prior to performing any service on this unit.
Continuous Mode Light
This indicates unit has been set in the“Continuous”operation mode.The light will illuminate a green
color.
Auto defrost
When the Auto Defrost light glows red, it means the unit is in the defrost mode and is clearing the
evaporator coil of any ice buildup.
Humidity Display Lights
These lights have 2 functions:
1. When the power is on, it shows the indoor humidity level;
2. When you set humidity value, it shows the selected humidity setpoint. After a brief delay, the
display will go back to the actual indoor humidity level.
The“Comp”indicator light on red indicates the compressor operation has been initiated. If
the compressor doesn’t immediately, just wait several minutes for its time delay protection to be
completed and the compressor with energize.
The“Comp”indicator light on green indicates the compressor has been in working status
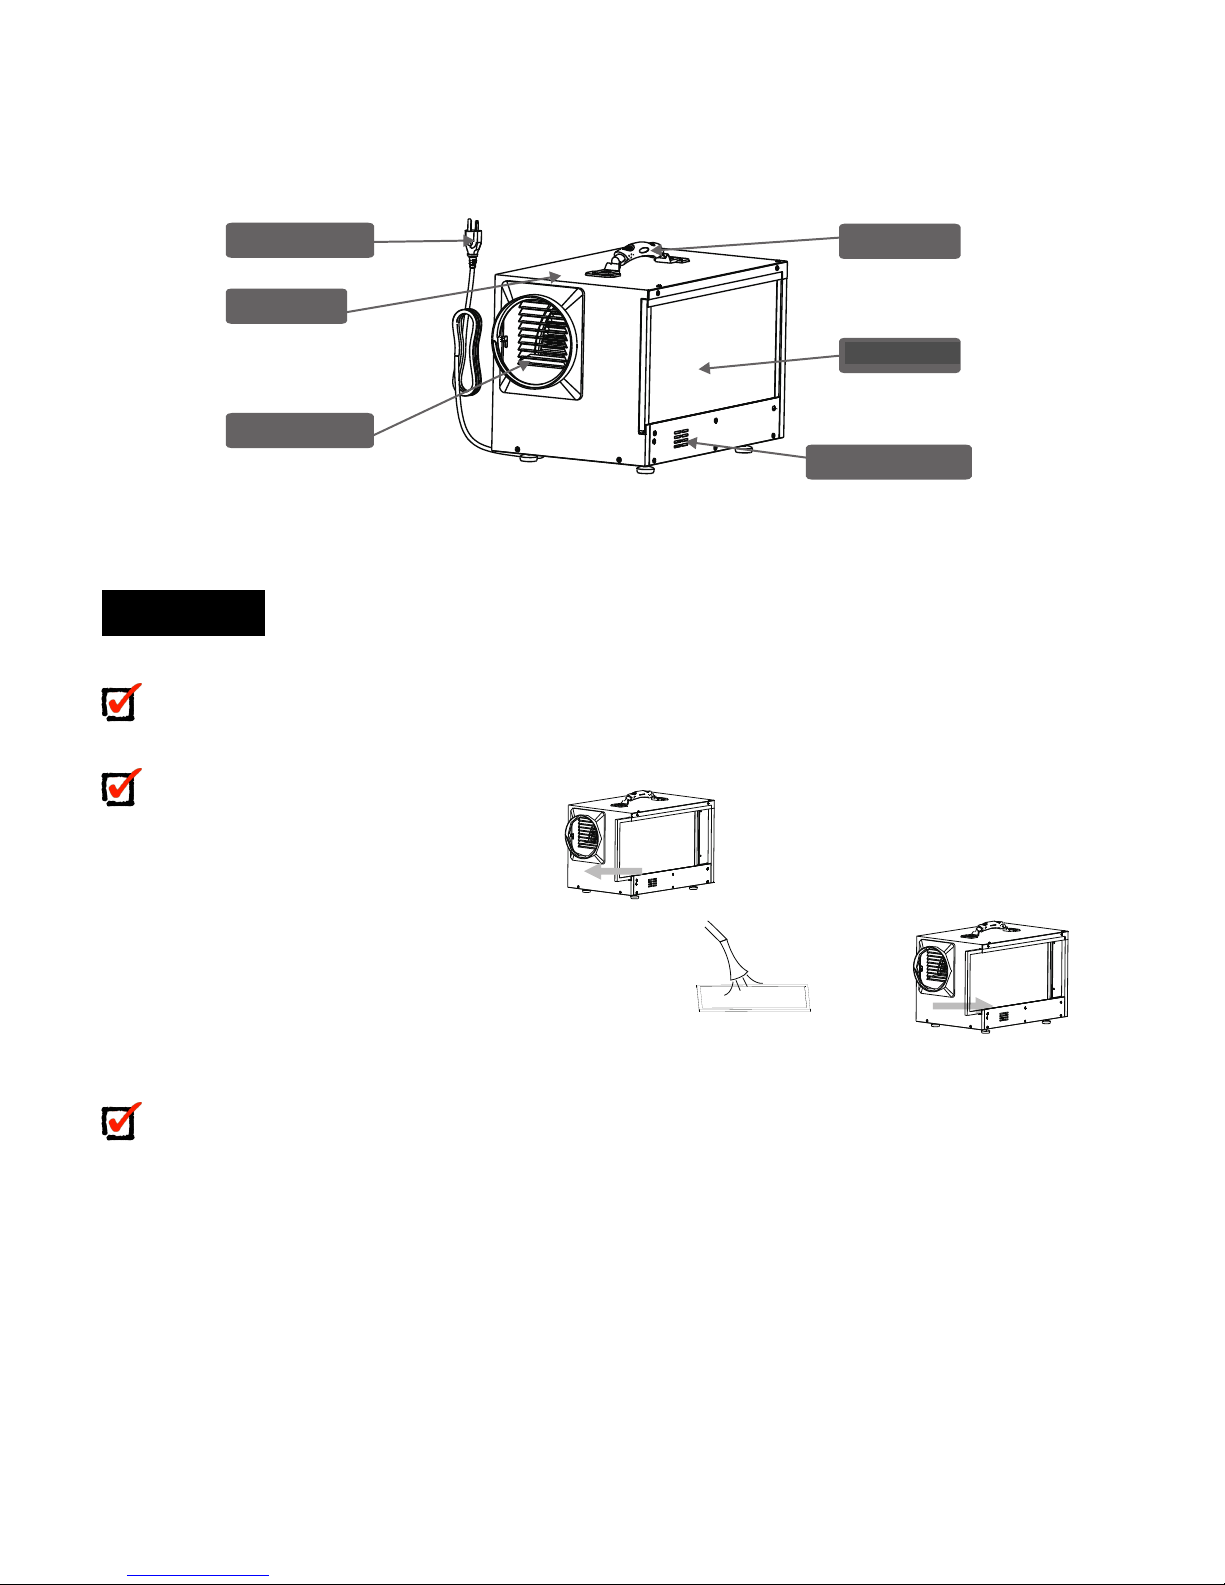
※ ※Horizon Titan XG 90
※Front View
Unit Cover
Control panel
Air Outlet Grille
Discharge End Cap
Power cord
Remote control
※Back View
Unit Cover
Drain Hose Quick
Handle
Power cord
Inlet End Cap
Air Intlet Grille
※ ※Operating Instructions
1. Start the machine
As soon as the machine is powered on for the first time, the buzzer will buzz. Adjust the humidity
level to the desired setpoint (typically 50-55%). Press to start the machine.
2. Stop machine
Press and the machine will stop. Note the fan will operate for 1 minute after the unit has
been turned off.
DO NOT unplug the power cord directly to force the machine stop working directly.
3. Water Drainage
During normal operation, the Titan XG90 will automatically drain by the force of gravity. If you
want to move or store the machine, wait at least 10 minutes to allow the machine to completely defrost
and then lean machine gently towards drain to insure the unit is completely drained.
Cont.
Defrost
Cont.
Defrost
Comp
88
Comp
••The display screen has two functions:
•1. When the unit is powered on, it shows the indoor humidity.
•2. While setting the desired humidity level, the screen will show the set humidity. After a brief
delay, the display will revert to indoor humidity level.
2. Power Indicator Light
HORIZON-DEHUMIDIFIERS
HORIZON-DEHUMIDIFIERS
Do not install dehumidifier in a corrosive environment. Some liquid vapor
barriers dry via“solvent evaporation”. Insure barrier is completely dry and area is
thoroughly ventilated before installing dehumidifier.
WARNING!
1) Place dehumidifier on level surface
If after unit is positioned
If the unit is handled in such a manner that the compressor did not remain in the upright position,
place on level surface and wait a minimum of 2 hours before turning the unit“on”.
NOTE: XG90 dehumidifier can’t sit directly on floor unless the unit is feeding directly into a sump
next to it. Elevation is required to allow gravity flow of condensate water to drain.
WARNING!
2) Drain Line
3) Plug unit into 15 amp grounded outlet.
Key functions
1. Power Key
indicator light must be on to show unit is plugged in and has power to it. Press the on/off
button, and the machine will start running (Two Beeps). Press this key again, the machine will stop
running (Single Beep). The display will read room humidity levels except while you’re adjusting the
setpoint humidity level. NOTE: When unit is turned off, the fan will run for 1 minute prior to shutting off.
2. Increase Humidity button
Press this button to set indoor humidity , according to this sequence: 60%, 65%, 70%, 75%.
When the indoor humidity is lower than the set humidity, the machine will stop automatically. When
indoor humidity is higher than setpoint, the unit will operate.
3. Decrease Humidity button
Press this button to set indoor humidity , according to this sequence: 60%, 55%, 50%,45%,
40%. When the indoor humidity lower than set humidity, the machine will stop working automatically.
When the indoor humidity is higher than setpoint, unit will operate.
4. Continuous Mode button
Press either the increase or decrease humidity buttons. Once you hear an audible beep, press both
buttons simultaneously to put the dehumidifier into“continuous”mode.”
The indicator light on will illuminate green indicating the unit is in continuous mode.
The unit will continue to operate regardless of humidity level until the user manually changes the
humidity setting, turns the unit off or presses again and the unit will return to normal
humidistat control operation.
NOTE: The humidity levels shown on the unit display are approximate only. (+/- 5%).
Drain line should be routed to a suitable drain on outside. Drain line must flow down to a drain
without any loops, dips or valleys.
Recommended Drain Option – Transition to PVC Pipe
Cut a piece of ¾”OD PVC approximately 6”long and insert into a ¾”elbow then attach to a ¾”
OD length of PVC to drain. (Note: Keep the length of PVC drain pipe to a minimum).
Insert the open end of the tubing into the ¾”pipe so that it does not extend into the elbow fitting.
For proper flow, a minimum downward slope of 1”per 10’run is required. (Note: If a proper downward
angle is not possible then it is recommended to use a Titan XP90 with the integrated condensate pump
or utilize an external condensate pump provided by others.)
Support the PVC tubing so that it maintains a smooth downward flow to drain.
Test drain before leaving.
Drain Tube – 12 inches Long. 12 mm OD.
88
Power
De hum id ifier sDe hum id ifier s
Comp Cont.
Defrost
Power
88
88
Cont.
Defrost
••This light indicates that the unit is properly powered on and ready to operate. Always
make sure this unit is “off” prior to performing any service.
3. Continuous Mode/AutoDefrost Light
HORIZON-DEHUMIDIFIERS
HORIZON-DEHUMIDIFIERS
Do not install dehumidifier in a corrosive environment. Some liquid vapor
barriers dry via“solvent evaporation”. Insure barrier is completely dry and area is
thoroughly ventilated before installing dehumidifier.
WARNING!
1) Place dehumidifier on level surface
If after unit is positioned
If the unit is handled in such a manner that the compressor did not remain in the upright position,
place on level surface and wait a minimum of 2 hours before turning the unit“on”.
NOTE: XG90 dehumidifier can’t sit directly on floor unless the unit is feeding directly into a sump
next to it. Elevation is required to allow gravity flow of condensate water to drain.
WARNING!
2) Drain Line
3) Plug unit into 15 amp grounded outlet.
Key functions
1. Power Key
indicator light must be on to show unit is plugged in and has power to it. Press the on/off
button, and the machine will start running (Two Beeps). Press this key again, the machine will stop
running (Single Beep). The display will read room humidity levels except while you’re adjusting the
setpoint humidity level. NOTE: When unit is turned off, the fan will run for 1 minute prior to shutting off.
2. Increase Humidity button
Press this button to set indoor humidity , according to this sequence: 60%, 65%, 70%, 75%.
When the indoor humidity is lower than the set humidity, the machine will stop automatically. When
indoor humidity is higher than setpoint, the unit will operate.
3. Decrease Humidity button
Press this button to set indoor humidity , according to this sequence: 60%, 55%, 50%,45%,
40%. When the indoor humidity lower than set humidity, the machine will stop working automatically.
When the indoor humidity is higher than setpoint, unit will operate.
4. Continuous Mode button
Press either the increase or decrease humidity buttons. Once you hear an audible beep, press both
buttons simultaneously to put the dehumidifier into“continuous”mode.”
The indicator light on will illuminate green indicating the unit is in continuous mode.
The unit will continue to operate regardless of humidity level until the user manually changes the
humidity setting, turns the unit off or presses again and the unit will return to normal
humidistat control operation.
NOTE: The humidity levels shown on the unit display are approximate only. (+/- 5%).
Drain line should be routed to a suitable drain on outside. Drain line must flow down to a drain
without any loops, dips or valleys.
Recommended Drain Option – Transition to PVC Pipe
Cut a piece of ¾”OD PVC approximately 6”long and insert into a ¾”elbow then attach to a ¾”
OD length of PVC to drain. (Note: Keep the length of PVC drain pipe to a minimum).
Insert the open end of the tubing into the ¾”pipe so that it does not extend into the elbow fitting.
For proper flow, a minimum downward slope of 1”per 10’run is required. (Note: If a proper downward
angle is not possible then it is recommended to use a Titan XP90 with the integrated condensate pump
or utilize an external condensate pump provided by others.)
Support the PVC tubing so that it maintains a smooth downward flow to drain.
Test drain before leaving.
Drain Tube – 12 inches Long. 12 mm OD.
88
Power
Dehum idi fi ersDehum idi fi ers
Comp Cont.
Defrost
Power
88
88
Cont.
Defrost
••When this light illuminates green, it indicates that the dehumidifier is set to continuous
operation mode.
5
Mode