Horizont Agrar EQUISTOP A2 User manual

85037C - 05/07
Type 10623
12 V DC / 180 mA
EQUISTOP A2
LEBEN MIT DEM TIER
horizont group gmbh
Division agrartechnik
Postfach 13 29
34483 Korbach
Homberger Weg 4-6
34497 Korbach
GERMANY
Telefon: +49 (0) 56 31 / 5 65-1 00
Telefax: +49 (0) 56 31 / 5 65-1 20
www.horizont.com
Leerlaufspannung - Voltage at no load
Tension à vide - Voltaggio senza carico 8000 V
Spannung bei 500 (Tierberührung) - Voltage at 500 (animal contact)
Tension à 500 - Voltaggio a 500 (contatto animale) 3500 V
Max. Zaunlänge - Max. fence line length
Longueur électrifiée - Lunghezza massima recinzione 30 km ( CEE )
BETRIEBSANWEISUNG
Elektrozaungerät
de
OPERATING INSTRUCTION
Electric Fencer
en
MODE D‘EMPLOI
Électrificateur de Clôture
fr
ISTRUZIONI D’USO
Recinto Elettrico
it

2
3
Operating instruction for electric fence controller
EQUISTOP A2
in connection with SECURA safety hints (www.horizont.com)
Installation and connection: The controller can be mounted alternatively onto a wall or a solid post.
The earth stake must be inserted into the ground as far as possible at a moisty place and must be
connected to the earth terminal of the controller by means of a noncorrosive wire. Connect the fence
connecting lead to the fence terminal (Fig.1). The controller is water protected only when being in-
stalled acc. the instructions. Prodect from bright sunshine.
Operation: Connect the controller to a 12V wet battery, ensure that the terminals are absolutely clean
and the polarity is correct. In case of wrong polarity the controller will not operate. Should a red lamp
under the left window be flashing the battery is not sufficiently charged. After a few seconds a slight
tic-tac can be heard. The fence control lamp flashes with the pulses. Do not operate the energizer
when laying on the ground.
Earthing: For a faultless operation and to obtain best possible output a good grounding is very im-
portant. There fore the grounding must be made at a rather moisty and overgrown place. An 1 m earth
stake (e.g. 12 mm ø) shall be used. With long fences and on dry soil a ground return wire with interme-
diate groundings (every 50 m) is necessary (see Fig.1, Fig.2 and SECURA ).
Requirements: The controller is designed to conform to the standard.
Service: Plug in modules can be replaced easily by your dealer, where in the event of failure the fault
is likely to be on the printed board.
Subject to alterations !
98299
94581
( 4x )
90493
94581
( 2x )
94353 / 97265 / 94280
90443
( 2x )
84719
( 2x )
81045
( 2x )
Fig.1 Fig.2
89923
90429
90875
83761
89224
83403
90461
Betriebsanweisung des Elektrozaungerätes
EQUISTOP A2
in Verbindung mit den Errichtungs- und Sicherheitshinweisen
für Elektrozaungeräte SECURA (www.horizont.com)
Aufstellung und Anschluss: Das Gerät kann wahlweise an einer Wand oder einem soliden Pfahl mon-
tiert werden. Der Erdungsstab (Längsstab) muß an einer feuchten Stelle möglichst tief in den Boden
eingeschlagen und mit einem korrosionsfesten Draht mit der Erdklemme des Gerätes verbunden wer-
den. Zaunanschlusskabel anschließen. Das Gerät ist nur bei ordnungsgemäßer Montage gegen Feuch-
tigkeit geschützt (Fig.1). Vor direkter Sonneneinstrahlung schützen.
Inbetriebnahme: 12V Akku anschließen, dabei auf saubere Polklemmen und richtige Polarität achten.
Nach einigen Sekunden hört man ein gleichmäßiges Ticken, das Gerät ist in Betrieb. Bei falscher Po-
larität läuft das Gerät nicht an - Anschlussklemmen vertauschen. Die Zaunkontrollampe leuchtet im
Rhythmus der elektrischen Impulse auf. Gerät nicht auf dem Boden liegend betreiben.
Erdung: Eine gute Erdung des Zaunes ist äußerst wichtig für den einwandfreien Betrieb und die op-
timale Leistung des Gerätes, deshalb soll die Erdung an einer möglichst feuchten und bewachsenen
Stelle vorgenommen werden. Einen 1m tiefen Erdstab (z.B. Rundstab 12mm ø) einsetzen. Bei trocke-
nem Boden und langem Zaun sollte ein zusätzlicher Erdleiter mit Zwischenerdern (alle 50m) am Zaun
entlang verlegt werden (Fig.2).
Vorschriften: Das Gerät entspricht den Sicherheitsvorschriften.
Service: Wenn das Gerät nicht ordnungsgemäß arbeitet, ist die Leiterplatte auszutauschen
Technische Änderungen vorbehalten !
de
en

4
Mode d'emploi de l'électrificateur EQUISTOP A2
en liaison avec les remarques sur l'installation et la sécurité des électrificateurs
de clôture SECURA (www.horizont.com)
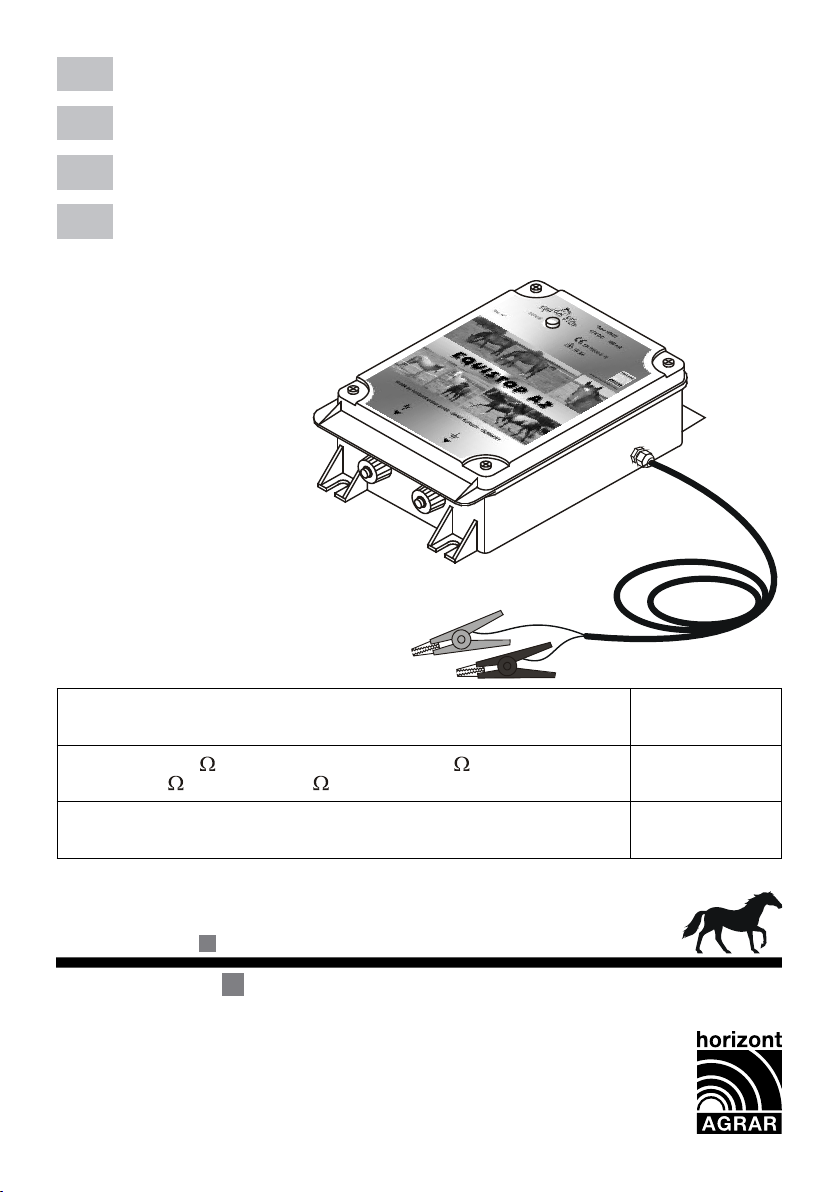
Montage et raccordement: L'appareil peut être monté au choix sur un mur ou sur un piquet solide.
Le piquet de mise à la terre doit être enfoncé le plus profond possible dans le sol à un endroit humide
et relié à la borne de terre de l'électrificateur par un fil non corrosif. Raccorder le câble de raccordement
de la clôture. l n’est protégé de l’humidité que lors par un montage correct (Fig.1). Ne pas exposé
directement du soleil.
Mise en service: Raccorder l'accumulateur 12V, veiller à ce que les bornes polaires soient propres et
à la bonne polarité. Après quelques secondes, on entend un tic-tac régulier, l’appareil est en marche.
Lors d’une mauvaise polarité, l’appareil ne fonctionne pas. Intervertir les bornes polaires. La lampe
témoin de la clôture clignote à la cadence des impulsions électriques.
Ne pas mettre en marche l'appareil couché sur le sol.
Prise de terre: Une bonne prise de terre est particulièrement importante pour le bon fonctionnement
et la performance maximum de l'électrificateur; c’est pourquoi la prise de terre doit être faite à un
endroit le plus humide possible et couvert de végétation. Placer une barre de fer à 1m de profondeur
(par exemple une barre ronde de 12 mm de diamètre). Par sol sec et clôture longue, on devra poser un
conducteur de terre supplémentaire avec des prises de terre intermédiaires (tous les 50 m) le long de
la clôture (Fig.1, Fig.2 et SECURA ).
Prescriptions: L'électrificateur est construit d’après les normes de sécurité.
Service: Changer la carte de circuit si l'appareil ne fonctionne pas correctement.
Sous réserve de changements techniques !
fr
Istruzioni per l´uso della centralina per il recinto elettrico
EQUISTOP A2
Rispondente alle norme costruttive e di sicurezza per gli apparecchi elettrificatori di
recinzioni SECURA (www.horizont.com)
Montaggio e collegamenti: Detta centralina può essere fissata sia a una parete che a un palo ben
solido. Infiggere profondamente nel suolo il piccetto della messa a terra in un punto piuttosto umido.
Esso va poi collegato al morsetto di massa della centralina medante un filo resistente alla corrosione,
quindi attaccare il cavo al recinto. L´apparecchio è protetto dall´umidità solo se il montaggio è fatto in
modo corretto (fig.1).
Collegamento a terra: Una messa a terra adeguata del recinto è estremamente importane per il per-
fetto funzionamento e prestazione dell´impianto; è per questo che il cavo di messa a terra deve essere
disposto in luogo dove il suolo è adeguatamente umido e ricoperto di vegetazione. Piantare un paletto
da 1 m (p.es. tondino di 12 mm). Se il recinto fosse molto lungo e il suolo molle si dovrebbe prevedere
un ulteriore conduttore di terra lungo il recinto con prese a intervalli di 50 m (fig.2).
Messa in esercizio e controllo: Connettere l´accumulatore di 12 V. Assicurarsi che i morsetti dei poli
siano puliti e la polarità corretta. Dopo pochi secondi si sentrià un lieve ticchettio, che è la conferma
che la centralina funziona. Essa però non funzionerà se la polarità fosse sbagliata - quindi scambiare i
morsetti di connessione. La lampada spia s´accende al ritmo degli impulsi elettrici. Per l‘esercizio mai
posare la centralina a terra.
Prescrizioni: La centralina risponde alle norme di sicurezza .
Assistenza: Se la centralina non funzionasse regolarmente si deve procedere al camio della piastra
di circuito.
Con riserva di eventuali modifiche !
it
Table of contents
Other Horizont Agrar Pet Care Product manuals
Popular Pet Care Product manuals by other brands

SportDOG
SportDOG TEK 2.0 quick start guide

NORTH STATES
NORTH STATES 8805 instructions

Trixie
Trixie 62324 Assembling Instruction & Part List

Zoofari
Zoofari 304571 Instructions for use

DOHSE AQUARISTIK
DOHSE AQUARISTIK Hobby Thermica Premium 10 W Operating instruction

iM3
iM3 Shona User's manual and care instructions