hot-steam EA Series User manual

Operating Manual
EA Series Electric All-Steam Iron
Model No.(EA-510, EA-210, EA-610)
Please read this Operating Manual
thoroughly before installing and
operating your iron.
Please retain this Operating Manual
for future reference.
Languages
English
한국어
Electric All-Steam Iron
EA-Series
www. HOT-STEAM .com

2 | P a g e
OPERATING MANUAL
HöT-STEAM® EA▪Series - Model No. EA-210, EA-510, EA-610
Thank you for purchasing the HÖT-STEAM® EA-Series Electric All-Steam
Iron. The HÖT-STEAM® Model EA-510 is an All-Steam Iron that combines
the capabilities of an Electric Steam Iron.
The Model EA-510 achieves to generate a much higher steam temperature
as the steam from the boiler gets reheated by the iron heating element of the
iron, providing an effortless ironing on tough wrinkles. This iron does not
require a solenoid valve (Steam Regulator or Low-Boy) to operate. Please
read this manual thoroughly before using the iron to ensure your safety and
to prolong life and proper functioning of the product.
[Table of Contents]
A. Installation ……… Page 3
B. Operation ……… Page 4
C. Maintenance ……… Page 5
D. Troubleshooting ……… Page 6
E. Parts List ……… Page 12
F. Warranty ……… Page 14
WARNING before Installation
Verify that your power voltage (110V/220V) is compatible with the iron
before installation. Be sure to shut off the steam supply line. Wait for the
iron to cool down completely before attempting to replace, install,
maintain or troubleshoot the iron.
** For additional questions or assistance about installation and operation of this iron, please
contact HOT-STEAM Customer Service.

3 | P a g e
OPERATING MANUAL
HöT-STEAM® EA▪Series - Model No. EA-210, EA-510, EA-610
A. INSTALLATION
CAUTION
It is highly recommended to adopt the use of two wrenches when
connecting the steam hose (Fig. 1). This method prevents over
tightening and damages to the iron fitting. Tighten the Nut of the hose
with a wrench while holding the Hose Fitting (Part#10) with another
wrench.
1. This iron only requires one steam hose to operate. Before connecting
the hose, it is recommended to apply sealing tape over the iron fitting
to prevent possible leaking. Tighten the Hose Nut to the iron fitting
with a wrench while holding the Hose Fitting (Part# 10) with another
wrench.
2. Connect the other end of the hose to the steam supply pipe. It is also
recommended to apply sealing tape before connecting the hose.

4 | P a g e
OPERATING MANUAL
HöT-STEAM® EA▪Series - Model No. EA-210, EA-510, EA-610
B. OPERATION
1. Plug in the iron to your power outlet.
2. Turn on the iron (The Power Switch light will turn ON)
3. Set the Temperature Dial to the desired level (1-5).
(The iron temperature will gradually increase as you set to a higher
number).
4. Open the ball valve on your steam supply.
5. Wait until the Power Switch light turns off.
•When the iron reaches the desired temperature, the light will turn
off automatically. (The iron will still remain ON regardless of the
light.)
•When the iron temperature decreases while in use, the unit will
automatically begin its re-heating stage by turning the Power
Switch light back ON.
*NOTE*
During operation of this iron, the light will continuously turn
back on and off every time when the iron enters the re-heating
stage.
6. Before pressing, it is possible that condensation is formed inside the
hose. Hold the iron with the base facing towards the floor and press
on the Push Lever (Part# 13) a few times until all condensation gets
released.
IMPORTANT
When you stop ironing momentarily during operation, the remaining
steam inside the hose begins to condensate. It is important to repeat
step 6 to release all condensation before continuing pressing on fabrics.
Make sure to face the iron away from any person and fabrics and press
on the Push Lever a couple of times. You will experience a mix of water
and steam when bleeding off the system.

5 | P a g e
OPERATING MANUAL
HöT-STEAM® EA▪Series - Model No. EA-210, EA-510, EA-610
[ADJUSTING THE STEAM VOLUME]
To adjust the steam volume, turn the Black Cap Nut located on top of
the Push Lever Bracket (Part# 11) counterclockwise to unlock. Keep
holding on the Black Cap Nut and turn the Adjusting Screw in the
center with a flat screwdriver. (Fig. 2)
➢Increase steam volume: Turn the Adjusting Screw
counterclockwise.
➢Decrease steam volume: Turn the Adjusting Screw clockwise.
As you turn the Adjusting Screw, press on the Push Lever to verify the
steam volume coming out of the iron. Once you have reached the
desired steam volume, turn the Black Cap Nut clockwise to lock in
place.
C. MAINTENANCE
1. Clean regularly the iron base from dust and adhered starch-residues.
2. Inspect periodically near the Push Lever for possible steam leaks.
3. Inspect periodically the hose connection at both ends for steam leaks.
Ensure the hose fitting and nut are securely connected.
4. Use genuine HöT-STEAM® iron shoes to prevent shiny marks on
fabrics.
IMPORTANT
If you need replacement parts for this iron, contact your local Authorized
Dealer from whom the HöT-STEAM® iron was purchased.
Use genuine HöT-STEAM® replacement parts for optimum results.

6 | P a g e
OPERATING MANUAL
HöT-STEAM® EA▪Series - Model No. EA-210, EA-510, EA-610
D. TROUBLESHOOTING
Problem: The iron is not releasing any steam
(Solution 1) Verify the boiler is on.
(Solution 2) Verify the ball valve in the steam supply is open.
(Solution 3) Verify the steam hose is not clogged or kinked.
Problem: The iron is not heating up or the Power Switch light is not
turning on.
(Solution 1) Verify the iron is plugged in.
(Solution 2) Verify the electrical outlet has power.
(Solution 3) Verify the iron Power Switch is ON.
(Solution 4) Set the iron Temperature Dial Knob to 1 or higher.
(Solution 5) Inspect the Thermal Fuse for continuity with a multimeter.
(If there’s no continuity, the fuse needs to be replaced.)
Problem: The iron base is releasing water
(Solution 1) When you stop ironing momentarily during operation, the
remaining steam inside the hose begins to condensate.
Make sure to face the iron away from any person and fabrics
and press on the Push Lever a couple of times. You will
experience a mix of water and steam when bleeding off the
system.
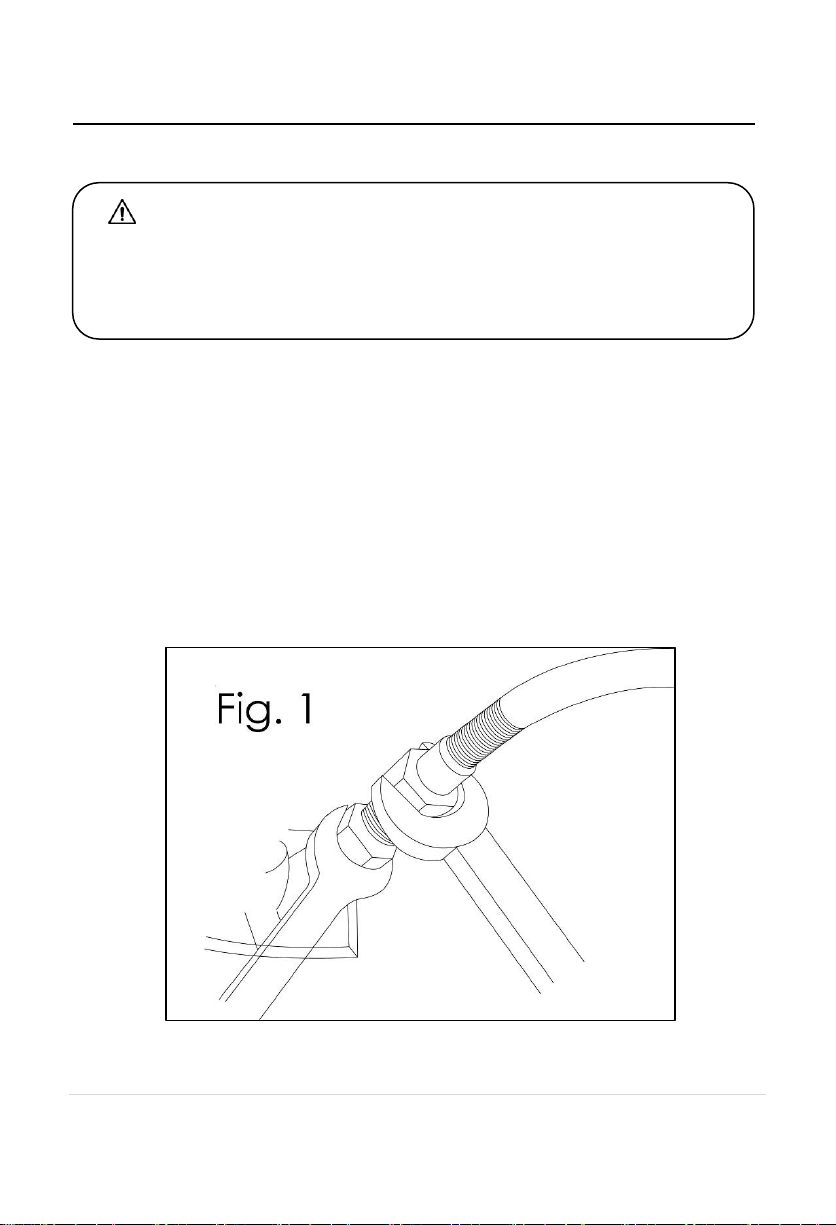
(Solution 2) Verify the steam supply for possible condensation in the
line.
Problem: The iron keeps releasing steam while not pressing on the
Push Lever
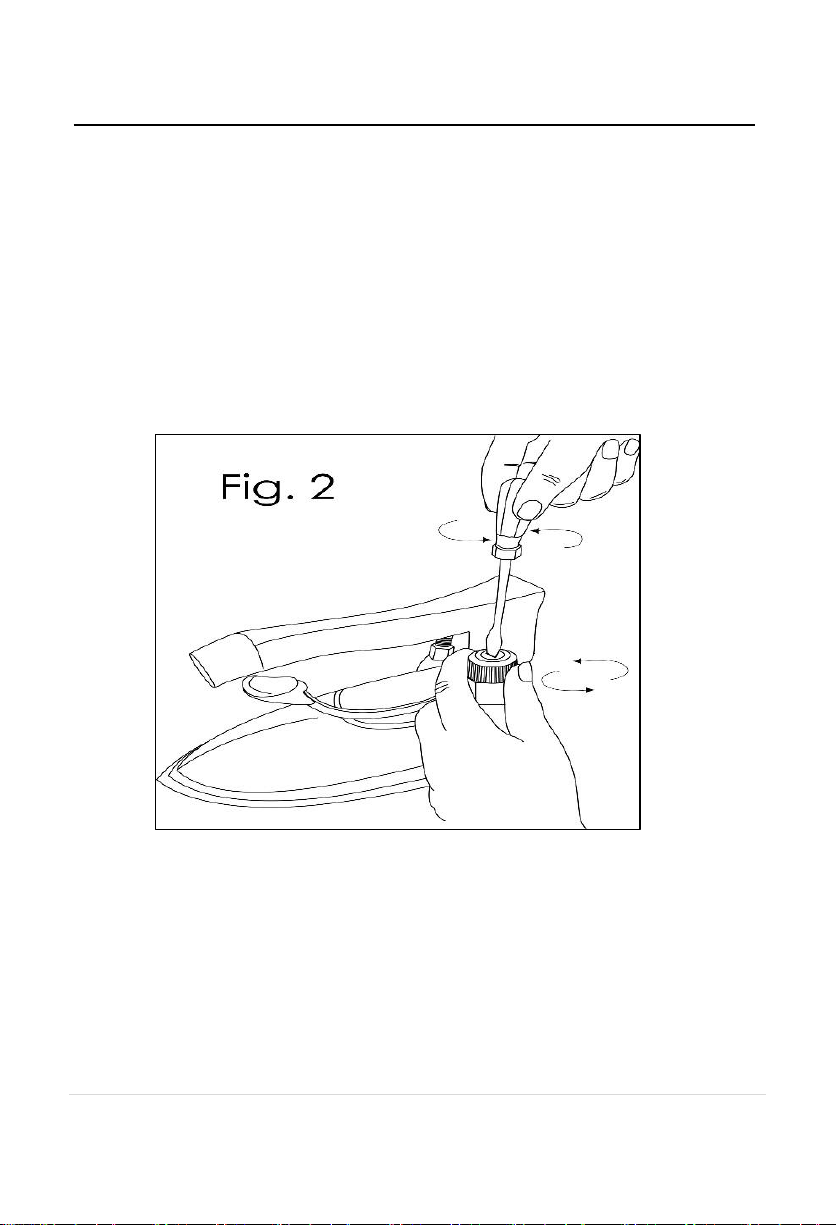
(Solution 1) Remove the Push Lever (Part#13) and then the Steam
Valve Assembly (Part#12) from the iron. Inside the Steam
Valve, remove any debris found in the PTFE packing of the
spindle.
(Solution 2) Verify condition of the spindle PTFE packing. If worn out or
damaged by debris, the Steam Valve Assembly (Part#12)
needs to be replaced.

7 | P a g e
OPERATING MANUAL
HöT-STEAM® EA▪Series - Model No. EA-210, EA-510, EA-610
저희 HöT-STEAM® EA-Series 다리미를 구입해 주셔서 감사합니다.
지금 귀하께서 구입하신 HöT-STEAM® EASeries 다리미는 올-스팀(ALL-
STEAM) 다리미와 전기(ELECTRIC) 다리미의 장점이 복합된 다리미입니다.
보일러에서 공급되는 스팀을 전기히터로 재가열하여 사용하므로 다림질이
힘든 옷감을 편하게 다릴 수있습니다. 기존의 일반 전기 다리미를 사용하기
위해서는 솔레노이드 밸브(LOW-BOY, STEAM REGULATOR) 가
필요하지만, 저희 HöT-STEAM® EA-Series 다리미는 솔레노이드 밸브
(로우보이, 또는 스팀 레귤레이터) 가필요하지 않습니다. 일반 올스팀
다리미에 연결하는 스팀호스 하나만을 이용하여 최고의 다림질을
제공합니다. 사용하시기 전에 이사용설명서를 반드시 읽어 보시고, 내용을
숙지하시면 보다 안전하고 문제없이 다리미를 오래도록 사용하실 수
있습니다.
[차례]
A. 설치 ……… Page 8
B. 사용방법 ……… Page 9
C. 관리 ……… Page 10
D. 문제해결 ……… Page 11
E. 부품도 ……… Page 12
F. 품질 보증 ……… Page 14
설치 전주의 사항
EA SERIES 다리미를 설치하기 전에 반드시 다리미와 전원의 전압이
(110V/220V) 일치하는지 확인하시기 바랍니다. 또한 안전을 위해 다리미의
교체, 설치, 점검 시, 보일러로부터 스팀이 들어오는 파이프의 볼밸브를
잠그시고, 다리미가 식었을 때작업하시기 바랍니다.
** 다리미 설치, 사용, 문제에 관한 문의는 HOT-STEAM 본사로 연락하시면, 친절히
도와드리겠습니다.

8 | P a g e
OPERATING MANUAL
HöT-STEAM® EA▪Series - Model No. EA-210, EA-510, EA-610
A. 설치
호스 연결 시주의 사항
호스를 다리미에 연결할 때는, 반드시 두개의 렌치를 사용해야 합니다. 다리미에
있는 호스 피팅의육각부분을 렌치로 잡고, 호스에 있는 육각 너트 부분을 또
다른 렌치로 조이십시오. (Fig. 1)
*두개의 렌치를 사용하지 않으면 호스 피팅이부러질 수있습니다.
1. 다른 올-스팀 다리미와 달리 이다리미의 작동을 위해서는 일반 올스팀
다리미용 호스 하나만 필요합니다. 다리미와 호스 연결 부분의 스팀누수 방지를
위해 다리미에 있는 호스 피팅에파이프 실링 테이프를 감고, 반드시 두개의
렌치를 이용해서 호스 피팅이부러지지 않도록 적당한 힘으로 호스의 너트를
다리미의 호스 피팅(PART# 10)에연결하십시오.
2. 스팀이 공급되는 배관 파이프에 파이프 실링 테이프를 감고, 이호스의 다른
한쪽을 연결하시기 바랍니다.

9 | P a g e
OPERATING MANUAL
HöT-STEAM® EA▪Series - Model No. EA-210, EA-510, EA-610
B. 사용 방법
1. 다리미의 전원 코드를 전원 아울렛에 연결하십시오.
2. 다리미의 전원스위치를위쪽으로 눌러서 켜십시오.
(다리미 스위치에 불이 들어옵니다.)
3. 다리미 뒤쪽에 있는 온도 다이얼을원하시는 번호에 맞추어 놓으세요 (1~5).
(번호가 높을수록 다리미 바닥온도가 높아집니다.)
4. 보일러에서 다리미로 들어오는 스팀 공급 배관의 볼밸브를 오픈합니다.
5. 다리미 전원스위치의 불이 꺼질 때까지 기다리세요
•다리미가 원하시는 온도에 도달하면 전원스위치의 불이 자동으로
꺼집니다. (다리미는 계속 작동 중입니다.)
•다리미 바닥의 온도가 낮아지면 전원 스위치의 불이 자동으로 들어오며,
다리미는 자동으로 재가열을 시작합니다.
•다리미가 켜져 있는 동안 이동작들이 자동적으로 반복됩니다.
6. 다림질을 시작하시기 전에, 스팀 배관이나 호스 안에 남아있던 스팀이 변해서
생긴 응축수가 있을 수있으므로, 다리미를 작업장 바닥 쪽을 향하게 한후
다리미의 Push Lever (PART#13)를몇번눌러서 응축수를 배출시켜야
합니다.
응축수(물) 배출 시주의 사항
다림질 작업 중간에 잠시 다리미를 사용하지 않았다가 다시 사용하실 때,
반드시 위의 ‘6 번’ 작업을 반복하시기 바랍니다. 다리미를 사용하지 않는 동안
스팀 배관과 다리미 호스안에 있는 스팀이 응축수로 변하기 때문에, 다림질을
새로 시작하실 때는 옷감을 다리기 전반드시 응축수를 제거해야 합니다.
이때 스팀과 응축수가 나올 수있으므로 다리미를 사람이 없는 곳으로 향해
Push Lever 를몇번눌러서, 응축수가 모두 배출시키십시오.

10 | P a g e
OPERATING MANUAL
HöT-STEAM® EA▪Series - Model No. EA-210, EA-510, EA-610
[스팀 양조절 방법]
Push Lever 를누를 때다리미에서 나오는 스팀의 양을 조절할 수있습니다.
Push Lever 가연결되어 있는 Steam Valve Bracket (PART# 11) 위쪽의 검정색
캡나사를시계반대 방향으로 돌리어 잠금 상태를 푸시고, 그안에 들어있는
일자 형태의 조절나사를일자형 드라이버로 조절합니다. (Fig. 2)
➢스팀 양이 더많아지게 할경우: 조절 나사를시계 반대방향으로 돌립니다.
➢스팀 양이 더적어지게 할경우: 조절 나사를시계 방향으로 돌립니다.
Push Lever 를눌러 보면서 스팀 조절나사의 높이를 원하는 위치에 맞추신 후
검정색 캡나사를시계방향으로 돌려서 고정시키십시오.
C. 관리
1. 먼지나 이물질이 쌓이지 않도록 정기적으로 다리미 바닥을 닦아야 합니다.
2. 다리미 Push Lever 쪽에서 스팀이 새는지 확인하십시오.
3. 다리미에 연결된 스팀호스가 새는 곳은 없는지, 호스와 다리미의 연결
부분이 빠지지 않았는지, 꺾인 부분은 없는지 정기적으로 검사해야 합니다.
4. 옷감에 따라 번들거림이 발생할 수있으므로 HöT-STEAM® 다리미
신발을 구입하시어 사용하시기를 권장합니다.

11 | P a g e
OPERATING MANUAL
HöT-STEAM® EA▪Series - Model No. EA-210, EA-510, EA-610
주의 사항
다리미의 부품을 교체해야 할경우 다리미를 구입하신 곳이나, HOT-STEAM
본사에 문의하시고, 부품은 반드시 HöT-STEAM® 정품을 사용해야 합니다.
정품이 아닌 다른 부품을 사용할 경우 다리미의 심각한 고장의 원인이 되며,
품질 보증을 받지 못할 수있습니다.
D. 문제 해결
문제: 다리미 사용시 스팀이 나오지 않는 경우
(해결 1) 보일러가 켜져 있는지 확인.
(해결 2) 다리미로 유입되는 스팀 서플라이 배관의 볼밸브가 열려 있는지 확인.
(해결 3) 다리미에 연결된 스팀 호스의 꺾인 부분이 없는지 확인.
문제: 다리미가 뜨거워지지 않는 경우
(해결 1) 다리미의 전원 코드가 전기 아울렛에 잘꼽혀 있는지 확인.
(해결 2) 전원코드에 전기가 공급되고 있는지 확인.
(해결 3) 다리미의 Power Switch 가켜져 있는지 확인.
(해결 4) 다리미 뒤쪽의 온도 다이얼이 #1 또는 높은 번호로 되어있는지 확인.
(해결 5) 테스터를 이용하여 다리미의 온도 Fuse 가끊어지지 않았는지 확인.
문제: 다리미를 사용시 물이 나오는 경우
(해결 1) 다리미 사용을 잠시 중단한 경우, 호스와 배관에 남아있던 스팀이
응축수로 변하게 됩니다. 다리미의 Push Lever 를몇번누르면서
스팀이 응축수가 모두 빠질 때까지 반복하세요.
(해결 2) 다리미의 전원 코드가 전기 아울렛에 잘꽂혀 있는지 확인.
(해결 2) 다리미에 스팀을 공급하는 스팀 서플라이 배관에서 응축수가 유입되는
것은 아닌지 확인.
문제: Push Lever 를누르지 않아도 다리미 바닥으로 스팀이 나오는 경우
(해결 1) Steam Valve Assembly (Part# 12)안에 있는 Spindle 의PTFE 팩킹
부분에 보일러나 배관으로부터 유입된 이물질이 끼어 있는 경우입니다.
Steam Valve 를렌치로 빼어낸 후안에 들어있는 긴막대 모양의
스핀들(SPINDLE) 아래에 위치한 PTFE 패킹표면의 이물질을 제거한
후에 Steam Valve Assembly 를다시 조립합니다.
(해결 2) 스팀밸브안에 있는 스핀들의 테플론 팩킹의 수명이 다한 경우입니다.
다리미를 구입하신 곳이나, 저희 HOT-STEAM 본사에 연락하시어 해당
부품을 구입, 교체해야 합니다.

12 | P a g e
OPERATING MANUAL
HöT-STEAM® EA▪Series - Model No. EA-210, EA-510, EA-610
Parts List
Ref #
Description
Parts #
1
Handle Assembly
EAP-01
2
Handle Nut
EAP-02
3
Handle Bracket
EAP-03
4
Handle Bolt
EAP-04
5
Spring Washer
EAP-05
6
Thermo Protector
EAP-06
7
Screw for Heat Shield
EAP-07
8
Screw for Metal cover
EAP-08
9
Metal Cover
EAP-09
10
Hose Fitting
EAP-10
11
Push Lever Backet
EAP-11
12
Steam Valve Assembly
EAP-12
13
Push Lever
EAP-13
14
Iron Base
EAP-14
15
Inner Cover
EAP-15
16
Power Switch
EAP-16
17
Thermal Fuse
EAP-17
18
Screw for Thermal Fuse
EAP-18
19
Copper Wire
EAP-19
20
Lead Wire to Fuse
EAP-20
21
Lead Wire to H.E.
EAP-21
22
Lead Wire to Thermostat
EAP-22
23
Power Cord
EAP-23
24
Cord Bushing
EAP-24
25
Outer Cover
EAP-25
26
Metal Name Plate
EAP-26
27
Dial Knob Set
EAP-27
28
Thermostat
EAP-28

13 | P a g e
OPERATING MANUAL
HöT-STEAM® EA▪Series - Model No. EA-210, EA-510, EA-610
Parts Breakdown

14 | P a g e
(6) Months Limited Warranty
The HöT-STEAM® All-Steam Iron is tested and inspected before
leaving our factory. We warrant to the original user of this product
that it will be free from defects in material and workmanship for
6 Months from date of purchase. With respect to non-durable
parts that normally require replacement within 6 Months, including
hoses, and valve packing that can wear down to normal wear and
tear there is a limited warranty of 90 days. The warranty period
on each replacement part furnished for the HöT-STEAM® iron in
fulfillment of the warranty shall be for the unexpired portion of the
original part that was replaced.
In no way will the manufacturer of the HöT-STEAM® iron be
responsible for any incidental or consequential damage caused
by the iron. Any liability is limited solely to the repair or
replacement of the part or product, excluding any labor or any
other cost to remove or install said part or product.
This warranty is contingent upon installation and use of
equipment under normal operating conditions. This warranty is
void on iron and parts that have been subject to misuse, accident,
or negligent damage.
For warranty service, contact an Authorized Dealer from whom
the HöT-STEAM® iron was purchased.
This manual suits for next models
3
Table of contents
Other hot-steam Iron manuals