hot-steam SGB Series User manual
Operating Manual
SGB Series Gravity-Fed Iron
Model No.(SGB-300, SGB-600, SGB-700, SGB-800, SGB-900)
Please read this Operating Manual
thoroughly before installing and
operating your iron.
Please retain this Operating Manual
for future reference.
Languages
English
한국어
Spanish

1
OPERATING MANUAL
HÖT-STEAM® SGB Series-Model No. SGB300, SGB600, SGB700, SGB800 & SGB900
“ Thank you for purchasing the“ Thank you for purchasing the
HÖT-STEAM® SGBHÖT-STEAM® SGB SeriesSeries
Gravity-Fed Iron ”.Gravity-Fed Iron ”.
The HÖT-STEAM® SGB Series Gravity-Fed Iron is a ste-
amelectric iron that generates steam by feeding water from an
independent tank, and does not require a boiler to operate. Ple-
ase read the manual thoroughly before using the iron to ensure
its longest possible life.
• Table of Contents
A. Installation
B. Operation & Use
C. Troubleshooting
D. Maintenance
E. Warranty Coverage
WARNING
Be sure to have 110V (10Amps) capacity power supply source to
prevent shut offs in circuit breakers before attempting to plug in the
iron. This iron is recommended for commercial use only.
2
OPERATING MANUAL
HÖT-STEAM® SGB Series-Model No. SGB300, SGB600, SGB700, SGB800 & SGB900
A. INSTALLATION
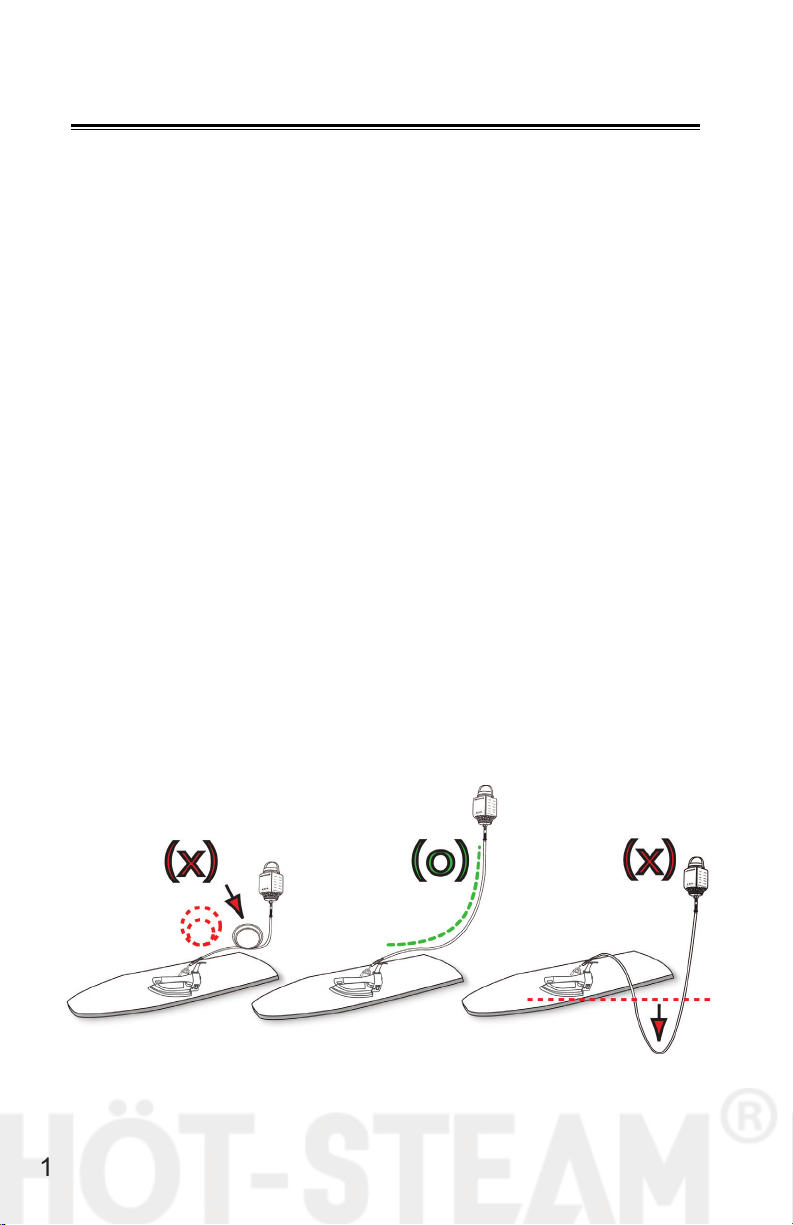
1. Before setting up new iron, nd a secure place where the tank
can be stationed at least 3 Feet (1 Meter) above the iron.
2. Verify the WATER CONTROL VALVE of the WATER TANK is
closed. Pour entire bag of DEMINERALIZER into the WATER
TANK. Fill with water and close the cap.
3. Hang the WATER TANK on the place you found.
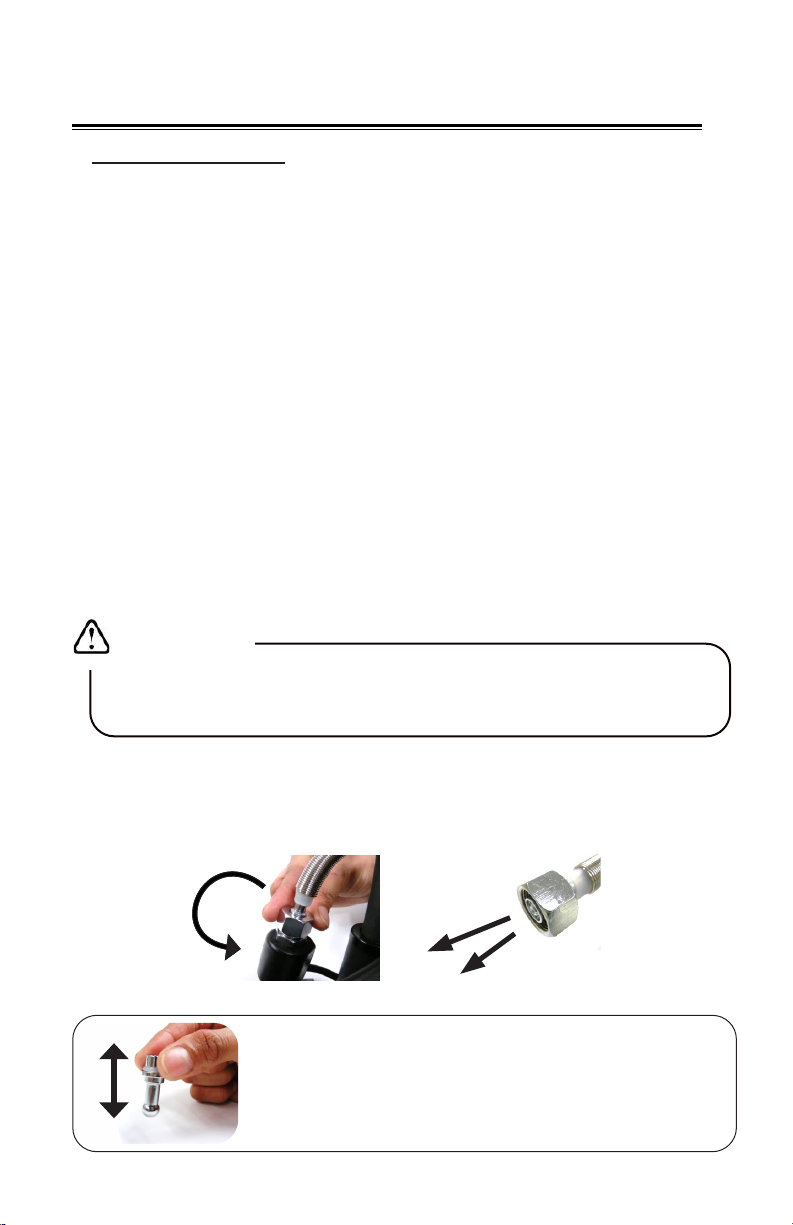
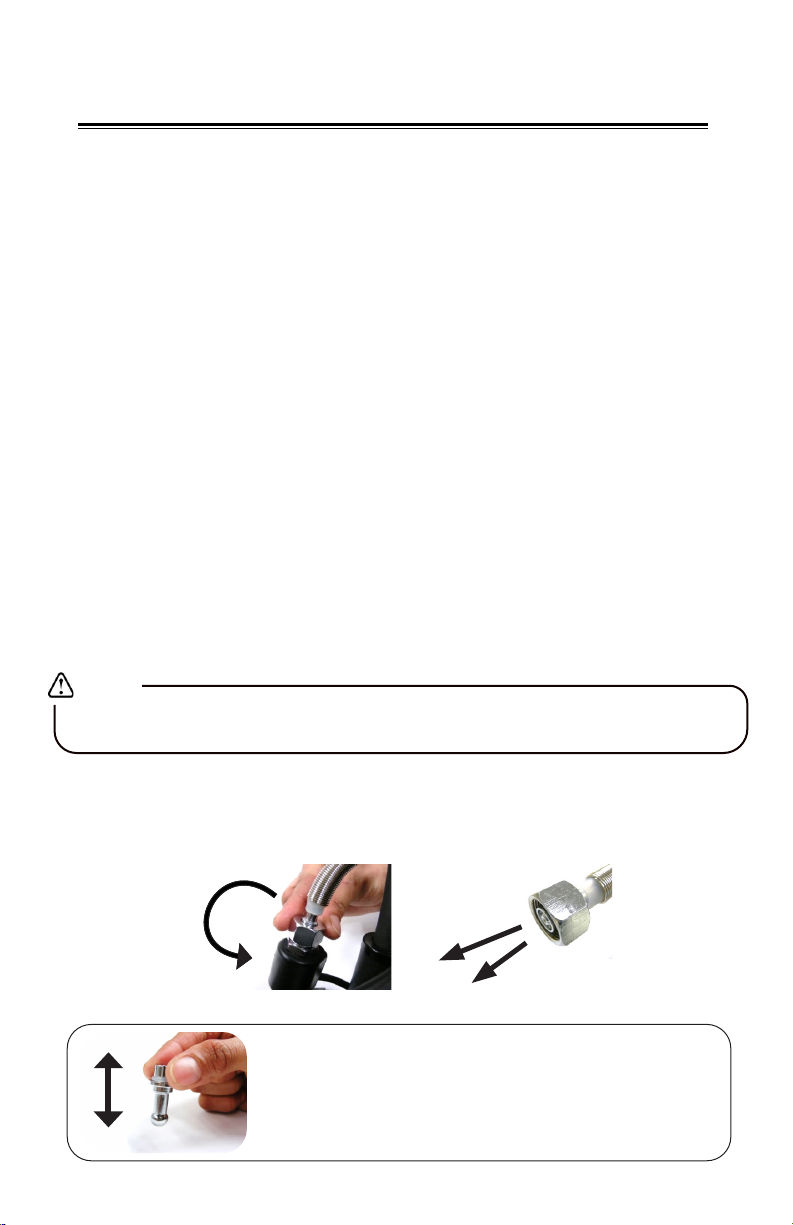
(* Caution: Secure the WATER TANK so it won’t fall)
4. Connect one end of the hose to the WATER CONTROL
VALVE, and the other end to the HOSE FITTING of the iron.
Slide the HOSE SPRING down to the HOSE FITTING (The
HOSE SPRING will prevent the HOSE from vending).
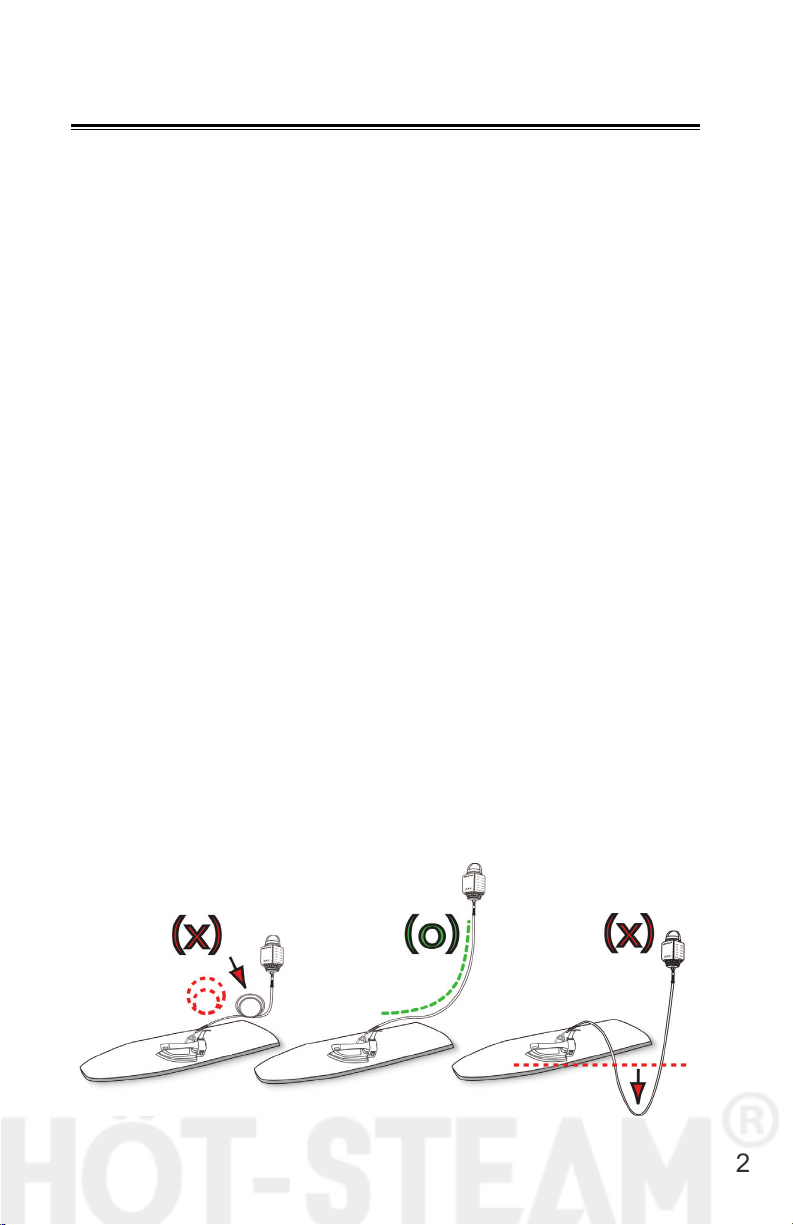
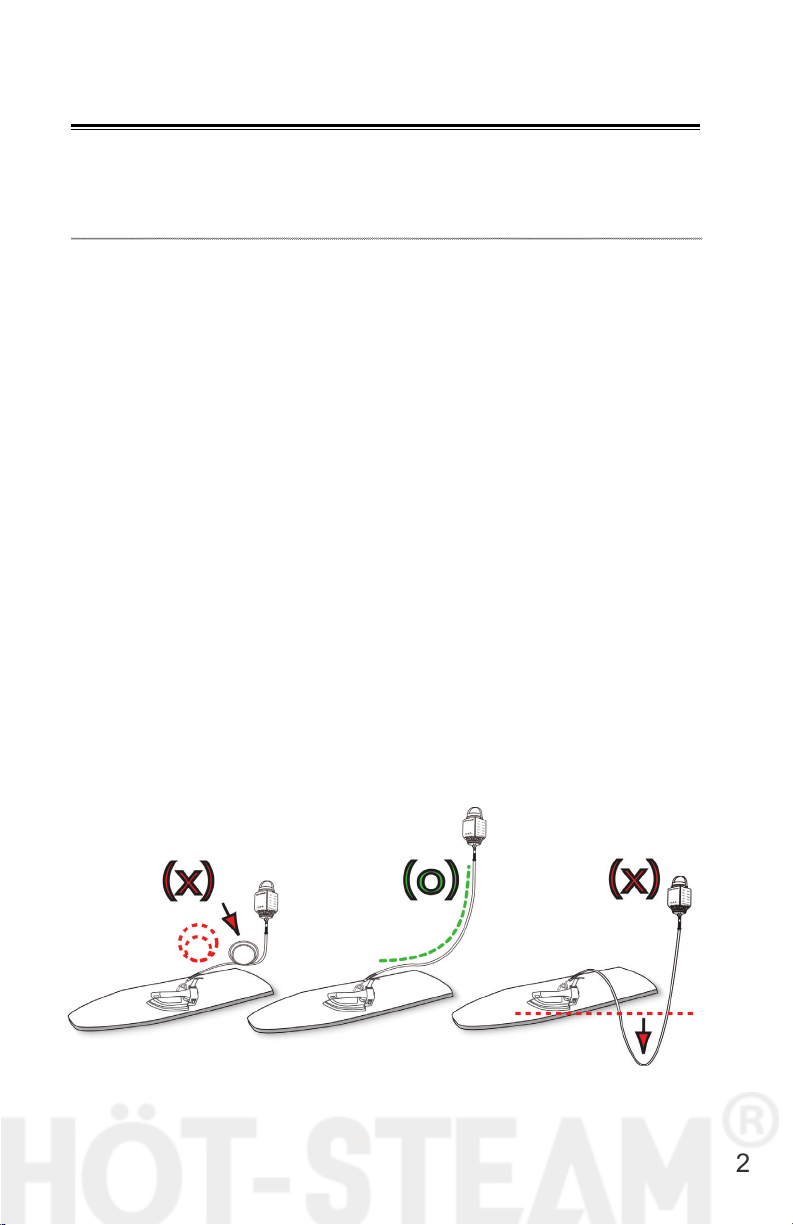
5. After placing the iron on the IRON REST, nd the proper hose
length according to below drawing and cut the unnecessary por-
tion of the HOSE.
(*Caution: If any part of the hose is below the iron level or tan-
gled in between, it will affect the water ow gravity and the iron
won’t produce enough or any steam).
6. Install Plastic Clips to hold the HOSE and POWER CORD to-
gether (optional).
1
OPERATING MANUAL
HÖT-STEAM® SGB Series-Model No. SGB300, SGB600, SGB700, SGB800 & SGB900
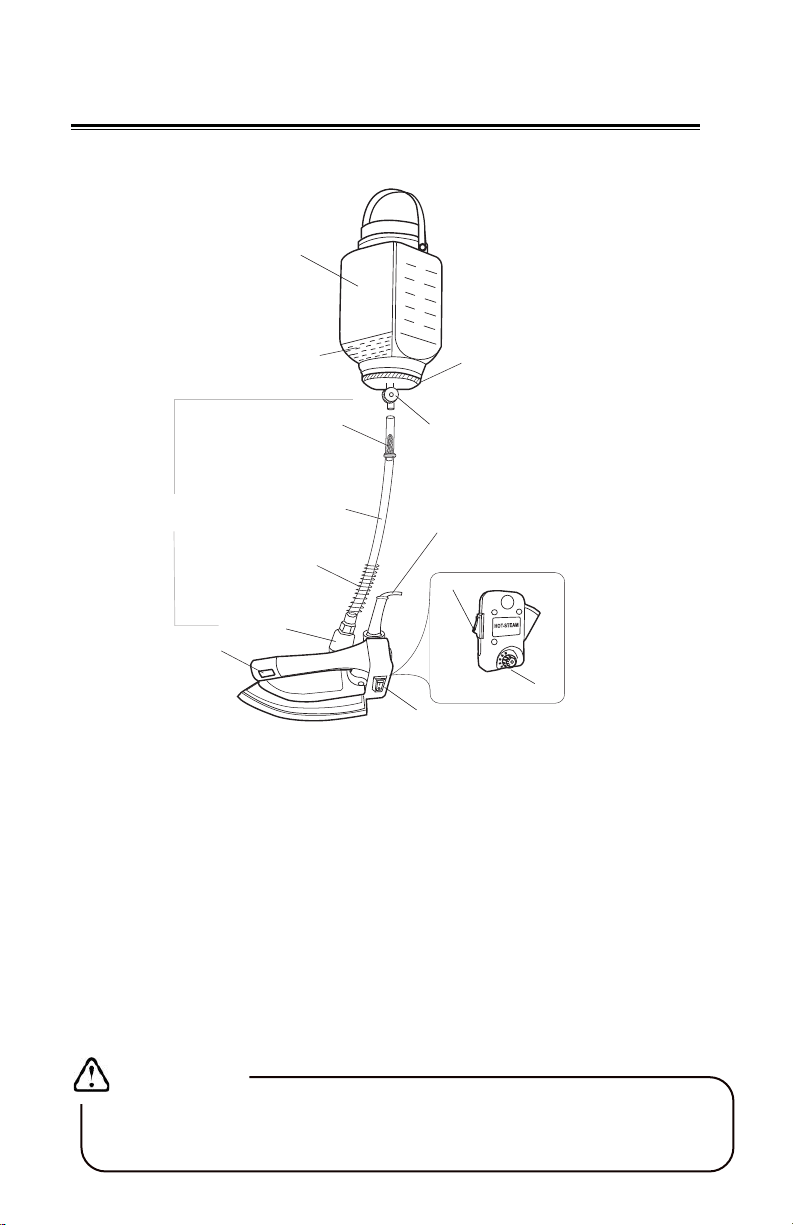
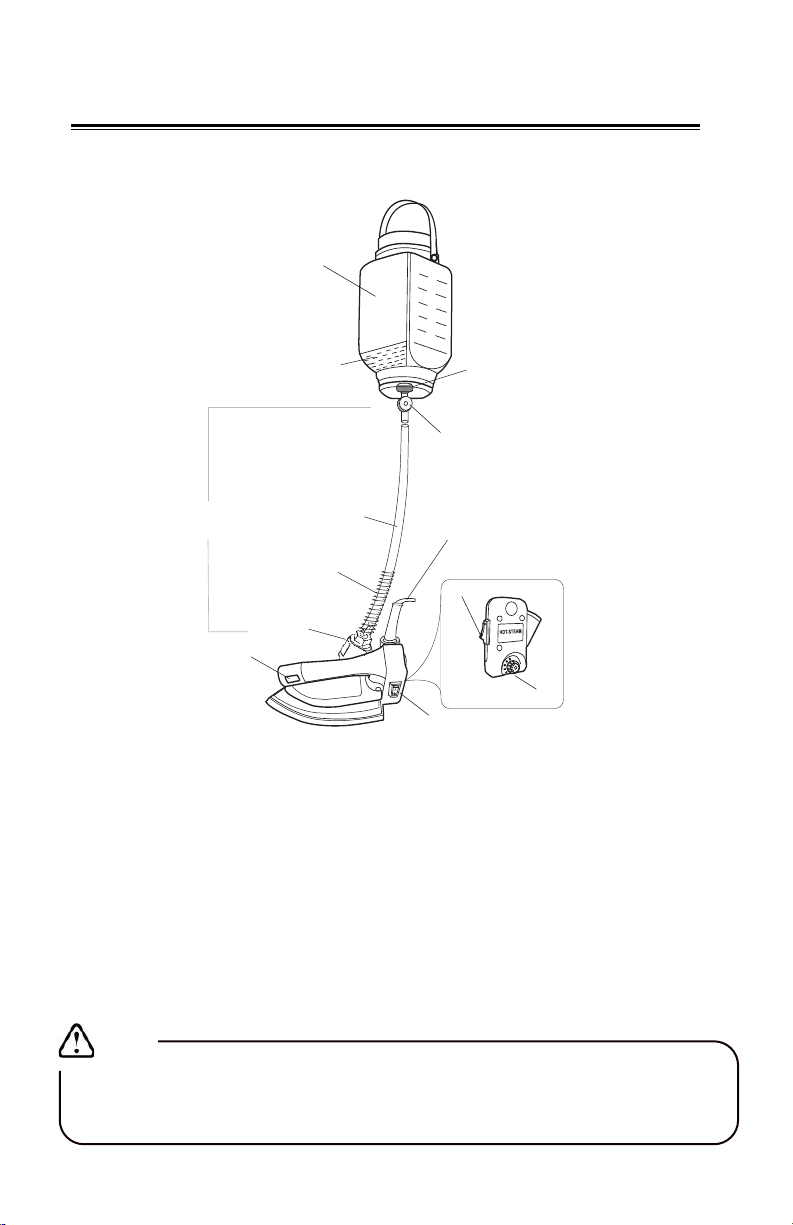
[NAME OF THE PARTS]
Mesh Filter
Power Switch
Silicon Hose
Strainer
Thumb Switch
Power Cord
Water Tank
Spring
Heat Indicator Light
Temperature Dial
Demineralizer
Water Control Valve
Solenoid Valve
1 Meter
(3 Feet)
HOT-STEAM
U. S. A.
[HOW TO USE RESIN FILTER (DEMINERALIZER)]
• HÖT-STEAM® RESIN is a DEMINERALIZER. It is a Self-Indicating RESIN that
makes soft water by ltering and removing minerals (such as calcium and mag-
nesium particles) found in water. Consequently, undesired mineral deposits do
not collect and harden inside the iron.
• When the color of the Resin has changed from being mostly Blue to mostly light
Brown, the DEMINERALIZER must be replaced immediately.
• If you continue using the iron without replacing a Brown DEMINERALIZER, se-
rious clogging can occur to your iron in just few days depending on the water
quality of your area. (*Warranty may not be applied in this case)
• The DEMINERALIZER has a limited shelf life of 12 months under the proper
storage conditions. Keep resin in cool dry area (32°F to 90°F).
Direct sunlight should be avoided. Do not keep in freezer.
IMPORTANT
Avoid using the iron without HÖT-STEAM® Demineralizer as mineral
deposits tend to collect and harden inside the iron. Although regular tap
water is allowed, it is highly recommended to use soft or distilled water.
2
OPERATING MANUAL
HÖT-STEAM® SGB Series-Model No. SGB300, SGB600, SGB700, SGB800 & SGB900
B. OPERATION & USE
1. Turn the knob counterclockwise to open the WATER CONTROL VALVE.
(* Caution: Use nger pressure when turning the knob)
2. Plug in the POWER CORD and turn on the POWER SWITCH upward.
(* POWER SWITCH light will be ON.)
3. Set TEMPERATURE DIAL to desired number as below temperature table.
4. Wait until the HEATING INDICATOR LIGHT turns OFF.
(* When the iron nishes its heating up to desired temperature, the light
will be off automatically.)
5. Your iron is now ready to press. Start using the iron by pressing STEAM
BUTTON by ‘Press & Release’ (1 second interval) method.
IMPORTANT
During initial heating of the iron, you may see water or steam from the iron.
This is not an iron malfunction. Please wait until the light of the POWER
SWITCH goes off.
“TIPS
The air bubbles in the hose has no effect in producing steam.
You can just disregard the bubbles.”
[FUNCTION OF THE HEATING INDICATOR LIGHT]
When you turn on the POWER SWTICH, the light on the POWER SWITCH oper-
ates as an ‘indicator of the iron’s heating stage.
(* This light goes on and off automatically while using the iron)
• When light is ON :
The iron is heating up to the desired temperature set by the TERMPERATURE
DIAL (* If you press on the STEAM BUTTON too long at this stage, the iron may
leak water. Wait until the light goes off to start pressing).
• When light is OFF :
The iron has reached its desired temperature. You can start pressing by
press-and-release (Press 1 second and release) the STEAM BUTTON.
[Iron Temperature Range and Dial Number]
Dial Scale
Range
1
80C
o176FoLow
2
110Co230Fo
(80C
o
~120C
o
)
Medium
(140C
o
~160C
o
)
4
170C
o338FoHigh
5
210Co410Fo
(180C
o
~210C
o
)
3
140C
o
284Fo
Recommended Fabrics
Silk and delicate fabric
Linen, Yarn & thick fabric
Cotton and Wool
Temperature
*** Actual scale and temperature range may vary ***
1
OPERATING MANUAL
HÖT-STEAM® SGB Series-Model No. SGB300, SGB600, SGB700, SGB800 & SGB900
[Safety Instructions]
• Place the iron on the iron rest always when not in use.
• Do not place the iron on its back. It may cause injury to the operator.
• After use, make sure to close the WATER CONTROL VALVE.
• Unplug the power cord and wait for the iron to cool down before attempting
to trobleshoot the iron.
• Consult with technician if you need to x the iron.
C.TROUBLESHOOTING
- Problem: The iron releases burning odor or smoke when rst set up.
= Solution: You may experience some smoke and odor when rst used. This is not
considered to be defect. Lubrication applied on the unit during assem-
bly at the factory will disappear after few hours of initial use.
- Problem: The iron is not releasing any steam or is not sufcient.
= Solution:
1. Make sure the WATER CONTROL VALVE of the WATER TANK is in open position.
2. Make sure the WATER TANK is stationed at 3 feet (1 Meter) above the iron.
3. Check if the current hose length is affecting the gravity of the water supply. Cut and
adjust the length if the HOSE is too long.
4. Inspect the water ow into the iron. Water should pass through the WATER TANK,
STRAINER, HOSE, and HOSE FITTING.
IMPORTANT
When you open the COVER NUT, use with hand while it is not hot. Don’t
use wrench nor other tools to open it. It may damage the connecting
wires of the SOLENOID VALVE.
A. Close the WATER CONTROL VALVE and unscrew the COVER NUT in the
SOLENOID VALVE with HOSE connected on the HOSE FITTING.
B. Open WATER CONTROL VALVE while you hold HOSE FITTING with HOSE.
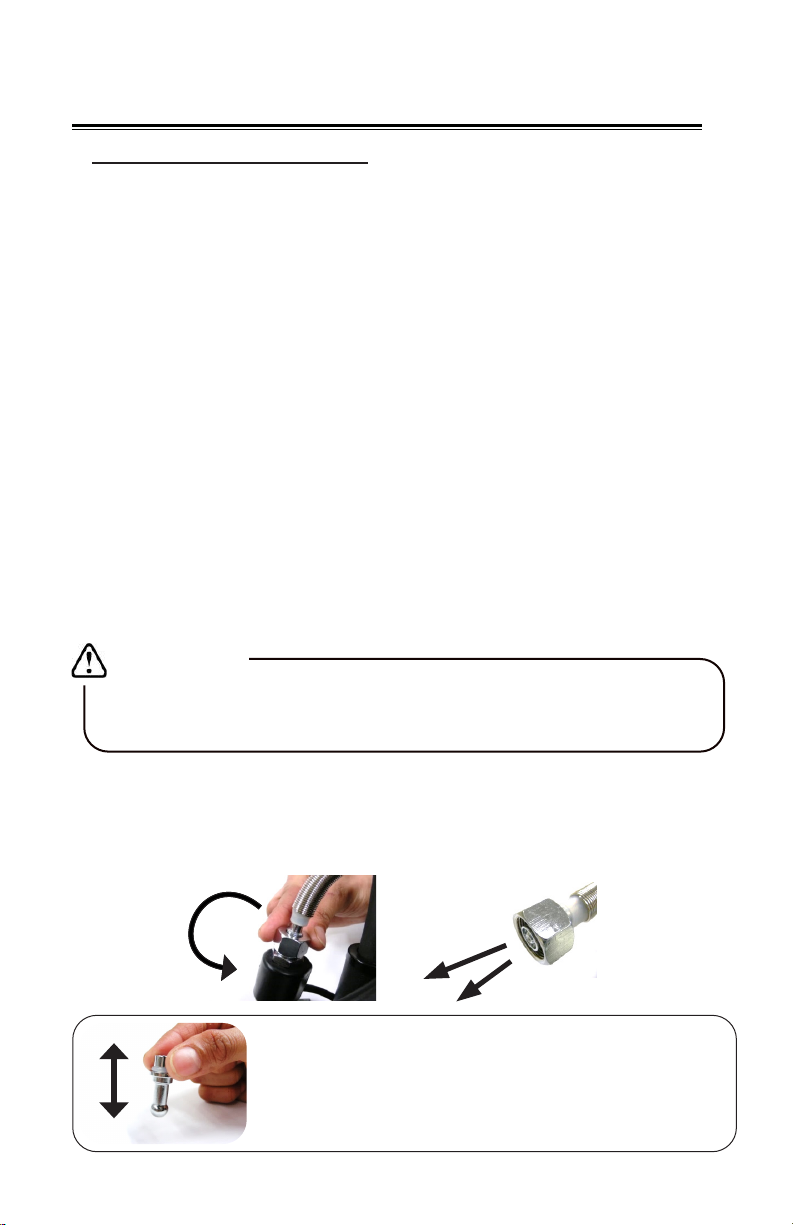
Make sure that there is water shooting out from the bottom of HOSE FITTING.
If there is dripping water or no water coming out, pull the
tting off the hose. Tap the tting over a hard surface to
remove any debris stuck inside. Re-connect tting to the
hose and re-test. Repeat the cleaning process until a
continuous and steady water ow is obtained.

2
OPERATING MANUAL
HÖT-STEAM® SGB Series-Model No. SGB300, SGB600, SGB700, SGB800 & SGB900
5. Check if the steam orices on the base are clogged. Clean them using the CLEAN-
ING PIN (Included in the Maintenance Kit).
6. While the power is on, you should hear a “clack” from the SOLENOID VALVE
whenever the STEAM BUTTON is pressed. If not, open the COVER NUT to re-
move the PLUNGER and SPRING. Inspect the PLUNGER and SPRING in place.
If there is any damage, replace the SPRING (Included in the Repair Kit) and re-in-
stall.
IMPORTANT
PLUNGER & SPRING REINSTALLATION
Locate the orice at the bottom of the PLUNGER and
insert the SPRING into it. You must keep the SPRING
inside the plunger at all times. Tilt the iron to the side
and install both pieces horizontally inside the Solenoid
Valve.
- Problem : The iron keeps releasing steam without pressing the STEAM BUT-
TON.
= Solution
1. When there is some dirt or debris on the PLUNGER PACKING or damaged
SPRING, water keeps going into the iron.
2. Clean or replace the PLUNGER PACKING.
3. Inspect the SPRING, and replace if it is bent.
(*These extra parts are included in Maintenance Kit.)
IMPORTANT
Make sure the PLUNGER and SPRING stays together at all times.
Tilt the iron to the side when putting them back into the SOLENOID VALVE.
- Problem: The iron is releasing a mix of water and steam.
= Solution:
1.This iron is designed to produce steam by Press-and-Release method
(Press 1 second and release) of the STEAM BUTTON.
2.If you press STEAM BUTTON too long when the HEATING INDICATOR
LIGHT is on, the iron can’t make enough steam because it is in ‘heating’stage.
3.Wait until the HEATING INDICATOR LIGHT goes OFF.
- Problem: You don’t hear the ‘Clack’ of SOLENOID VALVE or is buzzing and
vibrating when the STEAM BUTTON is pressed.
= Solution:
When debris gets stuck inside the SOLENOID
VALVE, it prevents the PLUNGER from moving free-
ly. Open the COVER NUT, remove the PLUNGER
and SPRING. Clean the inner walls of the SOLE-
NOID VALVE. Re-install and re-test. Repeat this pro-
cess until a solid “clack”

1
OPERATING MANUAL
HÖT-STEAM® SGB Series-Model No. SGB300, SGB600, SGB700, SGB800 & SGB900
-Problem: The Power is ON but the HEATING INDICATOR LIGHT OFF
and the iron does not heat.
=Solution: “ You may have 2 different situations.”
1. There is no Clack of SOLENOID VALVE when you press STEAM BUTTON.
a. Make sure your electric outlet has electric current.
b. Make sure your POWER SWITCH is upward position.
c. Try to plug the iron to another electric outlet.
d. Make sure your electric circuit breaker is on.
e. Increase the TEMPERATURE DIAL to higher number.
(If this is the case, the light in the POWER SWITCH will be turned on.)
2. There is Clack of SOLENOID VALVE when you press STEAM BUTTON.
a. The THERMAL FUSE is blown due to overheating.
b. Replace the FUSE with genuine HÖT-STEAM® replacement parts.
** Unplug the iron when attempting this repair. **
D. MAINTENANCE
• Once nished operating the iron, close the WATER CONTROL VALVE and
press the STEAM BUTTON couple of times until all remaining water inside the
iron gets released.
• Avoid using the iron without resin, as mineral deposits tend to collect and hard-
en inside the iron. Although the use of regular tap water is allowed, it is highly
recommended to use soft or distilled water for best results.
• Follow up the iron Basic Maintenance Schedule regularly noted on last page of
this manual to ensure its longest possible life.
• If you need replacement parts for this iron, contact your local Authorized Deal-
er or HÖT-STEAM® at www.hot-steam.com.
• Use genuine HÖT-STEAM® replacement parts for optimum results.
E. WARRANTY COVERAGE
• Contact your local Authorized Dealer or Distributor from whom the HÖT-
STEAM® SGBnSeries Gravity-Fed Iron was purchased for warranty coverage.
• Warranty can be a form of Replacement or Repair Service of the product.
• You need a Sales Receipt issued by an Authorized Dealer where you iron was
purchased. The Receipt must show Date of Purchase, Model Number and
Serial Number.
• You must obtain a RAN (Return Authorization No.) from HÖT-STEAM® prior to
returning the iron. Contact your Dealer or Distributor for assistance.
• Altered irons with other replacement parts which are not HÖT-STEAM® gen-
uine, may not be covered by this warranty.
• HÖT-STEAM® is not responsible for any freight charges.
“ Technicians will perform thorough examination of the
returned iron to nalize whether the causes are defects
or misuse of the product. ”
2
OPERATING MANUAL
HÖT-STEAM® SGB Series-Model No. SGB300, SGB600, SGB700, SGB800 & SGB900
“ HÖT-STEAM® SGB“ HÖT-STEAM® SGB SeriesSeries
물통 다리미를 구입해 주셔서
감사드립니다 .
””
이 다리미는 스팀 전기 다리미로서 보일러 없이
사용하실 수 있는 다리미입니다.
다리미 사용 전에 이 사용설명서를 주의 깊게 읽어 보신 후
다리미를 더 오래도록 사용하시기 바랍니다.
• 차 례
A. 설치
B. 사용방법
C. 점검 및 문제해결
D. 관리
E. 품질보증
WARNING
이 다리미는 1,000 Watt 용량으로서 상업 용 다리미입니다. 전원코드를 꼽기 전에
전기 아울렛에 공급되는 전기가 110V (10 Amps) 공급되는지 확인하세요.
1
OPERATING MANUAL
HÖT-STEAM® SGB Series-Model No. SGB300, SGB600, SGB700, SGB800 & SGB900
A. 설치
1. 다리미를 설치하시기 전에, 다리미로부터 약 3 FEET (1 METER)
이상 높은 곳에WATER TANK를 걸어 놓을 안전한 곳을 정하세요.
2. 플라스틱 물통(WATER TANK)의 아래에 달려있는 WATER
CONTROL VALVE가 잠겨 있는지 확인하시고, DEMINERALIZER
(1 BAG)을 수돗물과 함께 물통안에 모두 넣은 후 뚜껑을 닫으세요.
3. 물통을 고정시키세요.
(*주의: 물통이 떨어지지 않도록 견고하게 고정하세요.)
4. 실리콘 호스의 한쪽을 물통에 있는 WATER CONTROL VALVE
에연결하고, 다른 한쪽은 다리미의 HOSE FITTING에 연결한 후
HOSE SPRING을 HOSE FITTING에 고정시키세요. (*주의: 스프링
은 호스의 꺾임을 방지합니다.)
5. 다리미를 IRON REST에 올려놓은 후 사용하기 편한 호스 길이를 조
정하세요. (필요 이상으로 긴 호스는 가위로 잘라 내세요.)
(*주의: 호스가 너무 길어서 테이블 바닥에 걸쳐 있거나, 테이블 밑
으로 떨어져 있으면, 다리미에 물공급이 되지 않아서, 스팀이 나오
지 않는 문제의 원인이 됩니다.)
6. 제공되는 플라스틱 클립을 이용하여 실리콘 호스와 전원 코드를 필요
에 따라 고정 하세요.
2
OPERATING MANUAL
HÖT-STEAM® SGB Series-Model No. SGB300, SGB600, SGB700, SGB800 & SGB900
[NAME OF THE PARTS]
[RESIN FILTER (DEMINERALIZER) 사용법]
HÖT-STEAM® RESIN은DEMINERALIZER이며, 물에 포함되어 있는 미네랄 (칼슘,
마그네슘 등)을 제거하여 다리미에 SCALE 이 쌓이는 것을 방지해줍니다.
RESIN의 색깔이 짙은 파란색에서 엷은 갈색으로 변하면 수명이 다한 것이므로 바로 교
체해야 합니다.
(갈색 상태의 레진을 계속 사용할 경우, 지역에 따라 몇일 만으로도 다리미의 스팀 통로가
막힐 수 있으며, 이는 제품 품질 보증에 포함되지 않습니다.)
저희가 공급하는 DEMINERALIZER의 유통기한은 구입일로부터 12 개월입니다. 여분
의 DEMINERALIZER는 직사광선을 피해32°F ~ 90°F 온도에서 보관하시고, 냉장고에
보관하지 마십시요.
주 의
HÖT-STEAM® 정품 DEMINERALIZER 없이 물만 사용하면, 다리미에 침전물이 쌓여, 다
리미의 심각한 고장을 초래합니다. 증류수를 사용하시거나, 일반 수돗물에 HÖT-STEAM®
정품 DEMINERALIZER를 사용하시면 다리미를 오랫동안 사용하실 수 있습니다.
Power Switch
Silicon Hose
Strainer
Thumb Button
Power Cord
Water Tank
Spring
Heating Indicator Light
Temperature Dial
Demineralizer
Water Control Valve
Solenoid Valve
1 Meter
(3 Feet)
HOT-STEAM
U. S. A.
1
OPERATING MANUAL
HÖT-STEAM® SGB Series-Model No. SGB300, SGB600, SGB700, SGB800 & SGB900
B. 사용 방법
1. 물통에 달린 WATER CONTROL VALVE를 시계 반대방향으로 돌려서 밸브를
“OPEN” 상태로 만드세요. (*주의: 손가락 힘으로만 돌리시기 바랍니다.)
2. 전원코드를 전기 아울렛에 꽂으시고, POWER SWITCH를 위쪽으로 눌러서 스위치
를 켜세요. POWER SWITCH의 붉은 불이 켜집니다.
3. 아래에 있는 다리미 바닥온도와 조절번호 테이블을 참고하시어, 다리미 뒤쪽의 TEM-
PERATURE DIAL을 원하시는 번호로 조정하세요.
4. 원하시는 온도로 가열이 완료되면, POWER SWITCH의 붉은 불이 꺼집니다.
5. 이로써 다리미가 스팀을 만들 준비가 모두 끝났습니다. 이제부터 STEAM BUTTON
을 ‘누르고-떼고’ 를 반복하시면서 (1초간격) 다림질을 시작하세요.
주 의
처음 다리미 전원을 켜시고 가열되는 동안 물이나 스팀이 나올 수 있습니다. 이는 다리미
고장이 아니며, 다리미가 가열을 마치고, POWER SWITCH 불이 꺼질 때까지 기다리세요.
“TIPS
호스 안에 물과 섞여 있는 공기 방울은 다리미가 스팀을 만들어 내는데 아무
지장을 주지 않습니다. 공기 방울과 상관없이 다림질을 하시면 됩니다.
[POWER SWITCH LIGHT의 작동 안내]
POWER SWITCH가 켜져 있는 상황에서, POWER SWITCH의 붉은색 불빛은 다리미 히터의
작동상태를 표시해줍니다.
(*주의: 이 불빛은 다리미를 사용하시는 동안 자동으로 켜지고 꺼지는 것을 반복합니다.)
POWER SWITCH 불이 켜져 있는 경우 (LIGHT IS ON):
다리미가 현재 가열되고 있는 상태를 나타내며, 이때는 STEAM BUTTON을 너무 오랫동
안 사용하시면 물이 나올 수 있습니다.
(* 가능한 스위치의 불이 꺼진 후에 다림질을 시작하세요.)
POWER SWITCH 불이 꺼져 있는 경우 (LIGHT IS OFF):
다리미가 원하는 온도로 가열이 완료된 상태를 나타내며, STEAM BUTTON을 이용하여
스팀을 사용할 수 있습니다.
[온도조절 번호와 다리미 바닥 온도]
*** 실제 다이얼 번호와 온도는 약간의 차이가 있을 수 있습니다. ***
Dial Scale
Range
1
80C
o176FoLow
2
110Co230Fo
(80C
o
~120C
o
)
Medium
(140C
o
~160C
o
)
4
170C
o338FoHigh
5
210Co410Fo
(180C
o
~210C
o
)
3
140C
o
284Fo
Recommended Fabrics
Silk and delicate fabric
Linen, Yarn & thick fabric
Cotton and Wool
Temperature
2
OPERATING MANUAL
HÖT-STEAM® SGB Series-Model No. SGB300, SGB600, SGB700, SGB800 & SGB900
[안전 수칙]
»다리미 사용이 끝난 후에는 다리미를 항상 IRON REST 위에 얹어 놓으세요.
»다리미를 뒤로 세워 놓지 마세요. 사람이 다칠 위험이 있습니다.
»다리미 사용이 끝나면 WATER CONTROL VALVE 를 잠그고, 전원코드를 뽑아 놓으세요.
»다리미를 점검, 청소하기 전에 반드시 POWER CORD를 빼고, 다리미가 차갑게 식은 후
진행하세요.
»다리미 수리가 필요 할 경우 반드시 전문 기술자에게 문의하세요.
C. 점검 및 문제 해결
- 문 제 : 다리미를 처음으로 설치한후 다리미에서 연기 또는 냄새가 날 경우.
= 해 결 : 다리미를 처음으로 설치한 후 전원을 켰을 때 타는 듯한 냄새나 연기가 나타날 수 있습
니다. 이것은 다리미가 잘못된 것이 아닙니다. 조립과정에서 사용된 윤활유 등으로 인
해 나타날 수 있는 초기 현상이고, 몇시간이 지나면 모두 사라집니다.
- 문 제 : 다리미에서 스팀이 나오지 않거나, 나오는 스팀양이 너무 적을 경우.
= 해 결 :
1. WATER TANK의 WATER CONTROL VAVLE가 OPEN 상태 인지 확인하세요.
2. WATER TANK 가 다리미 위쪽으로 3 피트(1 METER) 이상에 설치되었는지 확인하세요.
3. WATER TANK 와 다리미를 연결하는 실리콘 호스가 너무 길어서 꼬여 있는지 확인하시고,
호스가 너무 길 경우 잘라서 길이를 조절하세요.
4. WATER TANK의 물이 STRAINER, HOSE, HOSE FITTING을 통과하여 HOSE FITTING
밑의 작은 구멍으로 물이 ‘뿜어져 나오는지 확인하세요.
주 의
SOLENOID VALVE의 맨 위 COVER NUT를 열 때는 손으로 열어야 하며, 렌치나 다른 TOOL
을 사용하시 마세요. SOLENOID VALVE 자체가 돌아가서 연결 선이 끊어 질 수 있습니다.
a. WATER CONTROL VALVE를 닫고, 호스가 다리미에 연결된 상태에서,SOLENOID
VALVE 의 COVER NUT를 열고, 호스와 커버 넛트를 빼세요.
b. 호스와 넛트가 연결된 곳을 한손으로 잡고, WATER CONTROL VALVE를 열어서 HOSE
FITTING 아래 구멍으로 물이 뿜어져 나오는지 확인해야합니다.
만약, 이 구멍에서 물이 뿜어져 나오지 않고, 한 두
방울씩 떨어지거나, 물이 나오지 않으면 HOSE FITIING
을호스에서 분리하여, 그림과 같이 호스 피팅을 탁자에
가볍게 치시거나, 입으로 불어 이물질을 제거하세요.
호스에 연결하여 물이 나올 때까지 이방법을 반복하세요.

1
OPERATING MANUAL
HÖT-STEAM® SGB Series-Model No. SGB300, SGB600, SGB700, SGB800 & SGB900
5. 다리미 밑바닥의 스팀 홀이 막혀 있다면 Maintenance Kit에 포함된 CLEANING PIN으로 청소하세요
6. 다리미에 전원이 켜진 상태에서STEAM BUTTON을 눌렀을 때, SOLENOID VALVE에서 ‘딸깍’ 하는
소리가 나야 합니다. 이 소리가 들리지 않는다면, SOLENOID VALVE 맨 위쪽의 두꺼운 넛트(COVER
NUT)를 “손으로 돌려 열어서, SOLENOID VALVE 안의 ‘PLUNGER’ 와 ‘SPRING’이 제자리에 꽂혀
는지 확인해야 합니다.
주 의
PLUNGER & SPRING 다시 넣는 방법
PLUNGER 아래쪽에 SPRING 이들어가는 홈이 있습
니다. SPRING을이곳에 넣고, 다리미를 위쪽으로 들어,
SPRING과PLUNGER가분리되지 않도록 하여 SOLE-
NOID 안쪽으로 넣으세요.
- 문제: STEAM BUTTON을 누르지 않아도 다리미에서 스팀이 계속해서 나올 경우
= 해결:
1. SOLENOID VALVE 안의 PLUNGER에 이상이 있거나, 이물질이 끼인 경우이며,
물통으로부터 다리미로 물이 계속 유입이 되는 경우입니다.
2. SOLENOID VALVE 안에 있는 PLUNGER PACKING을 교체하세요.
(*여분의 PLUNGER PACKING 은 Maintenance Kit안에 들어 있습니다.)
3. PLUNGER 아래쪽에 들어 있는 SPRING이 손상되었으면 교체하세요.
(*여분의 SPRING은 Maintenance Kit안에 들어 있습니다.)
주 의
PLUNGER와 SPTING의 점검 또는 교체 시, 반드시 다리미를 옆쪽으로 뉘어서 SPRING 이
PLUNGER 에서 분리되지 않도록 SOLENOID VALVE 안으로 넣어야 합니다.
- 문제: 다리미에서 스팀과 물이 같이 섞여 나올 경우
= 해결:
1. 이 다리미는 STEAM BUTTON을 누르고 떼는 동작을 반복함으로써 스팀을 만들어 내도록
설계되어 있습니다.
2. POWER SWITCH에 불이 들어온 상태에서 STEAM SWITCH를 오랫동안 누르고 있거나,
계속해서 다림질을 오래하시면 다리미에서 물이 나올 수 있습니다.
3. 다리미가 계속 가열되어서 POWER SWITCH의 불이 꺼질 때까지 기다리세요.
- 문제: 스팀 스위치를 누를 때 ‘딸깍’ 하는 소리가 나지 않거나, ‘윙’하는 진동이 느껴 질 때.
=해결:
물에서 발생하는 물때와 이물질이 SOLENOID VALVE
의 작동을 방해하는 경우입니다. SOLENOID VALVE를
열고, PLUNGER 와SPRING을빼내고, 내부벽을 면봉
을이용해 닦아낸 후다시 PLUNGER 와SPRING을제
자리에 넣으세요. 소리가 나지 않을 때까지 이작업을 반
복하세요

2
OPERATING MANUAL
HÖT-STEAM® SGB Series-Model No. SGB300, SGB600, SGB700, SGB800 & SGB900
- 문제: POWER SWITCH를 켰으나 불이 들어오지 않고 다리미가 뜨거워지지 않는 경우
= 해결: 이 문제는 두가지의 경우로 나누어서 문제를 해결해야 합니다.
1. STEAM BUTTON을 눌렀을 때 SOLENOID VALVE에서 ‘딸깍’ 하는 소리가 나지 않는 경우
a. 다리미의 POWER CORD 가 잘 꼽혀 있는지 확인하세요.
b. POWER SWITCH가 위쪽으로 눌러져서 켜져 있는지 확인하세요.
c. POWER CORD를 다른 전기 아울렛에 꼽아 보세요.
d. MAIN 전기 판넬의 차단기가 떨어져 있는지 확인하세요.
e. 다리미 뒤쪽의 온도 조절기를 높은 번호 쪽으로 돌리세요.
(이경우 다이얼을 높은 번호 쪽으로 돌리시면 POWER SWITCH에 불이 들어옵니다.)
2. STEAM BUTTON을 눌렀을 때 SOLENOID VALVE에서 ‘딸깍’ 하는 소리가 나 는 경우
a. 다리미 안에 있는FUSE가 과열로 끊어진 경우입니다.
b. HÖT-STEAM® 다리미의 정품 FUSE를 구입하시어 교체하세요.
**수리하는 동안 반드시 전원코드를 빼야 합니다. **
D. 관리
• 다리미 사용이 끝나시면 물통의 WATER CONTRAOL VALVE를 잠그고, STEAM BUT-
TON을 몇 번 눌러서 다리미 안에 남아 있을 수 있는 물과 스팀을 제거하세요.
• 물통안의 FILTER RESIN의 색을 확인하세요. 연한 갈색이면 바로 교체하세요.
• 다리미를 고장 없이 오랫동안 사용하기 위해서는, 매뉴얼 마지막 페이지에 설명된 “Basic
Maintenance Schedule”에 따라 정기적으로 다리미를 점검하고 최적의 상태로 유지하
세요.
• 다리미의 파트의 교체가 필요할 경우HÖT-STEAM® SGBnSeries다리미를 구입한 곳이
나 www.hot-steam.com에서 HÖT-STEAM® 정품 부품을 구입하세요.
E. 품질보증
• 다리미에 대한 문의나 품질 보증에 대한 문의 사항은HÖT-STEAM® SGBnSeries다
리미를 구입한 곳에 연락하시기 바랍니다.
• 품질에 문제가 있을 경우 교체 또는 수리해드립니다.
• 다리미구입시 받은 영수증이 있어야합니다. (구입날짜, 모델명 그리고 시리얼 번호
가 표시되어 있어야합니다.)
• 다리미를 반품하시기 전에 반드시 저희 에게 연락하시어 RAN(Return Authorization
No.)을 받으세요. (다리미 구입처에 먼저 연락하시기 바랍니다.)
• HÖT-STEAM® 정품 부품을 사용하지 않거나, 사용자가 임의로 변형시킨 다
리미는 품질 보증을 받지 못할 수 있습니다.
• 제품의 교체 또는 수리에 소요되는 모든 운송비에 대한 부담은 구입자에게 있습니다.
“품질문제로 반품된 다리미는 저희 TSD(Technical Support Division)에서,
품질에 문제가 있는 것인지, 사용자의 잘못인지를 검사하게 됩니다.”
1
PRECAUCIÓN
Antes de conectar la plancha, asegurarse que la corriente eléctrica sea de 110V
(10Amperaje) de capacidad para evitar cortes en el interruptor eléctrico.
Esta plancha es recomendada solamente para uso comercial.
OPERATING MANUAL
HÖT-STEAM® SGB Series-Model No. SGB300, SGB600, SGB700, SGB800 & SGB900
“ Gracias por adquirir la“ Gracias por adquirir la
Plancha de GravedadPlancha de Gravedad
HÖT-STEAM® SerienSGB.”HÖT-STEAM® SerienSGB.”
La Plancha de Gravedad HÖT-STEAM® SerienSGB es una
plancha eléctrica
que genera vapor por medio del suministro de agua a través de
un tanque independiente y no requiere un generador o fuente
de vapor (Caldera) para su uso.
Lea las instrucciones del manual detenidamente antes de su
uso para
asegurar una larga durabilidad del producto.
• Contenido
A. Instalación
B. Operación & Uso
C. Detección & Resolución
D. Mantenimiento
E. Cobertura de la Garantía
2
OPERATING MANUAL
HÖT-STEAM® SGB Series-Model No. SGB300, SGB600, SGB700, SGB800 & SGB900
A. INSTALACIÓN
1. Antes de comenzar la instalación, buscar un lugar jo y es-
table en donde pueda colgarse el tanque a 1 metro de alto
como mínimo sobre el nivel de la plancha.
2. Vericar que la VÁLVULA DE AGUA del tanque esté cerra-
da. Echar todo el contenido del paquete de ltro DESMINER-
ALIZADOR dentro del TANQUE DE AGUA. Llenar el tanque
con agua y mantenerlo cerrado.
(* Precaución: Asegurarse que el tanque no se caiga)
3. Colgar el TANQUE DE AGUA en el sitio encontrado.
4. Conectar un extremo de la manguera a la VÁLVULA DE
AGUA del tanque y el otro extremo al CONECTOR DE
MANGUERA en la plancha. Deslizar el RESORTE de la
manguera hasta cubrir el CONECTOR DE MANGUERA en
la plancha (El resorte evitará que la manguera se doble).
5. Asentar la plancha sobre el REPOSADOR, buscar el largo
apropiado de la manquera conforme a la ilustración y cortar
la porción que no sea necesario.
(* Precaucion: Si la manguera queda acordonada entre me-
dio o si cae por debajo del nivel de la plancha, la gravedad y
el ujo quedará afectado y la plancha no producirá suciente
o nada de vapor).
6. Instalar los CLIPS para sujetar el cable eléctrico junto a la
manguera (opcional).

1
OPERATING MANUAL
HÖT-STEAM® SGB Series-Model No. SGB300, SGB600, SGB700, SGB800 & SGB900
[NAME OF THE PARTS]
[IMPORTANCIA DEL FILTRO DESMINERALIZADOR]
• El ltro Desmineralizador HÖT-STEAM® es una Resina auto indicadora que
remueve los minerales (tales como partículas de calcio y magnesio) encontrados
dentro del agua. Consecuentemente, sedimentos de minerales no se acumulan y
endurecen dentro de la plancha.
• Cuando el color de la Resina cambia de ser Azul a un Marrón claro, el Desmineral-
izador necesita ser reemplazado inmediatamente.
El continuo uso de la plancha sin reemplazar un Desmineralizador marrón, causará
serios taponamientos a la plancha en tan solo pocos días dependiendo de la condi-
ción del agua en su área.
(* La garantía pueda que no sea cubierta en estos casos)
• El Desmineralizador tiene un límite de vida de 12 meses bajo un almacenamiento
apropiado. Mantener en un lugar fresco y seco (0°C a 32°C). Evitar contacto directo
al sol. No mantenerlo en el congelador.
IMPORTANTE
Evitar el uso de la plancha sin el Desmineralizador HÖT-STEAM® de-
bido a que sedimentos tienden a acumularse y endurecerse dentro de la
plancha. Aunque el uso del agua corriente sea permitido, se recomienda
mejor el uso de agua destilada.
Power Switch
Silicon Hose
Strainer
Thumb Button
Power Cord
Water Tank
Spring
Heating Indicator Light
Temperature Dial
Demineralizer
Water Control Valve
Solenoid Valve
1 Meter
(3 Feet)
HOT-STEAM
U. S. A.

2
OPERATING MANUAL
HÖT-STEAM® SGB Series-Model No. SGB300, SGB600, SGB700, SGB800 & SGB900
B. OPERACIÓN & USO
1. Abrir la VÁLVULA DE AGUA en el tanque hacia la izquierda.
(* Precaución: La válvula girará con tan solo utilizar la presión de los dedos).
2. Enchufar el CABLE ELÉCTRICO y encender la plancha.
(* La Luz del Interruptor se encenderá).
3. Asignar el DIAL DE TEMPERATURA al nivel recomendado en la tabla.
4. Esperar hasta que la LUZ DEL INTERRUPTOR se apague.
(* Cuando la plancha termine su recalentamiento y alcance la temperatura asignada,
la luz se apagará automáticamente).
5. La plancha está lista. Presionar y soltar el INTERRUPTOR DE VAPOR en
intervalos de 1 segundo para comenzar a planchar.
IMPORTANTE
Inicialmente, pueda que la plancha comience a gotear en la base. Esto no
signica un mal funcionamiento. Tomará unos segundos a que el calor
evapore la condensación restante de su previo uso.
“TIPS
La acumulación de aire dentro de la manguera no causa ningún
efecto en la producción de vapor. Ignore el aire y continúe planchando .”
[FUNCIONAMIENTO DE LA LUZ DEL INTERRUPTOR]
Cuando la plancha es encendida, la Luz del Interruptor actúa como un indicador de
calentamiento y no se mantiene prendido todo el tiempo.
(* La luz constantemente se encenderá y apagará durante el transcurso de su uso).
• LUZ ENCENDIDA:
La plancha se está recalentando para alcanzar la temperatura asignada en el
Selector.
(* El continuo uso del Interruptor de Vapor en esta etapa, causará una descarga mixta
de vapor y agua. Se recomienda dejar de planchar y esperar hasta que la luz se apague).
• LUZ APAGADA:
La plancha ha alcanzado la temperatura asignada en el Selector. Comience a
planchar presionando el Interruptor de Vapor en intervalos de 1 segundo.
[Variación de Temperatura]
Dial Scale
Range
1
80C
o
176F
o
Low
2
110C
o
230F
o(80C
o
~120C
o
)
Medium
(140C
o
~160C
o
)
4
170C
o
338F
o
High
5
210C
o
410F
o(180C
o
~210C
o
)
Recommended Fabrics
Silk and delicate fabric
Linen, Yarn & thick fabric
Cotton and Wool
Temperature
3
140C
o
284F
o
*** La actual escala y temperatura puede variar ***
1
OPERATING MANUAL
HÖT-STEAM® SGB Series-Model No. SGB300, SGB600, SGB700, SGB800 & SGB900
[Instrucciones de Seguridad]
• Asegurarse siempre de colocar la plancha sobre el Reposador.
• No asentar la plancha verticalmente, pueda que cause daños al operador.
• Luego de su uso, asegurarse de cerrar la Válvula de Agua del tanque.
• Desconectar el cable eléctrico y esperar a que la plancha se enfríe comple-
tamente antes de iniciar cualquier detección y resolución.
• Consultar con un técnico si necesita repara la plancha.
C. DETECCIÓN Y RESOLUCIÓN
- Problema: La plancha descarga un olor a quemado al inicio de su uso.
= Solución: Pueda que note olor a quemado o humo en su uso inicial. Esto es
normal y no es considerado defectuoso. La solución aplicada para asistir su fab
ricación comenzará a secarse en los primeros días de uso y no volverá a ocurrir.
- Problema: La plancha no descarga vapor o no es suciente.
= Solución:
1. Vericar que la VÁLVULA DE AGUA del tanque esté abierta.
2. Vericar si el TANQUE DE AGUA está ubicado a 1 metro de alto sobre la plancha.
3. Vericar que el largo de la MANGUERA no esté afectando la gravedad del agua.
Ajustar el largo y cortarlo si es necesario.
4. Inspeccionar el ujo de agua hacia la plancha. El agua debe pasar del TANQUE
DE AGUA a través del COLADOR, MANGUERA Y CONECTOR DE MANGU-
ERA.
IMPORTANTE
Si necesita abrir la Tuerca Superior, vericar que no esté muy caliente y aojarlo
a mano. No utilice ninguna herramienta debido a que los cables pueden desconec-
tarse de la Válvula Magnética al momento de girarlo.
a) Cerrar la VÁLVULA DE AGUA del tanque y sin desconectar la manguera del
conector, abrir la TUERCA SUPERIOR de la VÁLVULA MAGNÉTICA
b) Abrir la VÁLVULA DE AGUA del tanque sosteniendo el CONECTOR y la MANGU-
ERA. Vericar si el agua uye continuamente por el oricio del CONECTOR.
Si gotea o no sale agua por el oricio, remover el
conector de la manguera y limpiarlo. Golpear el conector
sobre una supercie sólida para remover los desechos
atorados adentro. Reconectar el conector a la manguera
e inspeccionar nuevamente el ujo. Repetir los mismos
pasos hasta obtener un ujo constante de agua.
Other manuals for SGB Series
1
This manual suits for next models
5
Table of contents
Languages:
Other hot-steam Iron manuals


Popular Iron manuals by other brands


Alliance Laundry Systems
Alliance Laundry Systems FCIX50200UE Original instructions

ARDESTO
ARDESTO IR-B2234 instruction manual

Morphy Richards
Morphy Richards Power SteamElite RN42221MUK instructions

TEFAL
TEFAL Cube manual

Philips
Philips PerfectCare PSG8030/20 user manual

Oster
Oster GCSTSP6101 instruction manual


