Hotone Ampero User manual

APP USER MANUAL
DESIGN INSPIRATION
The contents of this manual are subject to change without notice.
For Firmware V1.10
For Software V1.0.0

CONNECT
1. Turn on the Bluetooth switch on
your device, then turn on your mobile
Ampero Control and launch the app.
2. Login your account (optional).
3. Press and hold Footswitch 2+3 on your Ampero Control to
enable Bluetooth Pair Mode. The Bluetooth indicator (on the
bottom right corner of the screen on your unit) will flash to
indicate pairing status on.
4. When your Ampero Control appears listed on the startup page
(the app will automatically scan all nearby devices), select and
tap the “Connect To The Selected Device” button on the screen.
The Bluetooth indicator will stay solid to indicate a successful
connection.
888
888
This dot will flash
PC CC
1 2 3 4
BANK BANK
Bluetooth MIDI Controller
Hold/Pair

DEFINITION
A bank of Ampero Control contains the user data listed below:
- Bank name and description: Max. 16 characters (including
space)
- The footswitch modes of 4 built-in footswitches
- MIDI messages (no. of messages, channels, types, values,
etc. ) assigned on each footswitch
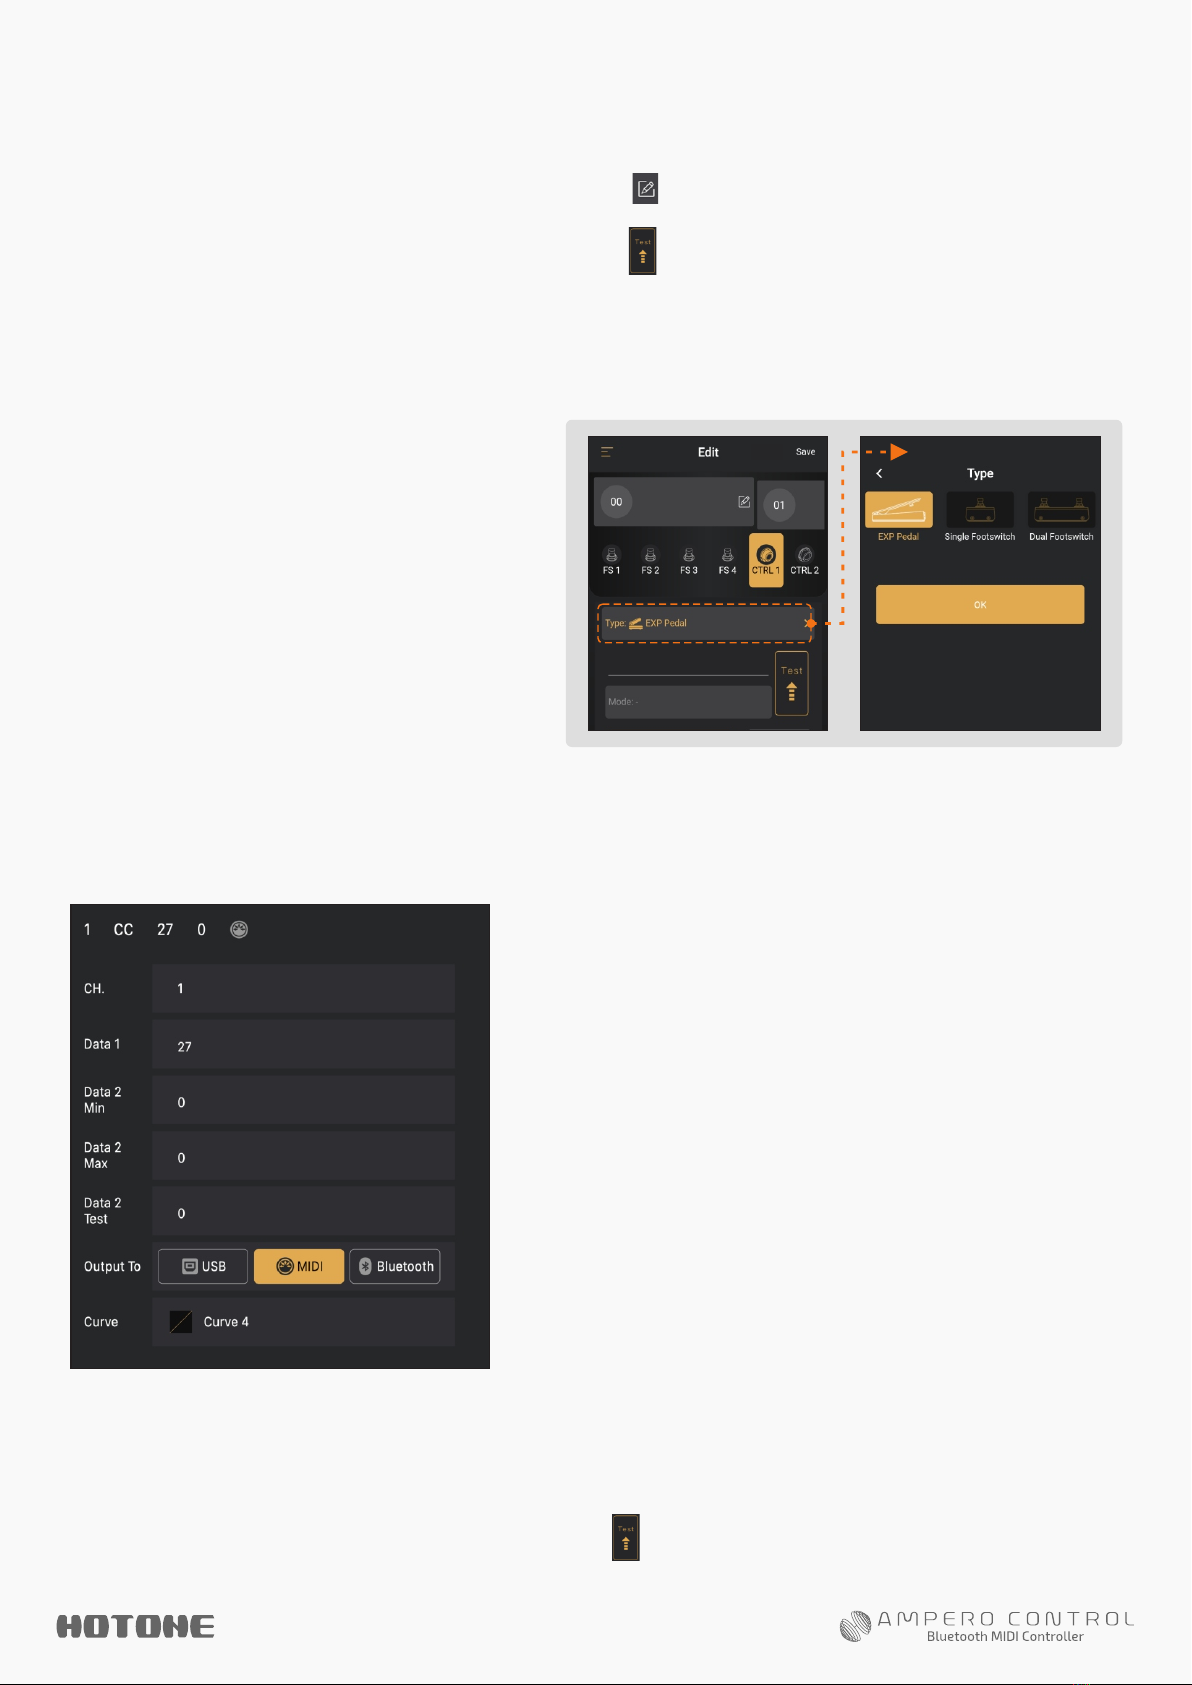
- CTRL 1/2 controller assign and related settings
BANK
Ampero Control features 100 banks (00-99).
TO SETUP A FOOTSWITCH
Follow the instructions :
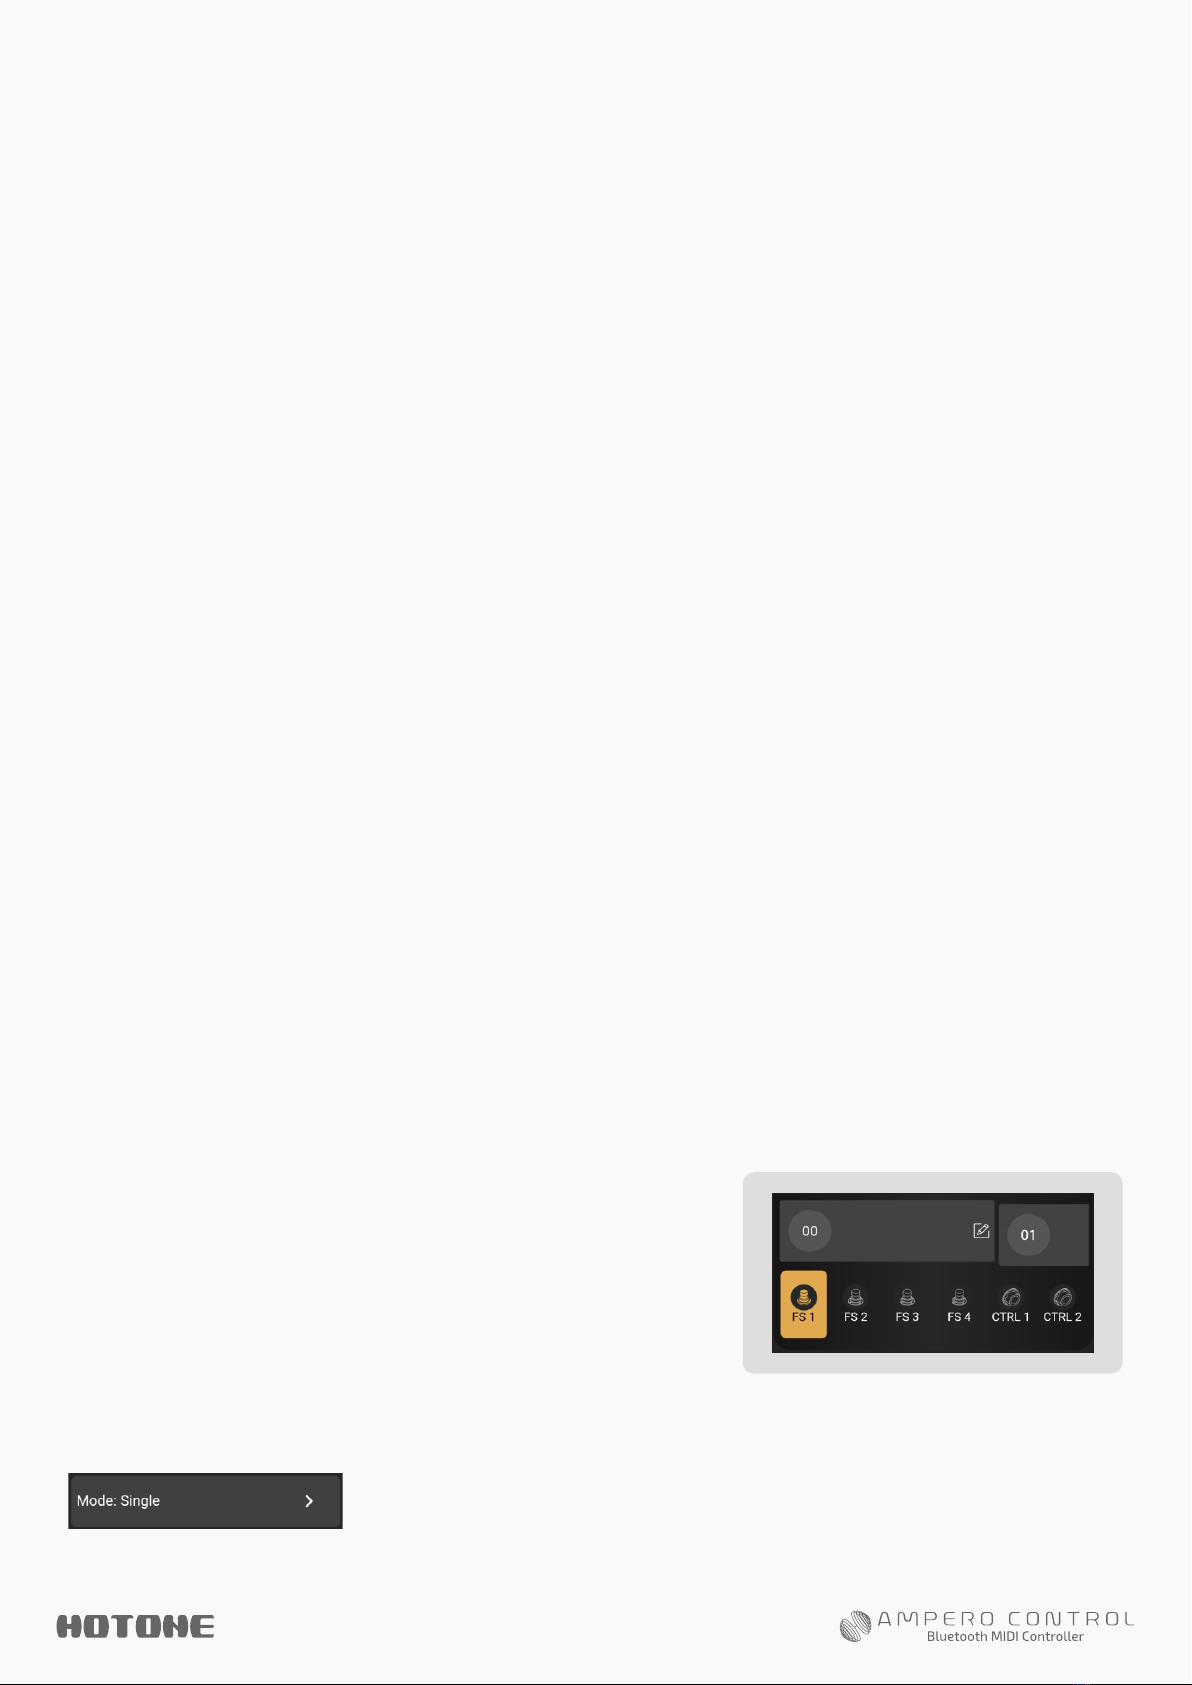
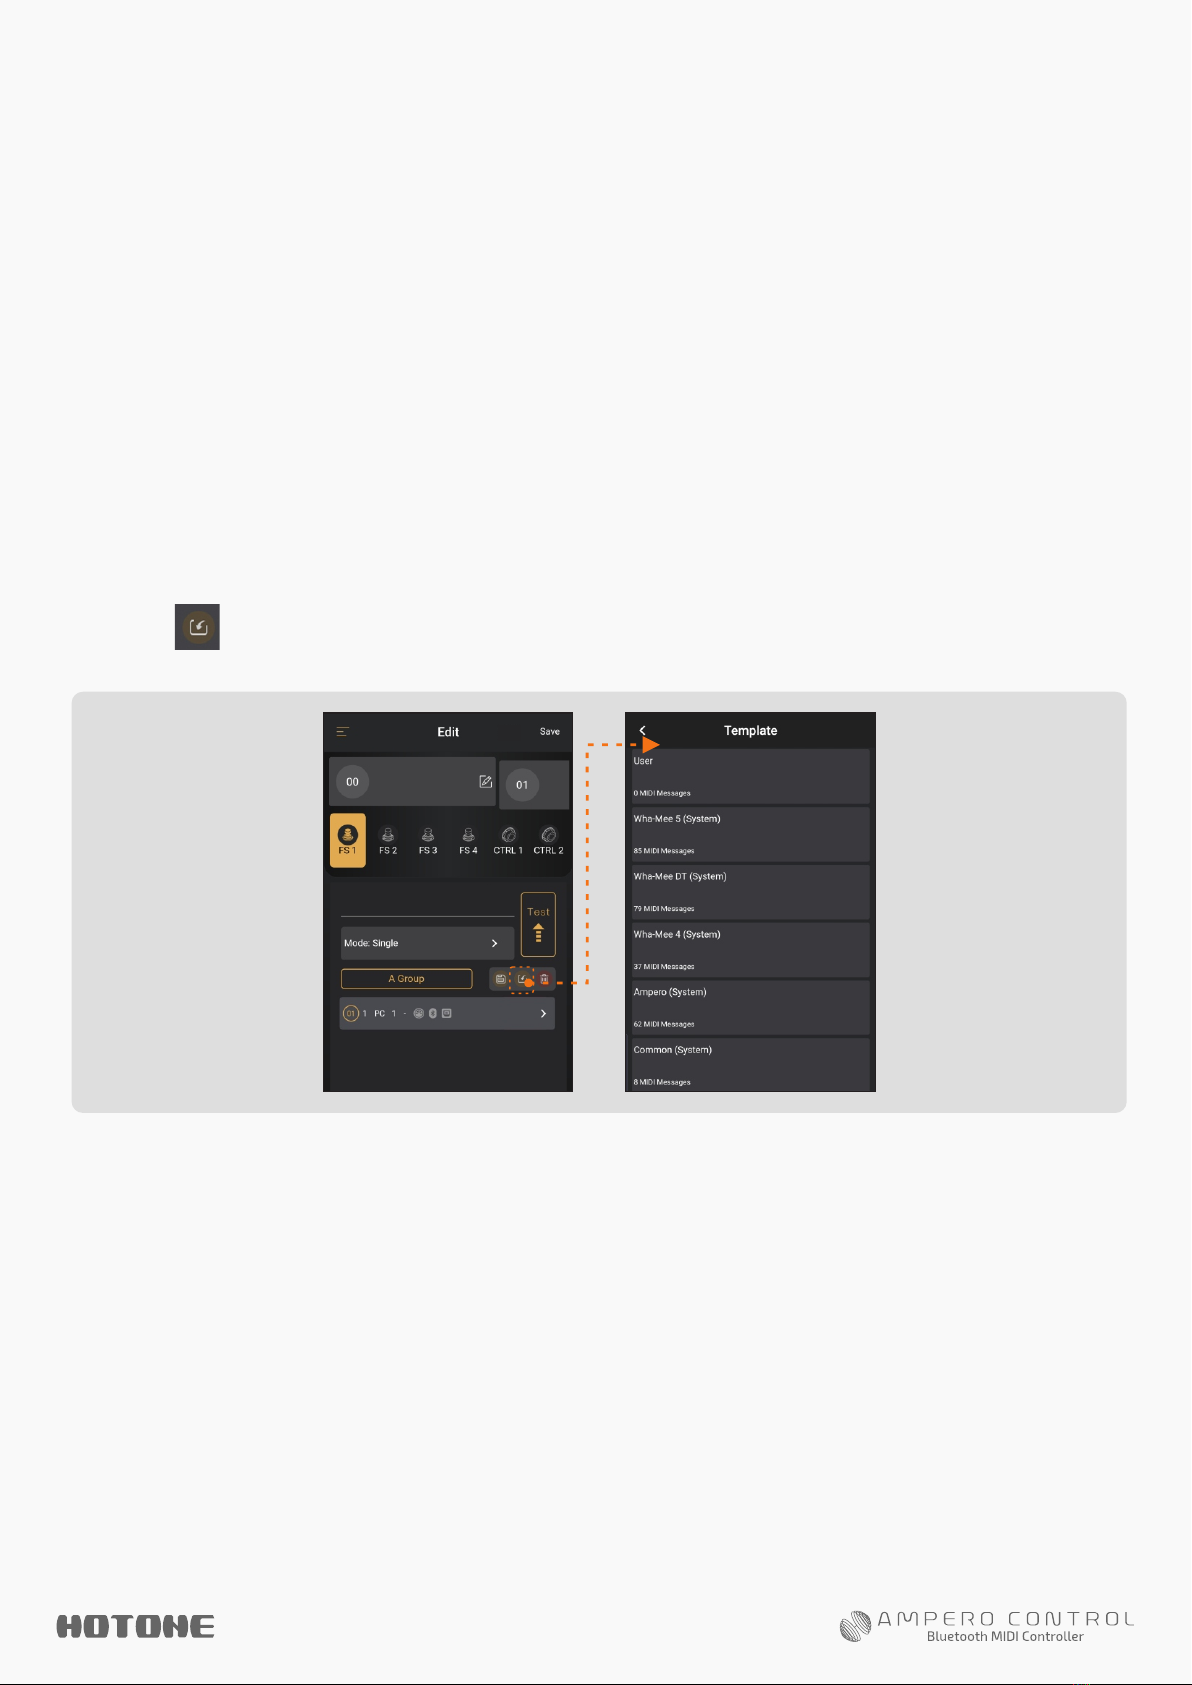
1. Select a bank and select one
footswitch. The image on the right
indicates Bank 0 and footswitch 1 is
selected.
2. Select a footswitch mode by tapping mode button:
Notes:
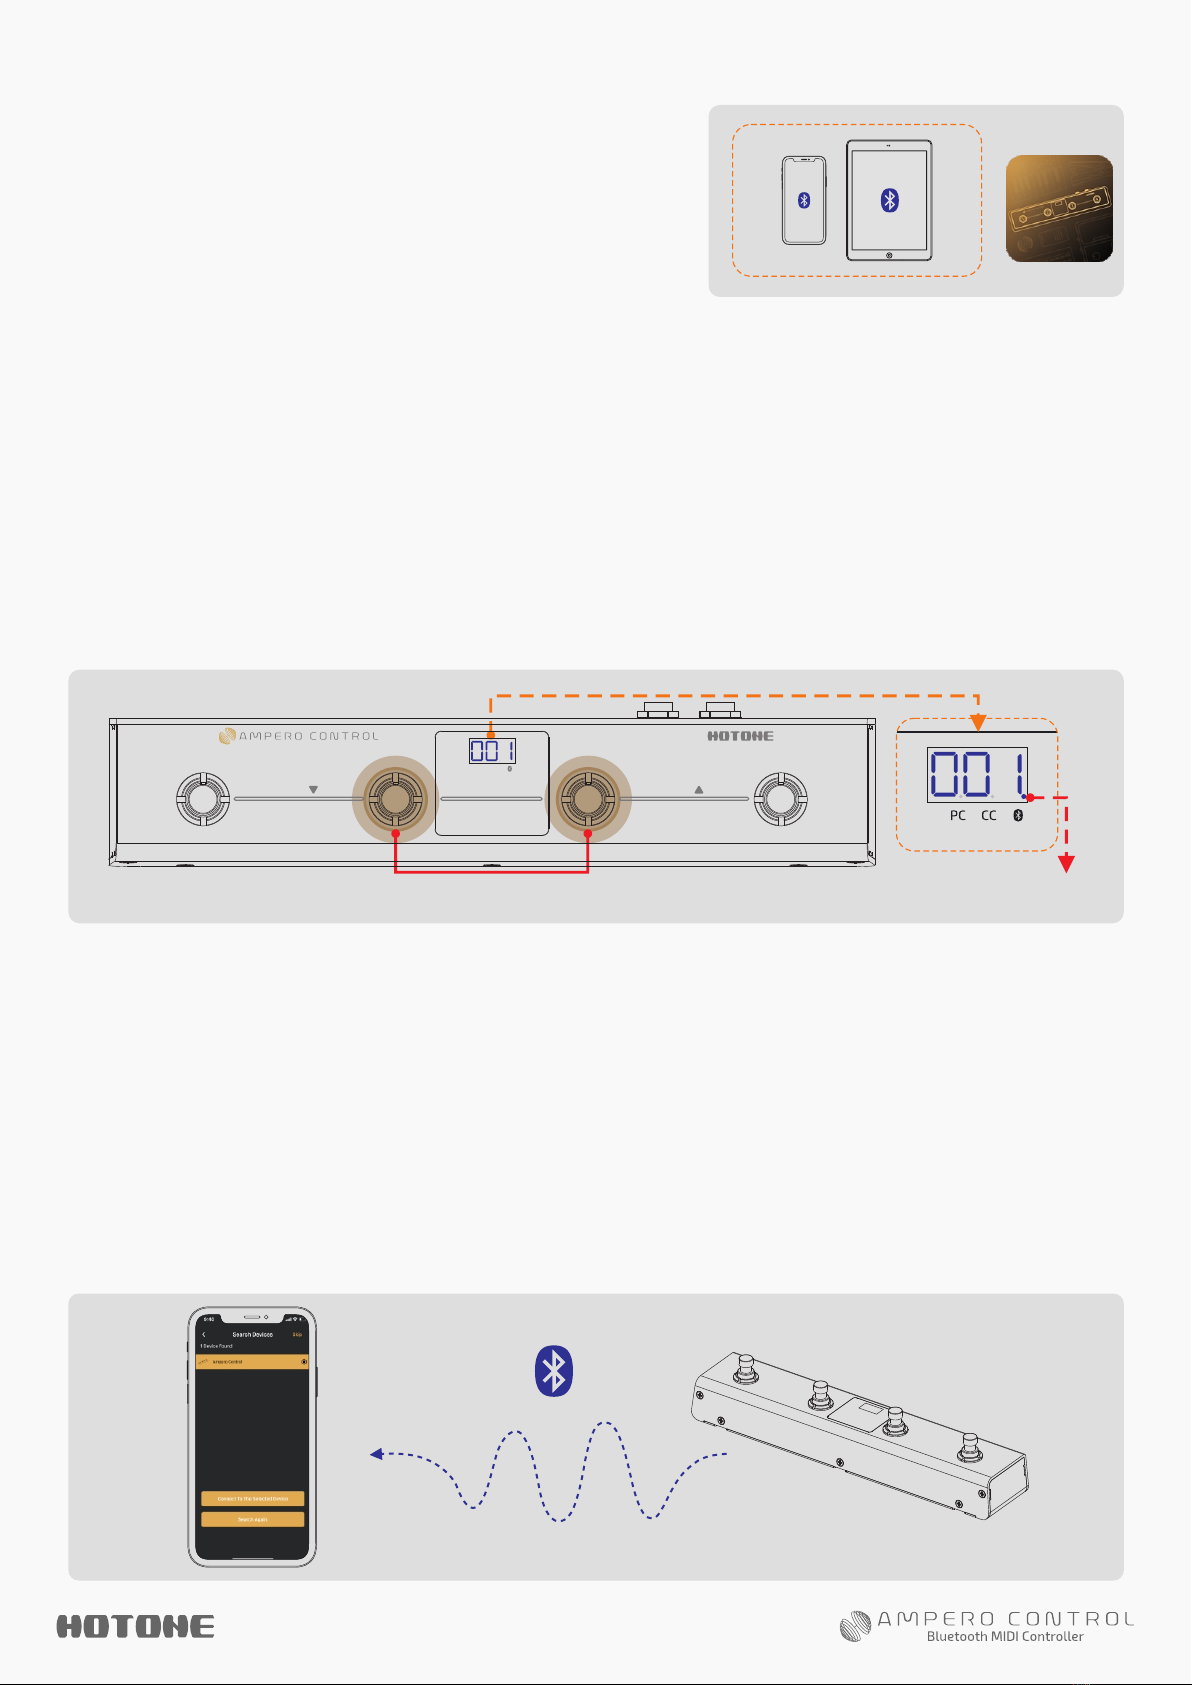
1. You can enter offline mode if no device is found.
2. Ampero Control can only be edited by one device at a time. To use other devices, tap
“Settings” icon on the lower right corner of the screen, find “Connection Status” and enter,
then tap “Disconnect”. Connect another device when finished.
3. The default device name is Ampero Control. You can customize your device name if needed.
4. If search failed (no device found or timeout), you can retry searching by manually tap
“Search Again” button, or restart Bluetooth on your mobile device.
5. When using Bluetooth connection for editing or MIDI control, please keep your Ampero
Control close to your phones/pads/computers for best possible experience.
The recommended range is less than 5m.

Ampero Control offers four footswitch modes:
- Single: Send same MIDI message (s) when you press the
footswitch. MIDI message (s) will be sent when the footswitch
is released.
- Toggle: You can set two different (A/B) groups of MIDI
message (s). Press the footswitch repeatedly to send MIDI
messages toggling between A/B message groups. MIDI
message (s) will be sent when the footswitch is released.
- Momentary: You can set two different (A/B) groups of MIDI
message (s). Press the footswitch to send MIDI message (s) in
group A, release the footswitch to send MIDI message (s) in
group B.
- Hold: Hold the footswitch to send one MIDI message or a
group of messages repeatedly at regular intervals. You can send
the first MIDI message once in the group by single press the
footswitch. If so, the MIDI message will be sent when the
footswitch is released.

-Type=PC: Data 1 stands for program number; no Data 2 option
available
-Type=CC: Data 1 stands for controller number, Data 2 stands
for controller value
-Type=Note On/Off: Data 1 stands for note number, Data 2
stands for note velocity
Output To lets you decide how MIDI message will be sent.
You can send it via either Bluetooth, USB jack, MIDI OUT jack
or any combinations.
3. Add up to 16 MIDI messages depending on your needs by
tapping the button on the bottom right of the screen.
4. Tap on a MIDI message button to edit message details:
CH. : For setting MIDI output channel from 1-16; you can set it
to Omni to send the message via all 16 channels.
Type: For selecting a MIDI message type. Currently Ampero
Control supports 4 MIDI message types: Program Change (PC),
Control Change (CC), Note On and Note Off.
Data 1/2: For filling MIDI data depending on MIDI message types:

5. After editing all footswitches you needed, don’t forget to
save your changes by tapping “Save” button on the top right
corner of the screen. You can tap to edit bank info if needed.
Note: To test your MIDI settings, you can tap button to send the MIDI message
(s) immediately.
Follow the instructions
below:
1. Select a bank and select
CTRL 1/2 (see above).
2. Select external controller
type by tapping type button,
as shown on the right.
TO SETUP EXTERNAL CONTROLLERS
3. Set MIDI messages for your external footswitch controller
depending on your needs (see above).
For expression pedals:
Expression pedal supports
assigning CC messages only. You
can assign max. 4 CC messages to
one expression pedal.
Data 2 Min represents the lowest
CC data 2 value (when the pedal is
pushed all the way up), Max
represents the highest CC data 2
value (when the pedal is pushed all
the way down).
For most situations, set Data 2 Min=0, Data 2 Max=127.
The value you filled in Data 2 Test is for testing your settings,
which will be sent when you tap button.

The MIN and MAX range is 0-127, and the MIN value can be
greater than the MAX value.
Curve is for selecting 7 different curves when the expression
pedal is pushed from all the way up to all the way down.
Default is Curve 4 (linear).
Note: Don’t forget to save after editing.
TO CALIBRATE YOUR EXPRESSION PEDAL
CONTROLLERS
The calibrate function helps you calibrate your expression
pedal. It is important to calibrate the expression pedal if you
find your pedal not working or the sweep has very little/too
much change while sending MIDI messages.
Follow the instructions below:
1.Connect your expression pedal (s) to Ampero Control’s
EXP/CTRL jack (s).
2.Hold footswitch 4 while powering up your Ampero Control.
The screen will display “PdL” to indicate that your unit has
entered Expression Pedal Calibration Mode:
3. Fully raise and press down the pedal you need to calibrate
at least 3 times. Your unit will automatically process and match
your pedal.
4. With the above operation finished, press footswitch 4 again
to exit Expression Pedal Calibration Mode.
888
1 2 3 4
BANK BANK
Bluetooth MIDI Controller
Hold/Pair
888

To Load A Template
Follow the instructions below:
1. Select a bank and select a footswitch/external controller
(see above).
2. Tap button to open Template menu:
Note: All default MIDI channels of system MIDI templates are set to 1, since the MIDI
receive channel of most devices are set to 1 or Omni. If your device cannot recognize the
messages you imported, try to change the MIDI message output channel or the device’s
MIDI receive channel depending on your needs.
3. Choose a group and then choose a MIDI template to import.
You may modify them depending on your needs.
A MIDI template is a group of pre-edited MIDI message (s) that
is suitable for many popular musical gear. You can simply load
them or create your own MIDI templates.
USE MIDI TEMPLATES

Note: You can tap the button to create a template group.
You can also create/manage/delete templates in Template menu.
To Save A Template
Follow the instructions below:
1.Edit MIDI messages depending on
your needs (see above).
2.Tap button to save a template.
A menu will appear as shown
on the right.
3.Choose a template group, enter your template name and tap
Save button.
TEMPLATE MENU
To Create Template Groups
Follow the instructions below:
1. Tap Template tab on the
bottom center of the screen to
enter Template menu.
2. Tap to create new
template groups. A window
will appear as shown
on the right.
3. Then enter the notes you
need and then save to create
a template group.

1. Tap to manage current template groups.
2. Tap to edit group info (see above).
3. Tap to select the template groups you want to delete.
When finished, tap the Delete button on the bottom of the
screen.
Notes:
1. System group cannot be deleted.
2. If you delete a template group, all messages in this group will also be deleted.
To Manage Template Groups
Follow the instructions below:

To Manage Templates In A Group
Follow the instructions:
1. Tap on a group to check the
messages in the group, as shown on
the right.
In this menu you can tap on a message to see detailed
template info:
2. Tap to edit group info (see above).
3. Tap to select and manage (copy/paste, move, delete,
etc. ) messages in the current group (see above).
Note: System messages are read only.

RENAME YOUR AMPERO CONTROL
Follow the instructions below:
1. Setup and pair your unit with your
mobile device.
2. Tap “Settings” tab on the bottom right of
your screen to enter Settings menu.
3. Tap “Device Name” button to enter your
device name. Default is Ampero Control.
Follow the instructions below:
1. Setup and pair your unit with
your mobile device.
2. Tap “Settings” tab on the
bottom right of your screen to
enter Settings menu.
3. Tap “Update Firmware” to
enter firmware update menu.
If you have downloaded
firmware files before, the files
will be listed below Local
Firmware, as shown on the
right.
UPDATE THE FIRMWARE

4. Tap “Search Firmware Files Online” to check online
firmware files. Online firmware files will be shown as below
(“Downloaded” means you’ve already downloaded the
firmware file to your phone):
5. Tap on a firmware file to see detailed firmware info.
Click “Download Now” to download the firmware file:
A progress bar will indicate downloading status.

6.Tap “Update Now” button to update firmware.
You need to confirm twice. In this case, your Ampero Control
will enter OAD mode for firmware update, and your Ampero
Control will be disconnected.
The app will automatically start to search the nearby devices,
then you’ll find a device named “Ampero Control OAD”
as shown below (this indicates your device is in OAD mode).
Select and connect to this device.
Firmware update will automatically start after connection.
This may take several seconds.
When the firmware update is finished, you need to manually
hold footswitch 2+3 on your Ampero Control to reconnect.
Notes
1. The update may take several seconds. You may need to restart and reconnect your
device.
2. Please DO NOT turn off the Bluetooth switch, or unplug the power jack while the update
is in progress. Update fail may cause device malfunction.
3. While the update is in progress, please keep your Ampero Control and your smart
device within 1m of each other to avoid signal interference.

Follow the instructions below:
1. Setup and pair your unit with your mobile device.
2. Tap “Settings” tab on the bottom right of your screen to enter
Settings menu.
3. Tap “Factory Reset” to execute factory reset. This will take
several seconds.
WARNING: This will clear all your user data.
FACTORY RESET
Other manuals for Ampero
7
Table of contents
Other Hotone Recording Equipment manuals