HOZAN L-546-10 User manual

1
11
1
各部
各部各部
各部の
のの
の名称
名称名称
名称と
とと
と入組明細
入組明細入組明細
入組明細
L-546-10
接眼
接眼接眼
接眼レンズ
レンズレンズ
レンズ(
((
(10
1010
10×
××
×)
))
)
このたびはホーザン L-546-10 接眼レンズ(10×) / L-546-20 接眼レンズ(20×)
をお買い上 いただき、まことにありがとうございます。この取扱説明書をよくお読みになり、
正しくお使いください。また、お読みになったあとも大切に保管してください。
取扱説明書
取扱説明書取扱説明書
取扱説明書
仕
仕仕
仕
様
様様
様
付属品
付属品付属品
付属品
アイカップ (長)
L-546-20
接眼
接眼接眼
接眼レンズ
レンズレンズ
レンズ(
((
(20
2020
20×
××
×)
))
)
アイカップ(短)
アイカップ(短) 単位:mm
61
※1
φ30
57
※1
φ30
※1 アイカップ(短)装着、
基準点「・」に目 「0」が合っているとき
235g ※2
L-546-20
WF20×・視野数10
175g ※2
L-546-10
WF10×・視野数20
重量
レンズ
※2 アイカップ(短)装着時
L
LL
L-
--
-546
546546
546-
--
-10
1010
10
L
LL
L-
--
-546
546546
546-
--
-20
2020
20

ご
ごご
ご使用上
使用上使用上
使用上の
のの
の注意
注意注意
注意
2
22
2
準
準準
準
備
備備
備
1. 本器の分解、および改造は絶対におやめください。故障の原因となります。
2. 運搬・移動時などに本器に衝撃を与えないでください。また、設置時も振動を与えな
いでください。故障の原因となります。
3. 直射日光の当たるところ、高温多湿なところ、ホコリの多いところでの設置・使用は避
けてください。故障の原因となります。
注意
注意注意
注意
まず入組品がすべて揃っているかご確認ください。
L-46 実体顕微鏡、もしくはL-461 標準鏡筒を
用意し、接眼レンズ装着部の保護キャップを取り外
します。
接眼レンズ固定ネジを緩め、接眼レンズを鏡筒に
差し込みます。
基準点「・」(右写真参照)が真上にくるようにして接
眼レンズ固定ネジを軽く締め込み、接眼レンズを固
定させてください。
必要に応じて付属のアイカップ(長)もお使いください。
<
<<
<アイカップ
アイカップアイカップ
アイカップ(
((
(長
長長
長)
))
)の
のの
の取
取取
取り
りり
り付
付付
付け
けけ
け方法
方法方法
方法>
>>
>
1.アイカップ(短)を取り外します。
2.アイカップ(長)を図のように取り付けます。 返り部分を
引っ掛ける
接眼レンズ
アイカップ(長)
基準点
接眼レンズ
アイカップ(短)
接眼レンズ固定ネ
アイカップ(長)
アイカップ
アイカップアイカップ
アイカップ(
((
(短
短短
短)
))
)・
・・
・(
((
(長
長長
長)
))
)の
のの
の使
使使
使い
いい
い分
分分
分けについて
けについてけについて
けについて
アイカップ(短)
・眼鏡をかけたまま検視を行うとき
アイカップ(長)
・裸眼(コンタクトレンズ装着時含む)で検視を行うとき
目の下(頬骨あたり)に軽くアイカップを当てるだけで、
目の位置が安定します。
・横からの光を遮断したいとき
※ L-46、L-461の使用方法については、それぞれの取扱説明書をご覧ください。
2
22
2
1
11
1
注意文
注意文注意文
注意文の
のの
の警告
警告警告
警告マークについて
マークについてマークについて
マークについて
この取扱説明書ではご使用上の注意事項を次のように区別しています。
警
警 警
警 …重傷をともなう重大事故の発生を想定してのご注意
注意
注意 注意
注意 …傷害や物的損害を想定してのご注意
なお、注意
注意 注意
注意 として記載されていても、あるいは特に記述がなくても、状況によっては重大
な結果をまねく恐れがあります。正しく安全にご使用ください。

焦点調整ノブ
4
.
5
0
.
7
ズーム調整ノブ
ホルダー固定ノブ
6
66
6
4
44
4
5
55
5
ズーム調整ノブを最高倍率の4.5に合わ
せます。
両眼で接眼レンズをのぞき、焦点調整ノ
ブで鏡筒を上下させ、ピントを合わせま
す。
焦点調整ノブだけでピントが合わない場
合は、ホルダー固定ノブを緩めてホル
ダーを上下させて調整してください。
ズーム調整ノブを最低倍率の0.7に合わせます。
対象物が平面でない場合は、必ず検視
する個所を一定にしてください。検視する
個所を変えると作動距離(※)が変わり、
ピントを合わせられなくなる場合がありま
す。
※作動距離はレンズフィルター先端から
対象物までの距離を言います。
両接眼レンズの幅を眼幅に合わせ、両眼でレンズをのぞ
いたときに視野がひとつの円になるように調整します。
右の写真のように左右が連動して弧を描くように動きま
す。
2
22
2
対象物を対物レンズ直下に置きます。
必要に応じて、当社L-710 LEDライトなど照明装置を
ご使用ください。
3
33
3
3
33
3
1
11
1 両接眼レンズそれぞれの基準点「・」(右写真参照)に目
盛「0」を合わせます。
基準点
基準点基準点
基準点
ご
ごご
ご使用方法
使用方法使用方法
使用方法
ホルダーを上下するときは、ホルダーを片手で支えながらホルダー固定ノブを緩
めてください。ホルダー固定ノブをいきなり緩めると、ホルダーが落下して本器や対
象物を破損するばかりでなく、けがをする恐れがあります。
注意
注意注意
注意

おねがい
おねがいおねがい
おねがい
レンズにホコリ・指紋などをつけないでください。鮮明な像が得られなくなる恐れがあります。
●
4
44
4
10.10
7
77
7 この時点でピントがずれていたら、それは両眼の視力のばらつきよるものです。
まず片眼で接眼レンズをのぞき、もう片方の眼は閉じた状態でレンズの目盛(※)を
回してピントを合わせます。
もう一方の接眼レンズも同様に合わせます。
両目で視野を確認し、ピントが合っていれば8
88
8に進んでください。
合っていない場合は、 度片眼ずつピント調整を行ってください。
※目盛の「-」と「+」について
近視であれば「-」側に、遠視であれば「+」側に回して調整してください。
度4
44
4~7
77
7を行い、ピントを確認してください。
この作業を何度か繰り返すことで、どの倍率に変えても鮮明な像を保つことができます。
8
88
8
ご
ごご
ご使用方法
使用方法使用方法
使用方法
9
99
9 ご使用後は寿命を縮める原因となるホコリやハンダのヒュームを防ぐため、ダストカ
バーをかけて保管ください。
視度調整した目盛の数値をメモしておくと、次の作業時に 「ご使用方法 7
77
7」を省略し
て検視が行えます。
倍率表
倍率表倍率表
倍率表
対物レンズ 0.7~4.5×
視野
mmφ mm
倍率
×
コン ーシ
ョンレンズ なし L-57-0.5 L-57-1.5
接眼レンズ
視野
mmφ
84
mm
倍率
×
L-57-2.0
160
視野
mmφ mm
倍率
×
43
視野
mmφ mm
倍率
×
26
日常
日常日常
日常のお
のおのお
のお手入
手入手入
手入れ
れれ
れ
レンズ
レンズレンズ
レンズ
ホコリなどの汚れは柔らかな毛筆(刷毛)でぬぐうかガーゼで軽くふき取ってください。
指紋や油類の汚れは無水アルコール(エチルアルコール、メチルアルコールなど)を柔
らかい布にわずかに含ませて、軽くふき取ります。
※ アルコール類は引火性が高いので、取り扱いには充分ご注意ください。
●
●
本社 〒556-0021 大阪市浪速区幸町1-2-12
TEL(06)6567-3111 FAX(06)6562-0024
補修部品については、web上のパーツリストをご覧ください。
ホーザン 通信販売 検索
検索検索
検索
通信 売もご利用いただけます。

Specifications
*2 When eye cups (short) attached
Objectives L-546-10
WF10X, Field number:20
Weight 175g *2
L-546-20
WF10X, Field number:10
235g *2
Identification of parts and contents
1
11
1
L-546-10
Thank you for purchasing the HOZAN L-546-10 EYEPIECES (10X) / L-576-20 EYEPIECES
(20X) . With proper care and hand ing, this fine instrument will provide years of trouble-free
operation. Please read this entire instruction manual carefully before attempting to place
this instrument in service. Please keep this instruction manual available for reference.
INSTRUCTION MANUAL
Eye cups ( ong)
Accessories
L-546-20
Units: mm
61 *1
φ30
57 *1
φ30
*1 When eye cups (short) attached,
graduation “0” adjusted to setting dot.
Eye cup (short)
L-546-10
Eye cup (short)
L-546-20

Precautions
1. Do not disassemble or modify the eyepieces yourself, otherwise this could
cause a malfunction.
2. Protect the unit against physica shock or vibration during transport. Otherwise, this
cou d cause a ma function.
3. Do not expose the unit to pro onged direct sun ight, high temperature, high humidity,
or dust. Such exposure cou d cause a ma function.
Caution
These symbo s are used throughout the instruction manua to a ert the user to potentia
safety hazards as fo ows :
Warning … Notice when incorrect hand ing cou d cause the user's death or serious
injury.
Caution … Notice when incorrect hand ing cou d cause injury to the user or materia
damage.
Even if the instructions do not have Caution mark, there are some possibi ities for a
serious situation. Fo ow the instructions.
Warning and caution symbols
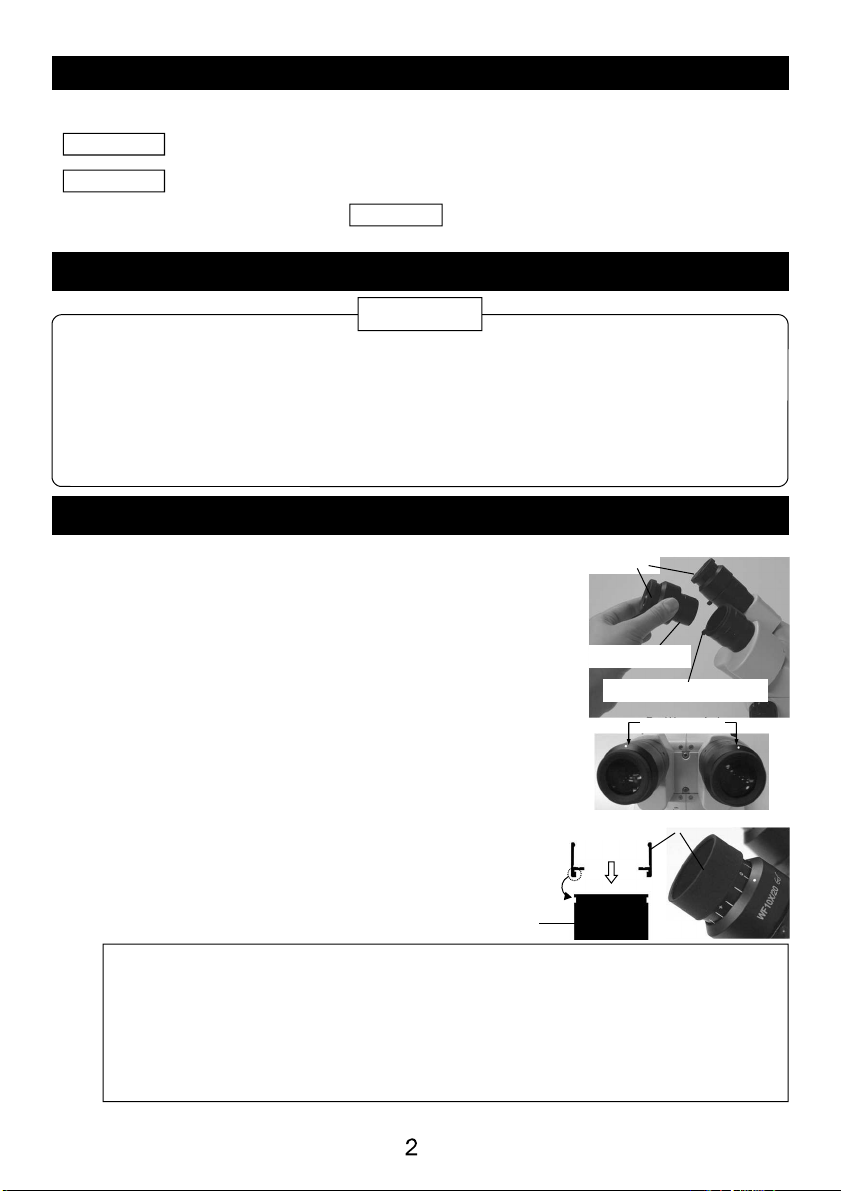
Preparation
First, make sure that the contents are comp ete.
Prepare the L-46 MICROSCOPE or the L-461
STEREO HEAD SCOPE.
Remove the caps from the barre s. Then, oosen
the eyepiece set screws and insert the eyepiec-
es into the barre s.
Drive the eyepiece set screws gent y so that the
eyepieces stay and the setting dot [・] of them,
refer to the photo, point at the zenith.
P ease use eyecups ( ong) if necessary.
< How to attach the eyecup (long) >
1. Remove the eyecup (short) .
2. Attach the eyecup ( ong) as sown
in the i ustration.
Choose to suit
Eyecup (short)
・for persons in spectac es
Eyecup ( ong)
・for persons in contact enses or without spectac es
Bringing inspector’s cheekbones at eyecups ( ong) stab es his/her eye
points.
・for b ocking the s anting rays
Engage the
pro ection with
the groove.
Eyepiece
Eyecup (long)
Setting dot
Eyepiece
Eyecup (short)
Eyepiece set screw
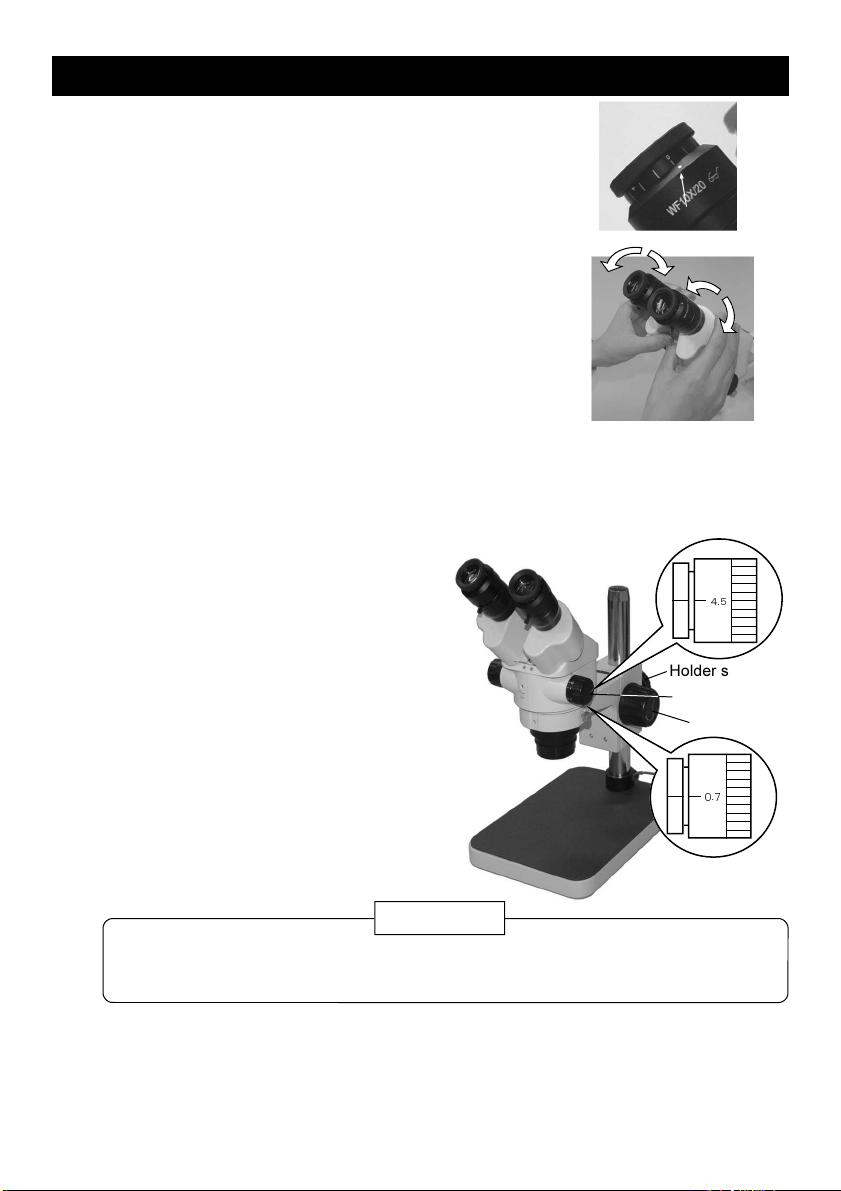
* P ease refer to each instruction manua for operation of the L-46 and the L-461.
2
22
2
1
11
1

3
33
3
1
11
1 Be agreed “0” of the graduation with each setting dot,
refer to the photo, of both the eyepieces.
Operation
Setting dot
6
66
6
4
44
4 Adjust the zoom adjust knob to 4.5
maximum magnification.
Adjust the zoom adjust knob to 0.7.
5
55
5 Adjust for proper focus with the focus
knob whi e ooking with both eyes.
If the focus knob does not focus
enough, move the ho der up and
down under oosening the ho der set
knob.
4
.
5
0
.
7
Holder set knob
Focus knob
Zoom ad ust
knob
Loosen the ho der set knob whi e supporting the ho der with one hand when move it
up and down. Otherwise, the ho der cou d fa down sudden y damaging the unit, the
object and the operator.
Caution
Adapt the eyepiece distance with your pupi distance to
view a sing e circ e of the fie d.
The stereo barre s wi rotate drawing arcs inter ocking
with (refer to the photo).
2
22
2
P ace an object just under the objectives.
Prepare ighting apparatus such as Hozan’s L-710 LED
LIGHT if necessary.
3
33
3
A ways aim the same point if the sur-
face of the object is not simp y f at,
otherwise the working distance* cou d
differ from before and this cou d not
come into focus.
*Working distance means the dimen-
sion from the top of ens fi ter to the
object.

1-2-12 Saiwaicho, Naniwa-ku, Osaka 556-0021, Japan
Tel : +81-6-6567-3111 F ax : +81-6-6562-0024
Note
Do not allow any dust or fingerprints to get on the lens to get clear images.
●
10.10
7
77
7 If the image is out of focus, it is due to the difference of right and eft eyesight.
First, turn the draw tube for proper focus by ooking with the dominant eye whi e
c osing the other eye.
Then, adjust the other eyepiece simi ar y.
Proceed to procedure 8 if the image ooking with both eyes is in focus.
If the image is sti not in focus, adjust each eyepiece again.
Regarding -” +” of the graduation
A nearsighted person shou d turn to minus side and a farsighted person shou d turn
to p us side.
Treat procedures 4 to 7 and check if the image is in focus.
Repeat these procedures so that a c ear image can be obtained whenever the zoom
magnification is changed.
8
88
8
Operation
9
99
9 Store the L-46 putting the dust sheet on after use.
Taking notes of sight adjust va ue can omit procedure 7 when the next work.
Magnification table
Ob ective 0.7-4.5X
Field o
view
mmφ
Working
distance
mm
57.1-
8.9
Magni-
ication
X
3.5-
22.5
7-
45 28.5-
4.4
No L-57-0.5 L-57-1.5
L-546-10
(Standard)
Eyepiece
L-546-20
Field o
view
mmφ
84
Working
distance
mm
28.5-
4.4
Magni-
ication
X
7-
45
14-
90 14.3-
2.2
L-57-2
160
Field o
view
mmφ
Working
distance
mm
19.0-
2.9
Magni-
ication
X
10.5-
67.5
21-
135 9.5-
1.5
43
Field o
view
mmφ
Working
distance
mm
14.3-
2.2
Magni-
ication
X
14-
90
28-
180 7.1-
1.1
26
Daily care
Lenses
* A coho is extreme y f ammab e, so hand e it with care.
Wipe away any dust gently with a soft cloth or a piece of gauze.
Clean away fingerprints or oil stains with a cloth which is lightly soaked in denatured
alcohol (such as ethyl alcohol or methyl alcohol).
●
●
This manual suits for next models
1
Table of contents
Other HOZAN Lens manuals
Popular Lens manuals by other brands

Sigma
Sigma 14-24mm F2.8 DG HSM instructions

Canon
Canon RF 50mm F1.2 L USM instructions

Panasonic
Panasonic ET-EMS650 operating instructions

Zhong Yi Optics
Zhong Yi Optics Speed Master Series operating instructions

CooperVision
CooperVision Stenfilcon A PATIENT INFORMATION BOOKLET

Barco
Barco UST installation manual