HP F150 User manual

f150
Wireless Mini Camcorder
User Manual

Preface
About this Manual
This manual is designed to demonstrate the features of your HP
Wireless Mini Camcorder f150. All information presented is as
accurate as possible but is subject to change without notice.
HP shall not be liable for technical or editorial errors or omissions
contained herein.For the latest reversion, visit www.hp.com/support.
Copyright
This manual contains proprietary information protected by copyright.
All rights are reserved. No part of this manual may be reproduced by
any mechanical, electronic or other means, in any form, without prior
written permission of the manufacturer. © Copyright 2013
Federal Communications Commission notice
This equipment has been tested and found to comply with the limits
for a Class B digital device, pursuant to Part 15 of the FCC Rules.
These limits are designed to provide reasonable protection against
harmful interference in a residential installation. This equipment
generates, uses, and can radiate radio frequency energy and, if not
installed and used in accordance with the instructions, may cause
harmful interference to radio communications. However, there is no
guarantee that interference will not occur in a particular installation.
If this equipment does cause harmful interference to radio or
television reception, which can be determined by turning the
equipment off and on, the user is encouraged to try to correct the
interference by one or more of the following measures:
· Reorient or relocate the receiving antenna.
· Increase the separation between the equipment and receiver.
· Connect the equipment to an outlet on a circuit different from that
to which the receiver is connected.
· Consult the dealer or an experienced radio or television technician
for help.

Modifications:
The FCC requires the user to be notified that any changes or
modifications made to this device that are not expressly approved by
HP may void the user's authority to operate the equipment.
Trademark Recognition
Windows XP/Vista/Windows 7/Windows 8 are registered trademarks
of Microsoft Corporation in the United States and/or other countries.
Macintosh and Mac OS are registered trademarks of Apple Inc. In
addition, all other companies or product names are trademarks or
registered trademarks of their respective companies.
Safety and Handling Precautions
WARNING:
Follow these instructions to prevent damage to the camcorder:
· DO NOT USE UNPROTECTED IN RAIN OR WATER. PREVENT CONTACT
WITH ANY KIND OF LIQUIDS
· USE RECOMMENDED ACCESSORIES ONLY
· DO NOT DISASSEMBLE OR ATTEMPT REPAIRS ON YOUR OWN.
DISASSEMBLING THE CAMCORDER MAY VOID THE WARRANTY
· THERE ARE NO PARTS OR COMPONENTS INSIDE THAT NEED TO
BE MAINTAINED
· REPAIRS WILL BE MADE BY AUTHORIZED SERVICE CENTERS ONLY
· Do not touch the camcorder lens
· Do not use abrasive chemicals, cleaning solvents or strong
detergents to clean the product. Wipe the product with a clean
slightly damp soft cloth.
ATTENTION!
· ELECTROSTATIC DISCHARGE OR STRONG ELECTROMAGNETIC
FIELDS CAN AFFECT THE CAMCORDER. RESTART THE CAMCORDER
IN THIS CASE.

| 1
English
HP Wireless Mini Camcorder f150
Clip Mount Magnet Mount
Tripod Mount
Strap Mount
Record Button
Status LED
Microphone
Micro SD
memory
Card Slot
Micro USB
Port
Strap Hook
Speaker
Video Mode
Photo Mode
Direct Mode
Cloud Mode
Mode Button
Power Button
Mode Indicators:

2 | English
Getting Started
Charging the camera
•
Before first use, charge the battery using AC adapter or PC USB.
• While charging the Status LED will flash. Upon completion, it
will turn off.
Mode Selection
• Press Power button to turn on camera.
• Press Mode button to switch between the two camera modes
(Video, Photo) and the two wireless modes (Direct, Cloud).
Two Camera Modes
Insert a micro memory SD card. (not included/accessory)
Video
• Press the Mode button to select the Video Mode.
• Press the Record button to capture video, press again to stop.
Photo
• Press the Mode button to select Photo Mode.
• Press the Record button to take still photos.
Two Wireless Modes
Before using the wireless modes, install the HP Ucam application:
•
Mobile: Download the
HP Ucam
AP from Google Play or Apple Store.
• PC: Install HP Ucam for Windows. (see page 6)
Direct Mode - local
Connect your f150 to your mobile unit or PC directly for remote
control, live view, managing albums, and camera & cloud setup.
Cloud Mode - Internet
Connect the f150 to a Cloud server via Access Point (AP) or mobile
Hotspot for Internet live video streaming or monitoring.

| 3
English
Cloud Mode (Internet)
AP
Cloud Server
Cloud AP
AP
Mobile Hotspot
Mobile / PC
USTREAM
3G/4G
The f150 can broadcast live streaming video to the Internet
on Ustream. You must first establish an account on Ustream
(www.ustream.tv) After you have established a Ustream account you
will use the HP Ucam AP on your PC or mobile device in Direct Connect
mode to enter your Ustream account information into the f150.
Anyone with a web browser will be able view your video streams.
Mobile users can install the Ustream AP on their mobile devices.
(Search YouTube for videos about the f150 that explain this in greater
detail.)
Getting Started
Direct Mode (Intranet)
Mobile / PC
Wireless Connection
Direct Mode (Connect to a Mobile unit or local PC)
Cloud Mode (Connect to the Internet)
Live Streaming Internet broadcast using Ustream:
4 | English
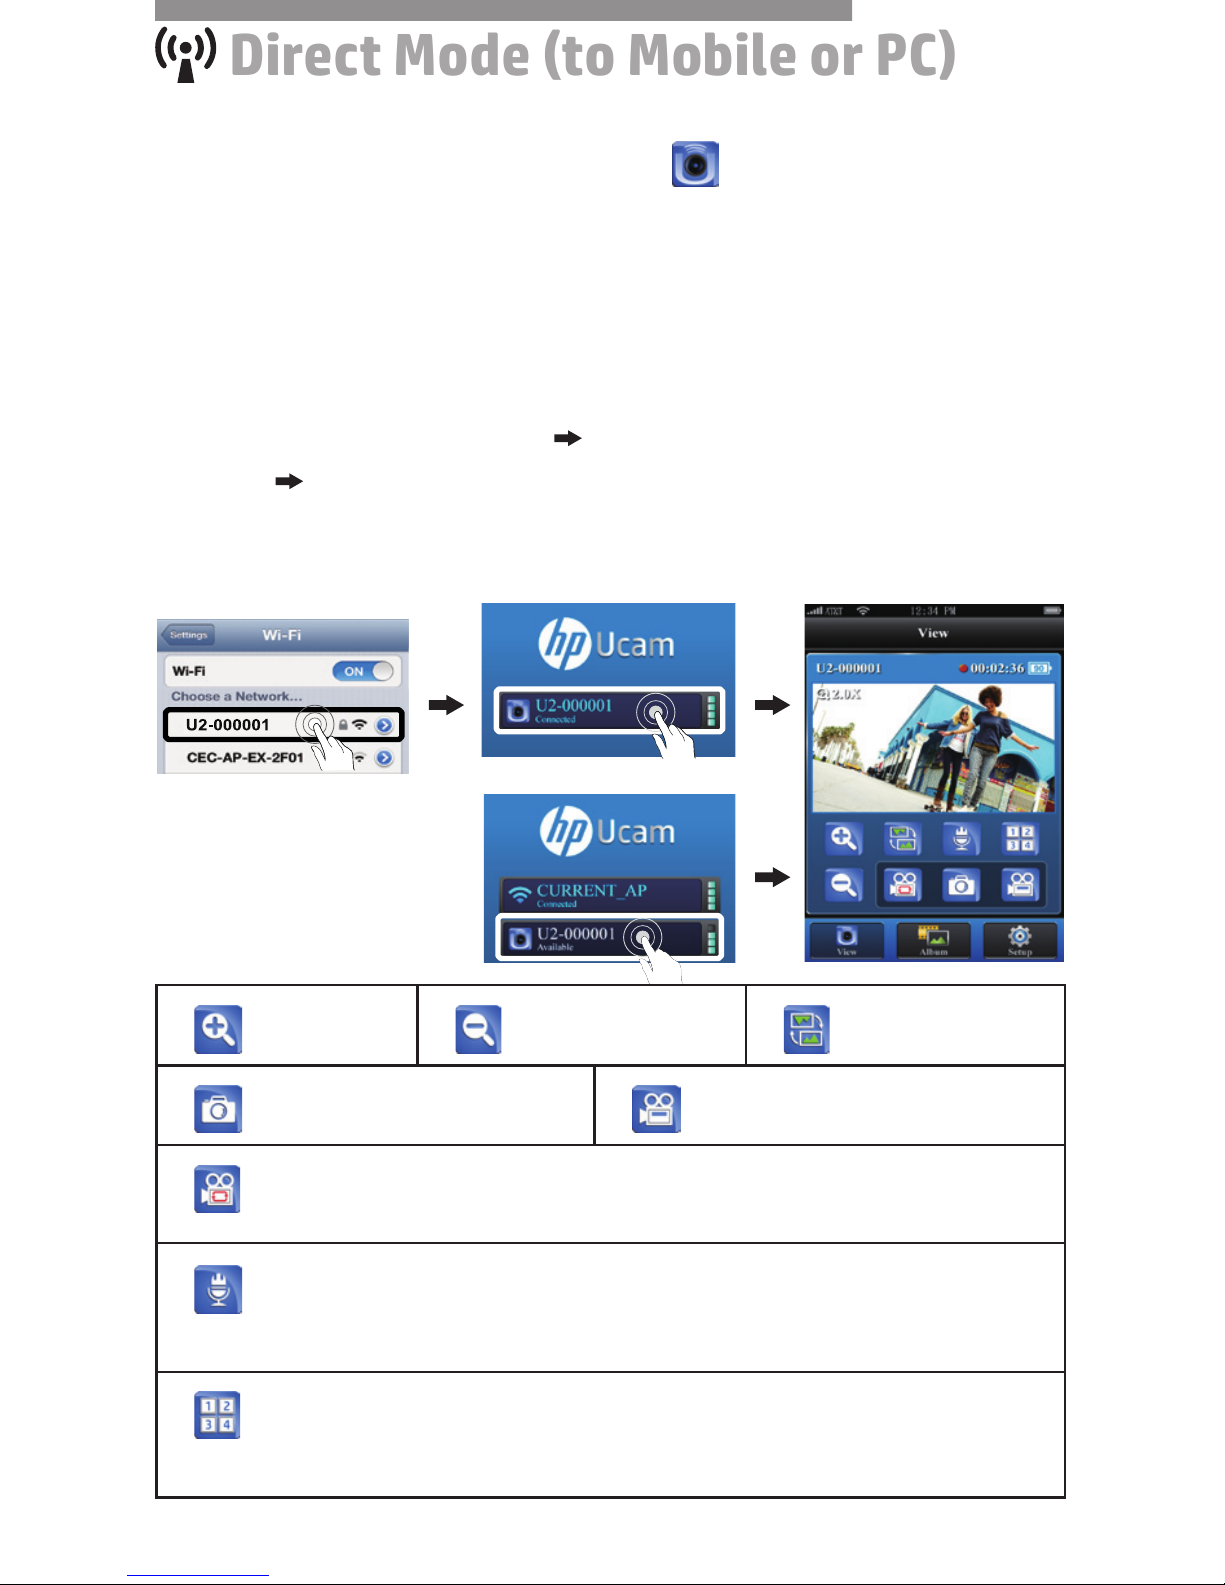
Direct Mode (to Mobile or PC)
You will setup your f150 using the HP Ucam mobile (or PC) AP.
Each f150 has a unique Camera ID. ( U2-xxxxxx) A password
is not required for first use. You may use the Setup function in
HP Ucam to enter a device password once you are connected.
Cloud Mode (stream to Internet)
Android users:
• Set camera to Direct Mode .
• On mobile, activate WiFi
connection.
• Start the HP Ucam AP.
• Explore the functions.
iOS users:
• Set camera to Direct Mode .
• On mobile, go to [Settings]
[Wi-Fi] Choose U2-xxxxx.
• Start the HP Ucam AP.
• Explore the functions.
Connect directly to your f150 -
Android:
iOS:
Zoom In Zoom Out Invert Image
Take Photos (SD card required) Capture Video (SD card required)
Loop Recording (SD card required)
• Retaining the last 10 minutes of recording.
Talk to your f150 (half-duplex voice communication)
• Press the mic icon and speak into your mobile - to the camera!
• The f150 microphone is mute while you are are speaking.
Quad View (multiple cameras)
• Press to enable Quad View. (view up to four cameras)
• Select "1" to return to single camera view.

| 5
English
Before using Internet Cloud Mode, you must setup your f150 camera.
You must enter your wireless network and Ustream (Cloud AP/Cloud
Service) parameters into the camera using HP Ucam. To do so, connect
to your f150 using Direct Mode (see page 4).
• Start HP Ucam. Go to setup. Scroll down to "Cloud Setting."
1. Select the preferred WiFi network you wish to use and enter
its WiFi password, if any. This step enables the f150 camera to
get on the local WiFi wireless network for Internet access.
Next, you must enter your Cloud Server (Ustream) information.
• Press then enter your Username (and/or email address)
and password for the Cloud AP you wish to use, such as Ustream.
When completed press [Save to Camera]. This will store your WiFi
and Cloud AP information to the camera.
Once you have setup your camera there are two ways to connect
it to a Cloud server:
1. Power on the camera. It will go to Direct Mode. Connect
your mobile to the f150 in Direct Mode. Start HP Ucam. Press
on Setup. Press [Camera to Cloud]. The camera will switch from
Direct Mode to Clous Mode for live streaming to the Cloud.
2. Power on the camera. Press the mode button to select Cloud
mode. The Cloud LED will flash red while connecting to the Cloud.
When the camera has sucessfully connected to the Cloud, the LED
will flash green, slowly. If the connection is unsucessful the Cloud
LED will flash fast-red. In that case, check your Cloud AP settings
Once your camera is connected to the Cloud you may view
your Live Video
at:
www.ustream.tv
Cloud Mode (stream to Internet)

6 | English
Using the f150 with your PC
There is a HP Ucam application for Windows. Install HP Ucam on
your wirelessly-connected PC and then note that the functionality
on the PC application is very similar to the mobile AP.
Install HP Ucam for PC from the Camera
• Connect your camera to your PC bu USB.
• HP Ucam will AutoRun (if AutoRun activated automatically.)
• If AutoRun is not activated Go to [My computer] search the f150
drive icon for the HP Ucam installation executable.
• Once installed, HP Ucam will run. (If not double-click program icon)
• Unplug the camera from USB for WiFi application, or keep it
connected via USB for additional USB applications.
Additional utility when connect by USB:
Note: While connected by USB, The [View] function on HP Ucam
is disabled. Press camera Mode button to switch between Mass
Storage Mode and Webcam Mode.
Mass Storage Mode (default): (LED indicator is orange)
1. You may transfer Video and Photo files from camera to your PC
• Go to [Album] Select video/photo Press [Save to PC].
2. Upload Videos/Photos to YouTube, Facebook or Youku
• Go to [Setup] [Upload Setting].
• Enter Email/Username and Password.
• Press [Save to PC].
• Go to [Album] Select video/photo Press [Upload].
Webcam Mode: (LED Indicator is green)
• Close (exit) the HP Ucam program.
•
For video Instant Messaging (Skype or QQ), select "U2 video device"
and "U2 audio device". (For Win XP, select "video device")

| 7
English
Control, Audible & Visual Indicators
Camera Control Functions
Power Off
Press Power button for 5 sec. to turn off.
Restore
Default
Setting
s
Press both Mode and Record buttons for
5 seconds to restore default settings.
Dashboard
Recording
Press the Record button for 3 sec. to start
loop recording
and to
invert the image.
Condition LED Status Indicator # Beeps
Recording Slow flash, Green One
Loop Recording Slow flash, Orange One
Charging Slow flash, Red
Fully Charged Two
Low Battery Flash Red every 5 sec (Warning) Five, then
shutdown
Power Off Two
Auto Power Off
(5 mins idle) Slow flash, Red Two
Memory Full
SD Card Error Slow flash, Red Three
No Cloud AP
No Cloud Account Fast flash, Red Three
Direct-Mode Ready Steady Green
Connecting Wireless Fast flash, Green
Streaming Video Slow flash, Green
Other manuals for F150
2
Table of contents
Other HP Camcorder manuals


Popular Camcorder manuals by other brands


Panasonic
Panasonic AG-HMC152EN operating instructions

Insignia
Insignia NS-DCC5HB09 - Camcorder - 720p user guide

MYDLINK
MYDLINK DCS-6100LH Quick installation guide

Sony
Sony video Hi8 Handycam CCD-TR555 operating instructions

SECURECOM
SECURECOM V-5014B installation guide

Panasonic
Panasonic HDC-SD100 operating instructions


