HP Pavilion t450 User manual

t450 High Definition
Wireless Camcorder
(hp logo here)
User’s Manual
t450
Digital Camcorder
User Manual

2
EN
Read This Before Using your t450 Video Camera
SAFETY INSTRUCTIONS
• Donotdrop,punctureordisassemblethecamera.
• Usethecamerawithcare.Roughhandlingmaydamageinternalcomponents.
• Donotexposethecameratohightemperatures.Avoidcontactwithwater.
• Notethatthebodyofthiscameramaybecomewarmafterextendedoperation.
• Useonlyaccessoriessupplied,orrecommendedbyHP.
• Onlyusethetypeofbatterythatcamewithyourcamera.
• Removethebatteryifthecamerawillnotbeusedforalongperiodoftime.
Product Information
• Designsandspecicationsofthecameraaresubjecttochangewithoutnotice.Thisincludesprimaryproduct
specications,software,andthisuser’smanual.
• ThisUser’sManualisageneralguideforreferenceonly.
• Theillustrationsandscreenshotsinthismanualmaynotbethesameasthoseyourcamera.
Foranelectroniccopyofthemanual(PDF),orupdatestothismanualgotowww.hp.com/support

Contents
Read This Before Using yout t450 Video Camera ...................................... 2
Section 1 Getting to Know Your Camera................................................. 4
Section 2 Getting Started..................................................................... 7
Section 3 Record Mode........................................................................10
Section 4 Playback Mode.....................................................................22
Section 5 Camera Settings...................................................................27
Section 6 Wireless-to-PC, WiVideo Suite ..............................................31
Section 7 Wireless-to-Mobile, WiVideo AP ............................................35
Section 8 Wireless-to-Cloud, Ustream..................................................39
Section 9 Viewing Photos and Videos on your TV...................................43
Section 10 Viewing Photos and Videos on your PC...................................44
Section 11 Specications and System Requirements ..............................45
Section 12 Troubleshooting..................................................................47

4
EN
Section 1
Getting to Know Your t450 Video Camera
Overview
Thet450videocameraisequippedwitha5MegaPixelsensoranditcanrecordH.264formatvideos.H.264
technology allows for extended video recording using less memory. The t450 can capture high quality
imagesupto16mega-pixels,byinterpolation.Withit’scolortouch-screenLCDmonitor,youcaneasilyview
yourvideosandphotos.
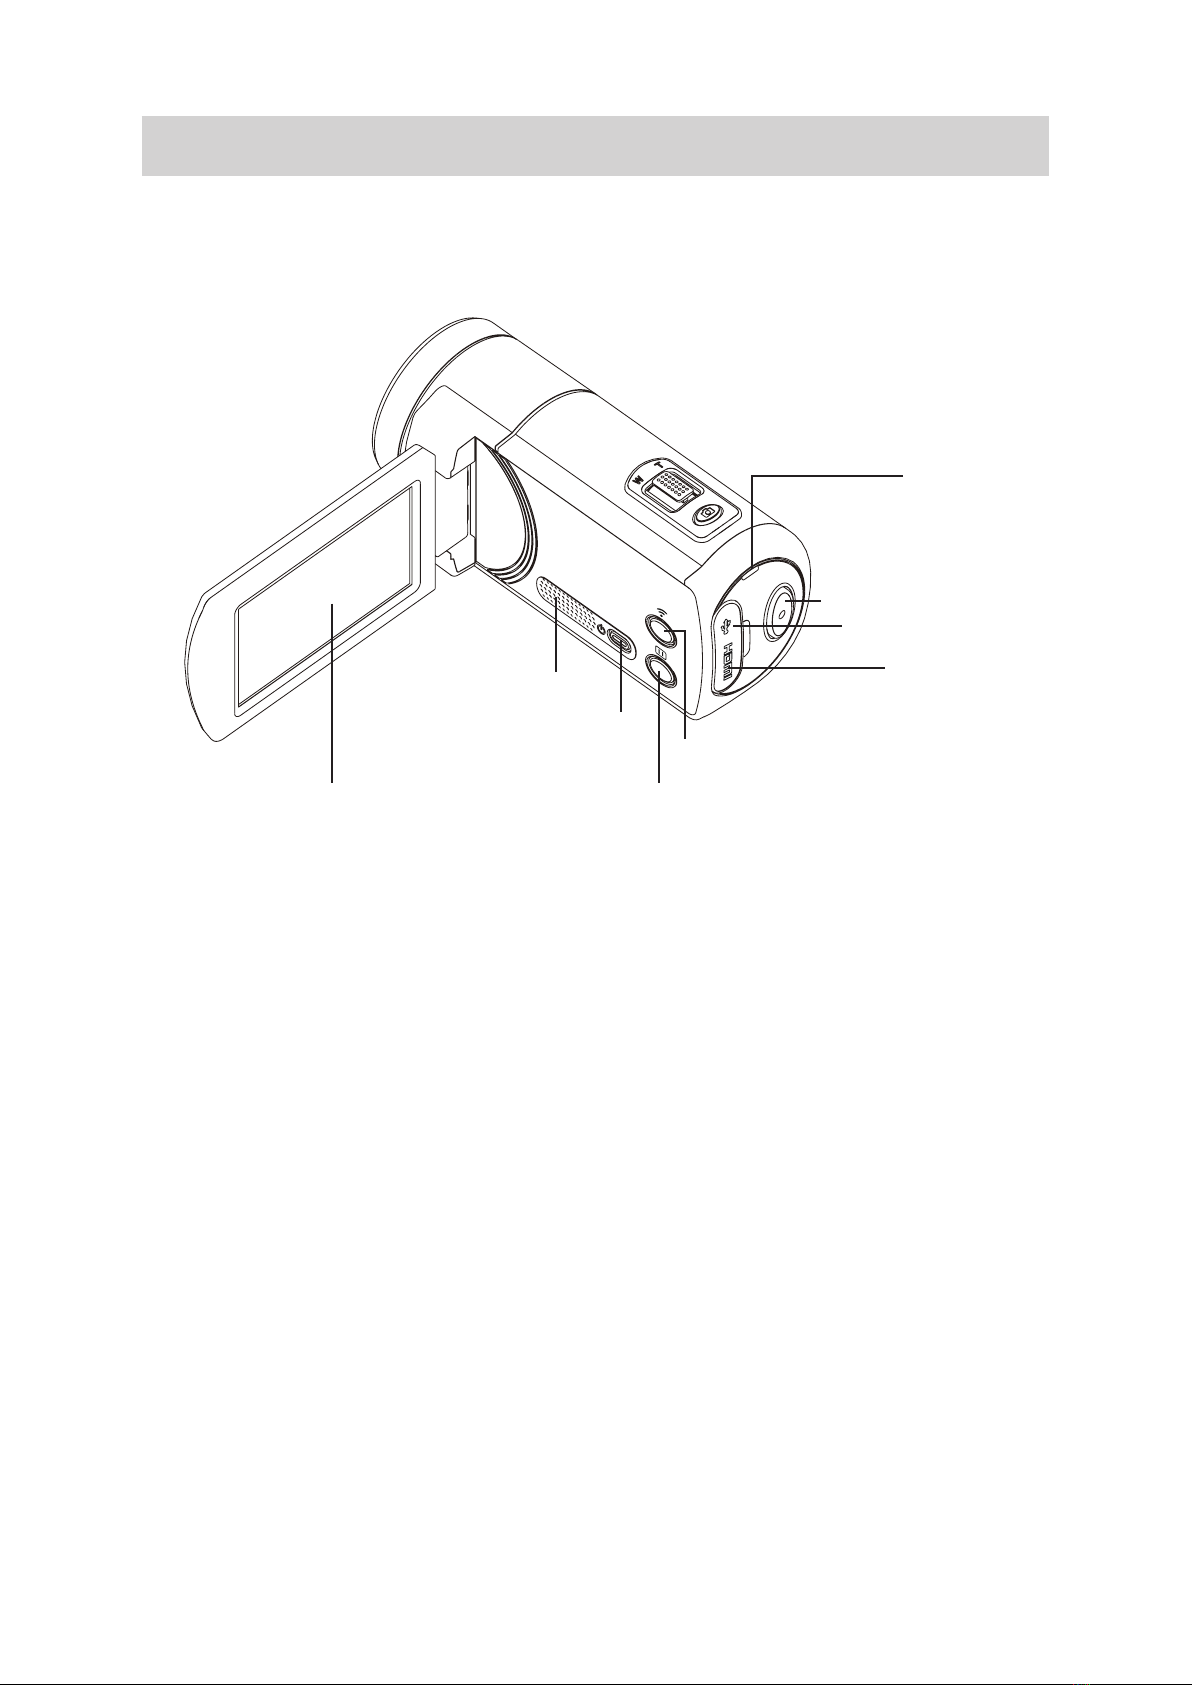
The3”LCDtouchscreenisanidealplatformforoperatingyourcamera.Themenuoptionsareaccessible
withyourngertip.Withthetouchpanel,youcanselectoptionsandsettingsdirectlyandquickly.
Thet450videocamerarecordsHDvideoataresolutionof1920x1080.Youmayconnectthet450toan
HDTVusinganHDMIcable,andplaybackyourhigh-denitionvideosonthewidescreenHDTV.
Thet450isequippedwithwireless(WiFi)moduleandanexclusivevideoapplication.Youcanbroadcastlive
streamingvideoontotheUstreamwebsite.Yourfamilyandfriendscanwatchyourlivevideostreaming
fromtheirsmartphones,tablets,orpersonalcomputers.
10X optical zoom oers tremendous scene composition control for the videos and photos you take.
Advancedoptions,suchasPrerecord,TimeLapse,andSlowMotion,addfuntotherecordingprocess.
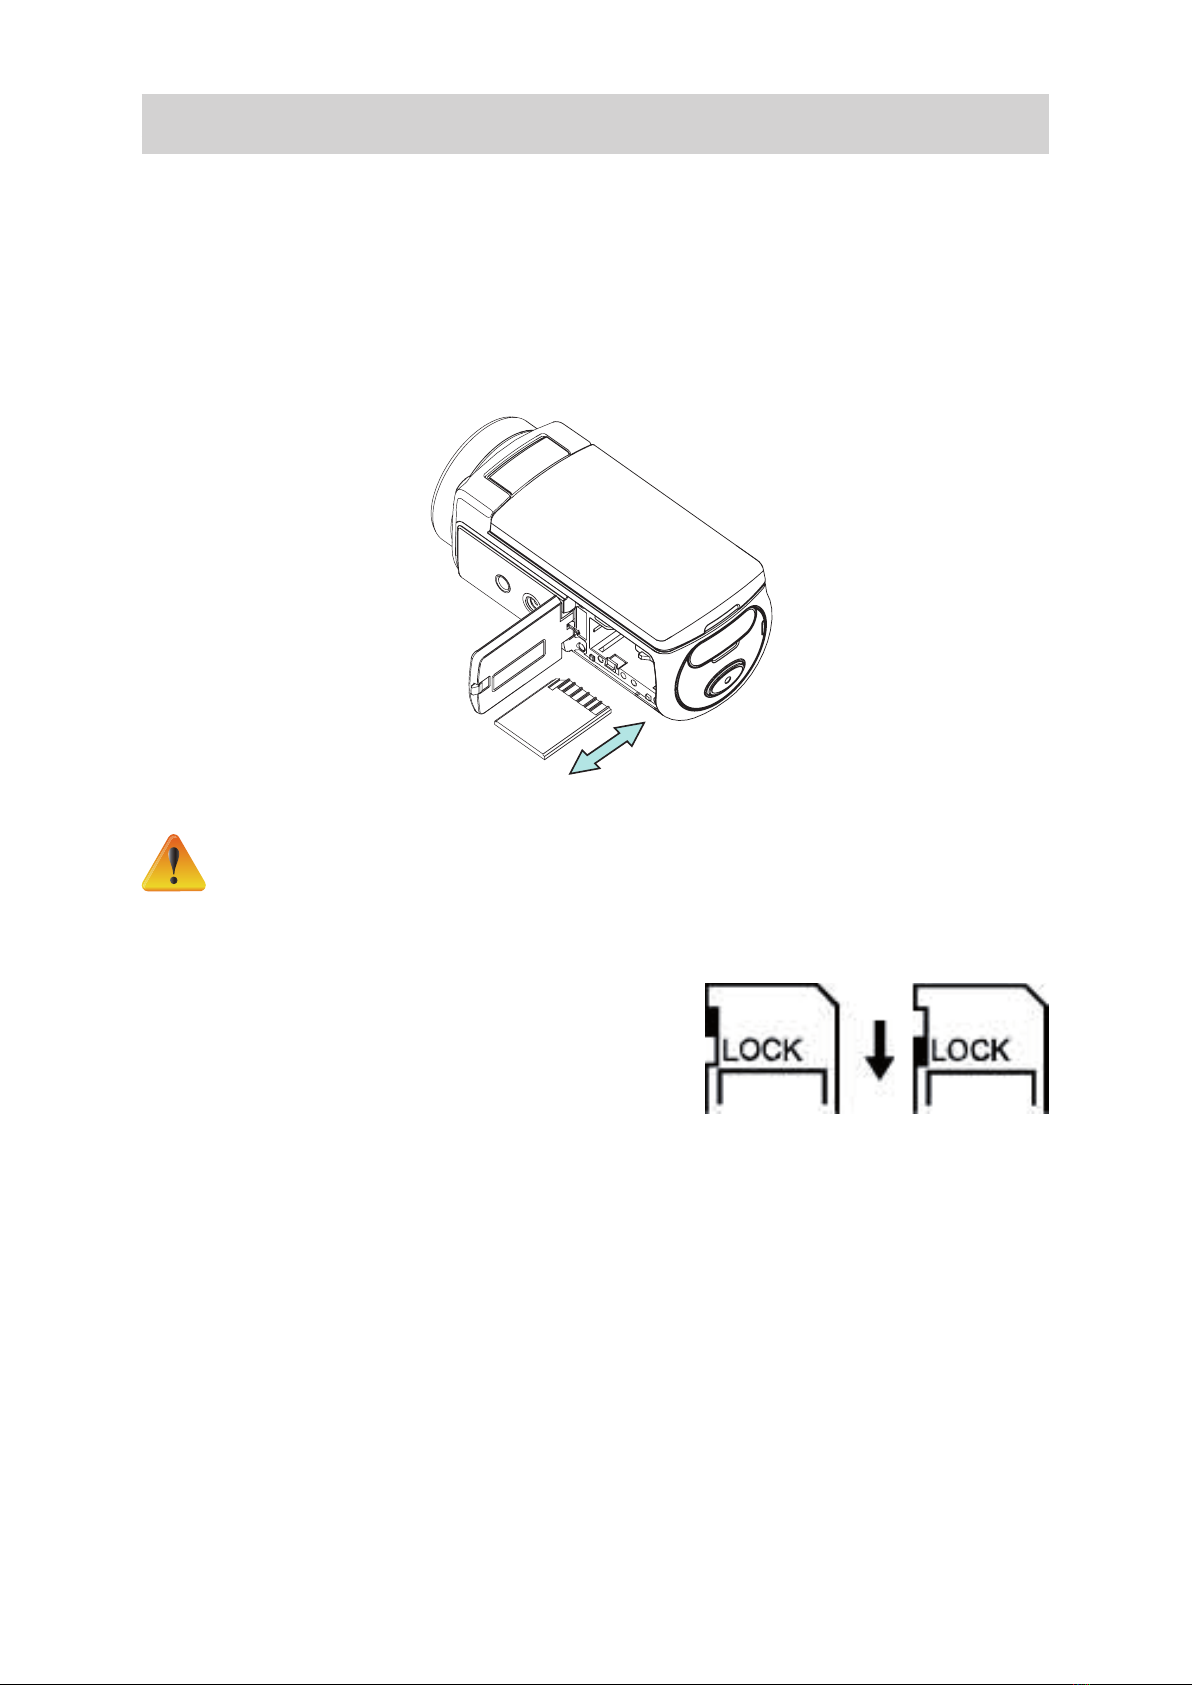
Built-inmemoryallowsyoutotakesomephotosandrecordlimitedvideoswithoutamemorycard.However,
athememorycardslotallowsyourtosignicantlythestoragecapacity.
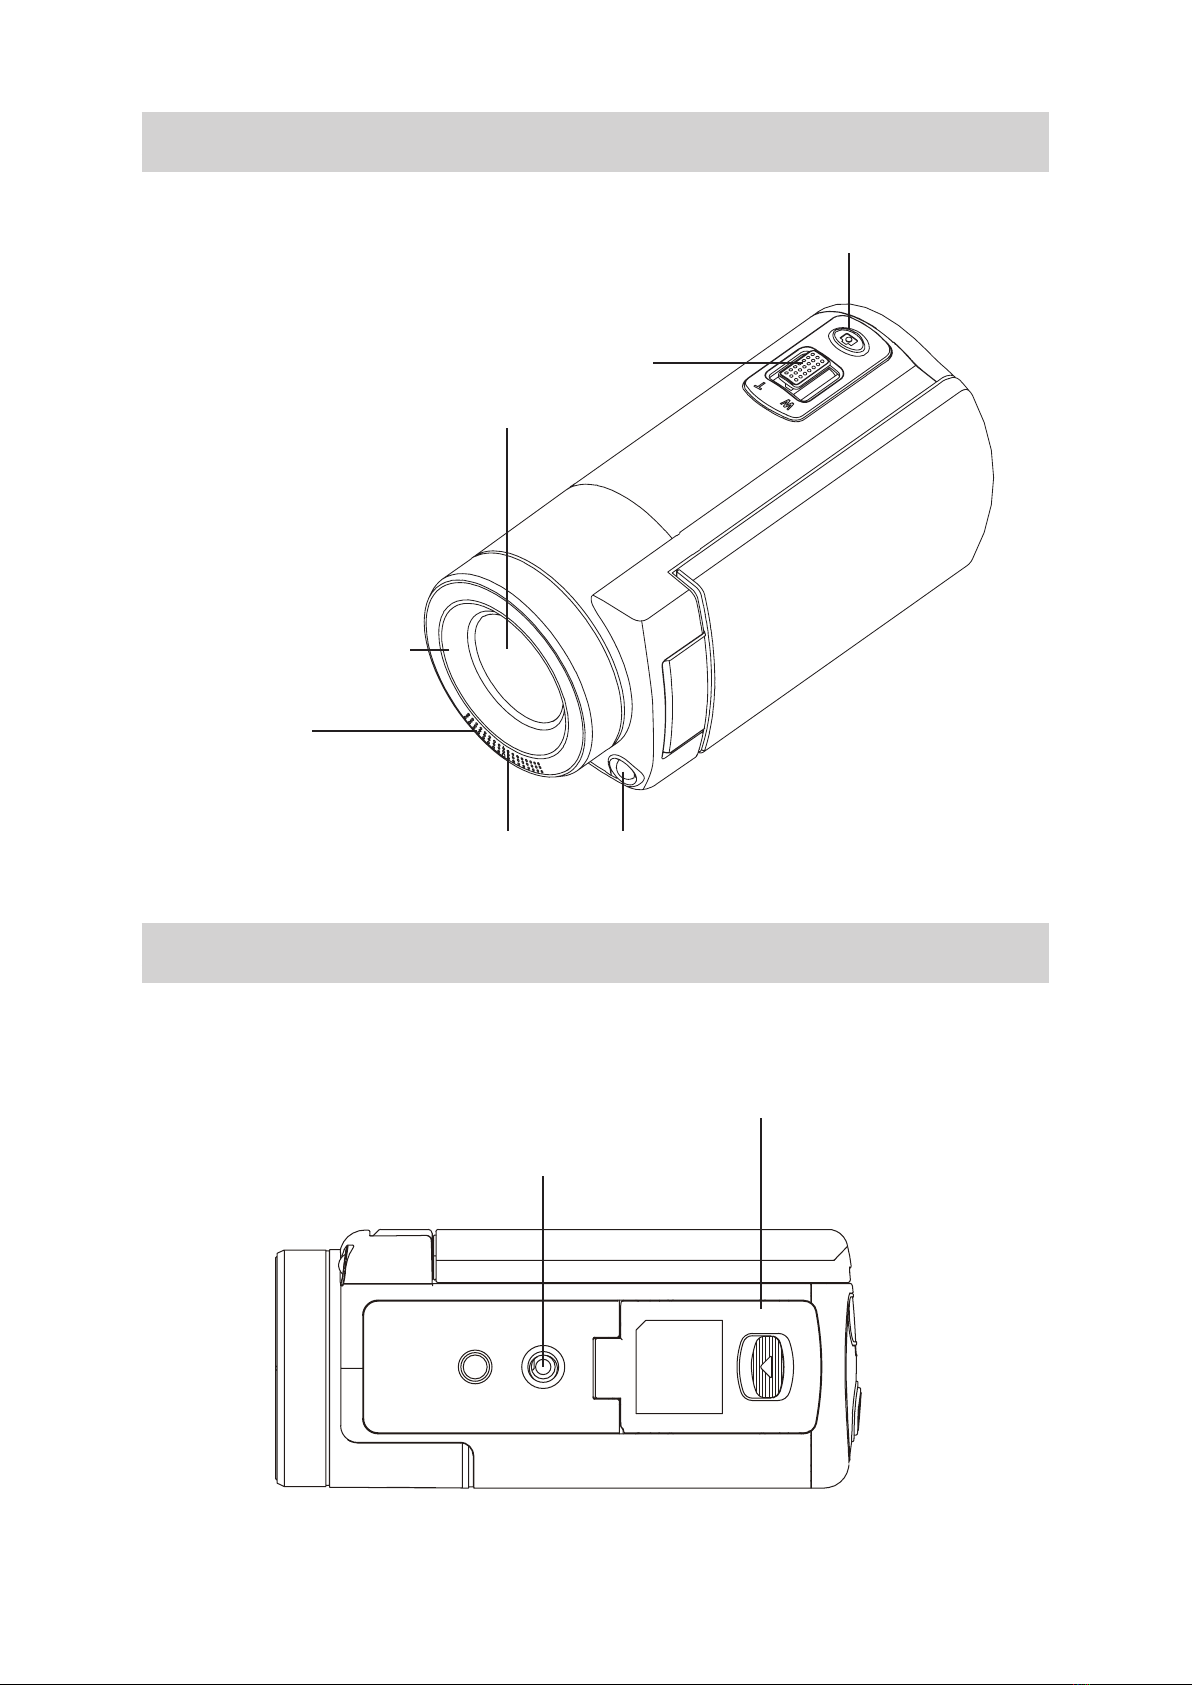
Thethreadmountingringonthelensfacilitatethemountingofscrew-onlensandlterforadvancedeects
suchasanauxiliarywide-anglelensforprovidingbetterwide-angleshots,amacrolensforcapturingclose-
upphotos,orotherspecialeectslters.
Thet450hasanadvanceduploadingfeature.Withtheexclusivebuilt-inInternet Direct application,you
canuploadvideoscapturedbythecameratoawebsiteeortlessly.
Note
• Aportionofthebuilt-inmemoryisusedforthecamera’sFirmwarecodeandsoftware.
• YoumayinstallthebundledsoftwareapplicationforeditingthevideosonyourPC.
• ToenablewirelessconnectivitytoyourPC,installtheWiVideoprogram(forWindows®only)onyourPC
andmakesurethewirelessLANmoduleofyourcomputerisactivatedandworkingonyourLAN
Standard Accessories
Unpackthepackageandensurealistofstandardaccessoriesbelowareincluded:
• MiniUSBCable
• HDMICable
• ACcharger/adaptor
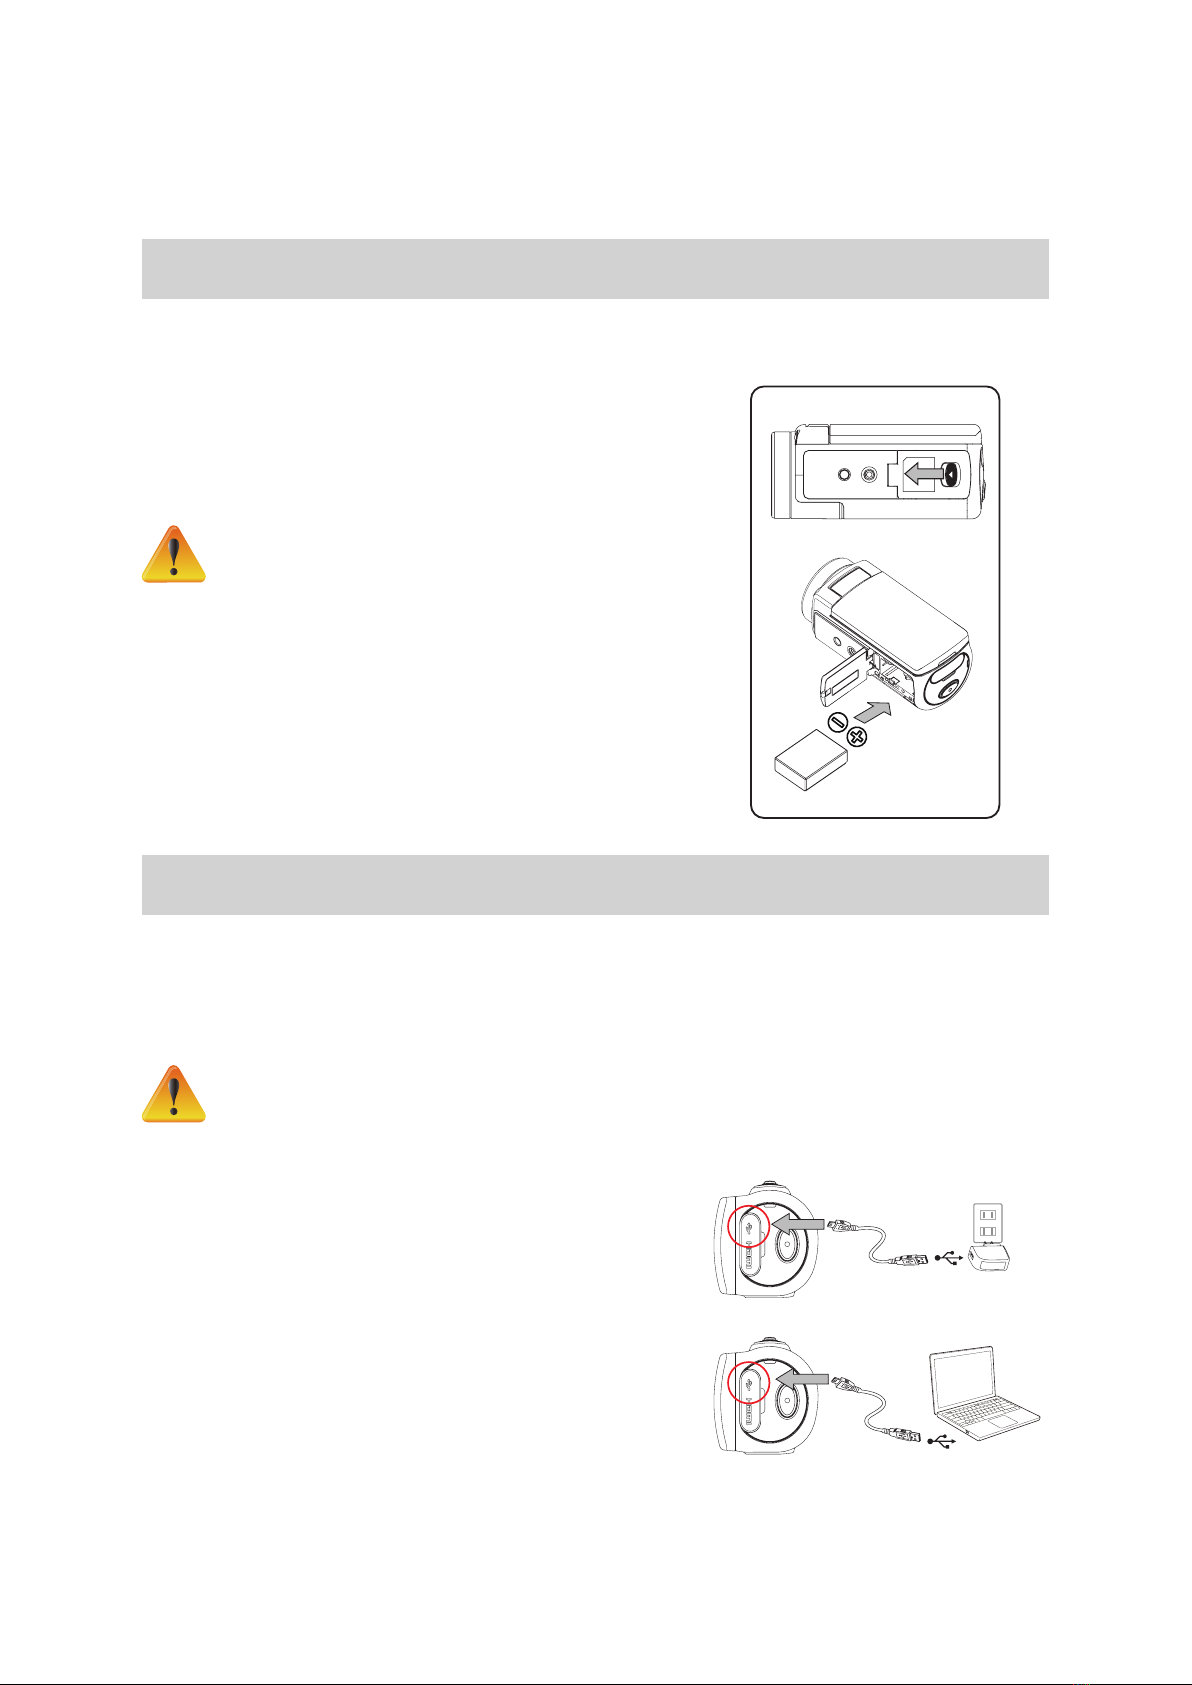
• Lithium-ionRechargeableBattery
• QuickStartGuide
• LensCoverandStrap

5
EN
Battery / SD Card Cover
Tripod Socket
Indicator Light
External Lens Mount
Microphone
[Tele/Wide Button
Optical Lens
[Photo Button
Front View
Bottom View

6
EN
Side/Rear View
Pause ButtonTouch Screen LCD
Power Button
Speaker
Record Button
Indicator LED
Mini USB Port
HDMI Port
Wireless (WiFi) On/Off Button

7
EN
Section 2
Getting Started
Loading the Battery
Beforeusingthecamera,youmustinsertthesuppliedLithium-ionrechargeablebattery.
1. Slidethelatchandopenthebatterycover.
2. Insertthebatteryobservingtothecorrectpolarity(+and-)as
showntotheright.
3. Closethebatterycover.
Note
• Dierentbatterytypesandambientoperating
temperatureswillaectthebatteryperformance.
• Neverexposethebatterytoextremeheat.Donotdispose
ofabatterybyburningorbythrowingitintoare.Heat
cancausethebatterytoexplodeand/orreleasecaustic
liquid,whichbothmaypossiblycauseseriousinjuries.
• Turnthepoweroandstopusingthebatteryifyoudetect
thatthebatteryisexcessivelyhot.
Charge the battery
Chargethebatteryfullybeforerstuse,usingtheACchargerortheprovidedUSBcable.TheLEDontheback
ofthecamerawillblinkasanindicationofactivecharging.TheLEDwillturntoasolidlight,indicatingthat
chargingiscomplete.Afullchargerequires4-5hours.TheLEDindicatorlightwillturnocompletelyafter3
to5minutes.Actualchargingtimewillvarydependinguponbatteryconditionandambienttemperature.
Note
• Neverchargethebatteryinawayotherthaninstructed.Otherwise,areorbatteryexplosionmay
occurresultingindamageorseriousinjury.
• UsetheACadapterprovidedonlywiththeproperpower
supplyvoltageasindicatedontheadapter.
• Usinganyotherpowersupplyvoltagemightcausedamage
tothecameraorpossiblyelectricshock.
• Whenyouneedtodisconnectpowerfromthecamera,be
suretounplugthepoweradapterfromtheelectricaloutlet.
• Ifawirelessconnectionisactive,thecamerawillkeep
runninguntilthepowerrunsout.
PC USB charging mode
Adapter charging mode

8
EN
Inserting and Removing an SD Memory Card (Optional)
Thet450comeswithlimitedinternalmemorywhichallowsyoutostoresomephotosandvideos.Youcan
expandthememorycapacitybyusinganoptionalSDmemorycard.Dependingonthemannerinwhichyour
localretailerbundledthecamerapackageamemorycardmayhavebeenincludedinthepackage.Ifnot
SecureDigital(SD)memorycardsarecommonlyavailableatcomputerstores,largeretailers,anddrugstores
1. InsertanSDmemorycardintotheslotuntilitclicksandlocksinplace.Refertothegurebelow.
2. ToremoveanSDcardfromthecamera,pressthecardinwardstoreleaseit.
3. Whenthecardpopsout,gentlyremoveitfromitsslot.
4. Recommendedmemory
capacity:4GBormore.
Note
• Whenamemorycardisbeeninsertedallnewvideos/photoswillbestoredonthecardasopposedto
thebuilt-inmemory.
• SDcardsmaybe“locked”toprotectdataonthecardfrombeingerased.WhenanSDcardislocked
itis“read-only”whileitislocked.Nophotosorvideoscan
berecordedwhenanSDcardislocked.Makesurethelock
isonthewriteableunlockedpositionbeforerecordingany
media.

9
EN
Turning the Video Camera On
• Toturnonthecamera:
1. FlipouttheLCDpanelandthecamerawillturnonautomatically.
2. Or,pressthePowerButtonforonesecondtoturniton.
3. Afteridlefor3minutes,thecamerawillturnoautomatically.
Conguring the Initial Date and Time Setup
• Thetimesettingscreenallowsyoutosetthecurrentdateandtime:
Operation Display Screen
1. TouchtheYear,Month,Day,Hour,Minute,andAM/PMiconsto
setthem.
2. Adjustthenumericvaluebytouching /
3. TouchtheOKicon( )toconrmthesetting.
4. TouchtheExiticon()toexit.
Getting Started
• Torecordavideo:PresstheVideoRecordButton tostartrecordingvideo.Tostoprecording,pressit
again.
• Topauserecording:PressthePauseButton topauserecording.Tocontinuetherecording,pressit
again.
• Totakeaphoto:PressthePhotoshutterButton halfwaydownuntilthefocusingframeturnsfrom
whitetogreen.Then,pressitdownfullytotakeyourphoto.
Focusing Frame: White Focusing Frame: Green
• Toviewstoredvideosandphotos:Touch onthescreentoswitchtothePlayback
Turning the Video Camera O
• Toturnothecamera:YoucaneitherpressthePowerButton foronesecond,oryoucanclosethe
LCDpanel.

10
EN
Section 3
Record Mode
Button Function
Power
• FlipouttheLCDpanelorpressthePowerbutton.
• Afteridlefor3minutes,thecamerawillturnoautomatically.
Record
• Presstobeginrecordingavideo.
• Pressagaintostoprecording.
Photo
• Pressthephotoshutterbuttontotakeaphoto.
Telephoto/Wide
• T:Zoomin.
• W:Zoomout.
Wireless
• Touchtoenable/disablewireless
Use the wireless function to link to a PC, Mobile device, or the Internet
(Ustream).
Pause
• Presstopauserecording.
• Pressagaintocontinuerecording.
Video/Photo Mode
• TouchtoswitchbetweenVideoandPhoto.
• Thedefaultmode(whenthecamerapowers-up)isVideomode.
Menu
• Touchtoopentheoptionmenu.
• Scrollleft/rightortouch tonavigateamongstthethreemenu
pages(Video/Photo/Setting).
Playback
• TouchtogotothePlaybackMode.
• Viewordeleterecordedles.
Note:TheVideo/PhotoMode,Menu,andPlaybackiconswillauto-hidetotheleftofthescreen.Simplytouch
thescreentodisplaytheseicons.

11
EN
LCD Monitor Information
TheindicatorsshownbelowmaydisplayontheLCD:
(1)
VideoResolution
FullHD(1080p30fps)
HD(720p60fps)
HD(720p30fps)
VGA(640×480)
SlowMotion(RecordvideoatQVGAresolution.)
PhotoResolution
16MP(byinterpolation)
5MP(nativeresolution)
3MP
(2)
00:06:30
Remainingrecordingtimeatthecurrentvideoresolution
1000
Remainingnumberofimagesatthecurrentresolution
(3) DatePrinting(PhotoRecordingOnly)

12
EN
(4)
SceneMode
SoftSkin.Thismodewillsoftenskintonestohelphideblemishes.
Night. Use this feature to help lighten up recording in night or dark
environments.
Backlight. Use this mode to help lighten up objects in front of sunlight
backgrounds.
Black/White.UsethismodetorecordvideoinBlackandWhite.
Classic.Usethisfeaturetorecordvideotolooklikeoldfashionmovies.
Negative.Usethistorecordvideoinnegativelmappearance.
(5)
WhiteBalance
Daylight
Fluorescent
Tungsten
(6) FaceTrackingOn(Photoonly)
(7) VideoStabilization(Videorecordingonly)
(8) TimeLapse(VideorecordingOnly)
(9)
DigitalLightOn
IlluminationLightOn
(10) SDCardInserted
(11)
Zoomindicator:
1Xto50X(10XOpticalzoomand5XDigitalzoom)
MotionDetection(VideoRecordingOnly)
(12) Self-timerenabled
(13)
WirelessSignalStrength
WirelesstoPC,Mobile,orInternet/Cloudison

13
EN
(14)
Battery:fullpower
Battery:highpower
Battery:mediumpower
Battery:lowpower
Battery:nopower
ACpowermode
On-screen touchable function icon
(15) PlaybackModeOn
(16) MenuOn
(17) SwitchbetweenVideoandPhotoMode
Note
• Taponthescreentoclosethetouchsensitivefunctionbar.Tapagaintoshowthebar.
• TheTimeLapseandSlowMotionfunctionscannotbeusedsimultaneously.Theyaremutually
exclusive.(IfTimeLapseison,thenSlowMotionmustbeo;orviceversa.)
• TheMotionDetect,SlowMotion,andTimeLapsefunctionscannotbeusedsimultaneously.Theyare
mutuallyexclusive.(IfMotionDetectisenabled,theSlowMotionandTimeLapsefunctionswillbe
disabled.)
• TheMotionDetectandZoomfunctionscannotbeusedsimultaneously.
• TheMotionDetect,TimeLapse,SlowMotion,andPausefunctionscannotbeusedsimultaneously.
• Whenchargingthecamera,youcanturnonthecameraanditwillbeusable.Batterychargingwill
takelonger,however.
• Thewirelesssignalstrengthindicatestheconnectionstrengthbetweenyourwirelessaccesspoint
andyourcamera.Someaccesspointsmaynotallowyoutoconnecttotheirnetwork.Networks
mayrequireapassword,oraMACaddress,ormayrequireotherauthorization.CheckwithyourLAN
administratororserviceprovider.
• Ifrequired,theMACaddressofyourcameramaybefoundintheSettingsMenu.Gotothesettings
menuandpressthe“ID”icon.

14
EN
Video Recording
• PresstheVideoButton tostartrecording.Whenavideoisbeingrecorded,atimeindicatorwilldisplay
ontheLCDmonitor( 00:06:30).Tostoprecording,pressitagain.
• Topauserecording,pressthePauseButton .Tocontinuerecording,pressitagain.
• Touch onthescreentoviewtherecordedvideo
• Fourvideoresolutionandframe-ratesettingsareavailable:
Video Quality
Full HD (1080p 30 fps)
HD (720p 60 fps)
HD (720p 30 fps)
VGA (640×480)
Note
• Theresolutionofanimagecapturedduringvideorecordingisthesameasthevideoresolution.
• WhentheSlowMotionfunctionisactivated,thevideoresolutionisQVGAandthefield-of-view(angle)
isreduced.
Photo Capture
• PressthePhotoShutterButton halfwaydownuntilthefocusingframeturnsfromwhitetogreen.
Then,pressitfullydowntotakeyourphoto.
• Touch onthescreentoviewyourphoto.
• Threephotoresolutionsettingsareavailable:
Image Quality
16 Mega Pixels (by interpolation)
5 Mega Pixels (native sensor resolution)
3 Mega Pixels
Using the Zoom Function
• Opticalzoommagniesthesceneofinterestwhenrecordingvideosortakingphotos.
1. Tozoomin/out,presstheTele/WideButton .Thecamerarstzoomsinusingitsopticalzoomlens.
Whentheopticalzoomlensisatitmaximumextentzoomingstopstemporarily.Pressandholdthe
TeleButton(T)againifyouwishzoomin(digitally)beyondtheopticalzoomrange.Thedigitalzoomis
activatedandzoomingcontinuesdigitally.
2. Zoomcanbesetfrom1Xto50X(10XOpticalzoomandthen5XDigitalzoom).

15
EN
Using a Wireless Connection
• TherearethreeWirelessconnectionoptions:
1. ConnecttoaPCwhichisalsoconnectedwirelesslytothesamesegmentofyourLAN
2. ConnecttoahandheldmobiledevicesuchasaniPhoneorAndroidwithwirelessaccessability
3. ConnecttotheInternet(theCloud)tostreamlivevideofromyourcameratotheinternetforbroadcastonthe
Ustreamwebsite.
• TostartawirelessconnectionpresstheWireless button.
Three Connection Types
Note
• Formoredetail,pleaserefertosections6,7,and8.
Recording Options Menus
Menu Flow
1. Touch on the screen to open the Menus.
2. Scroll left / right or touch on the menu screen to navigate amongst the three pages.
Video Photo Setting*
• VideoResolution
• Light
• Scene
• WhiteBalance
• VideoStabilization
• MotionDetect
• SlowMotion
• TimeLapse
• PhotoResolution
• FaceTracking
• DatePrinting
• ISO
• Self-Timer
• WirelessConnectionType
• WirelessID
• MenuSound
• TVSystem
• Language
• TimeSetting
• Formatmemory
• DefaultSetting
*RefertoSection5formoredetailoftheSettingmenu.

16
EN
Video Menu
Operation Display Screen
1. Touch onthescreentoopentheMenu.Themenuwill
showonthescreen.
2. Therstpagecontains8options:Resolution,Light,Scene,
WhiteBalance,VideoStabilization,MotionDetect,Slow
Motion,andTimeLapse.
3. TouchtheExiticon()toexit.
Video Resolution
Fourvideoresolutionandframeratesettings(framespersecond)areavailable.
• Full HD (1080p 30):Recordvideosat1920×1080presolutionat30fps.
• HD+ (720p 60):Recordvideosat1280×720presolutionat60fps.
• HD (720p 30):Recordvideosat1280×720presolutionat30fps.
• VGA (640×480): Recordvideosat640×480presolutionat30fps.
Operation Display Screen
1. IntheVideomenu,touchtheResolutionicononthescreen.
2. Touchtoselectthedesiredoption.
3. TouchtheOKicon( )toconrmthesetting.
4. TouchtheReturnicon()toreturn.
Note
• Theremainingrecordingtimewillvarybasedontheresolutionoptionyouselect.

17
EN
Light
Threelightsettingsareavailable.
• Light ON:Thelightwillbeturnedon.
• Digital Light: Toextendthedynamicrangeforbacklitandhighcontrastscenessothatthesubjectwillbe
brighterandclearer.
• Light OFF: Thelightisturnedo.
Operation Display Screen
1. IntheVideomenu,touchtheLighticononthescreen.
2. Touchtoselectthedesiredoption.
3. TouchtheOKicon( )toconrmthesetting.
4. TouchtheReturnicon()toreturn.
Without Digital Light Digital Light ON
Scene Mode
Youcanselecttheshootingmodeaccordingtosceneconditions.
• Auto:Shootwithoutanyspecialeectontheimage.
• Skin: Shootwithaneectthatmakesskintonesmorenatural.
• Night: UseNightModefornightscenesorunderlowlightingconditions.
• Backlight:Youcantakeshotswhenabrightlightisbehindthesubject.
• Black/White: Theimageisconvertedtoblack-and-white(grayscale).
• Classic: Theimageisrenderedinasepiatone.
• Negative: Theimageisconvertedtoappearifitwasthenegativeofthenormalscene.
Operation Display Screen
1. IntheVideomenu,touchtheSceneicononthescreen.
2. Touchtoselectthedesiredoption.
3. TouchtheOKicon( )toconrmthesetting.
4. TouchtheReturnicon()toreturn.
Note
• Toavoidblurryimages,placethecameraonaat,steadysurface,oruseatripodinlow-light
conditionsandwhenusingNightMode.

18
EN
White Balance
The camera adjusts the color balance of images automatically. Three manual white balance settings are
available.
• Auto: Thecameraautomaticallyadjustswhitebalance.
• Daylight: Shootingoutdoorsindaylight.
• Fluorescent: Underuorescentcondition.
• Tungsten: Undertungstenlightcondition.
Operation Display Screen
1. In the Video menu, touch the White Balance icon on the
screen.
2. Touchtoselectthedesiredoption.
3. TouchtheOKicon( )toconrmthesetting.
4. TouchtheReturnicon()toreturn.
Video Stabilization
Recordwithaneecttominimizecameramotion-jitterandimprovethedigitalimagestability.
Operation Display Screen
1. IntheVideo menu,touchtheVideoStabilizationicononthe
screen.
2. TouchtoselectOn()orO().
3. TouchtheReturnicon()toreturn.
Without Stabilization Stabilization ON
\
Motion Detection
Recordvideosautomaticallywhenthecameradetectsmotion.
Operation Display Screen
1. IntheVideomenu,touchtheMotionDetecticononthescreen.
2. TouchtoselectOn()or[O().
3. TouchtheReturnicon()toreturn.
4. The camera will start to record a video automatically if it
detectsmotion.Itwillstoprecordingonceitnolongerdetects
movement.

19
EN
Slow Motion
Recordvideoswithslowmotioneect.Whenplayingthevideo,theplaybacktimewillbelongerthanthe
actualrecordingtime.Someoccasionsyoucanusethiseect,suchastheskilldemonstrationofathletic
activitiesofallkinds,orakeymomentinanathleticgame.
Operation Display Screen
1. IntheVideomenu,touchtheSlowMotionicononthescreen.
2. TouchtoselectOn()orO().
3. TouchtheReturnicon()toreturn.
Note
• WhentheSlowMotionfunctionisactivated,audiowillnotberecordedanddigitalzoomwillbedisabled.
• Theeld-of-viewwillbecomenarrowerwhentheSlowMotionisactivated,because:
• WhentheSlowMotionfunctionisactivated,thevideoresolutionwillbeQVGA.
Time Lapse
Recordstillimages at specicintervalsthatyou can laterplaybackasonevideole.Thiseect is good for
recordingcloudscapes,seedgerminating,constructionprojects,andowersopening.
• O:DisablesTimeLapse.
• 1 Second: Recordoneframepersecond.
• 3 Seconds: Recordoneframeevery3seconds.
• 5 Seconds: Recordoneframeevery5seconds.
Operation Display Screen
1. IntheVideomenu,touchtheTimeLapseicononthescreen.
2. Touchtoselectthedesiredoption.
3. TouchtheOKicon( )toconrmthesetting.
4. TouchtheReturnicon()toreturn.
Note
• ThePausefunctioncannotbeusedwhentheTimeLapsefunctionisactivated.

20
EN
Photo Menu
Operation Display Screen
1. Touch onthescreentoopentheMenu.Themenuwill
showonthescreen.
2. Swipe your nger across the menu screen to change the
pageortouchtheP>icon.
3. The second page contains 5 options: Resolution, Face
Tracking,DatePrinting,ISO,andSelf-Timer.
4. TouchtheExiticon()toexit.
Photo Resolution
Threeresolutionsettingsareavailable.
• 16MP:4608×3456,16MP(interpolated).
• 5MP:2592×1944,5MP(nativeresolution).
• 3MP:2048×1536,3MP.
Operation Display Screen
1. InthePhotomenu,touchtheResolutionicononthescreen.
2. Touchtoselectthedesiredoption.
3. TouchtheOKicon( )toconrmthesetting.
4. TouchtheReturnicon()toreturn.
Face Tracking
Thecameracandetecthumanface(s)andfocusontheface(s)automatically.Thisfunctionworksonlywith
photocapturingonly.Itisaconvenientfeaturetocaptureportraitsinbacklightsituations.
Operation Display Screen
1. In the Photo menu, touch the Face Tracking icon on the
screen.
2. TouchtoselectOn()orO().
3. TouchtheReturnicon()toreturn.
• WhenFaceTrackingisenabled,thefocusframe(s)willdetect,andfocuson,humanface(s).Also,thefocus
frame(s)willdisplayontheLCDbeforetheRecordbuttonispressed.
Note
Other manuals for Pavilion t450
3
Table of contents
Other HP Camcorder manuals