manuals.online logo
Brands
  1. Home
  2. •
  3. Brands
  4. •
  5. HP
  6. •
  7. Desktop
  8. •
  9. HP rp5800 User manual

HP rp5800 User manual

PCI or PCIe Riser Card
Installation Guide
HP rp5800 Retail System
© Copyright 2011 Hewlett-Packard Development Company, L.P. The
information contained herein is subject to change without notice.The only
warranties for HP products and services are set forth in the express warranty
statements accompanying such products and services. Nothing herein should
be construed as constituting an additional warranty. HP shall not be liable for
technical or editorial errors or omissions contained herein.
Printed in
First Edition: May 2011
Before Your Begin
Before installing the riser card be sure to power off the rp5800 and
disconnect the power cord from the power outlet.
WARNING! To avoid the risk of serious injury, ensure that the
power cord is unplugged from the electrical outlet at the wall
before installing the riser card. Failure to do so may expose you to
the risk of electric shock.
CAUTION: To avoid the risk of damage to the system, ensure that
the power cord is unplugged from the electrical outlet at the wall
before installing the riser card.
WARNING! ONLY the accessories and equipment listed below
are authorized for connection to the 24V PoweredUSB port on the
riser card. Accessories and equipment that are not listed below
may cause a hazardous condition if connected.
• HP Hybrid Thermal Printer with MICR -- FK184AA
• HP Hybrid Thermal Printer with MICR and Imaging --
FK185AA
• HP USB Single Station Thermal Receipt Printer -- FK224AA
• HP USB Receipt Printer (Serial) -- BM476AA
• HP USB Receipt Printer -- EY023AA
Contact your retailer before connecting equipment not listed above to
the 24V PoweredUSB interface.
PCI and PCIe Riser Card Configurations
There are two riser cards available from HP for the rp5800 computer.
One has two PCI slots and the other has two PCI Express x1 slots. On
both cards the bottom slot is designated for the Powered Serial Port
expansion card.
CAUTION: The Powered Serial Port expansion card slot 3on the
riser card looks very similar to a PCIe x1 expansion card slot. DO
NOT attempt to install a PCIe x1 card in the bottom slot.
NOTE: Although there are three slots in each riser card, you can
only install two expansion cards in the riser card: one in the top
slot and one in either the middle slot or the bottom slot.
Installing the Riser Card
1. Turn off power to the system and disconnect the power cord from
the power outlet.
2. Slide the access panel handle toward the rear of the computer 1
then lift the access panel up and off the computer 2.
3. Rotate the power supply all the way back to access the full-height
expansion card retention latch.
NOTE: If you are using a PS/2 mouse and/or PS/2 keyboard,
make sure they are unplugged from the rear of the computer so
that the connectors do not block the power supply from rotating all
the way back.
4. Pull back the green tab on the full-height expansion card retention
latch to open the latch
5. If one or two expansion cards are installed in any of the riser card
expansion slots, remove the cards.
6. To remove the existing riser card, disconnect the hood sensor
cable from the system board 1, pull back the arm on the back of
the riser card slot 2, then lift the riser card out of the riser card slot
3.
7. Remove the two screws that secure the metal bracket to the top of
the card and remove the bracket. You do not need to remove the
hood sensor from the bracket.
8. Install the metal bracket onto the new riser card using the two
screws that secure the bracket in place.
No. Riser Card Slots
1PCI Expansion Card slots
2PCI Express x1 Expansion Card slots
3Powered Serial Expansion Card slots
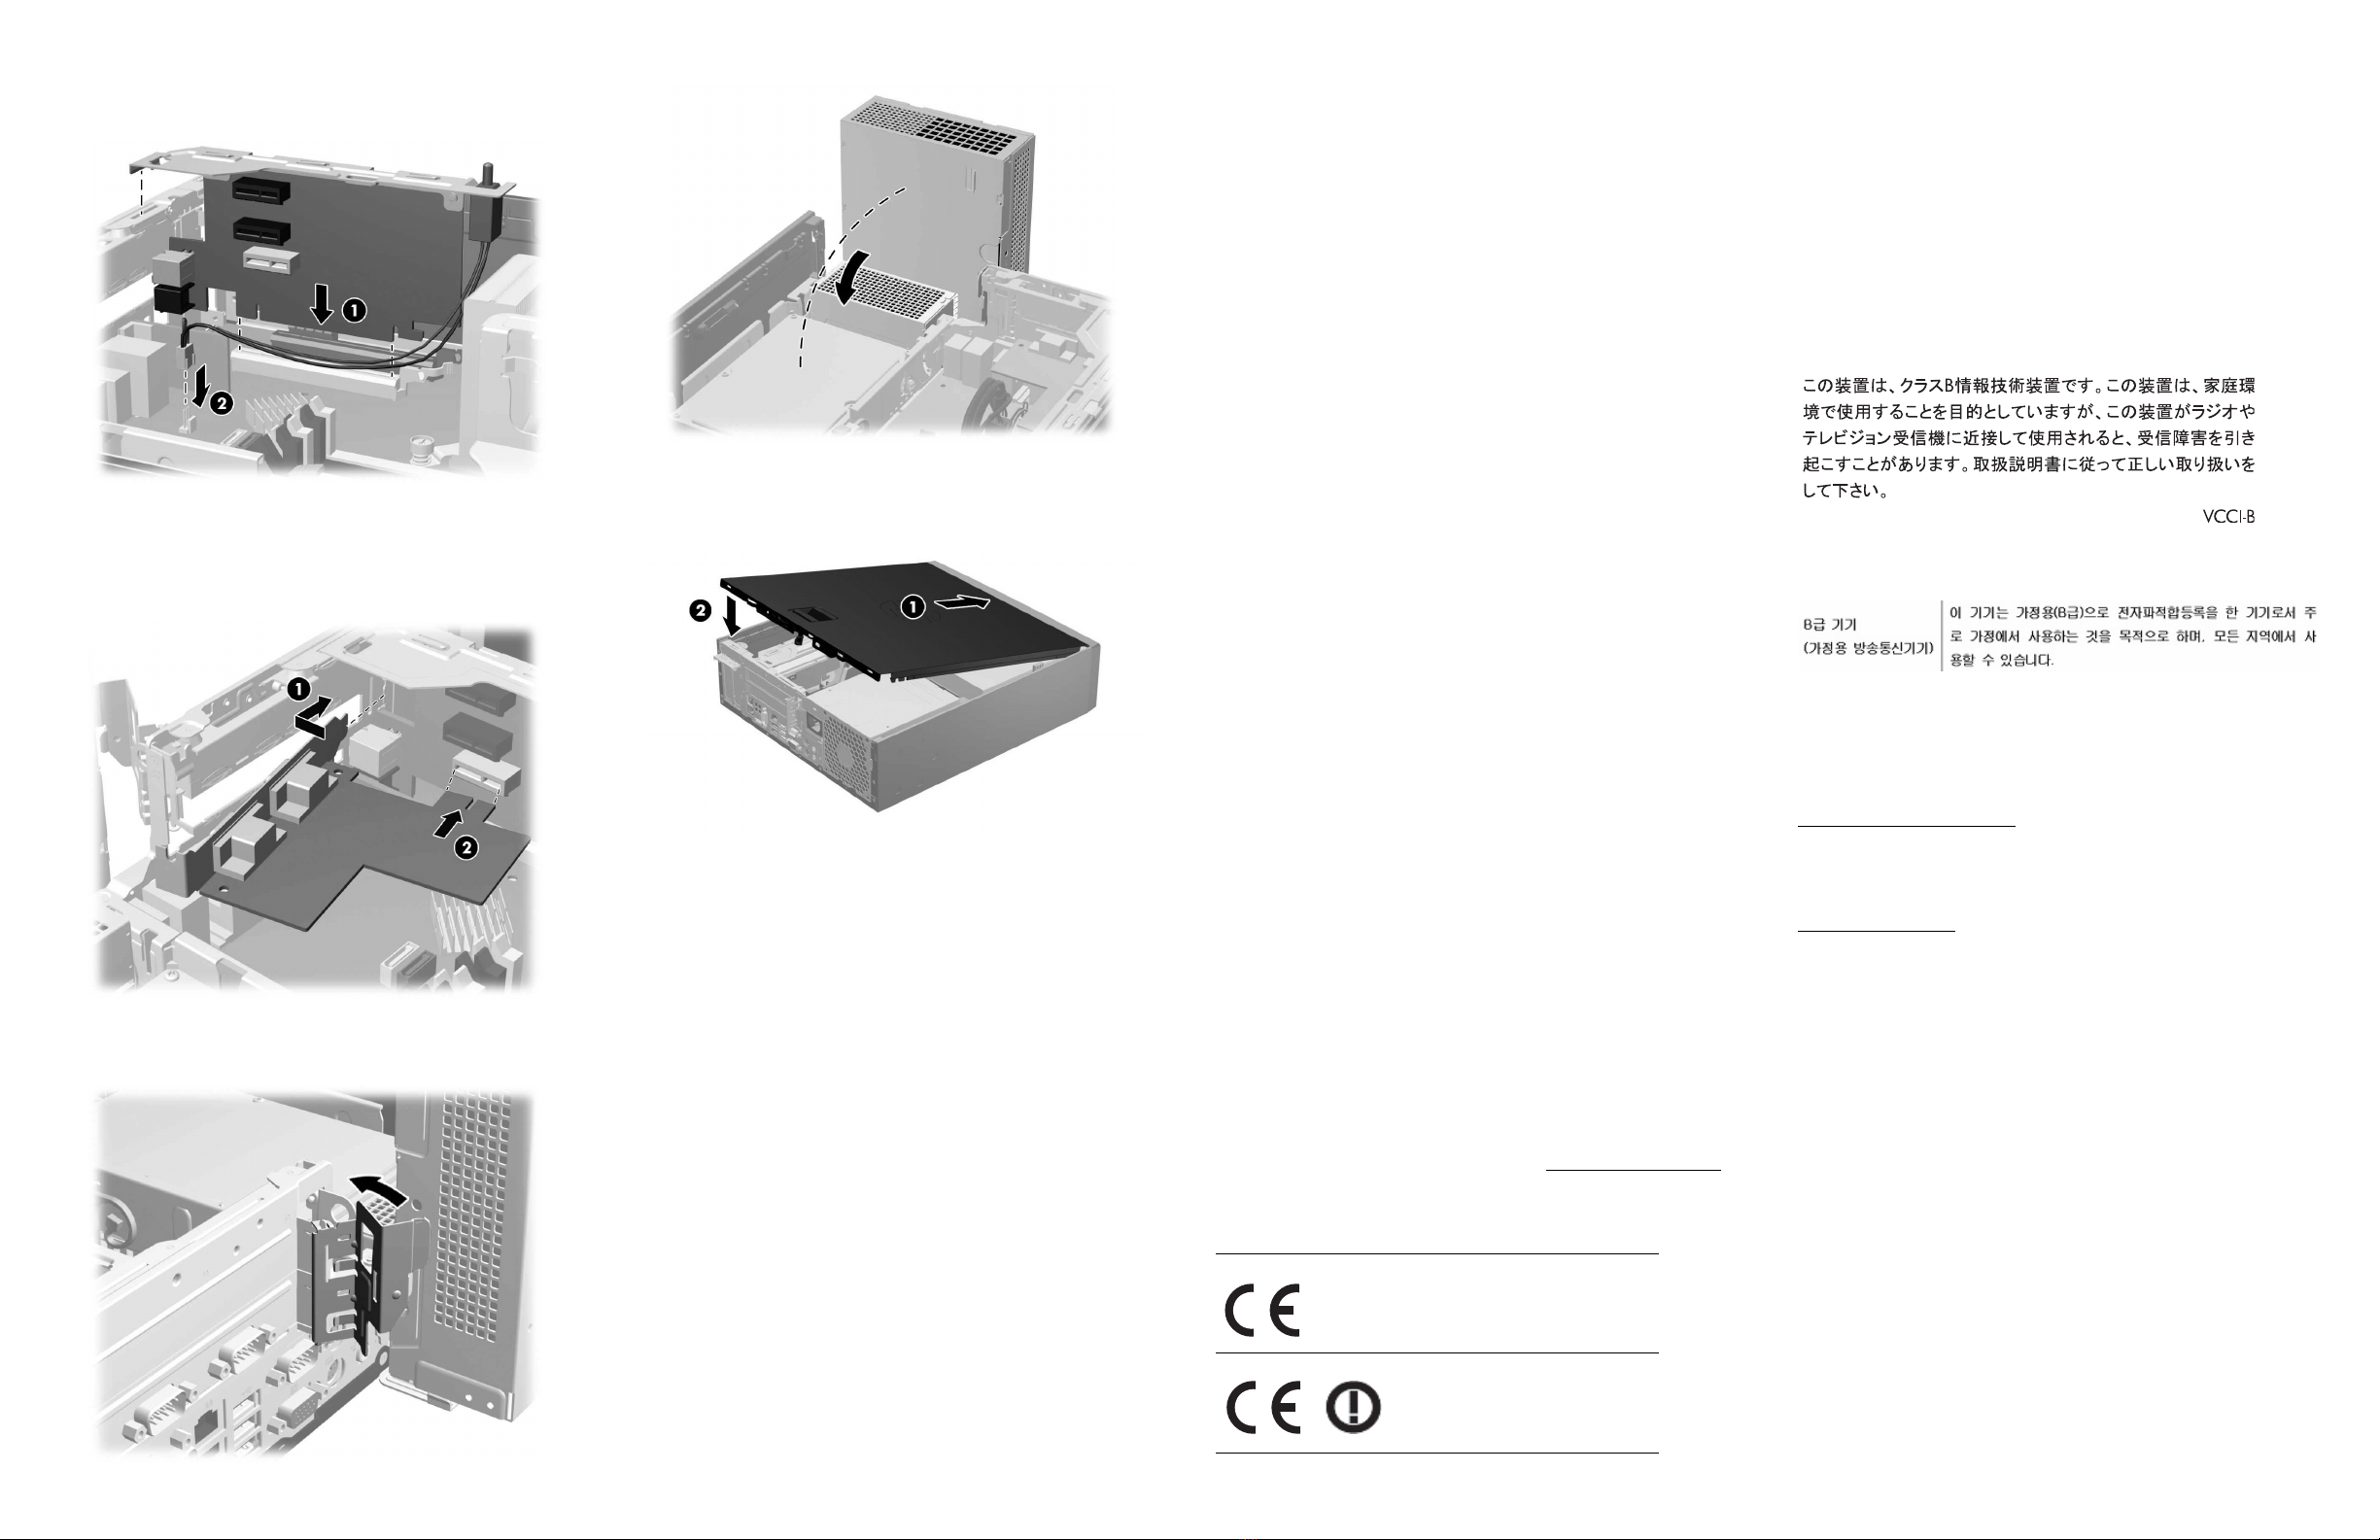
9. To install the new riser card, press the riser card firmly down into
the riser card slot on the system board 1and plug the hood
sensor cable into the hood sensor connector on the system board
2.
10. If a powered serial card was removed from the old riser card,
install the card into the bottom slot on the new riser card. Align the
bracket on the card with the open slot on the rear of the chassis 1
and press the card straight down into the expansion socket on the
riser card 2.
11. If you are adding a PCI or PCIe card, install it as shown above.
12. Close the expansion card retention latch.
13. Rotate the power supply back down to its normal position.
14. Slide the lip on the front end of the access panel under the lip on
the front of the chassis 1then press the back end of the access
panel onto the unit so that it locks into place 2.
15. Reconnect the power cord and any external devices, then turn on
the computer.
Federal Communications Commission Notice
This equipment has been tested and found to comply with the limits for
a Class B digital device, pursuant to Part 15 of the FCC Rules. These
limits are designed to provide reasonable protection against harmful
interference in a residential installation. This equipment generates, uses,
and can radiate radio frequency energy and, if not installed and used
in accordance with the instructions, may cause harmful interference to
radio communications. However, there is no guarantee that interference
will not occur in a particular installation. If this equipment does cause
harmful interference to radio or television reception, which can be
determined by turning the equipment off and on, the user is encouraged
to try to correct the interference by one or more of the following
measures:
•Reorient or relocate the receiving antenna.
•Increase the separation between the equipment and the receiver.
•Connect the equipment into an outlet on a circuit different from
that to which the receiver is connected.
•Consult the dealer or an experienced radio or television
technician for help.
Modifications
The FCC requires the user to be notified that any changes or
modifications made to this device that are not expressly approved by
Hewlett-Packard Company may void the user's authority to operate the
equipment.
Cables
Connections to this device must be made with shielded cables with
metallic RFI/EMI connector hoods in order to maintain compliance with
FCC Rules and Regulations.
Declaration of Conformity for Products
Marked with the FCC Logo (United States
Only)
This device complies with Part 15 of the FCC Rules. Operation is subject
to the following two conditions:
1. This device may not cause harmful interference.
2. This device must accept any interference received, including
interference that may cause undesired operation.
For questions regarding the product, contact:
Hewlett Packard Company
P. O. Box 692000, Mail Stop 530113
Houston, Texas 77269-2000
Or, call 1-800-HP-INVENT (1-800 474-6836)
For questions regarding this FCC declaration, contact:
Hewlett Packard Company
P. O. Box 692000, Mail Stop 510101
Houston, Texas 77269-2000
Or, call (281) 514-3333
To identify this product, refer to the Part, Series, or Model number found
on the product.
Canadian Notice
This Class B digital apparatus complies with Canadian ICES-003.
Avis Canadien
Cet appareil numérique de la classe B est conforme à la norme NMB-
003 du Canada.
European Union Regulatory Notice
Products bearing the CE marking comply with the following EU
Directives:
•Low Voltage Directive 2006/95/EC
•EMC Directive 2004/108/EC
•Ecodesign Directive 2009/125/EC, where applicable
CE compliance of this product is valid if powered with the correct CE-
marked AC adapter provided by HP.
Compliance with these directives implies conformity to applicable
harmonized European standards (European Norms) that are listed in the
EU Declaration of Conformity issued by HP for this product or product
family and available (in English only) either within the product
documentation or at the following web site: www.hp.eu/certificates
(type the product number in the search field).
The compliance is indicated by one of the following conformity
markings placed on the product:
Please refer to the regulatory label provided on the product.
The point of contact for regulatory matters is Hewlett-Packard GmbH,
Dept./MS: HQ-TRE, Herrenberger Strasse 140, 71034 Boeblingen,
GERMANY.
German Ergonomics Notice
HP products which bear the “GS” approval mark, when forming part of
a system comprising HP brand computers, keyboards and monitors that
bear the “GS” approval mark, meet the applicable ergonomic
requirements. The installation guides included with the products provide
configuration information.
Japanese Notice
Korean Notice
Online Technical Support
For the online access to technical support information, self-solve tools,
online assistance, community forums or IT experts, broad multivendor
knowledge base, monitoring and diagnostic tools, go to
http://www.hp.com/support.
Localized Versions of this Document
Localized versions of this document are available at
http://www.hp.com for the following languages:
•Brazilian Portuguese
•Dutch
•English
•French
•German
•Bahasa Indonesian
•Italian
•Japanese
•Korean
•Simplified Chinese
•Spanish
•Traditional Chinese
•Thai
For non-telecommunications
products and for EU harmonized
telecommunications products,
such as Bluetooth® within power
class below 10mW.
For EU non-harmonized
telecommunications products (If
applicable, a 4-digit notified
body number is inserted
between CE and !).

Other manuals for rp5800

7

Other HP Desktop manuals

HP dx5150 User manual

HP

HP dx5150 User manual

HP Z420 Series User manual

HP

HP Z420 Series User manual

HP Pavilion a400 - Desktop PC Installation instructions

HP

HP Pavilion a400 - Desktop PC Installation instructions

HP EliteDesk 800 G6 Installation instructions

HP

HP EliteDesk 800 G6 Installation instructions

HP Compaq dc5850 User manual

HP

HP Compaq dc5850 User manual

HP e-PC c10/s10 Service manual

HP

HP e-PC c10/s10 Service manual

HP ProDesk 600 G1 Tower Installation instructions

HP

HP ProDesk 600 G1 Tower Installation instructions

HP Pavilion dm4 Manual

HP

HP Pavilion dm4 Manual

HP Compaq Presario User manual

HP

HP Compaq Presario User manual

HP Omni Pro 110 Manual

HP

HP Omni Pro 110 Manual

HP A6110n - Pavilion - 2 GB RAM Operating manual

HP

HP A6110n - Pavilion - 2 GB RAM Operating manual

HP 9000 Series 300 Installation and operating manual

HP

HP 9000 Series 300 Installation and operating manual

HP Compaq Presario Manual

HP

HP Compaq Presario Manual

HP s3320f - Pavilion - Slimline Specification sheet

HP

HP s3320f - Pavilion - Slimline Specification sheet

HP Compaq Presario Manual

HP

HP Compaq Presario Manual

HP j6700 User manual

HP

HP j6700 User manual

HP Pavilion 403 Manual

HP

HP Pavilion 403 Manual

HP Compaq Pro 6305 Setup guide

HP

HP Compaq Pro 6305 Setup guide

HP Elite 7000 Microtower User manual

HP

HP Elite 7000 Microtower User manual

HP Vectra XA 6 Series User manual

HP

HP Vectra XA 6 Series User manual

HP Compaq dc5100 MT Manual

HP

HP Compaq dc5100 MT Manual

HP Media Center Operating instructions

HP

HP Media Center Operating instructions

HP A6300f - Pavilion - 2 GB RAM Installation instructions

HP

HP A6300f - Pavilion - 2 GB RAM Installation instructions

HP EliteBook 8540W Installation guide

HP

HP EliteBook 8540W Installation guide

Popular Desktop manuals by other brands

Sealey AP875 quick start guide

Sealey

Sealey AP875 quick start guide

ISE Sit-Stand installation manual

ISE

ISE Sit-Stand installation manual

Lenovo ThinkCentre 6008 user guide

Lenovo

Lenovo ThinkCentre 6008 user guide

Vecow MTC-4021 user manual

Vecow

Vecow MTC-4021 user manual

Edwards FireWorks UL5W7 installation manual

Edwards

Edwards FireWorks UL5W7 installation manual

Dell INSPIRON Inspiron 1100 owner's manual

Dell

Dell INSPIRON Inspiron 1100 owner's manual

Dell OptiPlex 7000 Micro Service manual

Dell

Dell OptiPlex 7000 Micro Service manual

Sony VPCL116FX Specifications

Sony

Sony VPCL116FX Specifications

Asus PB60G user manual

Asus

Asus PB60G user manual

Lenovo ThinkCentre Edge 72 Vodič za uporabnika

Lenovo

Lenovo ThinkCentre Edge 72 Vodič za uporabnika

Balt HI-LO-3 45972 Assembly instructions

Balt

Balt HI-LO-3 45972 Assembly instructions

Acer Aspire L series user guide

Acer

Acer Aspire L series user guide

Lenovo THINKSTATION D10 Handboek voor de gebruiker

Lenovo

Lenovo THINKSTATION D10 Handboek voor de gebruiker

Acer Aspire T620 user guide

Acer

Acer Aspire T620 user guide

Lenovo IdeaCentre B510 Quick reference guide

Lenovo

Lenovo IdeaCentre B510 Quick reference guide

Asus Essentio CM1740 user manual

Asus

Asus Essentio CM1740 user manual

Lenovo ThinkCentre M70q Setup guide

Lenovo

Lenovo ThinkCentre M70q Setup guide

Sony VGN-BX41VN user guide

Sony

Sony VGN-BX41VN user guide

manuals.online logo
manuals.online logoBrands
  • About & Mission
  • Contact us
  • Privacy Policy
  • Terms and Conditions

Copyright 2025 Manuals.Online. All Rights Reserved.