HSW DRENCH-MATIC User manual

Bedienungsanleitung
Instruction Manual
Manual de instrucciones
Mode d‘emploi
DRENCH – MATIC®
by HSW for veterinary use only
Vet-line
Henke-Sass, Wolf GmbH
Keltenstrasse 1
D-78532 Tuttlingen
Germany
Tel. +49 74 62 94 66 207
Fax +49 74 62 94 66 52 08
www.henkesasswolf.de
E-mail: [email protected]

Automatische Selbstfüllerspritze
z. Bsp. zur oralen Anwendung bei Schafen und Rindern
Innovatives ergonomisches Design
Einfache Handhabung und leichte Reinigung
Hochfester Plastikzylinder
Dosiermenge stufenlos einstellbar
Die DRENCH–MATIC® ist in zwei verschiedenen Versionen erhältlich: 10 / 23 ml (silber) 23 / 30 ml (weiß)
Die DRENCH – MATIC® wurde zur oralen Anwendung von Lösungen bei Schafen und Rindern oder
Reihenimpfungen entwickelt. Das ergonomische, anwenderfreundliche Design sowie alle verwendeten,
hochfesten Materialien, die bei der Herstellung verwendet wurden, garantieren einen ermüdungsfreien
Einsatz sowie extrem hohe Lebensdauer Ihrer DRENCH – MATIC®.
Die Produkte sind vor jedem Gebrauch mit geeigneten Mitteln zu reinigen und zu desinfizieren.
Beachten Sie bitte hierbei die Hinweise der Hersteller der von Ihnen eingesetzten Desinfektionsmittel.
Einsatz als DRENCHER
1. Schlauch an der Rückseite des Drenchers befestigen
2. Option 1: Befestigung des Schlauches an der Draw-off Kappe bei Einsatz mit Flasche
3. Option 2: Befestigung des Schlauches am Ansatz des Rückenkanisters
4. Lösen Sie die Arretierschraube (A) für die stufenlose Dosiermengeneinstellung
5. Drehen Sie die Dosierschraube (B) bis die gewünschte Dosiermenge erreicht ist.
Arretierschraube (A) festdrehen. Griff nach vorne drücken
6. Einstellschraube (C), stufenlos einstellbar zur Regulierung des gewünschten Federdruckes.
Einsatz als Injektions-Spritze
Für diese Anwendung ist Sonderzubehör erforderlich
a) Luer Lock Adapter mittels Überwurfmutter
befestigen, eventuell Drench Nozzle vorher abnehmen
b) Luer Lock Kanüle einsetzen
c) Dosiermenge wie unter Pkt. 4 / 5 einstellen, Griff nach vorne drücken
d) Spritze leicht schräg halten, Griff loslassen und aus Flasche aufziehen
e) Bei eventuell eingezogenen Luftblasen wiederholen Sie bitte wie unter (c) beschrieben
Dosiereinstellung: Positionieren Sie die schwarze Kante des Kolbens auf die gewünschte Dosiermenge
auf der Graduierung am Zylinder. Aussehen variiert je nach Modell. Die Spritzen
sind mit unterschiedlichen Kolben ausgestattet, dementsprechend ist gemäß den
nachstehenden Bildern zu verfahren.
DRENCH – MATIC®
by HSW

Gebrauch / Pflege der HSW DRENCH – MATIC®
Entfernen Sie nach der Applikation alle Rückstände mit den gängigen Reinigungsmitteln und
spülen Sie die Spritze anschließend unter warmem Wasser gründlich ab.
Wechseln der O-Ringe auf der Kolbenstange / Reinigung des Zylinders
(Vorgehensweise variiert je nach Modell)
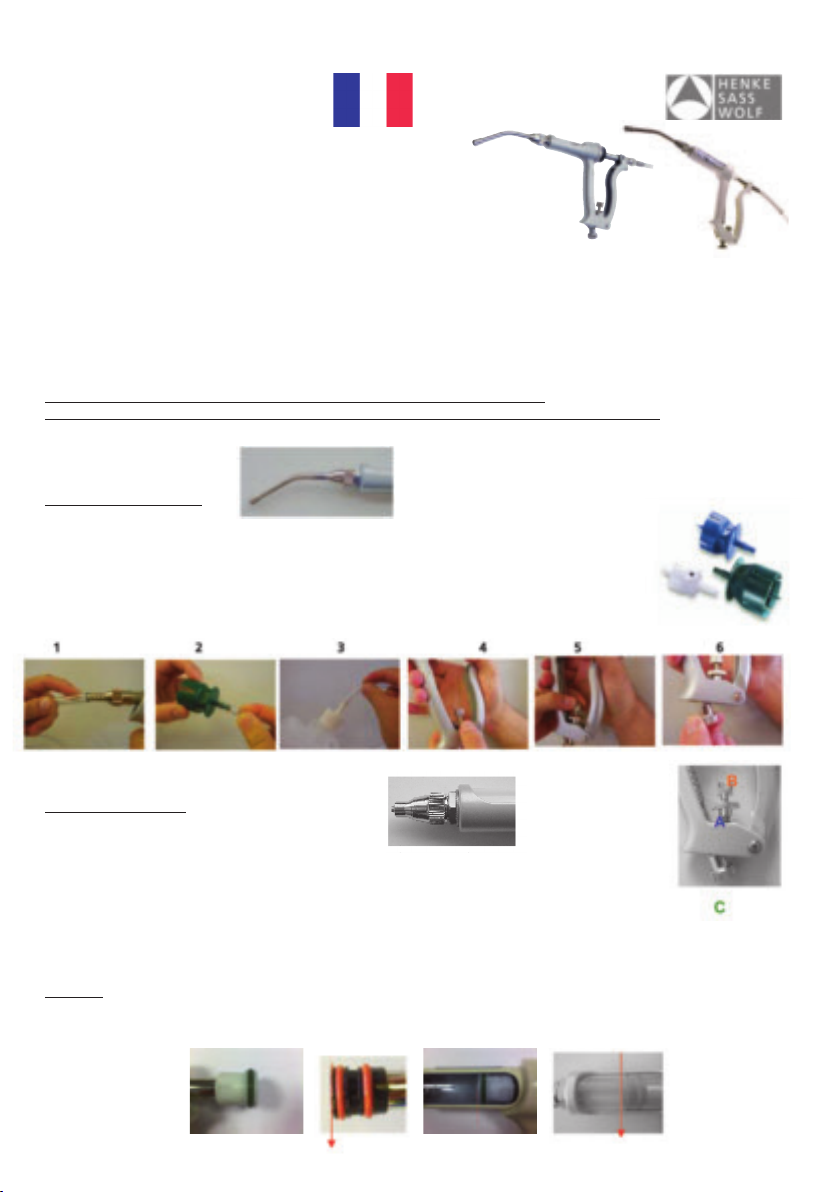
Bitte beachten Sie folgende Vorgehensweise beim Wechseln des O-Ringes auf der Kolbenstange:
Bild 1 Bild 2 Bild 3 Bild 4
1) Dosiereinstellung auf maximalen Wert einstellen, wie unter Punkt 4 / 5 auf Seite 1 beschrieben
2) Überwurfmutter lösen
3) Kolbenstange nach oben aus Halterung nehmen und aus dem Zylinder herausziehen
4) O-Ring bzw. O-Ringe wechseln. Füllen Sie 100% reines Olivenöl nativ extra kalt gepresst oder gleichwertiges
Speiseöl in eine Tasche zwischen den beiden O-Ringen auf dem Kolben.
Ölen Sie den O-Ring bzw. die O-Ringe ebenfalls leicht.
Ziehen Sie zur Reinigung (auskochen) den Kunststoffzylinder aus den beiden Griffen.
Der Einbau erfolgt in umgekehrter Reihenfolge.
5) Verwenden Sie bitte nur Originalersatzteile, um eine einwandfreie Funktion sicherzustellen.
Ausführung mit Stift Ausführung mit Flansch ein O-Ring
Bei Ausführung 23 ml/30 ml (weiß) mit Stift: Durch Lösen der Schraube am Gehäuse sowie 1/4Drehung des Behälters bis
Stift im Schlitz erscheint, den Zylinderbehälter mit Zylinder nach hinten abziehen.
Bei Ausführung 23 ml/30 ml (weiß) mit Flansch: Durch Lösen der Schraube am Gehäuse des Behälters, den Zylinderbehäl-
ter mit Zylinder nach hinten abziehen.
Wechsel / Reinigung der Ventile
– Überwurfmutter bei allen Versionen am Vorderteil lösen
– Ventil mit Feder und O-Ring wechseln oder reinigen
– Überwurfmutter am Schlauchansatz lösen bzw. den Kolben von der Kolbenstange
mit einem Schraubenschlüssel lösen und gleichermaßen verfahren. Bei Ausführung
mit Stift oder Flansch, Ventil gegen leichten Widerstand nach vorne abziehen.
– Ventil mit Feder und O-Ring wechseln oder reinigen
Bei allen Modellen auf den korrekten Einbau der Federn achten!
Desinfektion
Es wird unbedingt empfohlen, die DRENCH-MATIC®sowie Kanülen vor jeder Applikation zu desinfizieren.
1) Reinigen Sie die Spritze mit heißem Wasser.
2) Legen Sie die komplette DRENCH – MATIC®inkl. eingesetzter Kanülen oder Drench Nozzles in einen Behälter mit
Wasser ein und kochen Sie diese ca. 20 Minuten aus.
3) Entnehmen Sie die DRENCH – MATIC®nach dem Kochvorgang, trocknen diese mittels Reinigungstuch und spritzen
Sie trocken durch.
Ölen der O-Ringe
Kolbenstange schwergängig: Kolbenstange mit Kolben je nach Ausführung wie oben beschrieben entfernen. O-Ringe
je nach Ausführung mit 100% reinem Olivenöl nativ extra, kalt gepresst oder gleichwertigem Speiseöl schmieren. Bitte
beachten Sie die Haltbarkeits- sowie Lagerungsangaben der Hersteller. Verwenden Sie keine mineralischen Öle, Silikonöle,
WD-40, Glycerin oder Alkohol. Auf Petroleumbasis eingesetzte Öle können den Kolben beschädigen, bzw. mindern die
Lebensdauer des Produktes.

Automatic self-filling syringe
Can be used, for example, for oral application of sheep and cattle
Innovative and ergonomic design
Simple handling and easy cleaning
Plastic barrel
highly resistant adjustable dosage
Design for use as an Injector or Drencher
The DRENCH–MATIC® is available in two different versions: 10 / 23 ml (silver) 23 / 30 ml (white)
The DRENCH – MATIC® has been designed for the oral application of sheep and cattle or for multiple
dosing. The ergonomic, user – friendly design and strong materials which are used in manufacturing,
guarantee a tireless operation and a high lifetime of the DRENCH – MATIC®
It is essential that the drencher is cleaned before each use. Please follow the manufacturers
recommendations with any cleaning or disinfectant solutions used.
Using a tube feeding syringe
1. Attach one end of the tube to the drencher
2. Option 1: Attach the other end of the tube to the selected Draw Off Cap
3. Option 2: Attach the other end of the tube to the bag pack
4. Loosen dose adjustment look nut (A)
5. Turn dosing adjustment screw (B) to set the required dosage. Retighten lock nut. (A)
6. Handle spring pressure can be adjusted (C) for comfort and tension
Using an Injection Syringe
For this application, additional accessories are required.
a) Fit Luer Lock Adapter by means of the screw nut onto the tip
(attached nozzle to be removed first)
b) Insert Luer Lock needle
c) Adjust/set dosage as described under item 4/5 by pushing the handle in forward position
d) Squeeze adjustable handle and then release to draw fluid into the barrel.
To remove air bubbles inside the barrel, repeat as mentioned in step (c) taking care not to waste fluid
e) In case of air bubbles repeat step (c)
Dose Setting: Align the black surface of the piston to the required dosage shown on the barrel.
The syringes are equipped with different pistons; please operate according to
the following illustrations.
DRENCH – MATIC®
by HSW

Instruction / Maintenance of the HSW DRENCH – MATIC®
Remove all traces of material from drencher by flushing thoroughly with a warm water detergentmix.
Replacing piston O-ring / Cleaning of the barrel
(Varied according to each model)
Should it become necessary to replace the piston O-ring the subsequent procedure must be followed:
picture 1 picture 2 picture 3 picture 4
1) Adjust the handle by means of the dosage setting to maximum as instructed on page 1 (point 4/5)
2) Unscrew fixing ring for the handle
3) Remove piston rod by sliding it backwards
4) Replace two O-rings and lubricate new O-rings as well as one of the notches on the piston for self-
lubrication during use with 100% pure oil, cold squeezed or equivalent.
For the cleaning (boiling), remove barrel from housing by pushing it back.
Reinstall the opposite way.
5) Make sure that only original spare parts are used to guarantee function.
Version with pin Version with flange one O-Ring
23 ml/30 ml (white) with pin lock: unscrew the fixing screw on housing and turn housing by 1/4and retract the housing
with barrel from the handle. You can now remove the barrel.
23 ml/30 ml (white) with flange: unscrew the fixing screw and slide the housing with barrel backwards.
You can now remove the barrel.
Replacing the Valves
– unscrew fixing screw on the front part
– exchange or clean valve, spring and washer
– Version with pin or flange: Remove the valve to the front, against a slight resistance.
Unscrew tubing attachment at the rear end of the syringe or unscrew the piston from the
piston rod with a screw-wrench and operate correspondingly
– exchange or clean valve, spring and washer or unscrew the piston from piston rod
with a screw-wrench and operate correspondingly
With all versions, please pay attention to a correct assembly of the springs!
Desinfection
It is recommended to disinfect the DRENCH – MATIC®as well as the needles or nozzles before and after each use.
1) Draw “hot“ water into the barrel
2) Suspend the complete DRENCH – MATIC®including needles or nozzles in a container of water and boil for
up to 20 minutes.
3) Remove the DRENCH – MATIC®from container, wrap cloth around the handle and pump it dry
TO LUBRICATE
If piston becomes sluggish: Remove piston and lubricate O-rings (according to each model) with 100% pure oil, cold squee-
zed or equivalent vegetable oil. Please follow the manufacturers durability and storage life instruction. Do not use mineral
oil, silicone, WD-40, glycerine or alcohol. Petroleum based products harden the piston, reducing the life of the component.

Jeringa oral automática
Diseño innovador y ergonómico
Fácil de limpiar tanto las válvulas como el émbolo
Cilindro de plástico
Dosificación regulable
Diseño para utilizar como dosificador oral
Dos versiones; 10 cc y 23 cc
Tubo trasero de plástico para alimentación
La DRENCH–MATIC®está disponible en dos versiones differentes: 10 / 23 ml (plate) 23 / 30 ml (blanca)
Las DRENCH–MATIC® de 10 y 23 cc han sido diseñadas para la administración automática de soluciones y
suspensiones. El uso ergonómico, diseño agradable y los materiales resistentes utilizados en la fabricación,
garantiza incansables aplicaciones y una alta duración de la vida de DRENCH–MATIC®
Es esencial que la jeringa esté limpia antes de cada utilización. Por favor seguir las recomendaciones
del fabricante para la limpieza y desinfección.
Utilización del tubo
de alimentación
1. Fijar un extremo del tubo a la parte posterior de la jeringa
2. Opción 1: Fijar el otro extremo del tubo al adaptador para frascos seleccionado
3. Opción 2: Fijar el otro extremo del tubo al tapón de la mochila
4. Aflojar el fijador del dosificador con la tuerca (A)
5. Ajustar la dosificación deseada con el tornillo (B) Fijar la dosificación con la tuerca (A)
6. La presión del muelle del mango se puede ajustar con el tornillo (C)
Utilización como jeringa inyectable
Para esta aplicación accesorio especial es necesario
a) Fijar adaptador Luer-Lock con capa de tuerca, enventualmente quitar en primer lugar
el Drench Nozzle
b) Instalar cánula Luer-Lock
c) Ajustar la cantidad de dosificación vea puntos 4/5, apretar el mango al frente
d) Agarrar la jeringa un poco diagonal, desasir el mango y recoger de la botella
e) Si eventualmente hay burbujas, repite por favor cómo descrito en punto (c)
Modo de dosificación: Alinear el émbolo de color negro con la dosis deseada que se ve en el cilindro.
El aspecto varia según modelo. Las jeringas tienen pistones diferentes, por
consiguiente se debe proceder según las ilustraciones a continuación.
DRENCH – MATIC®
por HSW

Instrucciones / Mantenimiento de HSW DRENCH – MATIC®
Sacar todo tipo de restos de material de la jeringa limpiando a fondo con agua
caliente mezclada con detergente.
Cambiar el reten del embolo / Limpiar el cilindro
(Procedimiento varia según modelo)
Seguir las instrucciones siguientes para cambiar el retén del émbolo.
1 2 3 4
1) Ajustar el mango al máximo de dosificación como se indica en la página 1 (4 / 5)
2) Desenroscar la rosca de la cobertura
3) Sacar la varilla y el émbolo tirando hacia atrás
4) Cambiar los dos retenes del émbolo y lubricarlos con aceite de oliva o aceite vegetal inclusio el émbolo
5) Asegurarse de que las partes de recambio cambiadas son originales
Ejecución con barrita Ejecución con brida junta tórica
Concerniente ejecución 23 ml/30 ml (blanco) con barrita: por desbloquear el tornillo de la caja asi cómo 1/4rotación
del envase hasta que la barrita se figure, retirar el envase del cilindro con el cilindro atrás.
Concerniente 23 ml/30 ml (blanco) con brida: por desbloquear el tornillo de la caja del envase, retirar el envase de
cilindro con el cilindro atrás.
Cambiar las Válvulas
– Desenroscar la parte frontal de la jeringa
– Cambiar or limpiar la válvula, el muelle y el retén
– Desenroscar el tubo de la parte posterior de la jeringa respectivamente quitar el pistón del
vástago de pistón con una llave de tuerca, y proceder igualmente. Ejecución con barrita o
brido,
retirar la válvula contra resistencia floja el frente.
– Cambiar o limpiar la válvula, el muelle y el retén
Concerniente todos los modelos: tener cuidado a la instalación correcta de las lengüetas!
Desinfección
Es recomendable que la DRENCH-MATIC®, las agujas y los conos sean desinfectados antes
y después de cada uso.
1) Agitar agua caliente en el interior del cilindro.
2) Introducir la DRENCH – MATIC®completa incluyendo las agujas y los conos en un recipiente con agua y
hervir durante 20 minutos.
3) Sacar la DRENCH – MATIC®del recipiente envolverla en un trapo y secarla.
Para lubricar:
Si el émbolo se desliza lentamente:
Sacar el émbolo y lubricar el retén con aceite de oliva 100%, o aceite vegetal. Por favour seguir las instrucciones
del fabricante de almacenaje y para la durabilidad d la vidal del producto. No utilizar aceite mineral, silicona, WD-40,
glicerina o alcohol.
Los productos basados en petróleos secan los retenes reduciendo la vida de los componentes.

Seringue à auto-remplissage automatique pour
une application orale pour les moutons et les bovins
Design innovant et ergonomique
Maniement simple et nettoyage facile
Cylindre en plastique hautement résistant
Quantité de dosage réglable en continu
La seringue est disponible en deux modèles différents: 10 ml / 23 ml (argent) 23 ml / 30 ml (blanc)
La seringe DRENCH – MATIC®a été élaborée pour une application orale auprès des moutons et bovins ou
pour des vaccinations en série. Le design ergonomique et innovant ainsi que les matériaux résistants
utilisés, garantissent une utilisation simple ainsi qu‘une longue durée de vie de la DRENCH – MATIC®.
Les produits sont à nettoyer et à désinfecter avant chaque utilisation.
Tenir compte des instructions du fabricant lors de l‘utilisation du produit désinfectant.
Utilisation DRENCHER
1. Fixer le tuyau à l‘arriè du Drenchers
2. Option 1: Fixer le tuyau au capuchon Draw-off lors la mise en place avec bouteille
3. Option 2: Fixer le tuyau au bidon arrière
4. Dévisser la vis pour la mise en place de la quantité de dosage
5. Tourner la vis de dosage (B) pour atteindre la quantité de produit souhaité (B)
Serrer la vis d‘arrêt (A) – Appuyer sur la poignée
6. Vis de réglage (C) réglage graduellement pour la régulation de la pression du ressort
Utilisation seringue
Pour cette appliacation, il faut avoir des
accessoires spéciales.
a) Serrer l‘adaptateur Luer Lock Adapter au milieu de l‘embase à verrouillage femelle, enlever
éventuellement le Drench Nozzle auparavant
b) Insérer la canule Luer Lock
c) Régler la quantité de dosage – voir points 4 / 5, tirer la poignée vers l‘avant
d) Tenir la seringue légèrement en biais, lâcher la poignée et retirer de la bouteille
e) Renouveler l‘opération (c) afin d‘éliminer toutes bulles
Dosage: Positionner le bord noir du piston sur le dosage souhaité de la graduation du
cylindre. L‘apparence varie selon le modèle. Les seringues sont équipées avec des
différents pistons, il faut suivre les illustrations suivantes.
DRENCH – MATIC®
par HSW

Entretien après utilisation du HSW DRENCH – MATIC®
Après utilisation et enlèvement du flacon, rincer soigneusement la seringue à l‘eau chaude
Changement des joints sur le piston / nettoyage du cylindre
(Manière d‘agir dépends du modèle)
Veuillez tenir compte des recommandations suivantes lors du changement des joints sur le piston
1 2 3 4
1) Mise en pace du dosage sur maximum comme indiqué au point 4 / 5 page 1
2) Enlever la vis de réglage
3) Enlever le piston du support et le sortir du cylindre
4) Changer le joint, lubrifier légèrement avec de l‘huile d‘olive ou une autre huile alimentaire.
Sortir le cylindre en plastique pour le nettoyer (bouillir)
La mise en place du cylindre et du piston se fait dans le sens inverse
5) N‘utiliser que des pièces de rechange d‘origine
Version avec broche Version avec bride joint torique
Modèle 23 ml /30 ml avec broche (blanc): Enlever la vis à la boîte et tourner 1/4le conteneur afin que la broche
apparaisse à L‘échancrure.
Modèle 23 ml /30 ml avec broche (blanc): Enlever la vis à la boîte, après il faut irer la boîte du cylindre à l‘arrière
Changement / nettoyage de la soupape
– enlever la vis de réglage
– Changer ou nettoyer la soupage avec ressort et joints
– Modèle avec broche et flanc: Il faut décoller la soupape à l‘avant contre une petite resistance.
– Enlever la vis de réglage et dévissez le piston du perchoir du piston avec un clef à vis et
opérez à la manière correspondante.
– changer ou nettoyer soupage avec ressort et joints
Veuillez respecter le montage correct des ressorts avec tous les modèles.
Désinfection
Il est impérativement recommandé de désinfecter la DRENCH-MATIC®ainsi que les canules avant chaque usage
1) Rincer la seringue à l‘eau chaude
2) Poser la DRENCH – MATIC®complète ainsi que les canules ou Drench Nozzles dans un récipient avec d‘leau, bouillez
environ 20 minutes
3) Après cette opération, sécher la seringue à l‘aide d‘un tissu et soufflez la pour la sécher
Lubrification des joints
– démontez les joints du piston
– lubrifiez les joints avec de l‘huile 100% végétale (olive pressée à froid) ou équivalent
– vérifiez la date de péremption et les indications de stockage du fabricant
– n‘utilisez aucune huile minérale ou silicone, WD 40, glycérine ou alcool ni aucune base de pétrole, ces produits
détériorent les composants et réduisent la durée de vie de la seringue

© copyright · Henke-Sass, Wolf GmbH · 700037-05/12 · Änderungen in Technik und Design vorbehalten · Printed in Germany
© copyright · Henke-Sass, Wolf GmbH · 700037-05/12 · Subject to amendments in technology and design · Printed in Germany
© copyright · Henke-Sass, Wolf GmbH · 700037-05/12 · Reseradoa los derechos de modificaciones técnicas y de diseñco · Impreso en Alemania
© copyright · Henke-Sass, Wolf GmbH · 700037-05/12 · Sous reserve de modifications dans le design et la technique · Printed in Germany
Die kompletten Ersatzteillisten für dieses Produkt können Sie in der jeweils aktuellen Version unter www.henkesasswolf.de herunterladen oder anfordern.
You can download an updated version of the complete spare part list for this product under www.henkesasswolf.de or kindly request the same.
Usted puede obtener una version actualizada completa, de las piezas de recambio en, www.henkesasswolf.de, o solicitarnolo a nostros.
La liste complète des pièces détachées pour ce produit est d’ores et déjà disponible et peut-être téléchargée sur notre site, www.henkesasswolf.de.
Table of contents
Languages:
Other HSW Pet Care Product manuals
Popular Pet Care Product manuals by other brands

Prevue Hendryx
Prevue Hendryx Southbeach Collection/FlatTop Assembly

Trixie
Trixie Therm`o`Dog Insulation Assembly instructions

Dogtra
Dogtra FREE PLUS ARC1200S owner's manual

PETINCCN
PETINCCN P680 user manual

Premier Pet
Premier Pet GBC00-16997 user manual

Drinkwell
Drinkwell Ceramic Lotus Pet Fountain operating guide