Huazheng HZ5231 User manual

HZ5231
Intelligent DC High Voltage
Generator
User Manual
Huazheng Electric Manufacturing (Baoding) Co., Ltd

Dear use r:
Thank you for choosing HZ5231 Intelli ge nt DC High Voltage Generat or.
We hope that this instrum ent can mak e your wo rk easier and mo re
enjoyable, so that you can get the feel in g of office automat io n in th e test
and an al ysis work.
Be fore using th e instrum en t, please rea d this manual, and ope rate and
maintain the instrum ent accordi ng to the manual to pr olong its servi ce life .
"Just a lig ht pr es s, the tes t will be co mp le ted au tomatically" is th e
oper at ing cha racteristics of thi s instrument.
If you ar e satisfi ed wi th th is instrument, pl ea se tell your colleagues;
if you ar e not sati sfied with this instrum en t, please ca ll (0312) 6775656 to
te ll you to serve yo u at all times-Bao di ng Huazheng El ec tric Man ufacturing
Co. , Lt d., our company will de finite ly ma ke yo u satisfied !

Contents
I. Scope of application.................................................................................................................... 1
II. Technical features.......................................................................................................................1
III. Main technical performance, specifications and working methods:..................................1
IV. Instructions for use.................................................................................................................... 2
V.The use of discharge rod.......................................................................................................... 10
VI.Precautions................................................................................................................................ 11

1
I. Scope of application
HZ5 23 1 series intelligent DC high-voltage generators are mainly used for DC withstand
test or DC leakage current test of zinc oxide arrester, power cable, transformer, circuit
breaker, generator and other high-voltage electrical equipment in power departments,
industrial and mining enterprises, metallurgy and iron and steel enterprises.
With AIPWM technology, the inaccuracy linearity of PWM technology is adjusted, and the
precision of the instrument is greatly improved.Using AI technology set overvoltage
protection and overcurrent protection to replace the digital dial switch can only be set
voltage value, can't set the current value and voltage drift problems, increased the AI
automatic zinc oxide lightning arrester measurement, cable section pressure test, the
function of automatic pressure test, and can direct print test report and save the test report,
retained the manual way, strengthen the function of arbitrary voltage, power flow to print,
and segmented timing function.The instrument added perpetual calendar and time
function, experimental report with time and date.
II. Technical features
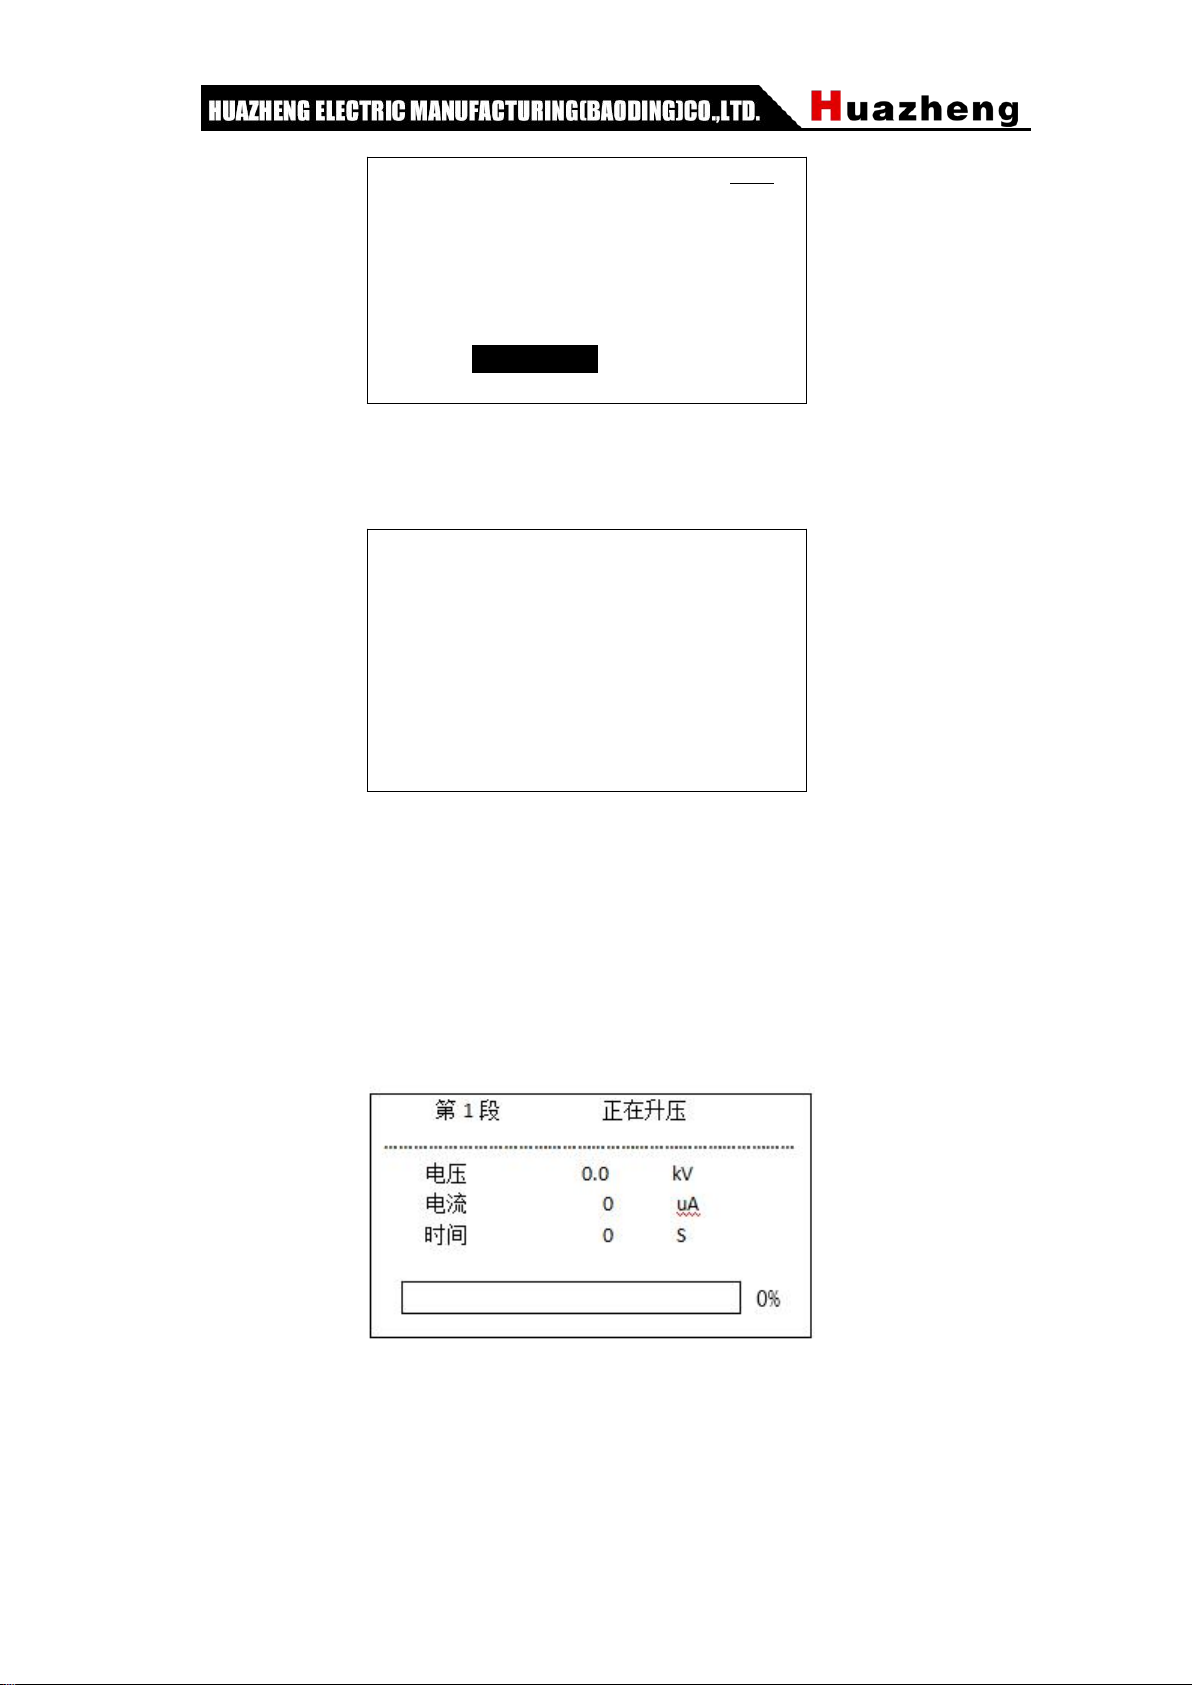
· Fully automatic MOA test, fully displaying the process of lifting pressure and holding
time.
· Automatic cable section withstand test, fully displaying the boost process and holding
time.
· Automatic withstand voltage test, complete display of pressure lifting process and
holding time.
· AIPWM technology is adopted to adjust the inaccurate linearity of PWM, and the
accuracy is greatly improved.Ripple coefficient ≤0.2%.
· With segmented timing and printing functions of arbitrary voltage and current.
· The instrument added perpetual calendar and time functions, and the experimental
report included time and date.
III. Main technical performance, specifications and
working methods:

2
1.Voltage output 0-120kV precision ±1%±1 word
2.Current output 0-2000 UA accuracy ±1%±1 word
3.With automatic zinc oxide arrester test, cable section withstand voltage, automatic
withstand voltage function
4.It has the function of manually adjusting voltage output.
5.Working mode: Intermittent use: rated load 30 minutes, 1.1 times rated voltage: 10
minutes
6.Working environment: Temperature: -10℃~ +40℃
7.Relative humidity: no more than 85% at room temperature of 25℃(no condensation)
8.Altitude: below 1500 meters
IV. Instructions for use
(1) Panel description
Figure 1 Panel illustration
Printer 2. LCD 3. High voltage output 4. Emergency stop switch 5.A power outlet
RS232 interface 8. Touch keyboard 9. Voltage regulating knob 10.The power switch
input 12. Ground 13. High voltage output
(2)Operation instructions
Turn on the power switch, and the screen will display the starting screen
shown in Figure 3

3
Intelligent DC high voltage
generator
Figure 3 Boot screen
Then the function selection interface in Figure 4 appears
Manual booster test
Automatic boost test
Zinc oxide arrester
Cable section withstand voltage
MOA multiple test with one key (optional)
.......................................................................
..............................................................
Set up the The query
Figure 4 Function selection interface
Press the Function key in this interface to move the cursor to each test item.Then press
the "start stop" button to enter the corresponding test item.
Go to Query to see the stored trial record data. A total of 255 records can be stored
Enter "Settings" date time adjustment, you can adjust the date time.
1. Dc high voltage generator test:
Under the function selection interface shown in Figure 4, move the cursor to the DC
high-voltage generator and press the start/stop button.
FIG. 5 shows the interface for setting parameters of DC high voltage generator.

4
manual
Protection voltage 030 KV
Protection current 1500 UA
Start the return
FIG. 5 Parameters setting interface of DC high voltage generator
At this point, press the function key to move the cursor to the corresponding parameter
and modify the value by increasing or decreasing the key or by starting and stopping the
key.
After modifying the parameters, move the cursor to start the test, and press the start and
stop key to enter the test.Figure 6 appears
FIG. 6 Booster interface of DC high voltage generator
At this point, gently twist the regulating knob to make the voltage rise slowly, and observe
the current.
Figure 7 is the voltage regulating knob
Figure 7.
When the boost is over, press the "start stop" button or the emergency stop switch to
close the high-voltage output, and the screen of automatic discharge will be
displayed as shown in Figure 8
Is testing
..........................................................................
.............
Voltage is 0.2 KV
Current 0, U, A
Time S

5
Release residual current
130.1kV
FIG. 8 Automatic discharge screen
If the discharge voltage is very slow, it is recommended to use a discharge rod for manual
discharge.When the discharge is completed, the instrument returns to the function
selection interface shown in Figure 4.
2. Zinc oxide lightning arrester test:
Under the function selection interface shown in Figure 4, move the cursor to the zinc
oxide lightning arrester and press the "Start stop" button.
Figure 9 shows the interface for setting parameters of zinc oxide arrester.
MOA
Protection voltage 030.00 kV
Protection current 001000 uA
Start the return
FIG. 9 Interface for setting parameters of zinc oxide arrester
At this point, press the Function key to move the cursor to the corresponding parameter
and modify the value by increasing or decreasing or start and stop.
The 10kV lightning arrester protection voltage is 30kV, and the protection current is
1000uA.
After modifying the parameters, move the cursor to start the test, and press the "start
stop" key to enter the test.After the test, enter the results interface, which displays
Figure 10

6
MOA 2018-05-16 13:31:02
Test voltage: 27.1kV
Test current: 1000 uA
75% voltage: 20.3 kV
75% current: 5 uA
Print save exit
FIG. 10 Interface of results of zinc oxide arrester
The voltage goes up and the current is 0.When the voltage rises to about 25kV, the
current starts to increase greatly, but the voltage increases very little.
When the current rises to 1000uA, the boost of the instrument stops. At this point, the
timing of 1mA current starts, and the default timing is 5 seconds.Or do it at a set time.
When the clock had finished, the instrument began to buck,
When the voltage drops to 0.751mA, wait 5s.
Then quickly turn off the high pressure. Automatic discharge. Figure 8 shows the
automatic discharge screen.
If the discharge voltage is very slow, it is recommended to use a discharge rod for
manual discharge. When the discharge is completed, the instrument displays the
interface of zinc oxide arrester test results shown in Figure 10.
At this point, press the Select key to "save" to store test results.
Press the Select key to "Print" to print the test results.
At this point, press the select key to "exit" the instrument and return to the functional
selection interface shown in Figure 4.
3. Sectional voltage withstand test of cable:
Under the function selection interface in Figure 4, move the cursor to the cable section
withstand voltage, and press the start/stop key.
FIG. 14 shows the interface for setting voltage withstand parameters of cable segment.

7
cable
Set the parameters
The boost speed is 3.0
Start the return
Figure 14
Click "Set Parameters" in Figure 14 to display figure 15 below
Cable section parameters
1, 005.0 kV 000010 seconds
2 010.0kV 000010 seconds
3 015.0kV 000010 seconds
4 020.0kV 000010 seconds
5 022.0V 000010 seconds
6 026. 0kV 000002 seconds
FIG. 15 Interface for setting voltage withstand parameters of cable sections
At this point, press the function key to move the cursor to the corresponding parameter and
modify the value by increasing or decreasing the key or by starting and stopping the key.Set
the voltage and withstand voltage time, modify the parameters, click "start and stop" to exit
the interface shown in Figure 14, move the cursor to "Start" test, and press "Start and stop"
to enter the test.Figure 16 appears

8
Fig.16 Cable section withstand voltage first section Interface Fig.16 Cable section
withstand voltage first section timing
When the voltage rises to the first voltage, start the timer, as shown in Figure 16.
When the timer ends, start the second phase of the boost...
The instrument will turn off the high pressure when the step 6 boost time is
completed.Automatic discharge. Figure 8 shows the automatic discharge screen.
If the discharge voltage is very slow, it is recommended to use a discharge rod for manual
discharge.
When the discharge is completed, the instrument displays the interface of the cable
section withstand voltage test results shown in Figure 17.Press up and down to turn the
page
The 2018-05-16 cable 13:30:40
Test voltage test current
Paragraph 1:5.0 KV 0 uA
Paragraph 2 10.2 KV 0 uA
Paragraph 3:15.1 KV 0 uA
Print save exit

9
The 2018-05-16 cable 13:30:40
Test voltage test current
Paragraph 4:20.1 KV 0 uA
Paragraph 5:22.1 KV 0 uA
Paragraph 6 26.0kV 180.2 uA
Print save exit
FIG. 17 Interface of cable section withstand voltage test results
At this point, press the Select key to "save" to store test results.
Press the Select key to "Print" to print the test results.
At this point, press the select key to "exit" the instrument and return to the functional
selection interface shown in Figure 4
4. Automatic boost test:
Under the function selection interface in Figure 4, move the cursor to the automatic boost
test and press the start/stop key.
FIG. 19 Interface for setting parameters of automatic boost test.
automatic
Test voltage 020.00 kV
Protection current 000 0 30uV
Boost speed 3.0
Pressure holding time 0010
Start the return
FIG. 19 Interface for setting parameters of automatic voltage withstand test
At this point, press the function key to move the cursor to the corresponding parameter
and modify the value by increasing or decreasing the key or by starting and stopping the
key.
After modifying the parameters, move the cursor to start the test and press the "Start" key
to enter the test.Figure 20 appears

10
FIG. 20 Booster interface of automatic withstand voltage test
When the voltage rises to the set voltage, start the timing, and the instrument will turn
off the high voltage when the timing is finished. Automatic discharge. Figure 8 shows
the automatic discharge screen.If the discharge voltage is very slow, it is recommended
to use a discharge rod for manual discharge.
When the discharge is completed, the instrument displays the interface of the results of
the automatic voltage withstand test shown in Figure 21.
The 2018-05-16 13:30:53 automatically
Test voltage: 20.3 kV
Test current: 20 uA
Test time: 10 S
Print save exit
At this point, press the Select key to "save" to store test results.
Press the Select key to "Print" to print the test results.
At this point, press the select key to "exit" the instrument and return to the functional
selection interface shown in Figure 4
V.The use of discharge rod
1. The special discharge rod shall not contact directly with THE HIGH-voltage DC
discharge and shall be kept at a distance. When the corona discharge occurs at the end of
the discharge rod and the voltage on the tested product drops by 20% gradually, the
discharge rod shall touch the housing of the microammeter and discharge.Finally, the
ground wire at the ground end of the discharge rod is directly hung on the test subject.

11
2. Pay special attention not to discharge the ground wire directly on the high-voltage
microammeter housing, so as to avoid the damage of high-voltage microammeter caused
by the strong impulse discharge current
VI.Precautions
1.Boost before: to boost the knob "zero", and then press the high voltage through the
boost experiment.
2.At the end: buck to "zero" and then disconnect according to the high voltage, do not turn
off the power, use the discharge rod to discharge the tested product, after the discharge,
turn off the power to end the experiment.
3.Note when discharging, the discharge rod can not discharge (microammeter case), this
will burn the microammeter.The discharge rod should discharge on the subject.
4.When conducting capacitive tests, for example, when conducting cable tests, current
limiting resistors must be installed at the output end of the voltage doubling cylinder.
5.During the air lift test, the output screw at the top of the double pressure tube should be
tightened with the insulation cap, and the micro-ammeter or high-tension wire should not
be used for the lift-off test.
Table of contents
Other Huazheng Portable Generator manuals