manuals.online logo
Brands
  1. Home
  2. •
  3. Brands
  4. •
  5. Hubbell
  6. •
  7. Lens
  8. •
  9. Hubbell KIM LIGHTING LTV57 User manual

Hubbell KIM LIGHTING LTV57 User manual

P.O. Box 60080 •16555 East GaleAve.
City of Industry, California 91716-0080
626/968-5666 • FAX 626/330-3861
Revised 7/16/10 ECN 100715008 Status 6 Part No. 95642
INSTRUCTIONS PERTAINING TO A RISK OF FIRE OR INJURY TO PERSONS
IMPORTANT SAFETY INSTRUCTIONS!
WARNING: Fixtures must be grounded in accordance with local codes or the National Electrical Code.
Failure to do so may result in serious personal injury. All work should be done by a qualified electrician.
SAFETY WARNING: Lighted lamp is HOT! Do not touch lens, guard, or enclosure. Do not operate
luminaire with missing or damaged lens.
MAINTENANCE: For optimum performance a regularly scheduled maintenance program should be followed.
See page 3 for furthur maintenance instructions. KEEP THIS SHEET FOR FUTURE REFERENCE.
LTV57
LTV58
LTV757
LTV758
Tools Required: J" Hex Socket Wrench F" Hex Socket Wrench K" Open End Wrench
Philips Screwdriver Silicone Grease
IMPORTANT: Condensation inside the fixture is a common occurrence due to the expanding and condensing of the
trapped air inside the fixture as it is cycled on and off. When the lamp is energized during the evening hours, moisture
on the inside of lens will burn off as fixture heats up. It will reappear after power is shut off and the inside air condenses
during cooling. A large majority of this moisture can be avoided by following the installation guide lines as described in
the housing installation instructions. Always relamp fixture during low humidity periods. Before closing fixture, remove
desiccant from zip lock bag and place in reflector compartment. Energize the lamp for approximately five (5) minutes to
dry air inside fixture. Install lens and lens frame as described below.
LENS FRAME / REFLECTOR INSTALLATION:
Make certain electrical supply is OFF before starting fixture installation.
!
1. Remove debris shield from
housing & discard. (Shield is
aluminum, please recycle.)
2. Place dessicant package inside
housing before connecting quick-
disconnect.
!
LIGHTVAULT®- LTV Lens ReflectorInstallation Instructions
!
3. Connect housing quick-disconnect
to reflector assembly quick-
disconnect.
Page 2 Kim Lighting • 16555 E. Gale Ave. • P.O. Box 60080 • City of Industry, CA 91716-0080 • 626/968-5666 • FAX 626/330-3861
LIGHTVAULT®- LTV Lens Reflector LTV57/58 & LTV757/758
Installation Instructions
7. Install lamp of type and wattage shown on fixture
label. 8. Note: After installing lamp, let fixture warm up for
5 minutes before completely closing. Install
eyeball-lens frame, lens and gasket making sure
surface is clean and dry.
1
2
3
4
Coat screws with silicone grease and tighten
opposing screws progressively and evenly until tight.
Any foreign object trapped in gasket will create
potential points of entry for ground water.
5. Install eyeball assembly onto
housing (making sure eyeball will
be facing desired position), and
tighten opposing screws
progressively and evenly until
tight.
Note: Eyeball will mount in 8
directions @ 45° increments.
6. Remove eyeball frame, lens and
gasket.
LENS FRAME / REFLECTOR INSTALLATION INSTRUCTIONS cont'd.
4. Grease threads before installing
eyeball onto housing.
Note: Make sure gasket and gasket
surface is clean and dry. Make
certain no dirt has fallen into screw
holes. Any foreign objects trapped
in the gasket areas will create
potential points of entry for ground
water.
Page 3 Kim Lighting • 16555 E. Gale Ave. • P.O. Box 60080 • City of Industry, CA 91716-0080 • 626/968-5666 • FAX 626/330-3861
LIGHTVAULT®- LTV Lens Reflector LTV57/58 & LTV757/758
Installation Instructions
LAMP / MAINTENANCE INSTRUCTIONS:
Make certain electrical supply is OFF before starting lamp installation.
1. To replace lamp remove eyeball lens frame & gasket with lens.
2. Replace lamp of type and wattage as shown on
fixture label.
3. NOTE: After installing lamp let fixture warm up
for 5 minutes before completely closing.
4. Before closing fixture, clean lens and gasket inside
and out. Be sure gasket and gasket surface is dry.
Make sure no dirt has fallen into screw holes. Any
foreign object trapped in the gasket will create
potential points of entry for ground water.
Coat screws with silicone grease and tighten opposing
screws progressively and evenly until tight.
!
MAINTENANCE:
▼A regularly scheduled maintenance program must be established to keep fixtures clean. Dried leaves and paper
can burn if allowed to accumulate on high temperature lenses. A buildup of dirt and other material on the lens
may cause excessive temperatures within the fixture.
▼High temperature lenses can burn feet, hand or objects inadvertently placed on top of fixtures.
▼Clean lens gasket and frame inside and out. Before closing fixture, be sure gasket and gasket surfaces are clean
and dry. Make sure no dirt has fallen into screw holes.
▼Install lens gasket and lens frame. Coat screws with silicone grease and tighten progressively and evenly until
tight.
WARNING:
This H.I.D. / Fluorescent fixture utilizes a lamp that may
contain mercury. For information on disposal of lamp,
go to website: www.lamprecycle.org
Page 4 Kim Lighting • 16555 E. Gale Ave. • P.O. Box 60080 • City of Industry, CA 91716-0080 • 626/968-5666 • FAX 626/330-3861
KIM LIGHTING LIMITED WARRANTY
When installed in accordance with Kim Installation Instructions
and accepted trade practices, the following shall apply:
General Product Limited Warranty Coverage
All material and component parts used in the manufacture of
Kim Products, are warranted to be free from defects of
material and/or workmanship for a period of 1 year from date
of sale, with the following exceptions:
Auxiliary Equipment
All auxiliary equipment (such as lamps, ballast, and
transformers) provided by and/or included in Kim Products
shall carry the component manufacturer's warranty.
Copper, Bronze and Brass Landscape Components
Copper and Bronze Landscape fixture components shall be
warranted against defects of material and/or workmanship,
and failure due to corrosion, for a period of 25 years from date
of sale. Kim Lighting's brass components are constructed
from several brass parts that are manufactured by various
methods at various times. Since brass naturally deepens in
color as it ages through the normal oxidation process, these
parts may exhibit subtle differences in coloration when the
product is new. This is normal and expected. These color
differences will be eliminated shortly after installation through
the normal brass oxidation process.
Composite In-Grade Components
Composite In-Grade fixture components installed below
grade, shall be warranted against defects of material and/or
workmanship, and failure due to corrosion, for a period of 7
years from date of sale.
Aluminum Landscape Components
Aluminum Landscape fixture components not in direct contact
with soil, shall be warranted against defects of material and/or
workmanship for a period of 3 years from date of sale.
Aluminum fixture components in direct contact with soil shall
be warranted from defects of material and failure from
corrosion for a period of 1 year from date of sale.
Stainless Steel Components
Stainless steel landscape components (Lens Rings) installed in
the outdoor environment shall show signs of oxidation after 5 to
6 years of install and is dependent on the application and its
environment. A proper maintenance and cleaning program will
extend the beauty of the stainless steel.
Limit of Liability and General Conditions
Only products which are installed, used and maintained in
accordance with applicable Kim instructions, specifications
and accepted trade practices, are covered by the Kim
Warranty. During the warranty period, with proof of purchase,
Kim will repair or replace with the same or similar product, at
Kim's option, without charge. Labor costs are the owner's
responsibility and are excluded from this warranty. This
warranty is void if the product is modified, tampered with,
misapplied, poorly installed, improperly maintained, or
subjected to abnormal conditions.
Repair or replacement as provided under this warranty is the
exclusive remedy of the purchaser. This warranty is in lieu of
all other warranties, expressed or implied, including any
implied warranty of fitness for a particular application. Kim
Lighting shall not be liable to the purchaser for indirect or
consequential damages.
How may we serve you better?
Please let us know. Visit our website at:
www.kimlighting.com
Your concerns are important to us.
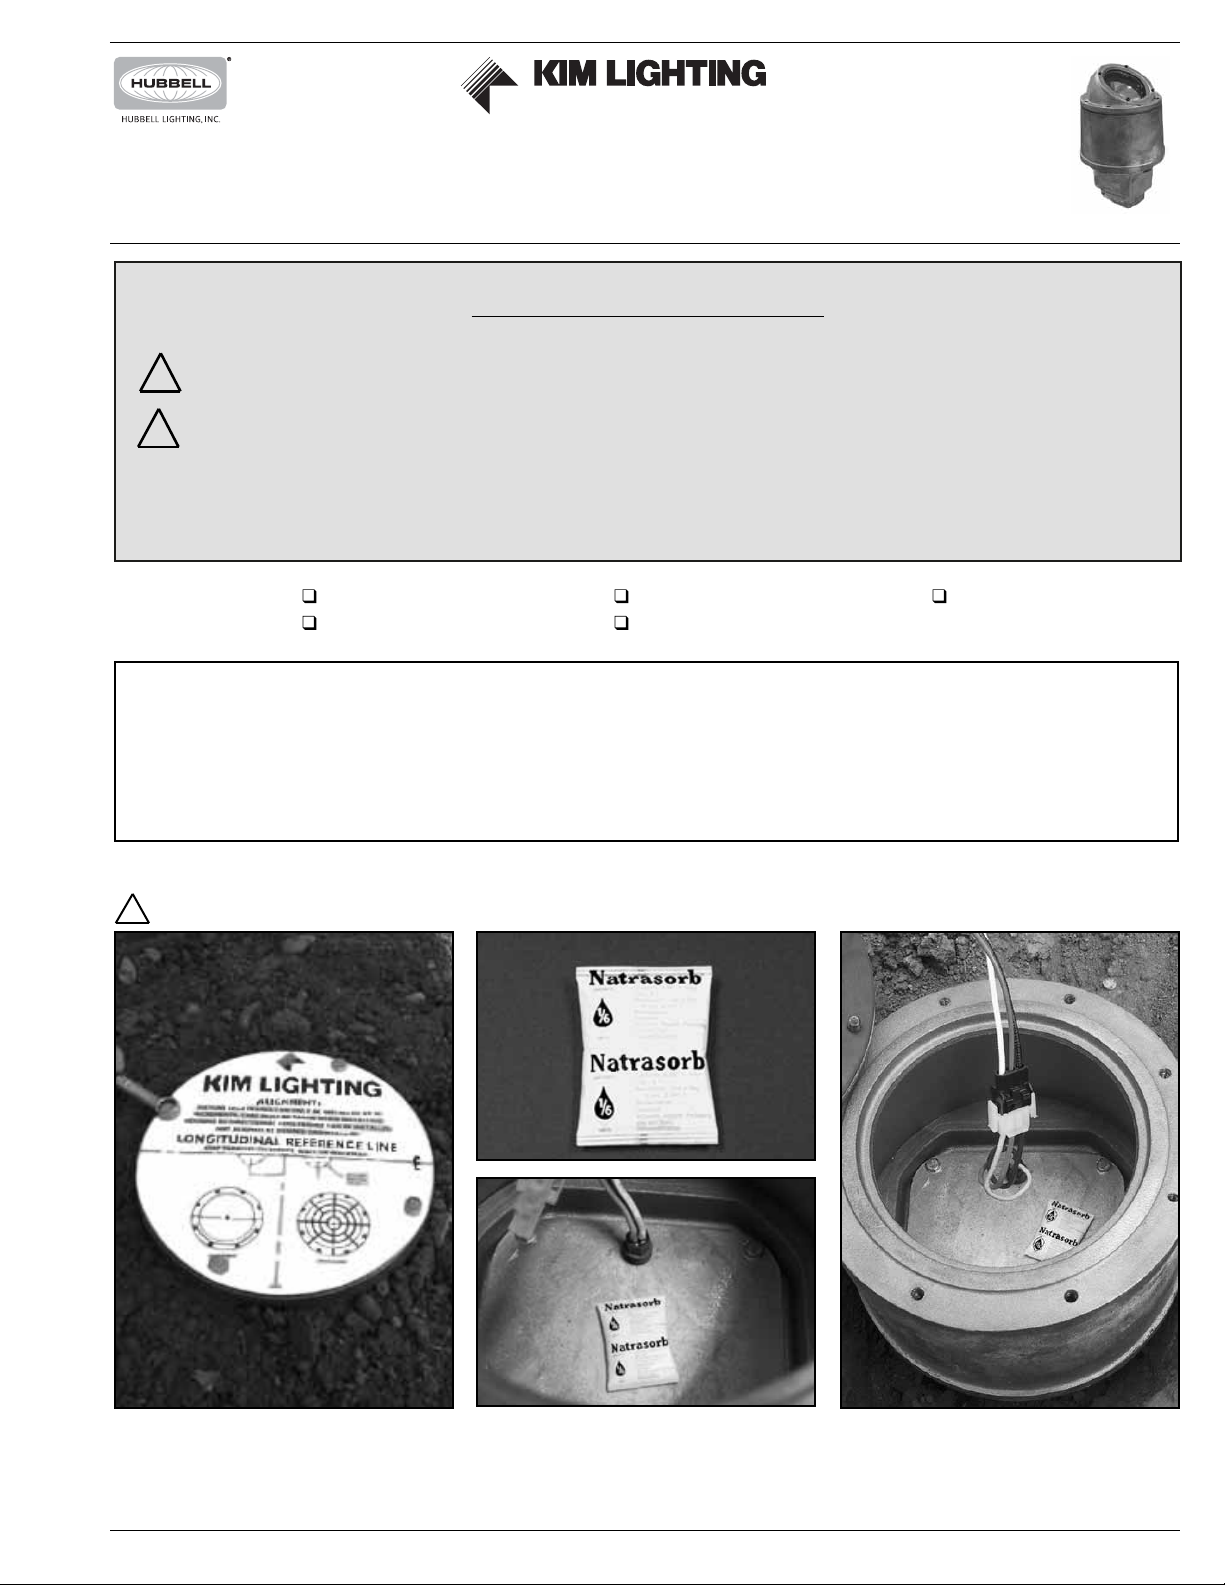
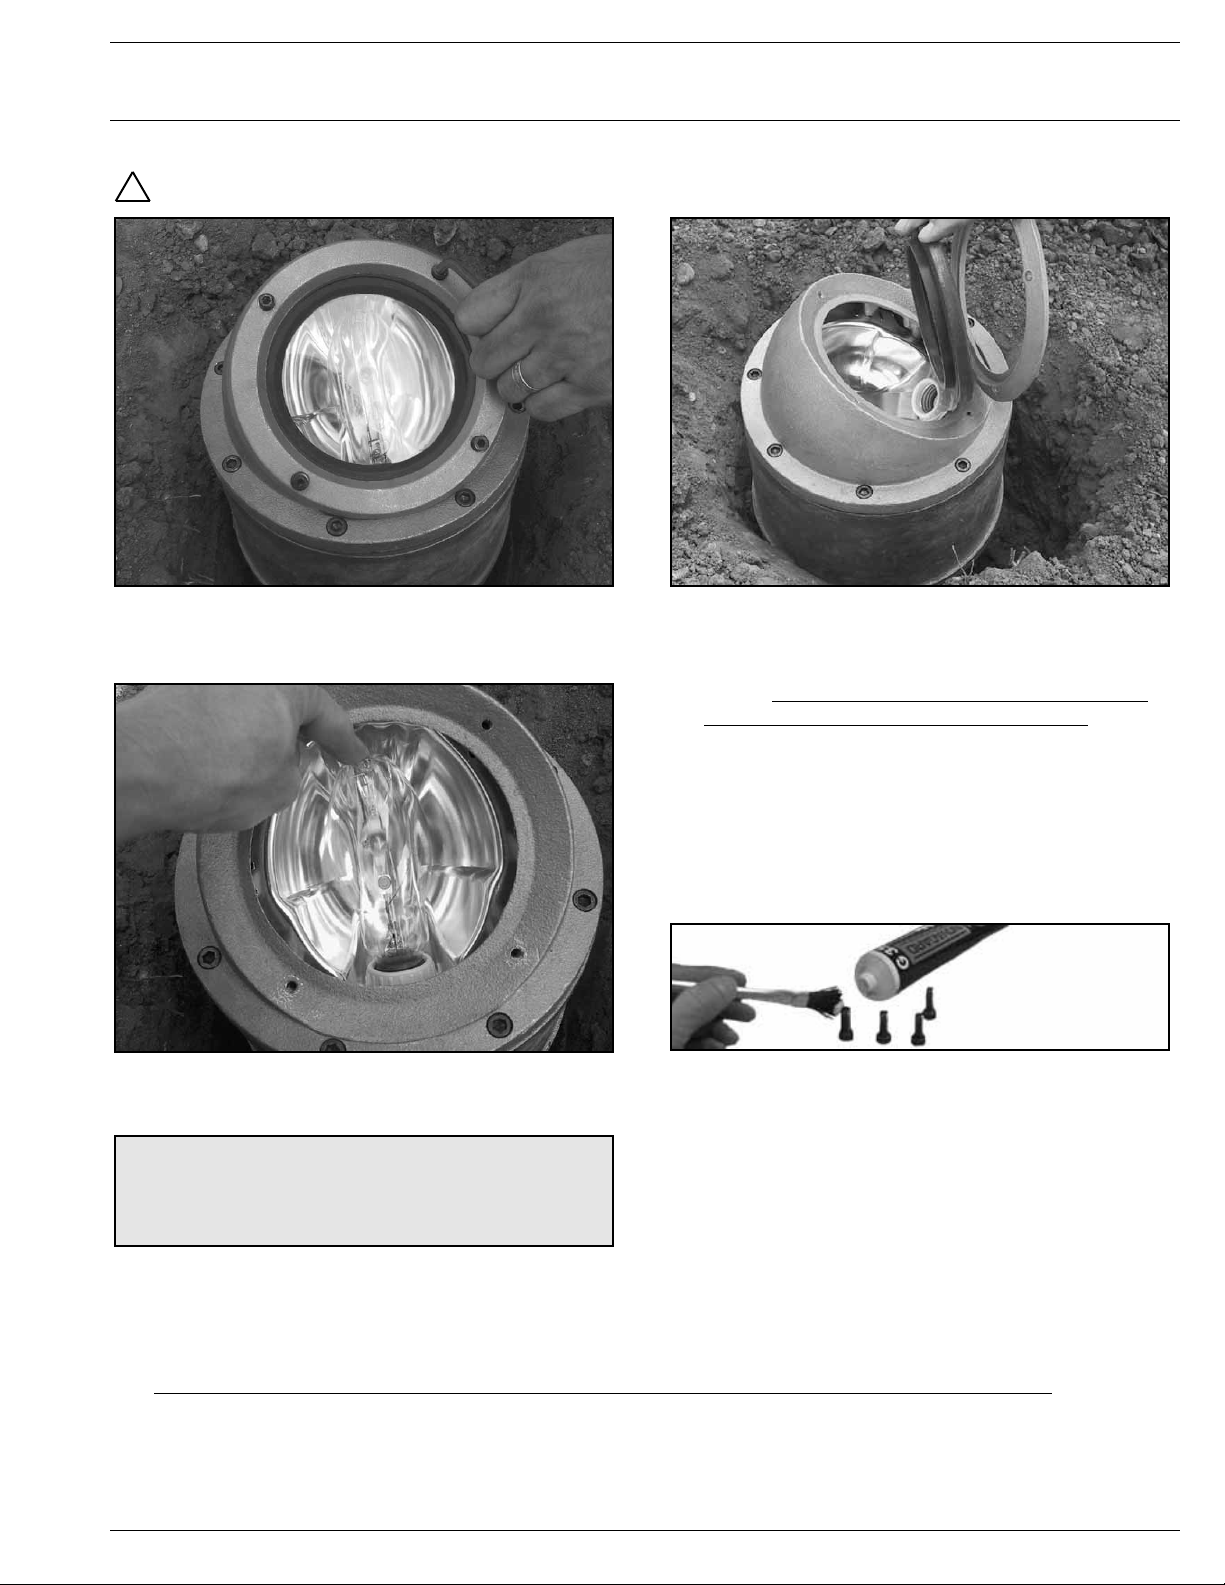
MAINTENANCE OF VISIBLE CONDENSATION ON
LENSES:
▼Never install or maintain fixtures in the rain, or on
days with very high relative humidity (over 80%).
▼After insuring that all water and visible moisture has
been dried out of the fixture, and before sealing the
fixture:
1. Install the lens ring and hand tighten all fasteners.
2. Start the fixture and allow it to reach operating
temperature (30 minutes or longer).
3. With the fixture still operating, loosen all lens ring
fasteners and lift the lens ring slightly (no more
than A"), leaving it propped open and "breathing" for
roughly 10 minutes with the lamp operating. This will
exhale the moist air trapped inside the fixture
housing.
4. With the fixture still operating (illuminated) and hot,
place the lens in its closed position and completely
tighten all fasteners. This process will evaporate a
great deal of the atmospheric moisture from the
interior of the fixture, and will reduce visible conden-
sation to a minumum. In order to maintain this, this
procedure must be repeated any time the luminaire
is opened for maintenance.
It is highly recommend-
ed that an installer wear gloves to protect from burns
caused by hot lens surfaces.
▼Should water be found inside of the fixture that has
entered through the conduit system, it is essential
that the conduit system be cleaned, dried-out and re-
sealed before the fixture is re-sealed.
▼Every effort must be made to insure the fixture
interiors remain completely dry during installation.
The debris shields provided with the fixtures are not
water tight. If flooding is anticipated during the
installation phase, extra effort must be made to
isolate the fixtures from water intrusion, or they must
be sealed off with plastic sheet and tape to prevent
water entry.
▼Should the appearance of condensation increase in
density or size of droplets, it is likely that water is
entering the fixture. Inspect all gaskets, conduit
entries, and interior covers. Once the leak has been
detected and repaired, repeat the sealing process
described (#3 page 3).
LIGHTVAULT®- LTV Lens Reflector LTV57/58 & LTV757/758
Installation Instructions

This manual suits for next models

3

Popular Lens manuals by other brands

urmet domus 1090 instructions

urmet domus

urmet domus 1090 instructions

Nikon AF-S DX NIKKOR 18-300mm f/3.5-5.6G ED VR User manaul

Nikon

Nikon AF-S DX NIKKOR 18-300mm f/3.5-5.6G ED VR User manaul

Olympus PTWC-01 instructions

Olympus

Olympus PTWC-01 instructions

ADEMCO VIDEO ALD02812L Operation manual

ADEMCO VIDEO

ADEMCO VIDEO ALD02812L Operation manual

DZOFILM 20-55mm T2.8 50-125mm T2.8 user manual

DZOFILM

DZOFILM 20-55mm T2.8 50-125mm T2.8 user manual

CooperVision Biomedics 55 Asphere PATIENT INFORMATION BOOKLET

CooperVision

CooperVision Biomedics 55 Asphere PATIENT INFORMATION BOOKLET

Navitar 1-62318 Dimensional drawing

Navitar

Navitar 1-62318 Dimensional drawing

Navitar 1-51206 Dimensional drawing

Navitar

Navitar 1-51206 Dimensional drawing

Irix 15 mm f/2.4 Extended user manual

Irix

Irix 15 mm f/2.4 Extended user manual

Panasonic ET-EMW200 operating instructions

Panasonic

Panasonic ET-EMW200 operating instructions

Brino BCS 24-70 user manual

Brino

Brino BCS 24-70 user manual

Sony SAL2470Z2 operating instructions

Sony

Sony SAL2470Z2 operating instructions

Rico PJ user manual

Rico

Rico PJ user manual

Canon CN-E18-80mm T4.4 L IS KAS S Operation manual

Canon

Canon CN-E18-80mm T4.4 L IS KAS S Operation manual

Rodenstock HR Digaron Macro 105 mm f/5.6 user manual

Rodenstock

Rodenstock HR Digaron Macro 105 mm f/5.6 user manual

Sony VCL-ES06 Operation manual

Sony

Sony VCL-ES06 Operation manual

Tamron B016 instructions

Tamron

Tamron B016 instructions

Nikon AF-S NIKKOR 400mm f/2.8G ED VR user manual

Nikon

Nikon AF-S NIKKOR 400mm f/2.8G ED VR user manual

manuals.online logo
manuals.online logoBrands
  • About & Mission
  • Contact us
  • Privacy Policy
  • Terms and Conditions

Copyright 2025 Manuals.Online. All Rights Reserved.