Huion KAMVAS Pro 24 User manual

GT-240
2
EN
Contents
1 / Precautions .............................................................................................................3
2 / Product Overview ..................................................................................................4
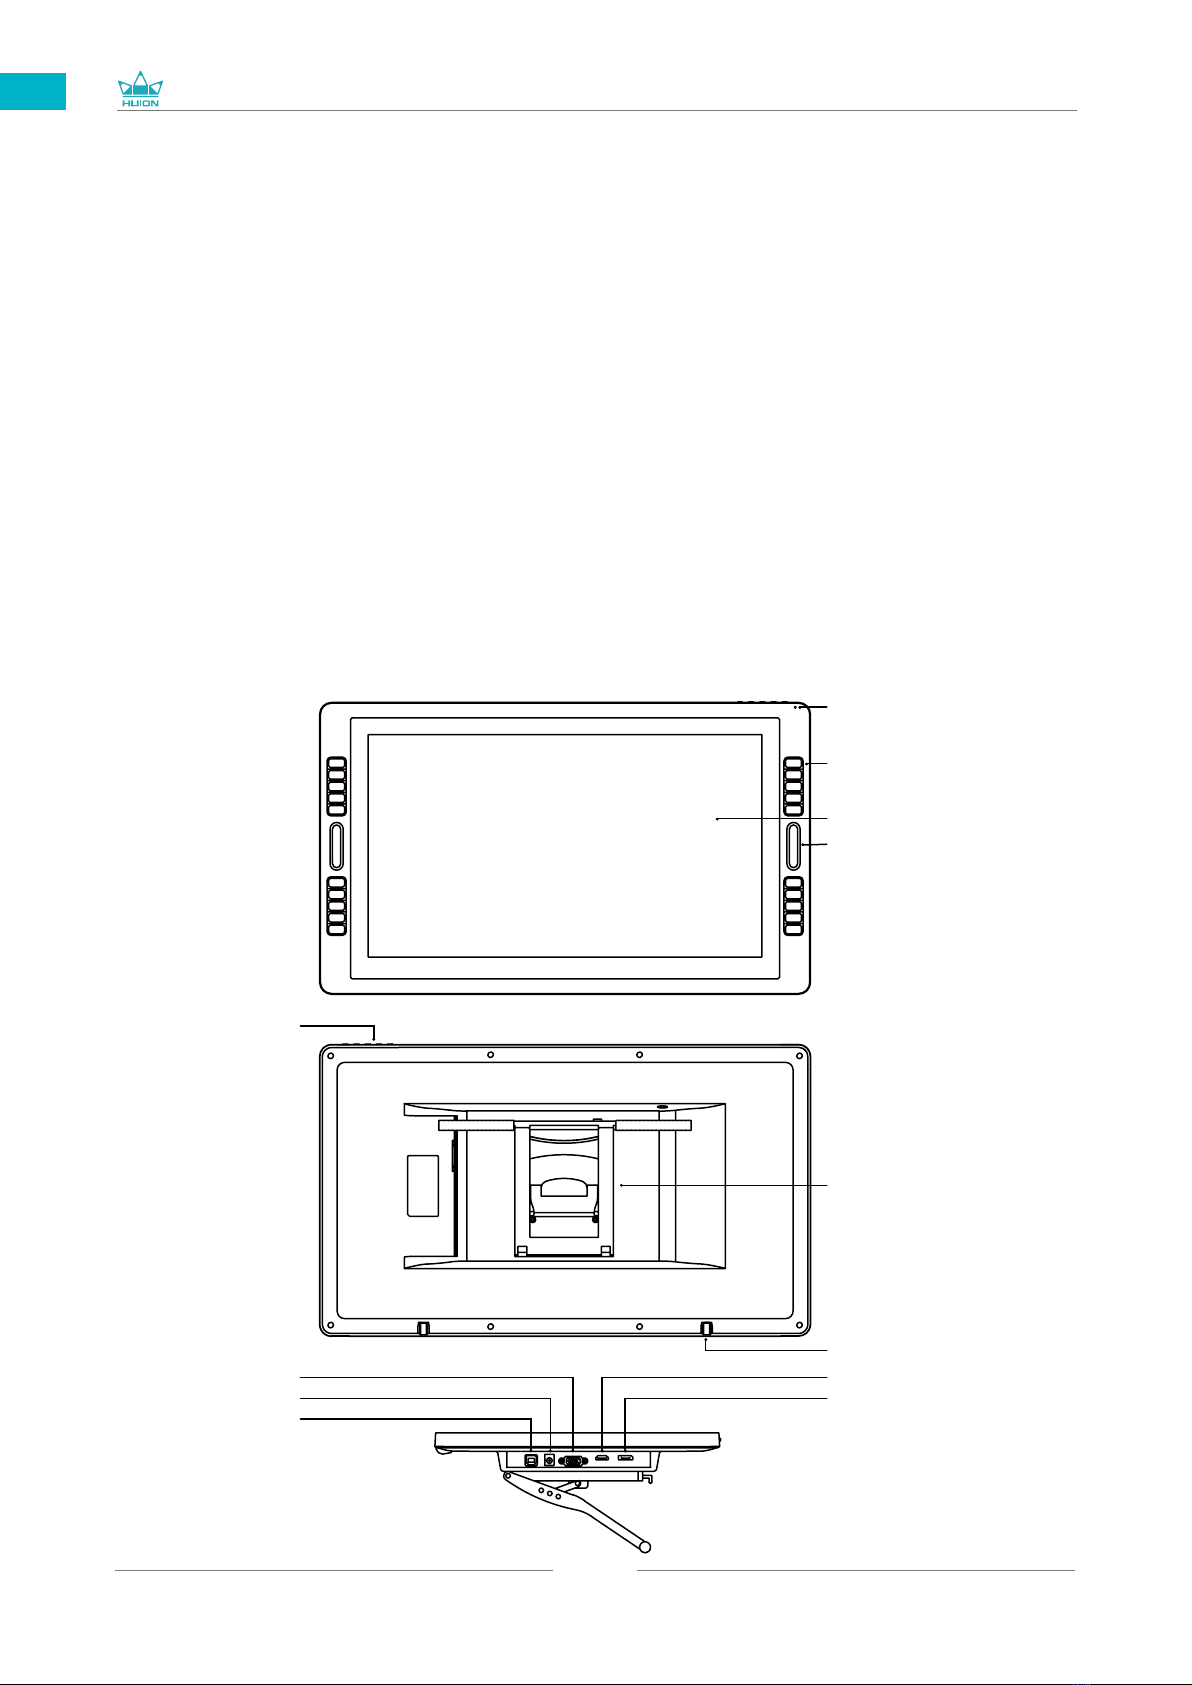
2.1 Display Introduction ..................................................................................................................4
2.2 Product and Accessories ..........................................................................................................4
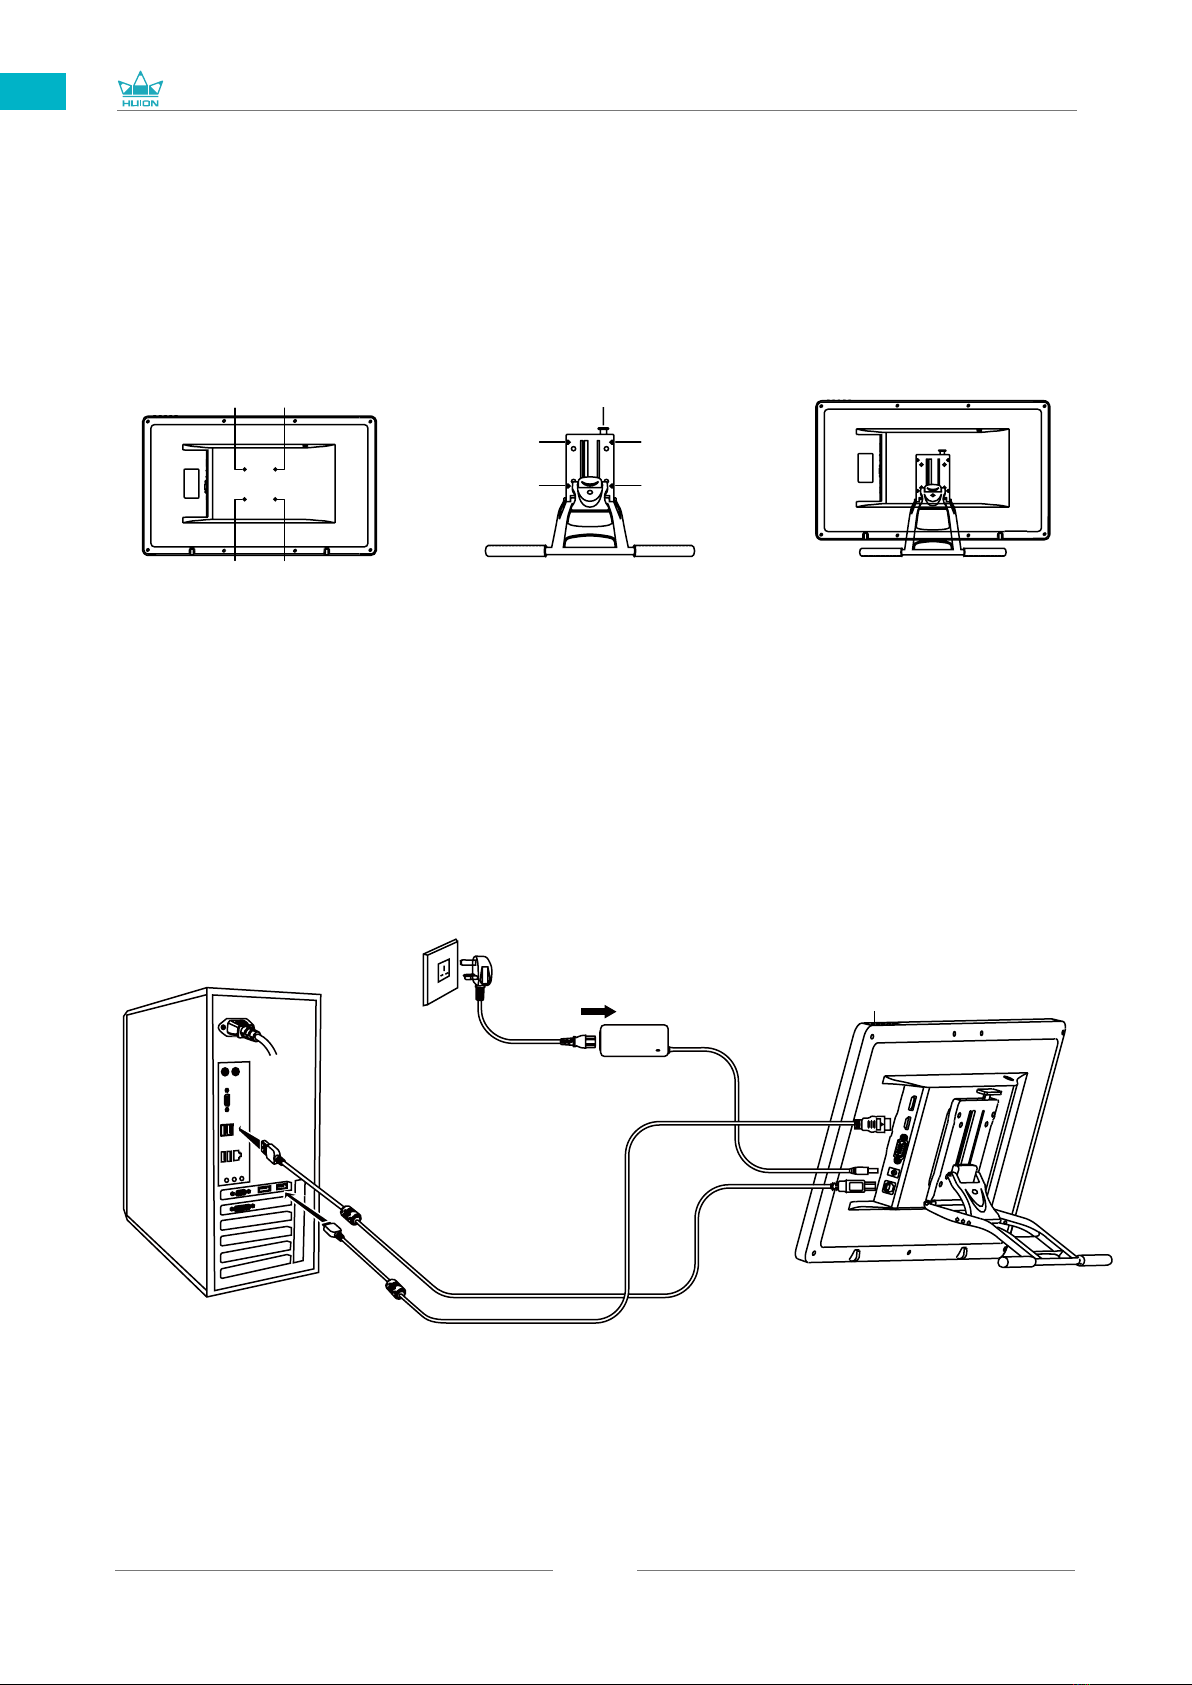
2.3 Display Setting ...........................................................................................................................7
2.4 Install Driver ................................................................................................................................7
3 / Pen Basic Operation ..............................................................................................8
3.1 Hold the Pen .................................................................................................................................8
3.2 Position the Cursor.....................................................................................................................8
3.3 Click .................................................................................................................................................9
3.4 Move ...............................................................................................................................................9
3.5 Use the Side Buttons .................................................................................................................9
3.6 Pen Nib Replacement .............................................................................................................10
4 / OSD Setting ..........................................................................................................11
4.1 OSD Buttons ..............................................................................................................................11
4.2 Brightness Setting ...................................................................................................................11
4.3 Image Setting ............................................................................................................................12
4.4 Color Temp. Setting ................................................................................................................12
4.5 OSD Setting ...............................................................................................................................13
4.6 Reset .............................................................................................................................................13
4.7 MISC .............................................................................................................................................14
5 / Function Setting ...................................................................................................15
5.1 Working Area Setting .............................................................................................................15
5.2 Press Keys Function Setting .................................................................................................16
5.3 Display Setting ..........................................................................................................................18
5.4 Pen Buttons Function Setting and Pen Nib Activity Setting .....................................20
5.5 Enable the Windows Ink feature ........................................................................................20
5.6 Pressure Sensitivity Setting ..................................................................................................21
5.7 Pen Pressure Testing ...............................................................................................................22
5.8 Data Export and Import ........................................................................................................22
6 / Specifications .......................................................................................................23
7 / Trouble Shooting .................................................................................................24

GT-240
3
EN
【Please read this manual carefully before using, and keep it well for future reference.】
/ Precautions
1
--Before cleaning the display, please unplug the USB cable and wipe with a soft damp
cloth, do not use any kind of detergents.
--Please don't place the display near water sources such as bathtub, washbasin, sinks,
washing machine, damp basement, swimming pool, etc.
--Do not place the display on where is unstable or a height for children reaching easily in
order to avoid danger.
--Do not place the display and digital pen close to the magnetic field.
--The grooves and holes on the back case is designed for ventilation to prevent the
monitor from overheating. Please don't place the display on beds, sofas, carpets or in
embedded device.
--Only power supplies shown on the nameplate can be used for the display. If you have
questions about the power supply which you are using, please consult the distributor of
your display.
--To protect your display, please switch off the power when it is not in use. During
blackouts or not using for long time, please unplug the display from the socket.
--Make sure no foreign bodies get inside the monitor through grooves and prevent liquid
from splashing on the display as to prevent short-circuit or fire.
--If the display has a breakdown, do not open the main case and try to repair it by yourself.
Please ask for a service for proper repair and maintenance.
--When the following situations occur, please unplug the power adapter and you may need
a service for full repair and maintenance:
A. The power wire or plug is damaged or worn out;
B. There is liquid splashed inside of the display;
C. The display has fallen or the LCD is broken;
D. When obvious abnormalities occur to the display.
--While getting the components replaced, you are supposed to guarantee that the
repairman is using the substitute components specified by the manufacturer. Unauthorized
component replacement might cause fire, electric shocks or other dangers.

GT-240
4
EN
/ Product Overview
2
2.1 Display Introduction
Thanks for choosing HUION® KAMVAS® Pro 24 creative display. This is a new
generation of desktop-level professional drawing display, which can greatly improve
your work efficiency of painting and creation, and full of fun. You can freely paint
and write, depicting different lines and colors, just as the pen writes on the paper,
which brings you a real shock experience.
To give you a better understanding and using of your display, please read this user
manual carefully. The user manual only shows the information under Windows,
unless otherwise specified, this information applies to both Windows and Mac
systems.
2.2 Product and Accessories
USB Port
Power Port
Anti-slippery Rubber
VGA Port
OSD Buttons
DP Port
HDMI Port
Working Area
Press Keys
Touch Bar
LED Indicator
Adjustable Stand

GT-240
5
EN
Battery-free pen Replacement Nibs
(inside the pen holder)
Pen Holder
Quick Start Guide Warranty Card
Power Adapter Power Cable HDMI Cable USB Cable
Quick Start Guide Warranty Card
Cleaning Cloth
Pen Nib Clip
(inside the pen holder)
2.2.1 Accessories
2.2.2 Adjustable Stand
We designed this ergonomic adjustable stand specially for your KAMVAS display,
you can adjust the angle of the display according to your usage habit, and make
you feel more comfortable when painting and creating.
By dragging this switch to adjust
the stand angle from 20° -80°

GT-240
6
EN
2.3 Setting Up Display
[1] Take out the pen display and stand from the package, then assemble the stand
to the back of the display with attached screwdriver according to the following
instruction.
①
①
②
②
③
③
④
④
Adjust the stand angle
by dragging this switch
[2] As shown on the below, connect the pen display to your computer with
attached power adapter, HDMI cable and USB Cable.
[3] Press the power button on the bottom of the display to power on the display.
USB Cable
HDMI Cable
Power Cable
Power Adapter Power Button

GT-240
7
EN
2.4.3 Driver Page
After the download is successful, double-click to open the driver, connect the
display to your computer with attached power adapter, HDMI cable and USB
Cable.
When the connection is complete, watch for a prompt at the bottom left of the
driver page that display two states "Device disconnected" or "Device connected".
Notes:
[1] Before installing, you need to uninstall other driver of similar products, including
the old driver of this product.
[2] Before installing, please close all graphics software and anti-virus software to
avoid unnecessary mistake.
2.4 Install Driver
2.4.1 OS Support
Windows 7 or later, macOS 10.12 or later.
2.4.2 Install Driver
Please download the driver from our website: www.huion.com/download
After finishing installation, you can find the driver icon " " in the system tray area,
which means the driver was installed successfully; when you connect the display
to computer, the icon will change to color " ", which means the driver has already
recognized the display and you can start using it now.

GT-240
8
EN
3
3.1 Hold the pen
Hold the pen as you hold a normal pen or pencil. Adjust your grip so that you
can toggle the side switch easily with your thumb or forefinger. Be careful not to
accidentally press the switch while drawing or positioning with the pen.
Notice:
When not in use, place the pen in the pen case or on the desk. Do not place the
pen on the surface of screen, which may interfere with the use of other screen
cursor positioning equipment, may also cause your computer can not enter the
sleep mode.
3.2 Position the cursor
Move the pen slightly above the active area without touching the screen surface,
the cursor will move to the new position accordingly.
Press the pen tip on the screen to make a selection. Tap the screen once with the
pen tip, or touch it to the screen with enough pressure to register a click.
/ Pen Basic Operation

GT-240
9
EN
3.3 Click
Use the pen tip to tap once on the screen to register a click. Tap to highlight or
select an item on the screen and double-click to open it.
3.4 Move
Select the object, then slide the pen tip across the screen to move it.
3.5 Use the side buttons
The buttons on the pen can be set to two different customizable functions.
You can use the buttons whenever the pen tip is within 10mm of the display active
area.
You do not have to touch the pen tip to the display in order to use the switch.

GT-240
10
EN
3.6 Pen Nib Replacement
The nib will be worn off after using for a long time, then you need to replace a
new nib.
[1] Anticlockwise rotate the pen holder to open the cover, take a new nib out.
[2] Insert the pen nib into the pen nib clip and tilt the pen to pull out the old nib.
[3] Insert the new nib straight into the pen and push the nib slowly and firmly
until it stops.

GT-240
11
EN
4/ OSD Setting
4.1 OSD Buttons
POWER: Power on/off the display.
MENU: Press to call up the menu, after entering menu, it's function is "confirm".
: After entering menu, it's function is "to up/right/increase".
: After entering menu, it's function is "to down/left/decrease".
AUTO: Before entering menu, it's function is "auto adjustment". After entering
menu, it's function is "back to previous menu".
4.2 Brightness Setting
[1] BRIGHTNESS: Adjusting background brightness of the screen images. Press
the buttons "+" and "-" to increase and decrease brightness.
[2] CONTRAST: Adjusting difference between darkness and brightness of the
screen. Press the buttons "+" and "-" to increase and decrease contrast.
[3] ECO: There are four eco modes of "STANDARD, TEXT, GAME, MOVIE".
[4] DCR: Choosing "on/off" to on/off dynamic contrast ratio.

GT-240
12
EN
4.3 Image Setting
[1] H. POSITION: Adjusting images left and right by using the buttons "+" and "-".
[2] V. POSITION: Adjusting images downward and upward by using the
buttons "+" and "-".
[3] CLOCK: Adjusting the vertical blinking of characters on the screen.
[4] PHASE: Adjusting the horizontal blinking of characters on the screen.
[5] ASPECT: There are "WIDE" and "4:3" two modes for you to adjust the aspect
of the screen.
4.4 Color Temp. Setting
COLOR TEMP.: There are three color modes of "WARM, COOL, USER".

GT-240
13
EN
4.5 OSD Setting
[1] LANGUAGE: There are 12 languages for your choice.
[2] OSD H. POS.: Adjusting the OSD position left and right by using the buttons
"+" and "-".
[3] OSD V. POS.: Adjusting the OSD position downward and upward by using the
buttons "+" and "-".
[4] OSD TIMER: Increase and decrease the residence time of the OSD menu by
using the buttons "+" and "-".
[5] TRANSPARENCY: Press "MENU", then "+" and "-" to adjust the transparency
of the OSD menu.
4.6 Reset
[1] IMAGE AUTO ADJUST: Automatically adjust the image's horizontal/vertical
position, focus and clock.
[2] COLOR AUTO ADJUST: Automatically adjust the image color balance.
[3] RESET: All the setting options will be restored to the default setting.

GT-240
14
EN
4.7 MISC
MISC: Display the current adjustment information.

GT-240
15
EN
5/ Function Setting
5.1 Working Area Setting
5.1.1 Using Multiple Monitors
Select the Working Area tab to define the relationship between pen movement on
the display and cursor movement on the monitor screen.
By default the entire active area of display maps to the entire monitor. If more
than one monitor is in use and you are in extended mode, you need to choose the
related monitor on the driver interface which you are going to map to.
If your monitors are in mirror mode (All monitors display the same content), the
display maps to the entire space on each monitor and the screen cursor is displayed
on each monitor simultaneously.
5.1.2 Working Area Setting
Define the display area that will be mapped to the screen area.
[1] Full Area: the entire active area of the display. This is the default setting.
[2] Screen Ratio: As a general rule, be 16:9.
[3] Customized Area:
1> Enter coordinate values.
2> Drag the corners of the foreground graphic to select the screen area.

GT-240
16
EN
5.1.3 Rotate Working Area
By changing the direction of the display to adapt to the left and right hand
operation. You can rotate the display by 0° , 90° , 180° or 270° .
5.2 Press Keys Function Setting
Default Setting:Place the cursor on the press key or click the press key to find the
default values.
Customized Setting: Select the function to be achieved on the pop-up dialog box,
then click "Apply" or "OK" to take effect.
Enable/Disable Press Keys: Check/Uncheck "Enable Press Keys".
①
②
③

GT-240
17
EN
The following shortcut key customization interface is displayed, with a total of 5
Settings.
① Custom: according to the use of custom or professional terms to set.
② Key combination function keys: Ctrl, Shift, Alt, Win+ any letter or other. Ctrl,
Shift, Alt, Win, you can select one or more of them, and you can arrange them in
any combination. Enter the corresponding Settings in the input box. For example:
deselect -Ctrl +D, enter task manager -Ctrl+Alt+Delete, etc.
③ Mouse Button Function: click the box, select the required function, can be set to
complete.
④ switch function: also click the box, select the required function.
⑤ Run the program function: click browse, select the connection, to achieve the
required run the program function.
①
②
③
④
⑤

GT-240
18
EN
5.3 Display Setting
Click the " " in the upper right corner of the driver to set the Tablet, including
General settings, Hotkeys and Updates.
5.3.1 General settings
Add App: Shortcut key function can be set by adding different programs.
When opening different programs, the driver will automatically recognize that the
shortcut function is the corresponding function set.

GT-240
19
EN
5.3.2 Hotkeys settings
Set the shortcut key to quickly open the driver interface. The default value is
Ctrl+Alt+H, which can be set according to usage habits.
5.3.3 Updates
You can view the driver version number, click "Check for Update", view the latest
driver version, and update according to the system prompt.

GT-240
20
EN
5.4 Pen Buttons Function Setting and Pen Nib Activity Setting
Select the function to be achieved on the pop-up dialog box, then click "Apply" or
"OK" to take effect.
The pen nibs can be set to be Active/Inactive as needed.Click the drop-down
option to select, and click OK again to save the Settings. In Active mode, the digital
pen can be used normally. In Inactive mode, the digital pen has cursor movement,
but cannot complete the specified action.
5.5 Enable the Windows Ink feature
Microsoft Windows provides extensive support for pen input. Pen features are
supported in such as Microsoft Office, Windows Whiteboard, Adobe Photoshop CC,
SketchBook 6 and so on.
Other manuals for KAMVAS Pro 24
1
This manual suits for next models
1
Table of contents
Other Huion Monitor manuals