Humanscale Horizon 2.0 User manual

Horizon 2.0
North America: +1 800 400 0625
Europe: +353 (0)1 858 0910
Asia Pacic: +852 2581 0570 NL 10
EN
FR
ES
DE
IT
2
6
7
9
8
Portable Luminaire
Assembly Instructions

2
Power Consumption: 7.5 watts
Input Power: 24V, 0.75A
Dimming Range: 5% - 100%
Lifespan: 50,000 hours (10 years)
Maximum Reach: 15"
Product Information
FCC Notice
Applies to USA
Model: H2
Note: This equipment has been tested and found to comply with the limits for a Class B digital device, pursuant to
part 15 of the FCC Rules. These limits are designed to provide reasonable protection against harmful interference in a
residential installation. This equipment generates uses and can radiate radio frequency energy and, if not installed and
used in accordance with the instructions, may cause harmful interference to radio communications. However, there is no
guarantee that interference will not occur in a particular installation. If this equipment does cause harmful interference to
radio or television reception, which can be determined by turning the equipment off and on, the user is encouraged to try
to correct the interference by one or more of the following measures:
• Reorient or relocate the receiving antenna.
• Increase the separation between the equipment and receiver.
• Connect the equipment into an outlet on a circuit different from that to which the receiver is connected.
• Consult the dealer or an experienced radio/TV technician for help.
Changes or modications made to this device that are not expressly approved by Humanscale may void the user’s
authority to operate the equipment.
Innovation, Science and Economic Development Canada ICES-005 Compliance Notice:
CAN ICES-005 (B) / NMB-005 (B)

3
Unplug from power source before cleaning.
Wipe clean with a soft damp cloth. Avoid amonia-based
cleaners and abrasives.
Do not expose power cord to liquids or high temperatures.
The external exible cable or cord of this luminaire cannot
be replaced; if the cord is damaged,
the luminaire shall be destroyed.
Avoid staring directly at light source.
The light source of this luminaire is not replaceable; when
the light source reaches its end of life
the whole luminaire shall be replaced.
(1.)
(2.)
(3.)
Important Safety and Care Instructions

4
Adjusting Tension
If needed, the tension of the lower ball joint
can be adjusted. Use a at head screwdriver to
tighten or loosen the screws on the underside of
the base.
(4.)
(5.)
Flat Head Screwdriver
For AdjustingTension
Tools Required
Included Parts
AC Adapter
(Only included for USA/Canada)
(1.) (2.) (3.)
AC Adapter
(Only included for EU/UK)
AC Adapter
(Only included for Asia-Pacic/Oceania*)
EU
UK
Type A Type C Type F
Type A
(China)
Type I (Australia,
New Zealand)
Type G
*Plug types are only designated for use in the countries listed.

5
To increase or decrease brightness, slide nger up
or down on the touch sensor
Dimming
(2.)
User Interface Behavior
To turn the light ON and OFF, lightly tap the touch
sensor. The luminaire will remember the last
brightness level it
was set to. (1.)

6
Consultez la page4
Consultez la page4
Consultez la page4 (5.)
Réglage de la tension
Pièces incluses
(4.) Tournevis à tête plate
Si nécessaire, la tension de la rotule inférieure
peut être réglée. Utilisez un tournevis à tête plate
pour serrer ou desserrer les vis sous la base.
Pour le réglage de la tension
Outils nécessaires
Instructions importantes de
sécurité et d‘entretien
Informations sur le produit
Consultez la page3 (2.)
Consultez la page3 (1.)
Consultez la page3 (3.)
Débranchez l‘appareil de la source d‘alimentation
avant de nettoyer.
Nettoyez-le à l‘aide d‘un chiffon doux et humide.
Évitez les nettoyants abrasifs et à base d‘ammoniac.
N‘exposez pas le câble d‘alimentation à des
liquides ou à des températures élevées.
Le câble ou cordon exible extérieur de ce
luminaire ne peut pas être remplacé; si le câble
est endommagé, le luminaire doit être détruit.
Évitez de regarder directement la source lumineuse.
La source lumineuse de ce luminaire ne peut pas
être remplacée; lorsque la source lumineuse atteint
sa n de vie, le luminaire entier doit être remplacé.
FR Instructions d’assemblage
Français
Consommation d‘énergie: 7,5watts
Puissance d‘entrée: 24V, 0,75A
Plage de gradation: 5% - 100%
Durée de vie: 50000heures (10ans)
Portée maximale: 15po
Avis de conformité ICES-005 d‘Innovation,
Sciences et Développement économique Canada:
CAN ICES-005 (B)/NMB-005 (B)
(1.) Adaptateur CA (uniquement inclus pour États-
Unis/Canada)
(2.) Adaptateur CA (uniquement inclus pour Asie-
Pacique/Océanie*)
(3.) Adaptateur CA (uniquement inclus pour
UE/R.-U.)
*Les types de prises ne sont conçus que pour une utilisation dans les
pays répertoriés.

7
Consultez la page5 (1.)
Pour allumer et éteindre la lumière, tapotez
légèrement le pavé tactile. Le luminaire reviendra
au dernier niveau de luminosité réglé.
Comportement de l‘interface
utilisateur
Pour augmenter ou diminuer la luminosité, faites
glisser le doigt vers le haut ou vers le bas sur le
pavé tactile.
Gradation
Consultez la page5 (2.) Instrucciones importantes de
seguridad y cuidado
Información del producto
Véase la página 3 (2.)
Véase la página 3 (1.)
Véase la página 3 (3.)
Desenchufe el aparato de la corriente antes de
limpiarlo.
Utilice un paño suave y húmedo para limpiarlo.
Evite productos de limpieza que contengan
amoniaco y abrasivos.
No exponga el cable de alimentación a líquidos o
temperaturas altas.
El cable exible externo de esta luminaria no
se puede sustituir; si el cable se rompe, deberá
destruir la luminaria.
Evite mirar directamente a la fuente de luz.
La fuente de luz de esta luminaria no se puede
sustituir; cuando la fuente de luz llegue al nal de
su vida útil, deberá reemplazar toda la luminaria.
ES Instrucciones de montaje
Español
Consumo de energía: 7,5 vatios
Potencia de entrada: 24 V, 0,75 A
Intervalo de atenuación: 5 % - 100 %
Vida útil: 50 000 horas (10 años)
Alcance máximo: 38,1 cm (15")

8
Véase la página 4
Véase la página 4
Véase la página 5 (1.)
Véase la página 4 (5.)
Ajustar la tensión
Piezas incluidas
(4.) Destornillador plano
Si es necesario, la tensión de la rótula inferior se
puede ajustar. Utilice un destornillador plano para
apretar o aojar los tornillos de la parte inferior de
la base.
Para encender y apagar la luz, toque suavemente
el sensor táctil. La luminaria recordará el último
nivel de brillo que se conguró.
Para ajustar la tensión
Herramientas necesarias
Funcionamiento de la interfaz
de usuario
Para aumentar y reducir el brillo, deslice el dedo
hacia arriba o hacia abajo por el sensor táctil.
Atenuación
Véase la página 5 (2.)
Istruzioni importanti su sicurezza
e manutenzione
Informazioni relative al prodotto
Vedere pagina 3 (2.)
Vedere pagina 3 (1.)
Vedere pagina 3 (3.)
Prima della pulizia, scollegare dalla fonte di
alimentazione.
Pulire con un panno morbido umido. Evitare
detergenti a base di ammoniaca e abrasivi.
Non esporre il cavo di alimentazione a liquidi o a
temperature elevate.
Non è possibile sostituire il cavo essibile esterno
di questo apparecchio di illuminazione; se il cavo
è danneggiato, è necessario sostituire l'intero
apparecchio.
Non guardare direttamente la fonte luminosa.
La fonte luminosa di questo apparecchio non è
sostituibile; quando termina la sua durata, l'intero
apparecchio deve essere sostituito.
IT Istruzioni per il montaggio in
Italiano
Assorbimento: 7,5 watt
Alimentazione in ingresso: 24 V, 0,75 A
Intervallo di attenuazione: 5% - 100%
Durata: 50.000 ore (10 anni)
Portata massima: 15"
(1.) Adaptador de CA (solo incluido para EE.UU./
Canadá)
(2.) Adaptador de CA (solo incluido para Asia-
Pacíco/Oceanía*)
(3.) Adaptador de CA (solo incluido para UE/Reino
Unido)
*Los tipos de enchufes solo están diseñados para su uso en los
países enumerados.

9
Vedere pagina 4
Vedere pagina 4
Vedere pagina 5 (1.)
Vedere pagina 4 (5.)
Regolazione della tensione
Parti incluse
(4.) Cacciavite con testa piatta
Se necessario, la tensione del giunto sfera
inferiore può essere regolata. Utilizzare un
cacciavite a testa piatta per serrare o allentare le
viti sul lato inferiore della base.
Per accendere e spegnere la luce, toccare
delicatamente il sensore touch. L'apparecchio di
illuminazione ricorda l'ultimo livello di luminosità
impostato.
Per la regolazione della tensione
Utensili necessari
Comportamento dell'interfaccia
utente
Per aumentare o ridurre la luminosità, far scorrere
un dito verso l'alto o verso il basso sul sensore
touch.
Attenuazione
Vedere pagina 5 (2.)
Wichtige Sicherheits- und
Pegehinweise
Produktinformation
Siehe Seite 3 (2.)
Siehe Seite 3 (1.)
Siehe Seite 3 (3.)
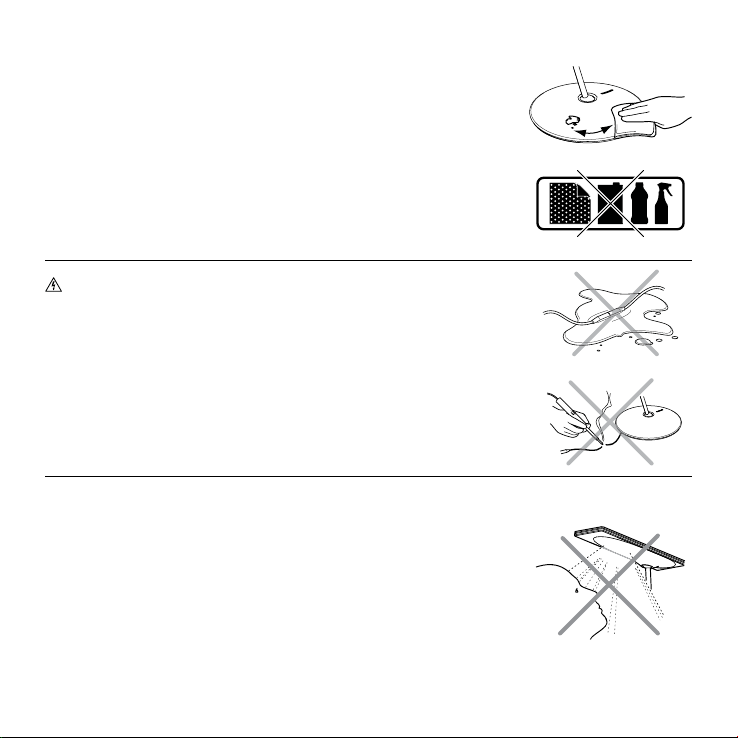
Vor dem Reinigen von der Stromquelle trennen.
Mit einem feuchten, weichen Tuch abwischen.
Vermeiden Sie Reinigungs- und Scheuermittel auf
Ammoniakbasis.
Setzen Sie das Stromkabel weder hohen
Temperaturen, noch Flüssigkeiten aus.
Das externe Kabel dieser Leuchte kann nicht
ersetzt werden; wenn es beschädigt ist,
muss die Leuchte entsorgt werden.
Vermeiden Sie es, direkt in die Lichtquelle zu schauen.
Die Lichtquelle dieser Leuchte ist nicht
austauschbar; wenn die Leuchtquelle das Ende
ihrer Lebensdauer erreicht, muss die gesamte
Leuchte ausgetauscht werden.
DE Installationsanleitung auf
Deutsch
Leistungsaufnahme: 7,5 W
Eingangsleistung: 24 V; 0,75 A
Dimmbereich: 5 % – 100 %
Lebensdauer: 50.000 Stunden (10 Jahre)
Maximale Reichweite: 38,1 cm (15")
(1.) Adattatore CA (incluso solo per USA/Canada)
(2.) Adattatore CA (incluso solo per Asia-Pacico/
Oceania*)
(3.) Adattatore CA (incluso solo per EU/UK)
*I tipi di spina sono progettati solo per l’uso nei paesi elencati.

10
Siehe Seite 4
Siehe Seite 4
Siehe Seite 5 (1.)
Siehe Seite 4 (5.)
Anpassung des Drehmoments
Zubehörteile
(4.) Schlitzschraubendreher
Bei Bedarf kann das Drehmoment für das untere
Kugelgelenk angepasst werden. Verwenden Sie
einen Schlitzschraubendreher, um die Schrauben
an der Sockelunterseite anzuziehen oder zu lösen.
Um das Licht AN und AUS zu schalten, tippen Sie
leicht auf das Touchpad. Die Leuchte speichert
automatisch die letzte Helligkeitsstufe.
Zur Anpassung des Drehmoments
Erforderliche Werkzeuge
Verhalten der
Benutzeroberäche
Streichen Sie mit dem Finger nach oben oder
unten über das Touchpad, um die Helligkeit zu
erhöhen oder zu senken.
Dimmung
Siehe Seite 5 (2.)
Belangrijke veiligheids- en
onderhoudsinstructies
Productinformatie
Zie pagina 3 (2.)
Zie pagina 3 (1.)
Zie pagina 3 (3.)
Trek de stekker uit het stopcontact voordat u het
apparaat reinigt.
Veeg het apparaat schoon met een zachte,
vochtige doek. Gebruik geen schurende middelen
en reinigingsmiddelen op basis van ammoniak.
Stel het snoer niet bloot aan vloeistoffen of hoge
temperaturen.
De externe exibele kabel of het snoer van deze
lamp kan niet vervangen worden. Als het snoer
beschadigd is, moet de lamp weggegooid worden.
Kijk niet direct in de lichtbron.
De lichtbron kan niet vervangen worden; als deze
het einde van de levensduur bereikt, moet de
gehele lamp worden vervangen.
NL Montagehandleiding
Nederlands
Stroomverbruik: 7,5 Watt
Ingangsvermogen: 24 V, 0,75 A
Dimbereik: 5%-100%
Levensduur: 50.000 uur (10 jaar)
Maximumbereik: 15"
(1.) AC-Adapter (nur für USA/Kanada enthalten)
(2.) AC-Adapter (nur für Asien-Pazik/Ozeanien
enthalten*)
(3.) AC-Adapter (nur für EU/UK enthalten)
*Steckertypen sind nur für die Verwendung in den aufgeführten
Ländern bestimmt.

11
Zie pagina 4
Zie pagina 4
Zie pagina 5 (1.)
Zie pagina 4 (5.)
De spanning afstellen
Bijgesloten onderdelen
(4.) Platkopschroevendraaier
Desgewenst kan de spanning op het onderste
kogelscharnier worden afgesteld. Draai met
behulp van een platkopschroevendraaier de
schroeven onderop de basis vaster of losser.
Om de lamp IN en UIT te schakelen, raakt u het
aanraakpaneel lichtjes aan. De lamp onthoudt het
laatst ingestelde helderheidsniveau.
Om de spanning af te stellen
Benodigd gereedschap
Gedrag gebruikersinterface
Om de helderheid aan te passen, schuift u uw
vinger omhoog of omlaag op het aanraakpaneel.
Dimmen
Zie pagina 5 (2.)
(1.) AC-Adapter (Alleen inbegrepen voor VS/
Canada)
(2.) AC-Adapter (Alleen inbegrepen voor Azië-
Pacic/Oceanië*)
(3.) AC-Adapter (Alleen inbegrepen voor EU/VK)
*Stekkertypes zijn alleen bedoeld voor gebruik in de vermelde landen.

12
Humanscale Corporation
1114 6th Ave. 15th Floor
NewYork, NY 10036
www.humanscale.com
For our terms and conditions please go to
https://www.humanscale.com/about/legal-information/terms-conditions.cfm
© 2020 Humanscale Corporation. The text and artwork are copyrighted materials. All rights reserved. The
Humanscale mark and logo are trademarks of Humanscale Corporation and are registered in the United States
and certain other countries.
8/16/2021
GT-NPD-AI-3674-001-R01
Table of contents
Languages:
Other Humanscale Lantern manuals
Popular Lantern manuals by other brands

Brinkmann
Brinkmann 844-0350-0 owner's manual

BEGA
BEGA 84 428 Instructions for use

WHITECROFT LIGHTING
WHITECROFT LIGHTING Florin IP65 installation instructions

Peaksun
Peaksun Venus Series installation manual

EcoxGear
EcoxGear EcoLantern GDI-EXLTN400...420 user guide

Kichler Lighting
Kichler Lighting LYNDON manual

WE-EF
WE-EF PFL230 Installation and maintenance instructions

Coleman
Coleman 5315 Series instructions

Patriot Lighting
Patriot Lighting DJ3825 quick start guide

Quoizel
Quoizel LWS33644B Use and care guide

Home Decorators Collection
Home Decorators Collection 5163701 Use and care guide

Honeywell
Honeywell Cube M ST LED manual