Husky 31748 User manual

All Products limited to Vehicle Tow Rating; see Vehicle Owners Manual
See www.huskytow.com for Warranty Information / Tech Support ©2012 Husky Towing Products
Revision: February 12, 2013-REV 1
Page 1 of 11
Installation Instructions
"KIT, SERVICE, HUSKY 10-16K, Part # 31748
PASSENGER SIDE HOUSING AND RAIL
ASSEMBLY. Patent Pending
Dealer / Installer:
Provide a copy of these Instructions to the end user of this product.
These Instructions provide important operating and safety information
for proper usage of this product. Demonstrate the proper use of the
product with the end user. Have the end userdemonstrate that they
understand the proper use of the product.
End User:
Read and follow all instructions included in this manual. Ask your
Dealer / Installer for assistance if you do not understand the proper use
of the product. Never remove any
decals from the product.
APPLICATION: For use on short bed pickup applications no less than 6-1/2 feet long.
NOTE
: The "HUSKY 10-16K" is to be used only with 5th wheel trailers which weigh 16,000 lbs. or
less. Never use with heavier trailers. You will need to disassemble the uprights from your current
5th wheel to install the "HUSKY 10-16K". The "HUSKY 10-16K" takes the place of those uprights.
Caution: The "HUSKY 10-16K" will reposition your 5th wheel 10" rearward. HOWEVER
this will NOT
guarantee complete truck cab/trailer clearance when towing & making sharp
turns. See page 2, "Truck Cab and 5th Wheel Trailer Clearance".
TOOLS REQUIRED:
DRILL*
5/8" DRILL BIT*
NEEDLE NOSE PLIERS
7/16" WRENCH & SOCKET
9/16" WRENCH & SOCKET
16mm WRENCH
3/4" WRENCH & SOCKET
TORQUE WRENCH (150 LBS.-FT. MIN.)
*These tools only required if you do not have
a center bolt kit installed in your base rails.
Husky Fastener Torque Specification
The "HUSKY 10-16K" will only work
in the base rail slots spaced 20-5/8"
apart. Only use Husky 5th Wheel
Hitches with this product.
All "Husky 10" fasteners are grade 5

All Products limited to Vehicle Tow Rating; see Vehicle Owners Manual
See www.huskytow.com for Warranty Information / Tech Support ©2012 Husky Towing Products
Revision: February 12, 2013-REV 1
Page 2 of 11
“Husky 10-16K” Preparation for new components
Remove the 5th
wheel head, cross member, pivot plate and retain as these will be re-used.
Contents
This kit contains one complete passenger side housing and rail assembly.
"HUSKY 10-16K" INSTALLATION
1. Remove passenger side housing and rail assembly and discard, leave the driver side
housing and rail assembly in place.
2. Place new passenger side assembly into base rail slots.
3. Insert base rail pins from rearward side of base rails and secure with clips.
4. Place Husky pivot plate on recesses on pivot stops by tipping the passenger side
assembly outward to get the plate in place. Slotted tabs on plate should rest in recesses
on pivot stops.
Using 1/4" bolts, flat washers and lock washers, thread into holes on pivot stops finger tight only.
5. Push entire hitch assembly forward until there is no movement.
6. Install cross member and ensure it is centered and straight by shimming (if necessary) and
then torque bolts to 75 lbs.-ft. Note:
Multiple Shims can be stacked together if gap width
is large.
A portion of the housing
was removed for clarity.
Shim location.
Shim location.
SLOTTED TAB &
1/4” HEX BOLT.

All Products limited to Vehicle Tow Rating; see Vehicle Owners Manual
See www.huskytow.com for Warranty Information / Tech Support ©2012 Husky Towing Products
Revision: February 12, 2013-REV 1
Page 3 of 11
7. After shimming of cross member is complete, measure "HUSKY 10-16K" at the indicated
areas shown below. Compare measurements "A" and "B", if measurements are within
1/4" of each other proceed to the next step. If not, then determine which of the shims that
were placed in the cross member can be moved to achieve this difference.

All Products limited to Vehicle Tow Rating; see Vehicle Owners Manual
See www.huskytow.com for Warranty Information / Tech Support ©2012 Husky Towing Products
Revision: February 12, 2013-REV 1
Page 4 of 11
8. Remove locking pin and pull up on link and then out on handle and release link then slide
hitch assembly into maneuver position to ensure it slides without binding.
9. If it does move without binding then proceed to next step, if it does not, go back to step 10.
10.Return the handle to the driving position and slide the hitch assembly forward until it stops
moving and the stops are engaged.
11.Center pivot plate left to right and also ensure that the pivot stops are straight relative to
the side of the housing and then tighten the 1/4" bolts to 8 lbs.-ft.
LINK
LOCKING PIN

All Products limited to Vehicle Tow Rating; see Vehicle Owners Manual
See www.huskytow.com for Warranty Information / Tech Support ©2012 Husky Towing Products
Revision: February 12, 2013-REV 1
Page 5 of 11
Partial top View of hitch assembly, some components removed to clarify instructions.
12.Check rotation of pivot plate and pivot stops to ensure it moves freely without binding.
13.With the hitch assembly in the driving position adjust the pivot stop surface so it just
touches the stop tab by loosening the jam nut on the clevis/yoke; remove the cotter pin
and clevis pin from the clevis that is furthest forward. Swing the clevis/yoke that is
attached to the threaded shaft inwards away from the curved plate. Turn the clevis/yoke
clockwise or counter clockwise to align the holes properly between the curved plate and
the holes in the clevis/yoke as shown on page 13.

All Products limited to Vehicle Tow Rating; see Vehicle Owners Manual
See www.huskytow.com for Warranty Information / Tech Support ©2012 Husky Towing Products
Revision: February 12, 2013-REV 1
Page 6 of 11
14.Re-install the clevis pin and the cotter pin.
15.Put the handle into the maneuver position and slide the hitch assembly into the maneuver
position and confirm that the stop edge on the pivot stops touch the stop tab.
16.If all moves without binding and the pivot stop surface makes full contact with the stop tab
in both positions then you are ready to complete the assembly by attaching the 5th wheel
head and related components. Ensure cotter pin legs are bent over to prevent them from
falling out.

All Products limited to Vehicle Tow Rating; see Vehicle Owners Manual
See www.huskytow.com for Warranty Information / Tech Support ©2012 Husky Towing Products
Revision: February 12, 2013-REV 1
Page 7 of 11
OPERATING INSTRUCTIONS
To Maneuver:
The "HUSKY 10-16K" has an "anti-bind" feature that will allow you to change the
locking handle position if the pivot stops are in a bind.
1. Align trailer and tow vehicle in a straight line
2. Pull up on link and out on handle then release link.
on a level surface.
Views showing pull handle and system in maneuver position.
3. When the handle is put into the maneuver position, make note whether the pivot stops
rotated or not. If they did then proceed to step 5.
4. If the pivot stops did not rotate then you will need to set the trailer brakes and then
back the tow vehicle up slightly until you hear the pivot stops actuate. Then proceed to
step 5.
5. Set the trailer brakes and slowly pull the tow vehicle forward until the "HUSKY 10-16K"
stops moving and you hear the pivot stops engage.
View showing pivot stops in the maneuver "locked" position from inside of the driver side
assembly.
Front of Tow Vehicle
View from cab side of truck bed

All Products limited to Vehicle Tow Rating; see Vehicle Owners Manual
See www.huskytow.com for Warranty Information / Tech Support ©2012 Husky Towing Products
Revision: February 12, 2013-REV 1
Page 8 of 11
To Tow:
1. Align trailer and tow vehicle in a straight line
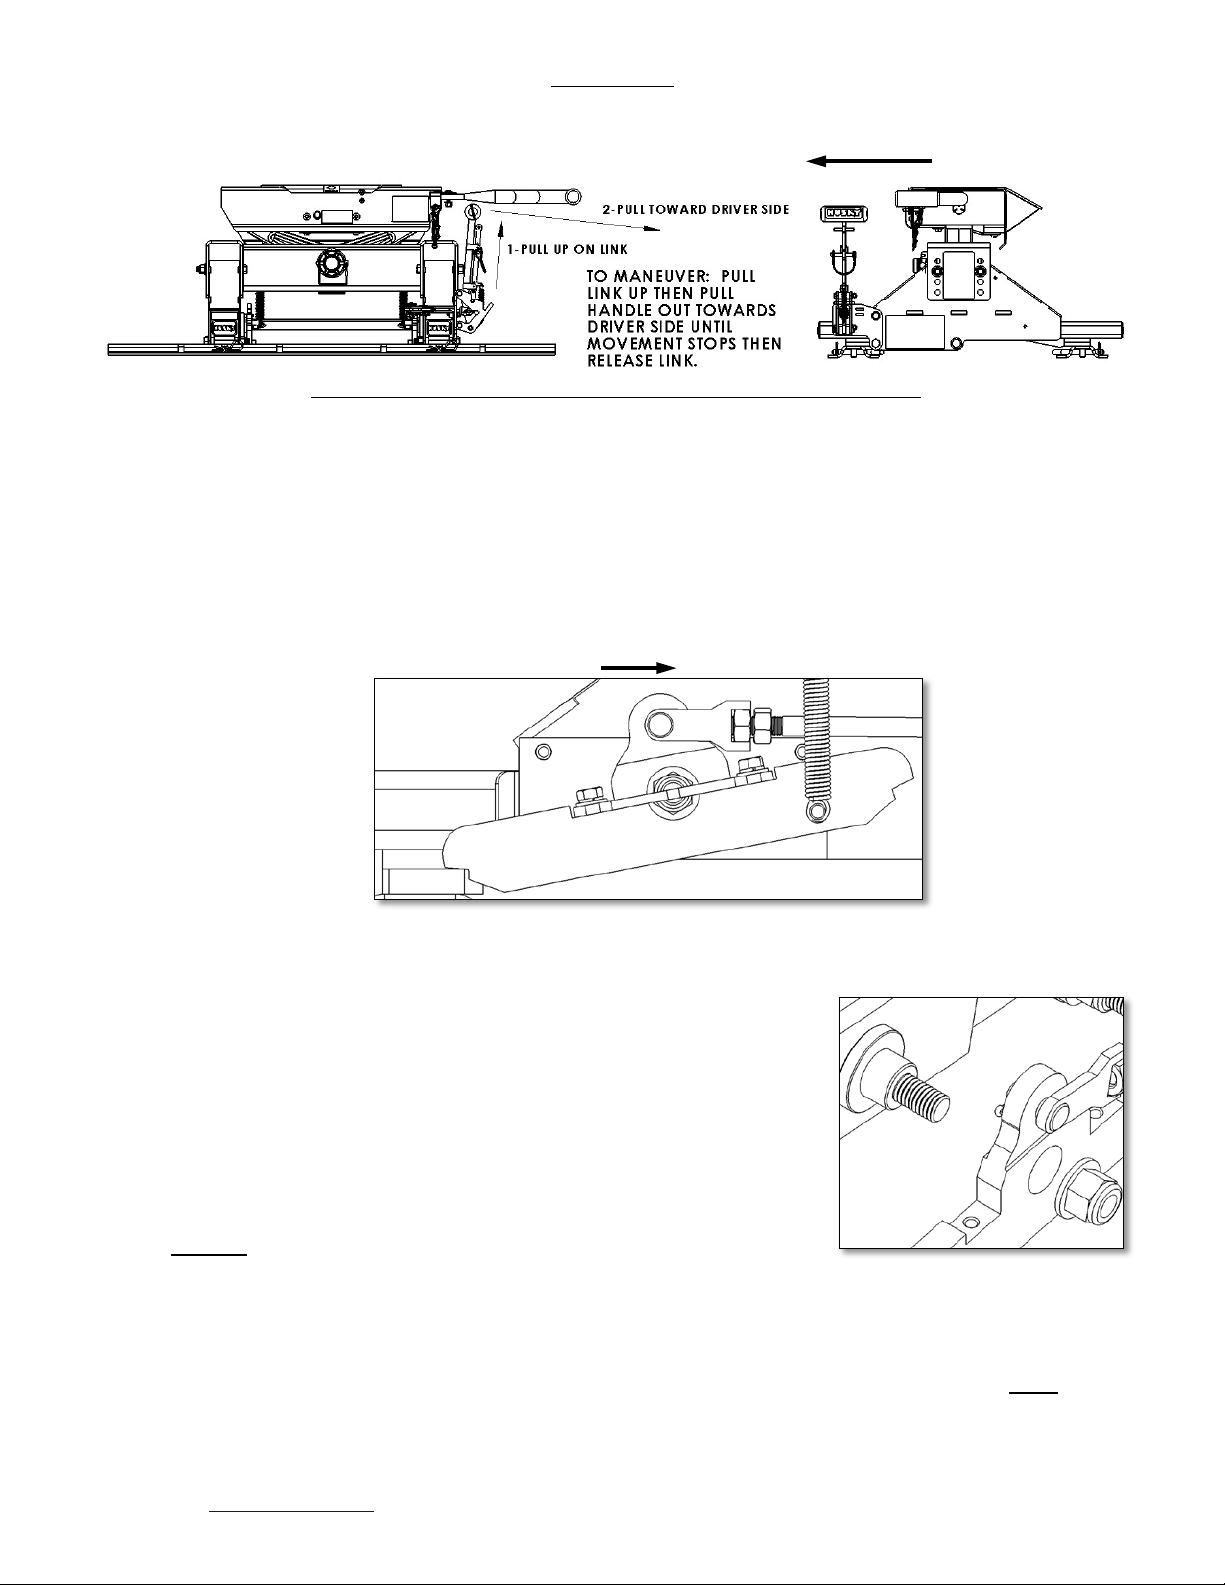
2. Pull up on link and push in on the handle then release link.
on a level surface.
Views showing pull handle and system in driving position.
3. When the handle is put into the driving position, make note whether the pivot stops
rotated or not. If they did then proceed to step 5.
4. If the pivot stops did not rotate then you will need to set the trailer brakes and then pull
the tow vehicle forward slightly until you hear the pivot stops actuate. Then proceed to
step 5.
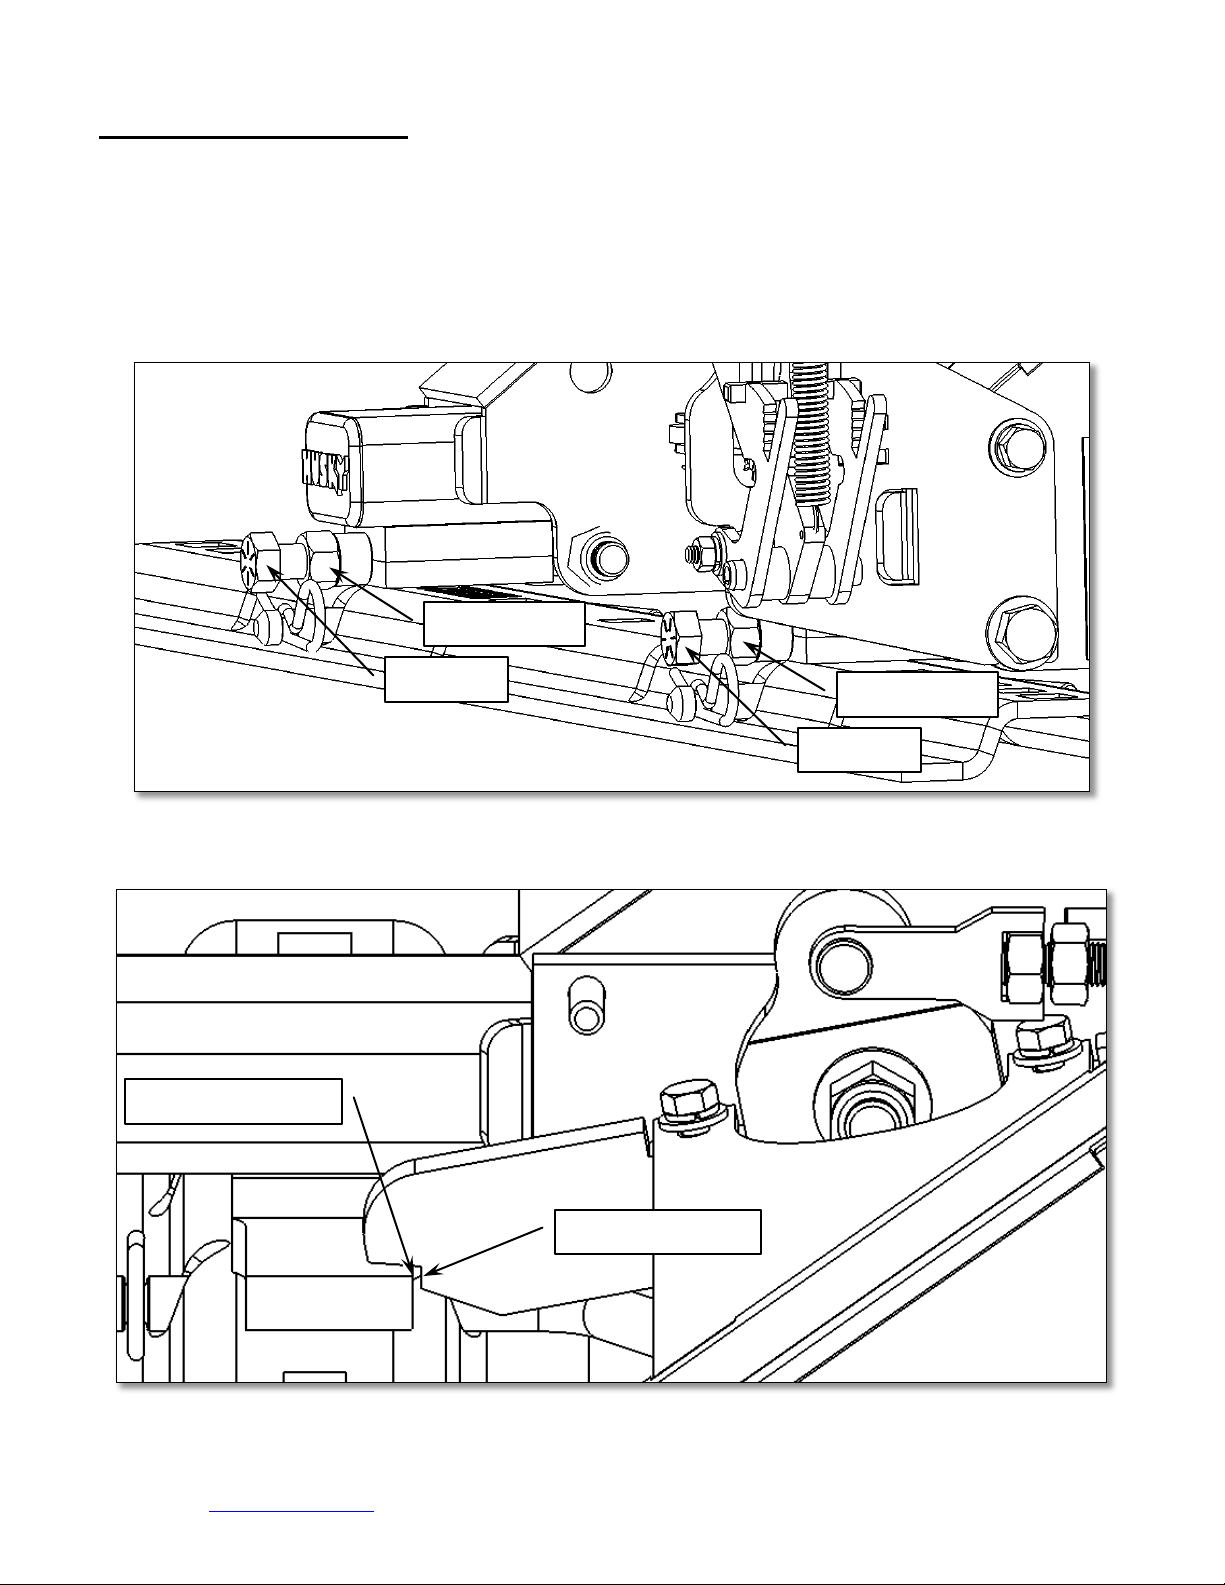
5. Set the trailer brakes and slowly move the tow vehicle rearward until the "HUSKY 10-
16K" stops moving and you hear the pivot stops engage.
View showing pivot stops in the driving "locked" position from inside of the driver side
assembly.
Maintenance and Care
1. Every 5,000 miles check all bolted connections to ensure
the proper torque is applied. (See page 1 for proper torque
values based on fastener size and grade.)Also, apply fresh
grease to the pivot shafts to ensure trouble free movement
of the pivot stops.
2. Using compressed air, clean cloth or hand brush periodically
wipe off the sliding surface of the "HUSKY 10-16K".
3. Do not
as this may affect sliding performance and accelerate wear.
use any kind of lubrication on the lower sliding pad
4. Before each trip, it is a good idea to check the actuating mechanisms of the "16K Husky-
10" for proper movement and make any corrections/adjustments if needed.
5. If system is removed from base rails with the cross member and pivot plate still installed
and then replaced back into the base rails, no adjustments should be needed. BUT, it is a
good idea to check all connections, settings and movement before towing and adjust as
needed.
Front of Tow Vehicle
View from cab side of truck bed
Front of Tow Vehicle

All Products limited to Vehicle Tow Rating; see Vehicle Owners Manual
See www.huskytow.com for Warranty Information / Tech Support ©2012 Husky Towing Products
Revision: February 12, 2013-REV 1
Page 9 of 11
The "HUSKY 10-16K" comes from the factory with some pre-adjusted features.
Fore and Aft spacing bolts.
The Fore and Aft spacing bolts are located at the forward end of the rails and are used to reduce
the amount of fore and aft “free travel” the unit has during sudden speed reduction, stopping and
taking off from a dead stop. You can reduce the amount of travel fore and aft by loosening the
1/2” jam nuts on the driver side and passenger side and the turn the 1/2” hex bolts clockwise 1/8-
1/4 of a turn equally to both sides. You must ensure that the pivot plate and flippers can still fully
rotate from the driving position to the maneuver position without binding. Once this is done
tighten the 1/2” jam nuts to secure the 1/2” bolts in place.
Loosen the 1/2” jam nuts and turn the 1/2” hex bolts 1/8-1/4 clockwise to reduce fore and aft
movement.
The flipper stop edge must not come in contact with the corner of stop tab during rotation.
1/2” Jam Nut
1/2” Bolt
1/2” Jam Nut
1/2” Bolt
Flipper stop edge.
Corner of stop tab.

All Products limited to Vehicle Tow Rating; see Vehicle Owners Manual
See www.huskytow.com for Warranty Information / Tech Support ©2012 Husky Towing Products
Revision: February 12, 2013-REV 1
Page 10 of 11
Vertical spacing bolts.
The Vertical spacing bolts are located underneath the Driver side and Passenger side housing
assemblies and are intended to reduce the amount of vertical negative load distance the housing
assemblies can travel while still allowing the “system” to move fore and aft without binding. To
check if the “gap” is correct, use a set of feeler gauges to check the space between the tip of the
3/8” hex bolt and the underside of the rail is no less than .015” and no more than .020”.
If gap needs to be adjusted, loosen 3/8” Jam Nut, then turn 3/8” Hex Bolt clockwise for less gap
and counter clockwise for more gap. This should be checked on the driver side and the
passenger side.
Some components
removed for clarity.
Using feeler gauge,
ensure gap is
between .015”-.020”
3/8” Jam Nut
3/8” Hex Bolt

All Products limited to Vehicle Tow Rating; see Vehicle Owners Manual
See www.huskytow.com for Warranty Information / Tech Support ©2012 Husky Towing Products
Revision: February 12, 2013-REV 1
Page 11 of 11
Warranty Terms:
10-Year Limited Warranty:
This warranty applies solely to 5th Wheel Hitches manufactured by DTS Manufacturing for Husky
Towing Products.
DTS Manufacturing, Husky Towing Products and Coast Distribution make no guarantees or
warranties for products not manufactured by DTS Manufacturing. Such products are covered
solely under any applicable warranty of the manufacturer. It is always recommended that the
operating instructions and guarantee instructions provided by the manufacturer are followed.
DTS Manufacturing warrants its products to be free from manufacturing and material defects to
the original purchaser for the length of warranty stated above from the date of retail purchase. If
any products are found to have a manufacturing or material defect, the product will be replaced or
repaired at the option of DTS Manufacturing, Husky Towing Products and Coast Distribution with
proof of purchase by the original purchaser. The original purchaser shall pay all transportation
and shipping costs associated with the return of the defective product and the defective product
shall become the property of DTS Manufacturing.
The Warranty applies to DTS manufactured products used for individual and recreational
purposes. Commercial usage of the DTS manufactured products limits the warranty to 90-days
from date of purchase.
The Warranty applies only to DTS manufactured products which are found to be defective in
manufacturing or material. This warranty does not apply to normal wear and tear of to the finished
placed on DTS manufactured products.
DTS Manufacturing, Husky Towing Products and Coast Distribution are not responsible for any
labor costs incurred for removal or replacement of the defective product.
DTS Manufacturing, Husky Towing Products and Coast Distribution are not responsible for repair
or replacement of any product under the limited warranty where the product was improperly
installed, misapplied, altered, abused, neglected, overloaded, misused or damaged as a result of
an accident, including any use of the product not in accordance with all product operating and
safety instructions.
Without limiting the generality of the foregoing, DTS Manufacturing, Husky Towing Products and
Coast Distribution shall under no circumstances be liable for any incidental or consequential loss
or damage whatsoever arising out of, or in any way relating to any such breach of warranty or
claimed defect in, or non-performance of the products. Some states do not allow the exclusion or
limitation of incidental or consequential damages, so the above exclusion or limitation may not
apply to you.
This limited warranty gives you specific legal rights, and you may also have other rights that vary
from state to state.
Table of contents
Other Husky Industrial Equipment manuals