manuals.online logo
Brands
  1. Home
  2. •
  3. Brands
  4. •
  5. Husqvarna
  6. •
  7. Sewing Machine
  8. •
  9. Husqvarna Zig Zag User manual

Husqvarna Zig Zag User manual

Class
a
L. L1
Y
Handbook
for
Husqmil
zig-zag selyiog nlaehine
Class Lq
for domestic use
Husqvarna Vapenfabriks Aktieholag
HuskYarna - Sw-eden
-Y
i
CAUTION!
Start the seanx in tire cloth
the thread rnay be drawn dorntnrlor outside it or
into the bobbin case"
Never start the machine
h aving cloth underneath urhen threaded without
the presser foot.
Alvrays turrl the flywheel tov,ards vou.
]\4ake sure the thread take-up lever is always in its
highest position before the thread is pulled out and
cr.rt off' after sewing.
* This handbook is intended ro teach you the working
of the Husqvarna zig-zag machine, Class 14, how to care
for it in the best wn/, and how ro use ro the best advanrage
the differen t attachments supplied with the machine, or
urhich can be bought.
* It is extremely important that you should study this
handbook carefully in order that the machine shall be a
source of utility and satisfaction a faithful and valuccl
servant for countless years.
* -rhc sewins machine represents a capital investm.r'r r
which, pr()pcrly administered, will yield a good rer,rr.
Faulty trclltntcnt or neglect wiln lower this return antl
contri[rrrtc to shorrcn its useful life.
Strr't ()rt, tlrcrefore, by making yourself familiar
Never pultr the cloth to
the eye in the throat
or the needle bent.
help the machine to feed, or
plate may become damagecl
2
the constr-trt'rirr.r ar-rd working of the machine, and its
plicability f.r'tliffcrcnt kinds of sewing, by studyinu
handbook cArcfrrlly. [t will pay vou to do so!
wit lr
l1 I)
t lr i.'
1
Wltttt
Getting the rmachirae nead'r'for sewing"
Fig. 1.
How to ger rhe machine ready for sewing"
Lift rhe machine our of irs case and place ir on a rable"
If the mar:hine is to be used with che wonk rable fiinrted, re-
lease nhe tratter from the case.
Then siide the table over the lower arm of the sewirrpi nr,r
chine and secure it in rhat position by rurning lever l, I'i: I
ro the right. Let down the supporting [e*s 2, whiclr \('r \ r !,,
support the rable at rhe outer end"
4
Thread, needle and f ormation ot sritches.
The thread, neeclle and shutde form rhe sritches.
j2
iir
r)
r"
rrg, J.
A seam sevrn xr), macl-rine consists of a series of firm
stitches, produced bv the inter locking of the upper and
louner threads" The needtre pushes down the upper thread
througl-l the cioth and further through the hole in the throat
pxate. \ihern the needtre has reached its lowest point a1ctr
begins to rise aeain, the upper thread forms a troop betweer-r
the eloe of the n,eedle and the cloth,
rvhich is trarge enough to engase thc
shr'rttXe. The shuttle enlarges this
troop and together with rhe undcr
thread, passes through it; the uppcr
thread then tightens and the stitclr
has been formed
Onl1. needles of class ZC5 should bt,
used for this sewing machine. IJr>tlr
the class number and stze are usurrlly
:tamped on the butt of the ncccllt..
On one side of rhe needle is a lcrrstlr
ri-ise groo\:e ii-r s,hich the thrcacl sli
4
(-
' ll[
IG
Fitting the needle"
Choosing suitable thread and needle.
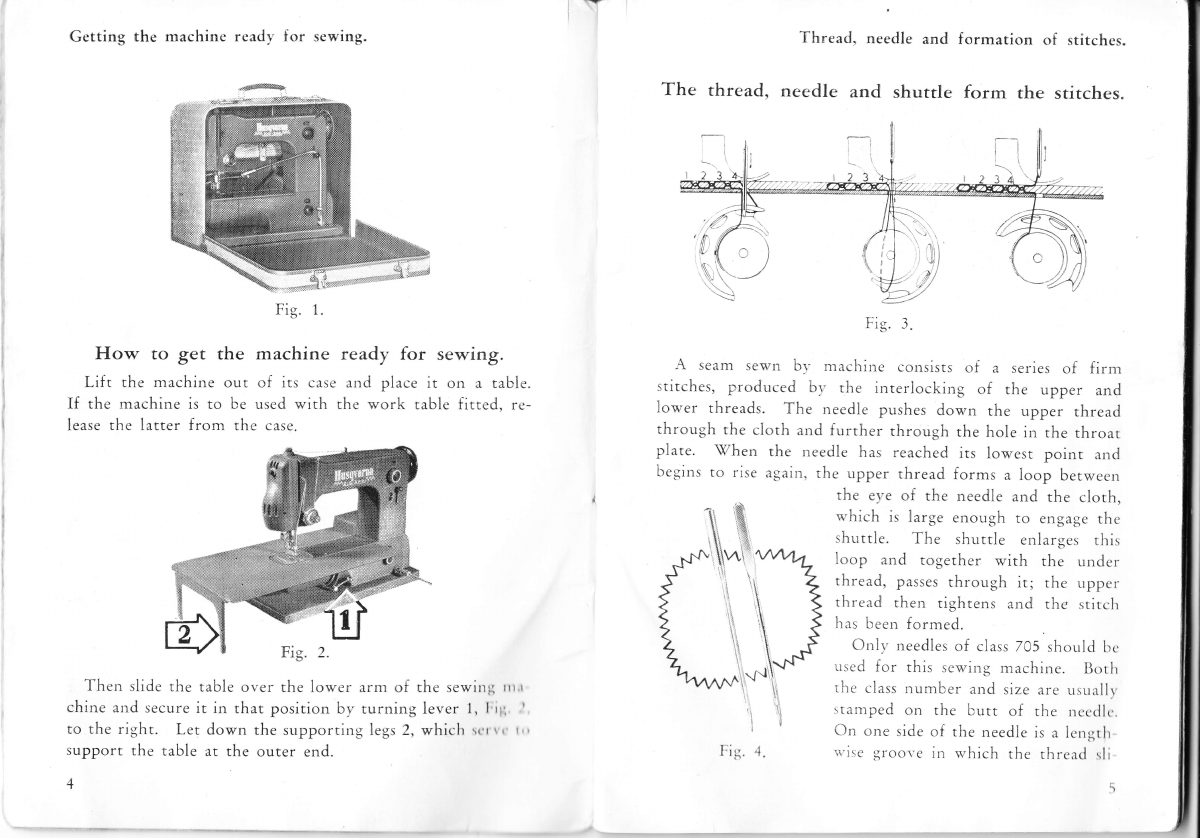
des 'when the needle works up and down ch rough che ma-
terial. On the opposite side of the needle, where the butt
is ground flat, the groove is shorter, and on this side the
thread forms the loop through which the shuttle is to pass"
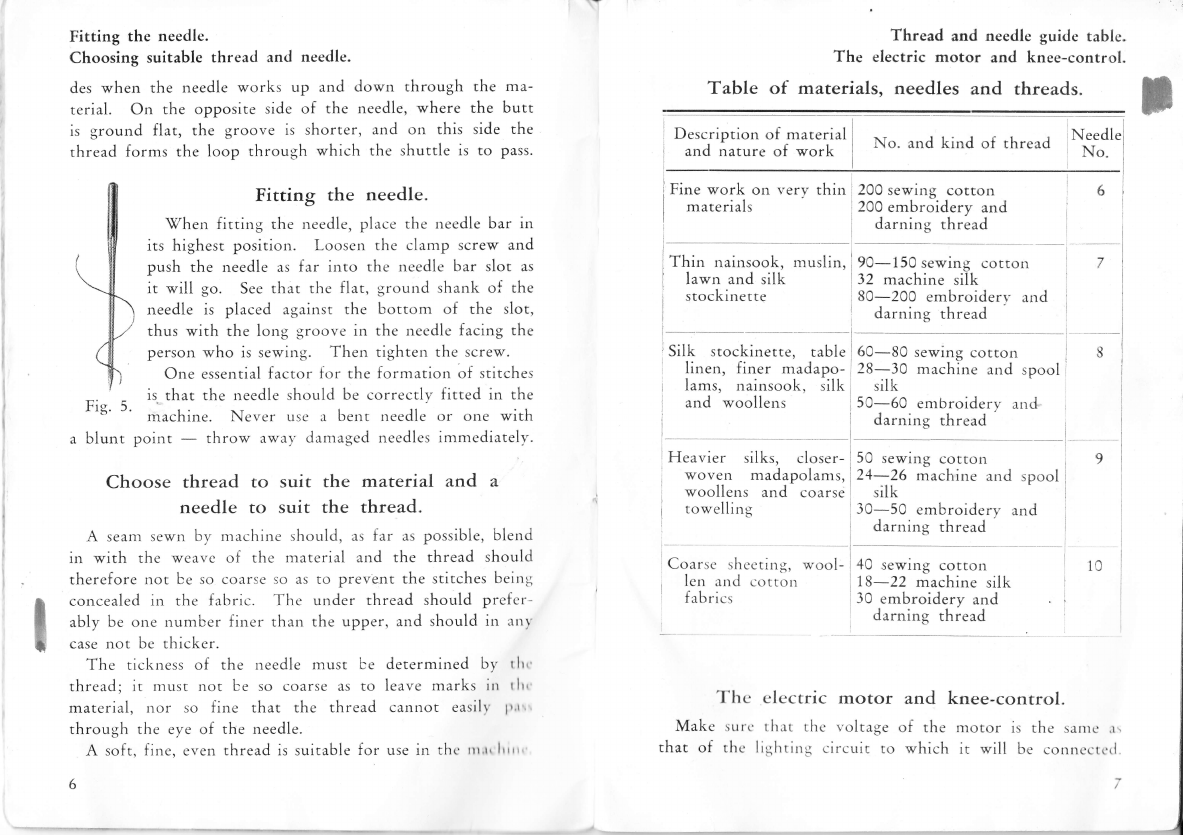
Fitting the needle"
Vhen fitting the needle, place the needle bar in
its highesr position. Loosen the clamp screw and
push rhe needle as far into the needle bar slot as
it will go. See that the flat, ground shank of the
needle is placed against the bottom of the slot,
rrhus with the long groove in the ,reedle facing the
person who is sewing. Then tighten the screw"
One essential factor for rhe formation of stitches
is, thar the needle should be correctly fitted in the
machine. Never use a bent needle or one with
point throw away damaged needles inrmediately"
Choose thread to suit the material and &
needle to suit the thread.
A seam se{/n by machine should, as far as possible, blend
in wirh the weave of rhe n.raterial arad the thread should
therefore nor be so coarse so as to prevent the stirches being
concealed in the fabric. The under thread should prefcr-
ably be one number finer than the upper, and should in anv
case not be thicker.
_,
Desc;iption of ,material i No. a'd ki*d of thread Ncedle
ano narure or worK i i.\o.
_rl
; Fine work on very ,rhin ! ZOa sewing cotron
I materials i 200 embroi dery and
I I i----: - ^L.. --,
Thread and needle guide table.
The electric motor and knee-contr,ol"
Table of materials, needles and threads"
I I darning thread i
Ifli" nainsook, muslin, I ,r-150 sewing corcon Z
I lu*r, and silk r)u sewrng corcorl
32 machine silk i
i rto.kinerre ]so-zoo embroiderr- and i
darnins rhread
r___i______i
--i
. Silk stockinerre, table i OC-AC sewing corron I S
i li.,err, finer rnadapo- ]eg-lo ,rra.hlr. and ,pool i
I^---^ ^: r ^'r,.rt - -r-
lams, nainsook, r;tt ] silk II
and i
il
ffi
Fig. s.
a blunt I t oarn"rng thread I I
I
iHeavier si[ks,_ closer- l5C sewing corrorl , g I
", t i^r i ' . ]
woven rnadapolams, | 24-26 machine and spool
woollens and coarse silk
'l'lrc clectric rnotor and knee-control.
Make sut'(' rltlt tlre vo[Tage o[ rthe nloror ls rhe sanlc ,r.
rhat of thc lis,lrr ing circuic to which rir will be conncc(t.tl
lc
l
l
The tickness of the needle must be
thread; it must not be so coarse as to
materia[, rlor so fiire that the thread
rhrough the eye of the needle.
A soft, fine, even thread is suirable f'or
6
determined by t lr,'
leave rnarks irr t l',
Canlnot easiIv Ir.r,
use ira thc tlt.tr lttr r '
! i darning thread '
lCor.r. sheering, wool- ,tC sewing cotton
lcrr .urd corron 18-22 machine silk
I fabrics 30 embroidery and
darning rhiead
i towelling ifO-SC embroidery and
The electnic motor and knee-control.
0n the motor there is a
sign plate at L, Fig. 6,
showing the voltage of the
motor.
The position of the knee-
control lever can be ad-
justed by means of the
screw that secures the lever
to the machine. The lever
can thus be fixed into the
position best suited ro the
person using the machine.
A light pressure with the knee against the control lever
vzitrl start the machine; the farther the lever is moved to the
right, the more the speed is increased, up to the maximum.
Some practice is required before the speed of the machine
ean be regulated correctly.
Machine lighting. 'S/inding rhe bobbin.
Machine
The machine lamp is en-
closed in a hinged coyer plate
on the forward part. of the
arm. The lamp is turned on
and off with the press-burron
1, Fig. 8. To change the
lamp, the cover is swung open
simply by gripping the fronr
edge close to the take-up lever.
lighting.
The thread is guidccl
from the cotton reel in thc
hole in thread guide 1,, Fig.
9, which should be swur)H
Fis. 9.
Fig" 8"
\ilfindirg rhe spool.
Fig. 7.
Winding the bobbin. Threading the under thread"
Insertion and removal of bobbin case"
right out) and between the tension discs 2. Vind a few
turns of the thread on the bobbin, which should be pushed
right on to the bobbin spindle 3, then srarr the moror as
described before. The machine is automatically released
when the bobbin is pushed on the spindle, so that only the
bobbin winding apparatus functions, During winding, the
speed can be regulated by means of the knee-lever" The
bobbin should not be fully wound with thread and winding
should be discontinued xrheni about tr mm remains to the
edge of the bobbin.
Threading of under thread; insertion and
removal of bobbin case"
Threading the under thrcad.
Insertion and removal of bobbin casc.
t,hat it is pushed c,orrectly into its place. The end of thc
thread from the bobbin should hang loosely out through thc
slot in the shuttle door when this is closed.
T'he bobbin is placed
thread, when pulled, is
tion of the arrow in
thread through notch 1
in the case in such a way that the
wound off the bobbin in the direc-
the following illustration" Pull the
in the case, under the tension spring
Fis.
needle bar shouXd be in
case is to be remorred.
10.
its highest position when the
Open the shuttle door by
The
bobbin
)2 on the outside of the case,
and down into the thread
guide opening 3 of the spring.
Pull the thread out a finger
length, then insert the case
with the bobbin into the
shuttle in the same way as it
'was removed. The hinged
tlap on the f ront of the bobbin case should be kept open
in order that the bobbin will remain in the case.
The bobbin case with the bobbin should be pushed o. r,
the pin in the shuttle as far as it will go" Make su rc r I r ,r r
the bobbin case pointer 7, FiS" 11, fits into the reces.s irr rlr,'
shuttle frame. Press the front of the bobbin case ro .lr,', l,
1C 1I
Fig. 1 1.
..........".-
Tension of under thread.
Threadling and tension of upper thread.
pressing the button as shown in Fig. 10. The bobbin lies
inside the case, which is pushed on to the pin in the shuttle"
The flap on the bobbin case can be opened with a grip as
shown in Fig. tr7, and the bobbin case with bobbin can rhen
be removed.
Tension of under thread"
The tension of the under thread can be regulated by rneaRs
of the tension spring on the outside of the bobbin case. If
the tension is to be altered,
this is done with the a.id of
the little screw driver, to
turn the screw of the
spring. The tension of the
thread is tightened when
the screw is turned to the
right and loosened when
the screw' is turned to the
treft" Usually llq to llz rurn
is sufficient to effect nhe
alteration.
On delivery, the under thread is adjusted for normal ten-
sion, which only needs ro be changed if very thin or espe-
cially thick materials are ro be used" If frequent changes are
.made f',rom sewing thread ro dar.ning thread, it mayj be 'ad-
visable to procure an extrd bobbin case, so that each case
can be kept at its parricular tension.
Threading and tension of upper rhread.
Vhen threading the upper thread, the take-up lever .sh,,rrl,l
bein its highest position (1, FiS. 13). The thread is gtri.l,.,l
d
Threading and tension of upper thread"
f'rom the reel through thread-guides 2 and 3, down between
the tension discs 4, over the regulating spring 5, under the
thread-guide 6, then upwards to the take-up lever 1, through
which the thread is passed from right ro lef t, downwards
through thread-guide 7 and into thread-guide 8 on the
needle bar, after which it is passed through the eye of the
needle from front to back and pulled our a finger lengrh.
FiS. 1,2.
Fig.
Threading and tension of upper thread"
Presser foot, throat plate and feed motion"
The tension of the upper thread is negulated with tension
discs 4 by means of a grooved screw. Correct tension caR
be judged by the appearance of the stitches. The red mark
on the icrew serves as a starting point whera altering the
tension. The tension is increased when the screw is turned
to the right and reduced when it is turned to the left.
Right tension of the threads is important for all kinds of
sewing." Thick or hard materials require hard tension of
the upper thread, in order to enable it to pull up the under
thread. Thin or loosely-woven f abrics will pucker if the
tension of the thread is too tight. On the other hand,
slack tension on thick materials results in seams that ,gape""
The following diagrams illustrate how correct and f aulty
rension of the thread affects
the stitching.
Presser foot, rthroat plate, feed motion and length o[ stitches"
feet are therefore supplied with the machine (see 'Page 23)"
It is important to keep the edges of the needle hole polished
and even, so as not to damage the needle or thread. Never,
therefore, pull the material while sewing, for this will bend
the needle, which may strike agains* the edges of the.needle
hole and damage them"
Fig. 14.
Fig. Ls.
rela-
and
ten-
has
the
Fig. L4 shows correct
tion between the upper
lower thread.
Fig. 15 shows thar the
sion of the upper thread
been to slack, or that of
under thread too tight.
Fig. 16 shows the opposite;
the under thread is so slack
that it is drawn up through
the material and the interloc-
king of stitches is visible on
the surf ace.
Fig. 17 b.
The feed motion can be raised or lowered by turning the
wheel as shown in Figs. 77 a and b. For zig-zag and straight
seams, the symbol in the window above the wheel should
indicate zrg-zag or straight seams, Fig. L7 a; for darning,
embroidery and sewing on buttons, it should indicate rhc
darning sign, FiS. t7 b.
Length of stitches"
Thc lcrrgth of the stitches is regulated with handle 1, Fig.
18, and thc lcngth for the stitches which has been ser can
be seen on t lr c scalc to the left of the handle. The movc-
ment of thc lr.rndlc is arrested for each length of stitch [r]'
Fig. L7 a.
FiS. 1,6.
Fresser' foot, throat plate and feed motion.
The rype of presser foor must be adapted to the k inrl .I
work for which it is intended, and various types of l)r'('\\('l
14' I5
Feed motion and length of stitches"
Adjustment for zig-zag and straight seanls.
means of a screw 2, FiS. 18. \flhen the handle is below
centre, the material is fed away from the person sewirg.
the handle is moved upwards, the material will be fed
wards the person sewing.
Adjustrnent for zig-zag and straight seams"
Sewing"
C-,+ mm) FiS. 20 (0 - straigth seam)" Adjusrment is made
by pressing and turning the wheel L, Fig" L9, and rhe scale
above the wheel indicates the breadth of stitch" ,
Points [o remember when sewing
It may be a good plan for a beginner to practise on a piea:e
of a material without needle or thread in the machine, be-
fore starting to sew. Place a piece of material underneath
the presser foot, which should be let down caref ully, and
start the machine with a slight pressure against the knee-
lever. By turning the rnaterial to left or right, the neces-
sary proficiency to guide the cloth will soon be acquired"
Before threading the needle, make sure that the take-up
]ever is in its highest position. The upper thread is threaded
through the needle and the loose end held lightly in the left
hand, while the flywheel is turned by hand towards the per-
son sewirg, until the needle has drawn up the under thread.
Pull the upper thread, the-
reby drawing the under i
thread through the needle i
and place the two ends of '
neath thc presser foot.
dowr-r gcntly on to the ma-
terial. Scwing carl then,
com I)) ('ll cc.
Alway.s stilrr rhe seam in i
the matcri:rl - nor outside
- for thc r lr rcncl is then
the
If
to-
Fis" 1E.
Adjustment for zig-zag and straight seams.
A zig-zag seam is produced by the needle moving ro and
fro from side to side, while the material is fed straight for-
ward" The breadth of the zig-zag seam can be ser from
76
Fig. 19. Fig" 20. Fis. 21..
t7
ti
Sewing.
Oiling and cleaning the machine"
triable to be dragged down into the shuttle path and broken
and it may then be necessary to clean the shuttle path of
pieces of thread before sewing can be started again. Never
keep the machine running without having material under
the presser foot, once it is let down.
\7hen altering the direction of sewing, at a corner, for
example, let the needle remain in the material, lift up the
presser foot, and swing the piece of work round the needle.
\[hen sewing is finished and the material is to be taken
out of the machine, this should be done with the needle bar
and take-up lever in their higheit position. Move the ma-
terial to the left and cut off the thread against the knife on
the presser rod extension t, Fig. 21"
The presser foot is jointed in order that it shall be able to
glide easily across thick seams and uneven surfaces.
*When sewing, the machine can be used with or without
the work table" The free arm facilitates sewing, as the gar-
ment can be drawn on to the arm.
Oiling and cleaning the machine"
In order to ensure ens/: smooth and silent running, and to
minimise the wear, oiling must be carefully attended to in
all places where there is f riction between moving parts.
It is important to remove odd ends of thread and fluff that
may have fastened under the feed motion and between the
teeth. This can be done most conveniently with the brush
supplied in the apparatus case. IJnscrew the throat platc,
therefore, and brush the feed motion clean.
The shuttle bearing path, Fig" 24, should be oiled frr'
quently but very sparingly each time"
1E
Oiling and cleaning the machine.
FiS. 22" Arrows show the points wich require oiling.
{
Fig. 23.
Oiling and cleaning the rnachine"
Fig. 21.
During sewing, thread ends and ftuff collect in rhe shuttle
path. These are liable to interfere with the smooth oPera-
irion of the machine and must therefore be removed, and to
do this, the shuttle must be taken out. Place the needte
bar in its highest position, open rhe shuttle door and remove
the bobbin case. Pressure ot.r. spring L, Fig. 24, will open
the shuttle path and shutrle 2 can then be removed, after
which it is easy to clean the shuttle path, first with a brush
and afterwards with a match or other implement not too
hard or pointed, wound round with a piece of material or'
cotton wool.. Clean the shuttle at the same time and lubri
cate it by wiping the bearing Path with a piece of cl< I t I r
moistened with a drop of oil" In order to avoid oil gcrtirrri
on the thread and material, it is important that oilirrq
2A
Oiling and cleaning the machine"
should not be carried our in any other u.oy. The cenrre
pin 3 in the shuttle should also be given a drbp of oil"
The tension of the under thread may sornerimes alter as a
result of dust or thread fluff collecting undern.uth the
thread tension spring on the bobbin case. If so, it is neces-
sfl,ry to unscrew the spring and clean it.
Itiil. 25. Arrows show the points which require oiling.
Thc 1'rarts irr thc upper arm of the machine should also bc
oiled, c.s[)ccially thc take-up lever and t.he parrs which im-
part, mov('r'l'tcnr ro the needle bar, the ztg-zag mechalti.sltr
and parts irr rlrc lo\\,cr Arm. See Fiqs. 22, ZS and 2C.
tj
l
2t
Oiling and cleanins the nnachine"
After oiling, be sure ,ro wip.e ofi
oiling places, and in any case it is
stitches on a piece of spare material
oil being left on the material.
excess oil om a[ surface
advisable to seur a few
so as to avoid stains of
Presser [eet, attachments and accessories.
Presser feet, attachments and accessories.
Darning irame urith
adjusrable supporr
s-r5245
Zig-zag darning
Presser foot for foot for wool.
zig-zag seams, S- 15256
Jointed.
s-1s229
t1-
c
p
i|;
\.J
'.\
Fig. 26. Arrows show che points which nequire oiling" Fresser foot for
straight seams,
Joi nted.
s-1510C
Srraight seann
. darning foot.
' s-15238
$I
ft7
*l
i$
ro,\t
\*'
-r
l
's4
$
1
('l
ll l
I
J
)
Zig-zag pressc r
foot with braicl
hole, Jointed.
s-15232
fixed presser foo,r
nuler for srraighn
zig-zag seams.
s-t522t
Simple
wirh
and
.\
.t
U
2?
P'ressen feet, attachrnents and accessories"
Straight searn
hemmer for
5 mm hems
(round hole at
notch).
3034
Zig-zag
hemmer for
rnussel seam.
s- 1 5240
S-L5224 and S-15186 respectively.
Buttonhole punch and wooden block for pulching
buttonholes,. (Do not use as a screu,driven !)
Jointed zig-zag Presser foot.
Zig-zag seam.
A zrg-zag searn can be stretched in elastic material and is
tl-rcrefore superior in strength to an ordinary straight seam'
Zig-zag,
hemmer for
rolled seam.
s-r5236
Straight seam
hemmer for
2 mm hems
(round hole at
notch).
s-1,5261 Fis. 28.
Buttonhole
foot.
s-1,5234
Sewing of elastic"
The elast,ic seam
cnables clastic to be
sewn on easilv ar-rd
qu i ckl y.
Br:tton sewing
foot.
s-15237
Other accessories"
1 large screwdriver, L small screr i-
driver, brush for feed motion,
oil can) bottle of oil"
24
j
1
I
?( I
LJI
i
I
I
I
J
Fig" 29 "
]ll
I
I
{
i
riI
i
I
I
I
Jointed zig-zag presser f,oot.
Fig. 30.
Darning of locknir and stockings"
Darning of elastic materials is work where rhe zig_zag
seam' with its elasticity, can be used mosr widely. Ir gives
smooth darning withou t any rhick edges. The breadtla of
the seam can var y f rom 2 to 4 mm, according [o rhe nature
Fis. 31.
Fig. 32
jointed zig-zag presser [oot"
Fis" 3 3
'of the vrork,
The f ree arm fa-
cilirares rhe work of
sewing, as rhe .gar-
ment can be drawn
on to rhe arm
for example, when
elastic is ro be sritch-
ed inside a sleeve, or
fo r rn ending socks
and stockings, [rou-
sers a[ rrhe knee, or
or srirching 0n .r
pocke c.
Casting seams,
The zig-zag seam is ver,y useful when casting rough edgres
dressmaking and other work.
The breadth of seam used rnusr depend on the weighr o[
rhe cloth and its kind of ureave. The uhread tension should
be regulated in relation to the rype of material. If the ten-
sion is too tight, it will tend to make the edges of ,rhe nla-
tcrial roll. FiS. 33 shows how the seam Xooks"
Fringeirg.
V"henever ic is necessary"
to prevent troose threads
from unraYelling, for ex-
ample when making finges
on tablecloths, rable rrrnt:j
and scarYes, the ztg.-zty
seam can L;e used.
Fis. 3 +.
aa
JointedJ zig-zag presser foot.
Appliqu6 work.
The zig-zag seam is ideal
for appliqu d work. Sew
the motif on with a narrow
and nor roo close zig-zag
seam. In some cases the
effect can be improved by
sewing olrer the first seam
urith a hroader, closer zrg-
zag seam.
The zig-zag presser foot
should be used for thin
materials. For firmer ma-
terials and rou,ded conrours) the button seuri,g foot is
suitable, and for appliqud urork with raised stitching, the
braiding presser foot is mosr suitable.
sewing on lace and insertion CIf trace.
\wihen sewing on lace or making lace inserrion, the lacc is
Fig. 3 s.
28
Fie. 36. Fig. 39.
|ointed zig-zag Presser ['oot"
\cwr) or1 arad the naacerial bound on the reverse side il:y use
, r l' th c zig-zag seam, so that ,rhe material can be cuf, off
.'lri.sc and does not need to be cast by hand. For rounded
('()ntours use the button sewing presser foor.
Picot.
Picot edging is sewn
.lll the turned-over
cdge of material, and
qives an even and at-
tractive edging for
trills and inserrcions.
Fis. 37 .
EmbroiderY.
Embroidery work can be done with 'che zl,g-zag Presser
foot and the piece of work stretched or1 a sewing frame.
#rm*#
ff rc#ffi
Fig. 3 8.
d
#IffiI1
29
Zig-zag presser foot with one braid hole.
vith lowered feed motion the urork can then [:e guided
backv'ards and forwards.
Decorative zig-zag seams.
Bv adjusting the length of stitches and r.aryilg the width
of the zig-zag seams, a wide variery of effec, .rn b. obtain-
ed. The seams are sewn partly with thg ordinary zig-zag
presser foot and partly with the zig-zag presser foot with a
braid hole, Fis" 39. The latter is provided with a recess on
the underside for the braid or cord. For oversewing and
close zig-zag seams, the length of stitches must be very
short. By turning the wheel for adjusting the breadth of
the zig- zng, whilst sewing, a varying breadth can be obtained.
Draw a soft cord through the groove of rhe braider pres-
ser foot and sew a zig-zag seam over the cord. v;a.ty
Fig"4a.
3C
FiS. 41. Fig. 42.
r .r r y'inu effects
., rr cl these can
t olou re d cord
Button sewing foot.
cani also be obtained in this kind of work,
be heightened by using coloured thread or
or b)' sewing a rorr of stitches close to each
ri\,,irrI.::!+:;ii,a+J.!:Eqs*Iid+iYfij
1... ljl ,.1 :: i::::: !,ji 1:i 1:::!::iy.*.:EY
:.i\i\ l\i :.1:!:!l:--':r.:!iil $l i'li f
.......\4.\:.r Bl".'.j.'Ll.ri::;4i,;it:\.\
iL,::*iri.'i\'a!:l:11i.)ii:'i':1:'r:i;ii
._.arr-.:.._r._'11.-.i-.ri.r:.r..ivjj:f,|2i
:,,, .',\',,: ,,. , j, ,, . : 'i,..,i: ,\: \, :i,,:i.:i!:;1'
!a l,i:, |\ir 1,j a:, !, \-'+;!' ! l!j\:,,,iq'
l.i};lti:i: :'!i'ri'i.:iril.:::;r ;:i".;!td:i!
il?;Yb):j:!lr.:::r:': i ! r.1': i:i;r':1!]' rlf \:
&Ar&i-.:..'*a:l:iia)i : i.:' j'i!::'!'Iil :
ffi5ffi:,n,:;oi;;,::i:,
Sewing on buttons, etc.
The button sewing foot is used fL, sewing on buttons by
the machine, which should be set for darning. The zig-zag
breadth should be adjusted so as to correspond with the
space between the holes in the button. Fasten the button
with 8 to 10 stitches, which are then secured by raising the
presser foot while the needle is lowered into the hole of the
button, altering the zig-zag breadth to C, lowering the foot
and sewing a few more stitches. When sewing on buttons
with four holes, the material should be moved together
with the button so that the button can be sewn through the
other two holes.
I !:l I :.....:l .:. :
ailt!:ii:i:!tj::iji
:lt:::::ili:::,:i::
:iji!lUii:i]jii:ii
ri!!:::iri:it!:i,i:i:l
!r:::::::i:::!r::: ::::!l
t::::t:tiiljl:.i:i:i:
31
Buttonhole,[oot, Butrtonhole punch"
Snap fasteners, hooks, eyes, e[c. can be sev/rl on in the
same way. Sewing Eiumonholes"
Use the burtonhole presser foor for sewing buttonholes.
The length of stitches should be ser for very short zig-zag,
say 2 mm. The first side of the burtonhole is se.wn very
slightly longer than rhe intended hole. At rhe last stitch
rhe needle should be ro rhe righr and rhe machine stopped
so that the needle remains in the cloth. Lifr the buttonhole
foot and turn rhe piece of work round, sew one stitch, lift
the presser foot, and alter rhe zig-zag breadth ro 4 mm with
the needle still in the clorh. Lower the presser foot and
sew a few braid stitches, which musr lie very close rogether,
and for this reason the cloth should be pulled gently so as
to slow the feed. Finish the lasr stitch ro rhe left. \Mith
the needle down in the cloth, lift ahe presser foot, reser the
zig-zag breadth ro 2 mm, lower the foor and sew the other
Fig. 43.
32
be inscrtcd in the hemmer. See Fig. 45.
Zig-zag hemmer for rolled seam.
,,itlc sligthly shorter than the first, with the last stitch finish-
r,l{ to the left. Lift the foot again, set the zig-zag breadth
r rr 4 mm, lower the foot and sew the braiding stitches at
r lrc other end. Finally, raise the presser foot, set the zig-
,,rii breadth to 0, lower the foot and fasten the stitches while
liccping the cloth in the same place" The buttonhole can be
r'r.rt open with the buttonhole punch shown on Page 24.
Three kinds of buttonholes can
be sewn, viz. braided buttonholes,
buttonholes with inlaid thread and
buttonholes with raised stitches"
The two first types of buttonhole
are sewn with weak tension of the
upper thread, with No. 40 darning
thread. For the last type, a Yery
weak tension for the under thread
should be used, while the upper
thread should be so tight that the
under thread is visible on the upper surface of the cloth.
A No. 40 6-twist thread is recomrnended for use as the
rrpper thread for the last type of buttonhole, with a \rery
{inc under thread, sxy, No. 60.
Rolled hem"
is best suited for thin fabrics and
for rolled seam, using a 4 mm widc
stitch length. In order to obtair-r
as little material as possible should
Fig.44.
'l'lris liind of hemming
is scwn with the hemmer
zig-'t;rg scan-I, and 7-1,rlz
a narr()w" attractlve seam,
JJ
Zig-zag hemmer for rnussel seams"
Fig. 45.
Mussel seams.
The hemmer for mussel seams is used for this work, which
is . very suitable for 'thin materials, silks, srockinerre, erc"
The wid'th of hem is about 4 mm and the breadth of the
zig-zag seam should be large enough ro make the ,eedle
Fig. 46.
31
'/.iy,-'r.trg presser foot for darnine with wool, with lowered"
feed motion"
l).rss r.r f raction beyond the outer edge of the hena. The
r lr rcad tension should be tight enough in relation to rhe
tlrickness and firmness of the material ro make the ,nlussels''
s t ;ul d out distinctly. Use 2-3 stitch length.
Darning with wool, esPeci ally socks"
The zig-zag seam and free arm make it possible to darre
socks without any difficulty. Remove the presser foot with
t lrc presser foot extensiori 9, Fig. 1'3 and replace with the
t,ig-zag presser foot for darning with wool. Lower the feed
rnotion" Darning thread should be used as the upper and
runder threads and darning wool as an inlay thread. Draw
the inlay thread through the grooYe in the darning foot,
l5
l
Fig. 47 .
Zig-zag presser foot for darning with wool, with lowered
feed motion.
under the steex plate, so that during darning it will run
through the round hole ro the front of the darning foot.
use a 4 mm zig-zag seam. vhen the sock is moved back-
wards and forwards in line with the arm, the darning woox
will be laid parallel with the rows of stitches and is auto-
matically sewn ro the edges of the hore with a few zig-zag
Fig. 48.
lchgmgtic figuri showing how the
thick darning wcol is sewn across
the hole and into the fabric when
darning. Note how the wool is
fastened with a few zig-zag
stitches.
36
Fig. 49"
Darning foot f or straight seams' lowered f eed motion,
darning or embroidery frame"
. r i t c h cs, when rhe direction of the wo rk is changed. Fig.
't7 . After having warped the wool in this way, the darning
is ccrntinued at right angles with zig-zag seams but without
.l.rrning wool. A softer and more pliable darn is ob'tained
irr this way than with straight sewing. FiS. 48.
Darning stockings, Iinen, underclothes and
garments.
This kind of darning is done with straight seams and with-
trut any inlay rhread.
Vhen darning small holes, a special daming frame is used.
'fhe outer ring with the adjustable holder is fixed in a hole
()r1 the free arm" Fig. 49, Page 36. The piece of work is
drawn on and held stretched out by the inner ring, which
should be fixed in position by means of the handle with
spring. Fig. 49, Page 36" The inner darning ring can easily
be lifted by pressing the handle together and the work can
be pushed along so that, for example, another nearby hole
can be darned at the same time without having to remove
the work frorn the machine. An ordinary embroidery
Fig.50. Fig. s 1.

Other Husqvarna Sewing Machine manuals

Husqvarna VIKING Onyx 15 User manual

Husqvarna

Husqvarna VIKING Onyx 15 User manual

Husqvarna Prisma 990 User manual

Husqvarna

Husqvarna Prisma 990 User manual

Husqvarna 1200 User manual

Husqvarna

Husqvarna 1200 User manual

Husqvarna Viking Designer Sapphire 85 User manual

Husqvarna

Husqvarna Viking Designer Sapphire 85 User manual

Husqvarna HUSKYLOCK 900 User manual

Husqvarna

Husqvarna HUSKYLOCK 900 User manual

Husqvarna Viking Tribute 150C User manual

Husqvarna

Husqvarna Viking Tribute 150C User manual

Husqvarna VIKING Amber S 100 User manual

Husqvarna

Husqvarna VIKING Amber S 100 User manual

Husqvarna Royale User manual

Husqvarna

Husqvarna Royale User manual

Husqvarna Quilt Designer II User manual

Husqvarna

Husqvarna Quilt Designer II User manual

Husqvarna Classica 100 User manual

Husqvarna

Husqvarna Classica 100 User manual

Husqvarna Saphire Series User manual

Husqvarna

Husqvarna Saphire Series User manual

Husqvarna 6690 User manual

Husqvarna

Husqvarna 6690 User manual

Husqvarna Platinum 730 User manual

Husqvarna

Husqvarna Platinum 730 User manual

Husqvarna 3240 Reference guide

Husqvarna

Husqvarna 3240 Reference guide

Husqvarna 545 TrioBrake User manual

Husqvarna

Husqvarna 545 TrioBrake User manual

Husqvarna Huskylock 90 User manual

Husqvarna

Husqvarna Huskylock 90 User manual

Husqvarna Viking Tribute 145C User manual

Husqvarna

Husqvarna Viking Tribute 145C User manual

Husqvarna VIKING Lisa User manual

Husqvarna

Husqvarna VIKING Lisa User manual

Husqvarna Prisma 980 User manual

Husqvarna

Husqvarna Prisma 980 User manual

Husqvarna Sapphire 960Q User manual

Husqvarna

Husqvarna Sapphire 960Q User manual

Husqvarna Viking Epic 3 User manual

Husqvarna

Husqvarna Viking Epic 3 User manual

Husqvarna VIKING Designer EPIC User manual

Husqvarna

Husqvarna VIKING Designer EPIC User manual

Husqvarna Huskylock 341 User manual

Husqvarna

Husqvarna Huskylock 341 User manual

Husqvarna Classica 90 User manual

Husqvarna

Husqvarna Classica 90 User manual

Popular Sewing Machine manuals by other brands

Jack k4 Series manual book & parts book

Jack

Jack k4 Series manual book & parts book

Sunstar Machinery DPK-2 user manual

Sunstar Machinery

Sunstar Machinery DPK-2 user manual

Singer 5400 Series Service manual

Singer

Singer 5400 Series Service manual

Anita Guardan GF-137-443 MH/L38 Operation manual

Anita

Anita Guardan GF-137-443 MH/L38 Operation manual

Singer 299U Service manual

Singer

Singer 299U Service manual

AEG 11681 instruction manual

AEG

AEG 11681 instruction manual

Duerkopp Adler 512/532 operating manual

Duerkopp Adler

Duerkopp Adler 512/532 operating manual

Brother Innov-is NV1800Q Quick reference guide

Brother

Brother Innov-is NV1800Q Quick reference guide

Necchi NC-102D instruction manual

Necchi

Necchi NC-102D instruction manual

Duerkopp Adler 69-373 parts list

Duerkopp Adler

Duerkopp Adler 69-373 parts list

Pfaff 487 instruction manual

Pfaff

Pfaff 487 instruction manual

ZOJE ZJ1414 Operation manual parts book

ZOJE

ZOJE ZJ1414 Operation manual parts book

Mitsubishi Electric PLK-J3020R-SE Technical manual

Mitsubishi Electric

Mitsubishi Electric PLK-J3020R-SE Technical manual

Singer 2282 Operation and safety notes

Singer

Singer 2282 Operation and safety notes

Duerkopp Adler 576 Spare parts

Duerkopp Adler

Duerkopp Adler 576 Spare parts

Brother LS-2220 instruction manual

Brother

Brother LS-2220 instruction manual

Duerkopp Adler 195 operating instructions

Duerkopp Adler

Duerkopp Adler 195 operating instructions

Texi Art Auto 2 Operations manual and parts book

Texi

Texi Art Auto 2 Operations manual and parts book

manuals.online logo
manuals.online logoBrands
  • About & Mission
  • Contact us
  • Privacy Policy
  • Terms and Conditions

Copyright 2025 Manuals.Online. All Rights Reserved.