HVCAM HV-72BIC User manual

1
User Manual
(For Web browser viewing)
Mode: HV-72BIC
Outdoor Wireless IP Camera

2
Chapter 1 Camera installation guide
Product overview
1,WIFI antenna, wireless signals acceptor,
2 Waterproof Cases
3 led lights it will flashing when no lights
4 Lens
5 Brackets
6 Extend line
7 Reset button
8 Network interface
9 Power interface

3
Chapter 2 Features
1. Basic features
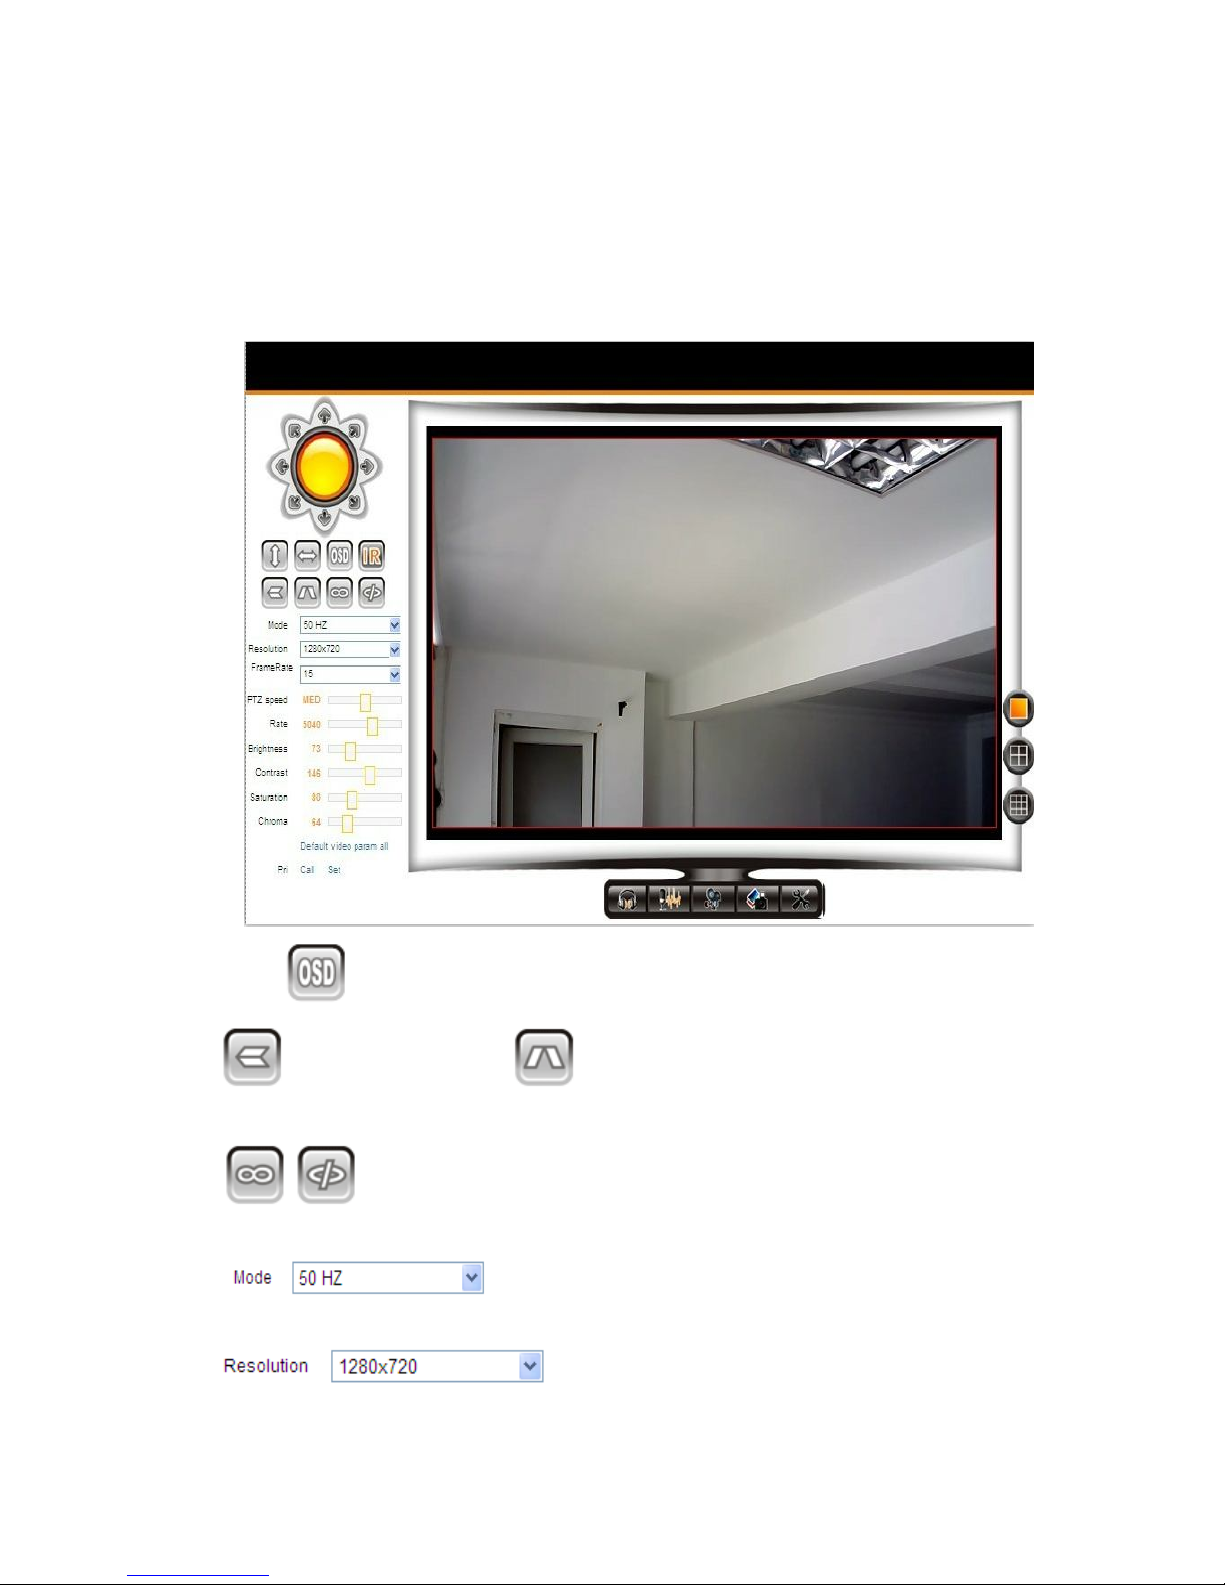
The basic function of IPCAM is to provide remote video on the IP network. Real-time
video images (720P, QVGA and VGA) quality are transmitted at up to 30fps on the
LAN/WAN by using H.264/MJPEG hardware compression technique.
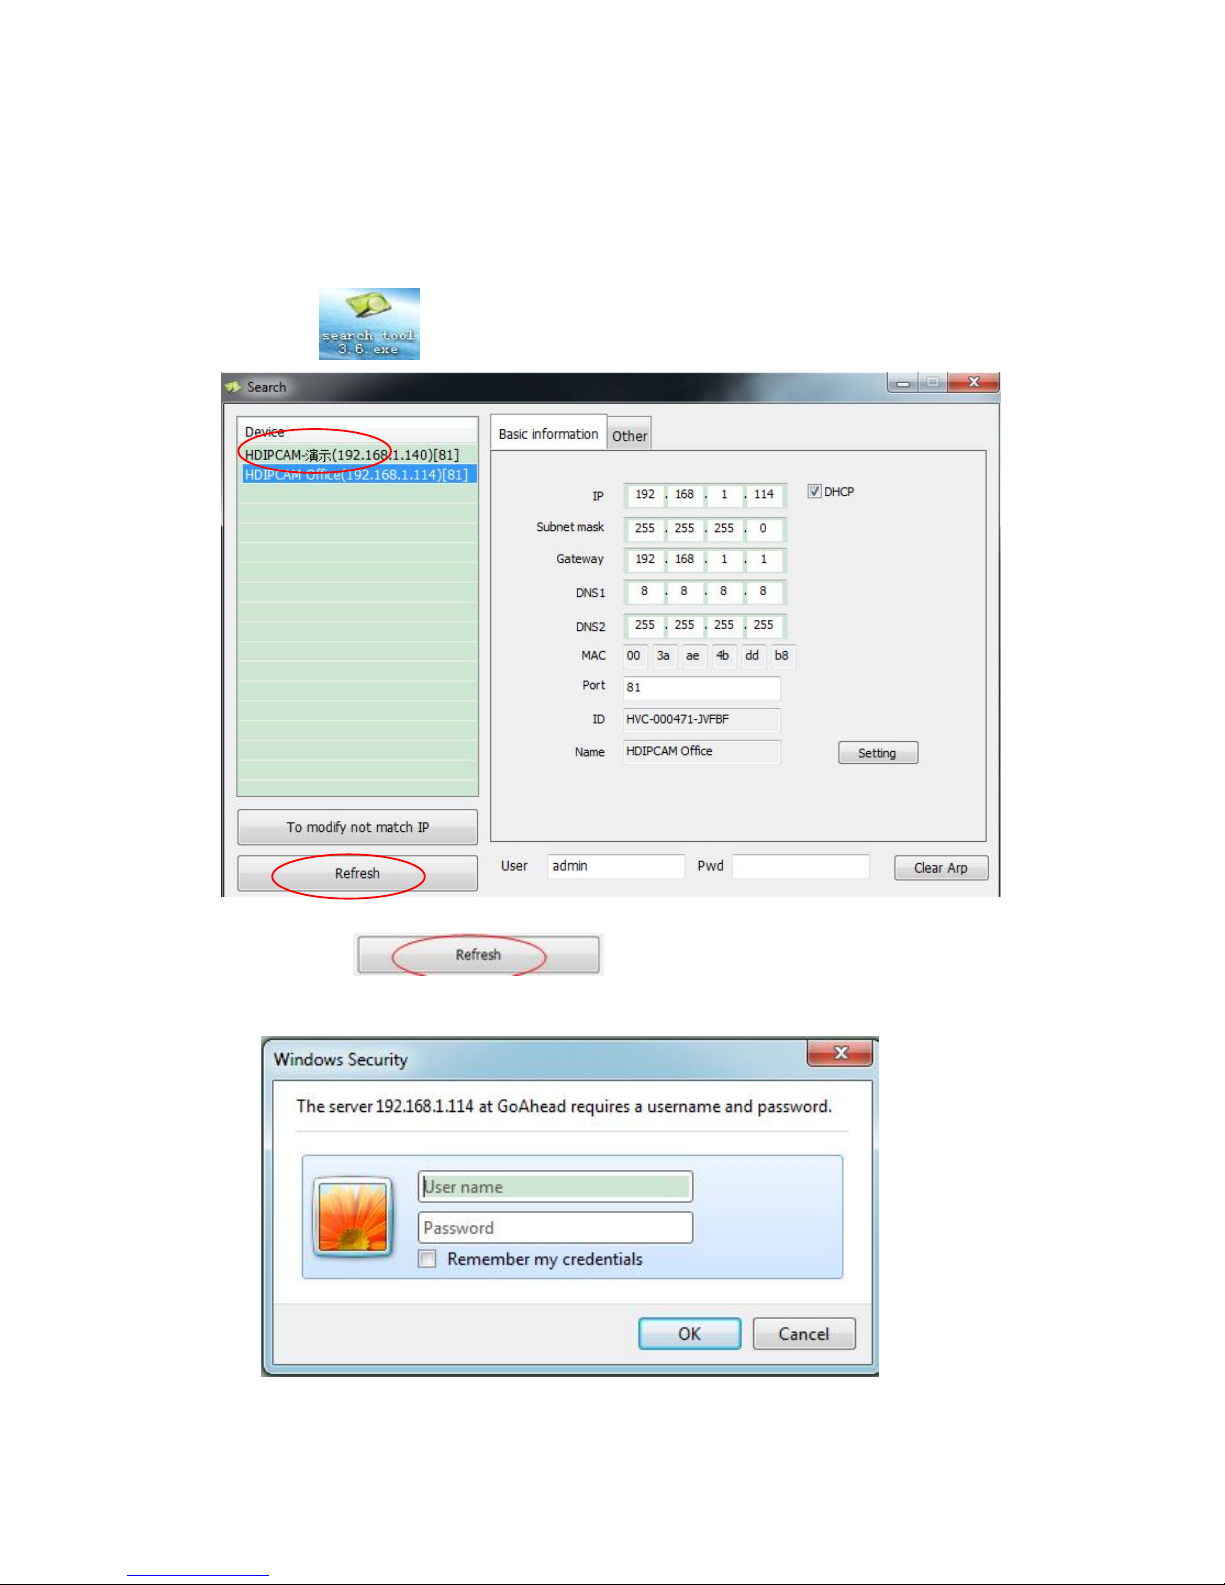
IPCAM is completely based on TCP/IP standard network protocol, Embedded WEB
server in IPCAM supports IE browser, Centralized monitoring the client and mobile phone
client browser. Therefore the management and maintenance of your device is simplified
by using the network to remotely configure, start-up, and upgrade the firmware of your
IPCAM. You can easily monitor and control image anytime in any place via clicking on the
net.
2. Advanced Features
Powerful High-performance media processor 32Bit RSIC
High Definition COMS Sensor, up to real-time 30fps
Optimized Motion—JPEG/H.264 video compression algorithm for high-definition
video transmission
Support lives tream, video stream and snapshot mode, each mode can be browsed
by 4 users or less.
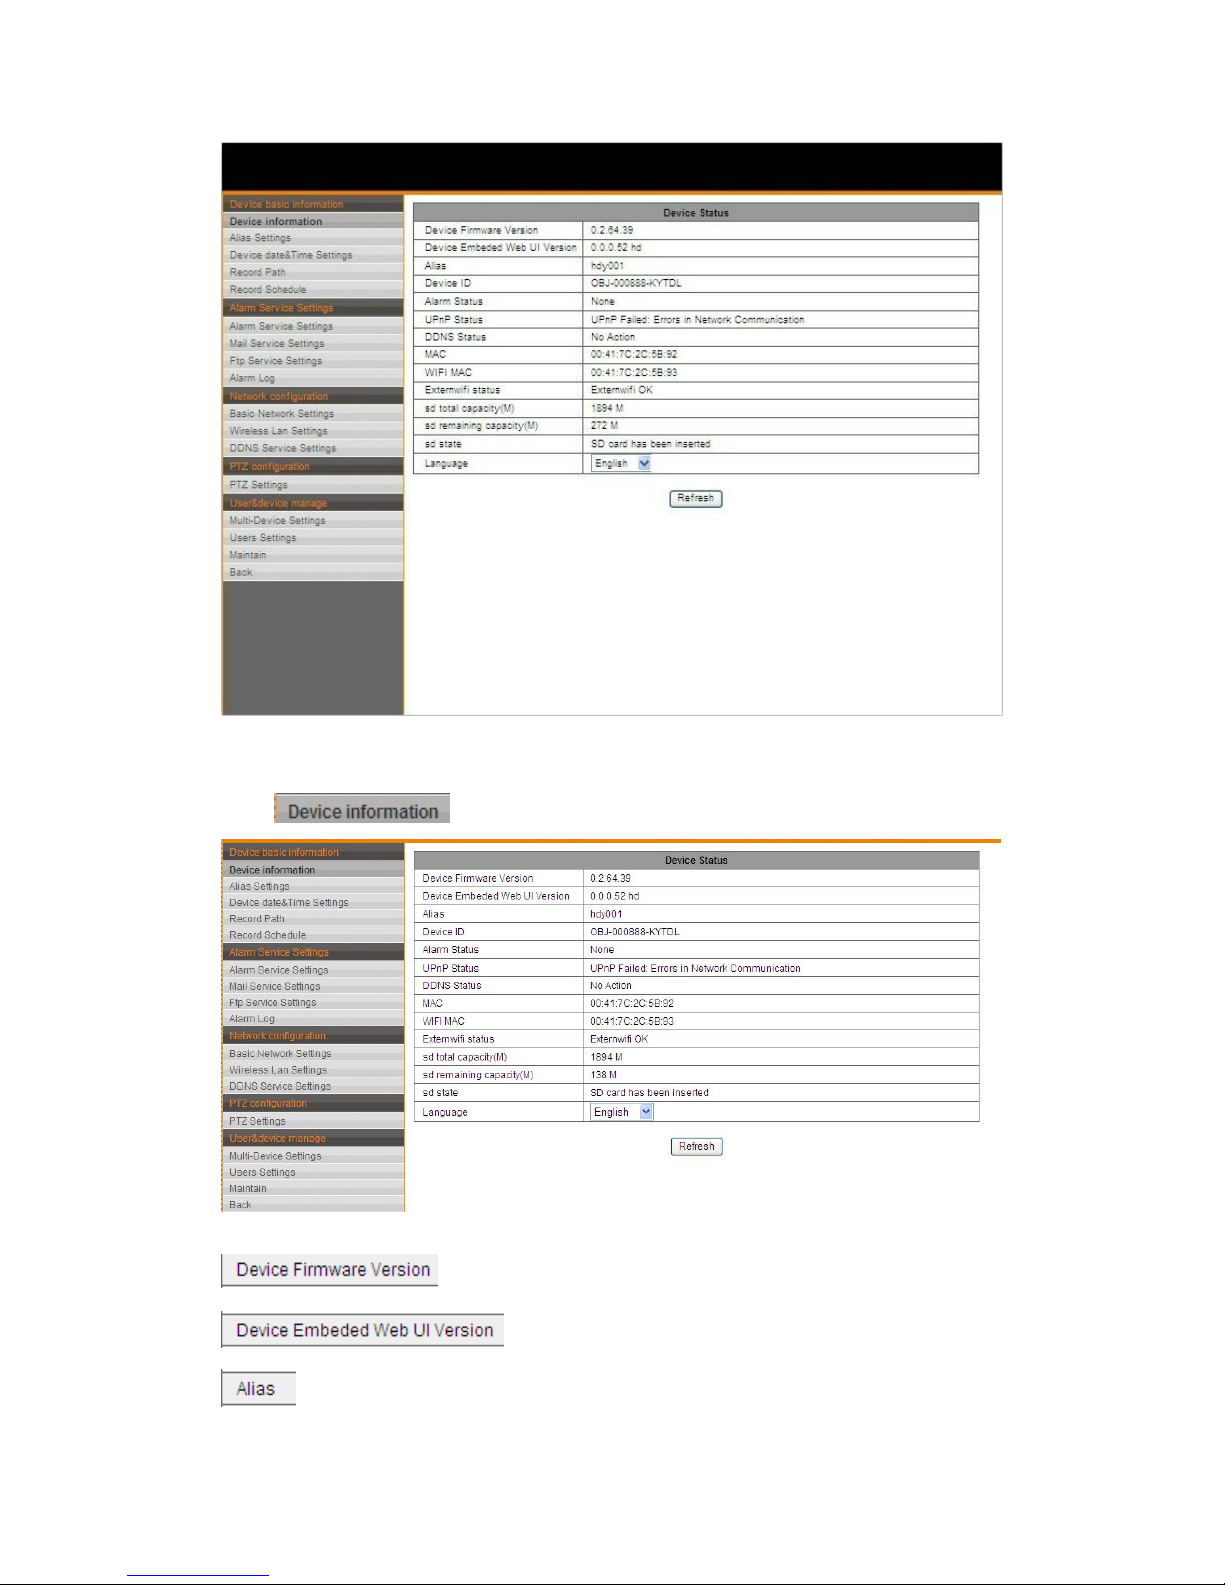
Embedded Web Server for users to realize real-time monitoring and settings
management
Support WIFI WIRELESS LAN
Support wireless P2P mode
Support DDNS, you can add manufactories domain name.
Support Motion Detection and Alarm by sending emails, ftp pictures and Output
warning.
Support mobile phones
Support 16 preset positions and call for warning
Support two-way voice intercom

4
Chapter 3 web instructions
1. Search Tool:
1.1 Please connect the camera to the power and network cable,
then open from CD to enter the following interface:
1.2 Then click to search online camera list, double click the
selected camera:

5
1.3 Input the user name: “admin”(no password). Click
2. Select Language and Login mode
Select languages
2.1 Double click the selected mode to enter IE page, It will appear a prompt as below:

6
2.2 You need to download and install OCX plug-in for first time using IE
2.3 Install directly after decompression
2.4 Refresh the IE page to watch video after installation

7
3. Direction for using IE operating interface
3.1 Direction for main interface
:OSD message
:Flip vertical image :mirroring image
:IO switch
: You can choose 50HZ or 60HZ to adjust indoor and
outdoor mode.
: Resolution adjustment; 720p(1280×720)
VGA(640×480) and QVGA(320×240) can be set.

8
:Frame rate adjustment;1-30 frame rate can be
set
:Adjustable if needed;
Factory default: It’s used to restore factory default in case you
adjust disorderly
:You can create 16 preset positions
: Recording Local video :Snapshot
: parameters settings
One camera viewing
Four cameras viewing
Nine cameras viewing
:
Adjust the Pan/tilt speed
3.2 Basic information
Click to enter parameter management page in the main interface as follows:

9
3.2.1 Device information
Click as follows:
: The version number of system software
: The version number of application software
: Display the name of device (customers can set the name if they want)

10
: That is Factory Series Number
: Alarm status display
: You can see whether the device enabled UPNP function and its state
: You can see a prompt of DDNS server if DDNS is set normally,
: Display wired MAC address of the device
: Display Wireless MAC address of the device
3.2.2 Video path
Click as shown below, click to choose where to store local
videos on your computer.

11
The camera will record automatically according to your time
schedule.
3.3 Alarm service settings
3.3.1 Alarm service
Click as shown below:
Choosing alarm mode: If you select , you will see:

12
There are some Alarm modes for selection: IO Linkage, sending mails, uploading images,
Alarm preset linkage. for example: all-day motion detection Arming, you can set detection
sensitivity to 10; it will output high level via liking IO, sending mails, uploading a ftp image
every 10 seconds, then aiming at preset position”1”; please see below settings:
Click to confirm.

13
3.3.2 Mail service settings
Click , the following screen will appear:
The key feature is E-mail Alarm, if the camera is triggered alarm, it will send alar
m messages to your settled email address.
: fill in E-mail address of the sender.
: Fill in E-mail address to receive Alarm messages.
: Fill in the sender’s mailbox website, such as QQ mailbox: smtp.qq.com
: Fill in username of sender’s mailbox
: Fill in the password of sender’s mailbox
Note: The camera need to connect Internet, if the password of sender’s mailbox changed,
the camera password must be the same as mailbox password before normal using.

14
3.3.3 FTP service
Click as shown below:
This feature is used to upload snapshots to specified folder on FTP server, it can’t be
normally used if there is no access to internet.
: Fill in URL of the site on which you want to upload
: The default is 21
: Fill in FTP username
: Fill in FTP user’s password
: Automatically and regularly upload capture pictures to
FTP (in seconds)

15
3.3.4 Alarm log
Click , you can check alarm information in below blank form:
4. Network configuration
Click
Get DHCP, device will obtain IP automatically:

16
Easy wireless settings, just press the SSID,you only need to entering the password
Click to connect your Wi-Fi network:
Click
Unlike legacy solutions, HVCAM does not require port forwarding. There is no risk
from leaving ports open on the network. HVCAM uses secure peer to peer networking
solution which provides a secure, encrypted connection each time your camera is viewed
from a remote location.
5. PTZ configuration(unavailable for this items)
Click as follows:

17
: Without preset function when start using.
: 0-16 preset positions can be chosen, aiming at matched position
when start the device; if it’s prohibited, default position is in the center.
: Adjust the PTZ speed
: set and start “up and down “or “left and right” to inspect cruise laps
6. Multi-Device Settings
Click , you can control 9 camera(in LAN) simultaneously.

18
Then video show, you can add 9 cameras at the same time.
6. Back
Click , It will back to monitoring main interface.

19
7. Troubleshooting
Warning
Risk of electric shock. Never remove the casing of the camera
To keep the warranty valid, never try to repair the camera by yourself
If you have problems using the camera, check the following points before you request
service. If you still have a problem, please leaving your message at www.hvcam.com or
directly contact your sales person to get support.
Cannot viewing your camera on iPad
When camera normal working, the power light blinks green. Please check if the
power cut or power cable is loose
Please use your available wired network, and make sure the network cable is
connected correctly.
If the camera still does not work or no light on, you may need to reset the camera by
pressing the reset button with a thin object on the bottom of the camera, hold this for 5
seconds, after that, repeat 3─set-up of this user manual.
Cannot make wireless control
Make sure your Wi-Fi router is turned on and that your iPad is wirelessly connected
to your Wi-Fi router network.
Make sure your Wi-Fi password is exact when Wi-Fi setting for the camera.
Keep away from potential sources of interference which may affect Wi-Fi signal, such
as Microwave ovens.

20
Video streaming is slow or has a delay.
The speed of login and getting the video feed from the camera highly depends on the
speed of the connection you are using
The Internet speed either from your Wi-Fi network or 3G/Edge highly infuences the
performance of the App. The faster the connection speed, the faster you can see the
video from the camera.
Table of contents
Other HVCAM IP Camera manuals
Popular IP Camera manuals by other brands

Foscam
Foscam FI9803P Quick installation guide

Panasonic
Panasonic AWHE2 operating instructions

Tenda
Tenda C50S user manual

boom collaboration
boom collaboration Boom AURA quick guide

Velleman
Velleman CAMCOLBUL15 user manual

Shenzhen Keekoonvision Technology Co.
Shenzhen Keekoonvision Technology Co. KK002 quick start guide