hygolet S3500 User manual

S3500 Hygienic Toilet Seat
Owner’s Manual
hygolet.com


3
Dear S3500 Owner,
Thank you for purchasing the S3500 hygienic toilet seat.
Your customers and colleagues will appreciate the improved
comfort and cleanliness of the restroom.
Please take the time to read this manual to understand the
operation of the seat.
We welcome you to visit our website for more information about
the S3500 at www.hygolet.com.
Table of Contents
S3500 and disposables ........................................................... 4
Exploded Diagram....................................................................5
Installation............................................................................... 6
Opening and Closing................................................................ 7
First Use...................................................................................8
Changing the Hygoplast Roll.....................................................9
Changing the PowerPack..........................................................10
Changing the Blade..................................................................11
LCD Display Information...........................................................12
Additional Information.............................................................. 13
Cleaning...................................................................................14
Troubleshooting........................................................................15

4
Accessories and Disposables
60.0xx
S3500 Hygienic Toilet Seat
60.170
PowerPack
60.970
Rubber grip kit
Sizes: S,M,L
60.950
Rubber adjuster kit
Sizes: S,M,L
60.905
Conversion Kit
PowerPack to Transformer
60.184
Blade
60.125
Hygoplast U125
60.900
Power transformer
60.990
Hygolet Key
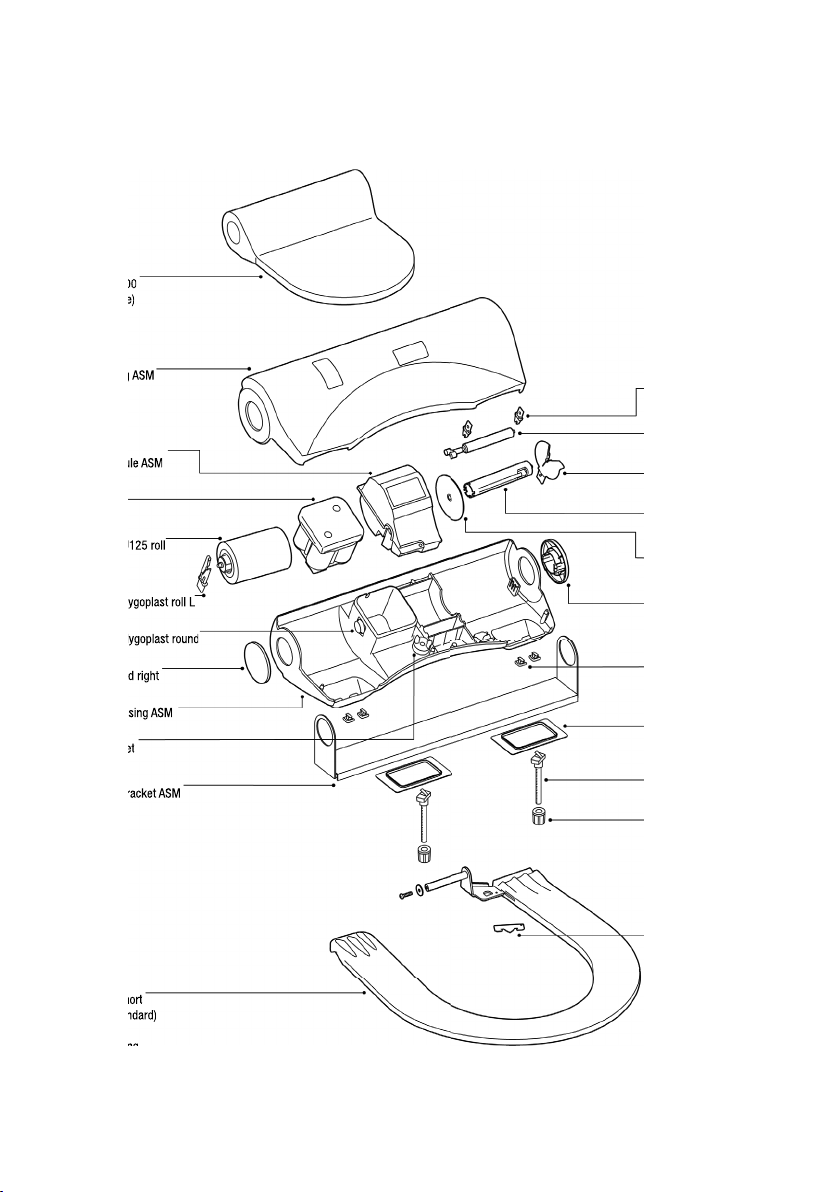
5
60.600
Top housing ASM
60.920
Lid for S3500
(Not to scale)
60.125
Hygoplast U125 roll
60.170
PowerPack
60.515L
Holder for Hygoplast roll L
60.513
Holder for Hygoplast round
60.500
Bottom Housing ASM
60.560
Pivot left and right
60.560
Pivot left and right
60.700
Moutning Bracket ASM
60.535
Auto-lock set
60.800
Seat ring short
(Europe standard)
60.850
Seat ring long
(USA standard)
60.184
Blade
60.650
Pressure roller ASM
60.128
Take-up spool U125
60.450
Coupler for motor module
60.515R
Holder for hygoplast roll R
60.658
Holder for pressure roller
60.970
Rubber grip kit
(Standard size: M)
60.760
Plastic Screw
60.765
Plastic Nut
60.950
Rubber adjuster kit
(Standard size: M)
60.400
Motor module ASM
Top housing ASM
Lid for S3500
(Not to scale)
Hygoplast U125 roll
Holder for Hygoplast roll L
Holder for Hygoplast round
Bottom Housing ASM
Pivot left and right
Moutning Bracket ASM
Auto-lock set
Seat ring short
(Europe standard)
Seat ring long
Motor module ASM
Exploded Diagram
6
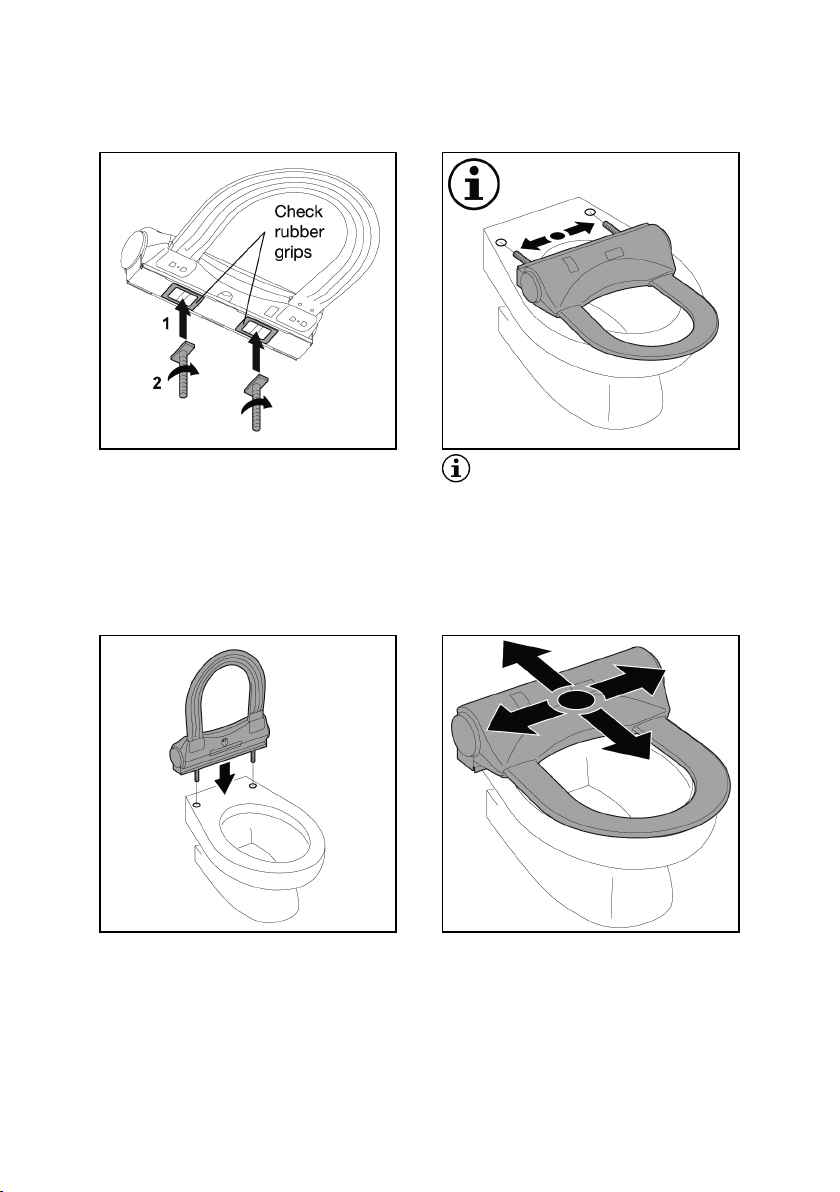
Center S3500 to align with toilet
bowl. Tighten plastic nuts by
hand or with tool.
Insert screws into holes. Loose-
ly screw plastic nuts on screws
from below.
Place S3500 flat on toilet first
to align mounting screws with
holes.
Check mounting bracket for
2 rubber grips. Insert screw
heads into small slits. Turn screw
90° to snap in.
Installation

7
The pressure roller must be
kept clean and spinning freely.
It secures the Hygoplast flow and
tracks the Hygoplast transporta-
tion and usage.
To close: Push top housing
down until the automatic lock
*clicks* into place.
Lift top housing up.
Tip: Maintenance of the S3500
is easier if the lid is removed.
To remove lid, lift one side over
the round pivot and slide off.
To open: Lift seat ring and open
lock with Hygolet key.
Opening and Closing
8
The LCD will turn on. Close
S3500 and allow S3500 to
calibrate the sensor field
and battery status. Allow 15
seconds for calibration.
Insert Hygolet transformer into
plug on left pivot of S3500.
*Note: Only Hygolet transformers
may be used. Non-Hygolet trans-
formers will damage electronics.
The LCD will turn on. Close
S3500 and allow S3500 to
calibrate the sensor field
and battery status. Allow
15 seconds for calibration.
Open S3500 (pg. 7). Remove
plastic contact protector from
PowerPack. Insert PowerPack
into opening. Push down lightly.
Close S3500 (pg. 7)
First Use
PowerPack Version
Transformer Version

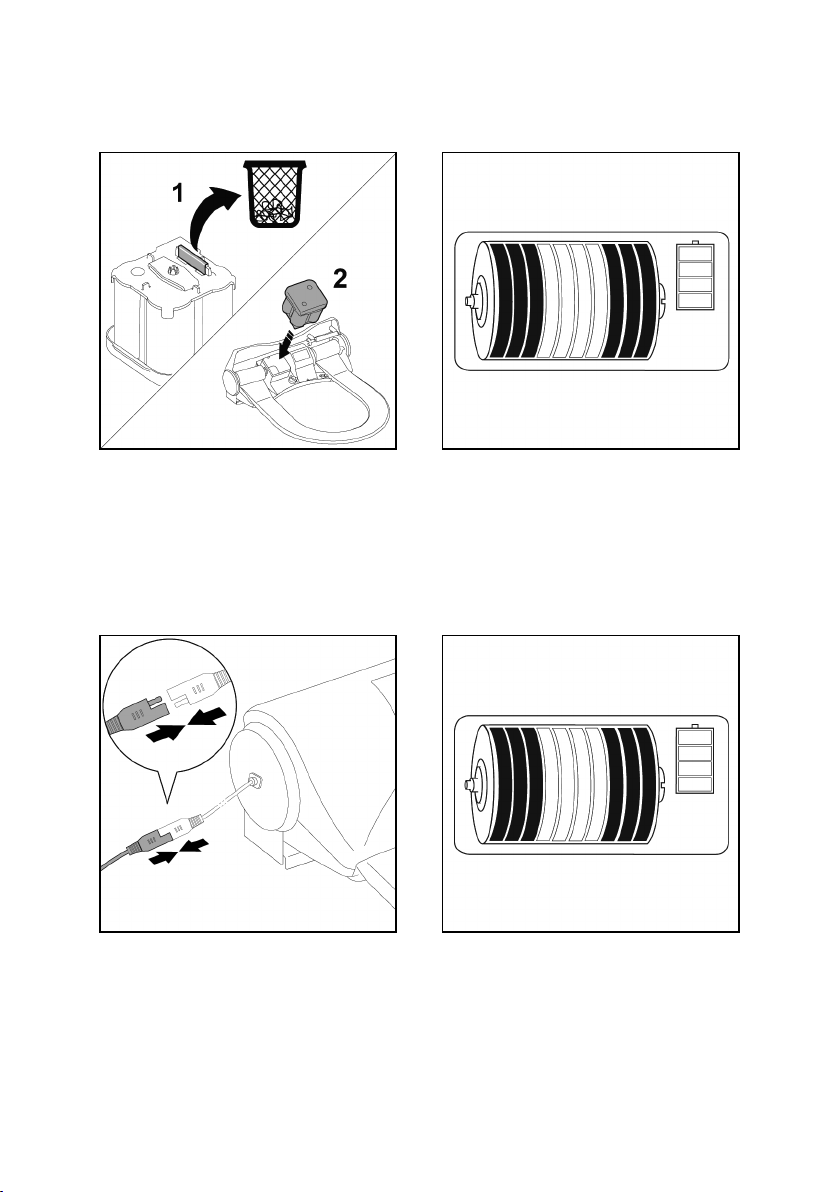
9
Place about 5 cm of Hygoplast
under the take-up spool clip.
Close S3500 (pg. 7). Activate
sensor to lock in Hygoplast. LCD
display will update Hygoplast
status after 2 - 3 activations
Insert new Hygoplast roll, *click*
into place. Fit onto and pull
around seat ring, over the blade
and past the take-up spool.
Left side: Remove empty roll.
Slide inner-core out and use it
as take-up spool on the right
side.
Open S3500 (pg. 7). Right side:
Remove the dirty Hygoplast roll.
Throw away.
Changing the Hygoplast Roll

10
S10_Changing PowerP
The LCD will turn on. Close
S3500 (pg. 7). The S3500 will
calibrate the sensor field and
battery status. Allow 15 sec-
onds for this.
Insert new PowerPack into
opening shown above. Push
down lightly.
Remove plastic contact protec-
tor from new PowerPack.
Open S3500 (pg. 7). Remove
used PowerPack. Dispose of
according to local regulations for
alkaline batteries.
Changing the PowerPack
Table of contents
Popular Toilet manuals by other brands


Better Bathrooms
Better Bathrooms BUN/BeBa 27555/78725 user manual

American Standard
American Standard CONCEPT Cube TF-2704 installation manual

BIOLAN
BIOLAN ECO Instructions for installation, use and maintenance

Thetford
Thetford C260 Series user manual

KELISS
KELISS T162A Series instruction manual

Kohler
Kohler K-22241K Installation and care guide


