Hyperspace HyperCube10 User manual

HyperCube
User’s Manual
Don’t Panic!
This is your personal guide to your new hyper-
dimensional portal device

2
Table of Contents
Table of Contents..................................................... 2
Getting Started......................................................... 3
What’s in the box?!.............................................. 3
Powering up......................................................... 3
Hyper-Care........................................................... 4
Operation................................................................. 4
The Button ........................................................... 5
The Hyperspace App ................................................ 6
Setup .................................................................... 6
Usage.................................................................. 11
Troubleshooting..................................................... 16
Warranty................................................................ 18
Contact................................................................... 18
Tech Specs.............................................................. 19
3
Getting Started
What’s in the box?!
❖HyperCube
❖Control Box
❖Power Supply
Powering up
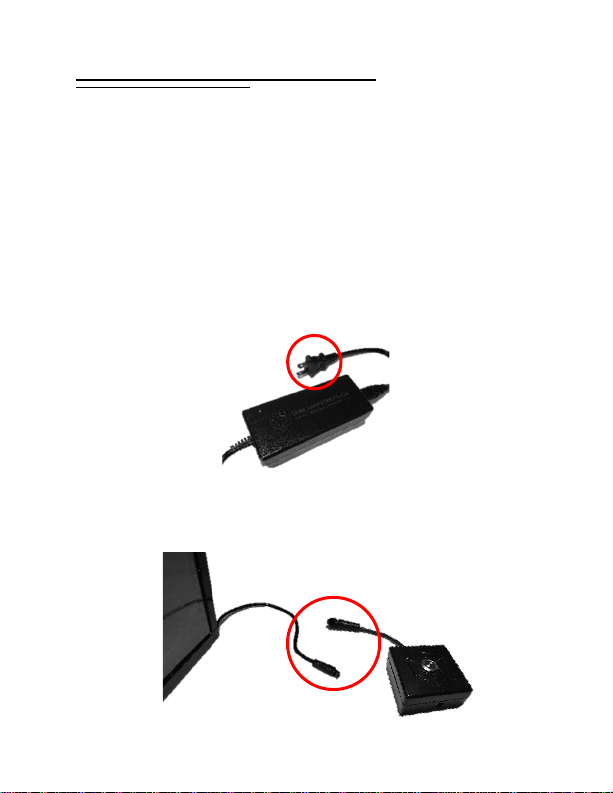
1. Plug the power supply into an outlet (accepts
outlet voltage from 100-240 V).
2. Connect the HyperCube cable to the control box
cable. Twist the screw-ring to secure

4
3. Connect the power supply barrel jack to the front
of the control box. The blue button on the control
box will light up.
4. Let there be light!
Hyper-Care
The HyperCube is an art piece; while it is sturdy, it is not meant
to be handled excessively. Be extremely careful with the
mirrors. When cleaning the mirror panels, use only a microfiber
cloth and, if needed, lightly soapy water. Clean very gently,
without applying much pressure, in order to prevent damage to
the mirrored panels.
Operation
The HyperCube features 3 modes:
❖Kaleidoscopic: dynamic, fast, and colorful patterns.
This is the default mode (40 patterns)
5
❖Meditative: calm, classy and slowed down patterns
to help you relax (24 patterns)
❖Sound Reactive: dance and entrance, with specially
designed patterns that respond to the beat. A
microphone is located inside the control box (31
patterns)
Each mode is essentially a playlist of unique patterns. By
default, a pattern plays for 60 seconds before switching.
New colors are randomly generated every 10 seconds, for
near-infinite variety! This behavior can be fully customized
in the app, and can be controlled with the button on the
control box.
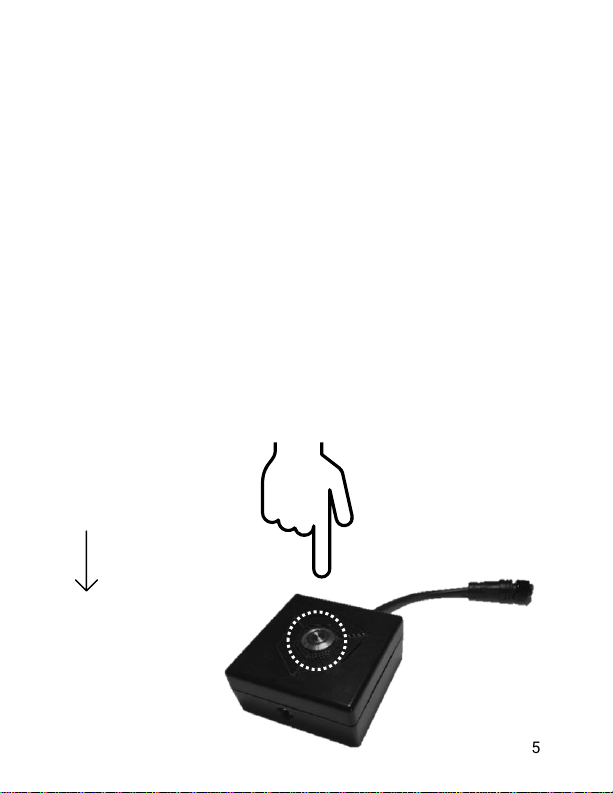
The Button
× 1: Next pattern
× 2: change mode:
Kaleidoscopic
Meditative
Sound Reactive
Hold (2s): Turn off
Hold (10s): Reset
WiFi credentials

6
The Hyperspace App
Hyperspace Lighting
Download the “Hyperspace Lighting” app to fully control
and customize your HyperCube!
Setup
The setup process will connect your HyperCube to your
home WiFi network for convenient smartphone control.
(NOTE: the HyperCube only connects to 2.4 GHz networks)
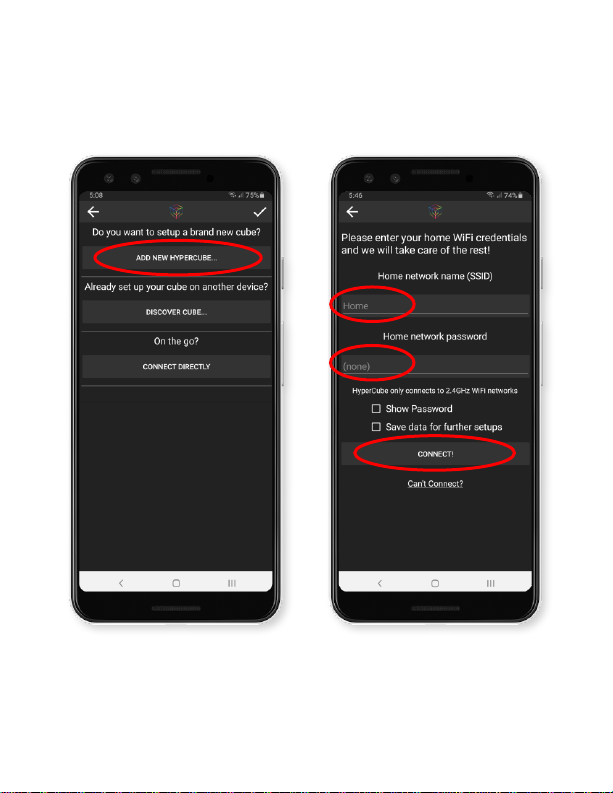
1. Make sure the cube
is not in sound
reactive mode.
2. Open the app and
press the “+” icon in
the top right corner
of the main menu
7
2. Press “Add New
HyperCube”
3. Enter your home WiFi
credentials and press
“Connect!”
Note: if the connection fails,
press “Can’t Connect?” at
the bottom of the screen
and follow the instructions.

8
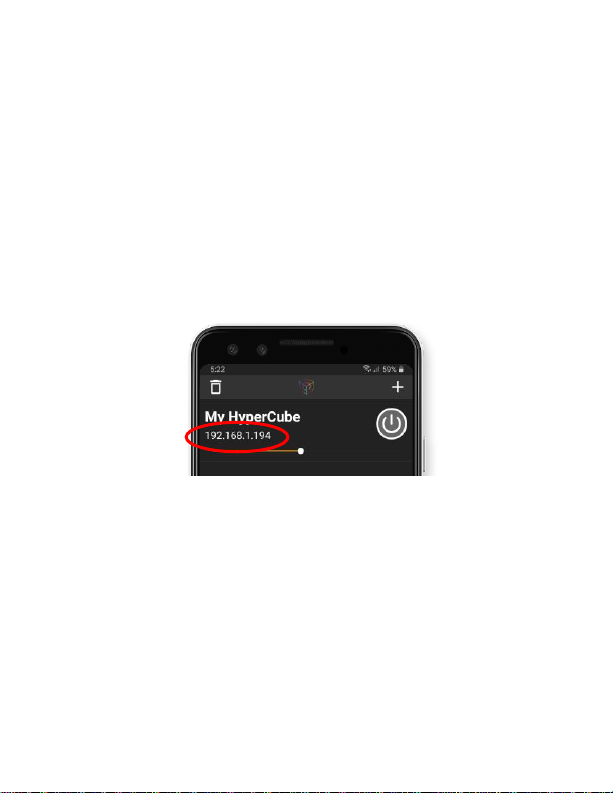
4. You’re done - press
“My HyperCube” to
pilot the controls!
Trouble connecting?
5. If the process
finished but the
cube isn’t showing
on the device list,
press “Discover
Cube”in the “+”
menu. Leave for
10-20s, then press
the check mark
6. If this does not work, reset the WiFi by
holding the button on the control box for 10s
(until the LEDs flash green)
7. Repeat steps 1-5. OR, in step 3 press “Can’t
Connect?”at the bottom of the screen.

9
Not at home?
If you’re out and about without a WiFi connection, you can
still connect to the HyperCube’s internal WiFi hotspot.
Press the “+” icon on the main menu and select “Connect
Directly”to access the controls! This will leave you
connected to the HyperCube WiFi channel.
Connecting via browser, without the app
If you don’t have an Android/iOS smart phone, you can still
connect to and control your HyperCube! All you need is an
internet browser on your PC or phone.
1. On your phone, connect to the “HyperCube” WiFi
network. Password: hyperspace
2. A new window will appear (or a prompt will appear
asking you to log in. Press this). Enter your home WiFi
network information. This procedure will connect the
HyperCube to your home network.
3. Access your router settings. Typically, this can be
done by entering the router IP address in a browser.
Most use an address of 192.168.1.1, but you may
need to confirm with your router’s manual.
4. Find the list of connected devices and copy the
HyperCube’s IP address (also in-app, after setup).
5. Enter the HyperCube IP address in any browser and
you will be taken to the controls!
10
Connecting via E1.31
The HyperCube also supports pixel mapping via sACN/E1.31
protocol. Various third-party software can be used to control
the LEDs, such as xLights and MadMapper. This feature is
experimental, not guaranteed to work smoothly, and is
recommended only for users with pixel mapping experience.
The setup process differs for all software. In general, you will
need your HyperCube’s IP address, shown on the main device
list page:
You will also need the following pixel information:
HyperCube10: 288 total pixels (WS8211/WS2812)
HyperCube15: 480 total pixels (WS8211/WS2812)
The total pixels are split across 2 separate LED tracks,
each with half the total pixels (i.e. 2 universes with
432/840 channels each for HC10/HC15).
This manual suits for next models
1
Table of contents
Popular Lighting Equipment manuals by other brands


Qazqa
Qazqa Suplux SL 3 Black 103062 instruction manual

Commercial Electric
Commercial Electric 54568141 Use and care guide

CREE LIGHTING
CREE LIGHTING 304 Series installation instructions

Goobay
Goobay 49867 user manual

ECOMAN ITALIA
ECOMAN ITALIA LED T8 instruction manual

Alkalite
Alkalite Krypton KT-81 user manual


