HyQuest Solutions SRG User manual

SRG
User Manual

© 2022 HyQuest Solutions 2
Table of Contents
Disclaimer 3I
II Scope of Delivery 4
III Safety Instructions 5
Part I Introduction 6
Part II Installation 7
2.1 Unpacking your SRG Raingauge .................................................................................................................. 7
2.2 Choosing the Site ............................................................................................................................................. 8
2.3 Placing the Gauge ............................................................................................................................................ 8
Part III Operation 9
Part IV Maintenance 10
Part V Repair 11
Part VI Obligations of the Operator and Disposal 12
6.1 Obligations of the Operator ....................................................................................................................... 12
6.2 Dismantling / Disposal ................................................................................................................................ 12
Part VII Appendices 14
7.1 Chart .................................................................................................................................................................. 14

Copyright Notice: No parts of this work may be
reproduced in any form or by any means without the
written permission of the publisher. HyQuest
Solutions waives copyright for users to print out
parts of the documentation in hard copy for their
own use only.
Trademark Notice: HyQuest Solutions (HS) and
KISTERS products and services referred to in this
document are trademarks or registered trademarks
of HyQuest Solutions or KISTERS AG. Other product
names used may or may not be the trademarks of
their respective owners.
© 2020 HyQuest Solutions, a KISTERS Group
Company. Any rights not expressly granted herein
are reserved.
The information provided in this manual was deemed
accurate as of the publication date. However, updates
to this information may have occurred.
This manual does not include all of the details of
design, production, or variation of the equipment
nor does it cover every possible situation which may
arise during installation, operation or maintenance.
HyQuest Solutions shall not be liable for any
incidental, indirect, special or consequential damages
whatsoever arising out of or related to this
documentation and the information contained in it,
even if HyQuest Solutions has been advised of the
possibility of such damages.
Any errors found in any HyQuest Solutions product
should be reported to HyQuest Solutions where
every effort will be made to quickly resolve the
problem.
This document is public.
3© 2022 HyQuest Solutions
I Disclaimer

© 2022 HyQuest Solutions 4
II Scope of Delivery
§
1 × catch #SRG01
§
1 × collector #SRG02-01
§
1 × outer enclosure #SRG03
§
1 × rain measure #SC085-01
© 2022 HyQuest Solutions 4

§
Read the user manual including all operating instructions prior to installing, connecting and powering up the HyQuest
Solutions SRG. The manual provides information on how to operate the product. The manual is intended to be used by
qualified personnel, i.e. personnel that have been adequately trained, are sufficiently familiar with installation,
mounting, wiring, powering up and operation of the product.
§
Keep the user manual on hand for later reference!
§
If you encounter problems understanding the information in the manual (or part thereof), please consult the
manufacturer or its appointed reseller for further support.
§
HyQuest Solutions SRG is intended to be used in hydrometeorological or environmental monitoring applications.
§
Before starting to work, you have to check the functioning and integrity of the system.
§
Check for visible defects on the SRG, this may or may not include any or all of the following mounting facilities,
connectors and connections, mechanical parts, internal or external communication devices, power supplies or
power supply lines, etc.
§
If defects are found that jeopardize the operational safety, work must be stopped. This is true for defects found
before starting to work as well as for defects found while working.
§
Do not use the HyQuest Solutions SRG in areas where there is a danger of explosion.
§
The present user manual specifies environmental/climatic operating conditions as well as mechanical and electrical
conditions. Installation, wiring, powering up and operating the HyQuest Solutions SRG must strictly comply with these
specifications.
§
Perform maintenance only when tools or machinery are not in operation.
§
If guards are removed to perform maintenance, replace them immediately after servicing.
§
Never make any electrical or mechanical diagnostics, inspections or repairs under any circumstances. Return the
sensor to the manufacturer’s named repair centre. You can find information on how to return items for repair in the
relevant section of the HyQuest Solutions web site.
§
Disposal instructions: After taking the HyQuest Solutions SRG out of service, it must be disposed of in
compliance with local waste and environmental regulations. The HyQuest Solutions SRG is never to be disposed in
household waste!
§
Inputs and outputs of the device are protected against electric discharges and surges (so-called ESD). Do not
touch any part of the electronic components! If you need to touch any part, please discharge yourself, i.e. by touching
grounded metal parts.
III Safety Instructions
© 2022 HyQuest Solutions 5

© 2022 HyQuest Solutions 6
Introduction
1Introduction
Thank you for choosing our product. We hope you will enjoy using the device.
HyQuest Solutions manufactures, sells, installs and operates quality instrumentation, data loggers and communication
technology. Products are designed with passion for environmental monitoring and with a deep understanding of the
quality, accuracy and robustness needed to fulfil the requirements of measurement practitioners in the field.
The present User Manual will help you understand, install and deploy the device. If, however, you feel that a particular
information is missing, incomplete or confusing, please do not hesitate to contact us for further support!
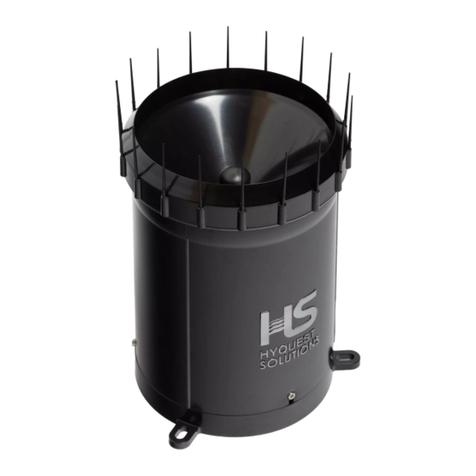
The HyQuest Solutions Standard Rain Gauge model SRG is recognised as the standard for non recording type rain gauges.
The SRG is fully constructed from aluminium except for the rain measure which is made from durable plastic and has a
capacity of 20 mm of rainfall. The overflow of rain is collected by a rain gauge collector which can store a volume
equivalent to 300 mm of rainfall.
The HyQuest Solutions Model SRG is a standard non recording type Raingauge featuring:
§
Catch diameter 203 mm (8 inch)
§
Bureau of Meteorology approved rain measure
§
Rain measure capacity 20 mm of rainfall
§
Smallest increment 0.2 mm of rainfall
§
Corrosion resistance
§
Collector capacity 300 mm of rainfall
§
UV resistant

© 2022 HyQuest Solutions 7
Installation
2Installation
For more information, see the following subsections:
§
Unpacking your SRG Raingauge
§
Choosing the Site
§
Placing the Gauge
2.1 Unpacking your SRG Raingauge
Please verify that you have received the items listed in the Scope of Delivery.
To prepare the SRG for installation:
§
Lift the unit from the carton and place on secure surface.
§
Remove all components from polythene bags.
Your SRG is ready for installation.
7
8
8

© 2022 HyQuest Solutions 8
Installation
2.2 Choosing the Site
Rainfall measurements are intended to be representative of the actual precipitation falling on a given area.
Some of the more important factors which influence the accuracy of the gauge are as follows:
§
Site the gauge on level ground. Avoid sloping sites
§
Site should have protection from strong winds
§
Site should be free of obstructions such as buildings and trees
§
Provide suitable ground surface to avoid splashing into the gauge
Wind is the most serious disturbing influence on the gauge, driving rain will fail to reach the gauge if it is placed too close
to buildings or trees. On the other hand, if the gauge is exposed to high winds, the rain can be carried away from the
gauge by the wind.
A compromise is required to achieve good results. The Gauge should be placed at ground level and a distance away from
obstructions equal to twice the height of the obstructions.
2.3 Placing the Gauge
Once the site is selected it is a simple matter to mount the gauge.
To do this it is necessary to dig a hole approximately 300mm diameter and 230mm deep.
Place a 50mm bed of compacted fine gravel or coarse sand in the bottom of the hole.
Place the outer enclosure in the hole and check for level, and adjust appropriately then backfill with gravel or sand,
compact the fill and recheck level. Ground level should be at the second ridge on the outer enclosure (see diagram).
Position the collector in the outer enclosure.
Position the rain measure centrally in the collector.
Place the catch onto the collector.
The immediate area around the gauge should be such that it does not promote splashing into the gauge (grass or mulch).
The gauge is now ready for operation.

© 2022 HyQuest Solutions 9
Operation
3Operation
It is recommended that the gauge be read daily at a fixed time (preferably 9.00 am) after a rainfall event, to the nearest
0.2 mm of rainfall.
To read the gauge it is necessary to lift the catch from the gauge, allowing access to the collector and rain measure.
Carefully remove the rain measure from the collector and read off the amount of rainfall from the graduations on the
rain measure. The rain measure is recorded in 0.2 mm of rainfall. The amount of rainfall should be recorded against the
date (a rainfall chart is included in this manual).
Dispose of the contents of the rain measure. Replace the rain measure and catch.
In the event of heavy rainfall where greater than 20mm of rain has fallen, the rain measure will overflow into the
collector. To measure this large amount of rainfall it is simply a matter of pouring from the collector into the rain measure
and totalling the amounts.

© 2022 HyQuest Solutions 10
Maintenance
4Maintenance
Periodically the following maintenance should be carried out:
§
Remove leaves or other material from the catch
§
Around the gauge from overhanging grass etc.
§
Clean the rain measure and collector
§
Inspect the gauge for damage, in particular the catch rim

© 2022 HyQuest Solutions 11
Repair
5Repair
HyQuest Solutions precision instruments and data loggers are produced in quality-controlled processes. All HyQuest
Solutions production and assembly sites in Australia, New Zealand and Europe are ISO 90001 certified. All equipment is
factory tested and/or factory calibrated before it is shipped to the client. This ensures that HyQuest Solutions products
perform to their fullest capacity when delivered.
Despite HyQuest Solutions most rigorous quality assurance (QA), malfunction may occur within or outside of the warranty
period. In rare cases, a product may not be delivered in accordance with your order.
In such cases HyQuest Solutions’ return and repair policy applies. For you as a customer, this means the following:
1. Contact HyQuest Solutions using the Repair Request Form made available online:
https://www.hyquestsolutions.eu/fileadmin/Form/Telemetry_Solution_app.jpg.pdf
In response you will receive a reference number that must be referenced on all further correspondence and on the
freight documents accompanying your return shipment.
2. Please provide as much information and/or clear instructions within the return paperwork. This will assist our test
engineers with their diagnosis.
3. Please do not ship the goods prior to obtaining the reference number. HyQuest Solutions will not reject any
equipment that arrives without reference number; however, it may take us longer to process.
Custom requirements for items sent to HyQuest Solutions for warranty or non-warranty repairs: Check with your
national customs/tax authorities for details, processes and paperwork regarding tax exempt return of products. Typically,
special custom tariff codes are available (such as HS Code = 9802.00) that verify the item is being returned for repair and
has no commercial value. Please note that the customs invoice / dispatch documents should also clearly state: “Goods
being returned to manufacturer for repair – No Commercial value”. It is mandatory to have any returned goods
accompanied by a commercial invoice on headed paper. HyQuest Solutions reserves the right to charge the customer for
time spent rectifying incorrect customs documents.
Note: Please ensure that your goods are packed carefully and securely. Damage that occurs during transit is not covered
by our warranty and may be chargeable.

© 2022 HyQuest Solutions 12
Obligations of the Operator and Disposal
6Obligations of the Operator and Disposal
This chapter contains the following subsections:
§
Obligations of the Operator
§
Dismantling / Disposal
6.1 Obligations of the Operator
European Union
In the Single European Market it is the responsibility of the operator to ensure that the following legal regulations are
observed and complied with: national implementation of the framework directive (89/391/EEC) and the associated
individual directives, in particular 2009/104/EC, on minimum safety and health requirements for the use of work
equipment by employees at work.
Worldwide
Regulations: If and where required, operating licences must be obtained by the operator. In addition, national or regional
environmental protection requirements must be complied with, regardless of local legal provisions regarding the
following topics:
§
Occupational safety
§
Product disposal
Connections: Local regulations for electrical installation and connections must be observed.
6.2 Dismantling / Disposal
When disposing of the units and their accessories, the applicable local regulations regarding environment, disposal and
occupational safety must be observed.
Before dismantling
§
Electrical Devices:
§
Switch off the units.
§
Disconnect electrical appliances from the power supply, regardless of whether the appliances are connected to the
mains or to another power source.
§
Mechanical devices:
§
Fix all loose components. Prevent the device from moving independently or unintentionally.
§
Loosen mechanical fastenings: Please note that appliances can be heavy and that loosening the fastenings may cause
them to become mechanically unstable.
Disposal
Operators of old appliances must recycle them separately from unsorted municipal waste. This applies in particular to
electrical waste and old electronic equipment.
Electrical waste and electronic equipment must not be disposed of as household waste!
Instead, these old appliances must be collected separately and disposed of via the local collection and return systems.
Integrated or provided batteries and accumulators must be separated from the appliances and disposed of at the
designated collection point.
12
12

© 2022 HyQuest Solutions 13
Obligations of the Operator and Disposal
EU WEEE Directive
As players in the environmental market, KISTERS AG and HyQuest Solutions are committed to supporting efforts to avoid
and recycle waste. Please consider:
Avoidance before recycling!
Recycling before disposal!
This symbol indicates that the scrapping of the unit must be carried out in accordance with Directive 2012/19/EU.
Please observe the local implementation of the directive and any accompanying or supplementary laws and regulations.

© 2022 HyQuest Solutions 15
Appendices
22
22
23
23
24
24
25
25
26
26
27
27
28
28
29
29
30
30
31
31
Totals
No. of
Days
Totals
Since
Jan 1
2
Mont
hs
3
Mont
hs
3
Mont
hs
3
Mont
hs
3
Month
s
3
Month
s
3
Month
s
3
Month
s
3
Month
s
3
Month
s
Year
Avera
ge
All
Year

Contact Data
© 2022 HyQuest Solutions
Europe
Australia
New Zealand
Latin America
North America | Hydrological Services America LLC
(KISTERS Group)
| HyQuest Solutions (KISTERS LATAM)
| HyQuest Solutions NZ Ltd
| HyQuest Solutions Pty Ltd
| HyQuest Solutions (KISTERS AG) |
|
|
|
|
|
|
|
|
|
+1 561 459 4876
sales-hsa@kisters.net
+57 350 575 4079
sales-latam@hyquestsolutions.com
+64 7 857 0810
sales@hyquestsolutions.co.nz
+612 9601 2022
sales@hyquestsolutions.com.au
+49 2408 9385 0
info@hyquestsolutions.eu
Table of contents
Other HyQuest Solutions Measuring Instrument manuals

HyQuest Solutions
HyQuest Solutions MagnaRod MAGD/CMC User manual

HyQuest Solutions
HyQuest Solutions HS40C User manual

HyQuest Solutions
HyQuest Solutions OSS-B1 User manual

HyQuest Solutions
HyQuest Solutions HyQual User manual

HyQuest Solutions
HyQuest Solutions TB71 User manual

HyQuest Solutions
HyQuest Solutions TB3 User manual

HyQuest Solutions
HyQuest Solutions PVD200 User manual

HyQuest Solutions
HyQuest Solutions PreciBal User manual

HyQuest Solutions
HyQuest Solutions CMC20A User manual