I-care TA01i Operating instructions

POLSKI
РУССКИ
SUOMINORSKSVENSKADANSKPORTUGUÊSITALIANOESPAÑOLDEUTSCHFRANÇAISENGLISH
USER’S AND MAINTENANCE MANUAL
ALL manual_icare _A5_100209.indd 1ALL manual_icare _A5_100209.indd 1 2.3.2009 11:06:142.3.2009 11:06:14

TONOMETER
Icare® TA01i
INSTRUCTION MANUAL v2.1 1/09 EN
This device complies with:
Medical Device Directive 93/42/EEC
Canadian Medical Device Regulations
0044
Copyright © 2009 Icare Finland Oy
Made in Finland
Icare Finland Oy
Hevosenkenkä 3, FI-02600 Espoo, Finland
Tel. +358 9 8775 1150, Fax +358 9 728 6670
2
ALL manual_icare _A5_100209.indd 2ALL manual_icare _A5_100209.indd 2 2.3.2009 11:06:152.3.2009 11:06:15

POLSKI
РУССКИ
SUOMINORSKSVENSKADANSKPORTUGUÊSITALIANOESPAÑOLDEUTSCHFRANÇAISENGLISH
Indications for use
The Icare® Tonometer TA01i is intended to be used for the measurement of intraocular pressure in
the human eye.
Introduction
The Icare® Tonometer is used in the diagnosis, follow up and screening of glaucoma.
It is based on a new, patented, induction-based rebound method, which allows intraocular pressure
(IOP) to be measured accurately, rapidly and without an anesthetic.
Since single-use probes are used for measurement, there is no risk of microbiological contamination.
Intraocular pressure changes due to the effects of the pulse, breathing, eye movements and body
position. Because measurements are taken using a handheld device in fractions of a second,
several measurements are needed to obtain an accurate reading and there fore the software is
pre-programmed for six measurements.
Contents
Indications for use .................................................................................................................................3
Introduction..................................................................................................................................................3
Safety instructions................................................................................................................................. 4
Parts of the tonometer.......................................................................................................................5
Turning the tonometer on and loading the probe.......................................................6
Measurement.............................................................................................................................................7
Display after the measurements................................................................................................ 8
Other functions......................................................................................................................................... 8
Accessing old measurement values.......................................................................................8
Turning the tonometer OFF...........................................................................................................8
Replacing the probe base............................................................................................................... 9
Replacing the batteries ..................................................................................................................... 9
Error messages.....................................................................................................................................10
Service procedures............................................................................................................................10
Technical information........................................................................................................................11
Spare parts and supplies..............................................................................................................11
Performance data................................................................................................................................12
Diagram of tonometer functions.............................................................................................13
Maintenance............................................................................................................................................13
3
ALL manual_icare _A5_100209.indd 3ALL manual_icare _A5_100209.indd 3 2.3.2009 11:06:162.3.2009 11:06:16

Safety instructions
•Retain this manual for future use.
• When you have opened the package, check for any external damage or faults, particularly for
damage to the case. If you suspect that there is something wrong with the tonometer,
contact the manufacturer or distributor.
• Use the tonometer only for measuring intraocular pressure. Any other use is improper and the
manufacturer cannot be held liable for any damage arising from improper use, or for the conse-
quences thereof.
• Never open the casing of the tonometer, except for the battery compartment or to change the
probe base.
•This manual contains instructions for replacing batteries and changing the probe base.
•Never use the tonometer in wet or damp conditions.
• The probe base, battery compartment cover, screws, collar and probes are so small that a child
could swallow them. Keep the tonometer out of the reach of children.
•Do not use the device near inflammable substances, including inflammable anesthetic agents.
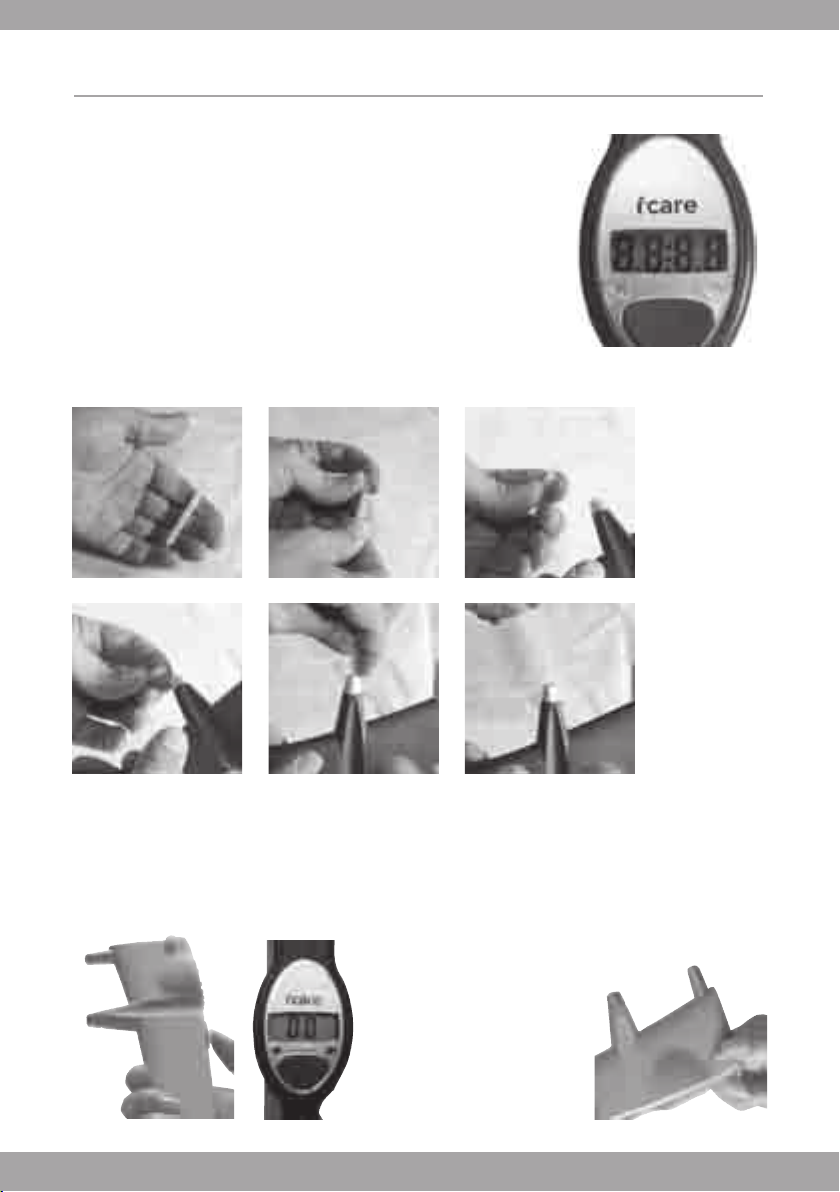
• Prior to each measurement, check that a new disposable probe from an intact package is being used.
•Be sure that the probe contains the small plastic round tip in front.
• Certain microbiological agents (e.g. bacteria) can be transmitted from the forehead support.
To avoid this, the forehead support should be cleaned regularly with a disinfectant, e.g. an alcohol solution.
•The tonometer conforms to EMC requirements (IEC 60101-1-2: 2001), but interference may occur
in it if used near (<1m) a device (such as a cellular phone) causing high-intensity electromagnetic
emissions. Although the tonometer’s own electromagnetic emissions are well below the levels permitted
by the relevant standards, they may cause interference in other, nearby devices, e.g. sensitive sensors.
• If the device is not to be used for a long time, we recommend that you remove its AA batteries,
since they may leak. Removing the batteries will not affect the subsequent functioning of the tonometer.
•Be sure to dispose of the single-use probes properly (e.g. in a container for disposable needles),
because they may contain micro-organisms from the patient.
• Batteries, packaging materials and probe bases must be disposed of according to local regulations.
Federal law (U.S.) restricts this device to sale by or on the order of a physician.
WARNING
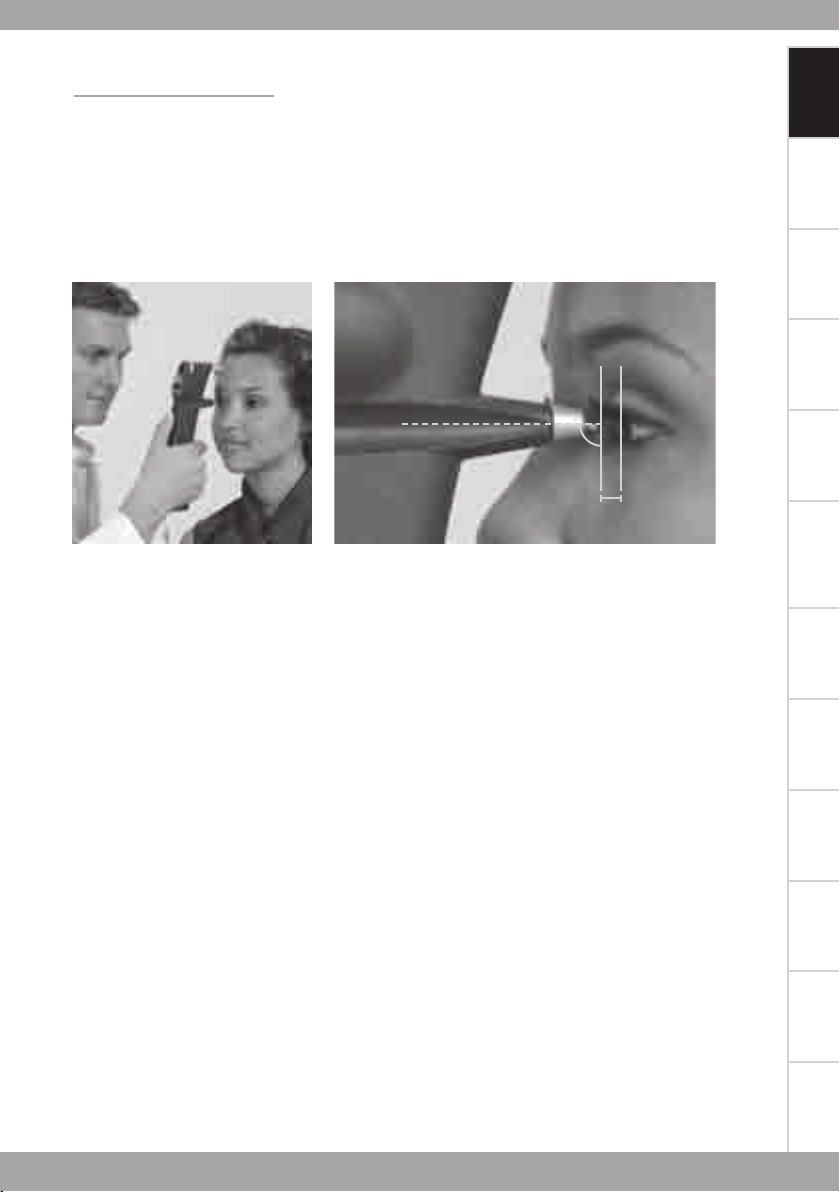
The tonometer must not come into contact with the patient’s eyes, except for the probes,
which may do so for a fraction of a second during measurement. Do not bring the tonometer
into contact with the eye or push it into the eye (the tip of the probe should be 4-8mm,
or 1/6 – 1/3 inch, from the eye).
CAUTION
Read this manual carefully, since it contains important information on using and
servicing the tonometer.
CAUTION!
4
ALL manual_icare _A5_100209.indd 4ALL manual_icare _A5_100209.indd 4 2.3.2009 11:06:162.3.2009 11:06:16

POLSKI
РУССКИ
SUOMINORSKSVENSKADANSKPORTUGUÊSITALIANOESPAÑOLDEUTSCHFRANÇAISENGLISH
Parts of the tonometer
5
Wrist strap attachment
Grip
Measurement button
Selector button
Display
Forehead support adjusting wheel
Central groove
Collar
Forehead support
Battery compartment cover Wrist strap attachment
5
ALL manual_icare _A5_100209.indd 5ALL manual_icare _A5_100209.indd 5 2.3.2009 11:06:162.3.2009 11:06:16

Turning the tonometer on and loading the probe
Open the probe tube by removing the cap and insert the probe into probe base as shown in the
images. After the probe has been inserted, be careful not to point it down before activating the
tonometer in order to prevent the probe from falling out. Activate by pressing the measurement
button once and the tonometer will be ready for measurement when 00 (see figure below) appears
on the display. After activating the probe is magnetized and will not fall out.
The tonometer is ready for
measurement.
To obtain firm support for the
patient’s forehead, in order to
obtain an accurate measurement
at the right distance, you can
adjust the forehead support by
turning the forehead support
adjusting wheel.
Place the wrist strap into the wrist strap attachment. Place the wrist strap
around your wrist and secure it. The wrist strap protects the tonometer
from dropping onto the floor accidentally. Insert batteries into the tono-
meter (page 9).
Press the measurement button to turn the tonometer ON. The tonome-
ter display will display all of the LCD segments (see the figure beside).
Check that all of the segments are functional in the four-digit, seven-
segment LCD display.
Following a brief pause, the display will show “LoAd,” reminding the user
to load the single use probe into the tonometer prior to measurement.
Load the probe in the following way:
6
ALL manual_icare _A5_100209.indd 6ALL manual_icare _A5_100209.indd 6 2.3.2009 11:06:162.3.2009 11:06:16

POLSKI
РУССКИ
SUOMINORSKSVENSKADANSKPORTUGUÊSITALIANOESPAÑOLDEUTSCHFRANÇAISENGLISH
*Since local anesthetic may lower the tonometer reading, we recommend that you refrain from using
an anesthetic when performing measurements.
Ask the patient to relax and look straight ahead at a specific point. Bring the tonometer near the
patient’s eye. The central groove should be in a horizontal position, and the distance from the eye to
the front part of the collar should be the length of the collar. In other words, the distance from the tip
of the probe to the patient’s cornea (see picture) should be 4-8 mm (1/6-1/3 inch).
If necessary, adjust the distance by turning the forehead support adjusting wheel. Press the measure-
ment button lightly to perform the measurement, taking care not to shake the tonometer. The tip of the
probe should make contact with the central cornea. Six measurements are made consecutively. After
each successful measurement, you will hear a short beep. Once the six measurements have been
performed, the IOP will be shown on the display after the ‘P’.
If there is an erroneous measurement, the tonometer will beep twice and display an error message.
Press the measurement button to clear the error message. If several erroneous measurements appear,
see error messages (page 10).
To obtain the most accurate reading, six measurements are required, but the result is also displayed
after the first measurement, which can usually be considered valid. The measurement values displayed
are average values for all previous measurements (1.-5.). Single measurement values are not shown.
Should there be variation between the measurements, ‘P’ will flash on the display after the sixth
measurement.
Following the performance of the entire measurement, a new measurement series can be begun by
pressing the measurement button. The tonometer will then be ready for the next measurement series
(00 will show on the display, see page 8).
If the user doubts the validity of the measurement (for example, if the probe made contact with the
eyelid, or missed the central cornea etc.), we recommend that he/she make a new measurement. In
addition, when encountering unusual values (for example over 22mmHg or below 8 mmHg) we recom-
mend the performance of a new measurement to verify the result.
*Badouin C, Gastaud P. Influence of topical anesthesia on tonometeric values of intraocular pressure. Ophthalmologica 1994;208:309-313
Measurement
90o
4-8 mm
(1/6-1/3”)
7
ALL manual_icare _A5_100209.indd 7ALL manual_icare _A5_100209.indd 7 2.3.2009 11:06:172.3.2009 11:06:17

Other functions
Accessing old measurement values
From the starting position, press the right or left selector button until ‘Old’ appears on the display. Then
press the measurement button. You can now ‘scroll’ through the old values by pressing the selector
buttons (right=older, left=more recent, from 0-9).
To exit the old values search, press the measurement button. The display will now show the word ‘Old’.
Press either selector button to access other functions (00=measurement, End=turning OFF).
Turning the tonometer OFF
Press either selector button until the display shows ‘End‘. Press the measurement button for two
seconds - the display will show ‘byE’ and the tonometer will switch off.
The used probe will be partially ejected. Use the used package to remove it from the tonometer.
Ensure that you dispose of the probe properly.
Before
00
After the second
measurement
2.13
After the sixth measurement.
P 13
Display after measurements
After the sixth measurement, the letter P appears on the display, followed by the IOP (Intraocular
pressure) reading.
If the P is blinking, it means that the standard deviation of the measurements is greater than normal.
P_ (line down) The standard deviation of the different measurements has a slightly greater value than
normally, but the effect on the result is unlikely to be relevant.
P_(line in the middle) The standard deviation of the different measurements is clearly greater than
normal, but the effect on the result is probably irrelevant. A new measurement is recommended if the
IOP is over 19 mmHg.
P_(line up) The standard deviation of the different measurements is great and a new measurement is
recommended.
8
ALL manual_icare _A5_100209.indd 8ALL manual_icare _A5_100209.indd 8 2.3.2009 11:06:242.3.2009 11:06:24

POLSKI
РУССКИ
SUOMINORSKSVENSKADANSKPORTUGUÊSITALIANOESPAÑOLDEUTSCHFRANÇAISENGLISH
Replacing the probe base
After several months of use, dust may collect in the probe base, affecting the probe movement. The
probe base should be replaced if the probe no longer moves smoothly.
Replacing the batteries
Unscrew the battery compartment locking screw with a screwdriver or a small coin.
Remove the battery compartment cover. Remove the old batteries.
Insert a new set of batteries (four AA batteries). Do not use rechargeable batteries, since they may not
function properly (the inner resistance of some rechargeable batteries is too high). Insert the batteries
in accordance with the diagrams inside the battery compartment, with the +terminals pointing down-
wards on the display side of the tonometer (the rear side), and the -terminals pointing downwards on
the measurement side (the front side).
Replace the battery compartment cover and secure it by screwing it in lightly using the coin or screw-
driver. Take care not to use excessive force when screwing the cover into place.
Unscrew the probe base
collar and put it in a safe
place.
Remove the probe base
by tilting the tonometer
downwards and pull the
probe base out of the
tonometer.
Insert a new probe base
into the tonometer.
Screw the collar in, to
lock the probe base.
Battery compartment cover
9
ALL manual_icare _A5_100209.indd 9ALL manual_icare _A5_100209.indd 9 2.3.2009 11:06:242.3.2009 11:06:24

Error messages
To clear error messages, press the measurement button, after which the measurement can be repeated.
The following messages may appear:
bAtt ........................... The batteries are low. Replace the batteries•
E 01 ........................... The probe did not move at all.•
If this error message is repeated, turn the tonometer so that the collar faces down for a short time.
If the error message is repeated, remove the probe base and replace it with new ones
(see page 9).
E 02 .............................The probe did not touch the eye.•
The measurement was taken from too far away.
E 03 ..............................The probe speed was too low.•
The measurement was taken from too far away or the tonometer was tilted too far upwards.
E 04 ..............................The probe speed was too high.•
The tonometer was probably tilted downwards. Make sure that the central groove is in the
horizontal position.
E 05 ...............................The contact with the eye was too “soft.”•
The probe probably made contact with the eyelid.
E 06 ................................The contact with the eye was too “hard.”•
The probe made contact with the opening eyelid or calcification in the cornea.
E 07 ................................”Bad hit.”•
The probe measurement signal detected by the tonometer was unusual. The probe may have
made contact with a peripheral part of the cornea or the probe was twisted or otherwise inserted
incorrectly. If this error message repeats, remove and replace the probe.
E 09 ................................”Bad data.”•
An erroneous measurement for a reason other than those described in E01−E07.
Service procedures
Replace the batteries when the <bAtt> message appears.•
Change the probe base if the probe does not move smoothly.•
No other service procedures can be carried out by the user. All other servicing and• repairs must be carried out by the manufacturer or certified service facilities.
The device can be cleaned with a damp cloth containing disinfectant.•
10
ALL manual_icare _A5_100209.indd 10ALL manual_icare _A5_100209.indd 10 2.3.2009 11:06:252.3.2009 11:06:25

POLSKI
РУССКИ
SUOMINORSKSVENSKADANSKPORTUGUÊSITALIANOESPAÑOLDEUTSCHFRANÇAISENGLISH
Technical information
Type: TA01i.•
The device conforms to CE regulations.•
Dimensions: 13 – 32 mm (W) * 45 – 80 mm (H) * 230 mm (L).•
Weight: 155 g (without batteries), 250 g (4 x AA batteries).•
Power supply: 4 x AA batteries.•
Measurement range: 7-50 mmHg, display range: 0-99 mmHg (IOP estimation beyond•
the measuring range).
Accuracy (95% tolerance interval relative to manometry): ±1.2 mmHg (• ≤20 mmHg)
and ±2.2 mmHg (>20 mmHg).
Repeatability (coefficient of variation): <8%.•
Accuracy of display: 1.•
Display unit: Millimeter mercury (mmHg).•
The serial number is on the back of the battery compartment cover.•
There are no electrical connections from the tonometer to the patient.•
The device has B-type electric shock protection.•
Storage/transportation environment:•
Temperature +5 to +40 °C.•
Rel. humidity 10 to 80 % (without condensation).•
Spare parts and supplies
Single-use probes.• Probe base replacement kit.•
WARNING -Indicates that important operating instructions are included in this
Instruction Manual.
11
ALL manual_icare _A5_100209.indd 11ALL manual_icare _A5_100209.indd 11 2.3.2009 11:06:252.3.2009 11:06:25

Performance data
The performance data is obtained from a clinical study, performed according to American National
Standard ANSI Z80.10-2003 and International Standard ISO 8612.2 for tonometers. The study was
performed ain the Department of Ophthalmology, Helsinki University Central Hospital. In the study,
158 patients were measured. The mean paired difference and standard deviation (Goldmann-Icare)
were -0.4 mmHg and 3.4 mmHg. A scattergram and Bland-Altman plot of the results is shown below.
12
ALL manual_icare _A5_100209.indd 12ALL manual_icare _A5_100209.indd 12 2.3.2009 11:06:252.3.2009 11:06:25

POLSKI
РУССКИ
SUOMINORSKSVENSKADANSKPORTUGUÊSITALIANOESPAÑOLDEUTSCHFRANÇAISENGLISH
Maintenance
Follow local regulations and recycling instructions regarding the disposal or recycling of the Icare®
Tonometer and accessories.
Returning the Icare® Tonometer for servicing /repair
Contact Icare Finland’s Technical Services Department (see www.icarefinland.com) or your local Icare
representative for shipping instructions. Unless otherwise instructed by Icare Finland, there is no need
to ship accessories along with the tonometer. Use a suitable carton with the appropriate packaging
material to protect the device during shipment.
Return the device using any shipping method that includes proof of delivery.
Service
Diagram of tonometer functions
Tonometer ON Ready for measurement Old values search Turning OFF
Shutdown
OLD00 END 00
1.18
5.18
P.18
P018
P9 18
Earlier measurement
values (0-9)
Final result
Measurement button (measure, confirm)
Selector button (left and right)
WARNING
The tonometer should only be opened by qualified service personnel. It contains no user-
serviceable parts, apart from the batteries and a probe base.
The Icare® Tonometer requires no routine servicing or calibration other than changing the
batteries at least every 12 months or changing the probe base.
If servicing is necessary, contact qualified service personnel or your local Icare representative.
13
ALL manual_icare _A5_100209.indd 13ALL manual_icare _A5_100209.indd 13 2.3.2009 11:06:262.3.2009 11:06:26

Periodic Safety Checks
We recommend that the following checks be performed every 24 months.
•Equipment inspection for mechanical and functional damage.
•Inspection of safety labels for legibility.
Cleaning
When surface-cleaning and disinfecting the tonometer, follow your institution’s procedures or:
• The Icare® Tonometer may be surface-cleaned using a soft cloth dampened with either a commercial,
nonabrasive cleaner or a solution of 70% alcohol in water. Lightly wipe the surfaces of the tonometer.
•The probe base can be cleaned separately, outside the tonometer, by carefully injecting isopropyl
alcohol through the probe base. Dry the probe base by injecting some air carefully into the probe
base and heating the part gently, for example with a hairdryer.
Patents and copyrights
US Patent No 6,093,147 and patents pending. The Icare® Tonometer is also protected by the applica-
ble copyright laws.
Symbols:
CAUTION
Do not spray, pour or spill liquid onto the Icare® Tonometer, its accessories, connectors,
switches or openings in the chassis.
Attention!!! See instructions
Serial number
Single use only
B-type device
Lot number
Manufacturing date
Sterilized using radiation
14
ALL manual_icare _A5_100209.indd 14ALL manual_icare _A5_100209.indd 14 2.3.2009 11:06:262.3.2009 11:06:26

MODE D’EMPLOI ET NOTICE D’ENTRETIEN
POLSKI
РУССКИ
SUOMINORSKSVENSKADANSKPORTUGUÊSITALIANOESPAÑOLDEUTSCHFRANÇAISENGLISH
15
ALL manual_icare _A5_100209.indd 15ALL manual_icare _A5_100209.indd 15 2.3.2009 11:06:282.3.2009 11:06:28

TONOMÈTRE
Icare® TA01i
MODE D’EMPLOI v2.1 01/09 FR
Cet appareil est conforme aux dispositions de:
la Directive 93/42/CEE du Conseil relative aux dispositifs médicaux
Règlements canadiens sur les instruments médicaux
0044
Copyright © 2009 Icare Finland Oy
Made in Finland
Icare Finland Oy
Hevosenkenkä 3, FI-02600 Espoo, Finland
Tel. +358 9 8775 1150, Fax +358 9 728 6670
16
ALL manual_icare _A5_100209.indd 16ALL manual_icare _A5_100209.indd 16 2.3.2009 11:06:282.3.2009 11:06:28

POLSKI
РУССКИ
SUOMINORSKSVENSKADANSKPORTUGUÊSITALIANOESPAÑOLDEUTSCHFRANÇAISENGLISH
Indications sur l’emploi
Le tonomètre Icare® TA01i est destiné à mesurer la pression intraoculaire de l’œil humain.
Introduction
Le tonomètre Icare® est destiné au diagnostic, au suivi et au dépistage du glaucome.
Le tonomètre fait appel à la nouvelle méthode brevetée du rebond par induction qui permet de mesu-
rer la pression intraoculaire (PIO) avec précision, rapidement et sans anesthésie.
Grâce à l’utilisation de sondes jetables pour chaque mesure, tout risque de contamination microbiologi-
que est exclu.
La pression intraoculaire varie en fonction du pouls, de la respiration, des mouvements oculaires et de
la position du corps. Comme la mesure est effectuée à l’aide d’un appareil à main, en une fraction de
seconde, plusieurs mesures sont requises pour obtenir une valeur précise. Par conséquence,
le programme est préinstallé pour six mesures.
Table des matières
Indications sur l’emploi....................................................................................................................17
Introduction...............................................................................................................................................17
Consignes de sécurité ....................................................................................................................18
Composants du tonomètre..........................................................................................................19
Démarrage de l’appareil et chargement de la sonde............................................20
Mesure..........................................................................................................................................................21
Affichage du tonomètre après les mesures..................................................................22
Autres fonctions...................................................................................................................................22
Accès aux valeurs enregistrées..............................................................................................22
Débrancher le tonomètre..............................................................................................................22
Remplacement du support de la sonde...........................................................................23
Remplacement des piles...............................................................................................................23
Messages d’erreur..............................................................................................................................24
Procédure d’entretien.......................................................................................................................24
Informations techniques.................................................................................................................25
Accessoires..............................................................................................................................................25
Données de performances..........................................................................................................26
Diagramme des fonctions du tonomètre.........................................................................27
Maintenance............................................................................................................................................27
17
ALL manual_icare _A5_100209.indd 17ALL manual_icare _A5_100209.indd 17 2.3.2009 11:06:282.3.2009 11:06:28

Consignes de sécurité
Conservez ce manuel pour vous y reporter ultérieurement.•
Après avoir retiré l’appareil de l’emballage, assurez-vous qu’il n’a subi aucun dommage externe et• ne présente aucun défaut. Assurez-vous notamment que son enveloppe n’a pas été endommagée.
Si vous suspectez que votre tonomètre présente un défaut, prenez contact avec le fabricant ou le
vendeur.
Utilisez le tonomètre uniquement pour mesurer la pression intraoculaire. Tout autre usage est• impropre et le fabricant ne saurait être tenu responsable de dommages causés par un usage
inapproprié ni des conséquences d’une telle utilisation.
N’ouvrez jamais l’enveloppe de l’appareil, excepté le couvercle du compartiment des piles ou pour• remplacer le support de la sonde.
Ce mode d’emploi comporte des instructions pour le remplacement des piles et du support de la• sonde.
Ne pas les utiliser dans des endroits humides ou mouillés.•
Le support de la sonde, le couvercle du compartiment des piles, le collier et les sondes sont• tellement petits qu’un petit enfant pourrait facilement les avaler. Garder le tonomètre hors de portée
des enfants.
Ne pas utiliser l’appareil à proximité ou aux alentours de substances inflammables, y comprises des• substances anesthésiques inflammables.
Avant chaque mesure, assurez-vous que vous avez utilisé une nouvelle sonde jetable d’un• emballage intact.
L’appui frontal peut être un vecteur de transmission d’agents microbiologiques (ex. bactéries). Pour• éviter des incidents pareils il est recommandé de désinfecter régulièrement l’appui frontal, par
exemple à l’aide d’une solution alcoolisée.
Le tonomètre remplit les critères EMC (IEC 60101-1-2: 2001), mais une interférence est toujours• possible à proximité (<1m) d’un appareil (tel que téléphone portable) avec une puissante source
de rayonnement électromagnétique. Même si les émissions électromagnétiques du tonomètre sont
inférieures aux normes requises, elles peuvent néanmoins interférer avec un autre appareil se
trouvant à proximité, par exemple avec un détecteur sensible.
Si vous n’allez pas utiliser l’appareil pendant une période prolongée il est recommandé d’enlever les• piles AA car il peut y avoir des fuites. Le remplacement de piles n’affecte pas le fonctionnement
ultérieur du tonomètre.
Veillez à vous débarrasser de manière adéquate des sondes utilisées (par exemple dans un• conteneur résistant pour la collecte des aiguilles jetables) parce qu’elles peuvent être porteuses de
microorganismes communiqués par un patient.
Les piles, les emballages et les supports de sonde remplacés doivent être jetés conformément à la• réglementation locale.
AVERTISSEMENT
Le tonomètre proprement dit ne doit jamais entrer en contact avec les yeux, sauf la sonde
qui peut toucher l’œil pour une fraction de seconde pendant la mesure. Ne laisser pas le
tonomètre entrer en contact avec l’œil et ne l’enfoncer pas dedans (le bout de la sonde doit
se trouver à une distance de 4 à 8 mm, ou 1/6 – 1/3 pouces de l’œil).
PRUDENCE
Lisez attentivement ce mode d’emploi avec des renseignements importants pour l’utilisation
et l’entretien du tonomètre.
18
ALL manual_icare _A5_100209.indd 18ALL manual_icare _A5_100209.indd 18 2.3.2009 11:06:282.3.2009 11:06:28

POLSKI
РУССКИ
SUOMINORSKSVENSKADANSKPORTUGUÊSITALIANOESPAÑOLDEUTSCHFRANÇAISENGLISH
Composants du tonomètre
Poignée
Bouton de mesure
Bouton de sélection
Écran
Roulette de réglage de l’appui frontal
Rainure centrale
Collier
Appui frontal
Couvercle du compartiment des piles Attache pour bracelet
19
ALL manual_icare _A5_100209.indd 19ALL manual_icare _A5_100209.indd 19 2.3.2009 11:06:282.3.2009 11:06:28

Démarrage de l’appareil et chargement de la sonde
Ouvrez le tube de la sonde en retirant l’embout et en insérant la sonde dans son support comme
indiqué sur les images. Après l’avoir insérée faites attention de ne pas la diriger vers le bas avant
d’activer le tonomètre afin de prévenir une chute accidentelle. Activez-le en appuyant une fois sur le
bouton central de mesure. Le tonomètre sera prêt à mesurer dès que l’indication 00 s’affichera sur
l’écran (voir l’image ci-dessous). L’appareil procède alors à la magnétisation de la nouvelle sonde
empêchant toute chute accidentelle.
Le tonomètre est prêt à
mesurer.
Afin de bien soutenir le front
du patient, pour une mesure
précise à la bonne distance,
vous pouvez régler l’appui
frontal à l’aide de la roulette
de réglag
Placez le bracelet dans l’attache pour bracelet. Enroulez le bracelet autour
de votre poignet et accrochez-le. Grâce au bracelet vous ne risquez pas de
laisser tomber le tonomètre par accident. Glissez les piles dans le tonomè-
tre (page 23).
Pour brancher le tonomètre, appuyez sur le bouton central de mesure.
Sur l’écran du tonomètre affichera tous les segments du LCD (voir l’image
ci-dessus). Vérifiez le fonctionnement de tous les segments sur les quatre
chiffres de l’écran LCD de sept segments.
Après quelques instants, l’écran affichera «LoAd » pour vous rappeler de
charger la sonde jetable dans le tonomètre, avant d’effectuer la mesure.
Chargez la sonde de la manière suivante:
20
ALL manual_icare _A5_100209.indd 20ALL manual_icare _A5_100209.indd 20 2.3.2009 11:06:292.3.2009 11:06:29
Other manuals for TA01i
3
Table of contents
Languages:
Other I-care Measuring Instrument manuals
Popular Measuring Instrument manuals by other brands

Dwyer Instruments
Dwyer Instruments 477AV-000 Specifications-installation and operating instructions

Panasonic
Panasonic WJ-NX100/2E installation guide

MFJ
MFJ 222 instruction manual

HoldPeak
HoldPeak 990B user manual

THORLABS
THORLABS HNL020R user guide

Bosch
Bosch Professional GIC 4-23 C Original instructions