I-FEEDER MXD User manual

1-rEEDER Global
MXD INSTRUCTIONS
•
Installation and operating instructions
YOUR LEADER IN DOSING TECHNOLOGY

GENERAL DESCRIPTION
MXD pumps are heavy duty, precision, electric diaphragm positive displacement pumps.
This dosing pump consists of one main gearbox with dosing head. This unit
forms the main drive of the dosing pump. What makes the MXD pump special
is the capability to add as many extras dosing units to the drive unit. This allows volumes from
10 liters per hour up to any volume imaginable. Each of these dosing units can be independently
regulated by means of a positive adjustment caliper.
Dosing units can be designed in such a manner that several different volumes
or products can be dosed or the total volume can be increased. Increased dosing units allow
higher permissible operating pressure, higher level of precision dosing & greater flexibility in the
products being dosed into the injection line. When four ( 4 ) injection units are combined, it is
possible to obtain straight line dosing, instead of
the pulsed flow usually found with positive displacement dosing pumps. Dosing
units can be added at a later stage as required or at the point of manufacture.
Dosing pumps are also upgradeable in volume as required.
I-FEEDER MXD dosing pumps are manufactured with materials that can
resist most chemicals products, even acids. They are designed for all sorts of processes where
it is necessary to dose a product into a hydraulic network,
such as: food, textile, chemical industry, water treatments, etc. (See materials
in Technical Features). In case there is any doubt about compatibility of
materials with the products to be used please contact I-FEEDER GLOBAL Technical Service.
Each injection unit can be controlled independantly with no need to stop operation when
adjusting the pump volume.
The original packing is prepared so that carriage and storing of the product do
not cause any damage to the product, as long as this is done far from heat
sources and in dry, ventilated spaces.

A. General
A1 Introduction
These installation and operating instructions contain all the
information required for starting up and handling the MXD-D
dosing pump.
If you require further information or if any problems arise, which
are not described in detail in this manual, please contact the
nearest I-Feeder company.
A2 Service documentation
If you have any questions, pleas e contact the nearest I-Feeder
company or service workshop.
Warning
Prior to installation, read these installation and
operating instructions. Installation and operation
must comply with local regulations and accepted
codes of good practice.
SAFETY RULES
To avoid personal or enviromental damages and to guarantee a proper
operation of the equipment, the staff in charge of the installation, set up and
maintenance of the equipment must follow the instructions of this manual,
specially those recommendations and warnings explicitly detailed. In addition,
specific instructions for the chemical products to be dosed should be followed.
CONTENTS
Pg
A General 3
A1 Introduction 3
A2 Service documentation 3
1. General Information 4
1.1 Applications 4
1.2 Warranty 4
2. Safety 4
2.1 Identification of safety instructions 4
2.2 Qualification and training 4
2.3 Risks 4
2.4 Safety conscious 4
2.5 Safety instructions 4
2.6 Safety for maintenance, inspection and installation 4
2.7 Unauthorised modification and manufacture 4
3. Type Key 5
B Technical data 6
4. Pump Performance 6
4.1 Accuracy 6
4.2 Performance 6
4.3 Suction heights 6
C Dimensions 7
5. Installation 8
5.1 General 8
5.2 Electrical Connection 8
6 Commissioning 8
6.1 Checks before start-up 8
6.2 Start-up 8
6.3 Switching on/ off 8
7 Installation tips 8
8 Tube/ Pipe lines 8
8.1 General 8
8.2 Connecting suction & Discharge lines 8
8.3 Suction 9
8.4 Injection 9
8.5 Dosing Flow 9
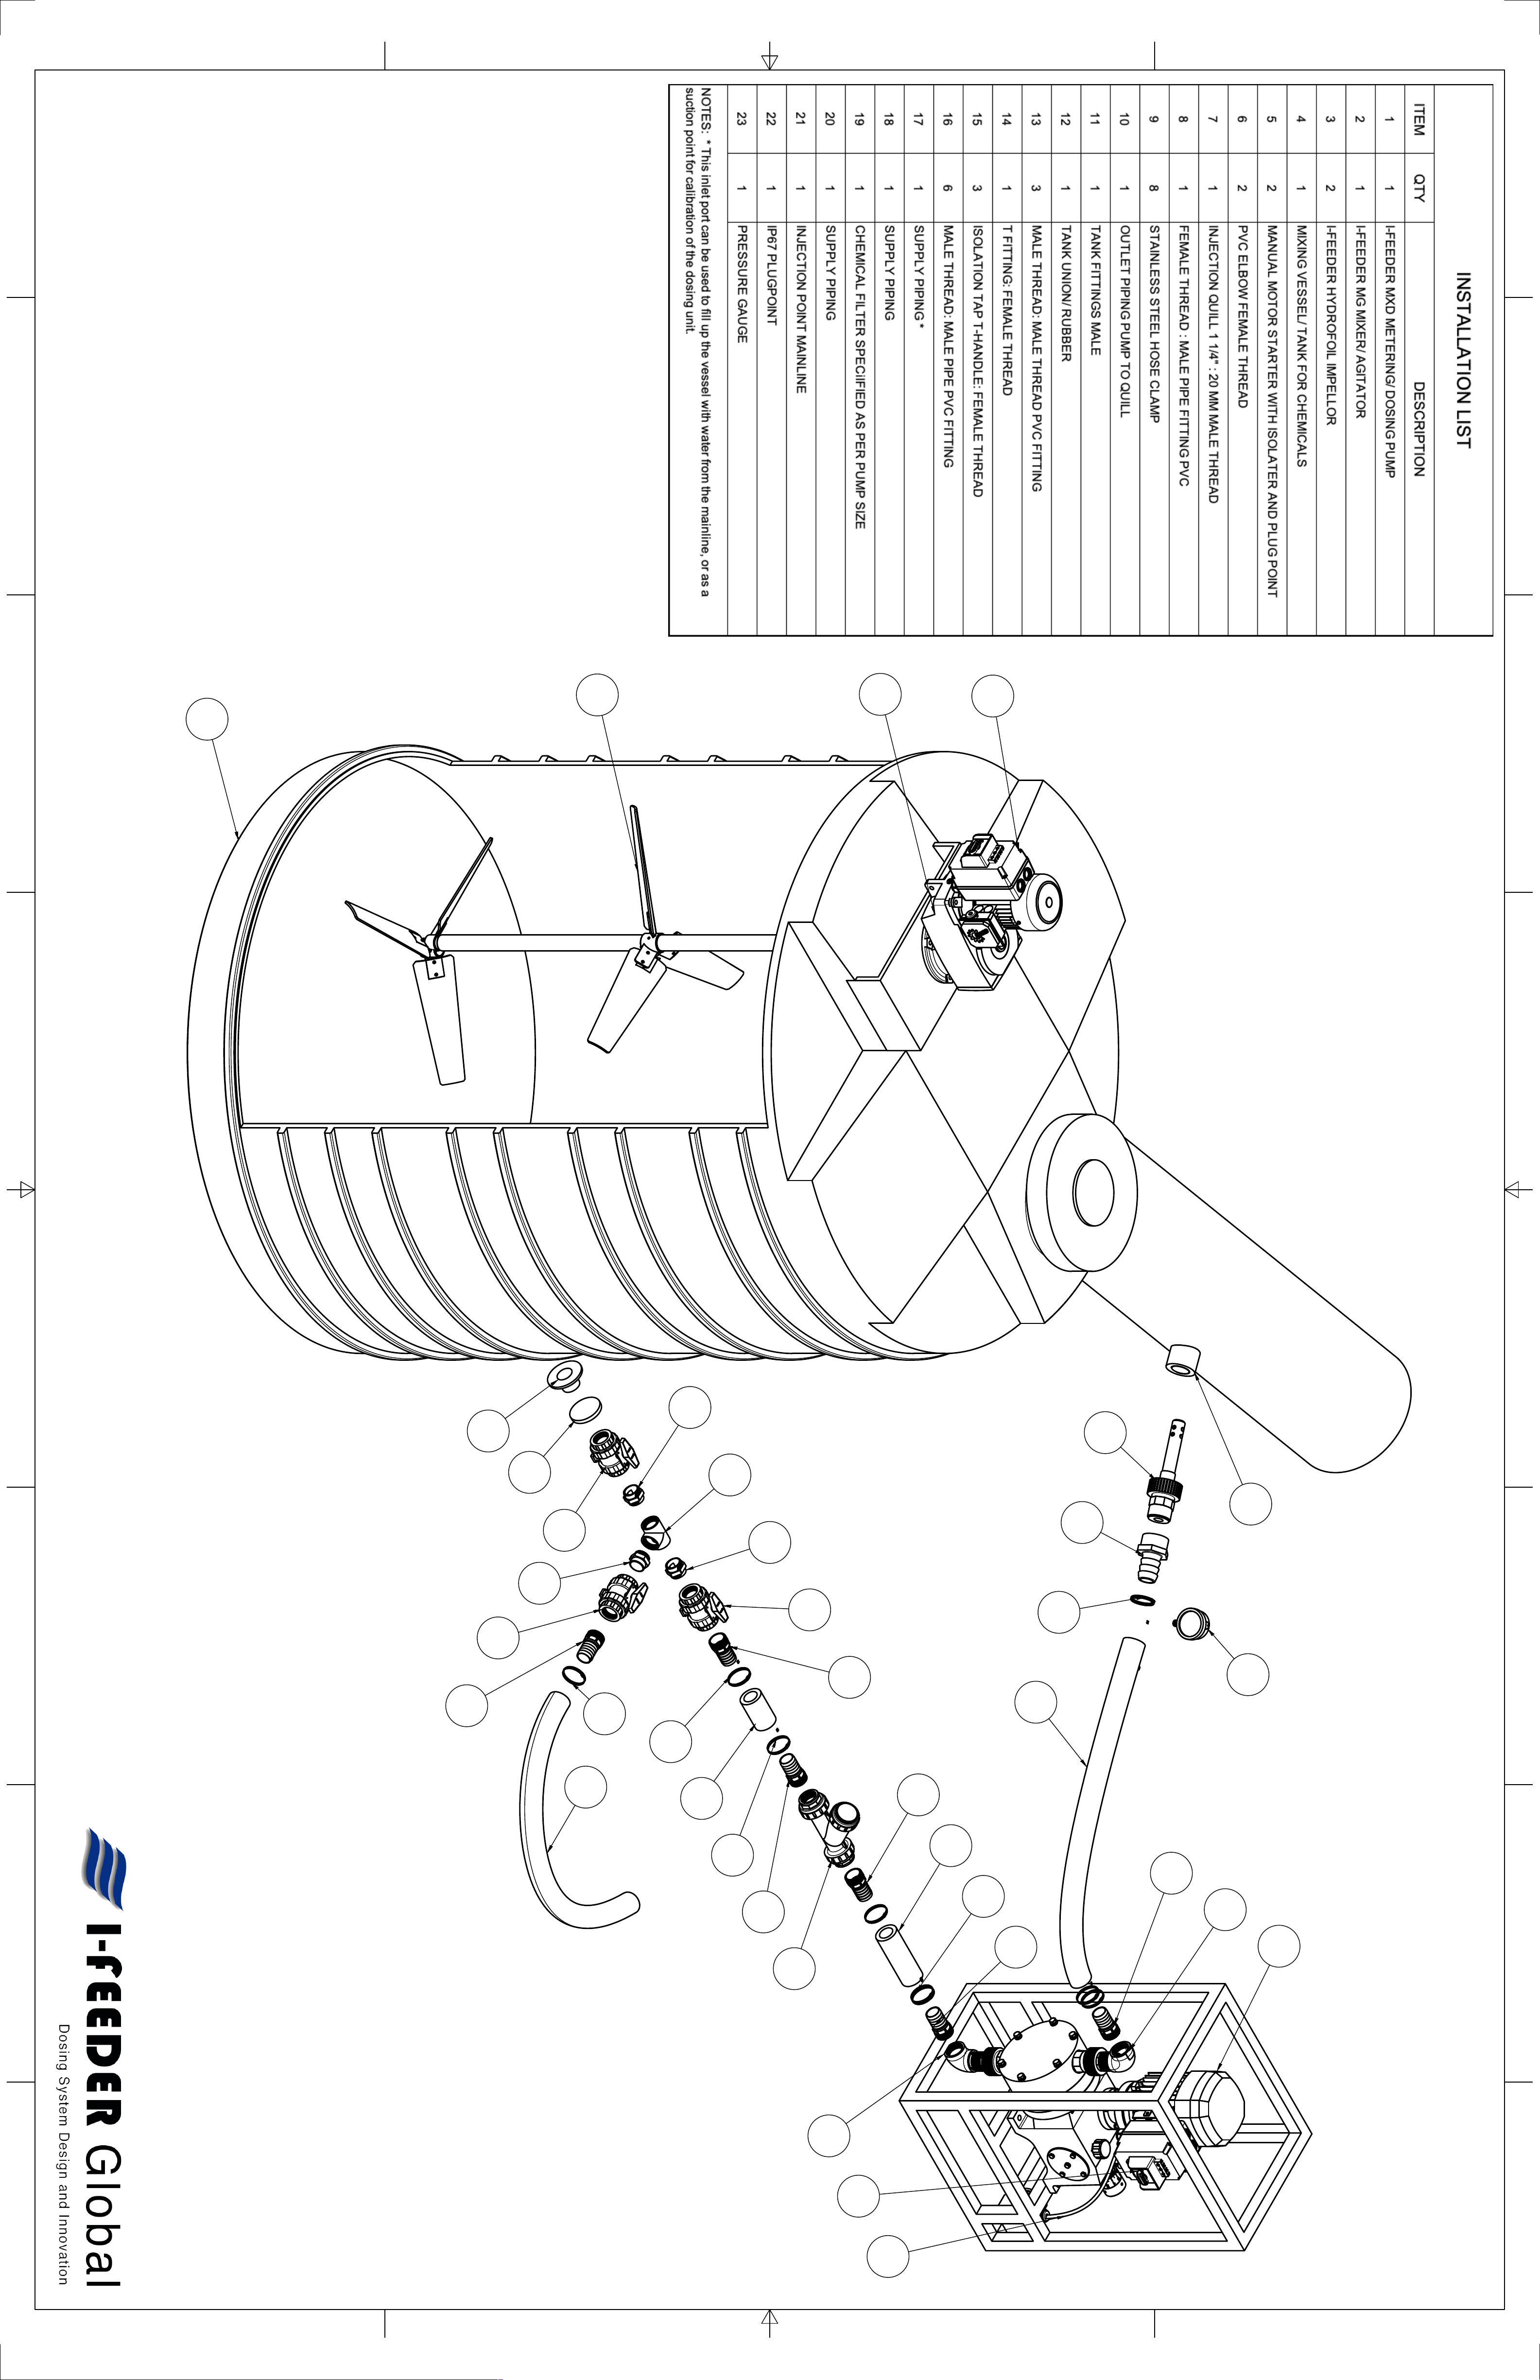
D Installation drawing 10
9 Maintenance 11
9.1 General notes 11
9.2 Replacing the diaphragm 11
9.3 Periodical maintenance 11
10 Transport & Storage 11
10.1 Delivery 11
10.2 Intermediate storage 11
10.3 Unpacking 11
10.4 Return 11
11 Fault finding chart 12
12 Dosing curves 13
E Parts list 14
F Warranty 15
1. General information
1.1 Applications
The MXD-D pump is suitable for liquid, non-abrasive and non-
inflammable media strictly in acco rdance with the instructions in
this manual.
1.2 Warranty
Warranty in accordance with our general terms of sale and
delivery is only valid
• if the pump is used in accordance with the information within
this manual.
• if the pump is not dismantled or incorrectly handled.
• if repairs are carried out by authorised and qualified
personnel.
• if original spare parts are used for repairs.
2. Safety
This manual contains general inst ructions that must be observed
during installation, operation and maintenance of the pump. This
manual must therefore be read by the installation engineer and the
relevant qualified personnel/operators prior to installation and start-
up, and must be available at the installation location of the pump at
all times.
It is not only the general safety instructions given in this "Safety"
section that must be observed, but also all the specific safety
instructions given in other sections.
2.1 Identification of safety instructions in this manual
If the safety instructions or other advice in this manual are not
observed, it may result in personal injury or malfunction and
damage to the pump. The safety instructions and other advice are
identified by the following symbols:
Information provided directly on the pump, e.g. labelling of fluid
connections, must be observed and must be maintained in a
readable condition at all times.
2.2 Qualification and training of personnel
The personnel responsible for the operation, maintenance,
inspection and installation must be appropriately qualified for these
tasks. Areas of responsibility, levels of authority and the
supervision of the personnel must be precisely defined by the
operator.
If the personnel do not have the necessary knowledge, the
necessary training and instruction must be given. If necessary,
training can be performed by the manufacturer/supplier at the
request of the operator of the pump. It is the responsibility of the
operator to make sure that the contents of this manual are
understood by the personnel.
2.3 Risks when safety instructions are not observed
Non-observance of the safety instructions may have dangerous
consequences for the personnel, the environment and the pump.
If the safety instructions are not observed, all rights to claims for
damages may be lost.
Non-observance of the safety instructions may lead to the
following hazards:
• failure of important functions of the pump/system
• failure of specified methods for maintenance
• harm to humans from exposure to electrical, mechanical and
chemical influences
• damage to the environment from leakage of harmful
substances.
2.4 Safety-conscious working
The safety instructions in this manual, applicable national health
and safety regulations and any operator internal working,
operating and safety regulations must be observed.
2.5 Safety instructions for the operator/user
Hazardous hot or cold parts on the pump must be protected to
prevent accidental contact.
Leakages of dangerous substances (e.g. hot, toxic) must be
disposed of in a way that is not harmful to the personnel or the
environment. Legal regulations must be observed.
Damage caused by electrical energy must be prevented.
2.6 Safety instructions for maintenance, inspection
and installation work
The operator must ensure that all maintenance, inspection and
installation work is carried out by authorised and qualified
personnel, who have been adequately trained by reading this
manual.
All work on the pump should only be carried out when the pump is
stopped. The procedure described in this manual for stopping the
pump must be observed.
Pumps or pump units which are used for media that are harmful
to health must be decontaminated.
All safety and protective equipment must be immediately
restarted or put into operation once work is complete.
Observe the points described in the initial start-up section prior to
subsequent start-up.
2.7 Unauthorised modification and manufacture of
spare parts
Modification or changes to the pump are only permitted following
agreement with the manufacturer. Original spare parts and
accessories authorized by the manufacturer are safe to use. Using
other parts can result in liability for any resulting consequences.
Warning
Other applications or the operation of pumps in
ambient and operating conditions, which are not
approved, are considered improper and are not
permitted. Irriquip CC accepts no liability
for any damage resulting from incorrect use.
Warning
If these safety instructions are not observed,
it may result in personal injury!
Caution
If these safety instructions are not observed,
it may result in malfunction or damage to the
equipment!
Note Notes or instructions that make the job easier
and ensure safe operation.
Warning
Electrical connections must only be carried out
by qualified personnel!
The pump housing must only be opened by
personnel authorised by I-FEEDER!

3 Type key
MXD XX X X X X X X X X X X X
Type range Motor variant
Model number E0 PTC motor for frequency control
Maximum counter-pressure [bar] E1 Motor type 400 V,
Control variant E2 Motor type 220 V,
B Standard - manual control Mains plug
AR* Analog/pulse control
4-20 mA control X no plug
Connection, suction/discharge
VSD Variable speed control
4 Tubed
6 Cemented
Dosing head variant
PP Polypropylene
PV PVDF (polyvinylidene fluoride)
PVC Polyvinyl chloride
SS Stainless steel, SUS 316
PV-R PVDF + integrated relief valve
PVC-R PVC + integrated relief valve
8 Threaded, male
Valve type
1 Standard valve
3 0.05 bar suction opening pressure
0.8 bar discharge opening pressure
Gasket material
E EPDM 4 Spring-loaded, discharge side only
0.8 bar opening pressure
5 Valve for abrasive media
T PTFE
Supply voltage
Valve ball material G 230 V, 50/60 Hz
G Glass
C Ceramic
E380 V, 50/60 Hz
SS Stainless steel
Control panel position
X no control panel

PROTECTION:IP-55
TECHNICAL :
4 Pump performance
4.1 Accuracy
• Dosing flow fluctuation: ± 1.5 % within the control range 1:10
• Linearity deviation: ± 4 % of the full-scale value. Adjustment
from max. to min. stroke length, within the control range 1:5.
Applies to:
• water as dosing medium
• fully deaerated dosing head
• measurement according to IRRIQUIP factory standard
no. 0027/0813
• standard pump version.
4.2 Performance
Applies to:
• maximum counter-pressure
• water as dosing medium
• flooded suction 0.5 mWC
• fully deaerated dosing head
• three-phase 400 V motor.
4.3 Suction heights ( See chart below )
4.3.1 Media with a viscosity similar to water
Applies to:
• counter-pressure of 1.5 to 10 bar
• non-degassing and non-abrasive media
• temperature of 20 °C
• stroke length 100 %.
Pump type
50 Hz 60 Hz Maximum length of
suction line
[m]
Suction height*
[mWC]
Intake height**
[mWC]
Suction height*
[mWC]
Intake height**
[mWC]
MXD 82S 4 3 4 3 4
MXD 23S 4 3 4 3 4
MXD 63S 3 2 3 2 3
MXD 53S 2 1 2 1 2
MXD 14S 2 1 2 1 2
MXD 20S 1 1 1 1 2
MXD 16S 1 1 1 1 2
* Suction line and dosing head filled ( continuous operation )
** Suction line and dosing head not filled.
M o d e l - M X D 8 2 S 2 3 S 6 3 S 5 3 S 1 4 S 2 0 S 1 6 S
M a x . d i s c h a r g e v o l u m e ( lph )5 0 1 0 0 2 0 0 3 0 0 6 0 0 9 0 0 1 2 0 0
M a x . d i s c h a r g e p r e s s u r e ( Bar ) 1 0 1 0 7 10 10 8 6
S t r o k e l e n g t h ( m m )
S t r o k e s p e r m i n u t e 3 6 3 6 3 6 5 8 1 1 6 1 7 4 2 3 2
C o n n e c t i o n t y p e / a p e r t u r e K 1 5 A
T r a n s f e r r a b l e v i s c o s i t y( mPa * s )
T r a n s f e r r a b l e t e m p e r a t u r e ( ° C )
P o w e r
S t a n d a r d m o t o r P o l e s 2
P o w e r ( k W ) 0 ,3 7 0 , 5 5 0 ,7 5 1 ,1 1 ,1
P u m p p a i n t c o l o r
W e i g h t ( k g ) 2 6 2 6 2 9 2 9 2 9 3 2 3 2
M a t e r i a l / T y p e P T S S T S V E C P E C
P u m p H e a d P P S U S 3 0 4 P V C P P
D i a p h r a g m P T F E P T F E E P D M E P D M
C h e c k B a l l S U S 3 0 4 S U S 3 0 4 C E R A M C E R A M
J o i n t P P S U S 3 0 4 P V C P P
O - r i n g N E O V IT O N N E O N E O
1 2 ,5
H a m m e r t o n e B l u e
S t a i n l e s s s t e e l c h e c k b a l l: 3 0 0 0 m P a * s
S t a i n l e s s s t e e l / P V D F : 0 - 6 0 ° c - N O F R E E Z I N G A L L O W E D
2 2 0 V ( s i n g l e - p h a s e ) o r 3 8 0 V ( t h r e e - p h a s e )
4
K 2 5 A
0 ,2 5
L i q u i d E n d M a t e r i a l s

The electric protection of the motor must be installed and adjusted
following its nominal instensity (overloaded switch disjuntor). (See
wiring).
A disconnection overload must be installed in case of emergency.
The equipment must be protected to avoid untimely sudden starts.
ON
OFFOFF
DOL Starter with overload
U
V
W
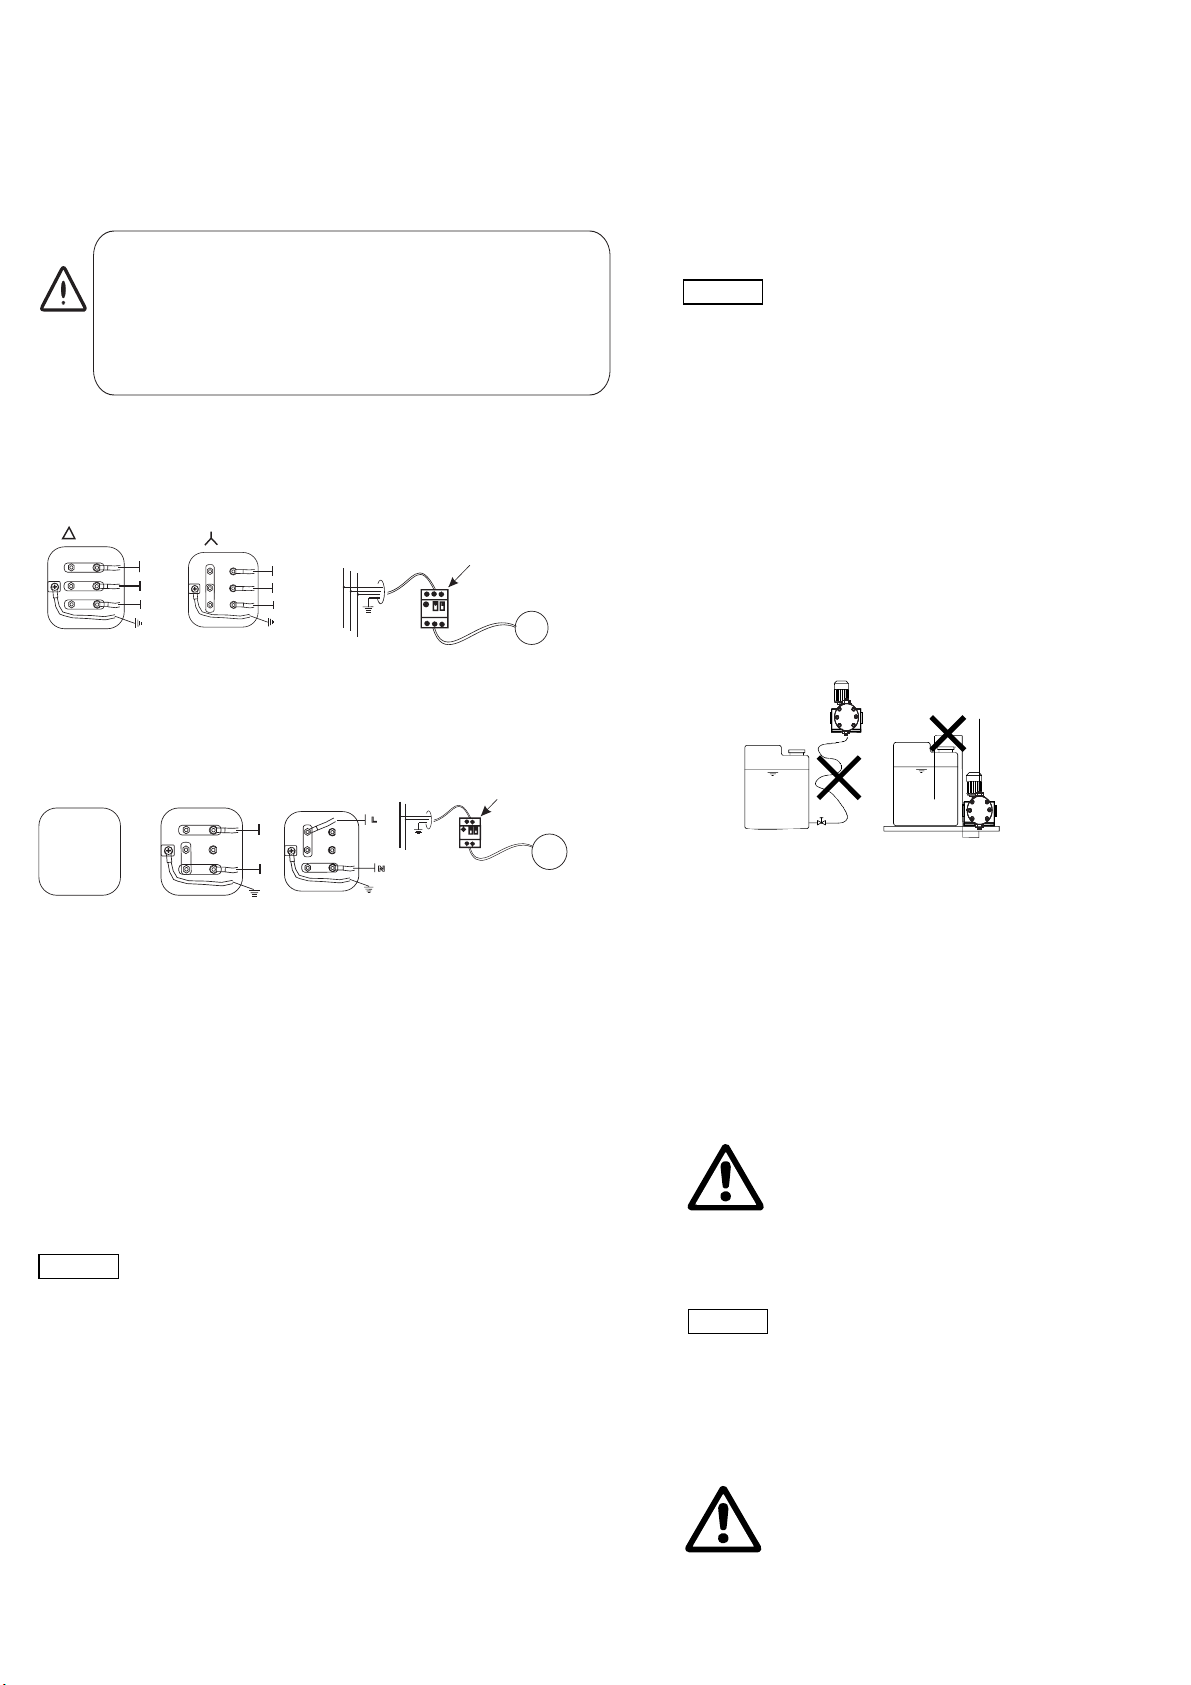
THREE-PHASE CONNECTION (50/60 Hz)
To work at 230 V we will plug the motor in delta
To work at 400 V it will be a star connection.
V1
W1
U1
230 V 400 V
V1
W1
U1
ON
OFF
DOL Starter with overload
L
SINGLE PHASE CONNECTION
N
To work at 230 V single-phase at 50 Hz we will connect directly the motor wire
to the adequate protection. To work at 60 Hz we will connect the connection box
plates as shown in the drawing.
N
L
115 VAC (60 Hz) 230 VAC (60 Hz)
230 VAC (50 Hz)
WIRE
INCLUDED
M
M
5 INSTALLATION
5.1 GENERAL
To install this pump it is advisable to choose places protected from water,
away from heat sources and air renewal.
Place the pump vertically over a rigid surface to achieve proper distribution
of lubrication. Anticipate spaces needed for maintenance and installation.
6. Commissioning
6.1 Checks before start-up
• Check that the rated voltage stated on the pump nameplate
corresponds to the local conditions!
• Check that all connections are secure and tighten,
if necessary.
• Check that the dosing head sc rews are tightened with the
specified torque and tighten, if necessary.
• Check that all electrical connections are correct.
6.2 Start-up
1. Open the deaeration valve , if installed, in the discharge line, or
relieve the pressure on the discharge side so that the medium
can run out without a counter-pressure.
2. Switch on the power supply.
3. Set the stroke-length adjustment knob to 100 %.
4. Leave the pump running until the dosed medium is free of air
bubbles.
5. Close the deaeration valve, if installed.
– The pump is now ready for operation.
Caution
After initial start-up and after each time the
diaphragm is changed, tighten the dosing head
screws.
After approximately 6-10 operating hours or two
days, cross-tighten the dosing head screws
using a torque wrench.
Maximum torque: 6 Nm.
Functional principle
• Reciprocating displacement pump with electric motor and
mechanical diaphragm control.
• The rotation of the motor is transformed into the reciprocating
movement of the dosing diaphragm by the eccentric and the
tappet.
• The dosing flow can be set by adjusting the stroke length of the
tappet.
6.3 Switching on/off
• To start the pump, switch on the power supply.
• To stop the pump, switch off the power supply.
Caution
Before switching on the pump, check that it is
installed correctly.
7 Installation tips
• For easy de-aeration of the dosing head, install a ball valve
with bypass line (back to the dosing tank) immediately after
the discharge valve.
• In the case of long discharge lines, install a non-return valve in
the discharge line.
• When installing the suction line, observe the following:
– Keep the suction line as short as possible. Prevent it from
becoming tangled.
– If necessary, use swept bends instead of elbows.
– Always route the suction line up towards the suction valve.
– Avoid loops which may cause air bubbles.
• For media with a tendency to sedimentation, install the suction
line with filter so that the suction valve remains a few millimetres
above the possible level of sedimentation.
8.Tube / pipe lines
8.1 General
8.2 Connecting the suction and discharge lines
• Connect the suction line to the suction valve.
– Install the suction line in the tank so that the foot valve
remains 25 to 30 mm above the bottom of the tank or the
possible level of sedimentation.
• Connect the discharge line to the discharge valve.
Caution
Warning
Only use the prescribed line types!
All lines must be free from strain!
Avoid loops and buckles in the tubes!
Keep the suction line as short as possible to
avoid cavitation!
If necessary, use swept bends instead of elbows.
Observe the chemical manufacturer's safety
instructions when handling chemicals!
Make sure that the pump is suitable for the actual
dosing medium!
The flow must run in the opposite direction to
gravity!
The resistance of the parts that come into contact
with the media depends on the media, media
temperature and operating pressure. Ensure that
parts in contact with the media are chemically
resistant to the dosing medium under operating
conditions!
Warning
All lines must be free from strain!
Only use the prescribed line types!

8.3 SUCTION
It is essential to fit in the suction of the dosing liquid the filter of 500 mesh.
Couple the suction pipe to the lower connecter of the cylinder, putting the mesh filter inbetween.
The sediment at the bottom of the tank must never be suctioned, to avoid suction of undiluted parts.
The piping must be stiff enough so that it does not lose its shape when there is suction.
To help suction the piping must be as short as possible, the pipe diameter must be at least 40 mm.
For pipes of over 3 m, diameter must be increased.
8.4 INJECTION
Fix the check valve supplied with the pump at the input of the water network, as
shown in the drawing, and couple the injection hose to the upper connecter of
the cylinder.
The pipe diameter will have to be the same as the valve diameter. For pipes over
15m length the diameter shall be increased. Do never insert a shutoff valve.
8.5 DOSING FLOW
Through the micrometic regulator adjust the dosing flow from 0 to 100 % depending
on the wished value. A regulation inferior than 10% is not advisable.
In order to check the dosing flow:
1.- Prime the pump immersing the
suction pipe in graduated receptacle ( A )
2.- Mark in the receptacle the liquid level.
3.- Start up the pump and pour a
known volume (V) of measured liquid
in a second receptacle ( B).
4.- Measure the time (t) that goes
between the start up of the pump and
the precise instant in which the liquid
reaches the level of the mark of
receptacle A.
5.- The dosed flow corresponds to:
Q(l/h) = V (liters) / t (seconds) x 3600
A
B
A
1
B
C
D
A
B
C
D
2345678
12345678
4
2
5
3
11
12
15
13
14
13
15
16
9
13
15
16
9
18
9
16
19
16
7
8
9
10
1
16
5
6
6
16
9
20
17
21
22
23
10. Transport and storage
10.1 Delivery
The MXD type dosing pumps are supplied in different packaging,
depending on pump type and the overall delivery. For transport
and intermediate storage, use the correct packaging to protect the
pump against damage.
10.2 Intermediate storage
• Permissible storage temperature: –20 °C to +50 °C.
• Permissible air humidity: max. relative humidity: 92 %
(non-condensing).
10.3 Unpacking
Retain the packaging for future storage or return, or dispose of
the packaging in accordance with local regulations.
10.4 Return
Return the pump in its original packaging or equivalent.
The pump must be thoroughly cleaned before it is returned or
stored. It is essential that there are no traces of toxic or
hazardous media remaining on the pump.
Before returning the pump to Irriquip for service, the
safety declaration at the end of these instructions must be filled in
by authorised personnel and at tached to the pump in a visible
position.
If Irriquip or agent is requested to service the pump, it must be
ensured that the pump is free from substances that can be
injurious to health or toxic. If the pump has been used for such
substances, the pump must be cleaned before it is returned.
If proper cleaning is not possible, all relevant information about the
chemical must be provided.
If the above is not fulfilled, Irriquip can refuse to accept
the pump for service. Costs of returning the pump are paid by the
customer.
The safety declaration can be found at the end of these instructions.
Caution
Do not throw or drop the pump.
Store the pump in a dry and cool place.
Store the pump in upright position so that the
gear oil cannot leak out.
Do not use the protective packaging as transport
packaging.
Observe the permissible storage temperature!
Caution
Irriquip accepts no liability for damage
caused by incorrect transportation or missing or
unsuitable packaging of the pump!
Caution
If a pump has been used for a medium which is
injurious to health or toxic, the pump will be
classified as contaminated.
Caution
The replacement of the supply cable must be
carried out by an authorised Irriquip service
workshop.
9. Maintenance
9.1 General notes
Warning
When dosing dangerous media, observe the
corresponding safety precautions!
Risk of chemical burns!
Wear protective clothing (gloves and goggles
when working on the dosing head, connections
or lines!
Do not allow any chemicals to leak from the
pump. Collect and dispose of all chemicals
correctly!
Warning
The pump housing must only be opened by
personnel authorised by Irriquip!
Repairs must only be carried out by authorised
and qualified personnel!
Switch off the pump and disconnect it from the
power supply before carrying out maintenance
work and repairs!
Replacing the diaphragm
1. Loosen the six dosing head screws.
2. Remove the dosing head.
3. Turn the fan blades until the diaphragm reaches the front dead
centre (the diaphragm detaches itself from the diaphragm
flange).
4. Unscrew the diaphragm by manually turning it counter-
clockwise.
5. Check the parts and replace by new ones, if necessary.
6. Screw in the new diaphragm completely. Then turn it back until
the holes in the diaphragm and the flange coincide.
7. Turn the fan blades until the diaphragm reaches the bottom
dead centre (the diaphragm is pulled onto the diaphragm
flange).
8. Refit the dosing head carefully and cross-tighten the screws.
Maximum torque: 6 Nm.
9. Deaerate and start the dosing pump.
Before any maintenance operation we will check:
That the pump is stopped and disconnected from the electric
supply.
There is no pressure neither inside the head nor in the impulsion
pipe. It is advisable to empty the head before opening it.
The staff in charge of the maintenance will use the adequate
protection means in order to manipulate the dosed liquid.
PERIODICAL MAINTENANCE:
Change oil after the first 500 hours. Next changes will be every 2000 hours
(minimum once a year).
Check the diaphragm every 3 months or 1000 hours.
Check the suction filter before and after operation..
Check the valves every 3 months or 1000 hours.
It is advisable to periodically clean the dosing unit, letting clean water flow through it
(we can make it coincide with the emptying of the tank), to eliminate precipitated
rests that can remain in the inner part of the cylinder or in suction / impulsion pipes.
If we are using highly corrosive liquids it is advisable to double the frequency
of checkings.
OIL: Take off re-filling lid and fill the pump with the provided oil:
320 GRADED OIL. If the pump has several boxes oil must be
filled into all boxes.
Approximate oil capacity: 1 liter per gearbox.
When carrying, keep upright.
CHECKING THE HYDRAULIC CIRCUIT: Check that all valves are
opened and that escapes from priming valves derive the liquid to a
proper receptacle.
ROTARY DIRECTION: Start up the pump to check that the rotary
direction coincides with the one shown by the arrow. To change rotary
direction invert two phases in the motor terminals box.
CHECKING OF PUMP: Check visually/auditorilly the proper working
of the pump.

11. Fault finding chart
Fault Cause Remedy
1. Dosing pump does not
run.
a) Not connected to the power supply. Connect the power supply cable.
b) Incorrect supply voltage. Replace the dosing pump.
c) Electrical failure. Return the pump for repair.
d) The empty indication has responded. Remove the cause.
e) The diaphragm leakage detection has responded. Replace the diaphragm.
2. Dosing pump does not
suck in.
a) Leaking suction line. Replace or seal the suction line.
b) Cross-section of the suction line too small or
suction line too long. Check with I-Feeder specification.
c) Clogged suction line. Rinse or replace the suction line.
d) Foot valve covered by sediment. S u s p e n d the suction line from a higher position.
e) Buckled suction line. I n s t a l l t h e suction line correctly. Check for
damage.
f) Crystalline deposits in the valves. Clean the valves.
g) Diaphragm broken or diaphragm tappet torn out. Replace the diaphragm.
3. Dosing pump does not
dose.
a) Air in the suction line and dosing head. Wait, until the pump has deaerated.
b) Stroke-length adjustment knob set to zero. Turn the adjustment knob in the "+" direction.
c) Viscosity or density of medium too high. Check the installation.
d) Crystalline deposits in the valves. Clean the valves.
e) Valves not correctly assembled. Assemble the inner valve parts in the right order
and check and possibly correct the flow
direction.
f) Injection point blocked. Check and possibly correct the flow direction
(injection unit), or remove the obstruction.
g) Incorrect installation of lines and peripheral
equipment.
Check the lines for free passage and correct
installation.
4. Dosing flow of the pump
is inaccurate.
a) Dosing head not fully deaerated. Repeat the deareation.
b) Degassing medium. Check the installation.
c) Parts of the valves covered in dirt or incrusted. Clean the valves.
d) Zero point misadjusted. Adjust the zero point to the actual counter-
pressure.
e) Counter-pressure fluctuations. Install a pressure-loading valve and a pulsation
damper.
f) Suction height fluctuations. Keep the suction level constant.
g) Siphon effect (inlet pressure higher than counter-
pressure). Install a pressure-loading valve.
h) Leaking or porous suction line or discharge line. Replace the suction line or discharge line.
i) Parts in contact with the medium are not resistant
to it. Replace with resistant materials.
j) Dosing diaphragm worn (incipient tears). Replace the diaphragm. Also observe the
maintenance instructions.
k) Supply voltage fluctuations. Decrease the counter-pressure of the pump.
l) Variation of the dosing medium (density,
viscosity).
Check the concentration. Use an agitator,
if necessary.
Caution For further error signals for the control unit, refer to the relevant section.
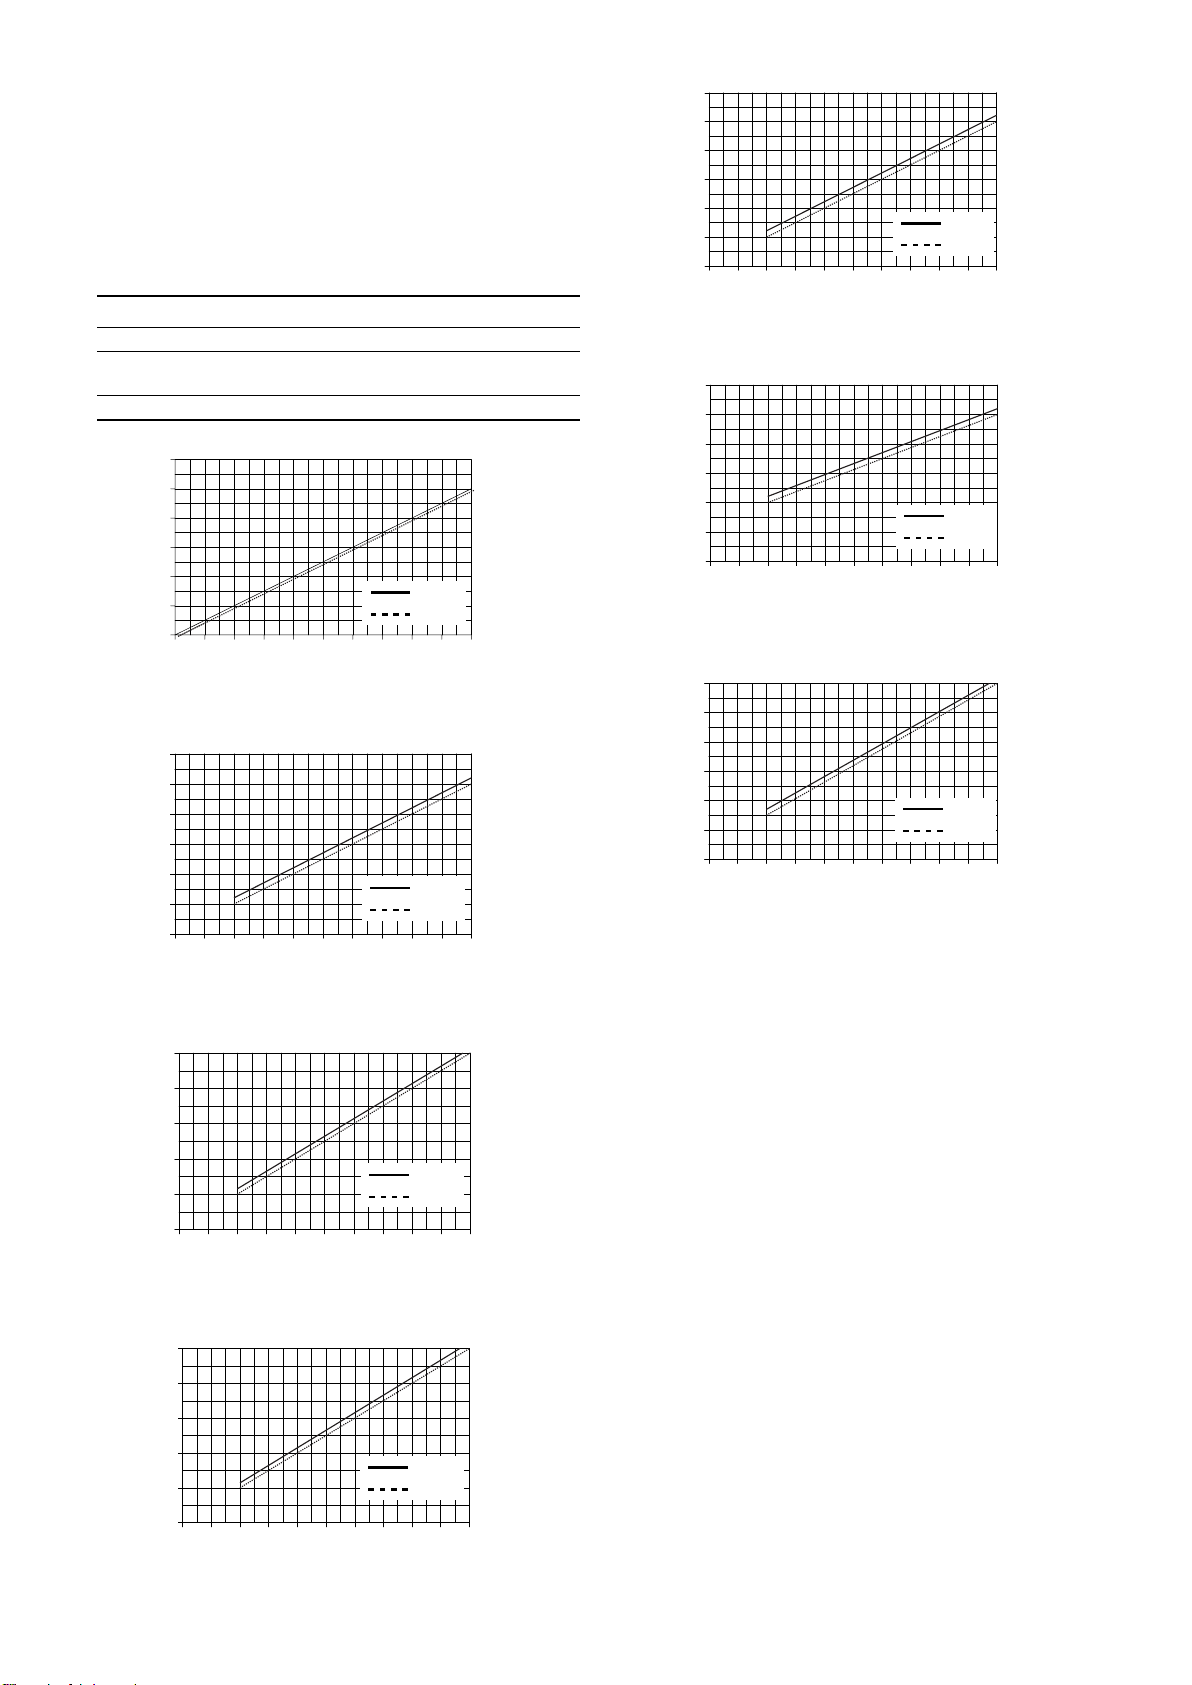
12. Dosing curves
The dosing curves on the following pages are trend curves.
They apply to:
• performance of simple pump (the flow rate is doubled for the
double pump)
• water as dosing medium
• suction line with foot valve, 0.5 m flooded suction
• zero point of pump Q0 for specified pressure, see table below
• standard pump version.
MXD-82S (50 Hz)
MXD-23S (50 Hz)
MXD - 63S (50 Hz)
MXD - 53S (50 Hz)
MXD-14S ( 50 Hz )
MXD - 20S ( 50 Hz )
Abbreviation Description
Q Dosing flow
Q0
Zero point of the pump
The pumps are calibrated so that Q is 0 at 2 bar.
h Stroke length
0
10
20
30
40
50
60
0 10 20 30 40 50 60 70 80 90 100
h [%]
Q [l/h]
2bar
10bar
2 bar
10 bar
0
20
40
60
80
100
0 10 20 30 40 50 60 70 80 90 100
h [%]
Q [l/h]
10bar
3bar
2 bar
10 bar
0
40
80
120
160
200
0 10 20 30 40 50 60 70 80 90 100
h [%]
Q [l/h]
3bar
10bar
2 bar
8.5 bar
0
60
120
180
240
300
0 10 20 30 40 50 60 70 80 90 100
h [%]
Q [l/h]
10bar
2 bar
10 bar
0
120
240
360
480
600
720
0 10 20 30 40 50 60 70 80 90 100
h [%]
Q [l/h]
3bar
2 bar
10 bar
0
180
360
540
720
900
1080
0 10 20 30 40 50 60 70 80 90 100
h [%]
Q [l/h]
16bar
2 bar
8 Bar
0
200
400
600
800
1000
1200
0 10 20 30 40 50 60 70 80 90 100
h [%]
Q [l/h]
3bar
10bar
2 bar
6 bar
MXD - 16S ( 50 Hz )
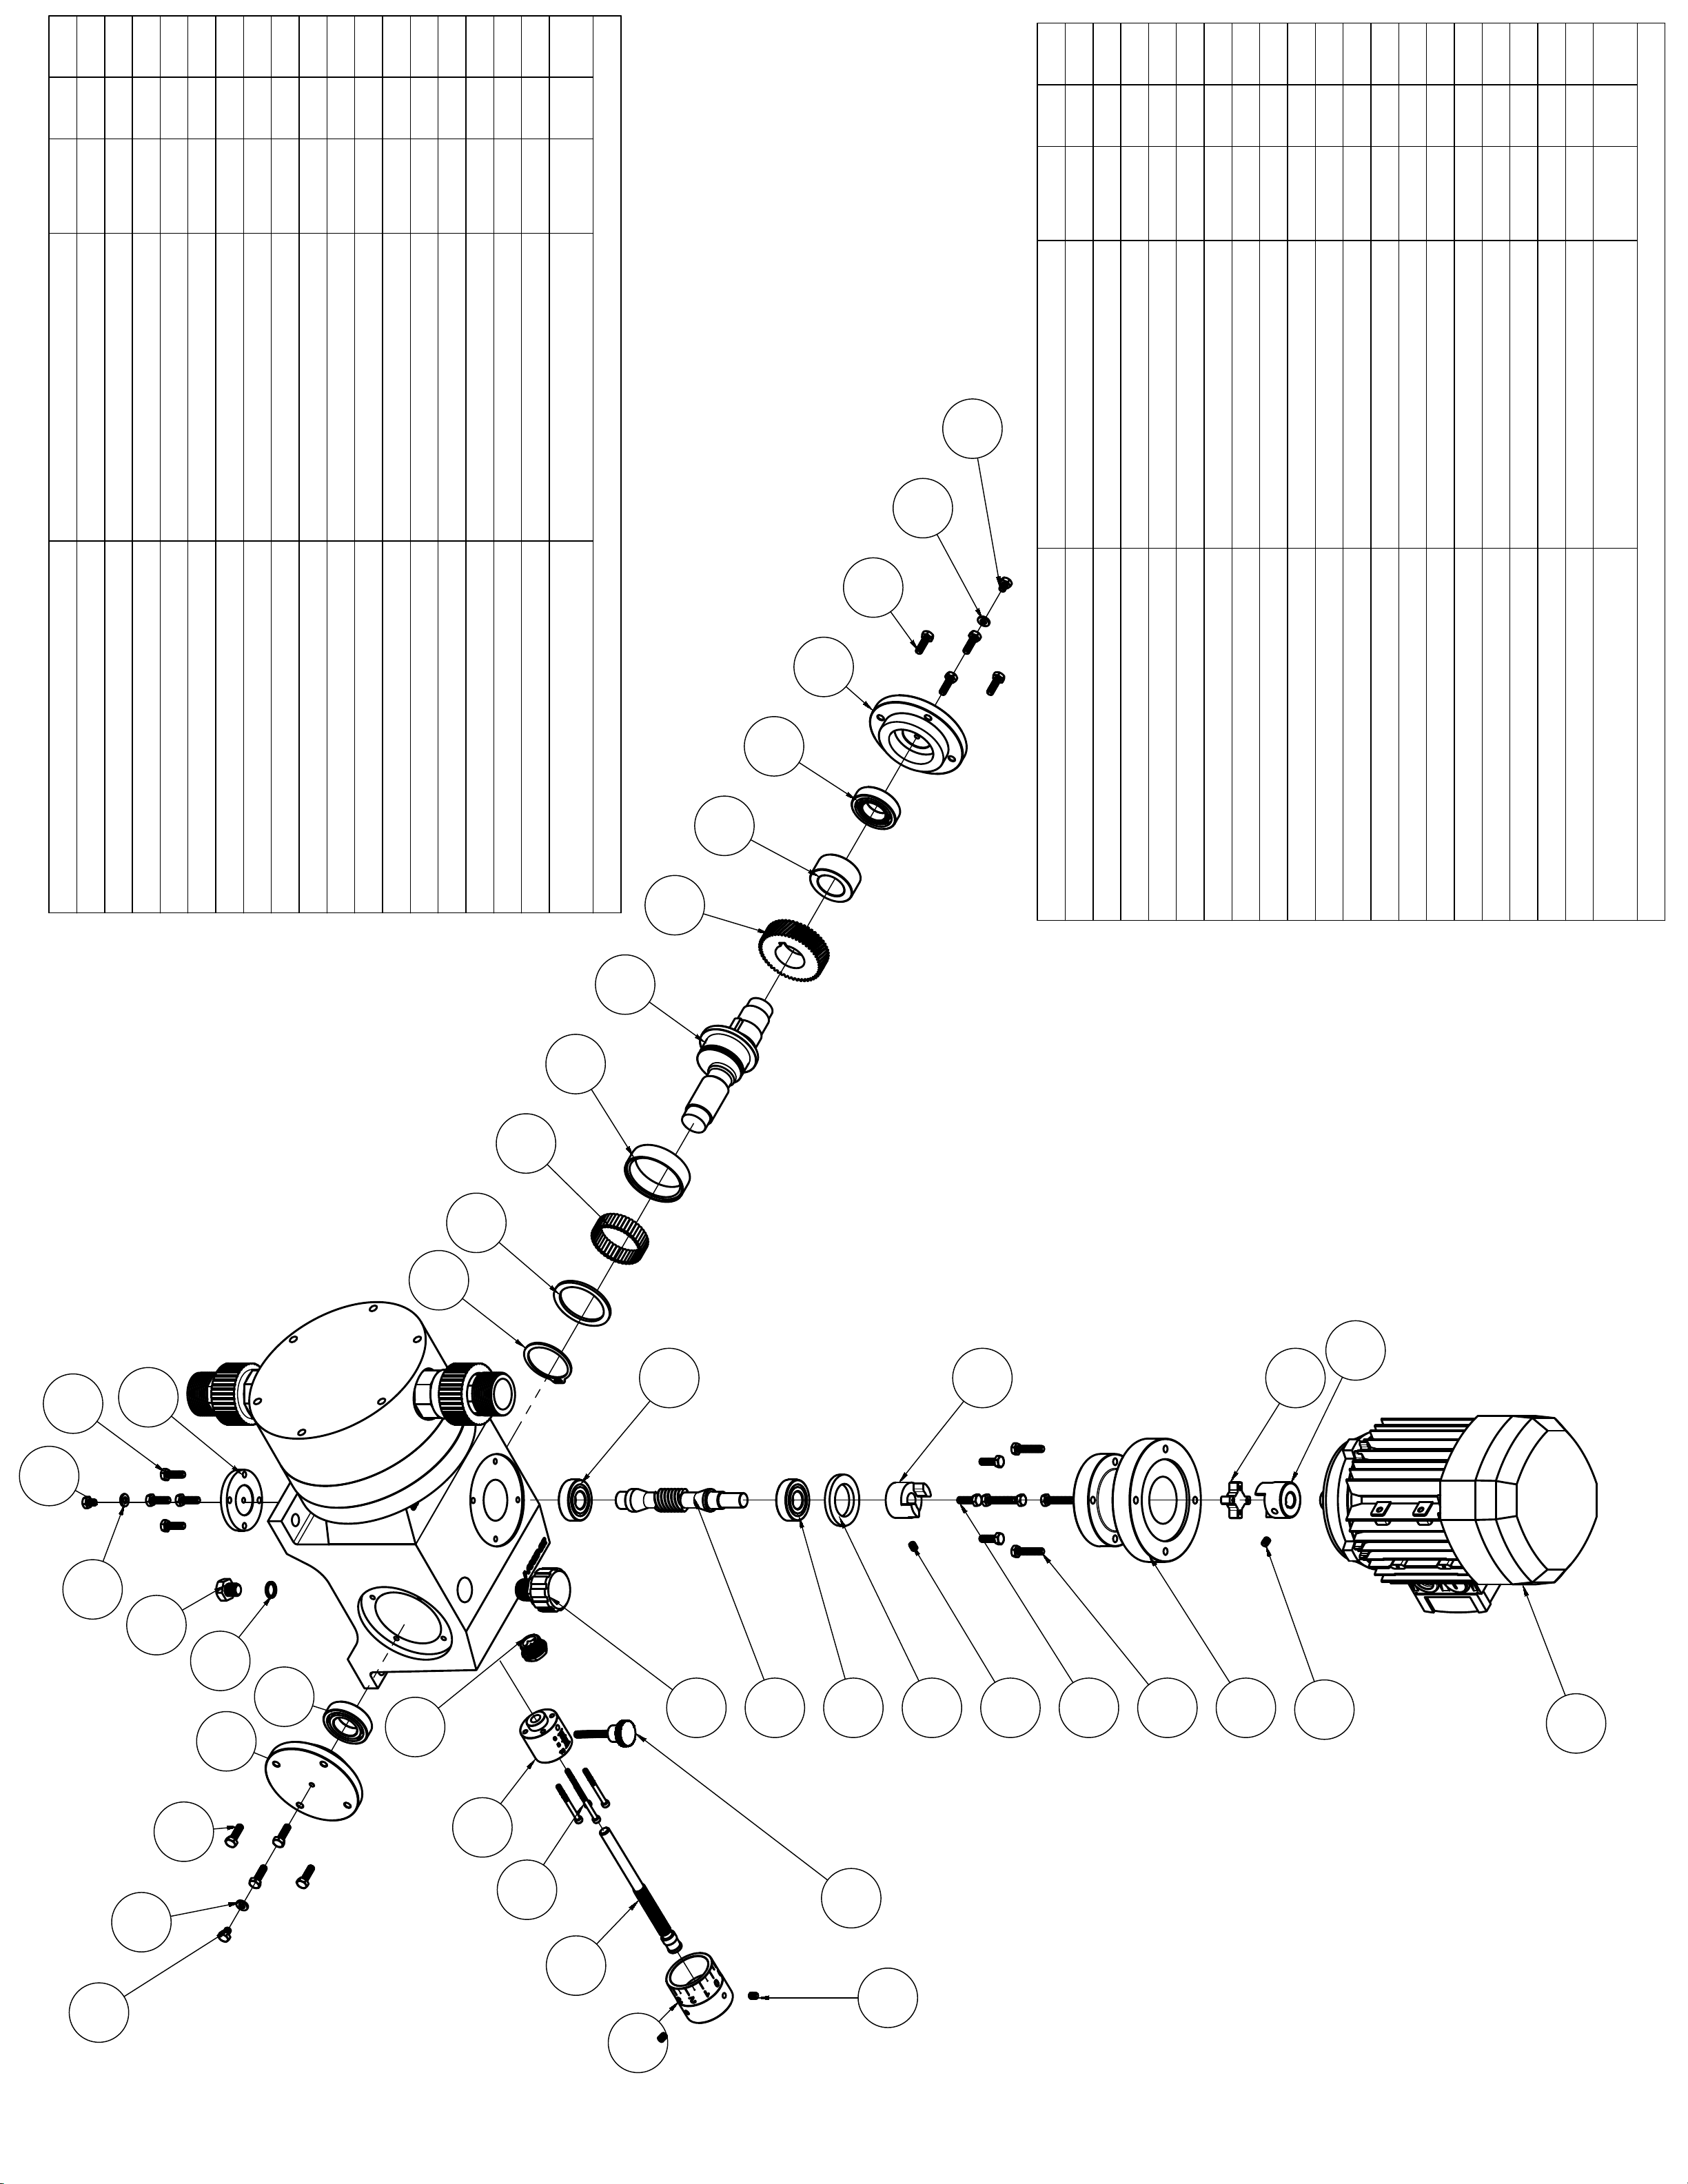
PARTS LIST
ITEM QTY PART
NUMBER PART NAME DESCRIPTION
1 3 K-34 BOLT M6:8 BOLT M6 X 8 STAINLESS STEEL
2 3 K-37 COPPER WASHER COPPER WASHER M6
3 16 K-33 BOLT M6:20 BOLT M6 X 20 MM STAINLESS STEEL
4 2 K-14 BEARING CAP MXD BEARING CAP MXD GEARBOX
5 2 K-44 BEARING MAIN SHAFT 6005 BEARING MAIN SHAFT
6 1 K-29 MAIN SHAFT SPACER MAIN SHAFT SPACER
7 1 K-22A WORM GEAR MAIN DRIVE GEAR
8 1 K-26 MAIN SHAFT ECCENTRIC CAM MAIN SHAFT
9 1 K-27 ECCENTRIC BEARING BUSH ECCENTRIC CAM ROLLER BEARING BUSH
10 1 K-31 ECCENTRIC BEARING ECCENTRIC CAM ROLLER BEARING
11 1 K-28 ECCENTRIC CAM RETAINING RING ECCENTRIC CAM BEARING RETAINING RING
12 1 K-30 ECCENTRIC CAM CIRCLIP MAIN SHAFT BEARING CIRCLIP 40,5
13 1 K-41 BOTTOM CAP BOTTOM RETAINING CAP STEEL
14 1 K-19 OIL DRAIN PLUG OIL DRAINING PLUG M12
15 1 K-19A OIL DRAIN WASHER OIL DRAIN COPPER WASHER M12
16 1 K-21 LEVEL INDICATOR HYDRAULIC PLUG LEVEL INDICATOR 1/2 "
17 1 K-47 ADJUSTMENT COARSE ADJUSTMENT HOLDER COARSE
18 4 K-36 CAPSCREW M4:45 CAPSCREW M4 X 45 STAINLESS STEEL
19 1 K-48 ADJUSTMENT SHAFT ADJUSTMENT SHAFT
20 1 K-49 ADJUSTMENT CONTROL NUMERICAL ADJUSTMENT CONTROL
PARTS LIST
ITEM QTY PART
NUMBER PART NAME DESCRIPTION
21 4 K-45 GRUBSCREW M6:8 GRUBSCREW M6 X 8 STAINLESS STEEL
22 1 K-52 SETSCREW M6:45 STAINLESS SETSCREW M6X50
23 1 K-20 OIL BREATHER CAP HYDRAULIC BREATHER CAP 1/2"
24 1 K-22 WORM SHAFT WORM GEAR SHAFT
25 2 K-42 BEARING WORM SHAFT 6203 BEARING WORM SHAFT
26 1 K-12 RETAINER STAINLESS STEEL RETAINER 32555
27 4 K-53 BOLT M6:35 BOLT M6 X 35 STAINLESS STEEL
28 1 K-40 MOTOR FLANGE MOTOR FLANGE STEEL 71:80
29 1 MF-AC380 AC ELECTRIC MOTOR ELECTRIC MOTOR 380V B34
30 2 K-38 DRIVE COUPLING SPIDER COUPLING LO70
31 1 K-37 LO70 COUPLING RUBBER SPIDER COUPLING RUBBER LO70
32 2 K-01 1ST JOINT 1 1/4" 1ST JOINT 1 1/4" PP
33 1 K-10A BACKING RING BACKING RING PP
34 1 K-23 MAIN FLANGE MAIN FLANGE LARGE
35 1 K-10 LARGE PUMP HEAD 190 LARGE PUMP HEAD PP 190 MM
36 1 MX-GB MXD GEARBOX MXD GEARBOX
37 2 K-02 VALVE MAIN VALVE 1 1/4"
38 2 K-07 UNION NUT UNION NUT PP 1 1/4"
29
21
30
31
28
27
3
21
30
26
25
25
21
17
18
19
20
5
4
3
2
1
15
14
13
1
2
3
4
5
6
7
8
9
10
11
24
22
16
23
12
32
1

Parts List
Item Qty Part Number Part Name Description
1 6 K-11 Head Bolt M8 x 120 Head Bolt Stainless Steel
2 6 K-11B Head Bolt Split Washer M8 Head Bolt Split Washer SUS
3 6 K-11A Head Bolt Flat Washer M8 Head Bolt Flat Washer SUS
41 K-10 Pumphead MXD Large Pump Head PP
5 4 K-05 O-Ring Valve 1 1/4" O-Ring Valve 1 1/4" EPDM
6 2 K-02 Valve Main Valve 1 1/4"
72K-03S Checkball 22 SUS Stainless Steel Check Ball 7/8"
8 2 K-04 Ballcage 1 1/4" Ballcage 1 1/4" PP
9 2 K-07 Union Nut Union Nut PP 1 1/4"
10 2 K-01 1st Joint 1 1/4" 1st Joint 1 1/4" PP
11 1 K-18E Diaphragm 140 140 mm Diaphragm
12 1 K-13 Diaphragm Connector Diaphragm Connector SUS
13 1 K-10A Backing Ring Backing Ring PP
14 4K-35 Capscrew M8:30 Capscrew Headflange M8x30
15 1 K-15 Oil Seal Piston OIl Seal 15307 for Piston
16 1 K-23 Main Flange Main Flange Large
17 1 K-16 Cap Screw M5:16 Capscrew for Piston Flange m5x16
18 1 K-24 Spring Steel Spring
19 1 K-25 Piston Shaft Piston Shaft
20 1 MX-GB MXD Gearbox MXD Gearbox
20
19
18
17
16
15
14
13
12
11
4
5
6
7
8
5
9
10
3
2
1
5
6
8
7
5
9
10

Sales date and shop stamp
SERIAL #
MODEL
14. WARRANTY
IRRIQUIP CC Warrants the product specified in this document for a period of 1 year from
the purchase date. This warranty obligation is limited to the free replacement of the
damaged parts due to any material or manufacture defect. This warranty does not
include periodic maintenance and damage resulting from misuse.
The equipment must be sent to a I-Feeder Service Center with prepaid transport
charges, and will be sent back with transport charges for customer’s account.
The warranty document with sales date and shop stamp, or an invoice copy must be
sent with the equipment.
IRRIQUIP CC can not be held liable for any loss of crop or product due to breakage.
WESTERN CAPE
TEL: +27 21 9135942
SOUTH AFRICA
CELL #: +27834579991
Table of contents
Popular Water Pump manuals by other brands


Pentair
Pentair INTELLIFLO VSF Series quick start guide

MYERS
MYERS SP75 Series Installation, Operation & Parts Manual

dosatron
dosatron D14MZ5VAFII manual

Vito Agro
Vito Agro VIBSMAL1000 instruction manual

Wilo
Wilo Star-Z 20/7 EM Installation and operating instructions

Novatech
Novatech 38888 instruction sheet


