I-Gard MGFR Series User manual

C-322EM Instruction Manual, March 2015
GROUND FAULT RELAY
GROUND FAULT RELAY
MGFR

I-Gard’s commitment to electrical safety provides both industrial and commercial
customers with the products needed to protect their electrical equipment and the
people that operate them.
As the only electrical-safety focused company whose product portfolio includes
neutral grounding resistors, high-resistance grounding systems and optical arc
mitigation, we take pride in our technologies that reduce the frequency and
impact of electrical hazards, such as arc flash and ground faults.
For those customers who have purchased from us over the last 30 years, you
know us for the quality and robustness of our products, our focus on customer
service and technical leadership. We build on this foundation by investing
in developing new products in electrical safety education - including EFC
scholarship program - by actively participating in the IEEE community programs
on technical and electrical safety standard, and working with local universities
at discovering new technologies. We remain unrelenting in our goal of improving
electrical safety in the workplace.
Our commitment to excellence is validated by long-standing relationships with
industry leaders in fields as diverse as petroleum and gas, hospitals, automotive,
data centers, food processing, aerospace, water and waste water plants, and
telecommunications. We provide our customers with the product and application
support required to ensure that their electrical distribution system is safe and reliable.
ABOUT I-GARD

SUBJECT PAGE
1. Introduction ...............................................................................................................................2
2. Description ................................................................................................................................3
2.1 Catalogue Numbers .................................................................................................3
2.2 Pick-up Settings ......................................................................................................3
2.3 Time-Current Characteristics .................................................................................3
2.4 Display ......................................................................................................................4
2.5 Trip Indicator ............................................................................................................5
2.6 Reset Control ...........................................................................................................5
2.7 Button Functions .....................................................................................................6
2.8 Power-On LED .........................................................................................................8
2.9 Pre Trip Alarm ..........................................................................................................8
2.10 ZSIP ........................................................................................................................8
3. Current Sensors .......................................................................................................................8
4. Operation ..................................................................................................................................9
5. Specifications .........................................................................................................................10
5.1 Scope ......................................................................................................................10
5.2 Control Power ........................................................................................................10
5.3 Temperature Range ...............................................................................................10
5.4 Dielectric Strength .................................................................................................10
5.5 Display ....................................................................................................................10
5.6 Accuracy .................................................................................................................10
5.7 Reset .......................................................................................................................11
5.8 Trip Indicator ..........................................................................................................11
5.9 Short Circuit Withstand Capacity .........................................................................11
5.10 Transient Immunity ...............................................................................................11
5.11 Relay Contacts .....................................................................................................11
5.12 Dropout to Pick-up Ratio .....................................................................................11
5.13 Frequency Range .................................................................................................11
5.14 Standards (except -AB types) .............................................................................11
6. Installation .............................................................................................................................12
6.1 Site Requirements .................................................................................................12
6.2 Mounting ................................................................................................................12
7. Maintenance ...........................................................................................................................12
7.1 General ...................................................................................................................12
7.2 Troubleshooting ....................................................................................................14
TABLE OF FIGURES
Figure 1: Block Diagram of MGFR Relays ................................................................................15
Figure 2: Time - Current Characteristics ..................................................................................16
Figure 3: Time - Current Characteristics ..................................................................................17
Figure 4: 3-level TCP and ZSIP Connection ............................................................................18
Figure 5: Connection Diagram for MGFR Relays .....................................................................19
Figure 6: Connection Diagram for MGFR-SE-ZB Relays ........................................................20
Figure 7 Outline & Mounting Dimensions for MGFR Relays ................................................21
Figure 8 Recommended Diode Protection to Reduce Switching Spikes ...............................21
TABLE OF CONTENTS

1. INTRODUCTION
To provide a total solution and coordination with other devices, MGFR series relays range in trip levels from 10mA
up to 1200A, in six versions. These versatile relays can be used in Solidly Grounded and Resistance Grounded
systems. Too often, systems are protected with just one relay on the main service breaker, which leads to power
interruption of the entire service if a ground fault occurs in any location. Consequently, in an effort to minimize
disruptions, the protection on the main breaker is often set to maximum pickup and delay settings, or worse,
disconnected entirely. This can lead to substantial equipment damage, due to increased clearing time.
Minimizing damage, downtime and maintaining service, I-Gard provides MGFR series relays with integral Zone
Selective Instantaneous Protection to protect systems, at LV and MV system levels, with optimized coordination.
Maximum protection with minimum service disruption.
GLOSSARY
A/D Analog to Digital
DMT Definite Minimum Time
EMF Electro Motive Force
IDMT Inverse Definite Minimum Time
P.U. Per Unit
RMS Root Mean Square
TCP Time Coordinated Protection
UPS Un-interruptable Power Supply
ZSIP Zone Selective Instantaneous Protection
ZSCT Zero Sequence Current Sensor
The MGFR series of ground fault relays are microprocessor based relays which measure the ground fault current
from the secondary of a zero sequence current sensor connected to the relay. Upon a ground fault, the relay
computes the RMS value of the fault current. If the fault current is above the level of pick up setting of the relay, the
trip unit operates to open a circuit breaker in accordance with a set of programmable time current characteristics.
The series has five basic models. Each model has eight discrete pick-up and time settings. The range of pick-up
settings varies from model to model. The entire series covers the pick-up settings ranging from 10mA to 1200A.
Each of the models has eight user selectable Definite Minimum Time (DMT) current characteristics. Four models
of relays use one of two sets of Inverse Definite Minimum Time (IDMT) characteristics. All relay logic and trip time
characteristics are software driven.
Each of the basic five models are again split in two subcategories. The relays are designed to be used in both Zone
Selective Instantaneous Protection (ZSIP) and Time Coordinated Protection (TCP) mode. All of the relays except the
Service Entrance model have an LED light for trip indication and it is necessary to take control power from the line
side of the breaker to maintain indication of the fault.
Besides the above five models, there is one service entrance model which has pick-up settings of 100A-1200A. This
model also needs a control power supply for relay operation but supply can be taken from the load side of breaker.
2. DESCRIPTION
2.1 CATALOGUE NUMBERS
The catalogue numbers, with control power requirements, and other features of the various models are as follows:
MGFR-1-AB 240 50 LED DMT NO
MGFR-2-AB 240 50 LED DMT/IDMT NO
MGFR-20-AB 240 50 LED DMT/IDMT YES
MGFR-200-AB 240 50 LED DMT/IDMT YES
MGFR-1200-AB 240 50 LED DMT/IDMT YES
MGFR-1-ZB 120 60 LED DMT NO
MGFR-2-ZB 120 60 LED DMT/IDMT NO
MGFR-20-ZB 120 60 LED DMT/IDMT YES
MGFR-200-ZB 120 60 LED DMT/IDMT YES
MGFR-1200-ZB 120 60 LED DMT/IDMT YES
MGFR-SE-ZB 120 60 TARGET DMT YES
CAT. NO. VOLTAGE FREQUENCY INDICATOR DMT/IDMT TRIP INHIBIT
2.2 PICK-UP SETTINGS
There are eight discrete pick-up settings in amperes for each of the MGFR models and they are as follows:
MGFR-1-ZB and MGFR-1-AB: 0.01A, 0.02A, 0.03A, 0.04A, 0.05A, 0.07A, 0.10A, 0.20A
MGFR-2-ZB and MGFR-2-AB: 0.1A, 0.2A, 0.3A, 0.4A, 0.5A, 0.7A, 1.0A, 2.0A
MGFR-20-ZB and MGFR-20-AB: 1.0A, 2.0A, 3.0A, 4.0A, 5.0A, 7.0A, 10.0A, 20.0A
MGFR-200-ZB and MGFR-200-AB: 10A, 20A, 30A, 40A, 50A, 70A, 100A, 200A
MGFR-1200-ZB, MGFR-1200-AB and MGFR-SE-ZB: 100A, 200A, 300A, 400A, 500A, 700A, 900A, 1200A
In respective models, these settings can be set through an 8-position switch on the front panel of the relay. The
switch is located under the heading PICK-UP within the SETTING section on the faceplate. Once the red cursor of
the switch is set at any of the eight positions, the figure in between the two black lines pointed by the middle line of
the red cursor, indicates the desired pick-up setting.
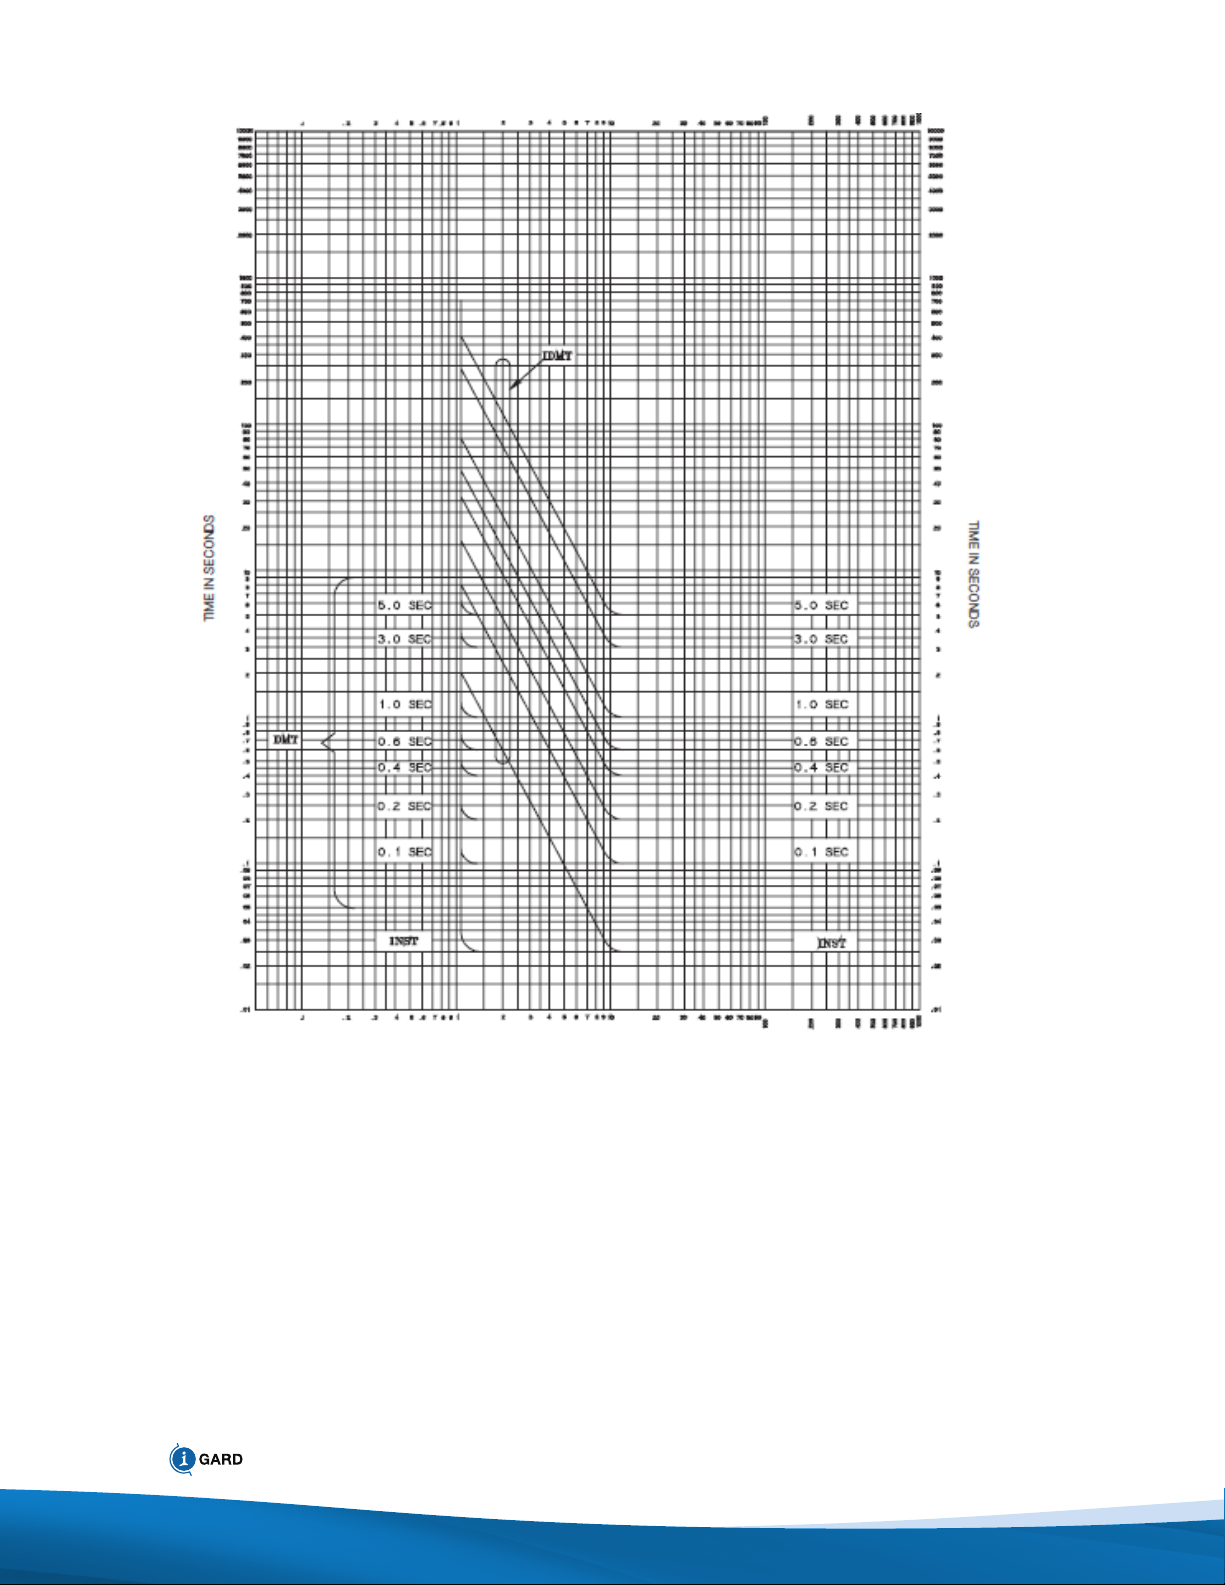
2.3 TIME-CURRENT CHARACTERISTICS
Except in MGFR-1-ZB, MGFR-1-AB and MGFR-SE-ZB, all other models of MGFR series have two sets of defined
trip characteristics. One is called Definite Minimum Time (DMT) and the other one is Inverse Definite Minimum Time
(IDMT) characteristics. The user may select either of the two characteristics by a CURVE SELECT switch on the
faceplate of relay.
2.3.1 DMT CHARACTERISTICS
A set of eight DMT curves is available in all models of MGFR. The CURVE SELECT switch should be set to the
DMT position to select the DMT characteristics. However, MGFR-(1, SE)-ZB and MGFR-1-AB do not have the
CURVE SELECT facility and they only work in DMT mode. The user may select one of the eight curves through
an eight-position DIP switch mounted on the faceplate. The switch is located under the heading TIME within the
SETTING section on the faceplate. The minimum times that the relay should operate according to the marked
time settings, appear on the faceplate and those are shown on the next page.

MGFR-1-ZB, MGFR-2-ZB, MGFR-20-ZB: Inst. 0.1 sec, 0.2 sec, 0.4 sec,
MGFR-1-AB, MGFR-2-AB, MGFR-20-AB: 0.6 sec, 1.0 sec, 3.0 sec, 5.0 sec.
MGFR-200-ZB, MGFR-200-AB, MGFR-1200-ZB: Inst. 0.1 sec, 0.2 sec, 0.3 sec,
MGFR-1200-AB, MGFR-SE-ZB : 0.4 sec, 0.6 sec, 0.8 sec, 1.0 sec.
Once the relay picks up, the relay will trip at the time set by the user, regardless of the magnitude of the fault
current. Once the red cursor is set at any of the eight positions of the time setting switch, the figure in between
the two black lines pointed by the middle line of the red cursor, indicates the desired time setting.
2.3.2 IDMT CHARACTERISTICS
There are two sets of IDMT characteristics available in the MGFR series. One set is available in models MGFR-
2-ZB, MGFR-2-AB, MGFR-20-ZB and MGFR-20-AB. The other set is available in models MGFR-200-ZB, MGFR-
200-AB, MGFR-1200-ZB and MGFR-1200-AB. The slope of the curves is 63° and trip time is represented by the
following equation:
T(M1.96) = K for 1.2 < M < 10 ------ (1)
where, M = Multiple of pick-up setting
T = Trip time in seconds
K = Relay Constant
As indicated, the above equation is valid for a fault current of magnitude between 1.2 X pick-up to 10 X pick-up.
So, for a relay to trip according to any of the IDMT curves represented by Eqn. (1), the fault current must have
a value of just above the pick-up. For M > 10, the trip time is definite and matches with the DMT settings of a
specific relay, as shown in section 2.3.1. Both sets of IDMT curves have similar mathematical representations as
shown in Eqn. (1), but the relay constants are different to match different minimum operating times.
The IDMT and DMT characteristics applicable to MGFR-1-ZB, MGFR-2-ZB, MGFR-20-ZB, MGFR-1-AB, MGFR-
2-AB, MGFR-20-AB are shown in Figure 2.
The IDMT and DMT characteristics applicable to MGFR-200-ZB, MGFR-1200-ZB, MGFR-SE-Z, MGFR-200-AB,
MGFR-1200-AB are shown in Figure 3.
As seen from the figures, there are eight curves in either of the sets. The CURVE SELECT switch should be set
to either DMT or IDMT position, as required.
Example: For a relay MGFR-20-ZB, the pick-up is set at 5.0A and the time-setting switch is set at 1.0 sec in
IDMT mode. If a ground fault current of 25A (5x pickup setting) is sensed by the relay, it should operate in
approximately 3.9 seconds (refer to Fig. 2).
2.4 DISPLAY
All models of the MGFR series have a three digit, numeric, LED display on the faceplate for indicating the fault
current in per unit. The fault value at which a relay picks up is 1.00 per unit. Thus, in the above example, the relay
should show ‘1.00’ when it senses a fault current of 5.0A (measured at the sensor primary). Any value of fault current
below or above the pick-up will be shown as a multiple of pick-up on the display. The relays measure the RMS value
of ground fault current, compute it in terms of per unit of pick-up and show it on the LED display.

A green POWER indicator lights when the MGFR is energized with control power.
Though the fault current is computed at approximately 2 msec intervals, the display is updated every 1 sec with the
new value. If a sustained fault current value is less than 1.00 per unit, the relay will never trip and the value will be
displayed for monitoring purposes.
All models are capable of displaying fault values from 0-99.9 times of the pick-up setting. The actual fault current
may be computed from the formula,
Fault current = Reading X Pick up Setting ------- (2)
When there is no fault, ideally, the relay should show ‘0.00’. In practice, the output of ZSCS may not be exactly zero
due to any small leakage in the system. In this case, the display will not be ‘0.00’ and will show the RMS value of the
vector sum of currents in all four conductors in a 3-phase 4-wire system.
2.5 TRIP INDICATOR
2.5.1 MGFR- S E-ZB
For service entrance models (type MGFR-SE-ZB) an electromagnetic status indicator provides trip indication.
If the control power supply of the relay is taken from the load side of a breaker, the indicator will show ‘red’
after tripping due to a fault. The indicator will maintain the same status even when the control power is off after
tripping the breaker. When the breaker is switched on, the relay will re-energize and will automatically reset the
indicator to ‘black’ colour. On the other hand, if the supply is taken from the line side of breaker or from UPS,
the target can be manually reset by a momentary push button on the faceplate. The relay itself is also reset on
power up.
2.5.2 ALL OTHER MODELS OF MGFR
All the relays have a red LED light for trip indication, which is manually reset by a momentary push button on the
faceplate. The button function will be explained in detail in the next section. If the relay power supply is taken
from the load side of a breaker, the relay will trip the breaker upon a fault, but will be de-energized after tripping
the breaker and the indication will be lost. To avoid this, it is recommended that the control power supply should
be taken from the line side of the breaker.
2.6 RESET CONTROL
2.6.1 ALL MODELS
In all MGFR-( )-ZB relays provision has been made to, either, have the trip relay reset automatically (self-reset),
or have it stay tripped after the fault has been cleared until an operator has pressed the RESET button on the
front of the relay (manual reset). The relay is shipped in the self-reset mode, but manual reset can be selected
by connection of a jumper across the SELF/MANUAL RESET terminals at the rear of the relay.
Note, in either case, self or manual reset, the Indicator lamp (or target in -SE types) will remain indicating that
the relay had tripped until the RESET button has been pushed by an operator. (Assuming the control power has
not been interrupted in the mean time, of course.) In other words, the operation of the Indicator is not affected
by the self/manual reset selection.
See also Section 2.5 (TRIP INDICATOR and 2.7.3 (TRIP INHIBIT)

2.7 BUTTON FUNCTIONS
2.7.1 SET FLASHING LEVEL AND FAULT CURRENT DISPLAY
Fault current display feature is common to all models of the MGFR series. After a relay has tripped due to a
ground fault, it keeps the last fault current value in internal memory. To see this value, in per unit, press the
uppermost momentary pushbutton on the faceplate and release immediately. The same operation will reset the
trip indicator, if it is on after a fault. When a relay is first energized, pressing the switch will show ‘0.00’.
The last fault value will stay always in the memory unless one of the following events occurs:
a) When the relay trips on a future fault, the previous value will be erased and the new value will be stored
in the memory.
b) If the control power is interrupted, for any reason after a fault has occurred (especially when MGFR-SE-
ZB is connected to the load side of the breaker).
c) When the preventive watchdog circuit inside the relay resets the microprocessor after detecting any
temporary problem, the memory will reset to ‘0.00’. This will also reset the trip indicator.
Since some of the models in the MGFR series can be used in resistance-grounded systems, monitoring a slow
developing fault from the LED display can be a useful feature. The display will start flashing, showing the fault
current, to attract the attention of operating personnel. It will keep on flashing until the relay trips itself or the
fault is cleared by a downstream relay.
The relay will start flashing when initialized at 50% of pick-up for a developing fault. However, this value is
user-programmable by the same pushbutton. The values of fault current at which the flashing can start to
occur are 0.16, 0.25, 0.75 and 0.90 of pick-up. After pressing and releasing the switch for the first time, the last
fault current value will appear on the display. Pressing the switch again after an interval of 1-1.5 seconds and
releasing it will cause the numbers ‘0.16’, ‘0.25’, ‘0.50’, ‘0.60’, ‘0.75’, ‘0.90’ to scroll through the display. When
the relay is first energized, the default setting ‘0.50’ will blink a few times to indicate that 0.50 is the preset
flash setting. In other words, the display will start flashing when the fault current is greater than or equal to
50% of pick-up. If the switch is pressed again and released when any of the values are shown on the display,
the relay will accept it as the new flash setting and will start flashing when the fault current exceeds that value.
The setting can be checked by repeating the operation but without pressing the button for the third time. While
doing so, the value at which the flashing has been set will blink when it appears on the display. The setting will
remain in the memory unless it is changed by the user or the power is interrupted, as explained in b) earlier in
this section. The relay will always flash above pick-up until it trips.
Selection of different flash settings is dependent on the two following conditions:
a) When there is no fault and the display is showing ‘0.00’.
b) When there is a developing fault in the system, but it is below pick-up level.
A sustained fault above pick-up level overrides the above operation and pressing the pushbutton will do nothing
until the fault clears, or falls below the pick-up level.

This feature is standard in all models of the MGFR series. However, the method of self test in MGFR-SE- ZB is
different from the rest of the models.
2.7.2.1 MGFR-(1, 2, 20, 200, 1200)-ZB Types
There is a built-in test facility by a SELF TEST pushbutton on the faceplate of the relay. The self-test will
ensure the proper operation of relay circuitry, energize the trip contact, and light up the indication.
However, this will not erase the last fault current value that is stored in the memory, if any. Proper
operation of the relay is indicated by a display reading of 1.1.1 for a few seconds after the SELF TEST
button is pressed.
The TRIP indicator light is reset by the TRIP RESET switch after the relay returns to normal and shows
‘0.00’.
2.7.2.2 MGFR-SE-ZB
The TEST winding terminals R3 and R4 of the RZ sensor (used normally with the MGFR-SE-ZB relay) are
connected to R3 and R4 terminals of the relay to provide Primary Injection Testing (See 3.3). To energize
the TEST winding the control supply to the relay has to be sufficiently rated to provide the TEST Current of
approximately 10 amperes at 120V, 60Hz. as shown in Fig. 6. The SELF TEST is designed to operate at any
pick-up and time settings. When the SELF TEST button on the relay is operated, a TEST current will flow in
the relay for the duration as set by the time-setting switch. The value of the current will show in the display
in per unit for a few seconds after the relay has tripped. The relay ‘knows’ that this is a TEST current and not
a FAULT current. So, this value will not be stored in the memory. The breaker will trip and the trip target will
come up.
If R3 and R4 terminals are not connected to the RZ sensor, no test current will flow in the relay when the
SELF TEST button is pressed and the relay will flash five times showing ‘0.0.0’. The breaker will not trip
but the trip target will come up.
The target can be reset by pressing the TRIP RESET button momentarily.
2.7.3 TRIP INHIBIT
Available to the models MGFR-20-ZB, MGFR-20-AB, MGFR-200-ZB, MGFR-200-AB, MGFR-1200-ZB, MGFR-
1200-AB and MGFR-SE-ZB.
This switch provides a convenient way of testing the system without operation of the breaker when the
continuity of the supply is to be maintained during self test operation.
The pushbutton on the faceplate may be used to INHIBIT the trip circuit of the relay to be energized, during the
SELF TEST operation. Pressing the TRIP INHIBIT button and holding it pressed BEFORE pressing the SELF
TEST button will prevent tripping the breaker.
WARNING
OPERATION OF THE SELF TEST WILL CAUSE THE
ASSOCIATED BREAKER TO TRIP unless the TRIP INHIBIT button
is held down for the entire duration of the test.
2.7.2 SELF TEST

3. CURRENT SENSORS
It will be necessary to hold down the TRIP INHIBIT button until the SELF TEST is complete and the TRIP
indicator has operated, and TRIP RESET is operated (if manual RESET has been selected).
2.8 POWER ON LED
A green LED on the faceplate of all the relays in the MGFR series indicates that the control power supply of the relay
is ON.
2.9 PRE TRIP ALARM
Two terminals on the terminal block at the back of all the models in the MGFR series are provided for remote
indication of ground fault current exceeding the pre-set FLASH setting of Section 2.6.1. This is a NORMALLY OPEN,
DRY contact which CLOSES without delay, to annunciate an ALARM condition to a remote panel, PLC or monitor,
whenever a fault condition greater than the FLASH setting occurs. The contacts automatically open when the fault is
cleared without the need for a manual RESET.
2.10 ZSIP
The ZSIP system (Zone Selective Instantaneous Protection) is available on all types of MGFR with -ZB and -AB
suffixes. The system allows the instantaneous operation of relays in different levels (zones) whenever a fault is
detected which is within their zone only. Higher level relays will not trip because they will operate with user-set
time delays, thus preserving coordination of the system. For this operation it is necessary to connect a restraint
signal (ZSIP OUT) from each relay to the relay in the level above (ZSIP IN terminal). The scheme can be extended
to any number of levels. Also a number of downstream relays can be connected to restrain a single main relay or
more if necessary. Three terminals are provided on each relay ZSIP-IN, ZSIP-OUT and COMMON. The COMMON
is connected to all other COMMON terminals in the system. The ZSIP-OUT of all downstream relays at a particular
level is connected to the ZSIP-IN of the relay, at the next level up. All wiring is by No. 14 AWG wire. The one-line
diagrams in Figure 4 illustrate examples of a 3 level TCP (Time Coordinated Protection) and ZSIP system.
To set the unit to the ZSIP mode it is necessary to remove the factory installed jumper between ZSIP-IN and ZSIP-
OUT of the relay involved. For TCP operation (Delayed Trip) the jumper between ZSIP-OUT and ZSIP-IN must be left
in place. All units are supplied from the factory with the jumper connected. For proper coordination in the TCP mode
the CURVE SELECT switch in upstream and downstream relays should be set to the same position (DMT or IDMT).
The sensors to be used with MGFR relays are I-Gard Zero Sequence sensors (ZSCT). These are listed below:
3.1 MGFR-1-ZB, MGFR-1-AB
Use with I-Gard Toroidal sensor type T2B, T3B and T5B ( 700 turns secondaries).
3.2 MGFR-2-ZB, MGFR-20-ZB, MGFR-200-ZB, MGFR-1200-ZB,
MGFR-2-AB, MGFR-20-AB, MGFR-200-AB, MGFR-1200-AB
These can be used with the following two different designs of current sensors depending on the application.
3.2.1 I-Gard toroidal zero sequence current sensors of type T2A, T3A, T6A or T9A. (1000 turns secondaries)
I-Gard rectangular zero sequence current sensors of type R4-17A, R7-13A or R8-26A for bus duct, switch board
buses or for a large group of cables.
3.3 MGFR-SE-ZB
These relays are designed to operate with I-Gard Type RZ R=rectangular zero sequence sensors, all of which are
electrically interchangeable.
A test winding is built into each sensor and four screw type terminals are provided, two for the sensing winding (W1
and W2), and two for the SELF-TEST winding (R3 and R4). The test winding has an equal number of turns (1000)
to the sensor winding, thereby providing primary injection testing with relatively little test current. (For example, if
the relay is set for 1200A, the relay can be tripped with 1.2 Amperes in the test winding, i.e. 1000 x 1.2 = 1200A).
Application of 120V, 60 Hz. to the test winding causes a current of about 8 to 10 Amperes to flow in it providing test
current to trip the relay on all settings.
CAUTION
Risk of equipment damage
The test winding current should not be continous, or overheating may result, with
permanent damage to the winding.
Failure to observe this precaution may result in equipment damage
The types of RZ sensors that are to be used depend only on size requirements. The size is implicit in the catalog
number (in inches) as follows:
RZ5-11, RZ5-21, RZ5-31, RZ5-35, RZ10-11, RZ10-21, RZ10-31.
4. OPERATION
The functional block diagram of Fig. 1 illustrates the basic operation of MGFR relays.
Three phases and the neutral of a 3-phase 4-wire power system pass through the window of a zero sequence
sensor described in section 3. The secondary of the sensor is connected to X and XI (W1 and W2 in case MGFR-
SE-ZB) terminals of the relay. Analog current signals from the sensor are converted to proportional voltage outputs
and digitized by an A/D converter in the relay. The microprocessor collects the digital samples approximately at
2 msec intervals, in a 60 Hz system, and computes the RMS value from the fundamental of the waveform. Under
normal operating conditions, the output of the ZSCT is zero and therefore the RMS computed by the relay is zero.
The display ideally should show ‘0.00’ under this condition. In practice, the vector sum of all phase currents may not
be exactly to zero for several reasons and thus, the display may not show exactly ‘0.00’. Any value showing less than
or equal to ‘0.10’ may be ignored.
Under a condition of ground fault, the vector sum of all three phase currents will not be zero, and the component
of the current not returning through sensor will be reflected in the output of the ZSCT. The RMS of that current will
be computed by the relay. When that value exceeds the pick-up setting, the relay begins routines of time delay
computation depending on curve and time selections on the faceplate described in earlier sections. After the
desired time delay is elapsed, the relay issues a trip signal to energize the trip coil of the circuit breaker associated
with the relay.

The MGFR relays continuously monitor the system for ground fault and check the output of the ZSCS 480 times
in one second in a 60 Hz system. The software is designed to take care of ground faults in a 50-60 Hz range of
power systems. There is a “watchdog” and microprocessor supervision circuit in the relay which continuously
monitors the status of the microprocessor. If they detect any abnormal behaviour in the operation of the relay,
they automatically, reset the processor as a preventive measure. A single +5V DC source supplies power to all the
electronics in the relay.
5. SPECIFICATIONS
5.1 SCOPE
The specifications provided in this section cover all models of the MGFR series unless stated otherwise.
5.2 CONTROL POWER
-ZB 120, 60 Hz, 15VA
-AB 240, 50 Hz, 9VA
5.2.1 OPERATING VOLTAGE TOLERANCE
-ZB -AB
Max. Voltage: 130 265 V AC
Min. Voltage: 65 130 V AC
5.3 TEMPERATURE RANGE
Operating Ambient Temperature: 0°C to 70°C*
Storage Temperature: -20°C to 85°C
* Continuous operation at maximum operating temperature is not recommended.
5.4 DIELECTRIC STRENGTH
1500V AC circuit to enclosure for 1 minute.
5.5 DI SPL AY
0-99.9 X P.U.
(1.00 P.U. = Pick-up Setting)
5.6 ACCURACY
5.6.1 PICK UP ACCURACY
±10%
5.6.2 TIME DELAY ACCURACY
DMT: ±5%
IDMT: T = K/M1.96 for 1.2 < M < 10
where: M = Measured multiple of pickup
K = Trip constant (Depends on time band)
T = Trip time
Instantaneous: 2 Cycles on computed RMS at 50/60 Hz
(including ½ cycle delay for dry contact to close)

5.6.3 METER ACCURACY (MEASURED MULTIPLE OF PICKUP)
0.2 X P.U. - P.U.: ±10%
1.2 X P.U. - 10 X P.U.: ±20%
10 X P.U. - 99.9 X P.U.: ±20%*
* MGFR-20-ZB and MGFR-20-AB have measurement accuracies of ±20% from 10 x P.U. to 50 x P.U.
5.7 RESET
Selectable - self Reset or Manual Reset by rear-connected jumper.
5.8 TRIP INDICATOR
Self reset on power up.
Manually reset otherwise.
5.9 SHORT CIRCUIT WITHSTAND CAPACITY
MGFR-1-ZB, MGFR-1-AB,
MGFR-2-ZB, MGFR-2-AB,
MGFR-20-ZB, MGFR-20-AB 50 KA for 0.6 sec.
MGFR-200-ZB, MGFR-200-AB,
MGFR-1200-ZB, MGFR-1200-AB,
MGFR-SE-ZB: 50 KA for 1 sec.
5.10 TRANSIENT IMMUNITY
According to ANSI/IEEE C62.41 - 1980 and
ANSI/IEEE C37.90 - 1978
5.11 RELAY CONTACTS
5.11.1 TRIP CONTACT
One Form C, (SPDT), dry contact, rated 10 A at 240V AC or 24 V DC resistive.
5.11.2 PRE-TRIP ALARM CONTACT
One Form A (SPST), Normally-open, dry contact rated 0.3 A, 120V AC or 0.5A, 24V DC
5.12 DROPOUT TO PICK-UP RATIO
0.70
5.13 FREQUENCY RANGE
The operating frequency of MGFR is 50-60 Hz within the accuracy limit specified in the section 5.7. This includes
both the system frequency and the control voltage frequency.
5.14 STANDARDS (EXCEPT -AB TYPES)
CSA File No.: LR65287
UL File No.: E107725

6. INSTALLATIONS
6.1 SITE REQUIREMENTS
MGFR receives a current input signal from the secondary of one of the zero sequence sensors described in section
3. The sensor should be selected according to the busbar/conductor size and the model of MGFR being used. The
sensor should be placed in the panel where the busbars/conductors are accessible. All three phase conductors
and the neutral must pass through the window of the sensor. The relay should be mounted on the front side of the
panel. Wiring from the secondary of the sensor are to be brought to the X and X1 terminals (W1 and W2 in case of
MGFR-SE-ZB) of the relay. See Fig. 5 and Fig. 6 for interconnection detail. Wiring connections should be made with
standard switchboard No. 14 SWG copper wire to the external terminal blocks on the rear of the MGFR. For MGFR-
SE-ZB Types the TEST winding R3, R4 on the Type RZ ZSCT should be connected for primary injection testing, as
required by code.
Note: For proper operation of the MGFR relays, the chassis should be grounded.
6.2 MOUNTING
The MGFR relay should be located in a position not subject to dirt, corrosive fumes or temperatures outside the
specified limit. The relay should be mounted in a 159 mm x 108 mm (6.25” x 4.25”) cutout on the compartment door
of the panel within reach of an observer or operating personnel. This is shown in Fig. 7. First, remove the “C” shaped
mounting bracket from the back of the MGFR, install the MGFR on to the relaying compartment door from the front
and through the cut out, refasten the mounting bracket on to the MGFR with the two No. 6-32 retained screws
provided. Tighten the screws so that the relay sits flush with the compartment door.
When the unit is in position and powered up, the display should, ideally, show ‘0.00’. Check the relay operation by
pressing the SELF TEST button to ensure that the unit is working properly. See Section 2.6.2.
7. MAINTENANCE
7.1 GENERAL
Each MGFR relay is tested before shipment. It is ready to be used after it has been inter-connected with the ZSCT
and the other components of the trip unit, and the appropriate settings have been selected.
The only maintenance recommended is the periodic verifi cation that the relay is functioning. Usually, the visual LED
display is a good indication of its proper operation. If the display shows ‘0.00’ or any value up to ‘0.10’, this situation
is normal. The verifi cation may further be supplemented if so desired by the following procedures:
a) For models having TRIP INHIBIT facility, perform the SELF TEST operation explained in section 2.6.3.
b) For MGFR-1-ZB models not having TRIP INHIBIT facility, perform the SELF TEST operation if the Breaker can
be tripped without incident.
c) If discontinuity of supply during SELF TEST operation in b) is not desirable, you may avoid this test, or
disconnect the trip circuit of the breaker involved.
DANGER
THE FOLLOWING APPLIES ONLY TO QUALIFIED PERSONNEL:
Hazard of electrical shock, fi re or explosion. All installation, servicing and testing
referred to in this manual must be performed by qualifi ed personnel. All power should
be disconnected prior to removing covers or enclosures and where live conductors
may otherwise be exposed.
Failure to observe these precautions will result in death or severe personal injury.
The MGFR is designed with solid state electronics to ensure long-term trouble-free operation. Since a relay is
an intermediate device between a current sensor and a circuit breaker, any malfunction of the breaker during a
fault may not necessarily be attributed to the relay. If any abnormal behaviour is noted, it is better to perform the
SELF TEST operation, including breaker trip operation. This will help to determine which of the three devices is
responsible for the problem. The following sections outline some problems and their
probable causes, and suggest appropriate corrective action.
7.2.1 FAILURE TO TRIP
Failure of the circuit breaker to trip in response to a fault may be caused by any of the reasons below:
a) Relay set too high - Check that the pick-up settings on the relay are correct.
b) Supply not grounded or neutral grounded on the downstream side of the main sensor.
c) ZSCT improperly connected - Check that all connections are tight, wiring is correct and leads are not
broken. Any current sensor with an open circuited secondary must be replaced.
d) Failure to trip on SELF TEST on -SE Types may result when the TEST current is not present, because of
TEST winding connections, or control supply is not adequate (Should be 120V, 250 VA minimum). The self-
test winding is only available on I-Gard type RZ sensors, therefore if any other types are used, the self-test
will not work.
e) Shunt-trip solenoid open circuited - Check that the wiring of the trip solenoid is not broken.
7.2.2 FAILURE TO CLOSE BREAKER
DANGER
Personnel Safety Hazard
It is not advisable to turn off the relay power supply and close the breaker under
this situation. If a fault already exists in the system, this kind of operation may cause
personal injury and/or damage to the equipment connected to the system.
Failure to observe these precautions may result in death or severe personal injury.
7.2 TROUBLESHOOTING

Reset the trip indicator (DISPLAY TRIP RESET) and try to close the breaker. If relay is responsible for tripping,
the indicator will come up again. Failure of the circuit breaker to close and latch mechanically may be due to
other reasons such as those listed below:
a) Shunt trip solenoid - Check to ensure that the plunger of the solenoid is not inhibited from resetting. Refer
to the circuit breaker instruction manual for mechanical mounting details.
b) Pick-up Setting - Check that there is no ground current exceeding the pick-up setting. If so, that will be
visible from the LED display of relay.
c) Other Trip relay - The breaker may be operated by other devices such as under voltage trip, over current
trip, reverse current trip relays etc.
7.2.3 DISPLAY FLASHING AT 0.00
Check the SELF TEST button to see if it is stuck in pressed condition.
7.2.4 DISPLAY FLASHING ALTERNATELY SHOWING 0.00 AND LAST FAULT VALUE
Check the DISPLAY button to see if it is stuck in pressed condition.
7.2.5 DISPLAY FROZEN, DOES NOT RESPOND TO BUTTONS
Turn off power momentarily to reset the unit.
7.2.6 TARGET RESETS AT BREAKER OPENING OR CLOSING
If an auxiliary DC contactor is being used with the trip contacts, try to use isolated DC supply if the above
problem occurs. If an isolated supply is not available, connect a diode with reverse polarity as shown in Fig. 8.
If the trip contacts are used with AC shunt trip coils, there are various ways to suppress any counter EMF that
might occur. The methods vary depending on applications, types of breaker used etc. Contact I-Gard if necessary.
7.2.7 UNIT TRIPS INSTANTANEOUSLY
The MGFR will trip Instantaneously, without Time Delay, if the Factory supplied jumper is missing from the ZSIP
OUT and ZSIP IN terminals at the rear of the unit.
7.2.8 MAIN RELAY TRIPS
The system has a main breaker relay MGFR-SE-ZB or MGFR-1200-ZB only and no other downstream relays on
the feeders. This can result in a coordination problem because the downstream breakers rely on over current
relays or fuses to clear the fault. They require typically, longer clearing times at ground fault levels and thus the
MGFR on the main is left to clear the fault. Ground Fault relays at the feeder level will be required, preferably
operated in the ZSIP mode for optimum coordination.
If none of the above helps, please contact I-Gard Customer Service (1-888-737-4787) for further advice. The
electronics within the MGFR cannot be adjusted or modified by the user, and any attempt to do so without
authorization from I-Gard may void the warranty.
WARNING: While operating an MGFR, the following points must be kept in mind:
a) If the display is already showing a fault above 0.30 X P.U., do not attempt to change the PICK-UP
setting under this condition. Nuisance tripping may occur.
b) If the display is already showing a fault above pick-up, DO NOT ATTEMPT TO CHANGE TIME
DELAY SETTING OR CURVE SELECTION. Allow the fault to clear or to come down below the pick-
up level before changing the time setting or curve selection.

FIGURE 1: BLOCK DIAGRAM OF MGFR RELAYS
TIME-CURRENT CHARACTERISTICS FOR
MGFR - 1-ZB, MGFR-2-ZB AND MGFR-20-ZB
MGFR - 1-AB, MGFR-2-AB AND MGFR-20-AB
FIGURE 2: TIME - CURRENT CHARACTERISTICS

TIME-CURRENT CHARACTERISTICS FOR
MGFR - 200-ZB, MGFR-1200-ZB AND MGFR-SE-ZB
MGFR - 200-AB AND MGFR-1200-AB
FIGURE 3: TIME - CURRENT CHARACTERISTICS

FIGURE 4: 3-LEVEL TCP AND ZSIP CONNECTION
ZONE SELECTIVE INSTANTANEOUS PROTECTION (ZSIP)
TIME CO-ORDINATED PROTECCTION (TCP)
This manual suits for next models
11
Table of contents
Other I-Gard Relay manuals


Popular Relay manuals by other brands


Schaffner
Schaffner ECOsine FN3416 user manual

Honeywell
Honeywell 7800 SERIES installation instructions

Schrack
Schrack LSZ0Y001 operating instructions

Rockwell Automation
Rockwell Automation Allen-Bradley Guardmaster Minotaur MSR131RTP installation instructions

Pizzato Elettrica
Pizzato Elettrica CS AT-0 Series manual

GE
GE IAV54E instructions