I-GO Fat Folding User manual
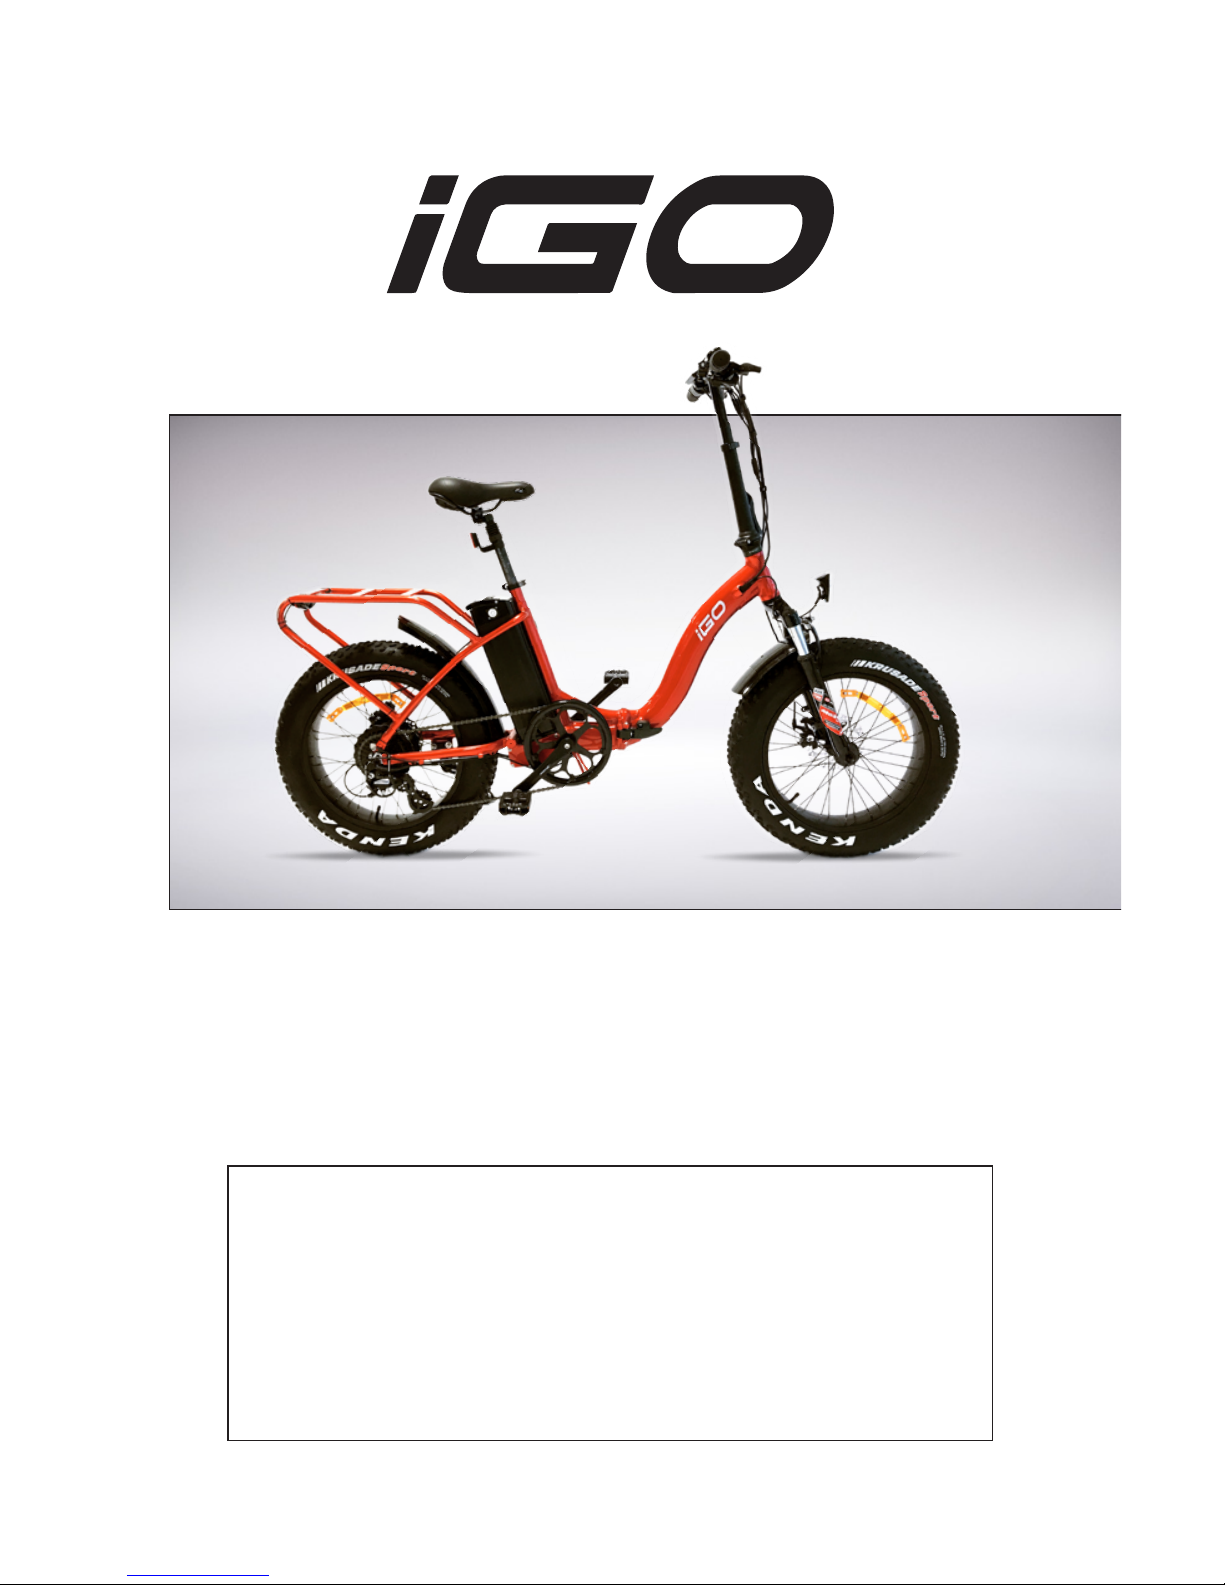
FOLDING FAT ELECTRIC BIKE
USER MANUAL
www.igoelectric.com/buildmymfat
PLEASE READ THIS MANUAL BEFORE OPERATING
AND WATCH
THE FULL ASSEMBLY
INSTRUCTIONAL VIDEO AT:

2www.igoelectric.com
ATTENTION! Your ebike may differ from
the illustrations in this manual.
Note:
iGO Electric reserves the right to make changes without
notice to design(s) and / prices listed in this manual.
This manual has be compiled with great care. iGO can not be
held responsible for any inaccuracies whatsoever.
iGO highly recommends having the ebike assembled
and adjusted by a professional bicycle technician.
IF YOU HAVE ANY ISSUES WITH YOUR BIKE PLEASE
DO NOT RETURN TO PLACE OF PURCHASE
PLEASE CALL
iGO Customer Service / Technical Support Toll-Free Number
1 866 996 6686
Mon - Fri 9:00 am - 5:00 pm EST

3www.igoelectric.com
CONGRATULATIONS !
You are the proud owner of an iGO electric ebike.
We have taken great steps to create an incredible product
and hope you enjoy riding it as much as we did creating it.
With the help of our electric bike your riding experiences
will be extremely pleasurable and memorable and
hope you will explore many new surroundings.
The ebike is equipped with electronic pedal assistance
which guarantees a Completely new way of cycling.
Whether you use the ebike for commuting, shopping or just a leisurely
ride, you will do so comfortably and condently on your new iGO.
Chances are that you have not previously owned an electric
bike with pedal assistance. For that reason iGO has compiled
a comprehensive user guide for you. iGO encourages you
to read through it carefully before riding your new ebike
to obtain a full understanding of your bikes features.
For more information, please visit our website at www.igoelectric.com.
We wish you many happy rides with your new ebike.
Sincerely,
T: 1 866 996 6686
ADDRESS: 1340, 55th Ave.
LACHINE, QC
H3T 3J8
CANADA

4www.igoelectric.com
TABLE OF CONTENTS
DISPLAY & FUNCTIONS
BUTTONS
INFORMATION ON THE SCREEN
ERROR INDICATION
CONTROLS
PEDAL ASSISTANCE
WHAT IS PEDAL ASSISTANCE?
TURNING PEDAL ASSISTANCE ON/OFF
DERAILLEUR FUNCTIONS
MORE INFORMATION ON PEDAL ASSISTANCE
BATTERY & CHARGING
BATTERY RANGE
DISCONNECTING AND REMOVING THE BATTERY
CHARGING THE BATTERY
WHAT YOU SHOULD KNOW ABOUT YOUR BATTERY
HOW TO STORE YOUR BATTERY DURING NON USE
FOLDING/UNFOLDING YOUR ERGOFIT EBIKE
FOLDING AND UNFOLDING
ADJUSTING YOUR EBIKE
ADJUSTING YOUR SEAT HEIGHT
ADJUSTING YOUR SADDLE POSITION
ADJUSTING YOUR HANDLEBAR POSITION
ALIGNING THE BRAKES
ADJUSTING THE BRAKES
6
6
7
8
9
10
10
10
10
11
12
12
13
14
15
16
17
17
20
20
21
21
22
22

5www.igoelectric.com
ADJUSTING YOUR EBIKE (Cont'd)
GEARS
TIRE PRESSURE
MAINTENANCE
SERVICING
GENERAL MAINTENANCE
CLEANING
PARTS
PARTS LIST
WARRANTY INFORMATION
WARRANTY
WARRANTY LIMITATIONS
WARRANTY TERMS
WARRANTY CARD
23
23
24
24
24
25
26
26
28
28
28
29
31
PLEASE READ IMPORTANT BATTERY STORAGE
INFORMATION ON PAGE 16
IMPROPER STORAGE OF YOUR BATTERY COULD RESULT
IN TOTAL BATTERY FAILURE
C
S
S
S
+
+
S
S
S
S
S
S
S
S
–
–
POWER
ASSIST
MPH
Km/h
Km
MILE
MAX AVG
ODO TRIP VOL CUR T1
iGO
+ –ECU
C
S
S
S
+
+
S
S
S
S
S
S
S
S
–
–
6www.igoelectric.com
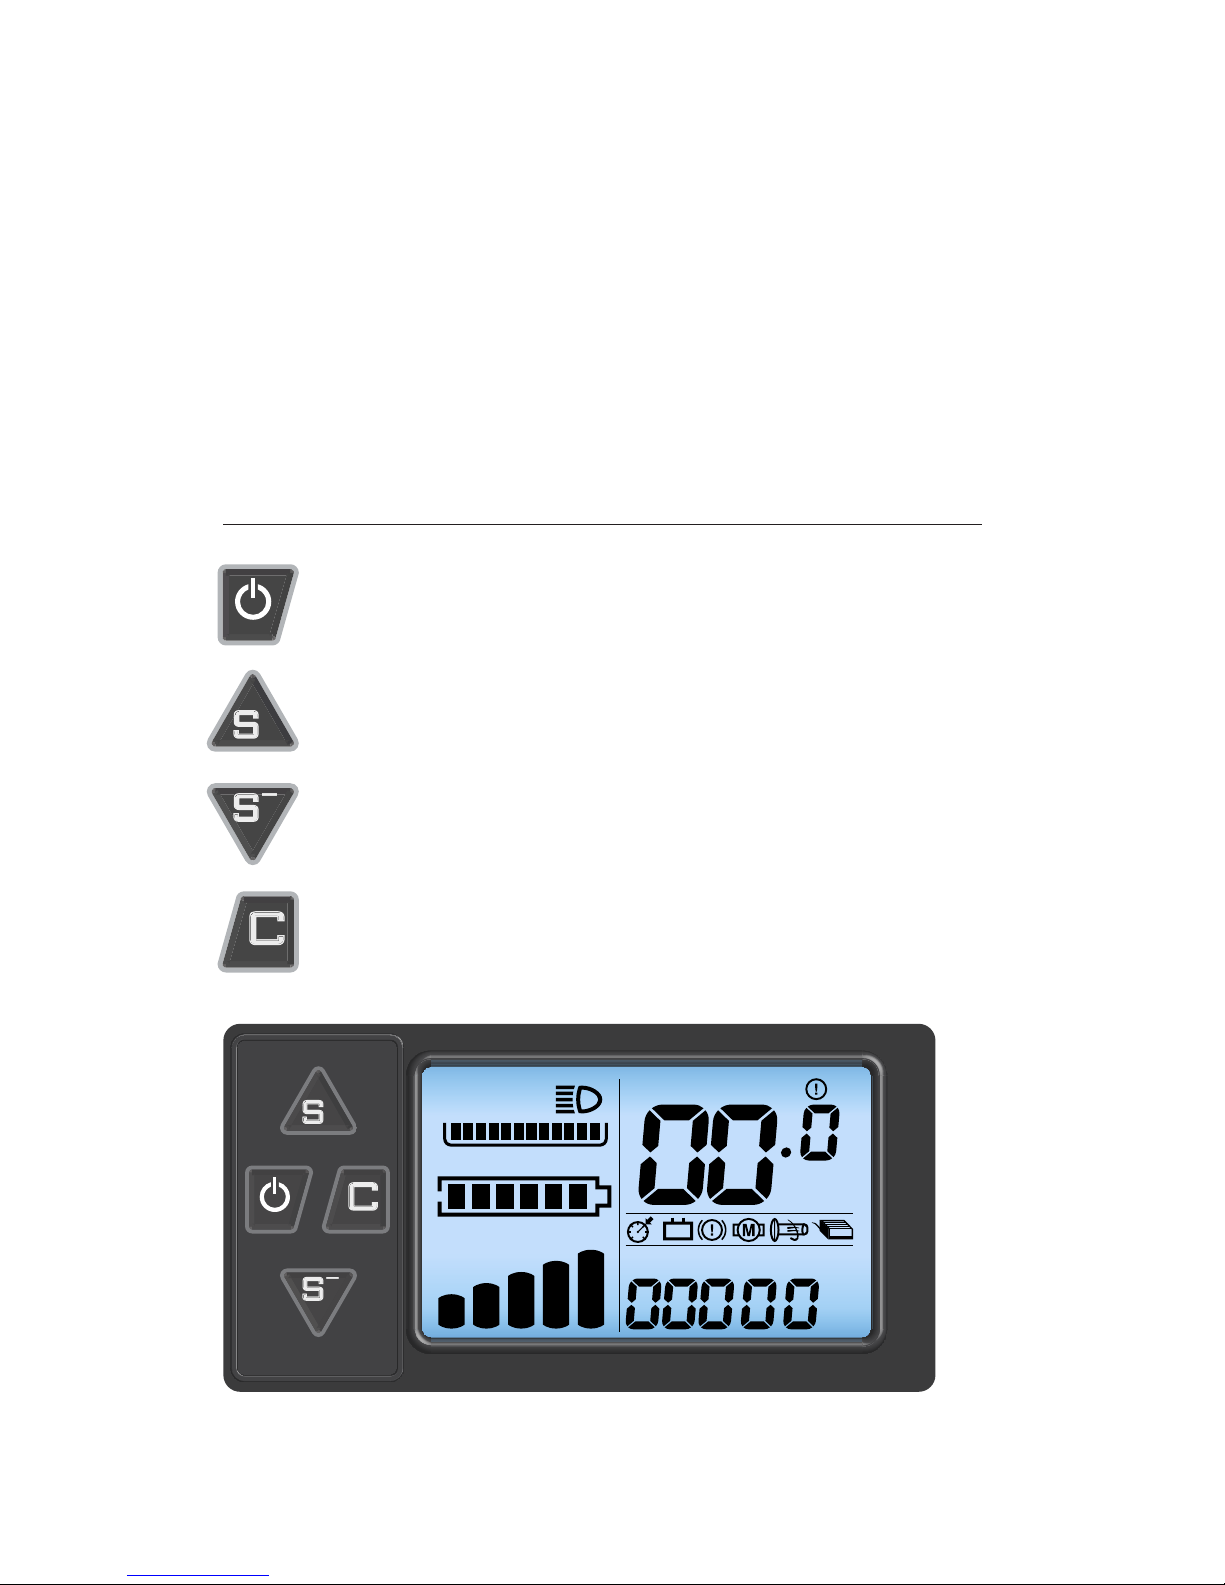
DISPLAY & FUNCTIONS
Before using the functions of the handlebar mounted display,
the main power to the bike must be turned on.
Please locate the power key switch located on the left side top of the battery.
You must turn the key to the on position and keep key locked into bike.
To turn off main power simply turn the key to the off position and remove key.
There is also a locked position which can be used to keep battery securely locked
onto your ebike while power is off. You can remove key in this position.
BUTTONS
‘ON/OFF’ : Powers ebike ON/OFF
‘S+’ : Pedal assistance level up
‘S -’ : Pedal assistance level down
‘C’ : light switch
Electric system display and control unit
ODO
TRIP
T1
VOL
CUR
Km/h
7www.igoelectric.com
DISPLAY & FUNCTIONS
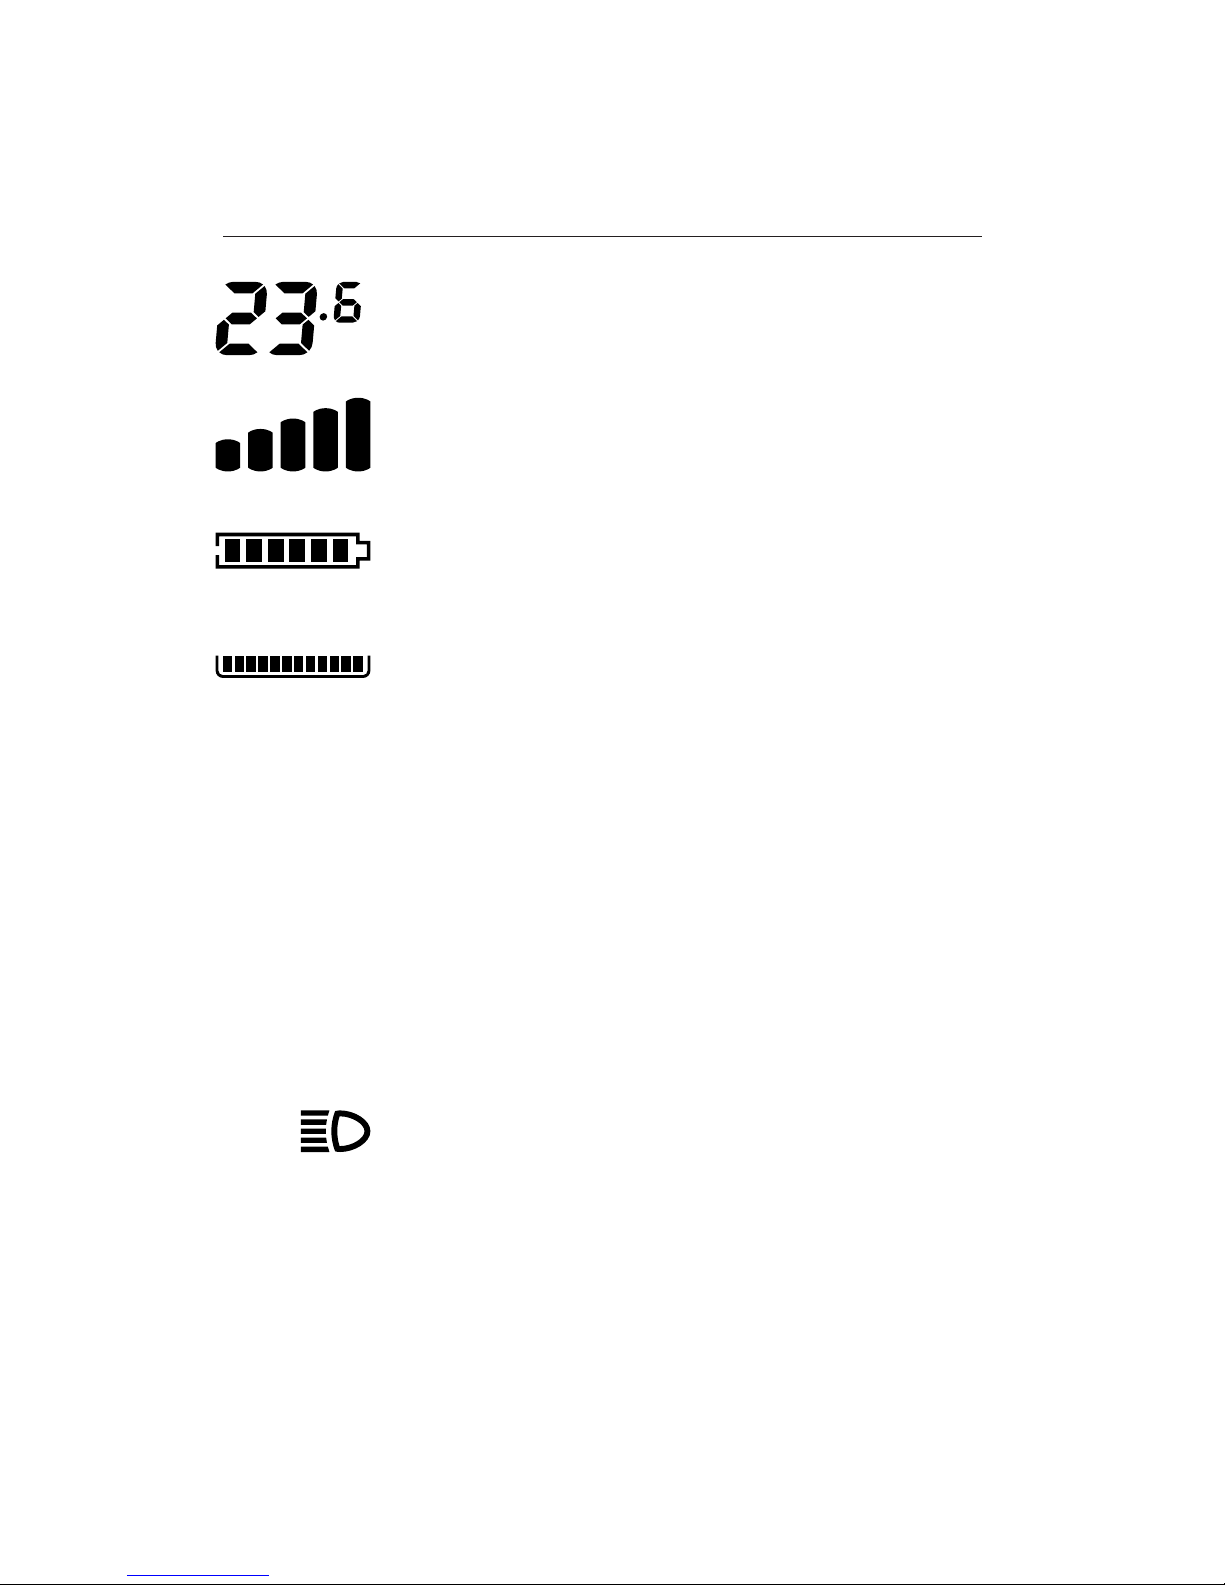
INFORMATION ON THE SCREEN
SPEED
(km/h or mph)
ASSISTANCE LEVEL
(1-5)
BATTERY INDICATOR
6 Bars = Full Battery
ENERGY CONSUMPTION INDICATOR
Full bars = High battery consumption = Less range
ODOMETER
Total distance traveled
TRIP ODOMETER
Distance traveled since last reset
TIMER
Trip timer
LIGHT INDICATOR
Appears when lighting system is turned on
VOLTAGE
Indicates the current level of voltage of the battery
CURRENT
Indicates the level of current from the battery
ECU
+ –
8www.igoelectric.com
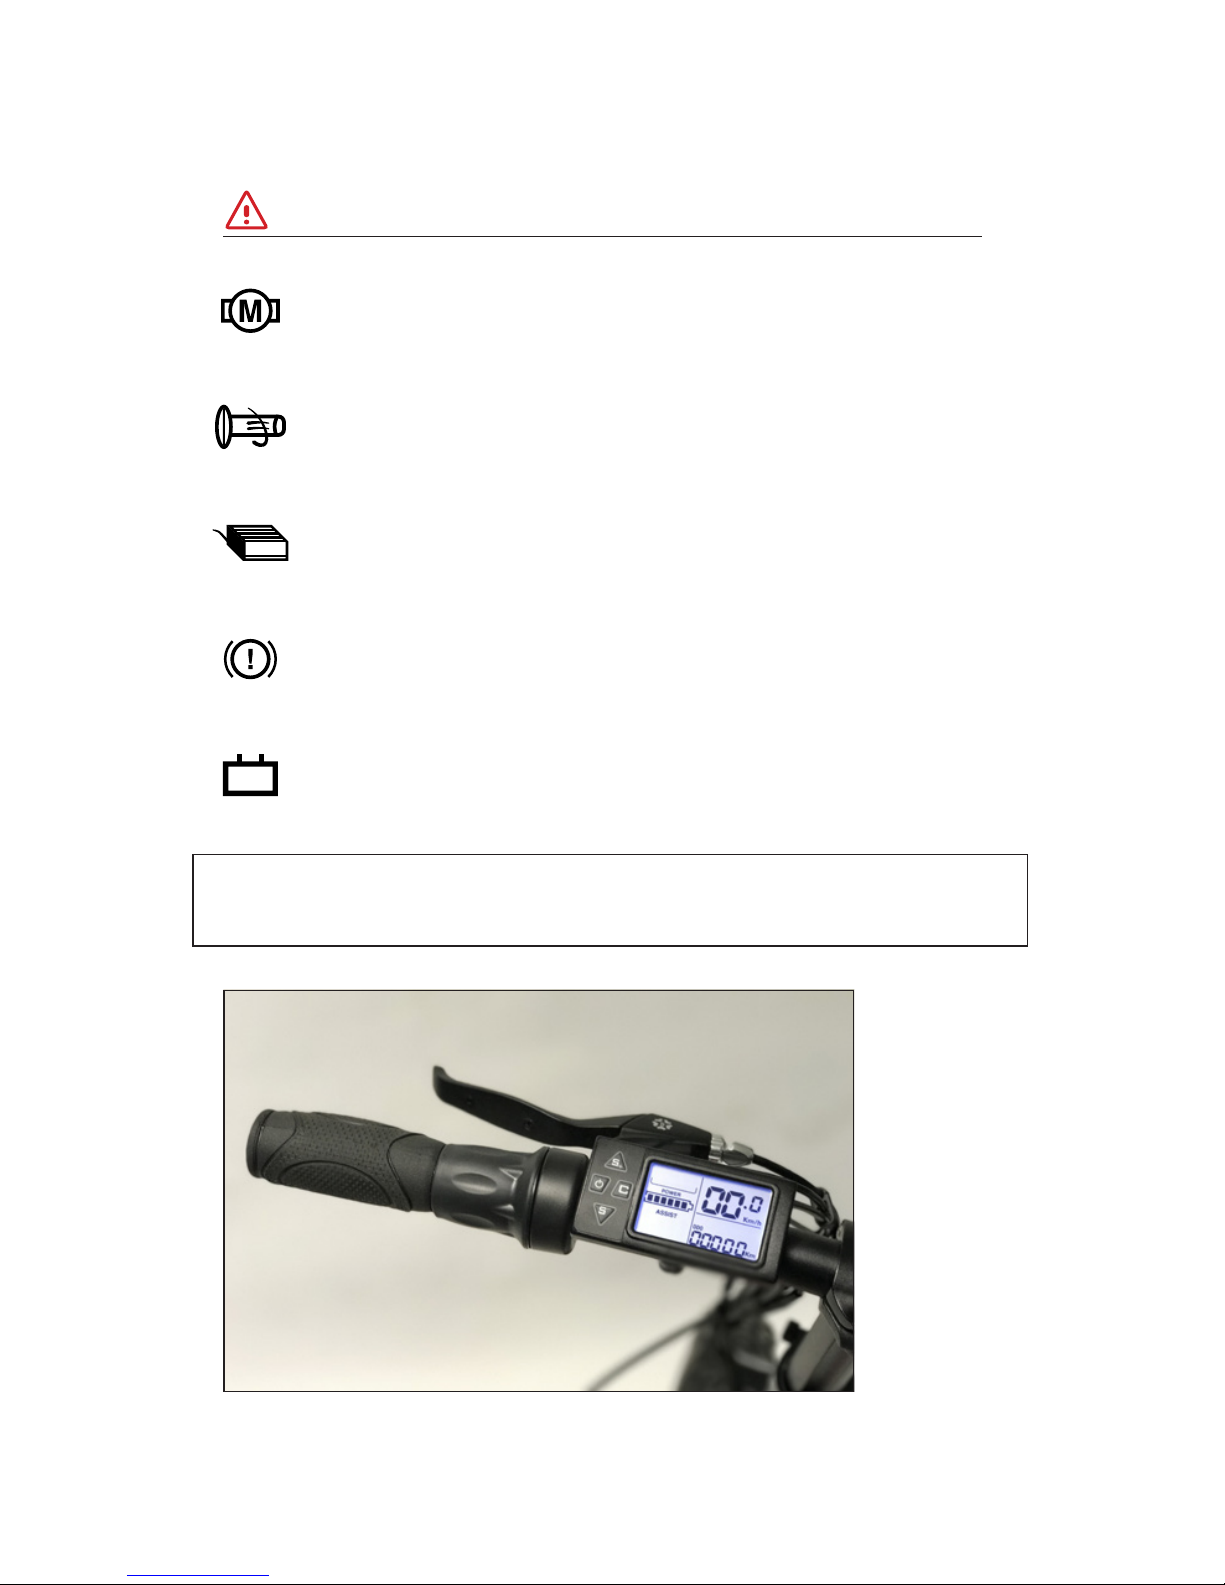
DISPLAY & FUNCTIONS
Control unit and throttle located on left handlebar
ERROR INDICATION
MOTOR FAILURE
If error persists contact iGO Technical Support
THROTTLE FAILURE
If error persists contact iGO Technical Support
CONTROLLER FAILURE
If error persists contact iGO Technical Support
BRAKE CUT OFF SWITCH
Check brake lever for physical damage
LOW VOLTAGE PROTECTION
If error persists contact iGO Technical Support
iGO TECHNICAL SUPPORT (phone lines open Mon-Fri 9:00 am - 5:00 pm EST)
tel:1 866 996 6686 email: [email protected]

9www.igoelectric.com
DISPLAY & FUNCTIONS
CONTROLS
Turning the ebike ON/OFF
Press and hold the 'ON/OFF' Button for 2 seconds to turn the electric system
on or off. The control panel can only be used when the battery is connected
to the ebike and key switched to the 'on' position. If the system is not used
for a duration of 5 minutes, it will shut itself off to conserve battery.
Selecting the speed mode
Press the ‘S+’ button for 2 seconds to switch between displaying
current speed, maximum speed and average speed.
Selecting the display options
Tap the ‘ON/OFF’ button to switch between the different functions
of the display. (Odometer, Trip distance, Timer, etc.)
Adjusting the pedal assistance levels
Use the ‘S+’ and ‘S-’ buttons to select the different levels of pedal assistance. (0 - 5)
Power level 5 gives the strongest assistance from the motor.
NOTE: The battery will run out of power quicker when
using a higher level of pedal assistance.
Throttle
Your bike is equipped with an on demand throttle on the left grip. Regardless of the
power assist level you select the throttle is capable of taking you to top speed.
You can use the throttle along with the pedal assist or on its own.
Lighting
With the ebike’s power on , tap the ‘C’ button once. This will turn
on the backlight for the display, as well as the front light. Tapping
the power button once again will turn the lighting off.
NOTE: The lighting system is powered through the ebikes lithium battery pack.

10 www.igoelectric.com
PEDAL ASSISTANCE
WHAT IS PEDAL ASSISTANCE?
The bike is equipped with 5 levels of electronic pedal assistance.
As you pedal, the motor will assist you and enhance your pedaling effort. This will allow
you to pedal much further and faster but use much less energy and effort. It is also a
great feature when climbing a hill, as the motor will help to make any climb easy.
TURNING PEDAL ASSISTANCE ON AND OFF
By using the ‘S+’ and ‘S-’ buttons, you can increase or decrease the level of assistance.
Pedal assist levels 1-3 are meant to be used more on at roads or paths, the higher
levels (4 and 5) are more powerful and meant for hills, slopes, or heavy circumstances.
If you prefer to ride slowly, it would be more comfortable for you to ride in a lower
power level. If you prefer to ride faster, then you should increase the power level.
DERAILLEUR FUNCTIONS
Your bike is equipped with a Shimano 8 speed derailleur.
Please choose the proper gear to match the riding terrain.
The use of a proper gear along with pedal assisted or conventional
power will enhance your riding experience.
We recommend checking your derailleurs functions at least once a month.

11www.igoelectric.com
PEDAL ASSISTANCE
SAFETY PRECAUTIONS WHILE USING THE
PEDAL ASSIST & ON DEMAND THROTTLE
• Since the motor is assisting you, you will easily reach higher speeds
than you might be used to. We recommend that you ride the bike in
a minimal trafc area at rst to become more comfortable with it.
• The operation of the pedal assistance depends on the speed
at which the pedals are rotated and your cycling speed.
• The electric motor speed is limited to a speed of 32 Km/h (20 mph).
This means that as you reach this speed electrical assistance
stops and returns when speed returns to 32km/h ( 20 mph )
• The level of pedal assistance will affect the battery range.
Battery range is dependent on many factors which are
measured under average conditions. It is dependent on, but
not limited to, rider weight, speed, elevation, tire pressure,
wind, start-stop frequency, and outside temperature.
ATTENTION! Remember that acceleration will be much quicker
with pedal assistance.
ATTENTION! Make sure to turn off the power when walking
next to, mounting, or dismounting the bike.
ATTENTION! Hold both brakes when stationary.
YOU MUST ALWAYS WEAR AN APPROVED BICYCLE HELMET
WHEN RIDING AN ELECTRIC BIKE.

1
2
3
4
5
12 www.igoelectric.com
BATTERY & CHARGING
BATTERY RANGE
How far can I travel on my electric bike?
The total distance you can travel on your electric bike is not an easy amount to
specify. The range depends on many different factors including, but not limited to:
• Total Weight (weight of the bike + rider + cargo)
• Resistance (wind, tire pressure, speed, road conditions and altitude)
• Outside Temperature
• The level of pedal assistance and throttle usage
• The condition of the battery
(battery capacity decreases as the battery ages)
Battery Capacity
Batteries are often compared based on capacity - Amp hours (Ah).
However, a comparison based on capacity alone does not properly depict a battery since
the performance of a battery pack is also based on battery voltage (V). The best way to
compare battery performance is by looking at the amount of energy that can be used in
watt-hours (Wh). Wh take into account both the capacity of the battery, as well as the
average voltage during discharge. Simply put, the higher the V/Ah, the higher Wh range!
Wh calculation ex: 48 V x 13 Ah = 624 Wh
PEDAL ASSISTANCE LEVEL
RANGE

13www.igoelectric.com
BATTERY & CHARGING
13.1
ATTENTION! Remove the key after installing the battery to
prevent any form of loss or theft to the key or the battery.
DISCONNECTING & REMOVING THE BATTERY
Please note that the main power position of the battery lock must be in the
"On" position before pressing the "Power On" button on the display
To unlock battery for removal
Key is locked into bike and cannot be removed when in the "off" or "on" position.
To remove the battery from either of these positions:
Turn key counter clockwise to the "unlock" position (gure 13.1).
Lift handle at top of battery and lift battery out of its carrier.
You can either move seat sideways or remove seat post to
facilitate the complete removal of the battery.
To reinstall battery
You can either move seat sideways or remove seat post to facilitate the installation
of the battery. The battery has a mounting groove on the back which lines up with
the battery mounting rail as shown (gure 13.2 and gure 13.3). Slide the battery
down the mounting rail until it connects to the bike. At this time you can either lock
the battery into the bike and remove the key or operate the bike (see above).
To lock battery into bike:
Insert key into lock.
Turn key clockwise until you reach "off" position.
Battery is now locked into bike and key can be taken out.
13.2 13.3
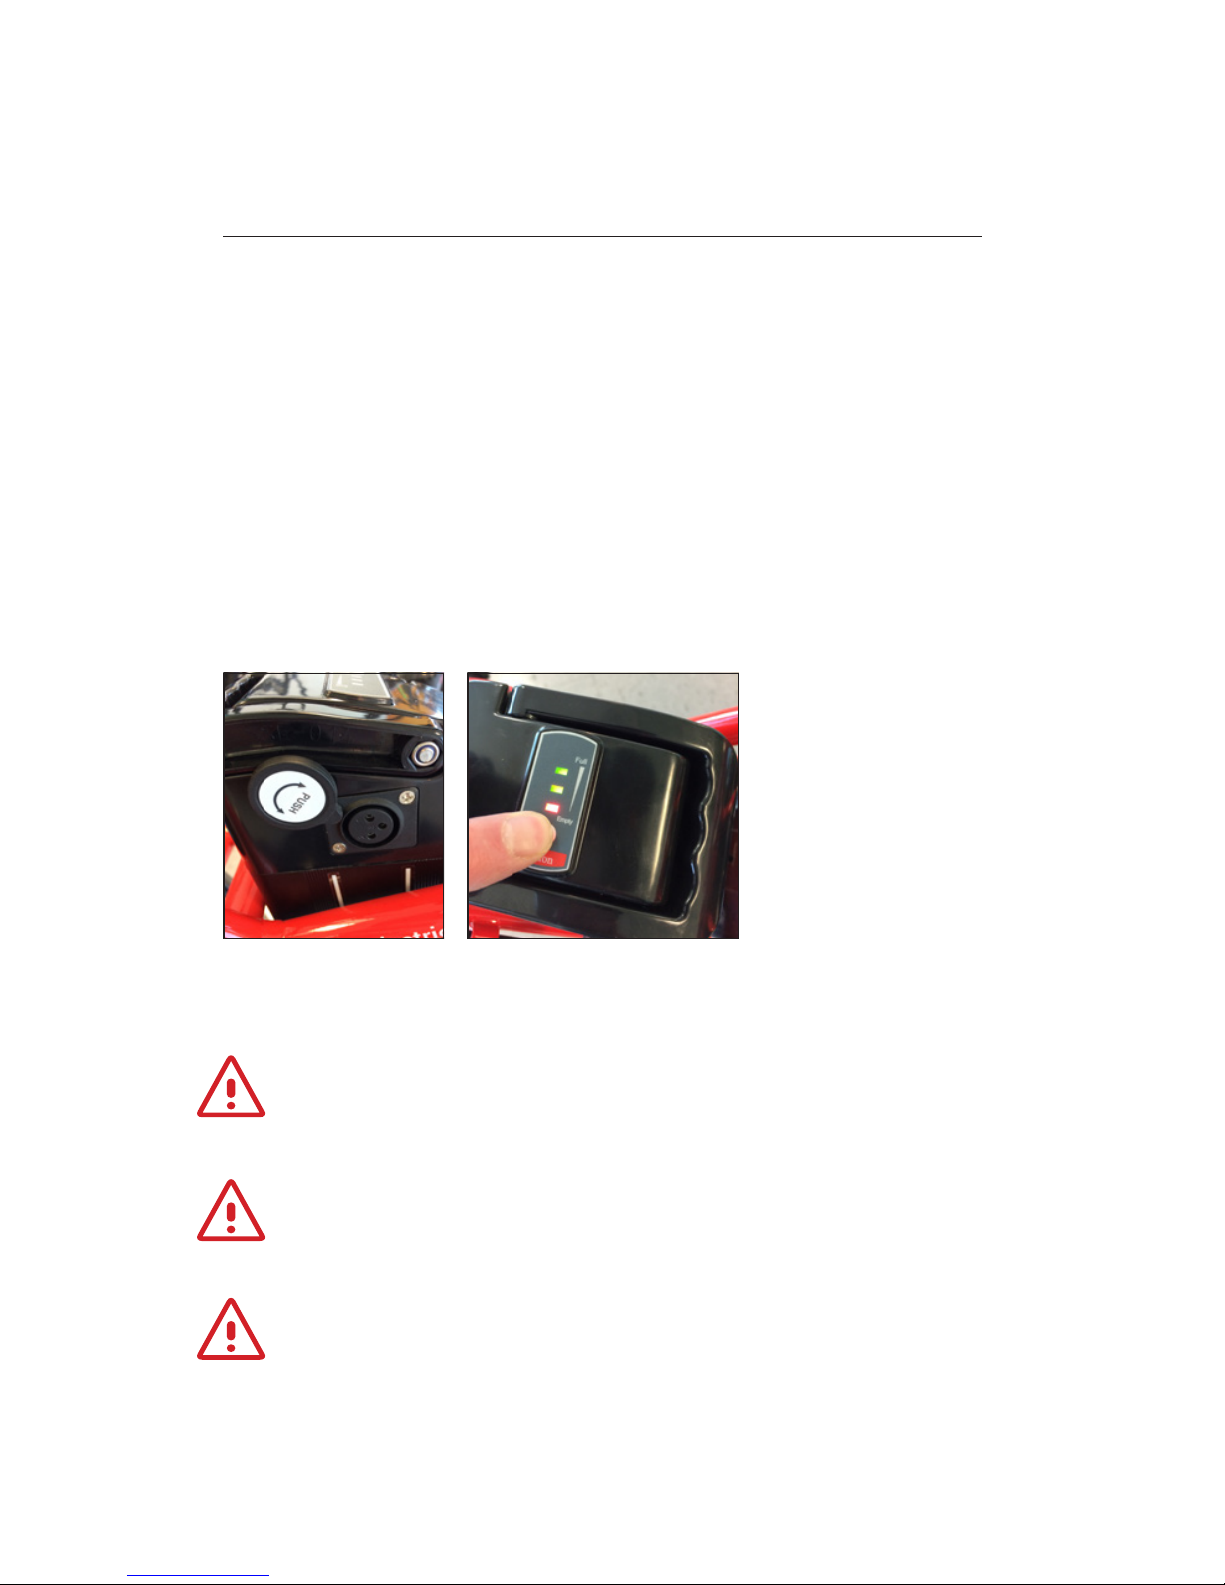
14 www.igoelectric.com
BATTERY & CHARGING
CHARGING THE BATTERY
The battery can be charged both on and off of the bike.
Please identify your charging port (gure 14.1).
First plug the chargers male plug into the battery, then plug the chargers 110
volt plug into your wall outlet. (Do not use an extension for 110 volt.)
The indicator on the charger will light green for a few seconds and
if a charge is necessary, the LED will turn red. The battery is fully
charged when the battery indicator LED becomes green.
Unplug the charger from the wall rst, and then from the battery.
If the battery is not mounted to the bike you can always
check the battery level as seen in gure 14.2.
ATTENTION! Unplug the charger when the battery
is fully charged, or when charger is not in use.
ATTENTION! When the battery is completely depleted you
must charge it immediately. If the cells are left depleted for a
long period of time, they may become irreparably damaged.
Fig. 14.1 Fig. 14.2
ATTENTION! Make sure to only charge the
battery in a dry, well ventilated area.

15www.igoelectric.com
BATTERY & CHARGING
ATTENTION! Please recycle your battery to an
authorized recycling company in your area.
ATTENTION! The battery will sustain permanent damage if not
used for a long period of time (ex: Winter storage). SEE PAGE 16
Make sure to charge the battery once a month during this time.
WHAT YOU SHOULD KNOW ABOUT YOUR BATTERY
• DO NOT connect the positive terminal of the
battery to the negative terminal.
• The battery is sealed and therefore is rain resistant,
however, DO NOT expose your battery to water.
• The battery should be recycled properly at the end of its life.
• The performance of the battery will decrease at low temperatures.*
• Under ideal conditions, the battery pack can be recharged
approximately 750 times. The performance will slowly
decrease over time and eventually will need to be replaced.
• DO NOT expose your battery to high temperatures.
(>50°C), such as direct sunlight)
• Problems: remove the battery from the bike and consult your dealer.
• For long term storage see storage info page 16.
• Use ONLY the supplied charger.
*The action mentioned is optimal at temperatures of approx. +/- 25°C. The guideline
is that the capacity will decrease by 1% at every 1°C of temperature drop.

16 www.igoelectric.com
BATTERY & CHARGING
IMPORTANT BATTERY STORAGE INFORMATION
When not using your bike for periods exceeding
one month please charge as follows:
1. Before storage make sure that the battery is not charged
more than 50% so that it will except a periodic charge.
(You cannot periodically charge a fully charged battery)
2. Once every month you must attach the supplied battery
charger and charge for a period of no more than 15 minutes.
3. Continue this procedure once a month until more frequent riding.
This process will make sure that your battery does not stay
at a specic rate of charge for long periods of time.
17www.igoelectric.com
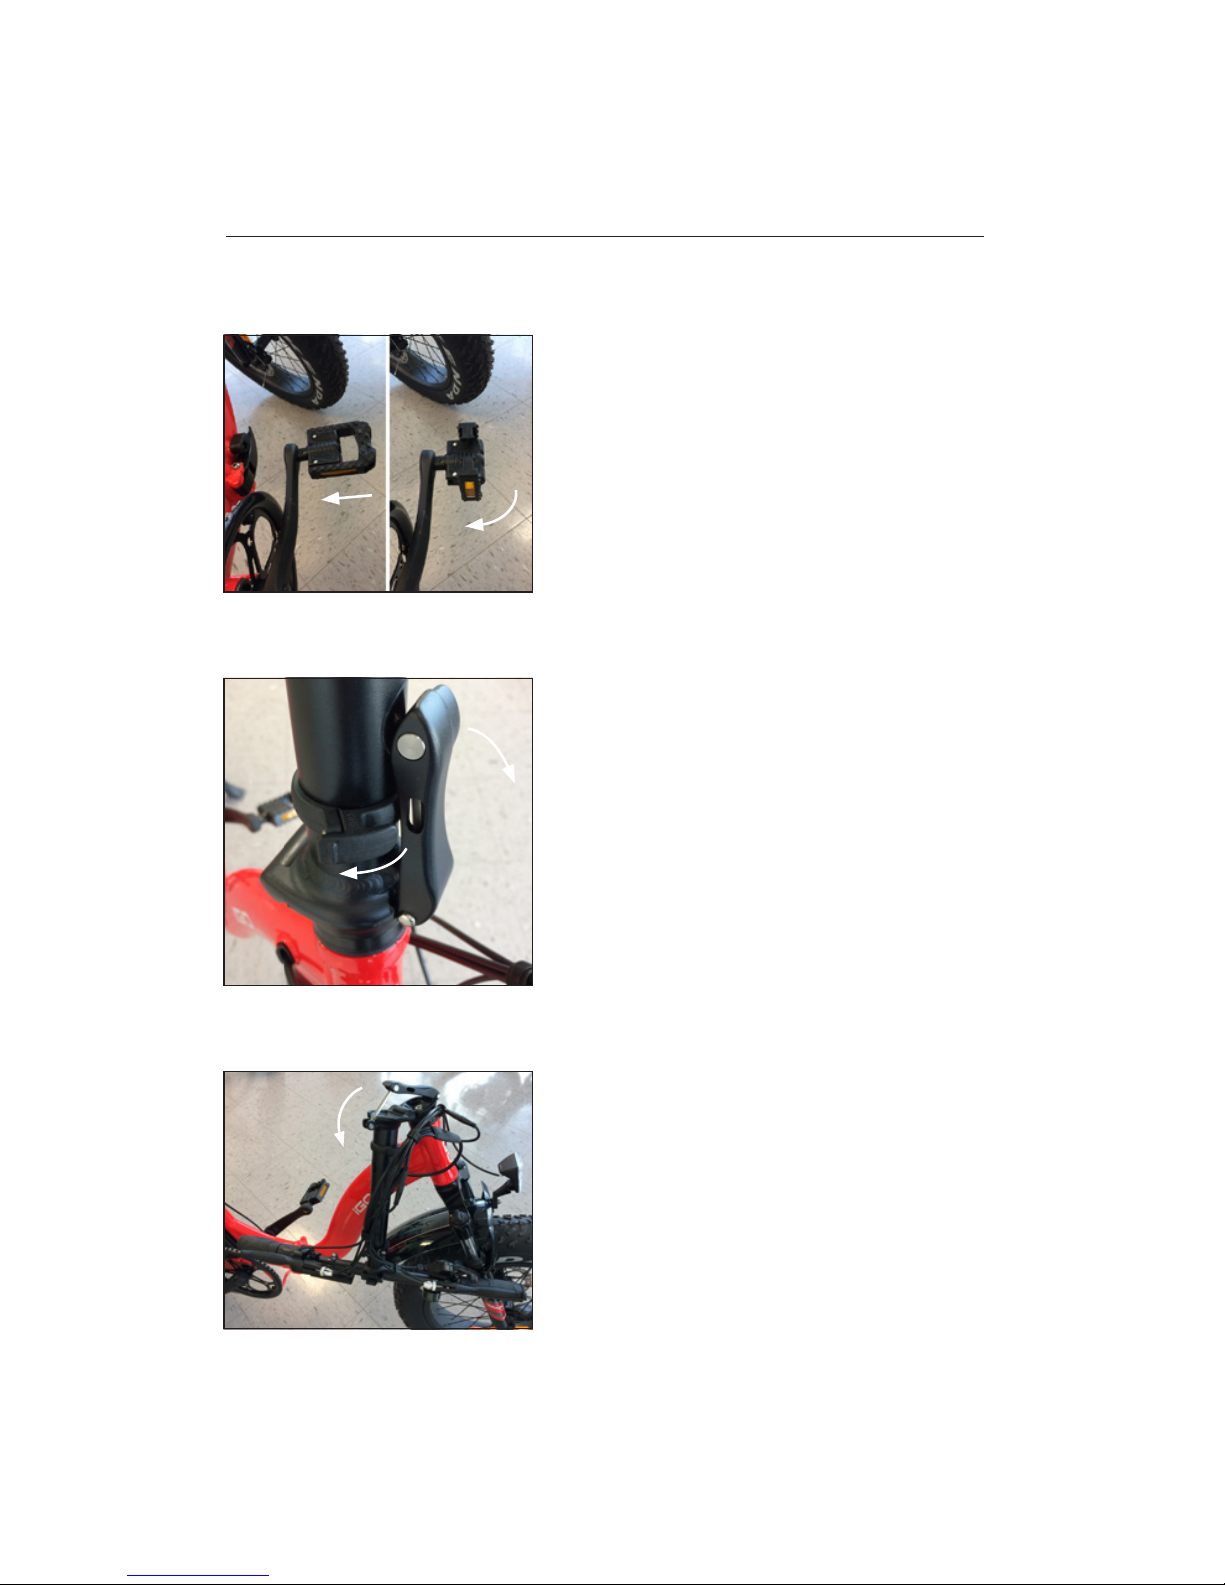
FOLDING/UNFOLDING YOUR ERGOFIT EBIKE
FOLDING / UNFOLDING
Follow these simple steps to fold your electric bike
STEP 1 (pedals)
Push the outside edge of the pedal
towards the frame and twist until the
folding section is parallel to the frame.
STEP 2 (handlebar and stem)
Release the 'safety catch' mechanism
on the stem by rotating clockwise.
Open the quick release lever by pulling
away from the stem and lowering .
STEP 3
Fold handlebars to the side of the bike
frame as shown in the picture.
(Pay attention not to force cabling. The cables
should fall in front or behind the stem when
folded, not forced over the folding mechanism.)

18 www.igoelectric.com
FOLDING/UNFOLDING YOUR ERGOFIT EBIKE
FOLDING / UNFOLDING (Cont’d)
STEP 4 (frame)
Release the 'safety catch' mechanism located
close to the bottom bracket by lifting.
Pull on the quick release lever to unlock
the frame hinge then push the lever
back towards the frame to fully clear the
latch from the locking mechanism.
STEP 5
Lift the kickstand then rotate the front
end of the bike until the front and rear
wheels are next to each other.
(The bike can now be supported by the metal
stand situated under the bottom bracket.)
19www.igoelectric.com
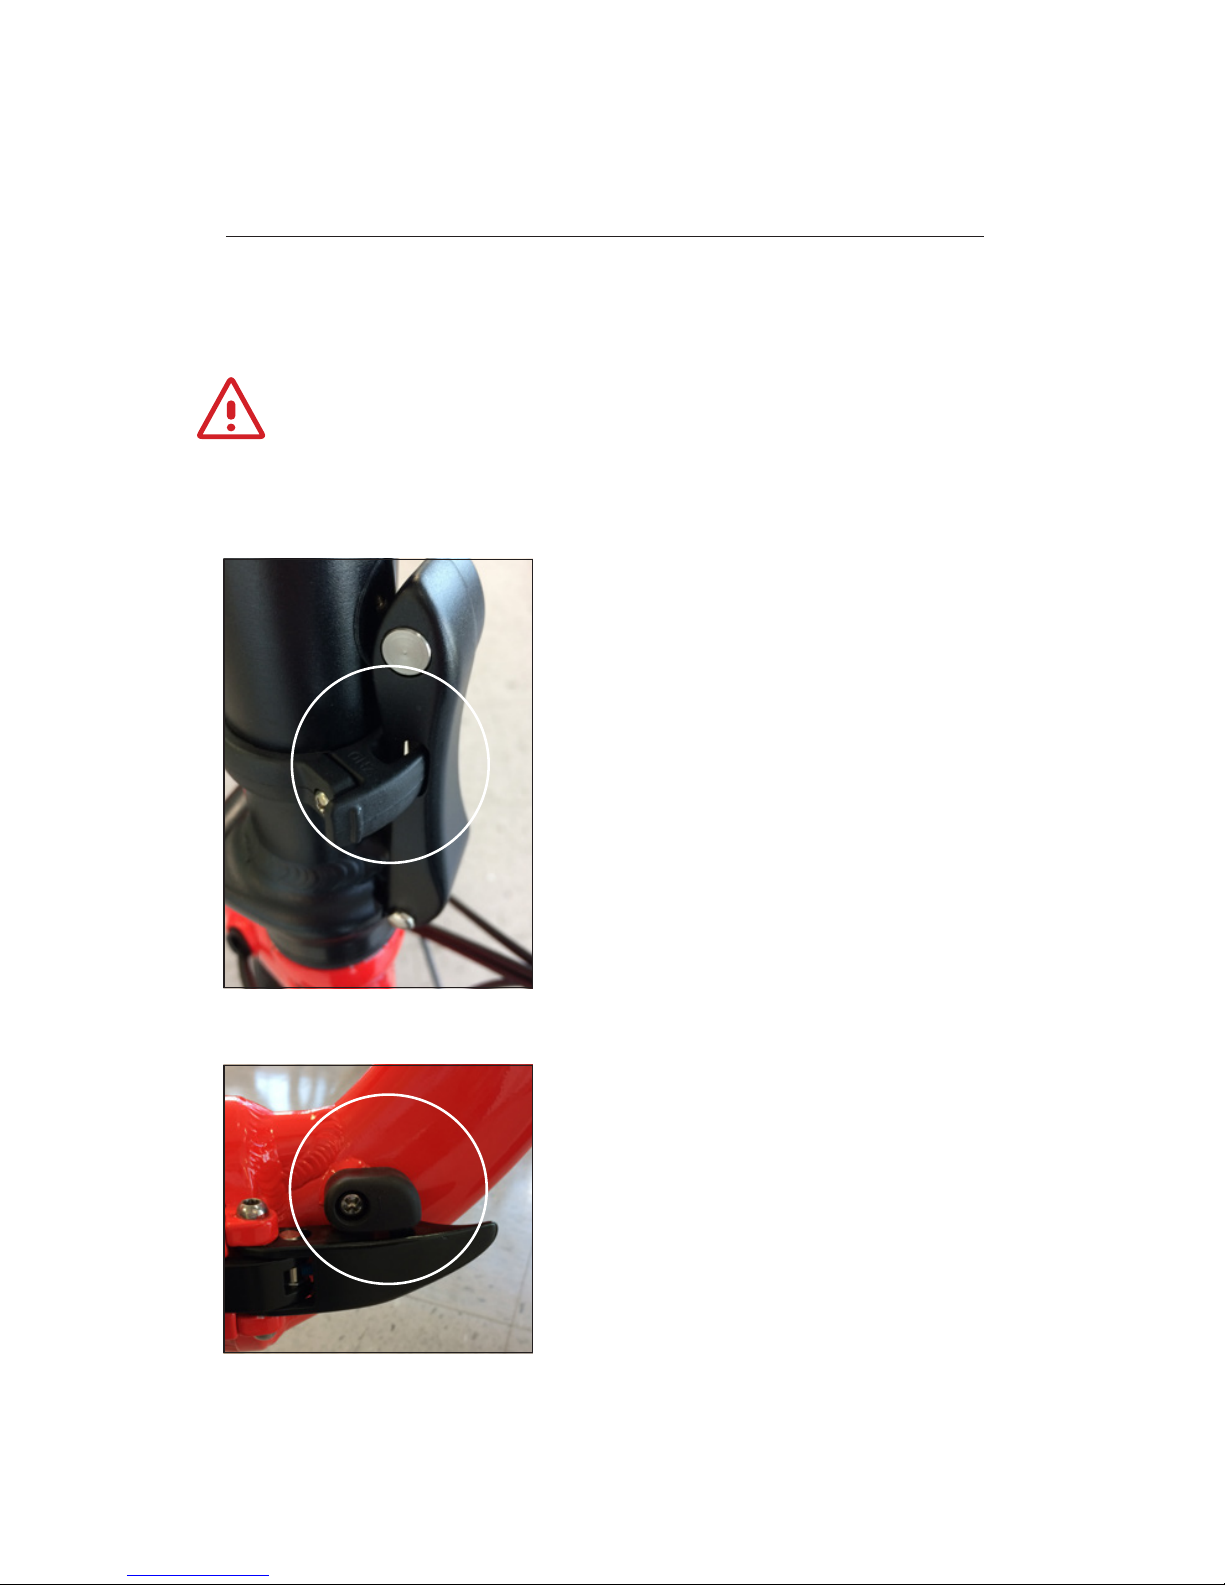
FOLDING/UNFOLDING YOUR ERGOFIT EBIKE
FOLDING / UNFOLDING (Cont’d)
To unfold your electric bike repeat the steps in reverse order.
STEM SAFETY CATCH
The stem safety catch is fully engaged
when turned anticlockwise and the
release lever cannot be opened .
FRAME SAFETY CATCH
The frame safety catch is fully engaged
when pushed down and the release
leaver cannot be opened.
ATTENTION! Always make sure all safety catches are
fully engaged before riding your folding electric bike.
20 www.igoelectric.com
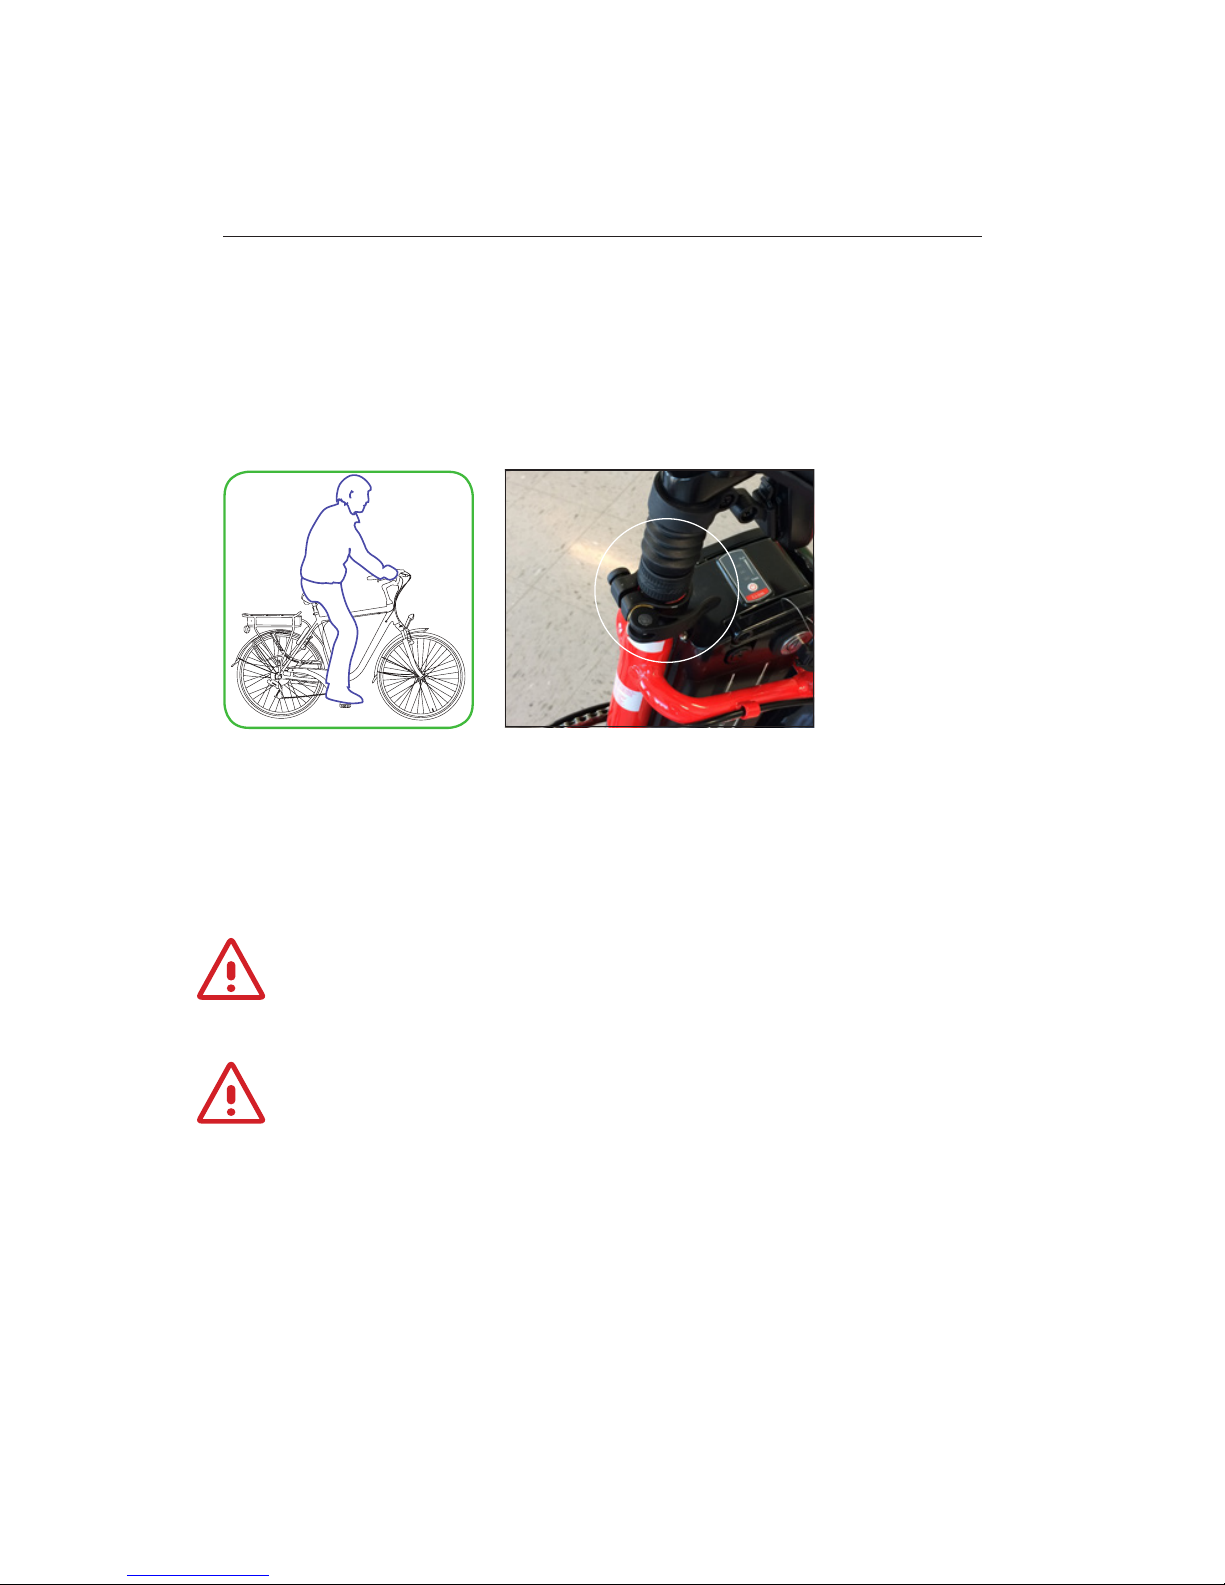
ADJUSTING YOUR ERGOFIT EBIKE
ADJUSTING YOUR SEAT HEIGHT
Your seat height should be adjusted properly to ensure you get the most
comfortable ride possible. The seat height is properly adjusted when your knee has
a slight bend when sitting on the saddle with your foot on the pedal at its lowest
position (gure 20.1). The seat height can be adjusted by loosening the lever on
the seat tube clamp gure 20.2. Make sure to retighten after adjustment.
Fig. 20.2Fig. 20.1
ATTENTION! Ensure that the safety marks for max. height written
on the seat post are not visible when retightening the hex bolt.
ATTENTION! If you can put your feet at on the
ground while seated, your seat height is too low.
Table of contents
Other I-GO Scooter manuals


