Razor Promodel User manual

Owner’s Manual
Read and understand this entire manual before riding. Specifications subject to change without
notice. Save this manual with your original sales receipt. For service buletins and answers to
frequently asked questions go to www.razor.com
TM TM

2
Razor Scooter Owner’s Manual + Safety Handbook
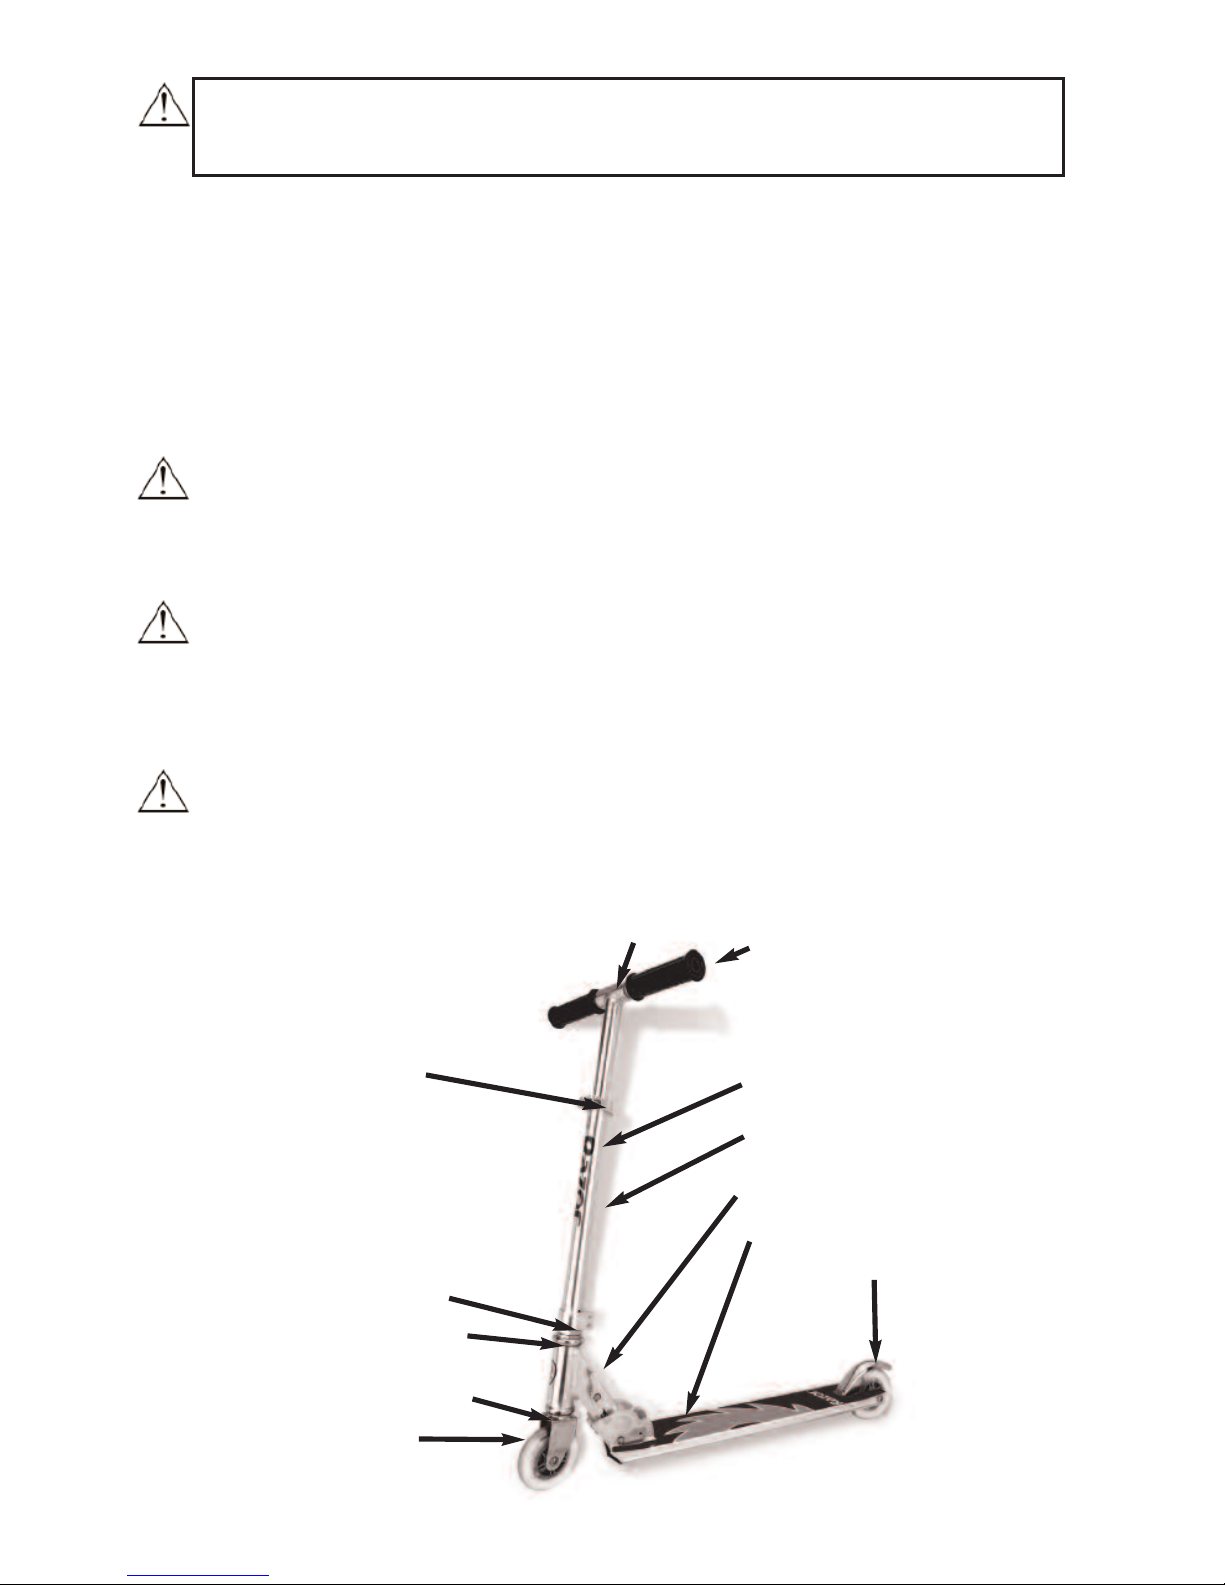
1. Scooter Parts and Components . . . . . . . . . . . . . . . . . . . . . . .3
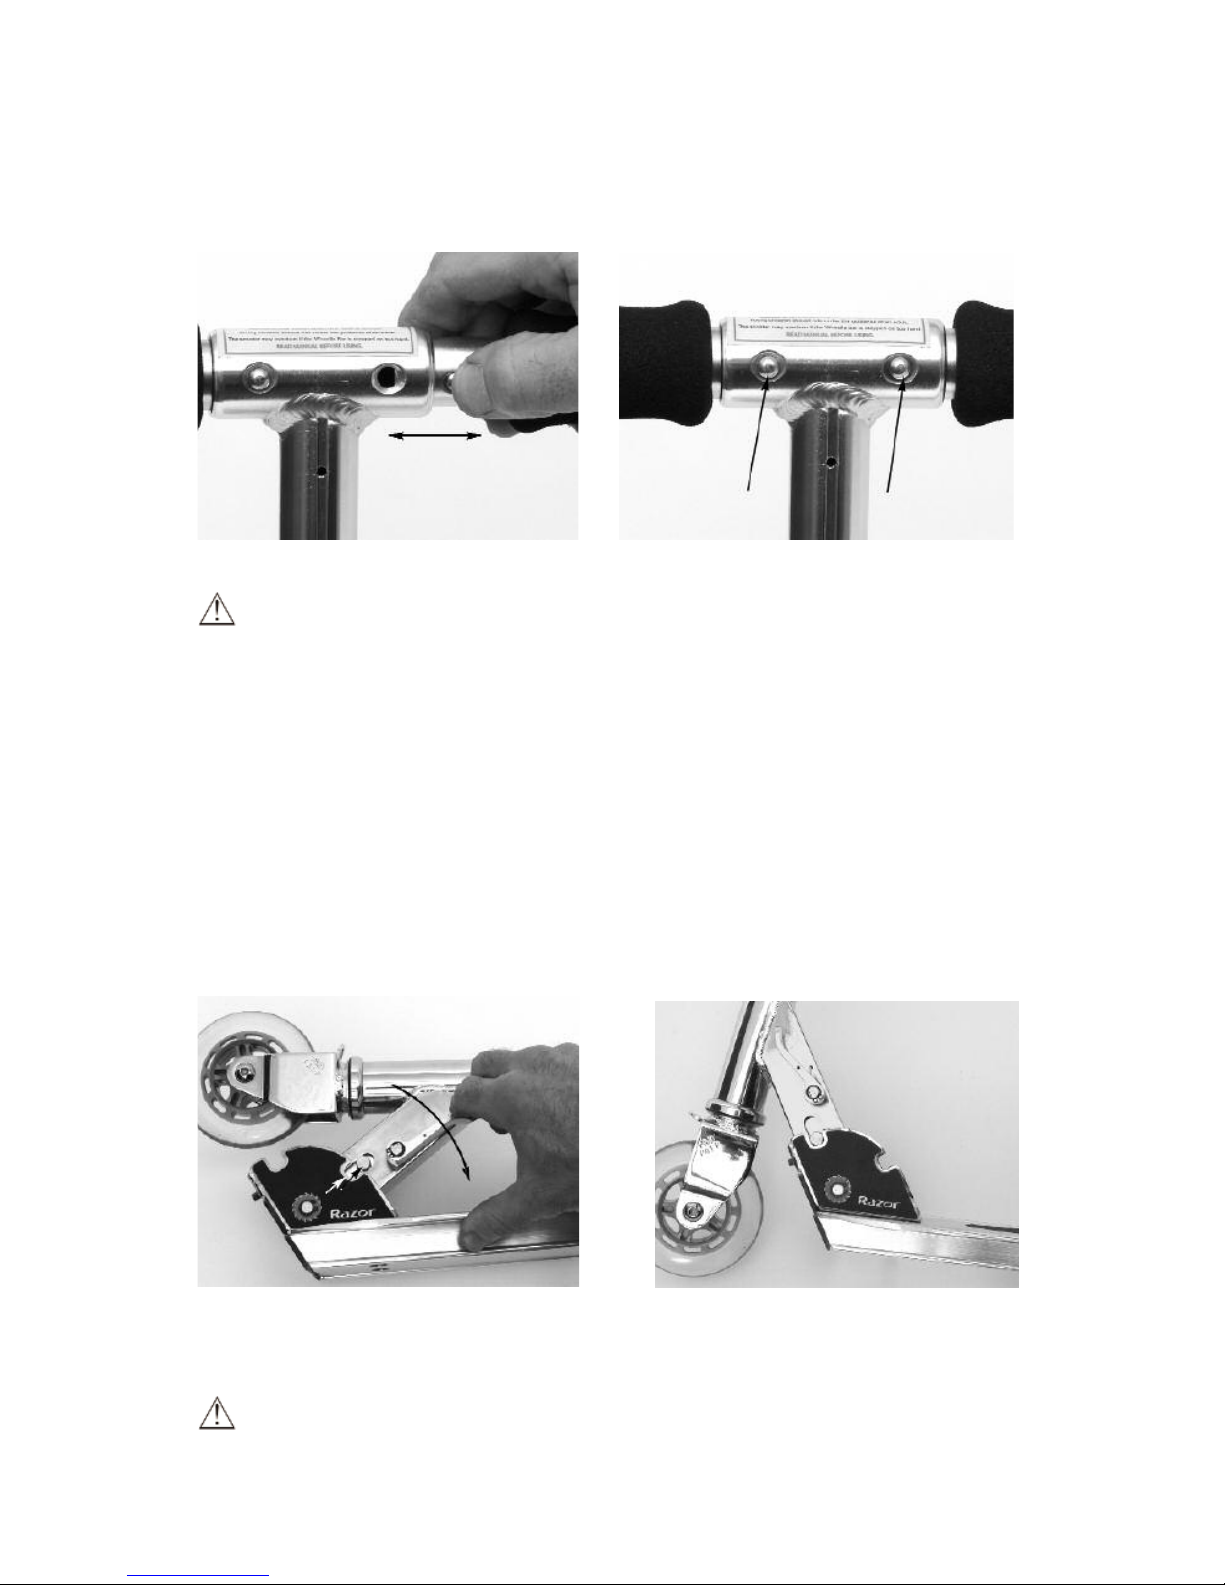
2. Unfolding the Scooter for First-Time Use . . . . . . . . . . . . . . . .4
3. Check Before Riding . . . . . . . . . . . . . . . . . . . . . . . . . . . . . . .5
4. Wheels and Bearings . . . . . . . . . . . . . . . . . . . . . . . . . . . . . . .6
5. Cleaning your Scooter . . . . . . . . . . . . . . . . . . . . . . . . . . . . . .6
6. How to Ride . . . . . . . . . . . . . . . . . . . . . . . . . . . . . . . . . . . . . .7
7. Razor Safety Tips . . . . . . . . . . . . . . . . . . . . . . . . . . . . . . . . . .7
8. Limited Warranty . . . . . . . . . . . . . . . . . . . . . . . . . . . . . . . . . .8
AN IMPORTANT MESSAGE TO PARENTS: This manual contains important
safety information. For your child’s safety, it is your responsibility to review this information
with your child and make sure that your child understands all warnings, cautions,
instructions and safety topics. Razor USA recommends that you periodically review and
reinforce the information in this manual with younger riders and that you are required to
inspect and maintain your child’s scooter to insure their safety.
GENERAL WARNING: Scooter riding can be a hazardous activity. Scooters can,
and are intended to move and it is therefore possible to get into dangerous situations
and/or lose control and/or fall off. If such things occur you can be seriously injured or die.
LIKE ANY OTHER MOVING PRODUCT,USING A SCOOTER CAN BE A DANGEROUS
ACTIVITY AND MAY RESULT IN INJURY OR DEATH EVEN WHEN USED WITH
PROPER SAFETY PRECAUTIONS. USE AT YOUR OWN RISK AND USE COMMON
SENSE.
• Always wear proper protective equipment, such as an ANSI, SNELL, CPSC or ASTM
approved helmet and elbow and kneepads. Always keep the chinstrap securely buckled
on the helmet. Long sleeve shirt, gloves, long pants, shoes, and elbow and knee pads
are mandatory. Wear athletic shoes (lace-up shoes with rubber soles). Don’t ride
barefoot or in sandals. Keep shoelaces out of the way of wheels.
• Use the scooter only on flat, dry, level ground without loose debris, such as rocks or
gravel. Ride on smooth, paved surfaces away from motor vehicles.
• Avoid excessive speed associated with downhill rides.
• BRAKE WILL GET HOT FROM EXCESS BRAKING. Do not touch the brake after
braking.
• Never use the scooter at dusk or night or in wet or icy conditions. Wet weather impares
traction, braking and visibility.
• Avoid sharp bumps, drainage grates, and sudden surface changes. Avoid water, speed
bumps, sand, gravel and anything else that could cause your front wheel to suddenly
stop. When in doubt, avoid the bumps.

3
• Do not exceed 220 pounds (100 kilograms) total weight on the scooter.
• Do not allow children under age six (6) to use the scooter. Children under age eight (8) should ride with adult supervision at
all times. All children and preteens should ride with adult guidance at all times.
• Never ride in traffic or on the street and watch your surroundings for pedestrians, bikes, and skateboard and scooter riders.
Use the scooter in areas free from fixed or moving hazards, such as poles, curbs, hydrants, walls, parked automobiles and
traffic.
FAILURE TO USE COMMON SENSE AND HEED THE ABOVE WARNINGS FURTHER INCREASES RISK OF SERIOUS INJURY. USE AT
YOUR OWN RISK AND WITH APPROPRIATE AND SERIOUS ATTENTION TO SAFE OPERATION. USE CAUTION.
WARNING: ALWAYS INSPECT SCOOTER PRIOR TO RIDING. Properly inspecting and maintaining your scooter
can reduce the risk of injury. Check and secure all fasteners before every ride. Always inspect your scooter before riding and
regularly maintain it. Replace worn or broken parts immediately. Adults must assist children in the initial adjustment procedures
to unfold scooter, adjust handlebar height and finally to fold scooter.
WARNING: REGARDING USE OF NON-RAZOR PRODUCTS WITH YOUR RAZOR SCOOTER. Your scooter has
been built to Razor’s design specifications. All the original equipment supplied at the time of sale were selected on the basis of
their compatibility with the frame, fork and all other parts. Certain after-market products may or may not be compatible with your
Razor scooter. Consult your retailer or call Razor prior to modifying or replacing any component with a non-factory specified
product.
WARNING: CHECK LOCAL LAWS REGARDING SCOOTER USE. Check local laws and regulations to see where
and how you may use your Razor scooter legally. In many states and local areas scooter riders are required BY LAW to wear a
helmet. Check local laws and regulations regarding laws governing helmet use and scooter operation in your area.
WARNING This scooter was manufactured for performance and durability but it is not impervious to
damage. Trick riding can over stress or damage any product, including this scooter and the rider
assumes all risks associated with high-stress activity.
1. Scooter Parts and Components
Handlebar Grip
T-tube Steering tube quick-release
Steering tube/steering column
Collar clamp
Joint lever/pivoting mechanism
Front fork
Wheels
Steering column adjusting screw
Baseboard /deck
Rear fender/brake

4
2. Unfolding the Scooter for First-Time Use
A. Insert and secure the left and right handlebars by pressing the spring-loaded buttons and
inserting them into the T-tube (Figure 1). Make certain the spring-loaded button engages the hole
in the T-bar for each handlebar (Figure 2).
Figure 1 Figure 2
WARNING: Failure to properly engage the spring-loaded buttons may cause the
handlebars to dislodge while riding and may cause you to lose control and fall. When correctly
engaged the handlebars will not rotate nor will they move sideways. Note that when properly
engaged, the spring-loaded buttons are clearly visible in the holes on the T-tube (Figure 2).
B. To release the folding mechanism, grasp the T-tube with one hand between the collar clamp
and the quick-release clamp and, with the other hand, rotate the joint lever (Figure 3.) to release
the steering column from the locked position and allow you to pivot it to the upright position. The
joint lever is spring-loaded and will automatically lock in the upright position when fully upright
(Figure 4).
Figure 3 Figure 4
WARNING: Keep your fingers clear of the pivoting mechanism when folding or
unfolding the scooter. Make sure others are standing clear.

5
C. To adjust the height of the handlebars, unlock the steering tube by pulling outward on
the quick-release lever. Slide the T-tube to the desired position and secure by pushing
inward on the quick release clamp (Figures 5 and 5a). The tension of the quick-release
clamping mechanism can be adjusted by tightening or loosening the Allen bolt. Be careful
not to over-tighten. You should always be able to open and close the quick-release lever
by hand and the T-tube should telescope freely with the quick-release open.
Figure 5 Figure 5a
WARNING: Failure to properly engage the quick-release clamp may cause the T-
tube to telescope up or down while riding which may cause you to lose control and fall.
With the quick-release properly adjusted and engaged, the handlebars will not move up or
down.
3. Check Before Riding
A. Collar Clamp. Using the correct size Allen wrench, check that the collar clamp bolt
(Figure 6) is tightened securely (30 to 60 inch-pounds torque). This item is tightened and
quality-inspected at the factory, but there is a slight chance that the effects of shipping or
handling may have caused this bolt to loosen.
Figure 6
B. Baseboard/Steering Column Adjusting Screw(s). Using an Allen wrench
and with the scooter in the upright and locked position (figure 7), adjust the set screw at
the baseboard until there is no free-play between the baseboard and the steering column.
Be careful not to over-tighten this screw as it needs only be snug against the steering

6
column. Verify the adjustment by releasing the steering column from the locked position
and folding the scooter. The locking lever should not bind and the folding movement
should be smooth. The spring-loaded mechanism should automatically lock and be fully
seated in the upright position.
Figure 7
WARNING: Keep your fingers clear of the pivoting mechanism when folding or
unfolding the scooter.
4. Wheels and Bearings
Under normal circumstances and conditions, Razor wheels and wheel bearings are
maintenance free. Nonetheless, it is the responsibility of the owner or guardian to
periodically inspect the wheels for wear and tear, the axle for proper tightness, and
bearings for side-to-side play and loose parts.
When a wheel or wheel bearing develops play, this is an indication of excess wear and
replacement is necessary. Replace immediately with only genuine Razor wheels.
Worn tires/wheels/bearings are considered normal wear-and-tear and are not covered by
the Razor Limited Warranty. Wheels other than genuine Razor wheels may not be
compatible with your Razor scooter. The use of anything other than genuine Razor
replacement parts may affect your safety.
5. Cleaning your Scooter
Wipe with a damp cloth to remove dirt and dust.
Do not use industrial cleaners or solvents as they may damage the surfaces. Do not use
alcohol, alcohol-based or ammonia-based cleaners as they may damage or dissolve the
plastic components or soften the decals or decal adhesive.

7
6. How to Ride
Place one foot on the baseboard, push forward with the other foot. Steer.
For enhanced cornering, lean slightly into the direction of the turn.
For controlled stops, apply the brake by stepping on the rear fender/brake. Razor
recommends that you practice applying the brake at various speeds and in an open area
free from obstructions before riding your scooter around others.
WARNING: Wheelies and other stunt-type riding reduces your ability to maneuver
and control your scooter. Take the necessary precautions, such as wearing appropriate
protective gear and practice in a area safe for stunt riding and free from obstructions.
7. Razor Safety Tips
A. Always wear proper protective equipment, such as an ANSI, SNELL, CPSC or ASTM
approved helmet and elbow and kneepads. Long sleeve shirt, gloves, long pants, shoes,
and elbow and knee pads are mandatory. Always wear a helmet when riding your scooter
and keep the chinstrap securely buckled. Always wear shoes. Don’t ride barefoot or in
sandals. Keep shoelaces out of the way of wheels.
B. Ride on smooth, paved surfaces away from motor vehicles.
C. Avoid sharp bumps, drainage grates and sudden surface changes. Scooter may
suddenly stop.
D. Avoid streets and surfaces with water, sand gravel, dirt, leaves, and other debris. weat
weather impares traction, braking and visibility. Avoid anything that could cause your front
wheel to stop. Bumps have the potential to stop the front wheel. When in doubt, avoid the
bumps.
E. Do not ride at night.
F. Brake will get hot from continious use. Do not touch after braking.
G. Avoid excess speed associated with downhill rides.
H. Adults must assist children in the inital adjustment procedures to unfold scooter, adjust
handlebar and steering to height, and finally to fold scooter.
I. Obey all local traffic and scooter riding laws and regulations.
J. Watch out for pedestrians
K. Check and secure all fasteners before every ride. Make sure the steering tube clamps,
steering tube extension quick release, and handlebars spring buttons are locked properly
in place before riding.
L. Replace worn or broken parts immediately. Call 1-866-GO-RAZOR for parts.
M. You will see people on TV and maybe even people you know doing tricks and stunts.
These are people who have been practicing on scooters for a very long time. Don’t try
something until you are ready. Avoid steep inclines and don’t ride too fast — you can lose
control and fall. Skateboard parks are not designed for scooters. Never ride in traffic or on
the street and watch your surroundings for pedestrians, bikers, boarders and skaters.
N. Keep your fingers and toes clear of the hinge when folding and unfolding your Razor
scooter.
O. Maintain a hold on the handlebars at all times.

8. Limited Warranty
This Limited Warranty is the only warranty for Razor scooters. There is no other express
or implied warranty.
The manufacturer warranties this product to be free of manufacturing defects for a period
of six months from date of purchase. This Limited Warranty does not cover normal wear
and tear, nor any damage, failure or loss caused by improper assembly, maintenance,
storage or use of the scooter.
This Limited Warranty will be void if the product is ever:
used in a manner other than for recreation or transportation;
modified in any way;
rented.
Check local laws and regulations to see where you can ride your scooter legally on public
property.
The manufacturer is not liable for incidental or consequential loss nor damage due directly
or indirectly from the use of this product.
To obtain service under this warranty you must, within the
or an authorized service center. Razor will provide warranty
replacement at its sole discretion.
Warranty service is available from Razor USA LLC Authorized
service centers. Visit www.razor.com to locate the service center
nearest you.
Specifications subject to change without notice.
11/12/04 ©Copyright 2004, Razor USA.
Cerritos, CA All rights reserved.
razor usa llc P.O. Box 3610 cerritos, ca 90703 www.razor.com
TM TM
8
Table of contents
Other Razor Scooter manuals

Razor
Razor Kix User manual

Razor
Razor E90 Series User manual

Razor
Razor E300 Series User manual

Razor
Razor Electric Party POP User manual

Razor
Razor Wild Ones User manual

Razor
Razor EcoSmart Metro User manual

Razor
Razor HOVERTRAX 2.0 User manual

Razor
Razor A125 User manual

Razor
Razor MIXI User manual

Razor
Razor POCKET MOD BELLEZZA User manual

Razor
Razor E125 User manual

Razor
Razor Ultra Pro User manual

Razor
Razor Cruiser User manual

Razor
Razor A5 CARBON LUX User manual

Razor
Razor Pro Series User manual

Razor
Razor C25 User manual

Razor
Razor E100 series User manual

Razor
Razor pocket mad Bistro 15130638 User manual

Razor
Razor E100 series User manual

Razor
Razor PowerRider 360 User manual