Demon Powersport OUTLAW User manual
1
First of all, we would like to thank you for
choosing the OUTLAW electric bike.
We warmly welcome you to our Demon
Powersports family. We wish you enjoy the
numerous kilometers and happy moments with
your new bike.
After the initial shipment we have made many
improvements and modifications for the
OUTLAW including:
*Suspended seat post - Takes the shock out of the big
bumps, without the cost or complexity of suspension.
*Adjustable handlebar stem- Provides up to 1 1/2” of
rise and reach adjustment, for fully customizable riding
position.
*Upgraded Shimano derailleur- Rigid cast aluminum
construction gives smoother, more precise shifting.
*New gearing, with taller top gear for relaxed touring,
plus a lower low gear for tight, technical riding.

2
Welcome 1
Important 3
Contact Us 3
Assembly Instructions 4
Parts 4
Kickstand 4
Handle bar 4
Pedal 5
Wheel 5
Battery Charging 7
Tips 7
Operation 7
Display 8
Button Definition 9
Meter Programming and Use 11
Error Code Definition 17
Warning and Safety 18

3
IMPORTANT
Electric Bikes can be dangerous to use. The user or
consumer assumes all risk of personal injuries, damage,
or failure of the bicycle or system and all other losses or
damages to themselves and others and to any property
arising as a result of using the bicycle.
As with all mechanical components, the bicycle is subjected
to wear and high stresses. Different materials and
components may react to wear or stress fatigue in
different ways.
If the design life of a component has been exceeded, it may
suddenly fail possibly causing injuries to the rider. Any form
of crack, scratches or change of coloring in highly stressed
areas indicate that the life of the component has been
reached and it should be replaced.
Please do not hesitate to contact us. If any problems may
occur, please email us at cus[email protected] for
any customer service solutions such as replacement parts,
technical information, and any other issues.
For any other commercial or general inquires please
contact Demon Powersports at 905 475 8383 or
Email us at [email protected]
PLEASE NOTE: THIS MANUAL IS NOT INTENDED
AS A DETAILED USER, SERVICE, REPAIR OR
MAINTENANCE MANUAL. PLEASE SEEK
ASSISTANCE FROM A QUALIFIED TECHNICIAN
FOR SERVICE, REPAIRS OR MAINTENANCE.
DO NOT DISASSEMBLE, MODIFY OR
REPLACE ELECTRICAL PARTS.
4
ASSEMBLY
INSTRUCTIONS
Your bike has been pre-assembled and requires
only a few simple steps to get it ready for you to
ride:
1) Remove the outside carton after cutting the nylon
bands. Remove all the inside cardboard
protection and bubble wrap. Carefully remove
your bike from the carton and gently rest it in
place. Be careful not to cut any wires when
cutting the zip ties.
2) Ensure the following pieces are included in the
package. If there are any missing parts, please
contact Demon for help replacing missing pieces.
i) Bike
ii) Pedals
iii) Charger
iv) Key for battery pack (usually attached with
plastic tie either on the handlebar or on the
battery)
v) Assembly Tools
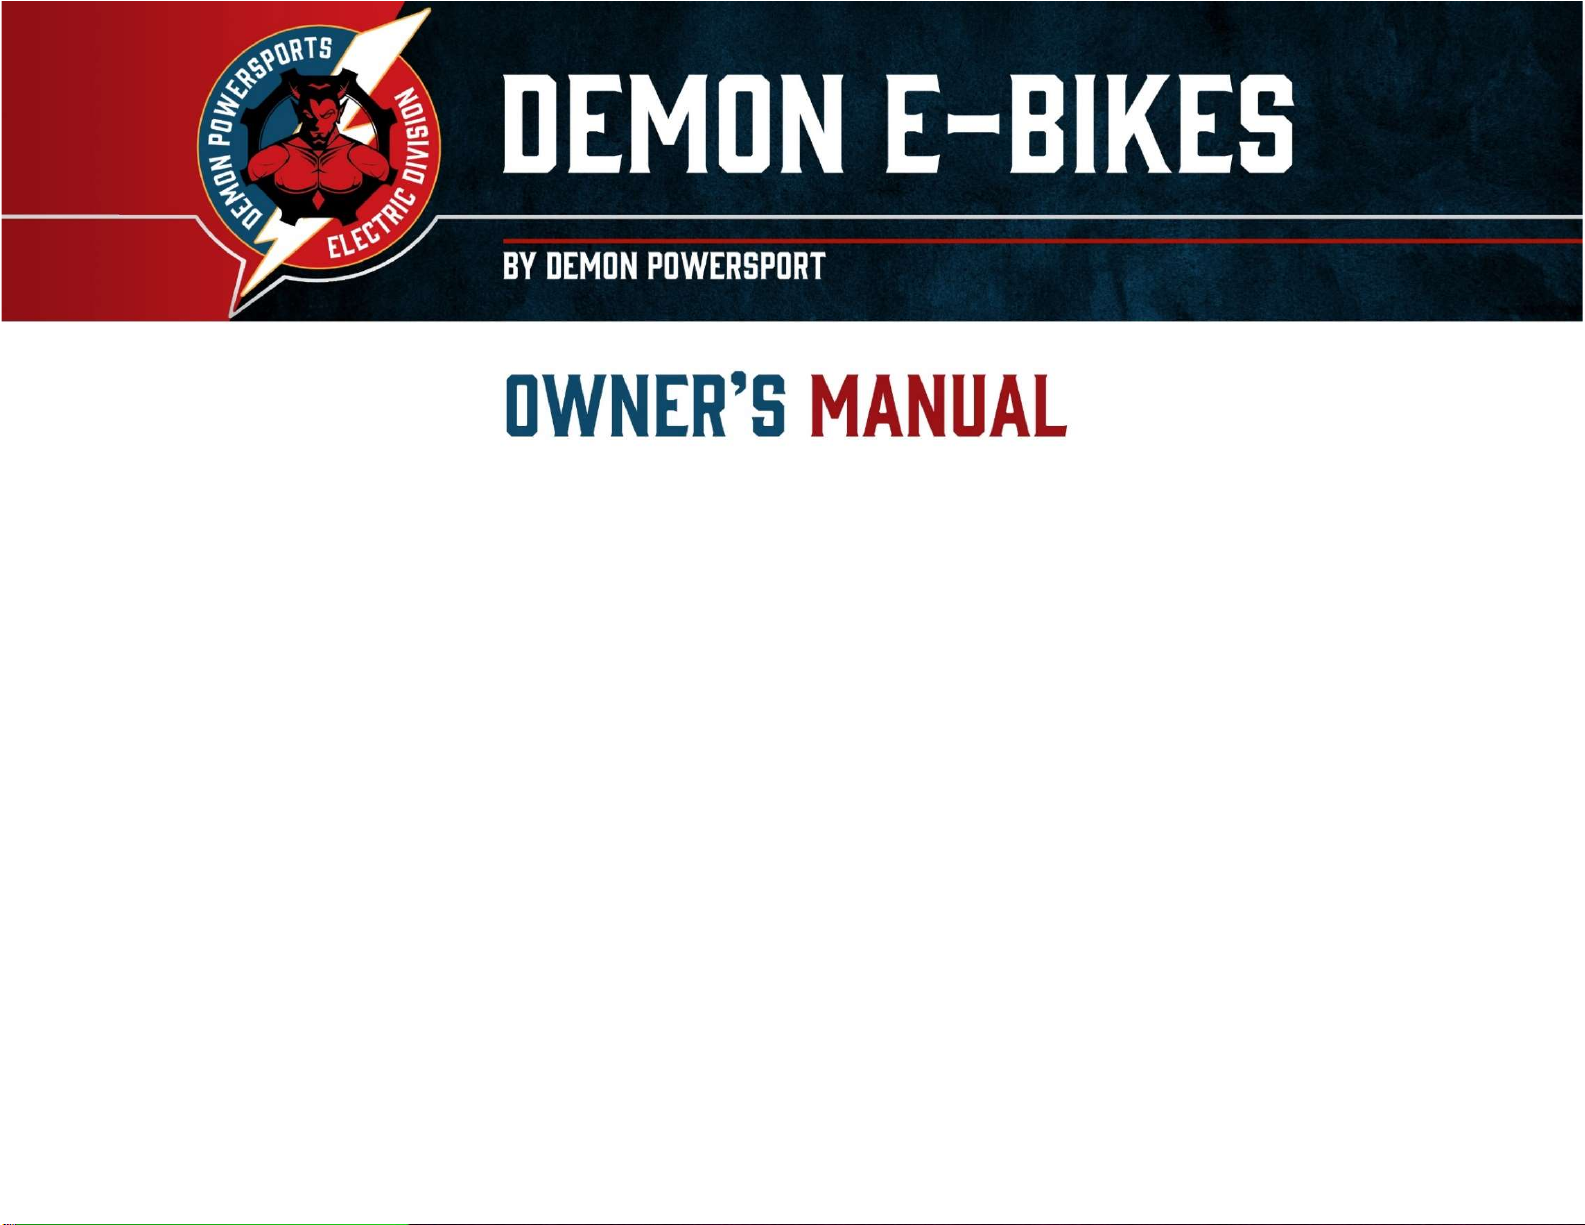
3) Install kickstand with the 5mm Allen key
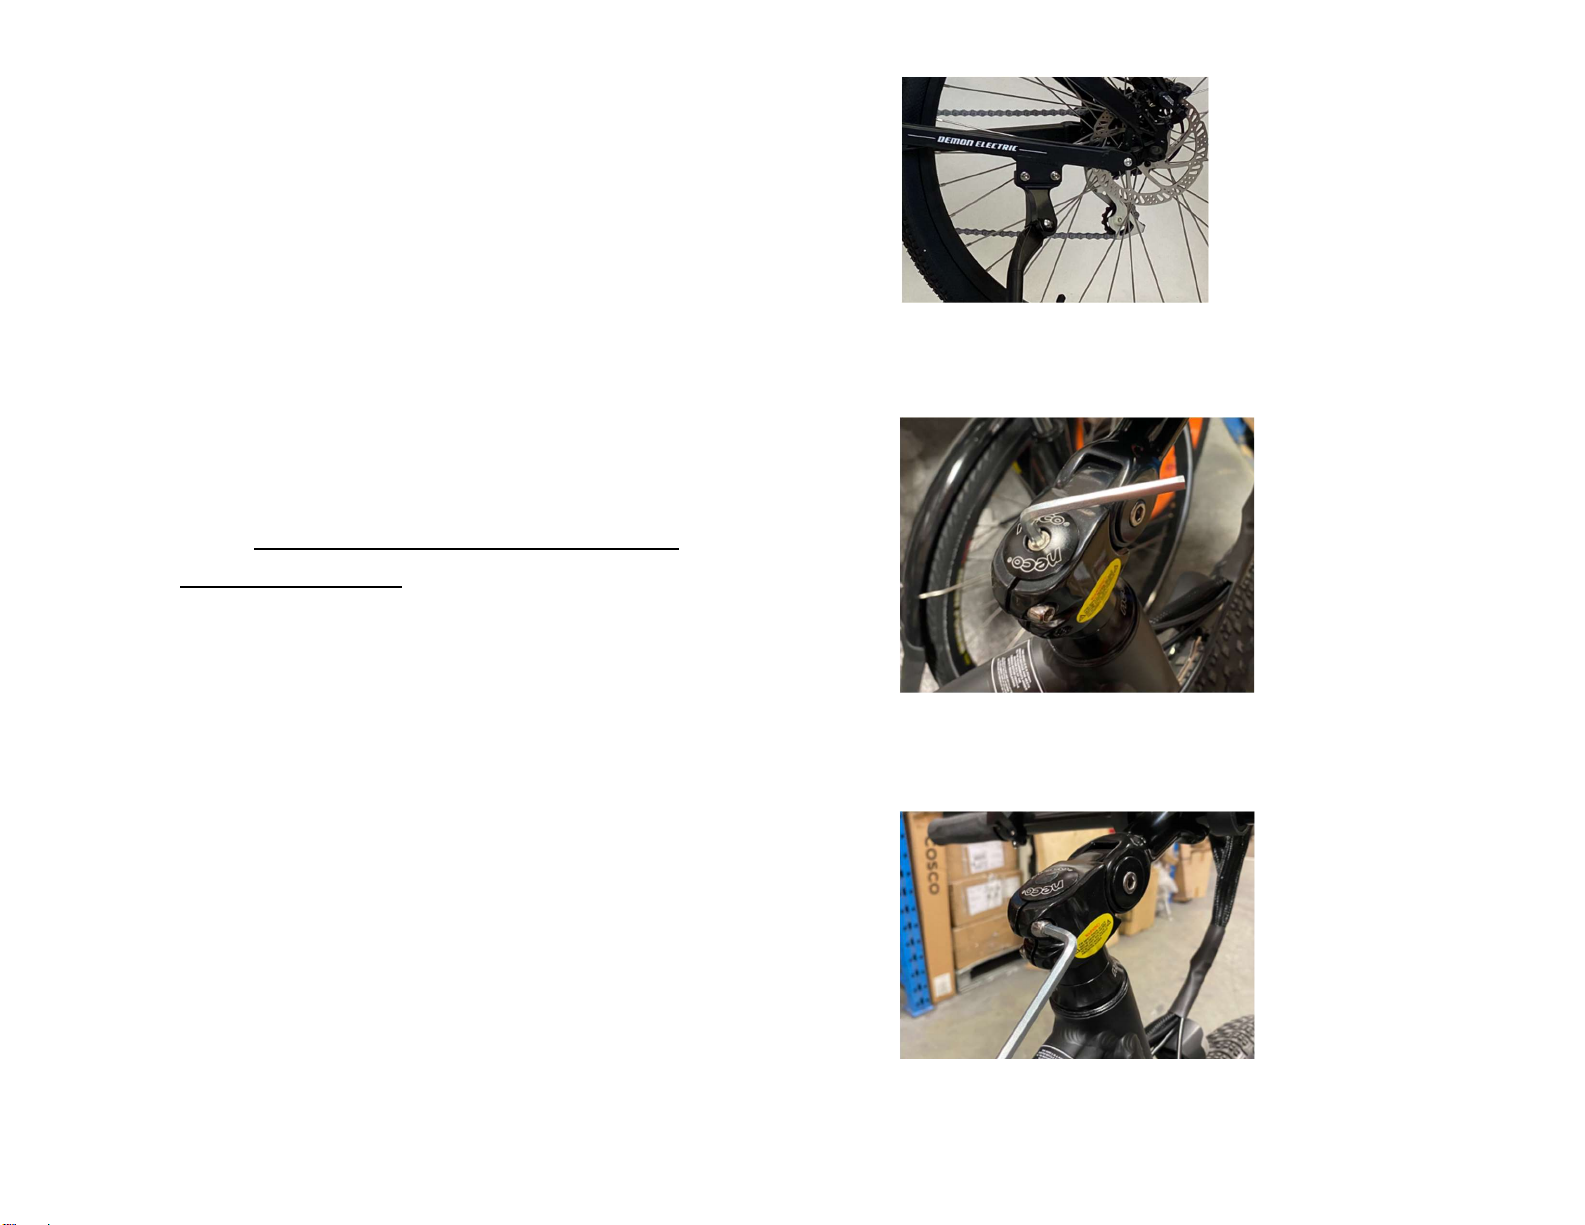
4) Align the stem with the front wheel and tighten the
top stem bolt with 5mm Allen key enough to hold
the stem in place.
Once the handlebars are aligned and the top bolts
is slightly secured, firmly tighten the 2 side bolts
with 5mm Allen key on the stem.
5
After tightening the 2 side bolts, firmly tighten the
top bolt. After all 3 bolts have been securely
fastened, make sure there is no play in the headset
by tighten the 4 pinch screws with 4mm Allen key.
Loctite is recommend on the screw Align the brake
controls so they are facing slightly downward. Fine
tune the position to align with your arm when
seated, stem rise angle can be adjusted by loosen the
big side screw with 6mm Allen key
5) Remove the plastic protector from the fork, insert
the axle through the wheel following the orientation
in the image and Install the front wheel on the front
fork, and make sure to align the brake disk with the
Brake caliper, then fasten the wheel hub using the
quick release handle.
6) Install the headlight to the front fork with the given
long bolt and nut, tighten with the 5mm Allen key
and 10mm wrench
6
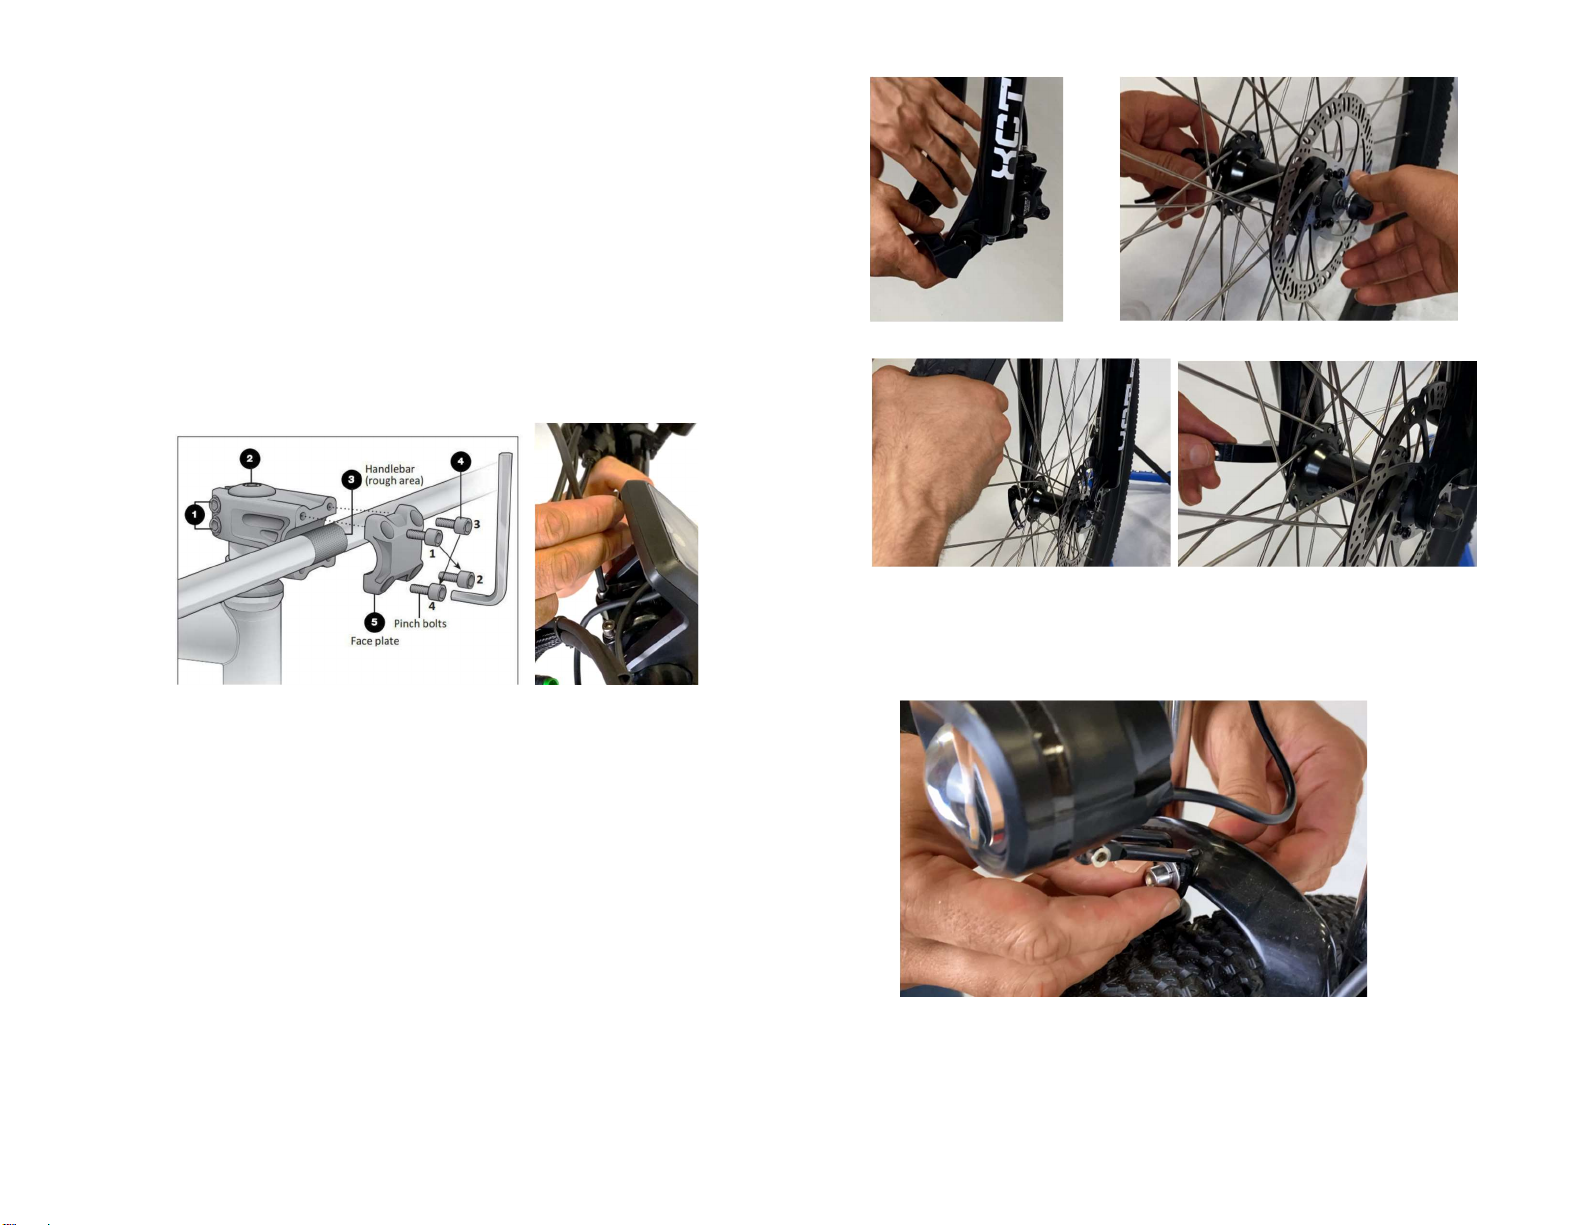
7) Using the 15mm wrench provided in the toolkit,
attach, and tighten the pedals. PLEASE NOTE – The
pedals are marked “L” for Left and “R” for Right. The
left pedal is attached by turning it counter clockwise
and the right pedal is tightened by turning it
clockwise. Make sure the pedals are tightly attached
to the crank arms to prevent stripping.
(See picture below)
8) Make sure the seat is tight enough so that you
cannot twist it out of alignment. Pull the seat clamp
handle away from the seat post and slide the seat up
or down to adjust it. Move the clamp handle inward
toward the seat post so it is held tight by the clamp.
Important! Be sure the minimum insertion marks
do not go past the top of the seat clamp and are
not visible.

7
BATTERY CHARGING
Included with your new OUTLAW is a lithium ion battery,
along with a charger, which plugs into a standard
household electric receptacle. A lithium ion battery
requires specially designed chargers. You should never
charge your battery with a substitute charger that is not
designed for this use.
Your OUTLAW battery arrives with 70% charge. It is
recommended that you fully charge the battery before your
first use. The OUTLAW battery may be charged while on the
bike or removed and charged at a location away from the
OUTLAW. To charge the battery please follow the steps
below:
- Remove the rubber cover on the charging socket
- Place the charger in a flat, secure place, and
connect the DC output plug from the charger
(round barrel connector) to the charging port on
the side of the battery pack.
- The indicator light on the charger will be red /
orange when battery is charging and will turn
green when fully charged.
The charger will charge a fully depleted battery in 3— 4
hours. If the battery will not be used for an extended
period of time, charge it fully and recharge it every 2
months. Store it in a cool, dry place. If you
experience unusual sounds or odors coming from the
charger or the battery, unplug charger immediately and
contact Demon Powersports customer service.
BATTERY CHARGING TIPS
- Recharge battery after every use. This will keep
the battery in good shape for longer time.
- Do not allow any liquids near or inside the battery
charger.
- Do not charge the battery with any other chargers
then what was originally supplied with your
OUTLAW
- Fully charge the battery before each use to extend
the life of the battery and help to reduce the
chance of over discharging the battery pack.
- Do not place the battery near fire or corrosive
substances.
OPERATION
Your OUTLAW is equipped with an LCD meter that
monitors pedal assist, speed, odometer, trip distance,
riding time, and battery energy level. To turn the meter
on, make sure the battery is fully inserted into the
OUTLAW battery holder.

8
DISPLAY

9
Button definition
Normal operation
10
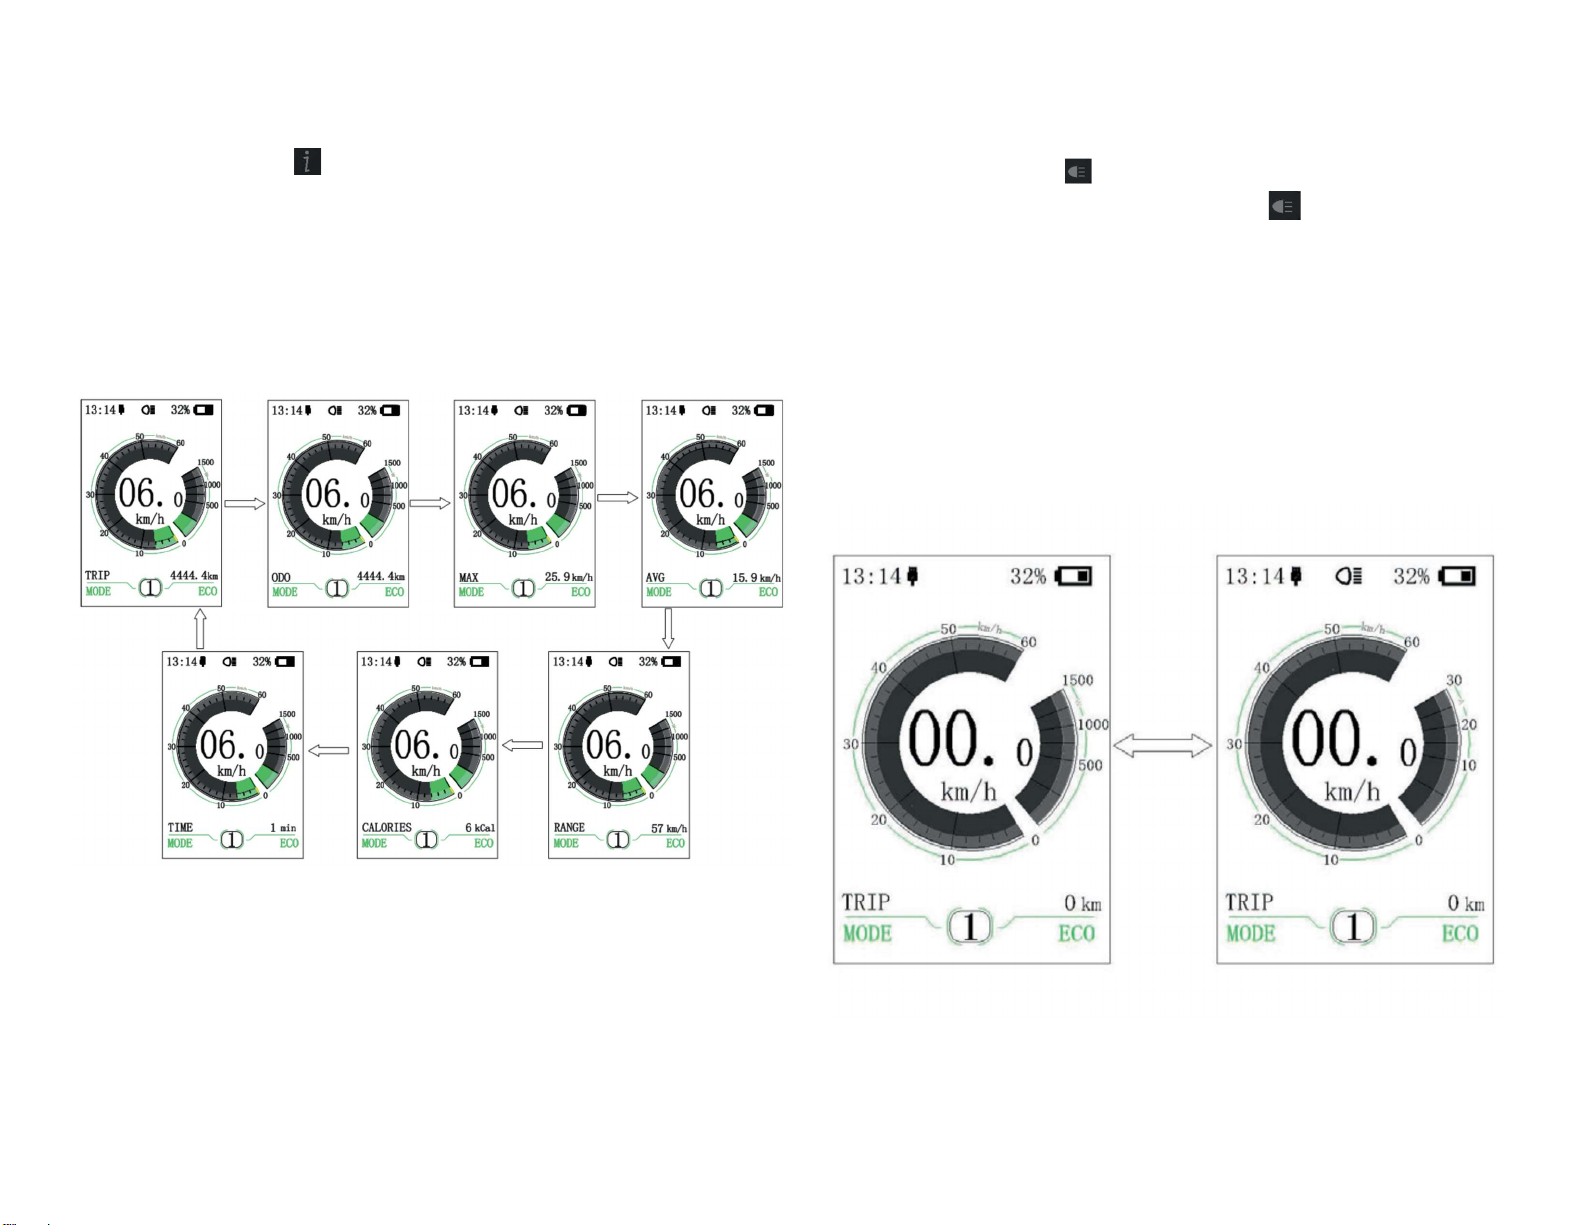
Switch between Distance Mode and Speed Mode
Briefly press (0.5s) to switch the display between the
distance and speed, cycle show signal-trip distance (TRIP) →
total distance (ODO) → maximum speed (MAX) → average
speed (AVG) → remaining distance (RANGE) → energy
consumption (CALORIES) → time (TIME). Energy
consumption unit CALORIES means kCal.
Headlight / Display Backlight Switch
Press and hold (>2S) to turn on the display backlight as
well as headlight. Press and hold (>2S) again to turn off
the display backlight and the headlight. There are 5 levels
of backlight brightness that can be selected by the user
(can be set in the “Brightness”). (If the display is turned on
in a dark environment, the display backlight/ headlight will
be turned on automatically. If the display
backlight/headlight are turned off manually, they also need
to be turned on manually afterwards)

11
Walk assistance mode
Press and hold (>2S) to enter walk assistance mode, the
symbol is displayed, when release key , will exit the walk
assistance the mode.
METER PROGRAMMING AND USE
12
Enter “SETTING” interface.
After turning on the display, briefly press (<0.5S) for two
times to enter the “SETTING” interface. The interface
includes the three options as “Display setting”,
“Information” and “EXIT”. Briefly press (<0.5S) or to
switch the options and then briefly press (<0.5S) to
confirm and enter the option. Select “EXIT” and briefly
press (<0.5S) to exit the interface or briefly press (<0.5S)
for two times in any interface to exit the set inface. The
set dates are saved for the two-exit mode. If there is not
any operation within 20s and then exit the set interface, no
dates are saved.
Enter “Display setting” interface.
In “SETTING” interface, briefly press (<0.5S) or to
select “Display setting” and then briefly press (<0.5S) to
confirm and enter into “Display setting”. There are thirteen
set options in the interface.
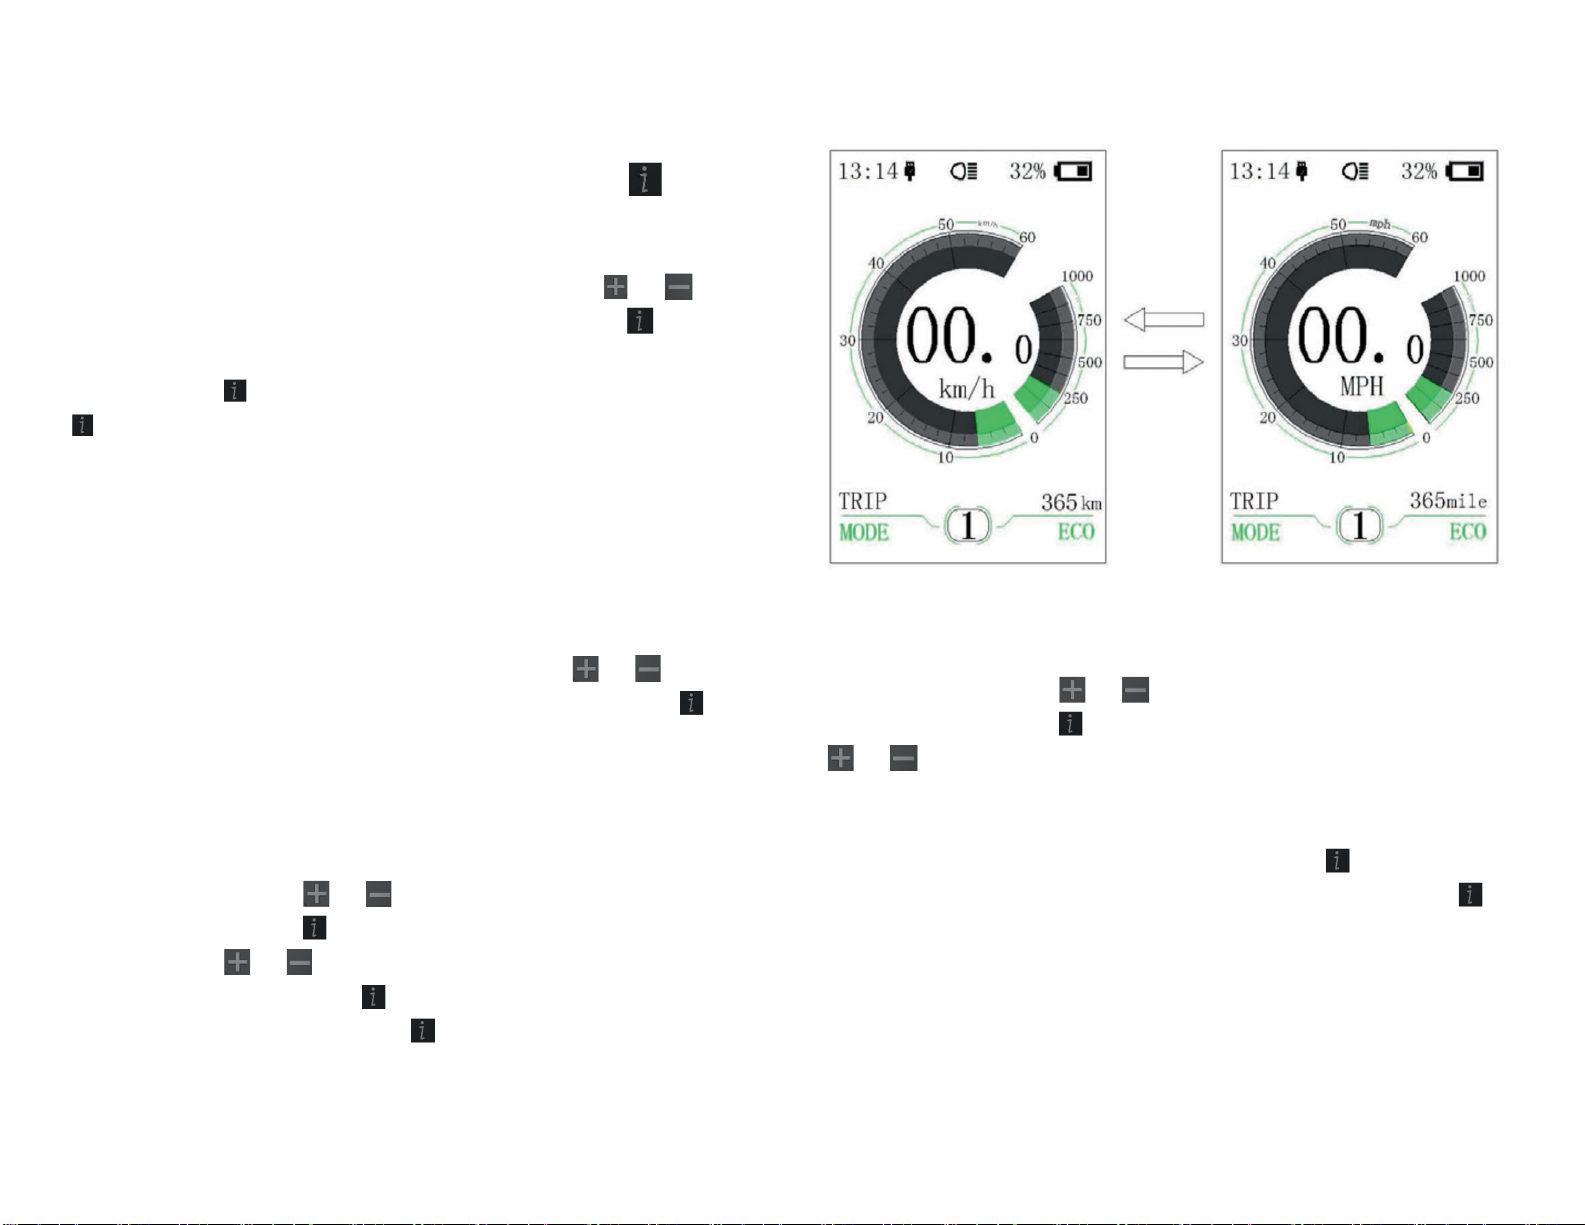
⑴ “Unit” - unit switch between the km and mile
Briefly press (<0.5S) or to select “Unit”, and then
briefly press (<0.5S) to enter the set interface. Briefly
press (<0.5S) or to select “Metric”/ “Imperial”, and
then briefly press (<0.5S) to save the set and exit back to
“Unit” interface. Briefly press for two times (interval time
is less than 0.5S) to exit back to main interface or select
“BACK” → “EXIT” to exit back to the main interface.
⑵ “Brightness” - set display brightness
Briefly press (<0.5S) or to select “Brightness” and then
briefly press (<0.5S) . This moment, briefly press (<0.5S)
or to switch the percentage as “100%”/
“75%”/“50%”/“30%”/“10%”. 100% is the highest
brightness, 10% is lowest brightness. After select the
brightness percentage, briefly press (<0.5S) again to
save the set and exit back to “Brightness”. Briefly press
for two times (interval time is less than 0.5S) to exit back to
main interface or select “BACK” → “EXIT” to back the main
interface.
13
⑶ “Auto Off”- set automatic Off time
Briefly press (<0.5S) or to select “Auto Off”, and then
briefly press (<0.5S) . This moment, briefly press (<0.5S)
or to switch automatic Off time as
“OFF”/“9”/“8”/“7”/“6”/“5”/ “4”/“3”/“2”/“1”. The unit is
minute. After selection, briefly press (<0.5S) to save the
set and exit back to “Auto Off”. Briefly press for two
times (interval time is less than0.5S) to exit back to main
interface or select “BACK” → “EXIT” to exit back to main
interface.
⑷ “Default Mode”- set riding mode for starting up
Briefly press (<0.5S) or to select “Default Mode”, and
then briefly press (<0.5S) . This moment, briefly press
(<0.5S) or to switch default riding mode for starting up
as “ECO”/ “Sport”. After confirmation, briefly press (<0.5S)
again to save the set and exit back to “Default Mode”.
And then briefly press for two times (interval time is less
than0.5S) to exit back to main interface or select “BACK” →
“EXIT” to exit the main menu.
⑸ “Power View”- set output display mode
Briefly press (<0.5S) or to select “Power View”, and
then briefly press (<0.5S) . This moment, briefly press
(<0.5S) or to switch the output display mode as
“Power”/“Current”. After confirmation, briefly press (<0.5S)
again to save the set and exit back to “Power View”.
Briefly press for two times (interval time is less than 0.5S)
to exit back to the main interface or select “BACK” →
“EXIT” to exit back the main interface.
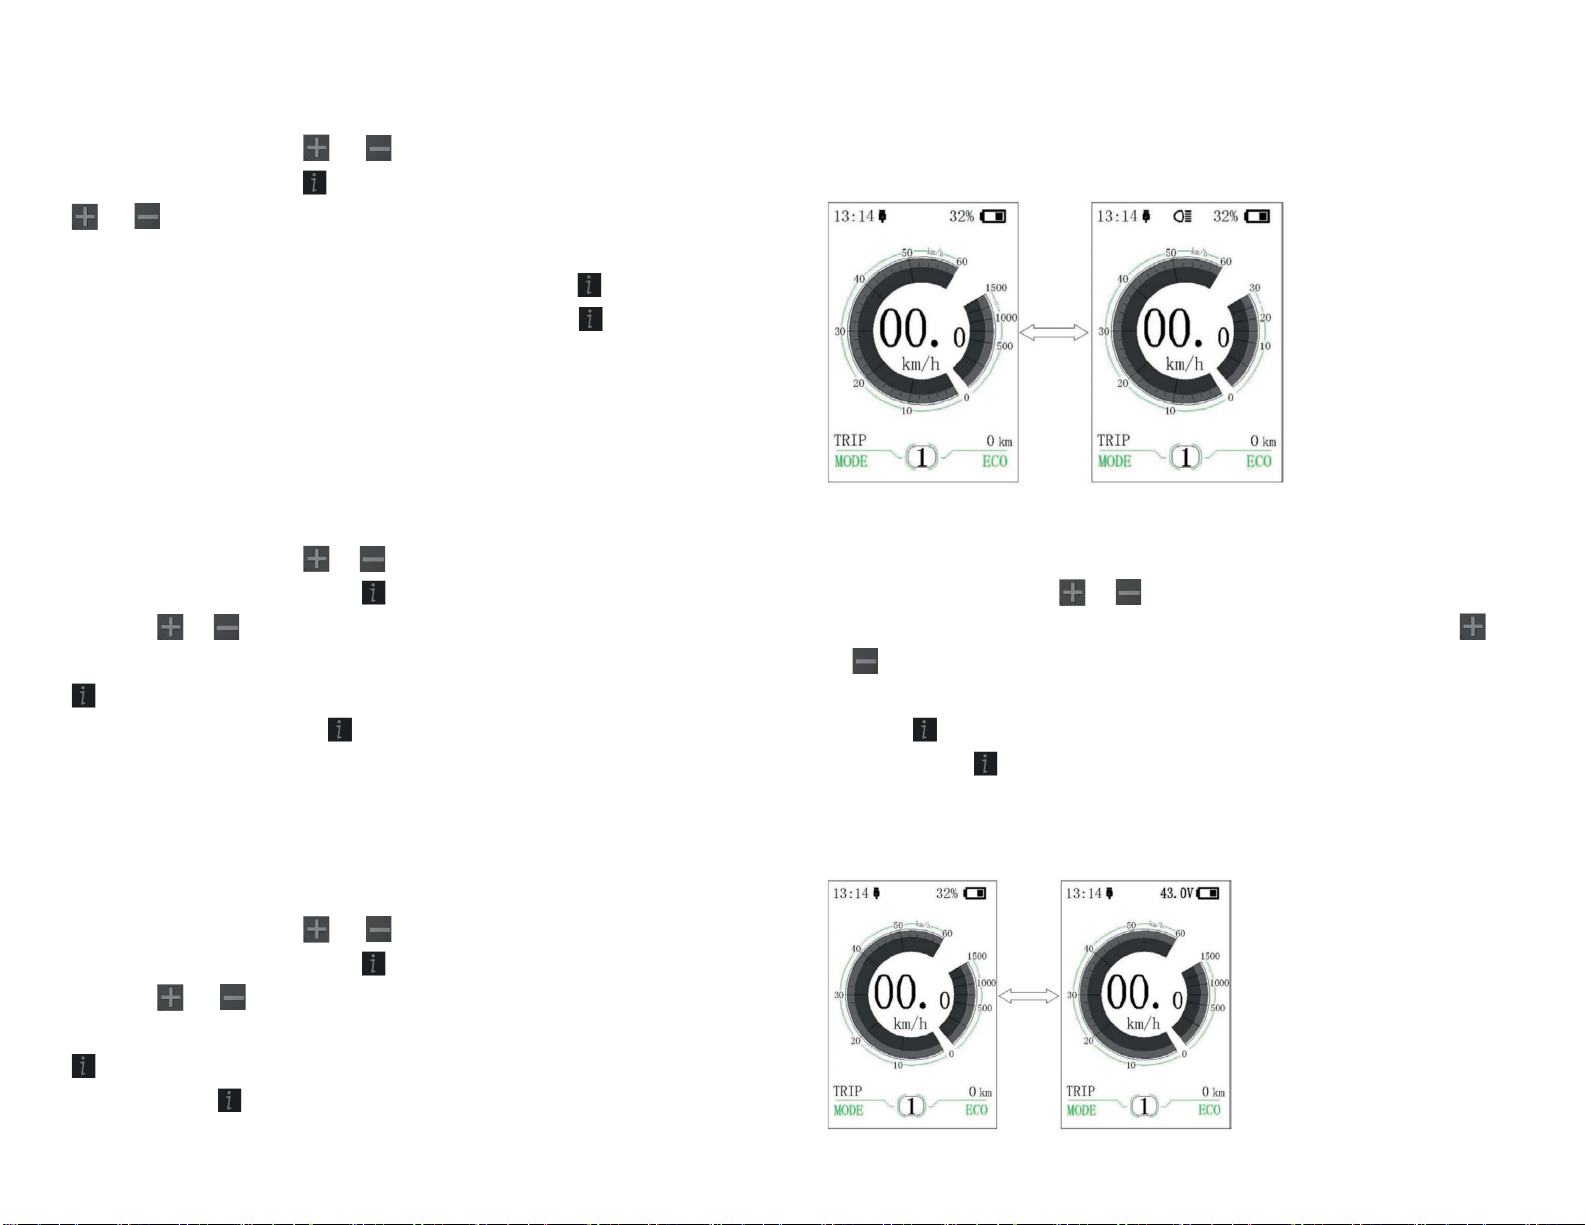
⑹ “SOC View” - set display mode for battery level
Briefly press (<0.5S) or to select “SOC View”, and then
briefly press (<0.5S). This moment, briefly press (<0.5S)
or to switch display mode for output as
“Percent”/“Voltage”. After confirmation, briefly press
(<0.5S) to save the set and exit back to “SOC View”.
Briefly press for two times (interval time is less than
0.5S) to exit back to the main interface or select “BACK” →
“EXIT” to exit back to the main menu.

14
⑺ “TRIP Reset” - set reset function for single-trip distance
Briefly press (<0.5S) or to select “TRIP Reset”, and
then briefly press (<0.5S) . This moment, briefly press
(<0.5S) or to switch between “NO” and “YES”. TRIP
Reset includes maximum speed (MAXS), average speed
(AVG), single-trip distance (TRIP). After confirmation, briefly
press (<0.5S) again to save the set and exit back to the
“TRIP Reset”. Briefly press for two times (interval time is
less than 0.5S) to exit the main interface or select “BACK”
→ “EXIT” to exit back to the main interface. The data is not
reset automatically when turn off the display or turn off the
power of the bicycle.
⑻ “Wheel” - set the wheel diameter
Briefly press (<0.5S) or to select “Wheel”, and then
briefly press (<0.5S) . This moment, briefly press (<0.5S)
or to select the wheel diameter as “6”/“7”/“8”/
……/“32”/“33”/“34”. After confirmation, briefly press
(<0.5S) to save the set and exit back to “Wheel”. Briefly
press for two times (interval time is less than 0.5S) to
exit back to main interface or select “BACK” → “EXIT” to
exit back to main menu.
⑼ “Speed Limit” - set speed limit
Briefly press (<0.5S) or to select “Speed Limit” and
then briefly press (<0.5S) . This time, briefly press (<0.5S)
or to select the number as “10”/“11”/“12
”/……/“58”/“59”/“60”. After confirmation, briefly press
(<0.5S) to save the set value and exit back to “Speed
Limit”. Briefly press for two times (interval time is less
than 0.5S) to exit back to main interface or select “BACK”
→ “EXIT” to exit back to main interface.
⑽ “AL Sensitivity” - set light sensitivity
Briefly press (<0.5S) or to select “AL Sensitivity”, and
then briefly press (<0.5S) . This moment, briefly press
(<0.5S) or to switch level of the light sensitivity
between “0”/“1”/“2”/“3”/“4”/“5”/“OFF”. “OFF” means
close the function. Level 1 is the weakest light sensitivity
and level 5 is the strongest light sensitivity. Select the level
desired and briefly press (<0.5S) again to save the
setting and exit back to “AL Sensitivity”. Briefly press for
two times (interval time is less than 0.5S) to exit back to
main interface or select “BACK” → “EXIT” to exit back to
main interface.
⑾ “Factory Setting”- Restore factory Settings
Briefly press (<0.5S) or to select “Factory Setting” and then
briefly press (<0.5S). This moment, briefly press (<0.5S) or
to select “YES” / “NO”. Select “YES” and briefly press
(<0.5S) . When display the “OK”, it means it is successful to
restore the factory setting. Briefly press for two
times(interval time is less than 0.5S) to exit back to main
interface or select “BACK” → “EXIT” to exit the main
interface.
15
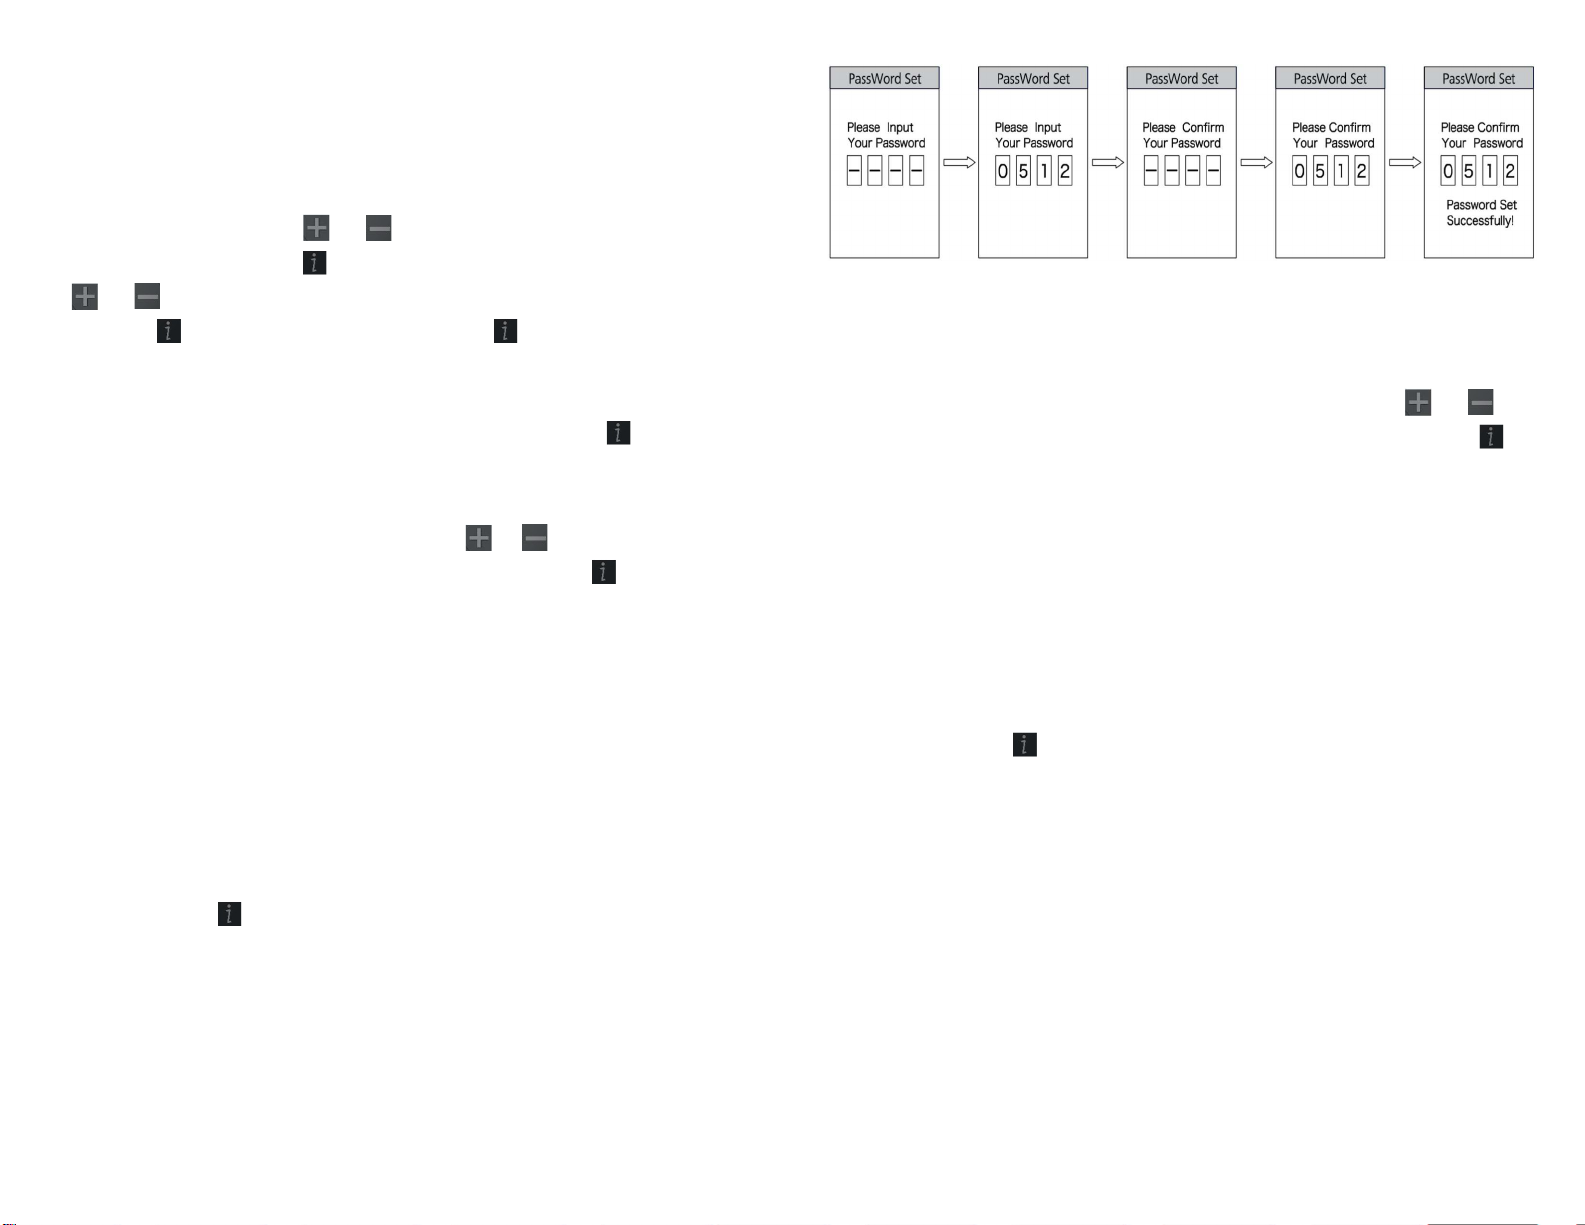
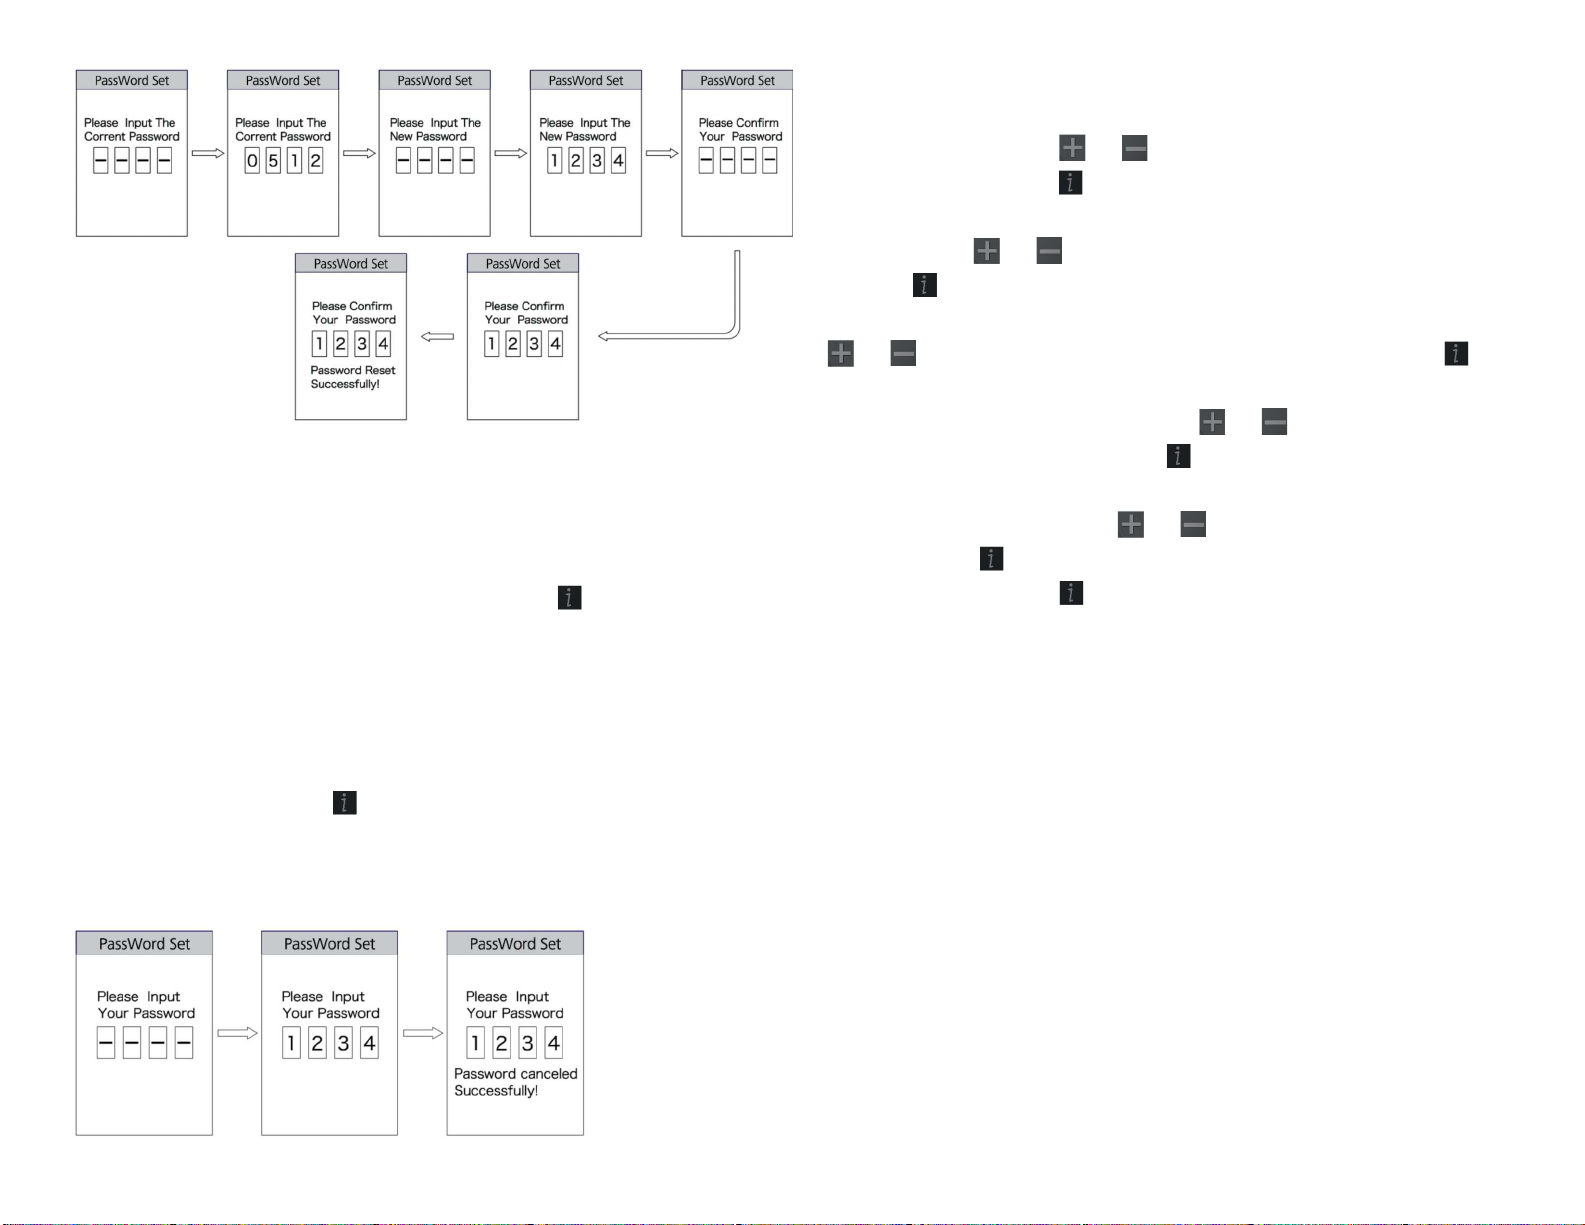
⑿ “Password”- boot password setting
Briefly press (<0.5S) or to select “Password” and then
briefly press (<0.5S) . This moment, briefly press (<0.5S)
or to select “Start Password” and then briefly press
(<0.5S) again. Briefly press (<0.5S) or to switch
between “OFF” / “ON”, the below is the specific way of
switching. Starting password: Enter “Start Password”
interface and select “ON”. Briefly press (<0.5S) , and then
it shows input password in the interface.
This moment, briefly press (<0.5S) or to switch
numbers “0-9”, and then briefly press (<0.5S) to confirm
input number. After input, it shows input password again in
the interface. Repeat the above step to input password
again. If the password is same with the previous time, the
system will prompt it is successful to set password,
otherwise it need to repeat the first step to input the new
password and then re-confirm.
After setting the password, the interface exit back
automatically to original interface within two seconds.
Briefly press for two times (interval time is less than 0.5S)
to exit back to main interface or select “BACK” → “EXIT” to
exit back to main interface.
Change password:
After setting the password, the interface “Password” will
add option “Reset Password”. Briefly press (<0.5S) or
to select “Reset Password”, and then briefly press (<0.5S)
This time it prompt input current password in the
interface. If inputting wrong password for ten times, the
display will turn off automatically. When inputting right
password, it prompt input new password in the interface.
The following step is same with starting password. After
changing the password, it will exit automatically back to
the original interface within two seconds.
Briefly press for two times (interval time is less than
0.5S) to exit back to the main interface or select “BACK” →
“EXIT” to exit back to main interface.
16
Close password:
Enter “Start Password” interface to
select “OFF” and then briefly press (<0.5S) . This moment,
it prompt input password in the interface. If inputting
wrong password for ten times, the display will turn off
automatically. After inputting right password, it prompts it
is successful to close password in the interface. Two
seconds later, it exits back automatically to the original
interface. Briefly press for two times (interval time is less
than 0.5S) to exit back to the main interface or select
“BACK” → “EXIT” to exit the main interface.
⒀ “Set Clock”- time setting
Briefly press (<0.5S) or to select “Set Clock” and then
briefly press (<0.5S) . The time is represented in the 24-
hour system. Cursor stays at the first digit of the clock.
Briefly press or to select “0-2” and then briefly press
(<0.5S) to confirm the selection. This moment, the
cursor switch to the second digit of the clock. Briefly press
or to select “0-9”, and then briefly press (<0.5S) to
confirm the selection. And the cursor will switch to the first
digit of the minute. Briefly press or to select “0-5”,
and then briefly press (<0.5S) to confirm the selection.
The cursor will switch the second digit of the minute, and
then briefly press (<0.5S) or to select “0-9”. Briefly
press (<0.5S) to save the selection and exit back to “Set
Clock”. Briefly press for two times (interval time is less
than 0.5S) to exit back to the main interface or select
“BACK” → “EXIT” to exit back to the main interface.
17
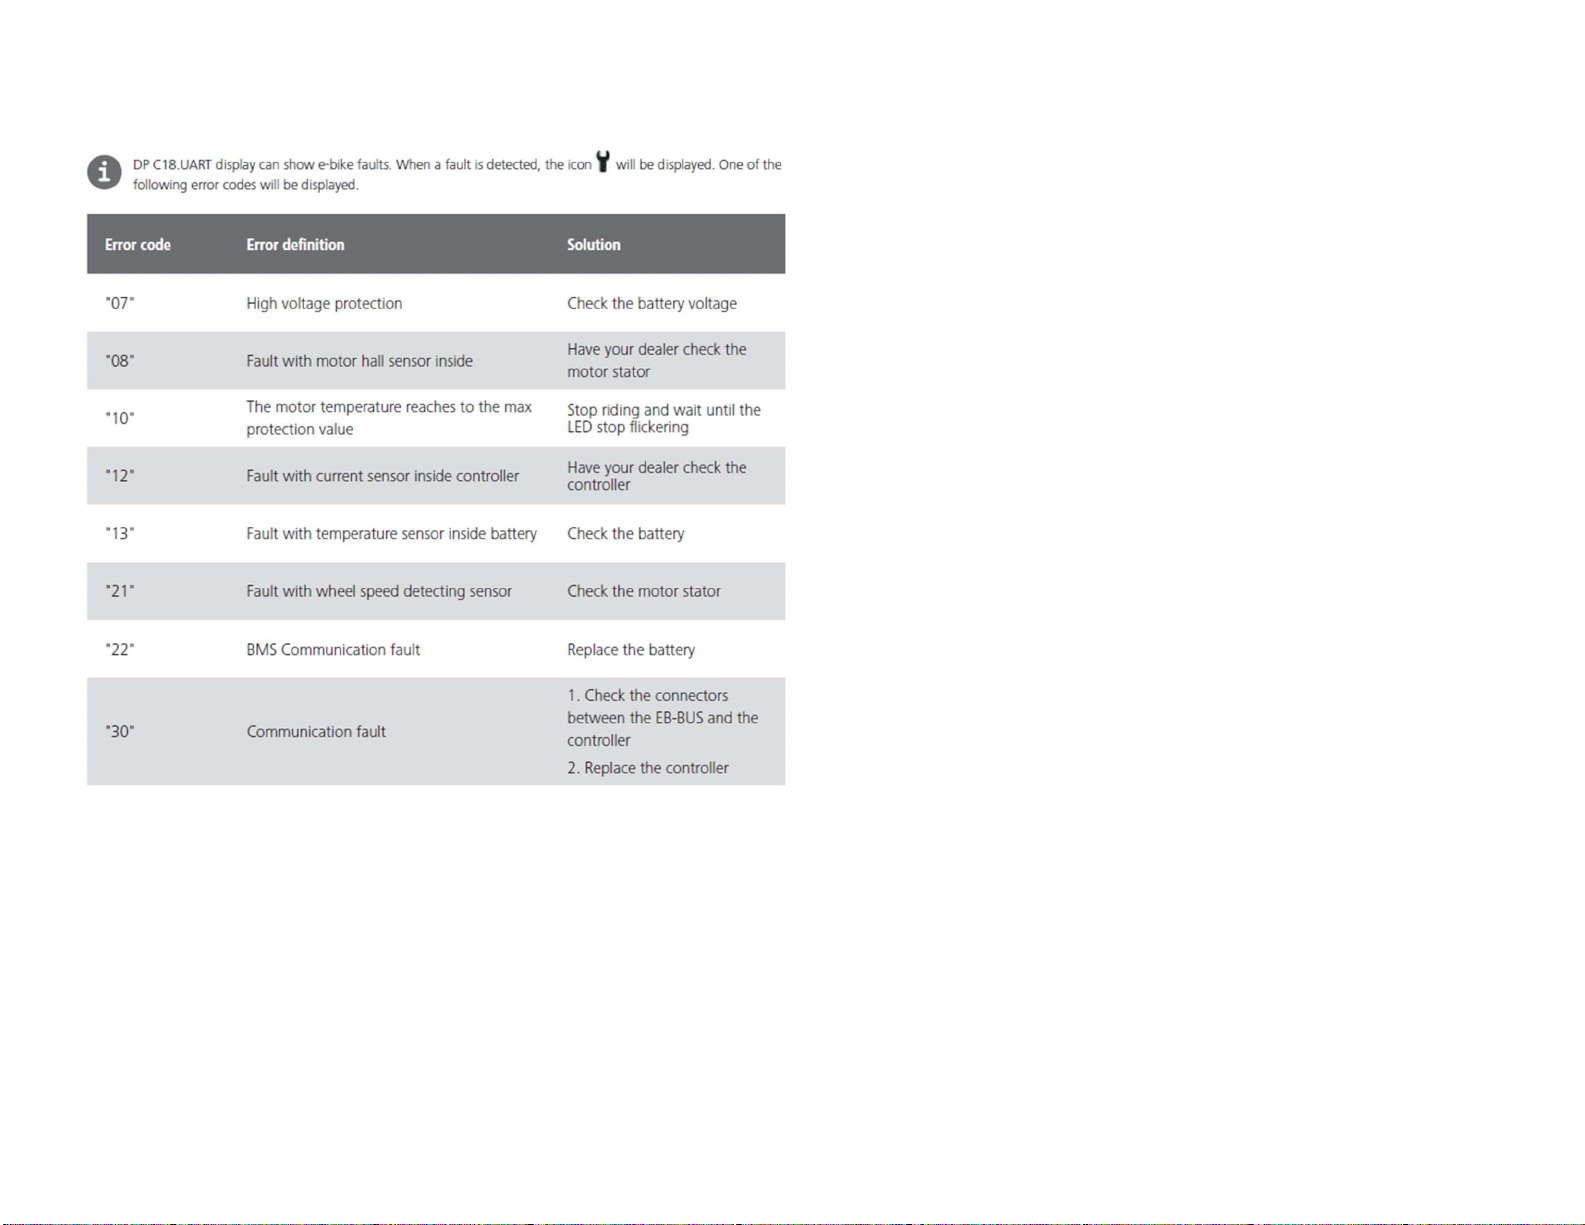
Error code definition

18
WARNINGS AND SAFETY
You should check the operation of your brake inhibitor
switches before every ride. While riding slowly in a
controlled environment (like a driveway), engage the
motor, then squeeze each brake in turn. The motor should
lose power immediately and remain off as long as a brake
lever is depressed.
Always use the lowest assist setting until you are
comfortable with the bike and feel confident controlling the
electric assist.
Keep your hands on the brake levers and remember that
they will always slow or stop the bike if pulled.
Use only the battery provided with your bicycle. Even if it is
physically possible to connect another type of battery, it is
dangerous and potentially damaging to do so.
Never short circuit on the discharge terminals of the
battery. A short circuit will damage the battery and could
cause a fire resulting in severe injury or death, and property
damage. When handling the battery outside the bicycle, be
aware of conductive materials that may short the battery
terminals, such as coins, nails, etc.
Electric bikes are faster and heavier than normal bikes.
When riding in wet weather, you should use extra caution.
Local laws may prohibit the use of high-speed electric
bicycles on bike paths or trails. Be sure you are familiar with
the laws in your area. Even if legal, it is usually not safe to
ride at high speed on paths or trails around other users.
Like any mechanical device, a bicycle and its components
are subject to wear and stress. Different materials and
mechanisms wear or fatigue from stress at different rates
and have different life cycles. If a component’s life cycle
is exceeded, the component can suddenly and
catastrophically fail, causing serious injury or death to the
rider.
Scratches, cracks, fraying, and discoloration are signs of
stress-caused fatigue and indicate that a part is at the end
of its useful life and needs to be replaced.
Electric Bikes can be dangerous to use. The user
or consumer assumes all risk of personal injuries,
damage, or failure of the bicycle or system and
all other losses or damages to themselves and
others and to any property arising because of
using this bicycle.
Website: www.demonelectric.ca
Toll Free: 1-855-373-4685
Telephone: 905 475 8383
Table of contents
Other Demon Powersport Scooter manuals


