I-note Mobile Note Taker Pro User manual


Table of Content
Product Overview
About the Digital Pen................................. . 2
Installing and replacing the ink refill into the pen 2
Installing/replacing pen batteries.......... .
.4
About the Base Unit .
Buttons description .
Reset the unit .
Memory unit LCD..
Charge the battery
Connect to computer
Mounting your base unit to paper.
. 5
. 5
. 6
. 7
.7
.8
...... 8
Take Handwritten Notes .......................••
Off-line mode .....................•.....
On-tine mode .
Use the Device in Connected Mode
Installing NoteTaker software
Uploading notes to your PC
Operation mode of the digital pen .
Using your pen in mouse mode .
Creating Notes. . .
Using the note manager. .
.. 11
..11
..12
. 14
. 15
. 16
. 16
Using the Mobile NoteTaker in Microsoft Windows Vista 17
Using NoteTaker Pen in JournaL...... . 17
Using NoteTaker Pen in MS·word 2007...... . 17
.... 1
..... 10
.10
...10
Product overview
Thanks for purchasing this powerful product
The Mobile NoteTaker can capture any handwritten notes or
drawings on a plain paper and store them in its internal flash
memory. Captured notes can be uploaded to computer via
its USB interface. It really helps when you are away from
computer and needs to capture any instant thoughts or
important points.
The Mobile NoteTaker consists of a digital pen and a small
receiving unit, which combines Ultrasound and Infrared
technologies with sophisticated algorithms to enable an
accurate tracking and positioning system that tracks the
movement of the tip of the pen on any surface and converts
the movement into a vector image of the user's handwriting .
The digital pen transmits handwritings to the receiver unit
for storage.
With the Mobile NoteTaker, you can:
eCapture natural handwritings and drawings while being
away from computer.
eSave captured handwritten notes into built-in flash
memory.
eUpload captured handwritten notes to computer via USB
connection.
eAct as a digital ink pen with hovering and mouse
functionality to directly write into Windows Vista and
Office 2007.
·1·
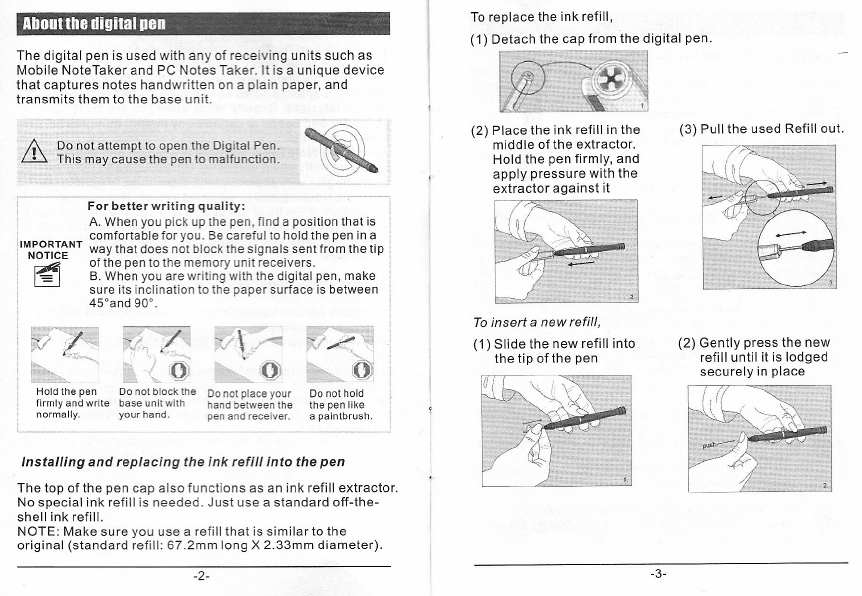
Abouttbe digital pen
The digital pen is used with any of receiving units such as
Mobile NoteTaker and PC Notes Taker. It is a unique device
that captures notes handwritten on a plain paper, and
transmits them to the base unit.
Do not attempt to open the Digital Pen.
This may cause the pen to malfunction.
For better writing quality:
A.
Whenyou pick upthe pen, find a position that is
, comfortable for you. Becareful to hold the pen in a
iIM:gT~~~NT
way that does not block the
~ignal~
sent from the tip
~ of the pen to the memory Unitreceivers.
~ B. When you are writing with the digital pen, make
sure its inclination to the paper surface is between
45"and 90".
'T~.
.,~.~
Do not block the 00 not place your
base unit with hand between the
your hand. pen and receiver.
Do not hold
the pen like
a paintbrush.
Installing and replacing the ink refill into the pen
The top of the pen cap also functions as an ink refill extractor.
No special ink refill is needed. Just use a standard off-the-
shell ink refill.
NOTE: Make sure you use a refill that is similar to the
original (standard refill: 67 .2mm long X 2.33mm diameter).
-2-
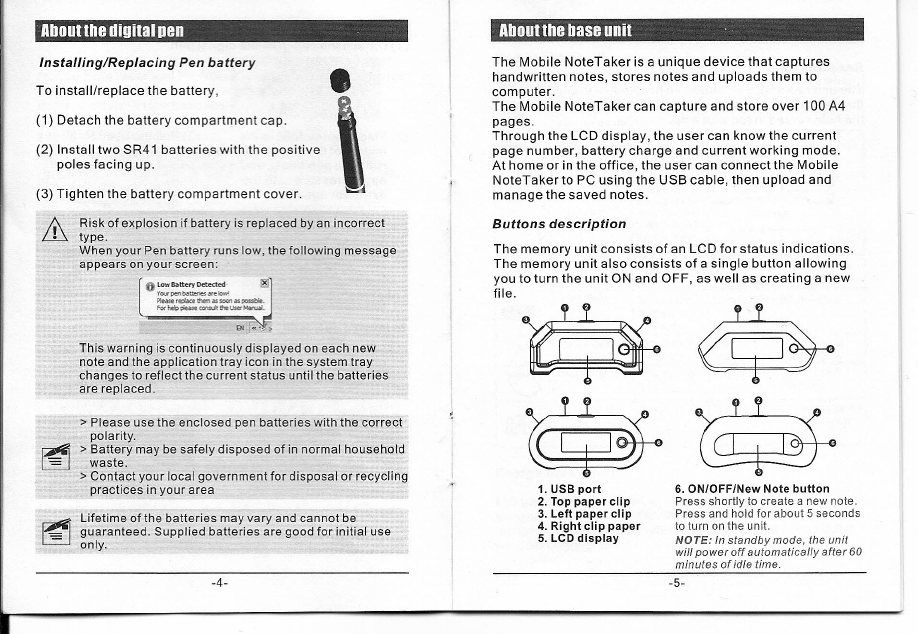
To replace the ink refill,
(1) Detach the cap from the digital pen.
(2) Place the ink refill in the
middle of the extractor.
Hold the pen firmly, and
apply pressure with the
extractor against it
To insert anew refill
(1) Slide the new refill into
the tip of the pen
(3) Pull the used Refill out.
(2) Gently press the new
refill until it is lodged
securely in place
-3-
About the digital pen
Installing/Replacing Pen battery
•
To install/replace the battery,
(1) Detach the battery compartment cap.
(2) Install two SR41 batteries with the positive
poles facing up.
(3) Tighten the battery compartment cover.
Risk of explosion if battery is replaced by an incorrect
type.
When your Pen battery runs low, the following message
appears on your screen:
This warning is continuously displayed on each new
note and the application tray icon in the system tray
changes to reflect the current status until the batteries
are replaced.
>
Please use the enclosed pen batteries with the correct
polarity.
>
Battery may be safely disposed of in normal household
waste.
>
Contact your local government for disposal or recycling
practices in your area
Lifetime of the batteries may vary and cannot be
guaranteed. Supplied batteries are good for initial use
only.
-4-
-5-
Aboutthe hase unit .
The Mobile NoteTaker is a unique device that captures
handwritten notes, stores notes and uploads them to
computer.
The Mobile NoteTaker can capture and store over 100 A4
pages.
Through the LCD display, the user can know the current
page number, battery charge and current working mode.
At home or in the office, the user can connect the Mobile
NoteTaker to PC using the USB cable, then upload and
manage the saved notes.
Buttons description
The memory unit consists of an LCD for status indications.
The memory unit also consists of a single button allowing
you to turn the unit ON and OFF, as well as creating a new
file.
1. USB
port
2. Top paper clip
3. Left paper clip
4. Right clip paper
5. LCD display
6. ON/OFF/New Note button
Press shortly to create a new note.
Press and hold for about 5 seconds
to turn on the unit.
NOTE: In standby mode the unit
will power off automatically after 60
minutes
of
idle time.

Aboullhe base unil
Reset the Unit
The unit has a RESET button on the back. It is used to reset
the unit when it has no respond. To reset the unit, stab into
the hole circled in red with a tip.
~
~DOD)
(EN100) (EN101)
@ill
~
(EN102) (EN103)
Aboullhe base unil
Memory Unit LCD
Indicator
Meaning
On when
Off when
Blink
when
-e- The device is
Unitis
Unitis NOT
Data is
connected connected connected to uploaded
with
computer.
tope
P
tope
(MEMORY FULL)
Memory space The unit Less than Never
is full.
Memory is 90%
capacity
90% full. It is
used
highly
recommende
d
to
upload
your files to
your PC and
delete them
from memory
~
Pen battery Pen battery Pen battery Pen battery
is low
is enough
islow
-
Base unit Base unit
Unitis Off Charging
battery batteryis
enough
"
Pen mode The pen is Mouse The pen is
writing
Mode
writing
U
Mouse Mode The pen is
Pen mode
The pen is
writing writing
ISB
Numberof
Always UnitisOff
Memory is full
saved notes or has error
in memory
Charge the battery
The base unit has a built-in rechargeable battery. No
external battery is needed. When the battery is low, just
recharge the battery by connecting the device to computer
via USB connection.

Aboullhe base unil
Connect to computer
You can upload notes from the base unit to a computer, work
in On-line mode and upgrade firmware by connecting the
device to a computer. Use the included USB cable to
connect the device to a computer.
Mounting your Base Unit to Paper
Your base unit can be mounted in 3 positions on top of the
paper except for EN1 01 which can only be mounted at top
center. The following images illustrate the way you can
mount your base unit, according to the recommended
positioning.
A.Mounting your base unit at the top center of the paper is
recommended for a single paper
r
u_s_a-,g~e_: -"
B. Mounting your base unit at the top left corner of a
paper block is recommended for right hand Users:
Aboullhe base unil
)
\
-'
C. Mounting your base unit at the top right corner of a
Paper block is recommended for left hand Users:
Base Unit Coverage area:
The following images illustrate the coverage area of your
base unit.
Note: a. The paper is an A4 size paper
b. The striped line illustrates the covered area in
Each of the positions
1
J~
~------~----: ~----::.----------- t]'---------------
, ,
.
";..-
:
-',
"
,
'----",
,
,---
, ,
,~--=-= ~-'
i, -- .:-
,=- - ~
-~-:::=-:-::-=--~ :..------------:, \.:::::-~:-~=----~:
IMPORTANT
NOTICE
~
DO NOT move or overturn the base unit when
you are using the base unit. Fix it up onto the
edge of the paper with the face up. Moving or
overturning it may result in mixed strokes or
other fatal errors.
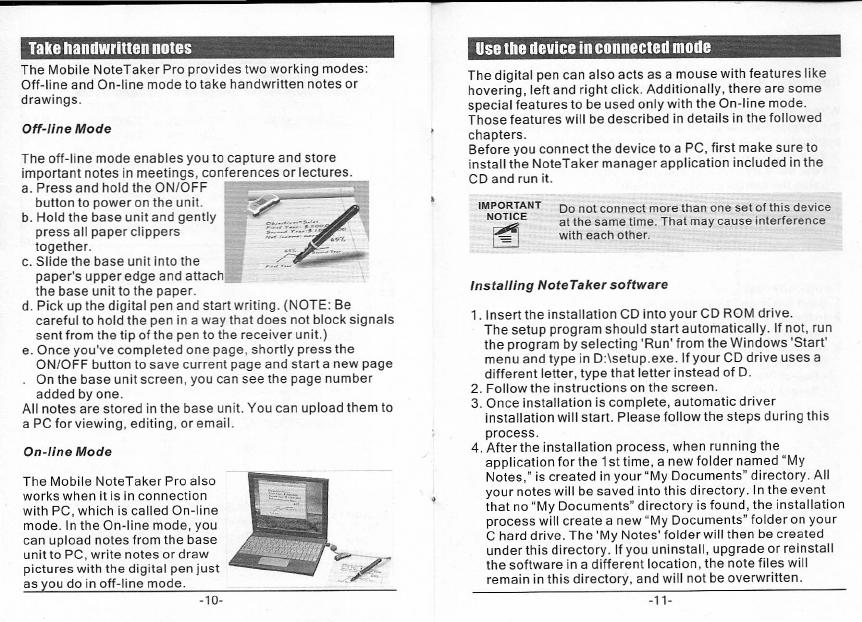
Take handwritten notes
The Mobile NoteTaker Pro provides two working modes:
Off-line and On-line mode to take handwritten notes or
drawings.
Off-line Mode
The off-line mode enables you to capture and store
important notes in meetings, conferences or lectures.
a. Press and hold the ON/OFF
button to power on the unit.
b. Hold the base unit and gently
press all paper clippers
together.
c. Slide the base unit into the
paper's upper edge and attach
the base unit to the paper.
d. Pick up the digital pen and start writing. (NOTE: Be
careful to hold the pen in a way that does not block signals
sent from the tip of the pen to the receiver unit.)
e. Once you've completed one page, shortly press the
ON/OFF button to save current page and start a new page
. On the base unit screen, you can see the page number
added by one.
All notes are stored in the base unit. You can upload them to
a PC for viewing, editing, or email.
On-line Mode
The Mobile NoteTaker Pro also
works when
it
is
in connection
with PC, which is called On-line
mode. In the On-line mode, you
can upload notes from the base
unit to PC, write notes or draw
pictures with the digital pen just
as you do in off-line mode.
-10-
Use the device in connected mode
The digital pen can also acts as a mouse with features like
hovering, left and right click. Additionally, there are some
special features to be used only with the On-line mode.
Those features will be described in details in the followed
chapters.
Before you connect the device to a PC, first make sure to
install the NoteTaker manager application included in the
CD and run it.
IMPORTANT
NOTICE
~
Do not connect more than one set of this device
at the same time. That may cause interference
with each other.
Installing Note Taker software
1. Insert the installation CD into your CD ROM drive.
The setup program should start automatically. If not, run
the program by selecting 'Run' from the Windows 'Start'
menu and type in D:\setup.exe. If your CD drive uses a
different letter, type that letter instead of D.
2. Follow the instructions on the screen.
3. Once installation is complete, automatic driver
installation will start. Please follow the steps during this
process.
4. After the installation process, when running the
application for the 1st time, a new folder named "My
Notes," is created in your "My Documents" directory. All
your notes will be saved into this directory. In the event
that no "My Documents" directory is found, the installation
process will create a new "My Documents" folder on your
C hard drive. The 'My Notes' folder will then be created
under this directory. If you uninstall, upgrade or reinstall
the software in a different location, the note files will
remain in this directory, and will not be overwritten.
-11-

Usethe device in connected mode
Uploading Notes to your P
Usethe device in connected mode
When in On-line Mode, you can upload all your notes from
the memory unit to your PC using the NoteTaker software
application. Before doing so, first make sure that:
• Your PC software application is running
• Your memory unit is connected to your PC's USB port
using Ihe memory unit USB cable
The following icon indicator will be displayed on your
memory unit LCD during USB connection.
-e-
To upload notes:
1. Start the NoteTaker Manager.
2. In the 'File' menu, select 'Upload'. All notes in your
memory unit are uploaded to your PC.
3. At the end of the process, a message appears asking if
you want to delete all notes on the memory unit.
• Select 'Yes' to erase all notes on your memory unit.
• Select 'NO' to retain the notes.
~.
When you select 'NO', the next time you upload
those notes that are already uploaded to the PC
will not be uploaded. However, if you delete notes
from the PC application and then upload again from
the memory unit, the notes will be uploaded again.
You can select one of three options to be performed
automatically when your Mobile NoteTaker base unit is
connected .
The following can be selected in the 'Confiquration=-
>Preferences menu within the Note Manager.
_ri_
r.y .
r "
r~.
~..---....
.~
r ••
r •••
Upload newnotes automatically options:
• YES· Your Mobile Notes will be automatically
uploaded each time you connect it to your PC
NO· Your Mobile Notes will not be uploaded.
Inthis option, you will manually need to perform
this action by selecting 'File ··>Upload' menu
within the Note Manager
ASK ME· Each time you connect the Mobile
NoteTaker base unit, you will be prompted if you
want to upload your notes
-13--12-

Use the device in connecled mode
Operation mode
of
the digital pen
When connected to PC, NoteTaker supports a Note mode
and a Mouse Mode.
In Note mode, writing on a paper with the digital pen will
create an Ink note within the NoteTaker application.
In Mouse mode, the digital pen acts as a mouse with
features like hovering, left and right click. The click button is
on the pen's body. Normally, Ink enabled applications such
as Microsoft Journal, Vista Ink applications, Office 2007
should be used in this mode.
·Selecting default mode can be done in
2
ways:
a. At the first time you start your NoteTaker application
OR
b. Using the NoteTaker 'Configuration' menu ('Set Digital
Pen Mode')
Changing modes during operation can be done in
3
ways:
a. Press the base unit top button ('ON/OFF' button)
OR
b. Right click the 'NoteTaker' tray icon, and change mode
OR
c. Clicking on the virtual area using your pen
L..-,t=""--
i-j
-I
I
On each mode change, a balloon will popup indicating
the current mode.
-14-
Usethe device in connecled mode
Using your Pen in Mouse Mode
In Mouse mode, your Digital pen behaves as a mouse.
Your pen will have the following functionality:
• Tomove your mouse cursor you can hover with the pen.
To start Hovering you can press the side button or tip
the pen on the paper. The pen will now hover even with
no press for about 30 seconds.
• To Click an object, point your mouse cursor on that
object. Now tip the pen on the paper or click the side
button.
• To Double-Click an object, point your mouse cursor on
that object. Now tip the pen twice on the paper or click
the side button twice.
• To Right-Click an object, point your mouse cursor on
that object. Now press the tip of the pen a bit longer on
the paper.
A
special 'Right Click' cursor will appear.
lift the pen from the paper, and the context menu (Right
Click menu) appears.
Avoid interference while using regular mouse:
It is recommend that while not in use,
the pen is placed as shown, to avoid
Interface with a regular mouse operation.
-15-

Creating Notes
Use the device in connected mode
The moment you begin to write or sketch with your digital
pen, a Note Window appears on your screen that reflects
everything that you write on the paper attached to the base
unit. The Note Window toolbar allows you to perform
various basic functions such as saving, editing, sending
and copying your notes while writing, or once you have
finished writing.
NOTE: While writing, make sure not to block the line of sight
between the pen and the base unit with your hand. When
the line of sight is blocked, the NoteTakerwili not function
properly.
~
-:I
..
o.
"
Whenyouhavefin~hed
with your note use the
other tool bar buttons to
save your note to a
picture file, email it, print
it, or simply save it to your
Note Manager window for
later use
Use the note manager
The Note Manager can be used for storing, viewing,
searching, copying, exporting and e-mailing notes.
For detail information about the note manager, see the
Instruction Manual contained in the CD.
-16-
I
Using the Mobile NoteTaller in MicrosoH Windows Vista
The Mobile NoteTaker enables you to use Windows Vista Ink
applications such as Journal, Sticky notes and also to add Ink
Notes into Office 2007 applications.
Make sure the Mouse Icon on the base unit LCD is on. There is no
need to operate the NoteTaker application yet. The pen works in
tablet-pen mode.
Start Hovering above the paper. Check the coverage area.
Coverage area means the size of the imaginative square on
the paper that covers the whole screen area (in between 4
corners).
Using Note Taker Pen in Journal
(1) RunWindows Journal
(2) Start writing on the paper while looking at the screen
(3) You can use few more features like circle a text with Lasso
(next the eraser) and ask for recognition in Actions drop down
directory. You can also erase, highlight texts etc.
Using NoteTaker pen in MS-Word 2007
(1)Open a Microsoft Word 2007 file
(2)From Ink tool bar (should be set manually) choose the red pen.
Various ink options are opened for you. You can annotate or
write in Word.
(3)Open ink comment-(blue pen on yellow mote at the ink toolbar).
A balloon is opened, on the right hand side. Use it for
handwriting comments.
In every Office Application there is a Tablet PC input Panel on
the left hand side. You can seejust the end of it. When you tap it,
it will appear on the screen. You can write sentence or individual
letters and it would recognize the handwriting automatically:
word byword or letter by letter.
Comment: at any time that the mouse goes dead. tip once
on the paper with the refill. Itwill take the pen out of sleep
mo~.
-17-
Table of contents


