I TUTTOFARE YUP000001 User manual

FOUR ME - ROBOT DA CUCINA
MULTI-PURPOSE KITCHEN ROBOT • MEHRZWECK-KÜCHENMASCHINE •
ROBOT DE CUISINE MULTIFONCTION • ROBOT DE COCINA MULTIFUNCIÓN
MANUALE DI ISTRUZIONI
YUP000001-YUP000002
INSTRUCTION MANUAL • HANDLEIDING •
MANUEL D’INSTRUCTION • MANUAL DE INSTRUCCIONES

2
FOUR ME - ROBOT DA CUCINA ITA
MANUALE DI ISTRUZIONI
INFORMAZIONE TECNICA
Modello: YUP000001
Alimentazione: 220-240 V ~ 50/60 Hz
Potenza: 450 Watt
ATTENZIONE: Leggere attentamente queste istruzioni prima di utilizzare il dispositivo e
conservarle!
RACCOMANDAZIONI DI SICUREZZA
• Durante l’uso di apparecchi elettronici, è importante seguire basilari precauzioni per la
sicurezza, incluse le seguenti:
• NON toccare le lame o rimuovere gli accessori quando l’apparecchio è in funzione.
• NON introdurre corpi estranei all’interno dell’apparecchio. Tenere a distanza capelli, dita,
altre parti del corpo ed indumenti dalle lame e dagli accessori in funzione.
• Scollegare sempre l’apparecchio quando non in uso e prima della pulizia.
• Rimuovere gli accessori prima della pulizia.
• L’accessorio sminuzzatore non è adatto ai surgelati
• NON eettuare la pulizia con prodotti in polvere o abrasivi.
• Questo apparecchio non è un giocattolo per bambini. Può essere utilizzato da bambini al
di sopra degli 8 anni di età e da persone con ridotte capacità siche, sensoriali e mentali o
con scarsa esperienza e conoscenza solo se supervisionati o istruiti adeguatamente sull’uso
sicuro dell’apparecchio stesso e se sono in grado di comprendere i pericoli insiti. La pulizia
e la manutenzione non devono essere eseguite da bambini, a meno che non abbiano più di
8 anni e non siano supervisionati. Tenere l’apparecchio e il suo cavo al di fuori dalla portata
dei bambini al di sotto degli 8 anni.
• NON utilizzare l’apparecchio per scopi diversi da quelli a cui è destinato. Prodotto destinato
al solo uso domestico.
• NON utilizzare l’apparecchio in caso presenti danni al cavo o alla spina elettrica. Non
utilizzare l’apparecchio nel caso risulti malfunzionante o in qualche modo danneggiato.
Portare l’apparecchio al centro assistenza autorizzato per controllo, riparazione o
sostituzione di parti elettriche e meccaniche.
• NON utilizzare l’apparecchio con mani bagnate.
• Per evitare il rischio di shock elettrico, NON immergere il cavo di alimentazione, la spina o
l’unità principale in acqua o altro liquido.
• Scollegare l’apparecchio staccando la spina dalla presa a muro. NON tirare il cavo.
• NON utilizzare l’apparecchio con accessori diversi da quelli in dotazione.
• NON posizionare l’apparecchio in prossimità di fonti di calore. Prestare attenzione anchè il
cavo non venga in contatto con superci roventi (piastre/fornelli/etc)
• Al primo utilizzo assicurarsi di rimuovere correttamente l’apparecchio dal suo imballaggio.
• Il dispositivo è destinato ad un uso interno, non utilizzarlo all’aperto.
• Utilizzare il dispositivo su un piano stabile.
• L’utilizzo di accessori allegati non raccomandati dalla fabbrica produttrice potrebbe causare
danni.
TEMPO DI UTILIZZO
Per proteggere il motore da surriscaldamento e allungare la vita dell’apparecchio, si prega di prestare particolare
attenzione ai tempi di utilizzo di ogni funzione:
Funzione Tempo di Utilizzo Massimo
FRULLATORE 3 minuti ON e 1 minuto OFF
TRITATUTTO 9 minuti
AFFETTA VERDURE 9 minuti
CENTRIFUGA 9 minuti
GELATIERA 9 minuti

3
FOUR ME - ROBOT DA CUCINA ITA
MANUALE DI ISTRUZIONI
PARTI:
1. Tramoggia
2. Attacco per frullatore
3. Unità motrice
4. ON/OFF/PULSE
5. Piedini antiscivolo
6. Attacco per tritatutto
7. Insaccatore per KIBE (due parti)
8. Disco perforato medio
9. Disco perforato ne
10. Insaccatore per salsicce
11. Frullatore comprensivo di bicchiere, anello lettato, inserto lama ed anello sigillante (v. capitolo “utilizzo del
robot come frullatore”)
12. Anello del coperchio con inserto del coperchio
13. Spintore
14. Tritacarne comprensivo di lame, disco perforato grosso, supporto di chiusura (v. capitolo “utilizzo del robot
come frullatore”)
ATTENZIONE!
L’elettrodomestico ha funzione di output 2 in 1 bidirezionale.
Quando si usa una funzione, l’altra funzione inutilizzata dev’essere chiusa col coperchio.
FRULLATORE
• ATTENZIONE! Non usare il dispositivo senza cibo all’interno e non sovraccaricare il contenitore!
Questo potrebbe surriscaldare il dispositivo o danneggiarne il motore.
• ATTENZIONE: Lame taglienti! Prestare attenzione quando si maneggia la lama inserita in modo
da prevenire qualsiasi rischio di tagliarsi. Spegnere il dispositivo prima di inserire o rimuovere le lame
inserite.
• ATTENZIONE: Pericolo di ustione! Non introdurre cibo bollente nel dispositivo perché potrebbe fuoriuscire
durante l’utilizzo. La temperatura del cibo dev’essere inferiore ai 50°C. Lasciar rareddare il cibo bollente prima
di lavorarlo nel dispositivo.
• Prima dell’accensione del dispositivo, assicurarsi che l’anello del coperchio sia correttamente posizionato sul

4
FOUR ME - ROBOT DA CUCINA ITA
MANUALE DI ISTRUZIONI
bicchiere del frullatore.
• Togliere gli accessori del tritacarne, se si sta utilizzando il dispositivo come frullatore. In caso contrario si
surriscalderà o si danneggerà il motore.
Il dispositivo è dotato di una protezione superiore: il dispositivo si spegne se sovraccarico.
In questo caso, posizionare il tasto su “0”. Estrarre la spina dalla presa elettrica e lasciar
raffreddare il dispositivo per circa 10 minuti. Ora il dispositivo è nuovamente pronto all’uso.
ASSEMBLAGGIO
• Prendere tutti i componenti del frullatore che sono illustrati a sinistra.
• Posizionare l’inserto lama nell’anello sagomato
• Posizionare l’anello di guarnizione sull’inserto lama
• Avvitare l’anello di guarnizione sul fondo del bicchiere mixer. Controllare
che sia ssato saldamente.
• Posizionare l’unità del motore su una supercie piana, stabile ed asciutta.
Premere leggermente l’unità del motore verso il basso anchè i piedini
aderiscano al piano di lavoro.
• Se il tritacarne è agganciato all’unità del motore, premere il bottone di
rilascio e girare il tritatutto in senso orario no a rimozione.
• Inserire l’ingresso nel supporto del tritacarne e girare in senso anti-orario
no al suo arresto.
• Se l’ingresso è stato ssato al supporto del frullatore sull’unità del motore,
girarlo in senso anti-orario e rimuoverlo.
• Posizionare l’anello sagomato col contenitore nel supporto del frullatore.
I dadi bloccanti sull’anello sagomato devono essere collegati nei vani di
corrispondenza sul supporto del frullatore.
• Premere verso il basso il bicchiere mixer e girarlo in senso anti-orario no
al suo arresto.
UTILIZZO
• Riempire il bicchiere mixer col cibo da ridurre in purea o in miscela.
• Posizionare l’anello del coperchio sul contenitore del tritacarne e premerlo su esso saldamente.
• Posizionare l’inserto del coperchio nell’anello del coperchio in modo che i dadi bloccanti nell’anello del
coperchio siano incastrati nei vani di corrispondenza. Poi girare l’inserto del coperchio in senso orario per
ssarlo nella sua posizione.
• Inserire la spina in una presa elettrica installata adeguatamente e facilmente accessibile.
• Accendere il dispositivo.
• - in modalità normale. Premere il tasto ON/0/P sulla posizione ON
• - in modalità pulsante (a intervalli), premere il tasto ON/0/P sulla posizione P e tenere premuto, quando si
rilascia il tasto, il dispositivo è spento. La modalità pulsante è adatto per tritare cibi duri ed i cubetti di ghiaccio.
Anche grandi quantità di cibo possono essere tritate se si preme il tasto ON/0/P sulla posizione P più volte in
successione.
• Puoi aggiungere altri ingredienti attraverso l’apertura nell’anello del coperchio durante l’operazione. Per fare
ciò, è suciente girare l’inserto del coperchio in senso anti-orario e rimuoverlo.
• Una volta che il cibo è stato processato, spegnere il dispositivo (in modalità normale premere il tasto ON/0/P
alla posizione “0”) e togliere la spina dalla presa elettrica.
• Girare il bicchiere mixer in senso anti-orario e rimuoverlo dall’unità del motore.
• Aprire il bicchiere mixer e rimuovere il cibo.
• Pulire tutte le parti utilizzate.
• Inserire il coperchio nel supporto del frullatore sull’unità del motore. Le frecce sulla copertura e l’unità del
motore devono essere puntati l’uno vero l’altro e i dadi bloccanti devono essere incassati nella nicchia. Poi
premere la copertura verso il basso e girare in senso orario no all’arresto.
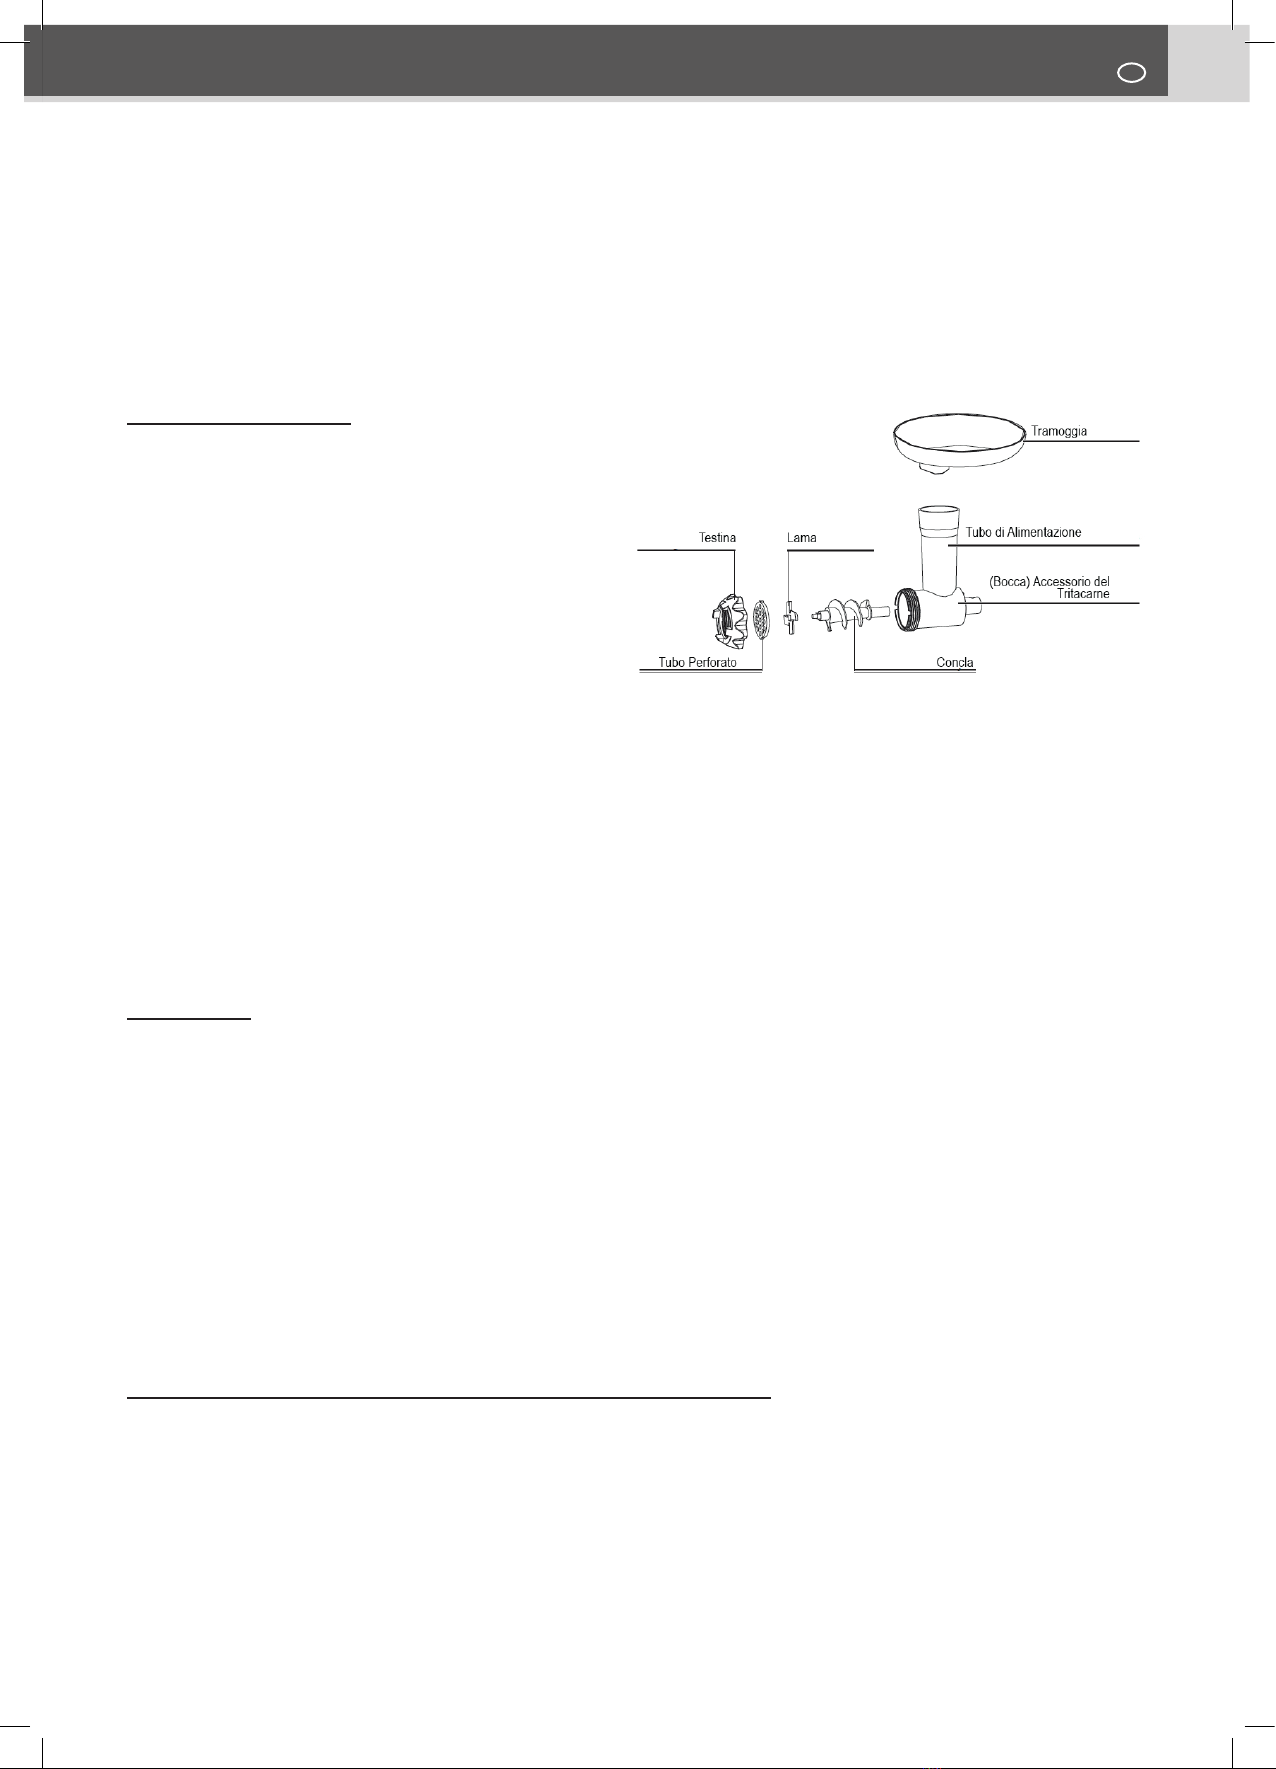
TRITACARNE
ATTENZIONE!
Non tentare di spingere il cibo sotto il piano di alimentazione del tritacarne: questo potrebbe
danneggiare il dispositivo!
ATTENZIONE: pericolo di lesioni! Non spingere il cibo sotto il piano di alimentazione usando la
mano o altri oggetti diversi dallo spintore in dotazione!
ATTENZIONE: pericolo di tagli da lame alate! Fare attenzione quando si maneggia la punta della fustella per
prevenire eventuali tagli da lama.

5
FOUR ME - ROBOT DA CUCINA ITA
MANUALE DI ISTRUZIONI
L’accessorio tritacarne non è adatto per cibi surgelati!
Togliere l’accessorio frullatore se si sta utilizzando l’accessorio tritacarne. In caso contrario si vericherà un
eccessivo surriscaldamento o danni al motore.
Il dispositivo è dotato di una protezione superiore: il dispositivo si spegne se sovraccarico.
In questo caso, posizionare il tasto su “0”. Estrarre la spina dalla presa elettrica e lasciar
raffreddare il dispositivo per circa 10 minuti. Ora il dispositivo è nuovamente pronto all’uso.
Puoi utilizzare l’accessorio tritacarne per sminuzzare carne e pesce ed utilizzare gli accessori addizionali per fare
piccole salsicce, kibe e biscotti.
ASSEMBLAGGIO
• Per assemblare i componenti del tritacarne illustrati
qui sopra:
• Posizionare la concla con la mano sul fronte
dell’accessorio tritacarne.
• Posizionare la lama all’estremità della concla: i
bordi sagomati della lama devono essere allineati
con gli inviti, lontano dalla concla.
• Selezionare uno dei tre dischi perforati (ne, medio
o grosso) e inserirlo all’estremità della concla. I dadi
bloccanti dei dischi perforati non devono sporgere.
• Se vuoi utilizzare l’insaccatore salsicce, posiziona
l’accessorio sul disco perforato.
• Avvitare la testina sull’accessorio tritacarne. Non stringere troppo.
• Posizionare l’unità del motore su una supercie piana, stabile ed asciutta. Premere leggermente l’unità del
motore no all’adesione dei piedini alla supercie.
• Se l’accessorio frullatore è inserito all’unità del motore, girare in senso antiorario e rimuoverlo. Inserire il
coperchio nell’aggancio del frullatore.
• Se il coperchio è nell’aggancio del tritacarne sull’unità del motore, premere il bottone di rilascio e fatto questo,
girare il coperchio in senso orario no alla sua rimozione.
• Inserire l’accessorio tritacarne nell’aggancio tritacarne. Inizialmente tenere il tubo di alimentazione ad un
angolo di 90°. Girarlo in senso antiorario no al suo arresto.
• Posizionare la tramoggia sul tubo di alimentazione.
UTILIZZO
• Posizionare una ciotola sotto l’accessorio tritacarne per raccogliere il cibo sminuzzato.
• Inserire la spina nella presa elettrica correttamente installata e facilmente accessibile.
• Accendere il dispositivo, selezionando:
• modalità normale. Premere il tasto ON/0/P sulla posizione ON
• modalità PULSE (a intervalli), premere il tasto ON/0/P sulla posizione P e tenere premuto, quando si rilascia il
tasto, il dispositivo si ferma
• Posizionare il cibo da sminuzzare nella tramoggia ed utilizzare lo spintore per spingere gradualmente il cibo nel
tubo di alimentazione.
• Una volta che il cibo è sminuzzato, spegnere il dispositivo (in modalità normale premere il tasto ON/0/P sulla
posizione 0) e togliere la spina dalla presa elettrica.
• Premere il tasto di rilascio, girare l’accessorio tritacarne in senso orario no alla rimozione.
• Pulire tutte le parti usate.
• Inserire il coperchio nell’aggancio del tritacarne e girarlo in senso antiorario nchè entra in posizione.
UTILIZZO DELL’INSACCATORE DELLE SALSICCE
• Preparare l’accessorio tritacarne nella modalità descritta nella sezione “Assemblaggio”. Inserire l’insaccatore
salsicce.
• Scegliere una guaina articiale o naturale della salsiccia e distenderla sull’insaccatore.
• Posizionare la carne da sminuzzare nella tramoggia ed usare lo stantuo per premerla gradualmente nel tubo
di alimentazione.
• Lasciar fuoriuscire la salsiccia dall’insaccatore. Girare la salsiccia piena a intervalli regolari per formare delle
salsicce singole. Assicurarsi di non riempire troppo la guaina della salsiccia.
• Spegnere il dispositivo dopo l’uso. Togliere la spina dalla presa elettrica e pulire tutte le parti utilizzate.

6
FOUR ME - ROBOT DA CUCINA ITA
MANUALE DI ISTRUZIONI
UTILIZZO DELL’ACCESSORIO KIBE
Il Kibe è una pietanza tipica del Medio Oriente: è una polpetta fritta fatta di
carne d’agnello e bulgur(grano spezzato)
Preparazione dell’impasto
Ingredienti:
• 500g di agnello o montone (tagliato a listarelle)
• 500g di grano spezzato (lavato e scolato)
• 1 cipolla piccola (nemente tritata)
Preparazione:
Importante! Non asciugare del tutto il grano spezzato; se si asciuga, il tritacarne si
sovraccarica e si danneggia.
• Preparare l’accessorio tritacarne seguendo la sezione “assemblaggio”. Inserire il disco perforato ne. Non
usare l’insaccatore salsicce.
• Posizionare una ciotola sotto l’accessorio tritacarne per raccogliere il cibo tritato.
• Connettere il dispositivo ad una presa elettrica installata adeguatamente ed accessibile; accendere il
dispositivo.
• Mischiare minuziosamente carne e grano in una ciotola.
• Lavorare la miscela carne/grano con l’accessorio tritacarne due volte.
• Aggiungere la cipolla alla miscela e mischiare tutto insieme.
Preparare il ripieno
Ingredienti:
• 400g di agnello (tagliato a listarelle)
• 1 cucchiaio da tavola di olio
• 2 cipolle medie (nemente tritate)
• 1 cucchiaio da tavola di farina
• Sale e pepe q.b.
Preparazione:
• Lavorare l’agnello col disco perforato ne dell’accessorio tritacarne
• Soriggere la cipolla
• Aggiungere l’agnello tritato e portarlo a cottura
• Aggiungere gli altri ingredienti e stufare per 2 minuti
• Togliere il grasso in eccesso e lasciar rareddare
Preparazione dell’accessorio per i Kibe
• Assemblare le parti dell’accessorio Kibe
• Preparare l’accessorio tritacarne nella modalità descritta nella sezione “assemblaggio”. Adattare l’accessorio
pe Kibe al posto del coltello su un disco perforato. I dadi bloccanti dell’accessorio Kibe devono essere incastrati
nell’accessorio tritacarne recesso.
• Posizionare una ciotola sotto il tritacarne.
• Inserire la spina nella presa elettrica correttamente installata e facilmente accessibile.
• Posizionare la miscela di carne/grano nella tramoggia e usare lo stantuo per spingerla gradualmente nel tubo.
• Una volta terminata la miscela, spegnere il dispositivo e togliere la spina dalla presa elettrica.
• Dividere l’impasto per formare gli involucri: inserire il ripieno e formare delle polpette allungate.
• Friggere le polpette in olio bollente no a completa doratura.
• Pulire tutte le parti utilizzate del dispositivo.
AFFETTAVERDURE
L’affettaverdure è dotato di tre tubi che permettono di ridurre a fette o a
julienne o grattugiare.
Tubo fette: per tagliare a fette sottili
Tubo julienne: per tagliare a julienne
Tubo grattugia: per formaggi, cioccolato, biscotti e verdure
ASSEMBLAGGIO
• Posizionare l’unità del motore su una supercie piana, stabile ed asciutta. Premere
leggermente l’unità del motore no all’adesione dei piedini alla supercie.
• Se l’accessorio frullatore è montato sull’unità del motore, girarlo in senso antiorario e
rimuoverlo. Inserire il coperchio sul supporto frullatore.

7
FOUR ME - ROBOT DA CUCINA ITA
MANUALE DI ISTRUZIONI
• Se l’accessorio tritacarne è montato sull’unità del motore, premere il bottone di rilascio e girare il coperchio in
senso orario no a rimozione.
• Inserire la cala nel supporto del tritacarne. Tenere la cala ad un angolo di 90° e girarla in senso antiorario no
al suo arresto.
• Selezionare uno dei tre tubi e installarlo nella cala.
• Posizionare una ciotola sotto la cala per raccogliere il cibo.
CENTRIFUGA
ASSEMBLAGGIO
1. Spintore
2. Vassoio
3. Cala
4. Barra a vite
5. Separatore del succo
6. Coperchio esterno
• Posizionare l’unità del motore su una supercie piana, stabile
ed asciutta. Premere leggermente l’unità del motore no
all’adesione dei piedini alla supercie.
• Se l’accessorio frullatore è ssato sull’unità del motore, girarlo
in senso antiorario e rimuoverlo. Inserire il coperchio nel
supporto del frullatore.
• Se il coperchio è nel supporto del tritatutto sull’unità del motore, premere il bottone di rilascio e girare il
coperchio in senso orario no a rimozione.
• Inserire la cala nel supporto del tritacarne. Tenere la cala ad un angolo di 90°, girarlo in senso antiorario no al
suo arresto.
• Aerrare l’accessorio centrifuga
• Posizionare la barra a vite nella cala
• Posizionare il separatore del succo sulla parte nale della barra a vite
• Tappare col coperchio la parte nale della cala
• Posizionare una ciotola sotto la cala per raccogliere il succo ed un altro contenitore sotto il coperchio esterno
per raccogliere gli scarti
1. La centrifuga è adatta a differenti tipi di frutta morbida o dura. Al ne di assicurarsi
un succo uniforme e proteggere il motore, tagliare la frutta in pezzi piccoli prima della
spremitura.
2. Se il frutto ha un torsolo o un seme duro, rimuoverlo prima della centrifuga altrimenti potrebbe bloccare
l’operazione o danneggiare parti del dispositivo
3. NON utilizzare con sesamo, frutta secca, pepe e altri ingredienti che non hanno succo
4. NON utilizzare con frutta sciroppata o sotto vini, miele, aceto, ecc…
5. La centrifuga non è adatta a spremere zucchero di canna: potrebbe danneggiare l’elettrodomestico
6. NON azionare l’elettrodomestico a vuoto
7. NON utilizzare per oltre 9 minuti consecutivi
8. Quando la macchina è in funzione, non inserire posate o qualsiasi altro attrezzo all’interno
9. Attenzione: non toccare i tasti con le mani umide.
UTILIZZO DELL’ACCESSORIO GELATIERA
1. Spintore
2. Vassoio
3. Cala
4. Barra a vite
5. Cono gelatiera
6. Coperchio esterno
E’ suciente rimuovere il separatore succo dall’accessorio
centrifuga e riposizionare i coni del gelato: la centrifuga si
trasforma in gelatiera!
ASSEMBLAGGIO
Per favore utilizzare frutta morbida per fare il
gelato. Al ne di ottenere un’emulsione vellutata e
proteggere il motore, per favore tagliare la frutta in

8
FOUR ME - ROBOT DA CUCINA ITA
MANUALE DI ISTRUZIONI
piccoli pezzi e mettere in freezer per 4 ore.
Estrarre la frutta dal freezer e lasciare a temperatura ambiente per 10 minuti: ora è possibile
posizionare la frutta nella cala per creare il gelato alla frutta.
PULIZIA E MANUTENZIONE
ATTENZIONE!
• Rimuovere la spina dalla presa elettrica prima di procedere alla pulizia
• Assicurarsi che l’unità del motore, il cavo di alimentazione e la spina non entrino in contatto con
acqua o altri liquidi.
• Pulire il dispositivo immediatamente dopo ogni utilizzo per evitare la formazione di germi o
incrostazioni di sporco.
• Per pulire gli accessori è necessario prima rimuoverli dall’unità motrice.
• Non usare nessuna sostanza abrasiva o corrosiva per pulire. Queste danneggerebbero la supercie.
• Pulire delicatamente l’unità del motore con un panno morbido ed asciugare con un altro panno morbido.
• Lavare tutti i componenti utilizzati con acqua tiepida e detersivo per stoviglie. NON lavare in lavastoviglie.
• Lasciare asciugare completamente tutti i componenti prima di agganciare i coperchi e mettere via il dispositivo
TRATTAMENTO DEL DISPOSITIVO ELETTRICO ED ELETTRONICO A
FINE VITA
Informazione agli utenti per il corretto smaltimento del prodotto ai sensi della Direttiva Europea 2002/96/CE e del
D.lgs N. 151/2005.
Il simbolo sopra indicato e riportato sull’apparecchiatura indica che il riuto deve essere oggetto di “raccolta
separata”. I dispositivi elettrici ed elettronici non devono essere considerati riuti domestici. Pertanto, il prodotto
alla ne della sua vita utile, non deve essere smaltito insieme ai riuti urbani. L’utente dovrà conferire (o far
conferire) il riuto ai centri di raccolta dierenziata predisposti dalle amministrazioni locali, oppure consegnarlo al
rivenditore contro l’acquisto di una nuova apparecchiatura di tipo equivalente. La raccolta dierenziata del riuto e
le successive operazioni di trattamento, recupero e smaltimento favoriscono la produzione di apparecchiature con
materiali riciclati e limitano gli eetti negativi sull’ambiente e sulla salute eventualmente causati da una gestione
impropria del riuto.

9
FOUR ME - ROBOT DA CUCINA ITA
MANUALE DI ISTRUZIONI
NOTE

10
INSTRUCTION MANUAL
MULTI-PURPOSE KITCHEN ROBOT
TECHNICAL DATA
Power Supply: 220-240 V~ 50/60 Hz
Maximum Power Consumption:450 Watt
INTENDED USE
• The device is suitable for :
• Pureeing and chopping up food, e.g. fruit, vegetables, hard cheese, nuts, chocolate or ice
cubes
• Chopping up meat and sh
• The device is not suitable for breaking up bones.
• The mincing attachment is not suitable for frozen food.
• Use the device only as described in the instructions. Any other use is deemed to be
improper.
CAUTION: Please read these instructions carefully before using this
appliance and retain for future use!
SAFETY INSTRUCTIONS
• Keep the appliance out of the reach of children. And close supervision is necessary when
used by or near children or the disable person.
• Check if the voltage indicated on the appliance corresponds to the mains voltage in your
home before you connect the appliance. The guarantee will be of no eect for the result from
misconnecting the electron. (please see the parameter on the instruction.)
• The appliance is intended for household use only, please do not use outdoors.
• Please use the appliance on the steady table.
• Unplug the appliance from outlet when not in use and before cleaning.
• Do not operate any appliance after the appliance malfunctions or has been damaged in any
manner. Return appliance to the nearest authorized service facility for examination, repair or
adjustment.
• To protect against electric shock do not immerse the appliance , cord or plugs in water or
other liquid.
• Do not let cord hang over edge of table in case touched by the children.
• Do not let cord near or touch the hot surface, or placed on the sharp object.
• Do not operate the appliance with a damaged cord or plug. Return it to the nearest
authorized service facility for examination.
• The use of accessory attachments not recommended by the appliance manufacturer may
cause injuries.
• This appliance shall not be used by children. Keep the appliance and its cord out of reach of
children.
• Appliances can be used by persons with reduced physical, sensory or mental capabilities
or lack of the appliance and knowledge if they have been given supervision or instruction
concerning use of the appliance in a safe way and if they understand the hazards involved.
• Children shall be taken when handling the sharp cutting blades, emptying the bowl and
during cleaning.
• Be careful if hot liquid is poured into the food processor or blender as it can be sprayed out
of the appliance due to a sudden steaming.
• CAUTION: Ensure that the blender is switched o before removing it from the stand
• Switch o the appliance and disconnect from supply before changing accessories or
approaching parts that movie in use.
• This appliance is intended to be sued in household and similar applications such as:
• Sta kitchen areas in ships, oces and other working environments;
• farm houses;
• By clients in hotels, motels and other residential type environments;
• Bed and breakfast type environments.

11
INSTRUCTION MANUAL
MULTI-PURPOSE KITCHEN ROBOT
CAUTION: NEVER IMMERSE THE MOTOR BASE IN WATER OR ANY OTHER LIQUID.
1.Storage bowl 8.Perforated disc, medium
2.Cover (large) for the blender mount 9.Perforated disc, ne
3.Motor unit 10.Sausage spout for making small sausages
4.ON/0/P switch(On/O/Pulse)
11.Blender attachment including mixing container, threaded ring, blade,
insert and sealing ring
5.Suction feet 12.Lid ring with lid insert
6.Cover(small) for the mincer mount 13.Plunger
7.Kibbe insert two parts
14.Mincing attachment with screw conveyor, cutter head, coarse
perforated disc, locking nut
CAUTION
• The appliance is 2 in 1 bidirectional output function.
• When using a single function, there must be a lid on the unused function.
•
OPERATION TIME GUIDELINES
ATTENTION
In order to protect the motor and extend the using life of the machine, Please strictly follow the following operating
time of each function when using this multifunctional kitchen machine.
FUNCTION MAXIMUN OPERATION TIME
BLENDER 3 MIN ON AND 1 MIN OFF
MINCER 9 MIN
VEGETABLE SLICER 9 MIN
SLOW JUICER 10 MIN
ICE CREAM MAKER 10 MIN
ATTENTION
In order to protect the motor and extend the using life of the machine, Please do not use the slow
juicer to squeezing the hard vegetable and fruit: such as carrot, coconut, sugarcane and so on. It may
impact the using life of the machine.
BLENDER
• Do not use the devise without food in it and do not overll the mixing container! This might result in the device
overheating or damage to the motor.

12
INSTRUCTION MANUAL
MULTI-PURPOSE KITCHEN ROBOT
• CAUTION: Sharp blades. Be careful when handling the inserted blade in order to prevent any cut injuries.
Switch o the device before inserting or removing the blades insert.
• CAUTION: Danger of scalding! Do not process any hot food in the device as it could spurt out during sed.
The food must not be hotter than 50℃. Allow hot food to cool down before you process it with the device.
• Before switching on the device, make sure that the lid ring is correctly places on the mixing container.
• Take o the mincing attachment if you are using the device as a blender. Otherwise there may be overheating
or damage to the motor.
• The devise is equipped with overload protection: the device switches o if it is overloaded. In this case, move
the switch to position 0, pull the plug out of the plug socket and allow the device to cool down for around 10
minutes. The device is then ready to be used again.
The blender attachment is suitable for pureeing smoothies made from fruit and vegetables
and for chopping up hard foods such as hard cheese, nuts, chocolate or ice cubes.
1. Grab the blender components which are shown in the adjacent
illustration.
2. Place the blade insert into the threaded ring.
3. Place the sealing ring onto the blade insert.
4. Screw the threaded ring onto the bottom of the mixing container.
Check it to make sure it ts place securely.
5. Place the motor unit on a at, stable and dry work surface Press the
motor unit down slightly until the suction feet stick to the work surface.
6. If the mincing attachment is tted to the motor unit, press the release
button and as you do this twist the mincing attachment clockwise until
it can be removed
7. Insert the cover into the mincer mount and twist it anti-clockwise as far
as it will go to secure it in place.
8. If the cover has been tted to the blender mount on the motor unit,
twist it a litter anticlockwise and remove it.
9. Place the threaded ring with the mixing container into the blender
mount. The locking lugs on the threaded ring must be plugged into the
matching recesses on the blender mount.
10. 1Press down the mixing container and twist it anticlockwise as far as it
will go.
USE
• Fill the mixing container with food which you want to chop up. Puree or blend.
• Place the lid ring onto the mixing container and press it on securely.
• Place the lid insert into the lid ring in such a way that the locking lusg are sunk in the matching recesses in the
lid ring. Then twist the lid insert clockwise to secure it in place.
• Insert the mains plug into a properly installed plug socket that is easily accessible.
• Switch on the device:
• -For normal mode. Flip the ON/0/P switch to position ON.
• -For pulse mode(in interval),ip the ON/0/P switch to position P and hold it pressed down, When you let go of
the switch , the device switches o. Pulse mode is suitable for chopping up hard foods and ice cubes. Even
fairly large food(quantities) are chopper up evenly if you ip the ON/0/P switch to position P a few times in
succession.
• You can add ingredients through the opening in the lid ring during operation. To do this , twist the lid insert
anticlockwise and remove it.
• Once the food has been processed, switch o the device(in normal mode ip the ON/0/P switch to the 0
position) and pull the mains plug out of the plug socket.
• Twist the mixing container anticlockwise and remove it from the motor unit.
• Open the mixing container and remove the items that have been blended.
• Clean all used parts.
• Insert the cover into the blender amount on the motor unit. The arrows on the cover and the motor unit must
point towards each other and the locking lugs must be sunk in the recessed. Then press the cover down and
twist it clockwise as far as it will go.
MINCER
• Do not attempt to force food down the feed chute of the mincer; this may damage the device!
• CAUTION: Danger of injury! Never push food into the feed chute using your hand or any objects other than the
plunger which is supplied!

13
INSTRUCTION MANUAL
MULTI-PURPOSE KITCHEN ROBOT
• CAUTION: Danger of injury due to sharp blades! Be careful when handling the cutter head in order to prevent
any cut injuries.
• The mincing attachment is not suitable for frozen food!
• Take o the blender attachment if you are using the mincing attachment. Otherwise there might be over
hearting or damage to the motor.
The device is equipped with overload protection; The device switches offer if it is
overloaded. In this case, move the switch to position 0,pull the plug out of the plug socket
and allow the device to cool down for around 10 minutes. The device is then ready to be
used again.
You can sue the mincing attachment to chop up meat and sh and use the additional attachments to make small
sausages, kibbe and cookies.
ASSEMBLY
• Grab the mincer components which are
shown in the illustration above.
• Place the screw conveyor with the shank
at the front into the mincing attachment.
• Place the cutter head onto the end of the
screw conveyor. The sharp edges of the
cutter heard must be aligned out wards.
Away from the screw conveyor.
• Select one of the three perforated
discs(ne, medium or coarse) and plug it
onto the end of the screw conveyor. The
clocking lugs on the perforated discs must not protrude out.
• If you want to use the sausage spout , place it onto the perforated disc.
• Screw the locking nut onto the mincing attachment. Do not over tighten the locking nut.
• Place the motor unit on a at . stable and dry work surface. Press the motor unit down slightly until the suction
feet stick to the work surface.
• If the blender attachment is tted on the motor unit. Twist it anticlockwise and remove it. Insert the cover into
the blender mount.
• If the cover is in the mincer mount on the motor unit, press the release button and as you do this twist the cover
clock-wise until it can be removed.
• Insert the mincing attachment into the mincer mount. As you do this. Initially hold the feed chute at an angle of
appox.90°.Twist it anticlockwise until it locks in places.
• Place the storage bowl onto the feed chute.
USE
1. Place a bowl under the mincing attachment to catch the chopped-up food.
2. Insert the mains plug into a properly installed plug socket that is easily accessible.
3. Switch on the device:
-For normal mode. Flip the ON/0/P switch to position ON.
-For pulse mode(in intervals). Flip the ON/0/P switch to position P and hold it pressed down . When you let go f the
switch. The device switches o.
4. Place the food which you want to chop up into the storage bowl and use the plunger to gradually press it bit by
bit into the feed chute.
5. Once the food has been processed. Switch o the device(in normal mode ip the ON/0/P switch to the 0
position) and pull the mains plug out of the plug socket.
6. Press the release button, twist the mincing attachment clockwise as you do this and then remove it.
7. Clean all used parts.
8. Insert the cover into the mincer mount and twist it anticlockwise as far as it will go to secure it in place.
USING THE SAUSAGE SPOUT
1.Prepare the mincing attachment in the manner described in the ‘Assembly” section. Insert the sausage spout as
you do this.
2.Connect the device to a properly installed, easily accessible plug socket and switch it on.
3.Select a sausage casing(e.g articial or natural gut etc.) and stretch it over the sausage spout.
4.Place the meat which you want to process into the storage bowl and use the plunger to gradually press it bit by

14
INSTRUCTION MANUAL
MULTI-PURPOSE KITCHEN ROBOT
bit onto the feed chute.
5.Allow the lled sausage casing to run o the sausage spout. Twist the sausage casing at regular intervals to
shape little individual sausages. Make sure that you do not overll the sausage casing.
6.Switch o the device after use. Pull the mains plug out of the plug socket and clean all used parts.
USING THE KIBBE INSERT
Kibbe is a traditional dish from the Middle East. It features fried croquettes made from lamb and bulgur wheat with
a mince lling. Below you will nd a sample recipe for how to make kibbe.
Prepare the pastry
Ingredients:
500g of lamb or low-fat mutton. Cut into strips
500g of bulgur wheat. Washed and drained
1 small onion, nely chopper
Preparation:
• Important! Always process the bulgur wheat immediately after draining. If it dries out. The mincer could be
overwhelmed and damages as a result.
• Prepare the mincing attachment in the manner described in the “Assembly” section. Insert the ne perforated
disc. Do not use the sausage spout.
• Place a bowl under the mincing attachment to catch the chopped-up food.
• Connect the device to a properly installed. Easily accessible plug socket and switch it on.
• Turn meat and bulgur alternately through the mincing attachment.
• Mix together meat and bulgur thoroughly in a bowl.
• Turn the meat/bulgur mixture though the mincing attachment two more times.
• Add the onion to the mixture and mix it all together.
Prepare the lling
Ingredients:
400g of lamb, cut into strips
1 tbsp. of oil
2 medium-sized onions. Finely chopped
1 tbsp.of our
Salt and pepper
Preparation:
Turn the lamb through the ne perforated disc of the mincing attachment
Fry o the onions until golden brown.
Add the chopped lamb and fry until brown.
Add the rest of the ingredients and simmer for around 2 minutes.
Pour away any excess fat and allow everything to cool down.
PREPARE KIBBE
• Assemble the parts of the kibbe attachment
• Prepare the mincing attachment in the manner described in the
“Assembly” section. However, t the assembled kibbe attachment
instead of the cutter head and the perforated disc. The locking
lugs of the kibbe attachment must be sunk in the recessed of the
mincing attachment.
• Place a collecting bowl under the mincing attachment.
• Connect the device to a properly installed. Easily accessible plug socket and switch it on.
• Place the prepared meat/bulgur mixture for the pastries into the storage bowl and use the plunger to gradually
press it bit by bit into the feed chute.
• Once all of the mixture has passed through, switch oer the device and pull the mains plug out of the plug
socket.
• Divide the hollow strand into piece of around
• Press the pieces down on one side so that pouches are produced. Pour some of the prepared and cooled lling
into the pouches. Then also seal the other sides of the pouches.
• Fry the lled pouches in hot oil until they are golden brown.
• Clean all used parts of the device.
VEGETABLE SLICER
The vegetable slicer is with three tubes: piece shredding/ lament shredding/fragment shredding

15
INSTRUCTION MANUAL
MULTI-PURPOSE KITCHEN ROBOT
Piece shredding tube is used to cut the root vegetables into thin slices.
lament shredding. tube is used to cut the root vegetables into lament.
Fragment shredding is suitable to cut cheese, chocolate, biscuit or vegetable
fragment.
ASSEMBLY
• Place the motor unit on a at . stable and dry work surface. Press the motor unit
down slightly until the suction feet stick to the work surface.
• If the blender attachment is tted on the motor unit. Twist it anticlockwise and
remove it. Insert the cover into the blender mount.
• If the cover is in the mincer mount on the motor unit, press the release button
and as you do this twist the cover clock-wise until it can be removed.
• Insert the food inlet into the mincer mount. As you do this. Initially hold the feed
chute at an angle of appox.90°,Twist it anticlockwise until it locks in places.
• Select one of the three perforated tube, Grab the tube and installed it into the
food inlet as shown in the illustration left.
• Place the container under the food inlet to receive the food.
SLOW JUICER
ASSEMBLY
• Place the motor unit on a at . stable and dry work
surface. Press the motor unit down slightly until the
suction feet stick to the work surface.
• If the blender attachment is tted on the motor unit. Twist
it anticlockwise and remove it. Insert the cover into the
blender mount.
• If the cover is in the mincer mount on the motor unit,
press the release button and as you do this twist the
cover clock-wise until it can be removed.
• Insert the food inlet into the mincer mount. As you
do this. Initially hold the feed chute at an angle of
appox.90°,Twist it anticlockwise until it locks in places.
• Grab the slow juicer attachment which are shown in the illustration above.
• Place the screw rod with the shank at the front into the food inlet.
• Place the juice separator onto the end of the screw rod.
• Plug the out cover onto the end of food inlet.
• Place a container under food inlet to receive the juice and another container under the out cover to receive the
slag.
The slow juicer is suitable to squeeze dierent kinds of soft fruit. In order to ensure smooth juicing and protect the
motor, please cut the fruit as small as possible before squeezing.
ATTENTION
In order to protect the motor and extend the using life of the machine, Please do
not use the slow juicer to squeezing the hard vegetable and fruit: such as carrot,
coconut, sugarcane and so on. It may impact the using life of the machine.
• If the fruit with hard core, please remove the hard core before squeezing, otherwise it will cause the stopping
operation or damaging parts
• Please do not put sesame, peas, pepper and other ingredients which could not juice
• Please do not put pickled fruit Preserved by wine, honey, vinegar, etc
• The slow juicer is not suitable for crushing grain, or squeeze sugar cane, will cause damage to accessories
• Please do not let the machine run idle until the ingredients are put in.
• Please do not use for more than 10 minutes.
• When the machine is running, please do not insert chopsticks, spoons and other foreign matter into the juice
port
• Pls do not press the switch with wet hands.

16
INSTRUCTION MANUAL
MULTI-PURPOSE KITCHEN ROBOT
ICE CREAM MACHINE FUNCTION
• Only need to move the juicer separator from the slow
juicer and replace the ice cream cones, the slow
juicer could be an ice cream maker.
• Please use soft fruit to make ice cream. In order
to ensure smooth operating and protect the motor,
please cut the fruit as small as possible and put it into
the freezer to frozen for 4 hours.
• Then take out the fruit from the freezer and let fruits
were thawed for 10 minutes.
• Then you could place the fruit into the food inlet to
make fruit ice cream.
CLEANING AND STORAGE
CAUTION!
• Remove the mains plug from the plug socket before doing any cleaning.
• Make sure that the motor unit, the mains cable and the plug cannot fall into water or other liquids and cannot
come into contact with them.
• Clean the device immediately after every use to prevent the formation of germs.
• Do not use any caustic or abrasive cleaning agents for cleaning. These can damage the surface.
• Remove all used accessories from the motor unit.
• Clean the motor unit with a slightly damp, soft cloth and then dry it with a soft cloth.
• Clean all used accessories with warn, clear water and some mild detergent.
• Allow everything to dry completely before you attach the covers and store the device and accessories away in
a dry, frost-free location that is out of the reach of children and animal.
INFORMATION FOR USERS OF DOMESTIC APPLIANCES
This symbol on the product or on its packaging indicates that this product shall not be treated as household
waste. Instead it shall be handed over to the applicable collection point for the recycling of electrical and
electronic equipment. By ensuring this product is disposed of correctly, you will help prevent potentially negative
consequences for the environment and human health, which could otherwise be caused by inappropriate waste
handling of this product. The recycling of materials will help to conserve natural resources. For more detailed
information about recycling of this product, please contact your local city oce or your household waste disposal
service or the shop where you purchased the product.

17
INSTRUCTION MANUAL
MULTI-PURPOSE KITCHEN ROBOT
NOTES

18
HANDLEIDING
MEHRZWECK-KÜCHENMASCHINE
TECHNISCHE DATEN:
Spannung: 220-240V -50/60Hz
Leistung: 450W
ANWENDUNGSBEREICH:
Das Elektrogeraet ist geeignet fuer:
• fuer Erosion und Feinschnitt der Lebensmittel, wie z.B Obst, Gemuese, Hartkaesen,
Nuesse, Schokoladen oder Eis.
• fuer Feinschnitt vom Fleisch und Fisch
• nicht fuer Zerschlage vom Knochen
• nicht fuer Gefriereisch
• Verwenden Sie bitte nach dieser Gebrauchsanleitung das Geraet. Andere
Verwendungsmethoden gelten als unsachgemaess.
Warnung: Leben sie bitte vor der Verwendung des Geraetes ausfuehrlich
diese Anleitung und bewahren Sie gut diese Anleitung zur zukuenftigen
Verwendung auf!
VORSCHLAEGE UEBER SICHERHEIT
• Kinder erlauben kein Kontakt zum Geraet. Wird das Geraet von Behinderten oder in der
Naehe von Kindern benutzt, muss man aufmerksam das ueberwachen.
• Pruefen Sie beim Anschluss am Geraet, ob die auf dem Geraet angezeigte Spannung der
Netzspannung zu Hause entspricht (siehe Spezikation in der Anleitung)
• Dieses Geraet ist nur geeignet fuer Familien und darf nicht draussen benutzt werden.
• Benutzen Sie auf dem stabilen Tisch dieses Geraet.
• Vor der Reinigung darf es nicht benutzt und der Netzleitung muss ausgezogen werden.
• Man darf nicht das Geraet bedienen, wenn es defekt oder beschaedigt ist. Schicken Sie das
Geraet zur naechsten ermaechtigten Servicestelle zur Nachpruefung und Reparatur.
• Um den Stromunfall zu vermeiden, duerfen das Geraet, die Netzleitung oder Stecker im
Wasser oder in anderen Fluessigkeiten getaucht werden.
• Die Netzleitung darf nicht am Tischrand gehaengt werden, damit Kinder kein Kontakt dazu
haben.
• Die Leitung darf keine Naeherung oder kein Kontakt zur warmen Oberaeche oder auf
scharfen Sachen gelegt werden.
• Man darf nicht mit beschaedigten Netzleitungen oder Steckern das Produkt bedienen und
schickt es zur naechsten ermaechtigen Servicestelle.
• Die Verwendung der vom Hersteller nicht empfohlenen Zubehoere koennen zur Verletzung
fuehren.
• Kinder duerfen das Produkt nicht benutzen. Das Geraet und Leitungen duerfen in einem Ort
gelagert werden, wo Kinder kein Kontakt dazu haben.
• Das Geraet kann von den Menschen benutzt werden, die behindert sind und wenig von
eletrischen Kenntnissen verstehen, wenn sie auf sichere Weise das Geraet bekommen,
unter Ueberwachung oder Hinweisung benutzen und die betreende Gefahr fuer sie schon
bekannt ist.
• Bei der Behandlung des scharfen Schnittmessers, Entleerung der Schuessel und Reinigung
soll es weit von Kinder stehen.
• Wenn warme Fluessigkeiten in die Bearbeitungsmachine der Lebensmittel oder
Ruehrmachine ausgeschenkt werden, achtet man darauf, dass warme Fluessigkeiten wegen
des Dampfs ploetzlich vom Geraet ausgestossen werden.
• Warnung:Man muss sicherstellen, dass die Ruehrmaschiene vor dem Herunterholen der
Ruehrmaschine auf der Unterlage ausgeschaltet ist.
• Beim Austausch der Zubehoere oder vor der Naeherung zum einsetzenden Teil muss das
Geraet ausgeschaltet werden.

19
HANDLEIDING
MEHRZWECK-KÜCHENMASCHINE
Dieses Produkt ist geeignet fuer Familien o,a., z.B.: Bauerhof;
Warnung: Basissockel vom Geraet darf nicht im Wasser oder in anderen
Fluessigkeit getaucht warden.
PRODUKTANGEBOT UND -BESCHREIBUNG:
1.Pallet 8. Scheibemesser vom Fleischwold (mit Mitteloenung)
2.Sicherheitsdeckel, gross 9. Scheibemesser vom Fleischwold (mit Kleinoenung)
3.Hauptmachine 10.Wurstpass
4.Schalter(On/O/Pulse) 11 Ruehrbehaelter
5.Haftfuss 12.Deckel vom Ruehrbehaelter
6.Sicherheitsdeckel, klein 13.Schiebstange
7.Form fuer Fleischpasteten 14. Hackeischpass
Warnung!
Diese Machine hat eine Funktion mie bidretktionalen Ausgaengen. Wenn nur ein
Ausgang benutzt wird, muss der unbenutzten Ausgang mit dem Sicherheitsdeckel
gedeckt.
BETRIEBSZEITRICHTLINIEN
Achtung:
Um den Motor besser zu schuetzen und seine Lebensdauer zu verlaengern, ist
entsprechende Bedienungszeit folgender Funktionen bei der Verwendung aller
Funktionen der Maschine strickt einzuhalten.
Funktionen Max. Verwendungszeit
Funktion der Ruehrmachine 3min ein, 1min aus
Funktion vom Fleischwolf 9min
Funktion zum Streifen- und
Scheibenschnitt 9min
Funktion der Maschine fuer
Originalgeschmack 9min
Funktion der Maschine fuer
Schneeeis 9min

20
HANDLEIDING
MEHRZWECK-KÜCHENMASCHINE
FUNKTION DER RUEHRMASCHINE
• - Wenn es im Ruehrbehaelter keine Zutaten gibt, darf man die Maschine
nicht einschalten. Man darf nicht zu viel in den Ruehrbehaelter einfuellen.
Dadurch wird die Maschine zu warm oder der Motor beschaedigt.
• - Warnung: Die Klinge ist scharf. Bei der Klingemontage muss man
vorsichtig auf scharfe Klinge zum Schutz vor Verletzung achten. Vor dem
Stecken oder Abladen der Klinge muss die Maschine ausgeschaltet.
• - Warnung: Bluehgefahr. Man darf nicht in der Maschine warmes Essen
bearbeiten, weil es wahrscheinlich waehrend der Arbeit ausgestossen
wird. Das Essen darf nicht ueber 50 sein. Vor der Bearbeitung durch die
Maschine muss das warme Essen gekuehlt werden.
• - Vor dem Maschinestart muss man sicherstehllen, dass der
Behaelterdeckel schon richtig auf dem Ruehrbehaelter liegt.
• - Wenn man die Funktion der Ruehrmaschine benutzt, werden Zubehoere
vom Fleischwolf abgenommen. Sonst wird der Motor zu warm oder
beschaedigt.
Die Maschine ist mit dem Schutz vor Ueberlast ausgestattet: Die Machine wird
beim Ueberlast ausgeschaltet. In diesem Fall wird der Schalter auf Positon “0 bewegt. Man ziehlt den Stecken
aus dem Sockel aus und laesst die Maschine ca. 10min kuehlen. Dann kann die Maschine bereit, wieder benutzt
werden.
Die Zubehoere der Ruehrmaschine sind geeignet fuer Obst und Gemuese, noch geeigneter fuer Herstellung vom
Fruchteinsgetraenk und auch fuer Feinschnitt der harten Lebensmittel wie Hartkaese, Nuesse, Schokolagen oder
Eis.
INSTALLATIONSMETHODE
1. Fassen Sie die Rührwerksbaugruppe wie in der nebenstehenden Abbildung gezeigt
2. Setzen Sie den Messersitz in den Becherhalter
3. Legen Sie den Dichtungsring auf den Messersitz.
4. Schrauben Sie den Becherhalter auf den Boden des Mischbecher Sitzschale.Überprüfen Sie,ob er sicher
installiert ist
5. Stellen Sie die Maschine auf eine ebene,stabile und trockene Arbeitsäche.Drücken Sie ihn leicht nach
unten,bis der Saugsuss an der Arbeitsäche klebt
6. Wenn das Fleischwolf-Zubehör auf der Maschine installiert ist,drücken Sie den Entriegelungsknopf.Und
drücken Sie im Uhrzeigersinn,um das Fleischwolf-Zubehör zu starten,bis es entfernt werden kann
7. Setzen Sie den Becherdeckel in die Grube der Fleischwolf.Drehen Sie es gegen den Uhrzeigersinn, bis es fest
sitzt.
8. Wenn der Becherdeckelan der Maschine Agitator Montagesockel installiert worden ist,drehen Sie die große
Sicherheitsabdeckung gegen den Uhrzeigersinn und entfernen Sie sie.
9. Den Gewindering mit dem Mischbehälter in die Mischerhalterung stecken.Die Rastnase am Gewindering muss
in die Passnut der Rühreraufnahme eingeführt werden.
10. Drücken Sie den Mixbecher nach unten und drehen Sie ihn gegen den Uhrzeigersinn, bis der Mixbecher gefüllt
ist.
NUTZUNGSMETHODE
• Geben Sie das zu zerkleinernde Lebensmittel in den Mischbehälter.
• Stellen Sie den Becherdeckel auf den Mixbecher und drücken Sie ihn.
• Legen Sie einen Kleinen Messbecher in den Becherdeckel und befestigen Sie den kleine Tasse mit dem
Becherdeckel des Deckels.Drehen Sie dann den kleinen Messbecher im Uhrzeigersinn, um sie zu befestigen.
• Stecken Sie den Netzstecker in die Sicherheitssteckdose.
• Önen Sie die Sicherheitssteckdose.
• 6.- Normaler Arbeitsmodus:Schalten Sie den ON / 0 / P-Schalter in die ON-Position.
• Elektrischer Modus: Schalten Sie den Schalter ON / 0 / P auf Position P, halten Sie ihn gedrückt und
schalten Sie den Schalter aus, wenn der Schalter ausgeschaltet ist.Wenn der ON / 0 / P-Schalter mehrmals
kontinuierlich auf die P-Position gedreht wird, kann sogar eine beträchtliche Menge an Futter (Menge)
gleichmäßig gehackt werden.
Sie können Material hinzufügen, indem Sie den kleinen Messbecher während des Betriebs
geöffnet wird.Drehen Sie den kleinen Tasse einfach gegen den Uhrzeigersinn und entfernen
Sie den kleinen Tasse, um das Rohmaterial hinzuzufügen.
This manual suits for next models
1
Table of contents
Languages:
Other I TUTTOFARE Food Processor manuals