Icy Box IB-MP309HW-B User manual


3
IB-MP309 series
http://www.icybox.de
HDD and Network Mediaplayer
Table of Contents
1. INTRODUCTION........................................................................................................... 4-7
1.1 Preface .............................................................................................................4-5
1.2 Packing List..........................................................................................................6
1.3 Miscellaneous ....................................................................................................6-7
2. PRODUCT OVERVIEW................................................................................................. 8-14
2.1 Front view............................................................................................................8
2.2 Back view ............................................................................................................8
2.3 Remote Control................................................................................................ 9-13
2.4 Command Keys for USB Keyboard (not included)..................................................... 14
3. FIRST TIME USAGE .................................................................................................. 15-21
3.1 HDD and additional rmware installation ........................................................... 15-17
3.2 General Connections....................................................................................... 17-21
4. GETTING STARTED ........................................................................................................22
4.1 Selecting Media Source – Playback Multimedia Files ................................................. 22
4.2 Selecting Web Services ........................................................................................ 22
4.3 Selecting Setup .................................................................................................. 22
5. SETUP MENU............................................................................................................ 23-25
5.1 Home ................................................................................................................ 23
5.2 Preferences ........................................................................................................ 23
5.3 Audio/Video .................................................................................................. 23-24
5.4 Network............................................................................................................. 24
5.5 Network Share.................................................................................................... 24
5.6 NMT Applications ................................................................................................ 24
5.7 DVD/ Audio CD ................................................................................................... 25
5.8 Maintenance....................................................................................................... 25
6. MEDIA SERVERS ...................................................................................................... 26-27
6.1 UPnP AV or DLNA Server ...................................................................................... 26
6.2 Windows Media Player Network Sharing Service (WMP-NSS) ..................................... 26
6.3 myiHome UPnp AV Server .................................................................................... 27
7. FTP SERVER/NAS/BITTORRENT .............................................................................. 28-30
7.1 FTP Server ......................................................................................................... 28
7.2 NAS (SMB Server).......................................................................................... 28-29
7.3 NAS (NFS Server) ............................................................................................... 29
7.4 BitTorrent Downloader ......................................................................................... 30
8. APPENDIXES ........................................................................................................... 31-32
8.1 Specifications ................................................................................................ 31-32
9. SAFETY PRECAUTIONS ..................................................................................................33

4
HDD and Network Mediaplayer
IB-MP309 series
http://www.icybox.de
5
4
1. INTRODUCTION
1.1 Preface
Dear Customer,
Thank you very much for purchasing our product. In the digital era, this product is a great home enter-
tainment partner. With the outstanding design, you can enjoy movies and music, view photos of precious
moments. It's easy to use this product as a portable external storage device with built-in HDD (not
included) and high-speed USB 2.0.
This player has the following functionality:
Movie Playback
Store movies on your Computer, NAS or internal HDD then watch them on your TV from the comfort
of your living room couch. No need to burn movies from your hard disk to CD or DVD, just the ease
and convenience of wired or wireless access with ngertip control.
You are able to stream IP TV from the Internet. The IB-MP309HW-B supports:
1. MPEG-1 VCD format (1.15 Mbps CBR) [.mpg, .mpe, .mpeg, .dat, .m1v, .iso]
2. SD and HD MPEG2 up to 20 and 40 Mbps [.mpg, .mpe, .mpeg, .m2v, .vob, .vro, .iso]
3. SD and HD MPEG-4 (Xvid, MP4) [.avi, .divx, .mov, .mp4.H264, .iso]
4. SD and HD WMV9 [.asf, .wmv, .mkv, .iso]
5. AVI audio codec: MP3, AC3, PCM, WMA, Ogg
Text Base Subtitle Format
1. Subtitle (MicroDVD, SubRip, Sub Station Alpha, Sami) [.sub, .srt, .saa, .smi]
Music Playback
Store music les on your Computer, NAS or internal HDD and listen to them in high quality in any room
with your audio system. Keep your music collection stored on your hard disk. Use your remote control
to select songs according to artist, album or genre.
You can listen to Internet Radio. The IB-MP309HW-B supports:
1. MPEG-1 Layer1 (MP1) [.mp1, .mpa]
2. MPEG-1 Layer2 (MP2) [.mp2]
3. MPEG-1 Layer3 (MP3) [.mp3]
4. Ogg Vorbis (OGG) [.Ogg]
5. AC3 5.1 (AC3) [.ac3]
6. Microsoft PCM Wave (WAV) [.wav]
7. Advanced Audi Coding (AAC, ADIF, ADTS) [.aac]
8. Microsoft Windows Media Audio Professional (WMA Pro) [.asf]
9. Free Lossless Audio Codec (FLAC) [.ac]
Photo Playback
Relax on the couch and look at your holiday photos with the whole family or friends.
Simply store your photo collections centrally on a PC, NAS or internal HDD and enjoy them anytime
on your TV. If you have a high-denition TV input on an LCD or plasma TV, your digital photos will
be brought to life!
1. JPEG
2. PNG, GIF
4
5
HDD and Network Mediaplayer
IB-MP309 series
http://www.icybox.de
5
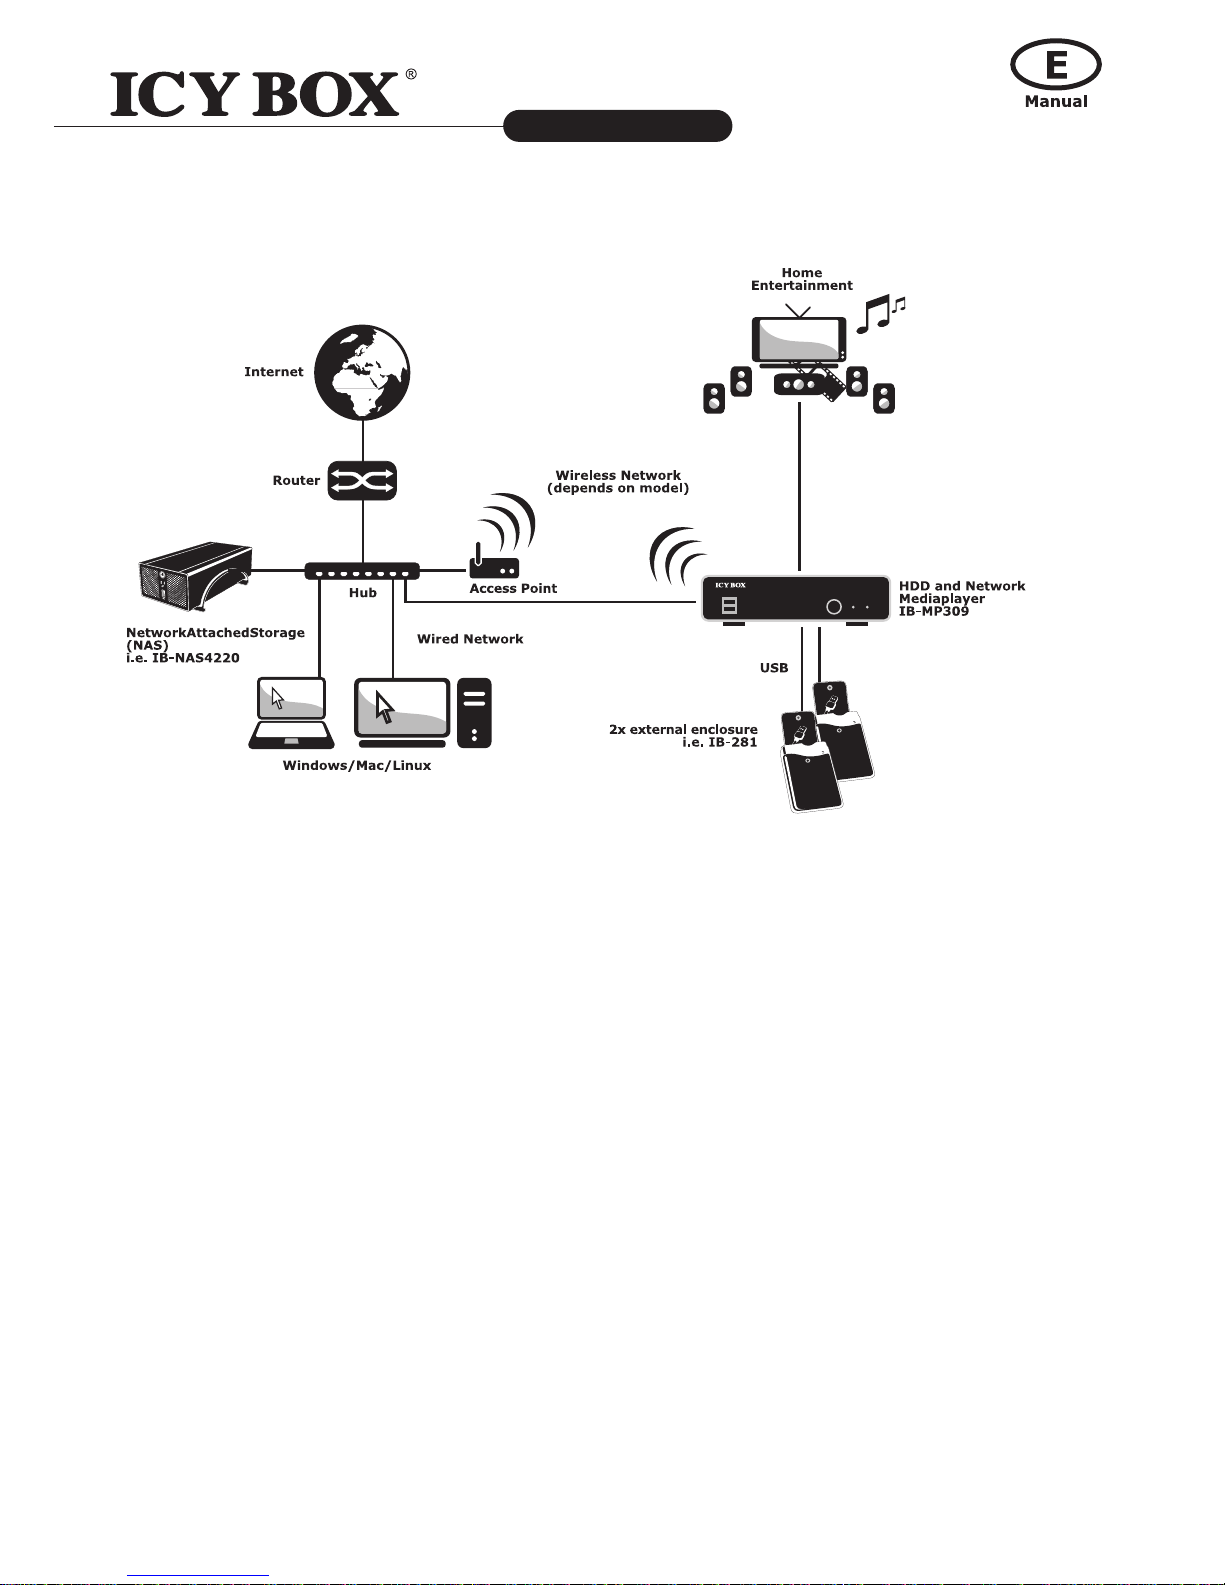
One Device - Multiple Options
Enjoy data from internal drive or up to two external drives via USB
No need to connect the IB-MP309HW-B to any other device than your Home Entertainment System. So
you are able to use your IB-MP309HW-B as a Media Player only by connecting up to two external HDDs
or one internal HDD (not included), but this device can do much more.
Stream data directly from your PC
You can access multimedia content from your Computer directly by using a cross cable without using a
Hub or Switch.
Stream data directly from each PC or NAS in your local network by using SAMBA protocol;
wired or wireless (optional by USB WiFi dongle)
You can access multimedia content from other Computers in your local network. So with just one Net-
work Multimediaplayer you can access content on several PCs, and there's no need to copy files across.
Stream data from NAS or Internet by using UPnP AV (Universal Plug and Play AV)
The IB-MP309HW-B supports UniversalPlugandPlay AV (UPnP AV)! UPnP AV Media Servers store and
share digital media, such as photographs, movies or music. There are UPnP AV Media Servers available
for most operating-systems and many hardware-platforms. Software-based UPnP AV Media servers can
be run on most PCs, mainly on Microsoft Windows, Linux, or Mac OS X.
When IB-MP309HW-B is plugged into the network, it will configure itself, acquire a TCP/IP address, and
announce its presence on the network to the IB-MP309HW-B login page.
We hope that this product will bring you a lot of enjoyment. We are committed to apply multimedia tech-
nology in your work, entertainment, family, daily life and everywhere! Welcome to be with us. Thank you
again for choosing our product.

6
HDD and Network Mediaplayer
IB-MP309 series
http://www.icybox.de
7
1.2 Packing List
Part Quantity
IB-MP309HW-B 1
A/V cable 1
RGB cable 1
Wireless LAN USB Adapter 1 (optional)
USB cable 1
Remote Control 1
Remote Control Battery 2
AC/DC adaptor 1
Content CD 1
User Manual (printed) 1
Note: The actual contents in the package might be different from the packing list in this manual.
1.3 Miscellaneous
This player's design and manufacture has your safety in mind. In order to safely and effectively use this
player, please read the following before usage.
1.3.1 Usage cautions
User should not modify this player. If commercial hard disk is being used, the environmental temperature
should be within +5°C ~ +35°C.
1.3.2 Power
The player's power voltage: DC 12V.
When using this player, please connect the supplied AC adapter or AC adapter cable to the player's power
jack. When placing the adapter cable, make sure it can not get damaged or be subject to pressure. To
reduce the risk of electric shock, unplug the adapter rst before cleaning it. Never connect the adapter to
the player in a humid or dusty area. Do not replace the adapter or cable's wire or connector.
1.3.3 Radio interference/compatibility
- If not properly shielded, almost all electronic devices will get radio interference.
Under some conditions, your player might get interference.
- The design of this player has followed the FCC/CE standard, and has followed the following rules:
(1) This player may not cause harmful interference;
(2) This player could accept some interference received including interference that may cause
undesired operation.
1.3.4 Repair
If the player has a problem, you should take it to an appointed repair center and let the specialists do
the repair, never repair the player yourself, you might damage the player or endanger yourself or your
data.

6
7
HDD and Network Mediaplayer
IB-MP309 series
http://www.icybox.de
1.3.5 Disposing of the player
When you dispose of the player, be sure to dispose it appropriately. Some countries may regulate dispo-
sal of electrical device, please consult with your local authority.
1.3.6 Hard disk cautions
The player uses an internal hard disk for data storage (not included).
- Physical impact may create bad sector in the hard disk, you can use CHKDSK to x the problem.
- All data stored in the player may be lost due to physical impact, electrical shock, power lost,
HDD format etc. Please backup your data.
- Regularly backup the data in the hard disk so that it can be recovered in the event of data
corruption or loss. Our company takes no responsibility for loss of data stored on the hard disk.
1.3.7 Broadband internet
Make sure that you have broadband internet access to use the internet functions of the product.
The IB-MP309HW-B is a Networkmediaplayer and requires some knowledge about network issues, in
order to connect the MP-309HW-B perfectly to your home network. Make sure the perfect conguration
of your network components before you start-up the IB-MP309HW-B.
The Internet service provider can charge extra fees for exceeding a certain limit of transferred data.
1.3.8 Wireless home network
The performance in a wireless home network is dependent upon the location of the wireless network
devices and the structure of the building.
1.3.9 Audio/Video formats
If you encounter problems while playing your media les, please check the utilised media formats. Due
to the very large number of different media formats and codec's, ICY BOX cannot guarantee the compa-
tibility of the IB-MP309HW-B with every available media format (depends on used Video-/Audio bit rate
and decoding software).
1.3.10 Others
When using this player, please do not let the player come into contact with water or other liquid, if
water is accidentally spilled on the player, please use a dry cloth to absorb the spillage.
Electronic products are vulnerable, when using please avoid shaking or hitting the player, and do
not press the buttons too hard.
- Do not let the player come into contact with water or other liquid.
- Do not disassemble the player, repair the player or change the design of the player, any
damage done will not be included in the repair policy.
- Do not press the buttons of the player too hard.
- Avoid hitting the player with hard object, avoid shaking the player, and stay away from
magnetic elds.
- During electrostatic discharge and the strong electromagnetic eld, the product will malfunction,
and then unplug the power cable and the product will return to normal performance next time it
is powered on.
- The IB-MP309HW-B is not designed or intended to, and may not be used to violate any
copyrights or other IP (Intellectual Property) rights. Each user of IB-MP309HW-B may
only use it in connection with materials legally owned by or licensed to the user and only
extend such ownership or license rights that will permit such use.

8
HDD and Network Mediaplayer
IB-MP309 series
http://www.icybox.de
9
2.2 Back view
1. Power supply IN 7. S/PDIF coaxial OUT
2. USB 2.0 to PC 8. S/PDIF optical OUT
3. HDMI OUT 9. Stereo L/R OUT
4. Composite OUT 10. RJ-45 10/100 Mbp/s interface
5. S-Video OUT 11. ON-/OFF switch
6. YPbPr (Component) OUT 12. 40 mm cooling fan
2. Product Overview
2.1 Front view
1. 2x USB 2.0 Host 3. Data access LED
2. Infrared Window 4. Power LED
1. 2. 3. 4.
1. 3. 5. 6. 7. 8. 9. 10.
2. 11.9.4. 6. 6. 12.

8
9
HDD and Network Mediaplayer
IB-MP309 series
http://www.icybox.de
2.3 Remote Control
First time usage of remote control.
Install the batteries before using the remote control!
To install the remote control batteries:
1. Slide the battery cover off the back of the remote control.
2. Install two AAA size batteries. Match the + and – symbols on the batteries to the symbols on the
battery compartment.
3. Slide the battery cover on to the remote control until the lock snaps.
Caution: Never throw batteries into a re.
Note:
- Be sure to use AAA size alkaline batteries.
- Dispose of batteries in a designated disposal area.
- Batteries should always be disposed of with the environment in mind. Always disposes batteries in
accordance with applicable laws and regulations.
- If the remote control does not operate correctly, or if the operating range becomes reduced,
replace batteries with new ones.
- When necessary to replace batteries in the remote control, always replace both batteries with new
ones. Never mix battery types or use new and used batteries in combination.
- Always remove the batteries from the remote control if they are dead or if the remote control is
not to be used for an extended period of time. This will prevent battery acid from leaking into the
battery compartment.
All procedures in this manual can be carried out using the remote control buttons.

10
HDD and Network Mediaplayer
IB-MP309 series
http://www.icybox.de
11
See the following for details on each button and its function:
10
11
HDD and Network Mediaplayer
IB-MP309 series
http://www.icybox.de
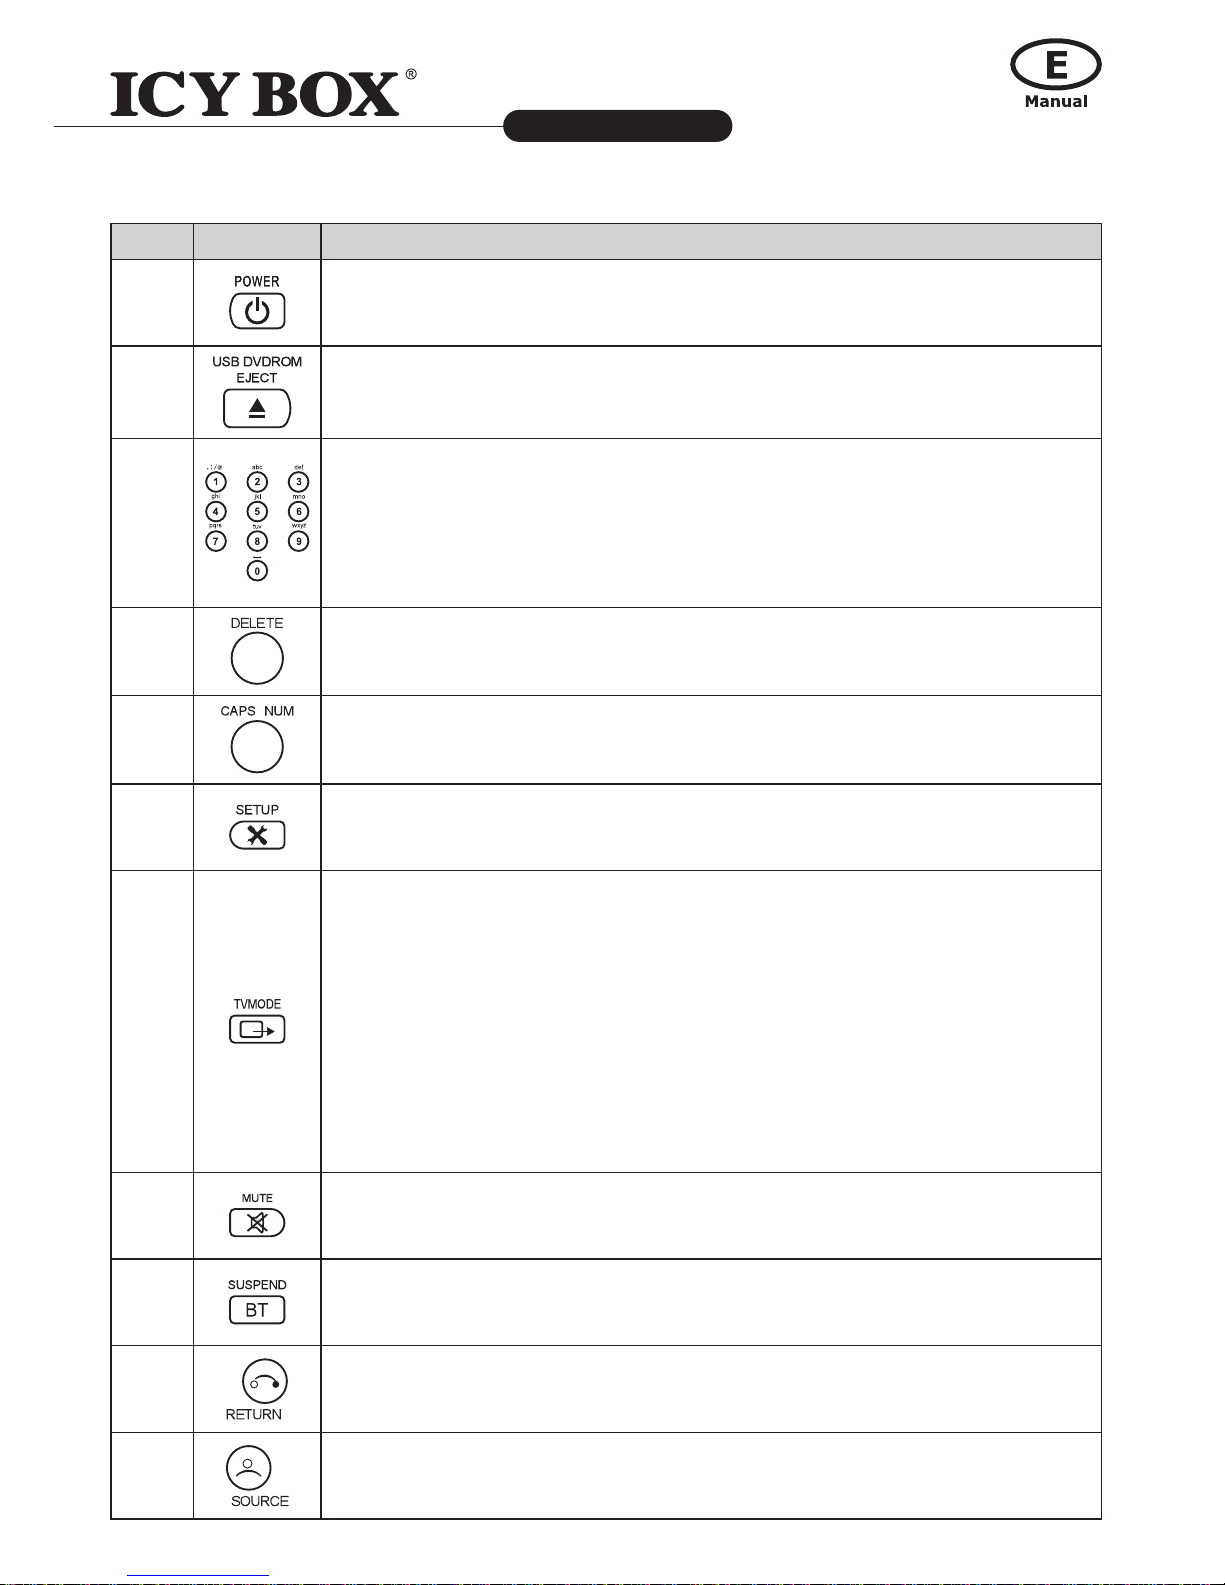
No. Button Function
1
POWER turns the IB-MP309HW-B standby mode on or off (Video DAC shutdown).
POWER+Eject: Reboot
IB-MP309HW-B
2USB DVD ROM is to eject external DVD player.
3
Numeric Pad in
Menu Screen:
is for select the corresponding number of the le list for quick jump.
To enter alphanumeric.
Movie playback: is for xvid/dvix to skip the percentage of movie playtime.
For example, press 1 will skip 10% etc.
4Delete input made by numeric pad.
5CAP/NUM locks the software keyboard for (a-z) or (0-9).
6Setup in Menu: accesses system setup page
Setup in Movie playback: Adjust Brightness, Contrast Settings
7
TV Mode+0: Auto TV Mode
TV Mode+1: Component/Composite NTSC 480i
TV Mode+2: Component/Composite PAL 576i
TV Mode+3: No function
TV Mode+4: Component 720P/60Hz
TV Mode+5: Component 1080i/60Hz
TV Mode+6: Component 1080P/60Hz
TV Mode+7: HDMI 720P/60Hz
TV Mode+8: HDMI 1080i/60Hz
TV Mode+9: HDMI 1080P/60Hz
TV Mode+CAPS/NUM: Toggles between 50Hz and 60Hz
8MUTE turns off the sound.
9SUSPEND: stop BT download
10 RETURN is used for paging up.
11
SOURCE IN MENU SCREEN is used for display the source list which is available
to IB-MP309HW-B, for example NFS, SMB, External USB, myiHome source.
SOURCE IN DVD MOVIE PLAYBACK is used for repeat chapters or title.
12
HDD and Network Mediaplayer
IB-MP309 series
http://www.icybox.de
13
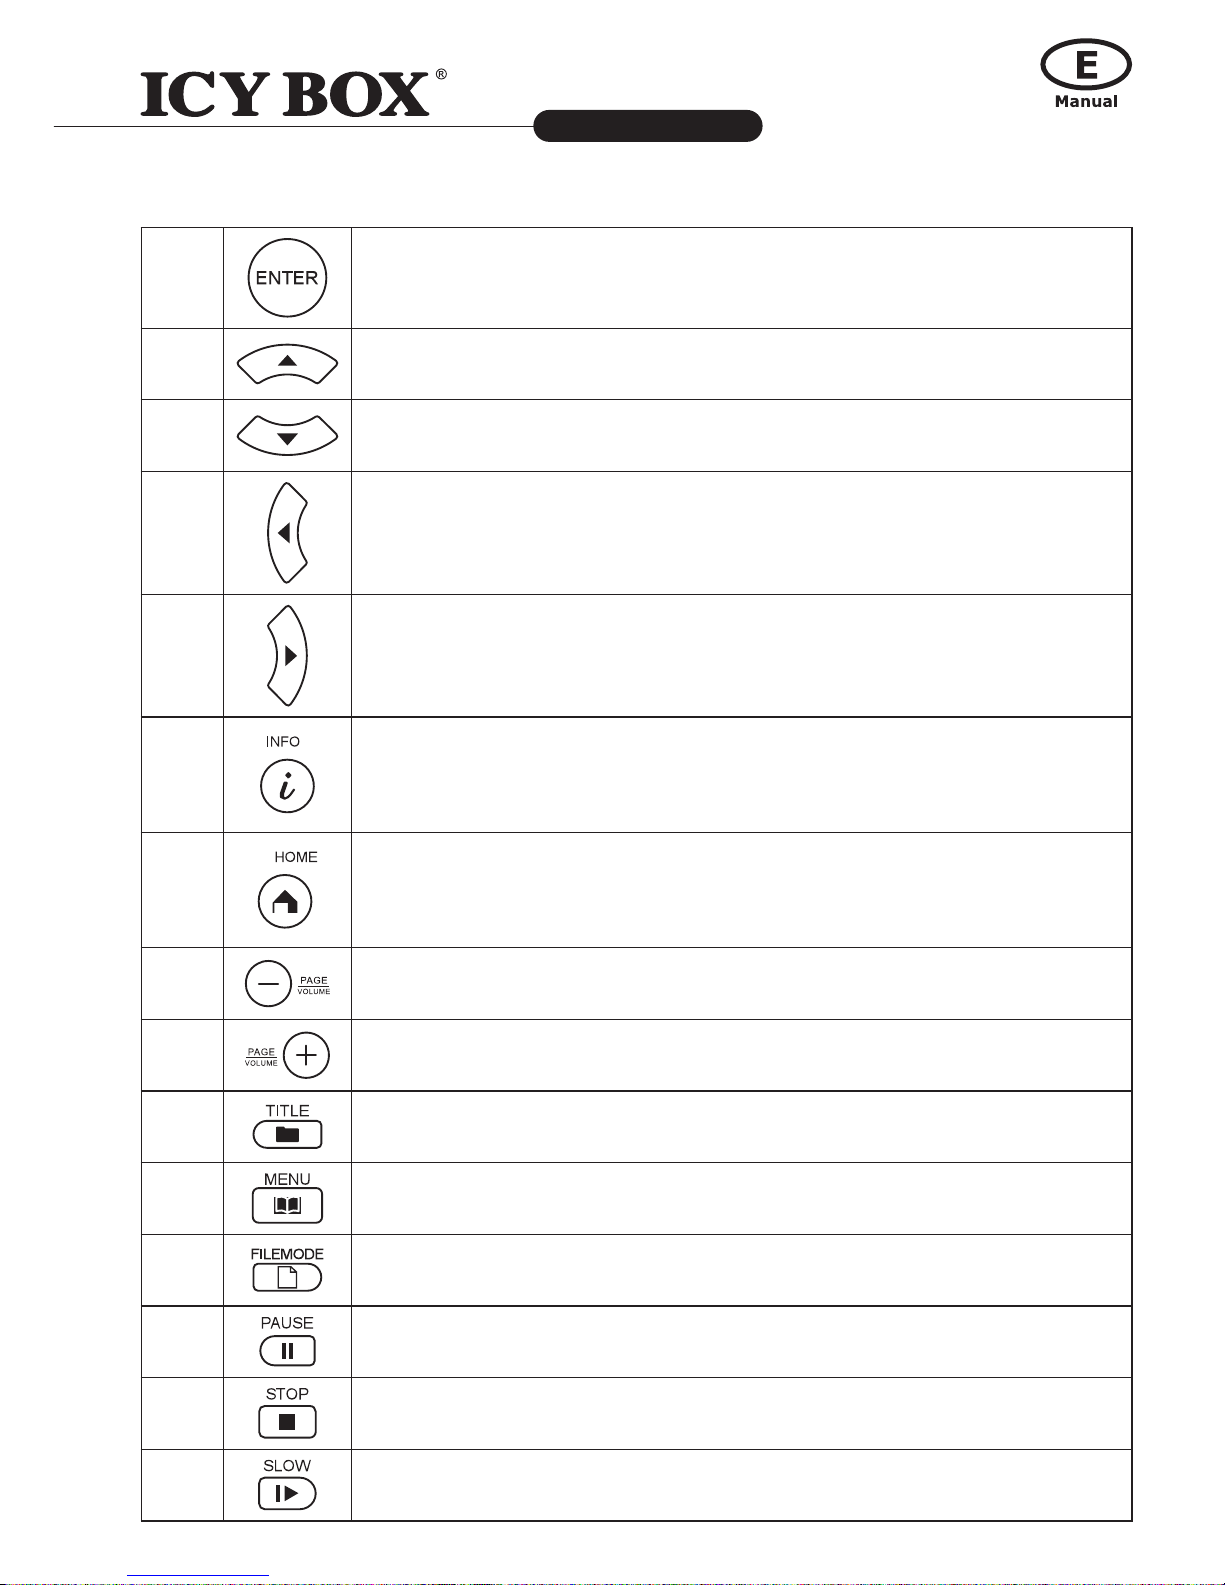
12 ENTER activates highlighted items in the main menu screen or playback the
selected le.
13 UP is used for scroll up in menu screen and navigation around the menu.
14 DOWN is used for scroll down in menu screen and navigation around the menu.
15
LEFT is used for partial time seek during movie playback.
16 RIGHT is used for navigation around the menu.
17
INFO IN MENU SCREEN works with internal or external HDD/SMB/NFS source,
display the lename/size.
INFO IN MOVIE PLAYBACK is used for displaying show timeline, video and
audio codec information when playback.
18
HOME IN MENU SCREEN is used for jumping to Movie, Music and Picture
selection screen.
HOME IN DVD/ISO le MOVIE PLAYBACK is used for repeat A/B.
19 PAGEDOWN is used for paging down on main menu system page,
and the VOLUME is used for adjusting the volume level.
20 PAGEUP is used for paging up on main menu system page,
and the VOLUME is used for adjusting the volume level.
21 TITLE is used for enter a URL to browser.
22 MENU is used for access the DVDISO le menu screen during DVD playback.
23 FILEMODE is to enable le and folder new, copy, rename or delete function in
HDD.
24 PAUSE is used for the temporary stopping of playback of stored media.
25 STOP is used for stopping playback of stored media.
26 SLOW is used for step through frames of movie.
12
13
HDD and Network Mediaplayer
IB-MP309 series
http://www.icybox.de
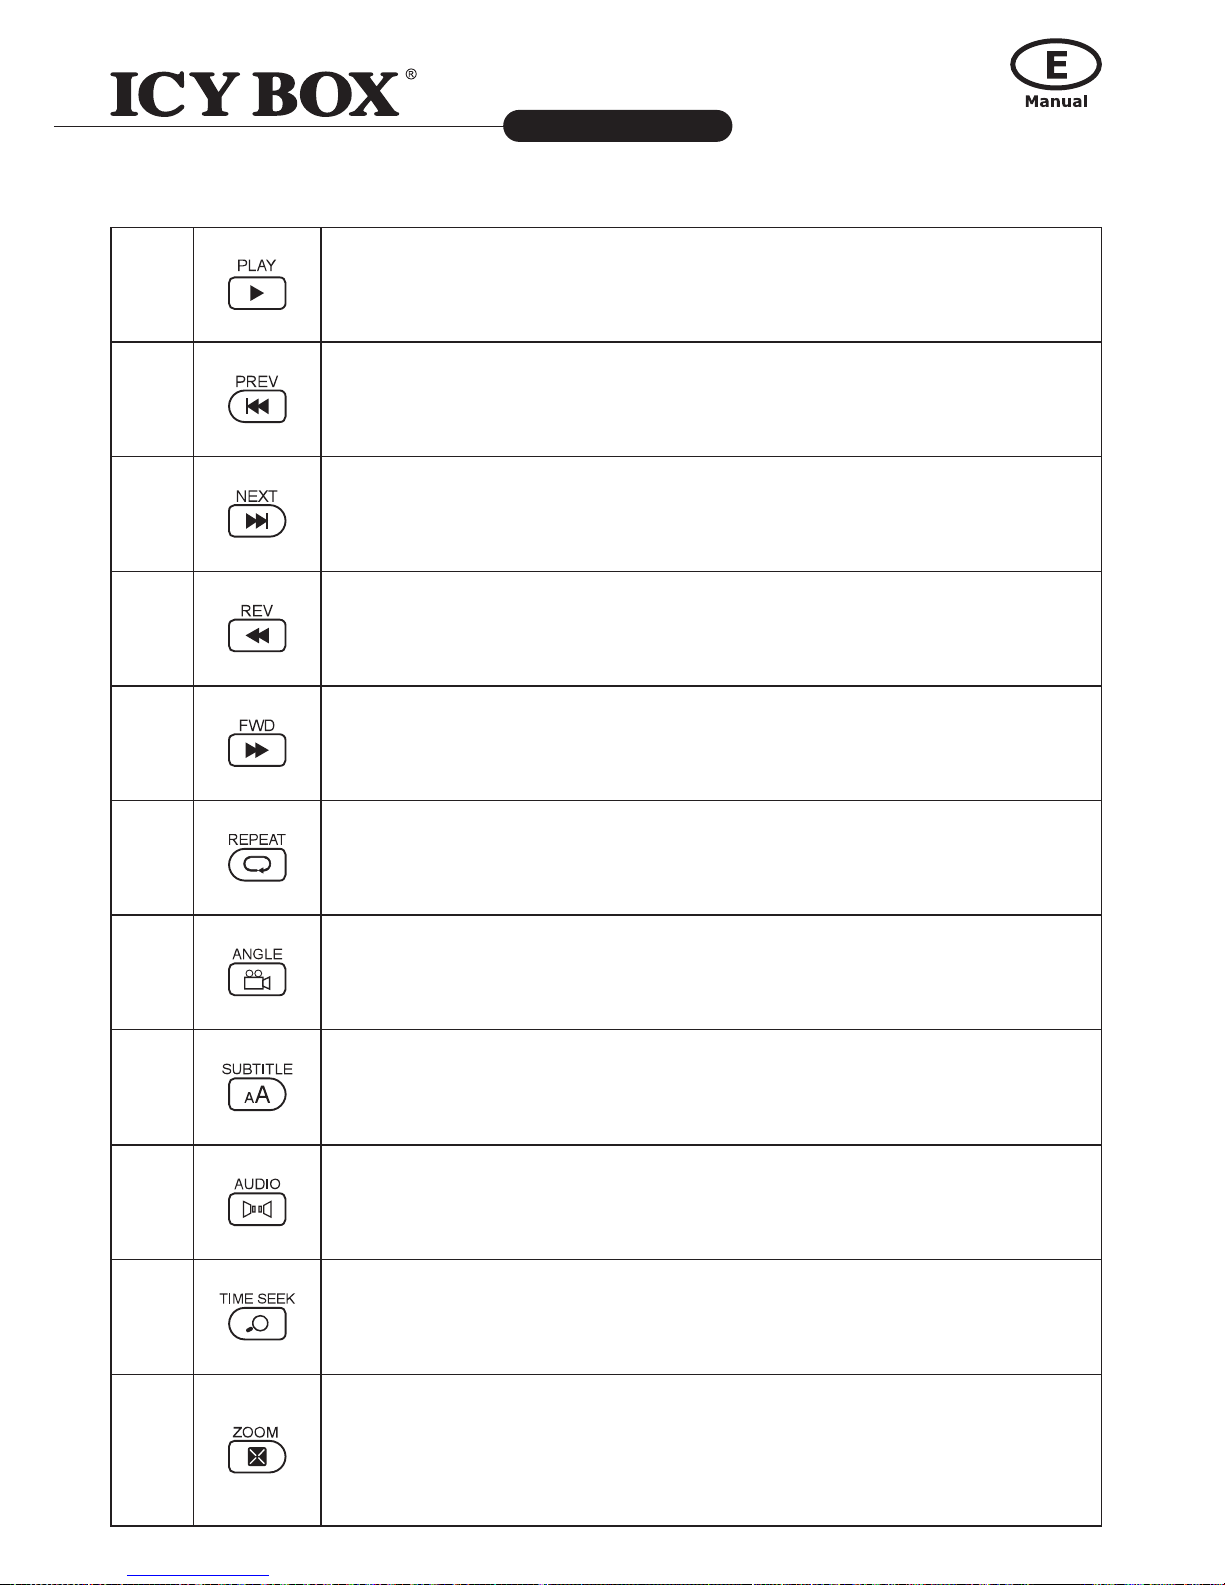
27 PLAY is used for starting to play a stored media.
28 PREV: Previous track, during movie/music playback.
29 NEXT can be used for jumping to next track during movie/music playback.
30 REV is used for rewinding during movie playback. When playing back DVD/ISO
le, you can resize the image after pressing ZOOM button.
31 FWD is used for forwarding 2- 8 times. When playing back DVD, you can resize
the image after pressing ZOOM button
32 REPEAT is used for repeat the current selected movie or music, but not applica-
ble during DVDISO le playback.
33 ANGLE: TS with multiple PMT support, PMT switching with ANGLE key.
34
SUBTITLE is used for turn on a subtitle. To select a different language,
please press UP key to scroll and toggle.
Font Size: press LEFT and RIGHT key to adjust the size.
35
AUDIO is used for select soundtrack when media le contains more than one
audio track. During DVD playback, you can toggle through the available audio
track.
36 TIME SEEK allows you to time seek the current selected media for quick jump.
37
ZOOM is switch between full-screen, actual-size and t-to-screen when play-
back a stored media.
During DVD playback, allow ZOOM function.
During playback DVD le, ZOOM+FWD to zoom in, REV to zoom out.
12 ENTER activates highlighted items in the main menu screen or playback the
selected le.
13 UP is used for scroll up in menu screen and navigation around the menu.
14 DOWN is used for scroll down in menu screen and navigation around the menu.
15
LEFT is used for partial time seek during movie playback.
16 RIGHT is used for navigation around the menu.
17
INFO IN MENU SCREEN works with internal or external HDD/SMB/NFS source,
display the lename/size.
INFO IN MOVIE PLAYBACK is used for displaying show timeline, video and
audio codec information when playback.
18
HOME IN MENU SCREEN is used for jumping to Movie, Music and Picture
selection screen.
HOME IN DVD/ISO le MOVIE PLAYBACK is used for repeat A/B.
19 PAGEDOWN is used for paging down on main menu system page,
and the VOLUME is used for adjusting the volume level.
20 PAGEUP is used for paging up on main menu system page,
and the VOLUME is used for adjusting the volume level.
21 TITLE is used for enter a URL to browser.
22 MENU is used for access the DVDISO le menu screen during DVD playback.
23 FILEMODE is to enable le and folder new, copy, rename or delete function in
HDD.
24 PAUSE is used for the temporary stopping of playback of stored media.
25 STOP is used for stopping playback of stored media.
26 SLOW is used for step through frames of movie.

14
HDD and Network Mediaplayer
IB-MP309 series
http://www.icybox.de
15
Browser Mode During Video Playback
ESC Open / Close QPrev
F1 Play WPlay
F2 Stop ENext
F3 Previous Page / Return AFR
F4 Next Page SStop
F5 Refresh DFF
F6 URL XPause
F7 Setup CSlow
F8 Time VOD/DVD Mode
F9 File Mode: is jump to Video ESC Open / Close
F10 File Mode: is jump to Music F1 Play
F11 File Mode: is jump to Photo F2 Stop
F12 File Mode: is jump to Other F3 Prev
PrtSc Info F4 Next
Pause Select F5 FR
Insert Copy F6 FF
Delete Backspace F7 Slow
Backspace Backspace F8 Time Seek
Home Home F9 Repeat
End TV Mode F10 Audio
Page Up Page Up F11 Subtitle
Page Down Page Down F12 Zoom
Tab Tab PrtSc Info
Window Source Scroll Menu
Menu File Pause Pause
Alphanume-
ric
Symbol and Arrow Page Up Volume Up
Page Down Volume Down
2.4 Command Keys for USB Keyboard (not included)

14
15
HDD and Network Mediaplayer
IB-MP309 series
http://www.icybox.de
3. FIRST TIME USAGE
3.1 HDD and additional rmware installation
For users who bought the player without a HDD inside, and want to install a SATA HDD, please see as
below:
You will need a 3.5" SATA HDD. Please carefully follow the procedures to install the HDD into the
IB-MP309HW-B.
1. The IB-MP309HW-B must be
disconnected from the power supply.
2. Unscrew 4 spot and open the top cover.
3. Connect the HDD to the SATA/power
connector and fasten the HDD to the
case.
4. Close the top cover and nish
assembling with screwing 4 spot.
5. Follow the instructions for connecting
the IB-MP309HW-B to your Home
Entertainment System as shown in
chapter 3.2 Connection.
Thereafter go to Setup > Preferences page and choose your preferred language. The system language of
this player can be set too many different languages. The selected language will take effect after saving
the settings.

16
HDD and Network Mediaplayer
IB-MP309 series
http://www.icybox.de
17
Thereafter go to Setup >Maintenance page and select the "NMT setup wizard" option.
6. Setup through the NMT wizard to partition, format and install NMT applications on the HDD
(network services). You can download the application (s. CD content) onto a USB thumb drive
(not included) and use that as the installation source.
[Attention] This step will DELETE ALL data on HDD and the HDD will be formatted as
EXT2/EXT3 le format. For Windows system, the special tool (EXT2FSD-046, free
downloadable from the internet) is needed to support EXT2/EXT3 format.
Using a MAC OS computer you are able to use the FAT32 or NTFS le system but without
following the NMT wizard procedure as mentioned above. Use an already partitioned HDD
(FAT32 or NTFS) or setup a new HDD to FAT32 or NTFS.
This Conguration will provide a limited range of network functionality (also for
Windows). NTFS devices connected to a MAC OS computer by USB: Therefore you need to
install MACfuse and the NTFS_3g driver to your MAC computer free downloadable from
the internet (read/write). EXT2 devices connected to a MAC OS computer by USB:
Therefore you need to follow the NMT wizard for formatting the internal HDD to EXT2 and
install MACfuse and the EXT2fsx driver to your MAC computer free downloadable from the
internet (read only).
Linux PCs will be able to support EXT2/EXT3 without additional drivers.
[Attention] This process takes some time and must not be interrupted.
Please make sure that the power supply is not turned off until the upgrade process
is complete.

16
17
HDD and Network Mediaplayer
IB-MP309 series
http://www.icybox.de
7. After reboot, most of the NMT applications will start up automatically. To manually adjust the
settings for the NMT applications, go to Setup page.
3.2 General Connections
3.2.1 Computer Connection
(1) Make sure the player is powered on;
(2) Plug in the squarish connector of the USB cable to the player's USB DEVICE port;
(3) Plug in the rectangular connector of the USB cable to computer's USB port.
For Windows system, the special tool (EXT2FSD-046, free downloadable from the internet)
is needed to support EXT2/EXT3 format, but Linux PCs will be able to support EXT2/EXT3
without additional drivers.
For MAC systems see chapter 3.1 HDD and additional rmware installation.

18
HDD and Network Mediaplayer
IB-MP309 series
http://www.icybox.de
19
3.2.2 USB Mass Storage Device Connection (like USB stick, MP3, USB HDD etc.)
(1) Make sure the player is powered on;
(2) Plug in USB HUB, USB Enclosure and USB Pen Drive, USB Keyboard, USB DVD-ROM to one
of the USB host ports of this player.
3.2.3 A/V Connection
(1) Follow the picture and plug in the 3 color connector to the player's A/V OUT jack;
(2) Follow the picture and plug in the 3 color connector to the TV's A/V IN jack.
In this way, you can enjoy the content in the player on TV or other display devices.
18
19
HDD and Network Mediaplayer
IB-MP309 series
http://www.icybox.de
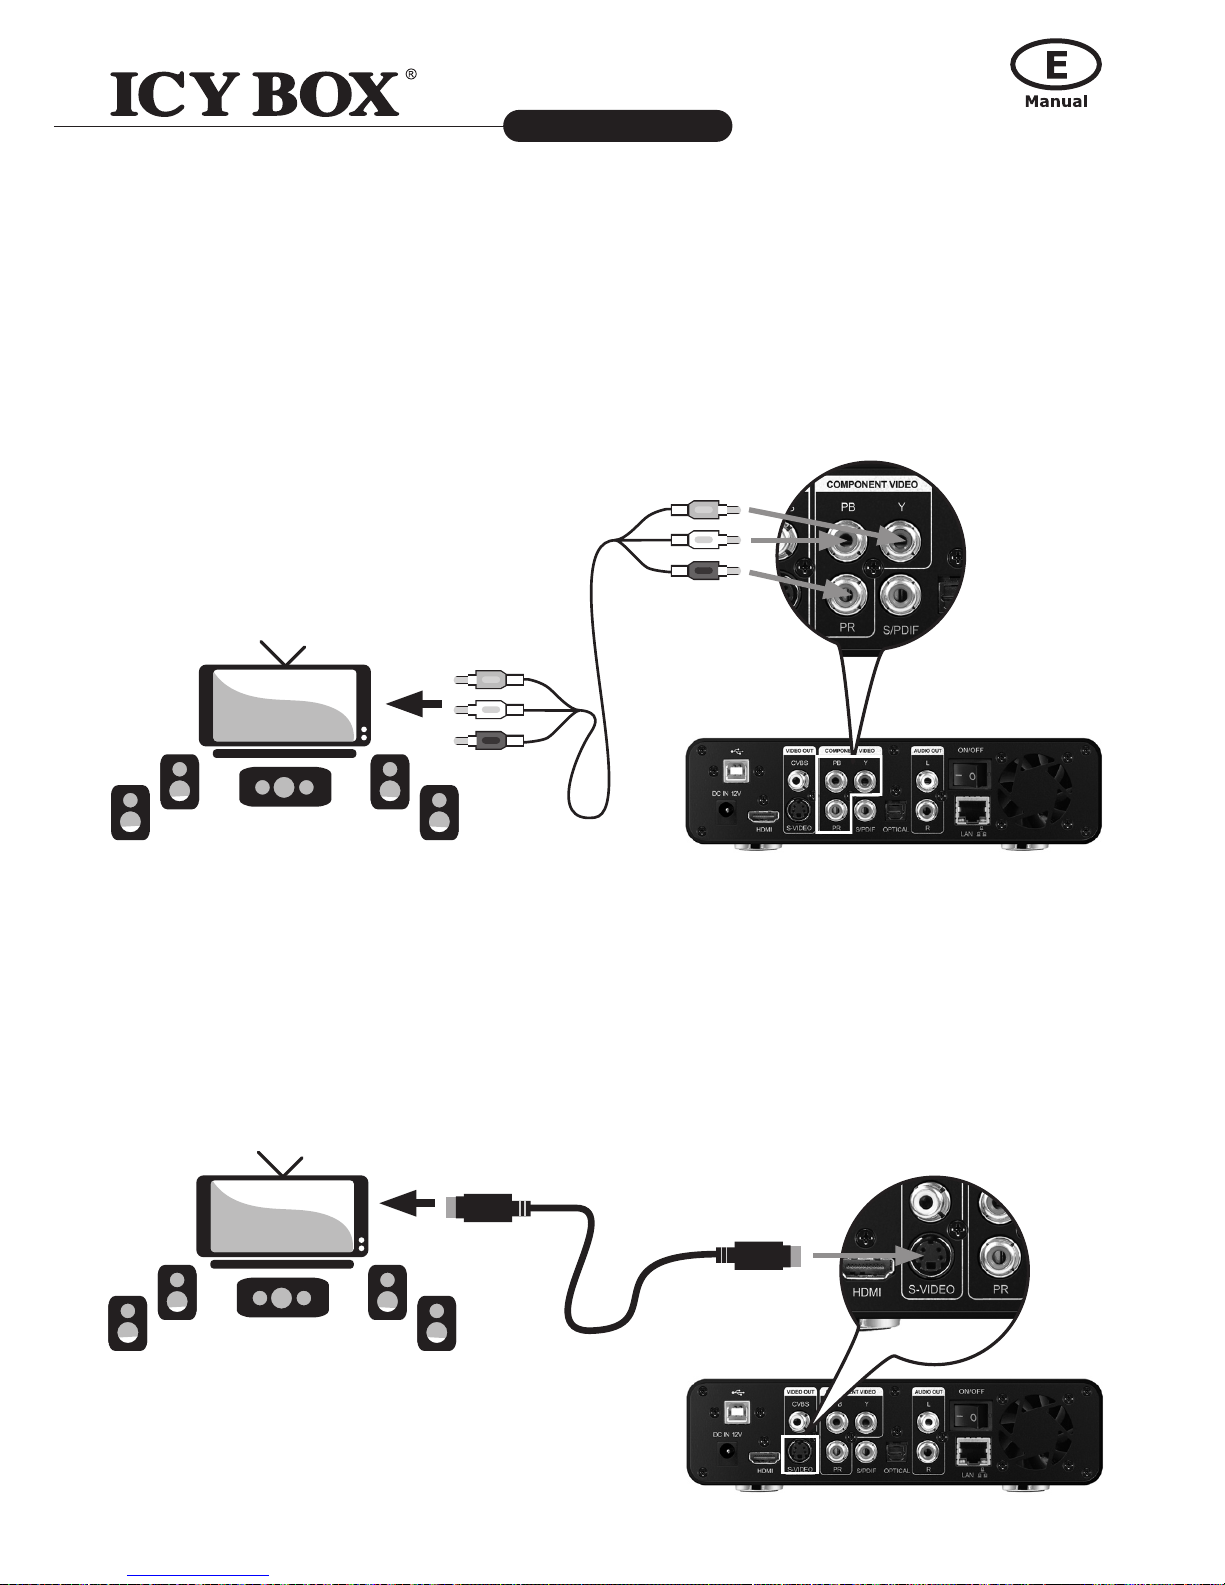
3.2.4 Component Connection
(1) Follow the picture and plug in the 3 color connector to the player's Y/Pb/Pr jack;
(2) Follow the picture and plug in the 3 color connector to the TV's Y/Pb/Pr jack.
Audio Connection while using Y/Pb/Pr Video out:
First method: use the audio output from the A/V OUT jack;
Second method: use the audio output from the S/PDIF Coaxial or Optical jack.
In this way, you can also enjoy videos, music, and photos in the player on TV.
3.2.5 S-Video Connection
(1) Follow the picture and plug in the S-Video connector to the player's S-Video jack;
(2) Follow the picture and plug in the S-Video connector to the TV's S-Video jack.
Audio Connection while using S-Video out:
First method: use the audio output from the Stereo OUT jack;
Second method: use the audio output from the S/PDIF Coaxial or Optical jack.

20
HDD and Network Mediaplayer
IB-MP309 series
http://www.icybox.de
21
3.2.6 HDMI Connection
(1) Follow the picture and plug one connector on your HDMI cable to the player's HDMI jack;
(2) Follow the picture and plug the other connector on your HDMI cable to the TV's HDMI jack.
In this way, you can have the highest quality video and audio via a single cable.
3.2.7 Digital Audio Device Connection (cables not included)
(1) Follow the picture and plug in the RCA connector on your coaxial cable to the player's
S/PDIF Coaxial jack. Or if you use optical ber, please plug in the Toslink connector on
your optical ber to the player's S/PDIF Optical jack; (not supplied)
(2) Follow the picture and plug in the other connector on your coaxial cable or optical ber
to the digital audio device.(not supplied)
Table of contents
Other Icy Box Media Player manuals


