Icy Box IB-U31-02 User manual
IB-U31-02
Manual IB-U31-02
2 Port USB 3.1 PCI Express extention-card
Handbuch IB-U31-02
2 Port USB 3.1 PCI Express Erweiterungskarte
Manuel Série IB-U31-02
Carte d‘extension 2x USB 3.1 PCI-E
Manuale della IB-U31-02
Scheda di espansione 2x USB 3.1 PCI-E
Manual Serie IB-U31-02
Tarjeta de expansión 2x USB 3.1 PCI-E
Instruções IB-U31-02
2x USB 3.1 placa de expansão PCI-E
Instrukcja obsługi IB-U31-02
Karta rozszerzenia 2x USB 3.1 PCI-E
Manuál IB-U31-02
2x USB 3.1 PCI-E rozšiřující karty
Εγχειρίδιο Χρήσης IB-U31-02
Κάρτα επέκτασης 2x USB 3.1 PCI-E
Руководство IB-U31-02
Плата расширения 2x USB 3.1 PCI-E


IB-U31-02
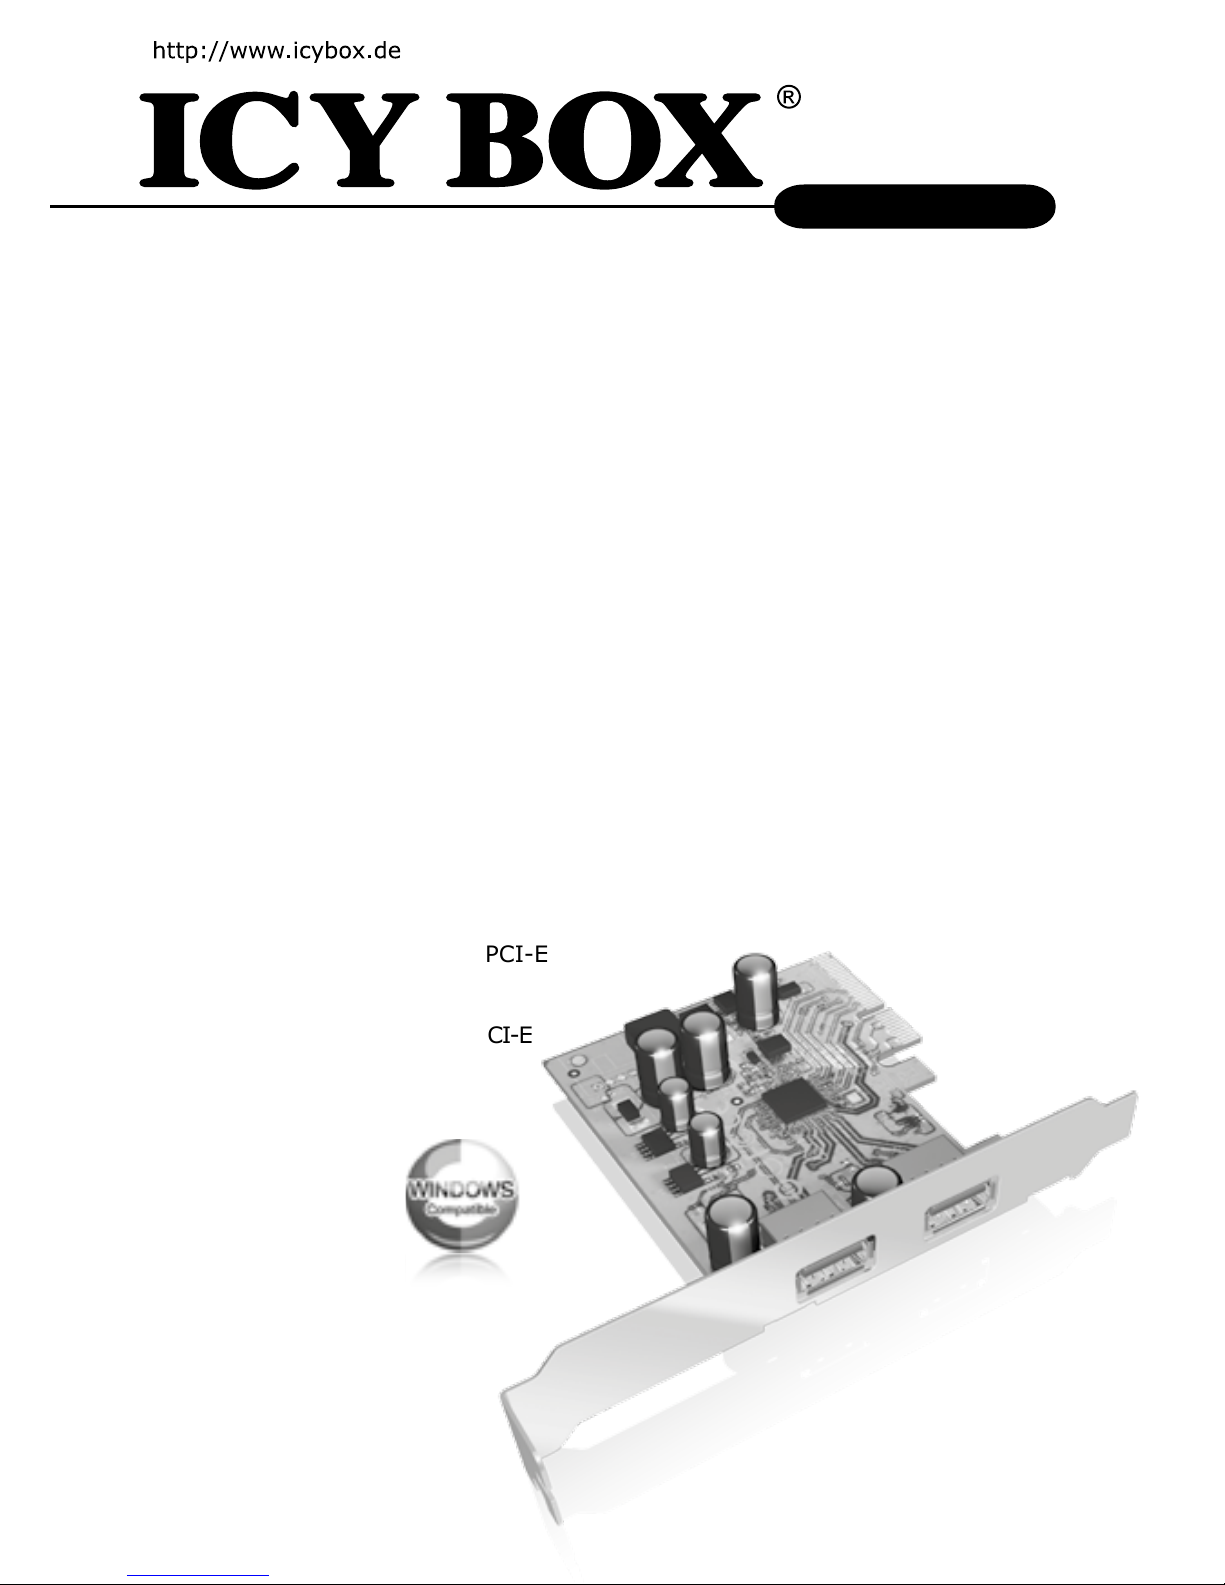
Product View / Produktansicht
1. 2x External USB 3.1 Super-speed+ Type A Female port
2. PCI Express x2 Gold Finger
System Requirements:
• PC with OS: >Windows 7
• One available x2, x4, x8 or x16 PCI Express slot. (PCI Express 2.0 at least)
• CD/DVD-ROM drive for driver installation or user can download driver from Raidsonic website.
Note:
In order to get USB 3.1 SuperSpeed+ performance, please use PCI Express Generation 2
slot for card installation. Or only get half of the data transfer rate.
To satisfy USB 3.1 10 Gbit/s SuperSpeed+ highest performance, ICY BOX IB-U31-02 adopts
the PCIe Gen2/x2 (10 Gbit/s) interface connector design. User has to plug IB-U31-02 add-
on card into PCIe x16 (or x4 above) slot on the mainboard. Due to expansion slot mechani-
cal limitation, this card can NOT be plugged into PCIe x1 slot.
1.
2.

IB-U31-02
Hardware Installation
Follow the instruction given above to install the PCI Express Card:
1. Turn your computer o and remove the power plug from the plug socket
2. Remove the cover from the computer case
3. Remove the metal cover plate on the rear of a free PCI Express slot (e.g. PCIe x16)
4. Insert the card into one free PCI Express slot and screw it rmly on the bracket side
5. Place the cover back onto the computer
6. Insert the plug into the plug socket
IB-U31-02
Driver Installation
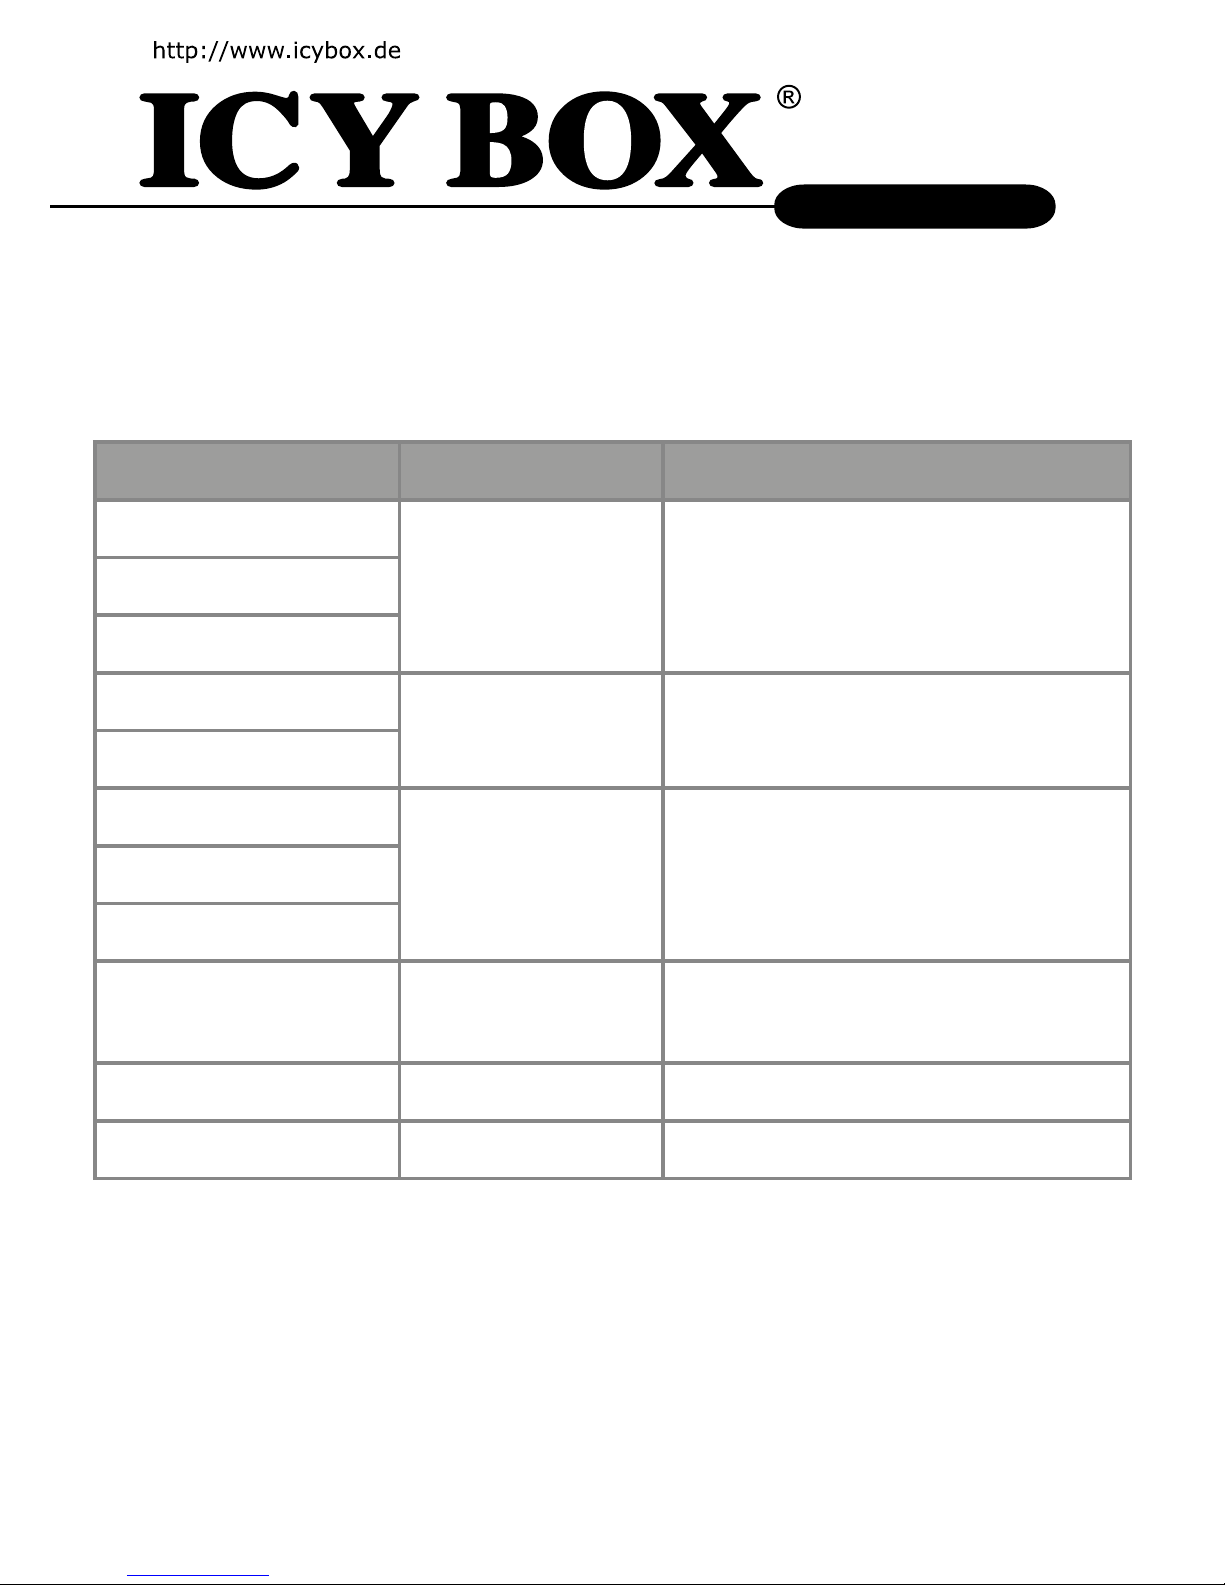
ICY BOX USB 3.1 PCIe Host card design is based on Microsoft Windows operation systems.
The table in this topic provides the operating systems and the supported drivers.
Please note that Microsoft® USB Hotx driver has to install separately on Windows 7 and
2008R2. Due to Microsoft® licensed issue, the driver package is not included, user can
go to Microsoft ocial website (http://support.microsoft.com/) and search keyword "KB
2581464" to download driver package.
Operating System USB 3.1 Driver Remark
Windows 10
Driver included Microsoft in-box driver with UASPWindows 8 / 8.1
Windows Server 2012R2
Windows 7 Driver is necessary
*USB 3.1 Host Driver
*Microsoft USB Hotx
User has to install additional USB 3.1 driver.
*Asmedia USB 3.1 HOST IC Driver no UASP
*Microsoft USB Hotx Driver KB 2581464
Windows Server2008R2
Windows Vista
No support USB Driver implements USB 3.0
performance only
Windows XP
Windows Server 2003
Linux No support USB Driver implements USB 3.0 per-
formance only. Linux Kernel 2.6.31 or
later includes USB 3.0 Driver
Mac OS No support No support
DOS No support No support

IB-U31-02
1. Model – Interface
Model Interface
IB-U31-02 2x USB 3.1 Type-A
2. Package contents
1x IB-U31-02, 1x CD, 1x quick installation guide (multilanguage)
3. Key Features
• 2 Port USB 3.1 PCI Express controller-card
• Expands your PC to two more USB 3.1 ports
• PCI Express Base Specication Revision 2.0 Dual-lane (x2)
• Compliant with Universal Serial Bus 3.1 specication Gen2
• Compliant with xHCI (eXtensible Host Controller Interface, R. 1.1)
• Supports USB data transfer rate of up to 10 Gbit/s
• Each USB port supplies maximum +5 V DC / 900 mA power output
4. Installation
• Turn OFF the power to your computer and any other connected peripheral devices
• Unplug the power cord from the back of the computer
• Remove your computer‘s cover
• Put the panel in one free PCI-E bay and x it with the screw
• Replace the computer cover and reconnect the power cord
For Windows®
• Insert the CD into the CD ROM drive
• Click on "Setup.exe"
• Follow the instructions and nish the driver installation
• Restart the PC

IB-U31-02
1. Modell - Schnittstelle
Modell Schnittstelle
IB-U31-02 2x USB 3.1 Type-A
2. Verpackungsinhalt
1x IB-U31-02, 1x CD, 1x Schnellinstallationsanleitung (Mehrsprachig)
3. Hauptmerkmale
• 2 Port USB 3.1 PCI Express Erweiterungskarte
• Erweitert Ihren PC um 2 weitere externe USB 3.1 Anschlüsse
• PCI Express Base Spezikation Revision 2.0 Dual-lane (x2)
• Konform mit Universal Serial Bus 3.1 Spezikation Gen2
• Konform mit xHCI (eXtensible Host Controller Interface, R. 1.1)
• Unterstützt USB Datenübertragungsraten bis zu 10 Gbit/s
• Jeder USB Port liefert maximal +5 V DC / 900 mA Strom
4. Einbau
• Schalten Sie Ihren Computer und alle angeschlossenen Geräte aus
• Entfernen Sie das Stromkabel an der Rückseite Ihres Computers
• Entfernen Sie die entsprechende Gehäuseabdeckung
• Setzen Sie das Gerät in einem freien PCI-E Einbauschacht ein und befestigen diesen
mit den entsprechenden Schrauben
• Schließen Sie das Computergehäuse und verbinden das Stromkabel wieder
Für Windows®
• Legen Sie die CD in ihr CD ROM Laufwerk
• Führen Sie "Setup.exe" aus
• Folgen Sie den Anweisungen und vervollständigen Sie die Installation
• Starten Sie ihren PC neu

IB-U31-02
1. Modèle – Interface
Modèle Interface
IB-U31-02 2x USB 3.1 Type-A
2. Contenu de la livraison
1x IB-U31-02, 1x CD, 1x guide d‘installation rapide (Multi-langue)
3. Spécialités principales
• Interfaces externes: 2x USB 3.1 Type-A
• PCI Express Dual-lane (x2) révision 2.0
• Taux de transfert : USB 3.1 jusqu‘à 10 Gbit/s
• Rétrocompatible avec USB 3.0/2.0/1.1
• Supporte: > Windows 7
4. Installation
• Débranchez votre ordinateur et tout périphérique connecté
• Débranchez le câble d’alimentation à l’arrière de l’ordinateur
• Retirez le couvercle de votre ordinateur
• Insérez le panneau dans une baie PCI-E pouces disponible et xez-le à l’aide de vis
• Remettez le couvercle de l’ordinateur et rebranchez le câble d’alimentation
Windows®
• Insérez le CD dans le lecteur de CD ROM
• Cliquez sur «Setup.exe»
• Suivez les instructions et terminez l‘installation du pilote
• Redémarrez le PC

IB-U31-02
1. Modello – Extern Collegamento
Modello Extern collegamento
IB-U31-02 2x USB 3.1 Type-A
2. Contenuto della confezione
1x IB-U31-02, 1x CD, 1x guida per l‘installazione rapida (multilingue)
3. Caratteristiche principali
• Con 2 porte USB 3.1 esterne Type-A
• PCI Express Dual-lane (x2) revisione 2.0
• USB 3.1 Host no a 10 Gbit/s
• Compatibilità con USB 3.0/2.0/1.1
• Supporta: >Windows 7
4. Installazione del disco rigido
• Spegnere il computer e tutte le eventuali periferiche collegate
• Slare il connettore di alimentazione dal retro del computer
• Togliere la copertura del computer
• Inserire il pannello in una bay da PCI-E" disponibile e ssarlo con le viti.
• Montare la copertura del computer e collegare il cavo di alimentazion
Windows®
• Inserire il CD nel CD ROM
• Fare clic su "Setup.exe"
• Seguire le istruzioni e nire l’installazione dei driver
• Riavviare il PC

IB-U31-02
1. Módulo - Interfaz
Módulo Interfaz
IB-U31-02 2x USB 3.1 Type-A
2. Contenido del embalaje
1x IB-U31-02, 1x CD,1x Guía de instalación rápida (en varios idiomas)
3. Características principales
• Puertos externos: 2x USB 3.1 Type-A
• PCI Express Dual-lane (x2) revisión 2.0
• USB 3.0 Host hasta 10 Gbit/s
• Compatible hacia atrás con USB 3.0/2.0/1.1
• Soporta: >Windows 7
4. Instalación del disco duro
• Desconecte el suministro eléctrico de su ordenador y el resto de periféricos conectados
• Desenchufe el cable de alimentación eléctrica del ordenador
• Quite la cubierta del ordenador
• Coloque el panel en un módulo libre de PCI-E y sujétela con los tornillos
• Vuelva a colocar la cubierta del ordenador y vuelva a conectar el cable de alimentación
Windows®
• Introduzca el CD en la unidad CD ROM
• Haga clic en "Setup.exe"
• Siga las instrucciones hasta que concluya la instalación del controlador
• Reinicie el PC
IB-U31-02
1. Model - Interfejs
Model Interfejs
IB-U31-02 2x USB 3.1 Type-A
2. Zawarcie pudełka
1x IB-U31-02, 1x CD, 1x krótka instrukcja instalacji (wielojęzyczna)
3. Funkcje kluczowe
• 2 zewnętrzne porty USB 3.1 Type-A
• PCI Express Dual-lane (x2) w wersji 2.0
• USB 3.1 Host do 10 Gbit/s
• Wstecznie kompatybilny z USB 3.0/2.0/1.1
• Zgodność z: >Windows 7
4. Instalacja dysku twardego
• Wyłącz zasilanie komputera i wszystkich podłączonych do niego urządzeń peryferyjnych
• Odłącz kabel zasilania podłączony z tyłu komputera
• Zdejmij obudowę komputera
• Umieść panel w jednej z wolnych wnęk PCI-E" i przymocuj śrubami
• Załóż obudowę komputera i podłącz kabel zasilania
Windows®
• Włożyć płytę CD do napędu CD-ROM
• Kliknąć "Uruchom Setup.exe"
• Postępować zgodnie z instrukcjami i zakończyć instalację sterownika
• Ponownie uruchomić komputer PC
IB-U31-02
1. Μοντέλο - Διεπαφή
Μοντέλο Διεπαφή
IB-U31-02 2x USB 3.1 Type-A
2. Περιεχόμενο συσκευασίας
1x IB-U31-02, 1x CD, 1x οδηγός γρήγορης εγκατάστασης (Πολύγλωσσος)
3. Βασικά Χαρακτηριστικά
• Με 2 εξωτερικές θύρες USB 3.1 Type-A
• PCI Express Dual-lane (x2) αναθεώρηση 2.0
• USB 3.1 ρυθμός μετάδοσης έως 10 Gb/δευτ
• προς τα πίσω συμβατότητα με τα 3.0/2.0/1.1
• Υποστηρίζει: >Windows 7
4. Εγκατάσταση σκληρού δίσκου
• Απενεργοποιήστε τον υπολογιστή και άλλες τυχόν συνδεδεμένες περιφερειακές συσκευές
• Αποσυνδέστε το καλώδιο ρεύματος που βρίσκεται στην πίσω πλευρά του υπολογιστή
• Αφαιρέστε το πλαίσιο του υπολογιστή
• Τοποθετήστε το πλαίσιο σε μια διαθέσιμη υποδοχή PCI-E" και στερεώστε το με τις βίδες
• Τοποθετήστε το πλαίσιο του υπολογιστή και συνδέστε το καλώδιο ρεύματος
Windows®
• Εισαγάγετε το CD στη μονάδα CD ROM
• Κάντε κλικ στο αρχείο "Setup.exe"
• Ακολουθήστε τις οδηγίες και ολοκληρώστε την εγκατάσταση του προγράμματος οδήγησης
• Κάντε επανεκκίνηση του υπολογιστή
IB-U31-02
1. Модель - хост интерфейс
Модель хост-интерфейс
IB-U31-02 2x USB 3.1 Type-A
2. Содержание упаковки
IB-U31-02 – 1 шт., 1 CD – 1 шт., инструкция по быстрой установке (многоязычная) – 1 шт.
3. Основные признаки
• 2 внешних порта USB 3.1 Type-A
• PCI Express Dual-lane (x2) модификация 2.0
• USB 3.1 скорость передачи – до 10 Гб/сек
• Обратная совместимость с USB 3.0/2.0/1.1
• поддерживает: >Windows 7
4. Установка жёсткого диска
• Выключить компьютер и периферийные устройства
• Вынуть шнур питания на задней панели компьютера
• Открыть корпус компьютера
• Вставить плату в свободный отсек PCI-E" и закрепить винтами
• Закрыть корпус компьютера и подключить шнур питания
Windows®
• Вставьте компакт-диск в дисковод для компакт-дисков
• Нажмите файл «Run Setup.exe»
• Выполните инструкции и завершите установку драйвера
• Перезагрузите компьютер
IB-U31-02
1. Modelo – Interface
Modelo Interface
IB-U31-02 2x USB 3.1 Type-A
2. Conteúdo da embalagem:
1x IB-U31-02, 1x CD, 1x manual de instruções
3. Recursos
• Com 2 portas USB 3.1 externas Type-A
• PCI Express Dual-lane (x2) revisão 2.0
• USB 3.1 com até 10 Gbit/s
• Para trás compatível com USB 3.0/2.0/1.1
• Compatível com: >Windows 7
4. Instalação
• Desligue o seu computador e os outros dispositivos periféricos que lhe estejam ligados
• Remova o cabo de energia da parte de trás do computador
• Remova a tampa do computador
• Introduza o painel num compartimento de unidade de PCI-E" e xe com os parafusos
• Reponha a tampa do computador e volte a ligar o cabo de energia
Windows®
• Insira o CD na unidade de CD-ROM
• Clique em "Setup.exe"
• Observe as instruções e termine a instalação do controlador
• Reinicie o PC

IB-U31-02
1. Vzor – Rozhraní
Vzor Rozhraní
IB-U31-02 2x USB 3.1 Type-A
2. A csomag tartalma
1x IB-U31-02, 1x CD, 1x návod k obsluze
3. Funkce
• Externí porty 2x USB 3.1 Type-A
• PCI Express Dual-lane (x2) revize 2.0
• USB 3.1 má kapacitu až 10 Gbit/s
• Zpětně kompatibilní s USB 3.0/2.0/1.1
• Podporuje: >Windows 7
4. Instalace
• VYPNĚTE počítač a veškerá připojená periferní zařízení
• Odpojte napájecí kabel ze zadní strany počítače
• Sejměte kryt počítače
• Panel umístěte do volné PCI-E" přihrádky a upevněte ho šrouby
• Vraťte zpět kryt počítače a opětovně připojte napájecí kabel
Windows®
• Vložte CD do jednotky CD-ROM
• Klikněte na "Spustit Setup.exe"
• Postupujte podle pokynů a dokončete instalaci ovladače
• Restartuje počítač

© Copyright 2015 by RaidSonic Technology GmbH. All Rights Reserved
The information contained in this manual is believed to be accurate and reliable. RaidSonic Technology GmbH as-
sumes no responsibility for any errors contained in this manual. RaidSonic Technology GmbH reserves the right to
make changes in the specications and/or design of the above mentioned product without prior notice. The diagrams
contained in this manual may also not fully represent the product that you are using and are there for illustration
purposes only. RaidSonic Technology GmbH assumes no responsibility for any dierences between the product men-
tioned in this manual and the product you may have.
Table of contents
Languages:
Other Icy Box PCI Card manuals

Icy Box
Icy Box IB-PCI224M2-ARGB User manual

Icy Box
Icy Box IB-AC614a User manual

Icy Box
Icy Box IB-PCI214M2-HSL User manual

Icy Box
Icy Box IB-PCI2017-U2 User manual

Icy Box
Icy Box IB-U31-01 User manual

Icy Box
Icy Box IB-LAN300-PCI User manual

Icy Box
Icy Box IB-PCI208-HS User manual

Icy Box
Icy Box IB-PCI1902-C31 User manual

Icy Box
Icy Box IB-PCI212 User manual

Icy Box
Icy Box IB-PCI215M2-HSL User manual


