Icy Box IB-PCI215M2-HSL User manual

Manual IB-PCI215M2-HSL
Manual IB-PCI215M2-HSL
PCIe extension card set for 2x M.2 SSDs
Handbuch IB-PCI215M2-HSL
PCIe Erweiterungskartenset für 2x M.2 SSDs
Manuel Série IB-PCI215M2-HSL
Set de la carte d‘extension PCIe pour 2x M. 2 SSD
Manual de IB-PCI215M2-HSL
Set de tarjeta de ampliación PCIe para 2x SSD M.2
Manuale IB-PCI215M2-HSL
Set di schede di espansione PCIe per 2x SSD M.2
Εγχειρίδιο IB-PCI215M2-HSL
Σετ κάρτας επέκτασης PCIe για 2x SSD M.2
Instrukcja obsługi IB-PCI215M2-HSL
Zestaw adapterów PCIe na 2 dyski SSD ze złączem M.2
Manuální IB-PCI215M2-HSL
Sada rozšiřující karty PCIe pro paměti 2x M.2 SSD
Handmatige IB-PCI215M2-HSL
PCIe-uitbreidingskaartenset voor 2x M.2 SSD’s
Kézi IB-PCI215M2-HSL
PCIe bővítőkártya-készlet 2x M.2 SSD-hez
Safety information
Please read carefully the following information to prevent injuries, damage to
material and device as well as data loss:
Warning levels
Signal words and safety codes indicate the warning level and provide immediate information in terms
of the probability of occurrence as well as the type and severity of the consequences if the measures to
prevent hazards are not complied with.
Warns of a directly hazardous situation causing death or serious injury.
Warns of a potentially hazardous situation that may cause death
or serious injury.
Warns of a potentially hazardous situation that may cause minor injury.
Warns of a potential situation that may cause material or environmental damage
and disrupt operative processes.
1. Risk of electrical shock
Contact with parts conducting electricity
Risk of death by electrical shock
• Read the operating instructions prior to use
• Make sure the device has been de-energised prior to working on it
• Do not remove contact p otection panels
• Avoid contact with conducting parts
• Do not bring plug contacts in contact with pointed and metal objects
• Use in intended environments only
• Operate the device using a power unit meeting the specifications of the type plate only!
• Keep the device/power unit away from humidity, liquid, vapour and dust
• Do not modify the device
• Do not connect the device during thunderstorms
• Approach specialist retailers if you require repairs
2. Hazards during assembly (if intended)
Sharp components
Potential injuries to fingers or hands during assembly (if intended)
• Read the operating instructions prior to assembly
• Avoid coming into contact with sharp edges or pointed components
• Do not force components together
• Use suitable tools
• Use potentially enclosed accessories and tools only
3. Hazards caused by a development of heat
Insufficient device/power unit ventilation
Overheating and failure of the device/power unit
• Prevent externally heating up components and ensure an exchange of air
• Do not cover the fan outlet and passive cooling elements
• Avoid direct sunlight on the device/power unit
• Guarantee sufficient ambient air for the device/power unit
• Do not place objects on the device/power unit
DANGER
WARNING
CAUTION
IMPORTANT
WARNING
CAUTION
IMPORTANT
Safety information
4. Hazards caused by very small parts and packaging
Risk of suffocation
Risk of death by suffocation or swallowing
• Keep small parts and accessories away from children
• Store/dispose of plastic bags and packaging in an area that is inaccessible to children
• Do not hand over small parts and packaging to children
5. Potential data loss
Data lost during commissioning
Potentially irreversible data loss
• Always comply with the information in the operating instructions/quick installation guide
• Exclusively use the product once the specifications have been met
• Back up data prior to commissioning
• Back up data prior to connecting new hardware
• Use accessories enclosed with the product
6. Cleaning the device
Harmful cleaning agents
Scratches, discolouration, damage caused by moisture or short circuit in the device
• Disconnect the device prior to cleaning
• Aggressive or intense cleaning agents and solvents are unsuitable
• Make sure there is no residual moisture after cleaning
• We recommend cleaning devices using a dry, anti-static cloth
7. Disposing of the device
Environmental pollution, unsuitable for recycling
Potential environmental pollution caused by components, recycling circle interrupted
This icon on product and packaging indicates that this product must not be disposed of as part
of domestic waste. In compliance with the Waste Electrical and Electronic Equipment Directive
(WEEE) this electrical device and potentially included batteries must not be disposed of in
conventional, domestic waste or recycling waste. If you would like to dispose of this product
and potentially included batteries, please return it to the retailer or your local waste disposal
and recycling point.
or visit our website at www.raidsonic.de.
WARNING
IMPORTANT
IMPORTANT
IMPORTANT
Manual IB-PCI215M2-HSL
Package contents
1x IB-PCI215M2-HSL, 2x heat sink (70 & 100 mm), 3x thermal pad (70 mm), 3x thermal pad
(100 mm), 2x profil bracket (80 & 120 mm), 1x screw set, 1x silicon band set, 1x manual
Installation
Note: Before starting the installation, make sure that your body is electrically dischar-
ged. Earth your body e.g. by briefly touching a heating pipe. Discharging on contact
with the board can cause irreparable damage.
Manual IB-PCI215M2-HSL
Hint:
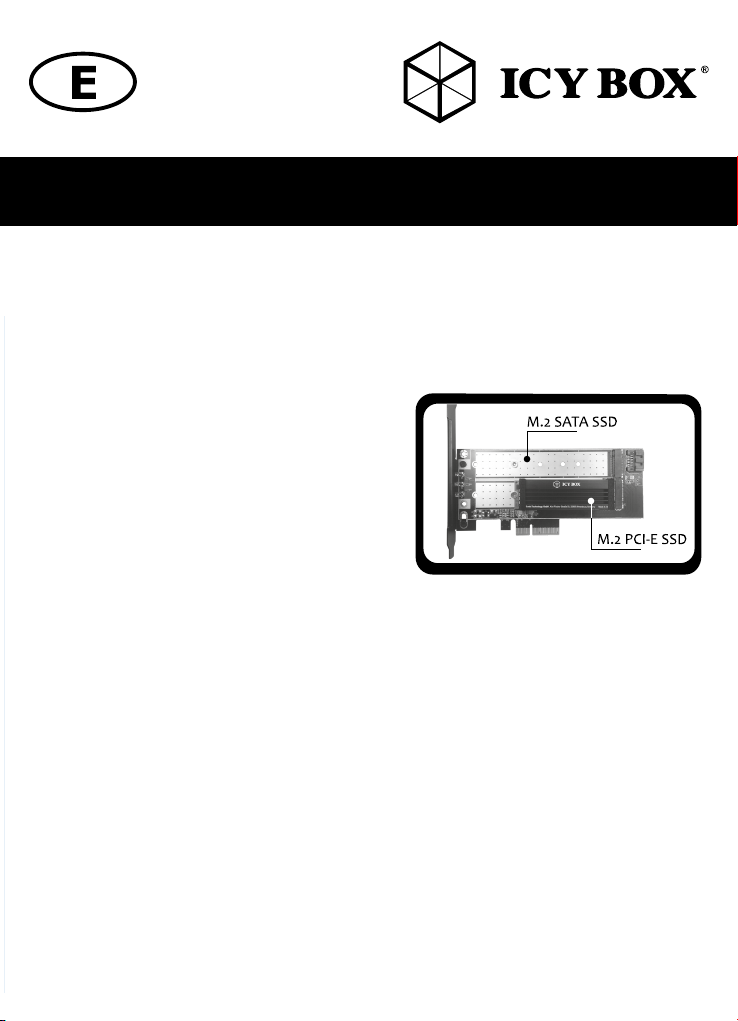
A NVMe M.2 SSD as well as a SATA M.2 SSD can be mounted on the IB-PCI215M2-HSL.
The lower M.2 M-Key socket, directly on the PCIe connector, is for mounting an NVMe M.2
SSD with M-Key. The upper M.2 B-Key socket is exclusively designed for mounting SATA M.2
SSDs and can accommodate B and B+M-Key M.2 SSDs.
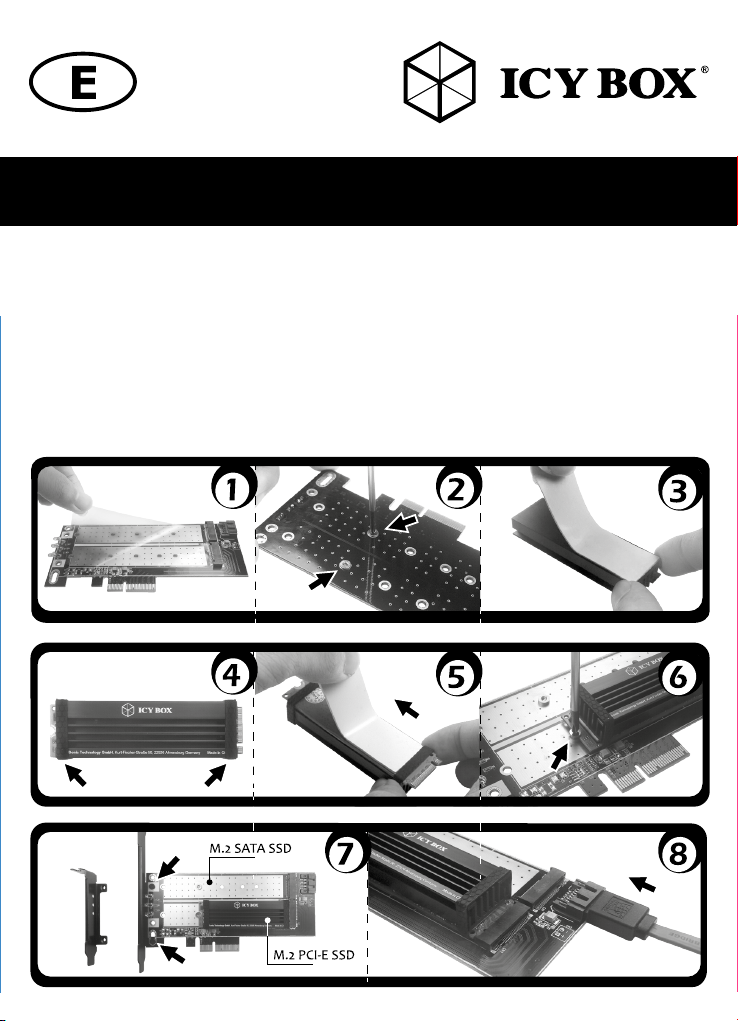
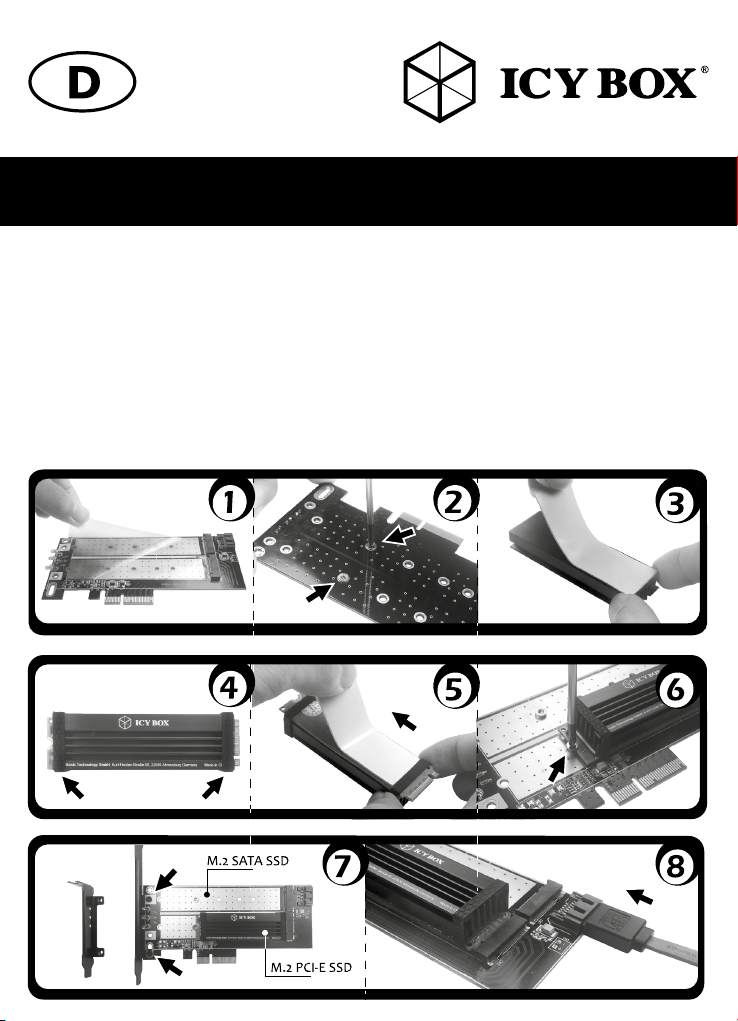
1. Remove the protective plastic film from the card
2. Remove the golden spacer and a silver pan-head screw from the screw set. Use the
screw to fix the spacer to the length you need for your M.2 SSD.
3. Take the blue thermal pad, remove the protective film on both sides and apply it to the
plain surface of the heat sink. The thermal pad adheres independently.
4. Place the heat sink with the blue thermal pad on your M.2 SSD. Please make sure that the
connector of the M.2 SSD remains free. Take two of the silicon bands and pull it over the
front and rear corners of the head sink with M.2 SSD.
5. Take the grey thermal pad, remove the protective film on both sides und place it on
bottom side of the M.2 SSD. The thermal pad adheres independently.
Hint:
• Thick pad: single sided M.2 SSD
• Thin pad: M.2 SSD equipped on both sides
• If the pad is too long, you can always shorten it to the required length with scissors
before removing the protective film.
• Avoid dust and dirt between the board and the thermal pad and apply the thermal
pad immediately after removing the protective film.
The NVMe M.2 SSDs creates enough heat to
require a heat sink. Depending on the length of
the SSD, the 70 mm (2280 M.2 SSD) or 100
(22110 M.2 SSD) mm heat sink must be used.
The heat sinks can optionally be used with SATA
M.2 SSDs.
Manual IB-PCI215M2-HSL
6. Carefully insert your M.2 SSD card with the connection side at an angle of approx. 30°
into the M.2 socket. Make sure that groove (M.2 SSD) and tongue (socket) are opposite
each other. Then press the card down and secure it to the rear end of the M.2 SSD with
the second silver screw.
7. Depending on the housing you use, fasten the profile bracket with the remaining large
black screws.
Hint:
• Before inserting the assembled PCIe card into your system, make sure that the system is
shut down and disconnected from the power supply.
8. Install the equipped IB-PCI215M2-HSL on your PCIe connector on the mainboard and
the profile bracket on your housing. If a SATA M.2 SSD is installed, connect the IB-
PCI215M2-HSL to your mainboard using a SATA cable.
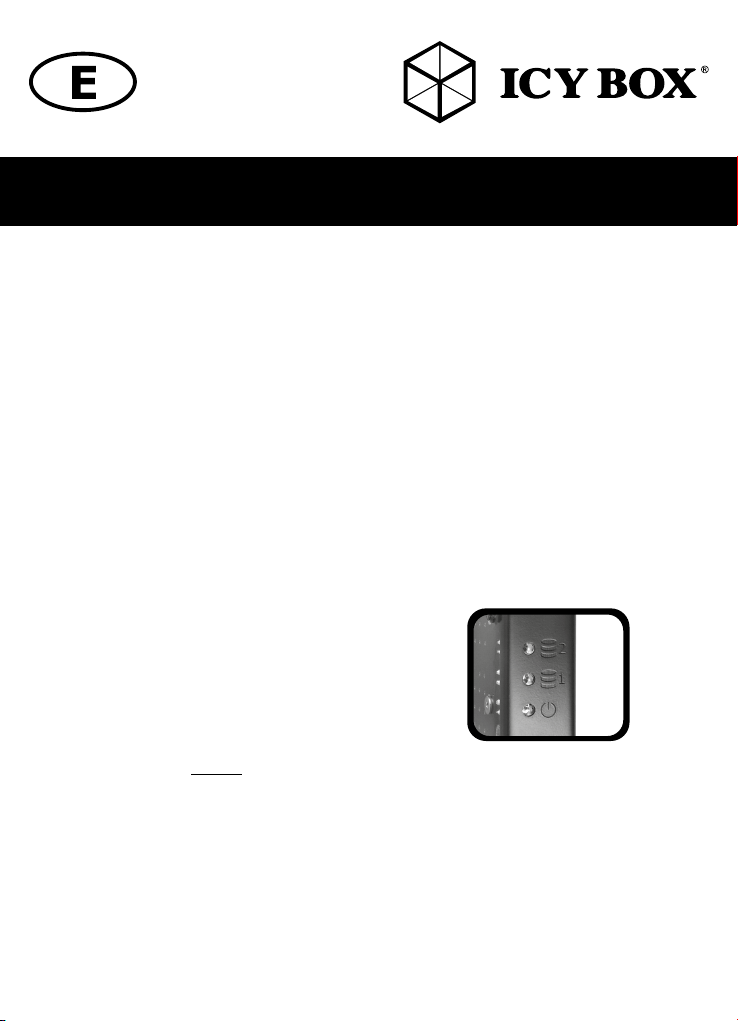
9. If the IB-PCI215M2-HSL is connected to the system,
the Power LED lights up. If one or both M.2 SSDs
are accessed, the access LEDs for SATA (2)
or PCIe (1) SSDs light up.
• The external SSD cannot be connected or disconnected while the computer is running.
• A new SSD must first be initialized, partitioned and formatted by the operating system to
be displayed by the system.
• If the SSD is not immediately recognized by the system, please check:
• whether the SSD is initialized, partitioned and formatted.
• PCIe M.2 SSDs become very warm when used. If you want to remove the SSD or PCIe
card, wait approx. 5-10 minutes after shutting down the system until the card has cooled
down to some extent.
Sicherheitshinweise
Zur Vermeidung körperlicher Schäden, sowie von Sach-, Geräteschäden und Datenver-
lust beachten Sie bitte folgende Hinweise:
Warnstufen
Signalwort und Sicherheitszeichen kennzeichnen die Warnstufe und geben einen sofortigen Hinweis auf
Wahrscheinlichkeit, Art und Schwere der Folgen, wenn die Maßnahmen zur Vermeidung der Gefahr
nicht befolgt werden.
warnt vor einer unmittelbar gefährlichen Situation, die zum Tod
oder zu schweren Verletzungen führen wird.
warnt vor einer möglicherweise gefährlichen Situation,
die zum Tod oder zu schweren Verletzungen führen kann.
warnt vor einer möglicherweise gefährlichen Situation,
die zu leichten Verletzungen führen kann.
warnt vor einer möglichen Situation, die zu Sach- und Umweltschäden
führen und den Betriebsablauf stören kann.
1. Gefahren durch elektrische Spannung
Kontakt mit elektrisch leitenden Teilen
Lebensgefahr durch Stromschlag
• vor Benutzung Betriebsanleitung lesen
• vor Arbeiten am Gerät, Spannungsfreiheit sicherstellen
• Kontaktschutzblenden nicht entfernen
• Kontakt mit Spannungsführenden Komponenten vermeiden.
• Steckkontakte nicht mit spitzen und metallischen Gegenständen berühren
• Verwendung nur in dafür vorgesehenen Umgebungen
• Gerät ausschließlich mit Typenschildkonformen Netzteil betreiben!
• Gerät/Netzteil fern von Feuchtigkeit, Flüssigkeit, Dampf und Staub halten
• Eigenständige Modifikationen sind unzulässig
• Gerät nicht während eines Gewitters anschließen
• Geben Sie Ihr Gerät im Reparaturfall in den Fachhandel
2. Gefahren während Montage (wenn vorgesehen)
Scharfkantige Bauteile
Finger- oder Handverletzungen bei Zusammenbau (wenn vorgesehen) möglich
• vor Montage, Betriebsanleitung lesen
• Kontakt mit scharfen Kanten oder spitzen Bauteilen vermeiden
• Bauteile nicht mit Gewalt zusammensetzen
• geeignetes Werkzeug verwenden
• nur gegebenenfalls mitgeliefertes Zubehör und Werkzeug verwenden
3. Gefahren durch Wärmeentwicklung
Mangelhafte Belüftung des Geräts/Netzteils
Überhitzung und Ausfall des Geräts/Netzteils
• externe Erwärmung vermeiden und Luftaustausch zulassen
• Lüfter-Auslass und passive Kühlkörper freihalten
• direkte Sonneneinstrahlung auf Gerät/Netzteil vermeiden
• ausreichend Umgebungsluft für Gerät/Netzteil sicherstellen
• keine Gegenstände auf dem Gerät/Netzteil abstellen
GEFAHR
WARNUNG
VORSICHT
ACHTUNG
WARNUNG
VORSICHT
ACHTUNG

Sicherheitshinweise
4. Gefahren durch Kleinstteile und Verpackung
Erstickungsgefahr
Lebensgefahr durch Ersticken oder Verschlucken
• Kleinteile, Zubehör für Kinder unzugänglich verwahren
• Plastiktüten und Verpackung für Kinder unzugänglich verwahren/entsorgen
• Kleinteile und Verpackungen nicht in Kinderhände geben
5. Möglicher Datenverlust
Datenverlust bei Inbetriebnahme
Unwiederbringlicher Datenverlust möglich
• Unbedingt Hinweise in der Bedienungsanleitung/Schnellinstallationsanleitung beachten
• Produkt nur verwenden, wenn Spezifikationen erfüllt sind
• Datensicherung vor Inbetriebnahme durchführen
• Datensicherung vor Anschluss neuer Hardware durchführen
• dem Produkt beiliegendes Zubehör verwenden
6. Reinigung des Gerätes
Schädigende Reinigungsmittel
Kratzer, Farbveränderungen, Feuchteschäden oder Kurzschluss am Gerät
• vor Reinigung, das Gerät außer Betrieb nehmen
• aggressive bzw. scharfe Reinigungs- und Lösungsmittel sind ungeeignet
• nach der Reinigung sicherstellen, dass keine Restfeuchtigkeit vorhanden ist
• Reinigung der Geräte am besten mit trockenem Antistatiktuch durchführen
7. Entsorgung des Gerätes
Umweltverschmutzung, Wiederverwertung nicht möglich
Mögliche Umweltbelastung durch Bestandteile, Recyclingkreislauf unterbrochen
Dieses auf dem Produkt und der Verpackung angebrachte Symbol zeigt an, dass dieses Pro-
dukt nicht mit dem Hausmüll entsorgt werden darf. In Übereinstimmung mit der Richtlinie über
Elektro- und Elektronik-Altgeräte (WEEE) darf dieses Elektrogerät und ggf. enthaltene Batterien
nicht im normalen Hausmüll oder dem Gelben Sack entsorgt werden. Wenn Sie dieses Pro-
dukt und ggf. enthaltene Batterien entsorgen möchten, bringen Sie diese bitte zur Verkaufsstelle
zurück oder zum Recycling-Sammelpunkt Ihrer Gemeinde.
oder besuchen Sie unsere Internetseite www.raidsonic.de.
WARNUNG
ACHTUNG
ACHTUNG
ACHTUNG
Handbuch IB-PCI215M2-HSL
Verpackungsinhalt
1x IB-PCI215M2-HSL, 2x Kühlkörper (70 & 100 mm), 3x Wärmeleitpads (70 mm), 3x
Wärmeleitpads (100 mm), 2x Profilblech (80 & 120 mm), 1x Schrauben Set,
1x Silikonband Set, 1x Handbuch
Installation Hinweis: Bevor Sie mit der Installation starten, stellen Sie sicher, dass Ihr
Körper elektrisch entladen ist. Erden Sie ihren Körper z.B. indem Sie kurz an ein Hei-
zungsrohr fassen. Entladen Sie sich beim Kontakt mit der Platine, kann diese irreparabel
Beschädigt werden.

Handbuch IB-PCI215M2-HSL
Hinweis:
Auf die IB-PCI215M2-HSL kann sowohl eine NVMe M.2 SSD als auch eine SATA M.2 SSD
montiert werden. Der untere M.2 M-Key Sockel, direkt am PCIe Anschluss, ist für die Montage
einer NVMe M.2 SSD mit M-Key gedacht. Der obere M.2 B-Key Sockel ist ausschließlich
für die Verwendung von SATA M.2 SSDs ausgelegt und kann B und B+M-Key M.2 SSDs
aufnehmen.
1. Entfernen Sie die Schutzfolie von der Karte.
2. Entnehmen Sie dem Schraubenset den goldenen Abstandshalter und eine silberne Flach-
kopfschraube. Fixieren Sie mit der Schraube den Abstandshalter auf der Länge, die Sie
für Ihre M.2 SSD benötigen.
3. Nehmen Sie das blaue Wärmeleitpad, entfernen die Schutzfolie auf beiden Seiten, und
bringen Sie es auf der glatten Fläche des Kühlkörpers auf. Das Wärmeleitpad haftet
eigenständig.
4. Bringen Sie den Kühlkörper mit dem blauen Wärmeleitpad auf Ihrer M.2 SSD auf. Achten
Sie darauf, dass der Anschluss der M.2 SSD frei bleibt. Nehmen Sie zwei der Silikonbän-
der und ziehen sie diese vorne und hinten über die Ecken der M.2 SSD mit Kühlkörper.
5. Nehmen Sie das graue Wärmeleitpad, entfernen Sie die Schutzfolie auf beiden Seiten
und bringen Sie es auf der Unterseite M.2 SSD auf. Das Wärmeleitpad haftet eigenständig.
Hinweis:
• Dickes Pad: einseitig bestückte M.2 SSD
• Dünnes Pad: beidseitig bestückte M.2 SSD
• Ist das Pad zu lang können Sie es jederzeit mit einer Schere auf die benötigte Länge
kürzen, bevor die Schutzfolie entfernt wird.
Die NVMe M.2 SSDs entwickeln unter voller Last so
viel Wärme, dass ein Kühlkörper notwendig wird. Je
nach Länge der verwendeten M.2 SSD muss der 70
mm (2280 M.2 SSD) oder der 100 mm (22110 M.2
SSD) Kühlkörper genutzt werden.
Handbuch IB-PCI215M2-HSL
• Vermeiden Sie Staub und Dreck zwischen Platine und Wärmeleitpad und tragen Sie das
Wärmeleitpad unmittelbar nach entfernen der Schutzfolie auf.
6. Installieren Sie die bestückte IB-PCI215M2-HSL auf ihrem PCIe Anschluss auf dem Main-
board und das Profilblech an Ihrem Gehäuse. Wenn eine SATA M.2 SSD verbaut ist,
verbinden Sie die IB-PCI215M2-HSL mit Hilfe eines SATA Kabels mit Ihrem Mainboard.
7. Je nachdem welches Gehäuse Sie verwenden, befestigen Sie mit den verbleibenden
großen schwarzen Schrauben das benötigte Profilblech.
Hinweis:
• Bevor Sie die fertig zusammengesetzte PCIe Karte in Ihr System einsetzen, stellen Sie
sicher, dass das System heruntergefahren und vom Stromnetz getrennt ist.
8. Installieren Sie die bestückte IB-PCI215M2-HSL auf ihrem PCIe Anschluss auf dem Main-
board und das Profilblech an Ihrem Gehäuse. Wenn eine SATA M.2 SSD verbaut ist,
verbinden Sie die IB-PCI215M2-HSL mit Hilfe eines SATA Kabels mit Ihrem Mainboard.
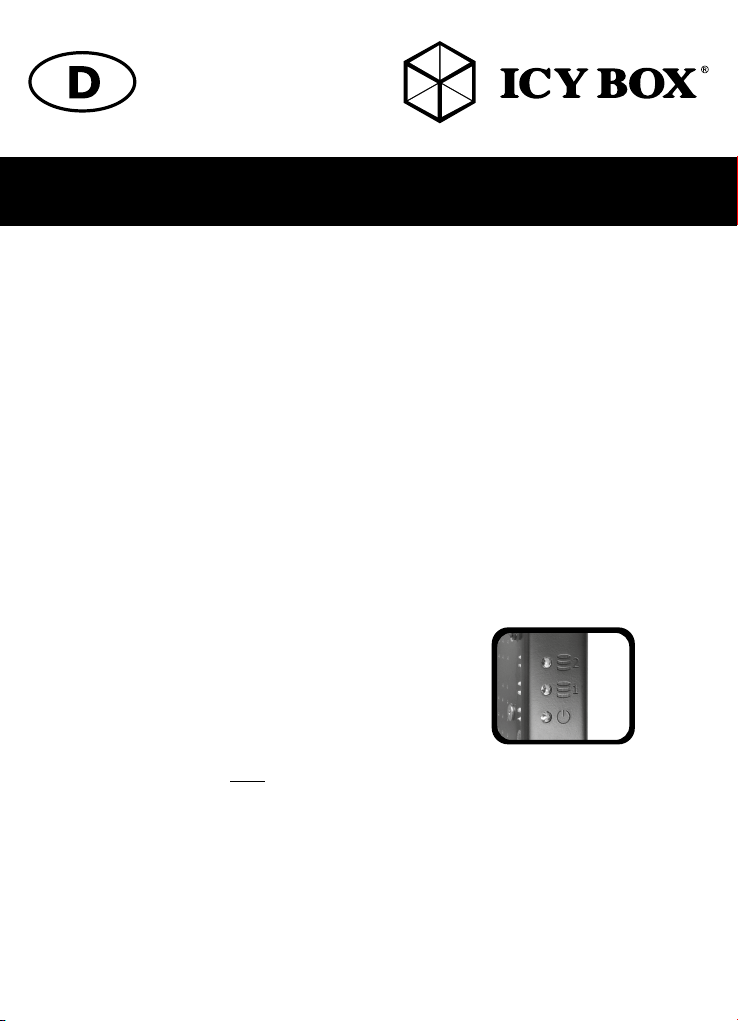
9. Ist die IB-PCI215M2-HSL mit dem System verbunden
leuchtet die Power LED. Findet ein Zugriff auf eine oder
beide SSDs statt, leuchten jeweils die Zugriffs LEDs
für SATA (2) oder PCIe (1) SSD.
• Die externe SSD kann nicht im laufenden Betrieb des Rechners angeschlossen oder von
diesem getrennt werden.
• Eine neue SSD muss vom Betriebssystem erst initialisiert, partitioniert und formatiert wer-
den, um vom System angezeigt zu werden.
• Wenn die SSD nicht sofort vom System erkannt wird bitte prüfen:
- ob die SSD initialisiert, partitioniert und formatiert ist.
• PCIe SSDs werden bei Benutzung sehr warm. Sollten Sie die SSD oder die PCIe Karte
demontieren wollen, warten Sie ca. 5-10 min nach herunterfahren des Systems bis die
Karte einigermaßen ausgekühlt ist.
© Copyright 2018 by RaidSonic Technology GmbH. All Rights Reserved.
The information contained in this manual is believed to be accurate and reliable. RaidSonic Technology GmbH assumes
no responsibility for any errors contained in this manual. RaidSonic Technology GmbH reserves the right to make changes
in the specifications and/or design of the above mentioned product without prior notice. The diagrams contained in this
manual may also not fully represent the product that you are using and are there for illustration purposes only. RaidSonic
Technology GmbH assumes no responsibility for any differences between the product mentioned in this manual and
the product you may have.
Table of contents
Languages:
Other Icy Box PCI Card manuals

Icy Box
Icy Box IB-AC614a User manual

Icy Box
Icy Box IB-U31-02 User manual

Icy Box
Icy Box IB-PCI212 User manual

Icy Box
Icy Box IB-PCI1902-C31 User manual

Icy Box
Icy Box IB-PCI208-HS User manual

Icy Box
Icy Box IB-U31-01 User manual

Icy Box
Icy Box IB-PCI214M2-HSL User manual

Icy Box
Icy Box IB-PCI224M2-ARGB User manual

Icy Box
Icy Box IB-PCI2017-U2 User manual

Icy Box
Icy Box IB-LAN300-PCI User manual


