IDA TRX-200 User manual

1
I.D.A.I.D.A.
I.D.A.I.D.A.
I.D.A.
TRX-200 WTRX-200 W
TRX-200 WTRX-200 W
TRX-200 Wide Band Receiveride Band Receiver
ide Band Receiveride Band Receiver
ide Band Receiver
Operation manualOperation manual
Operation manual
I.D.A.Inc.Tokyo,JapanI.D.A.Inc.Tokyo,Japan
I.D.A.Inc.Tokyo,Japan

2
I.D.A.I.D.A.
I.D.A.I.D.A.
I.D.A.
INDEX
TURNONTRX‑200 .................................................. 4
FRONTPANEL ...................................................... 6
SIDEVIEWOFTRX‑200 ............................................. 7
TOPPANEL ........................................................ 8
BACKPANEL ....................................................... 9
OPERATIONS ...................................................... 10
ADJUSTMENTOFSQUELCHLEVEL .....................................11
MONITORINGFUNCTION ............................................. 11
CONFIGURATION ................................................... 13
MANUALFREQUENCYTUNING .......................................31
MEMORYSCANNING ................................................33
SEARCHFUNCTION ................................................. 35
SEARCHPAIRPROGRAM .............................................36
SPECIFICATIONS .................................................. 38

3
I.D.A.I.D.A.
I.D.A.I.D.A.
I.D.A.
Thank you for purchasing the TRX-200 all modes wide band monitoring
receiver.
Please read this operating manual carefully to avoid miss operation of the
receiver. The TRX-200 is carefully designed but like all receivers the radio
can suffer from a degree of self-oscillation known as ‘birdies’. These are
from the nature of super heterodyne circuit and do not represent a fault.
NOTE: Where the text is described in [SQUARE BRACKETS][SQUARE BRACKETS]
[SQUARE BRACKETS][SQUARE BRACKETS]
[SQUARE BRACKETS] the keys
are to be pressed exactly as shown.
For example: [8] [0] [0] [ENT][8] [0] [0] [ENT]
[8] [0] [0] [ENT][8] [0] [0] [ENT]
[8] [0] [0] [ENT]
This means press the numeric key 8, followed by the 0, key followed by the
0 key, followed by the [ENT][ENT]
[ENT][ENT]
[ENT] key.
The arrow keys to the lower left of the keypad are referred to as [UP][UP]
[UP][UP]
[UP]
[DOWN][DOWN]
[DOWN][DOWN]
[DOWN] keys.
The function key [FUNC][FUNC]
[FUNC][FUNC]
[FUNC] provides access to additional facilities via the
numeric keypads. This key should be momentarily pressed only before an-
other numeric key is pressed. Do not hold the key in while pressing other
keys.

4
I.D.A.I.D.A.
I.D.A.I.D.A.
I.D.A.
TURN ON TRX-200TURN ON TRX-200
TURN ON TRX-200
To turn on TRX-200, press and hold the [PWR][PWR]
[PWR][PWR]
[PWR] key for more than 2.0 sec-
ond and you see starting message which can be edited to the way you like.
Similarly to turn the radio off, press and hold the power key for more than
2 second.
Power requirement: TRX-200 can be operated from either three AA
size Ni-Cad. batteries, three AA size dry cell bat-
teries or external DC supply of 9 to 14V DC, 300mA
minimum.
Always use the supplied charger or regulated DC
power supply of 9 to 14VDC, 300mA or by using the provided DC connect-
ing lead. The DC input socket is 1.3mm centre positive.
CAUTION: Do not attempt to connect the TRX-200 directly to the mainCAUTION: Do not attempt to connect the TRX-200 directly to the main
CAUTION: Do not attempt to connect the TRX-200 directly to the main
supplysupply
supplysupply
supply..
..
.

5
I.D.A.I.D.A.
I.D.A.I.D.A.
I.D.A.
Very carefully note the polarity of the battery cells. Also never attempt to
charge the receiver or connect to an external power source when dry bat-
teries are installed.Always remove dry batteries when they have run down.
Do not leave batteries in the battery compartment when the TRX-200 is
not being used for a long period of time, remove the batteries to avoid
leakage.
All memory channel data is stored into internal EEPROM which does not
require batteries or connection to external supply for backup. However
always turn off the TRX-200 whenever radio is not in use. Particularly
turn it off while charging.
HOW TO PUT BAHOW TO PUT BA
HOW TO PUT BATTERIES INTO THE BATTERIES INTO THE BA
TTERIES INTO THE BATTERIES INTO THE BA
TTERIES INTO THE BATTERTTER
TTERTTER
TTERY COMPY COMP
Y COMPY COMP
Y COMPARTMENTARTMENT
ARTMENTARTMENT
ARTMENT
1. While pressing the round shaped point as illustrated slide the cover
downward to open the compartment.
2. Put AA size batteries (3pcs) into the
compartment according to the [+] and
[-] markings engraved inside each bat-
tery cradle.
3. Slide the cover back until it closes firmly with “click”.

6
I.D.A.I.D.A.
I.D.A.I.D.A.
I.D.A.
CONTROLS, CONNECTORSCONTROLS, CONNECTORS
CONTROLS, CONNECTORS AND FUNCTIONSAND FUNCTIONS
AND FUNCTIONSAND FUNCTIONS
AND FUNCTIONS
FRONT PFRONT P
FRONT PFRONT P
FRONT PANELANEL
ANELANEL
ANEL
Strap hanger:Strap hanger:
Strap hanger: Put the hand strap
through this hanger.
Keyboards:Keyboards:
Keyboards: Enter frequencies or
initiate various functions through
the keyboards.
Power ON/OFF switch:Power ON/OFF switch:
Power ON/OFF switch: Press
the key for more than 1 second
to turn the radio on or off.
The radio resumes the last
status when turned on.
SpeakerSpeaker
SpeakerSpeaker
Speaker

7
I.D.A.I.D.A.
I.D.A.I.D.A.
I.D.A.
SIDE VIEW OF TRX-200SIDE VIEW OF TRX-200
SIDE VIEW OF TRX-200
Function [FUNC] key:Function [FUNC] key:
Function [FUNC] key: To initiate second function of
various keys. When this key is pressed, TRX-200 goes into
function mode and [FF
FF
F] is displayed on LCD and you are ready
to press a 2nd function key while this [FF
FF
F] is displayed.
Squelch monitor [SQLSquelch monitor [SQL
Squelch monitor [SQL MONI] key:MONI] key:
MONI] key:MONI] key:
MONI] key: To initiate monitor func-
tion (receive a signal regardless of squelch level) press a sec-
ond time to turn the function off. To adjust squelch level,
press [FUNC][FUNC]
[FUNC][FUNC]
[FUNC] key and then press [SQL MONI][SQL MONI]
[SQL MONI][SQL MONI]
[SQL MONI] key while
[FF
FF
F] is displayed on the LCD.
DC 12V socket:DC 12V socket:
DC 12V socket: This is the socket for external DC power
supply or to charge Ni-Cad. batteries when these are fitted
inside of the battery compartment

8
I.D.A.I.D.A.
I.D.A.I.D.A.
I.D.A.
TOPTOP
TOPTOP
TOP PP
PP
PANELANEL
ANELANEL
ANEL
Antenna Connector:Antenna Connector:
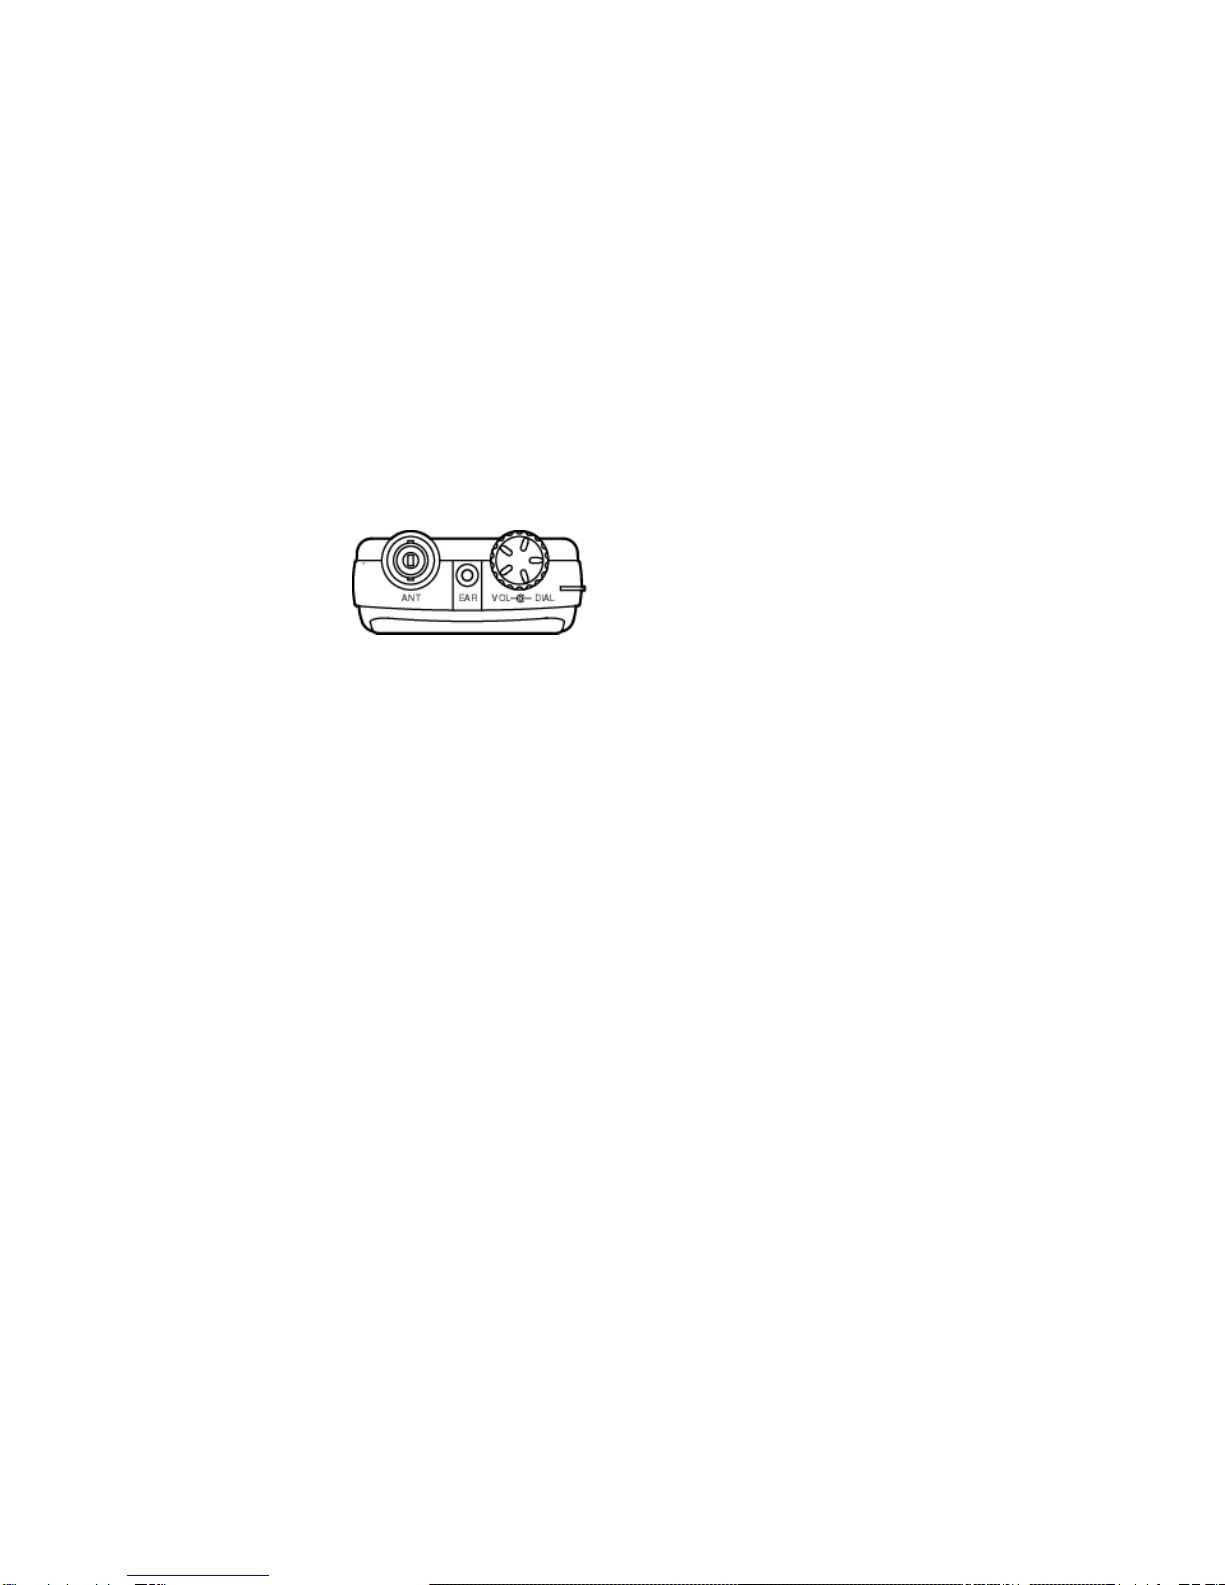
Antenna Connector: This is a high quality BNC 50 ohm unbalanced input.
The supplied telescopic antenna should be connected to this input.
VV
VV
Volume control:olume control:
olume control:olume control:
olume control: When rotated fully
clockwise the volume is at its maximum
and minimum level at fully counter-
clockwise
Dial - tuning control/selector:Dial - tuning control/selector:
Dial - tuning control/selector: This dial changes the receive frequency
up and down in the selected frequency increment and also operates as
a “selector” when entering certain data through the LCD menus. Being a
mechanical data device, it is not uncommon for operations to be
occasionally missed and this does not represent a fault.
Earphone socket/RS232C serial port:Earphone socket/RS232C serial port:
Earphone socket/RS232C serial port: This 3.5mm stereo socket permits
connection to an external earphone, headset or speaker of 8 ohm
impedance or greater. When the earphone socket is used, the internal
speaker will automatically be muted. This can also be used as RS232C
serial data port, making the TRX-200 capable of being connected to the
RS232C serial port of a personal computer.
The wiring diagram of cable and PC control software are available from
our home page.

9
I.D.A.I.D.A.
I.D.A.I.D.A.
I.D.A.
BACK PBACK P
BACK PBACK P
BACK PANELANEL
ANELANEL
ANEL
Reset Switch:Reset Switch:
Reset Switch: To restore the TRX-200
to initial factory set status, press the
switch using a needle or similar pointed
object as illustrated
Battery compartment:Battery compartment:
Battery compartment: This is for theAAsize
batteries (3), slide the cover downward to
open the compartment

10
I.D.A.I.D.A.
I.D.A.I.D.A.
I.D.A.
OPERAOPERA
OPERAOPERA
OPERATIONSTIONS
TIONSTIONS
TIONS
TURNING ON THE TRX-200:TURNING ON THE TRX-200:
TURNING ON THE TRX-200: Keep
pressing the [PWR][PWR]
[PWR][PWR]
[PWR] key for more than 2
second. The LCD displays opening message
when you turn the radio on.
ADJUSTMENT OFADJUSTMENT OF
ADJUSTMENT OF AUDIO VOLUMEAUDIO VOLUME
AUDIO VOLUMEAUDIO VOLUME
AUDIO VOLUME
When you are receiving a signal, rotate the
volume control in a clockwise direction to
increase the audio volume and rotate
counter clockwise to decrease it.
With no signal.
Press [SQL MONI][SQL MONI]
[SQL MONI][SQL MONI]
[SQL MONI] key to monitor noise, when no signal is received,
to adjust audio volume to appropriate level.

11
I.D.A.I.D.A.
I.D.A.I.D.A.
I.D.A.
ADJUSTMENT OF SQUELCH LEVELADJUSTMENT OF SQUELCH LEVEL
ADJUSTMENT OF SQUELCH LEVEL
The squelch control is used to eliminate unwanted background noise when
monitoring a normally inactive frequency.
1. Press [FUNC][FUNC]
[FUNC][FUNC]
[FUNC] key located on the left hand side of the
TRX-200 and then press [SQL MONI][SQL MONI]
[SQL MONI][SQL MONI]
[SQL MONI] key just beneath
the function key to put the TRX-200 in squelch
adjustment mode and rotate the dial clockwise until back-
ground noise just disappears (threshold point), this is the
most sensitive setting of the control.
In practice the control is usually rotated a little further clockwise beyond
the threshold point to prevent the receiver from stopping on noise or very
weak signals. Squelch level selected is displayed on the LCD from 00
00
0 to 3232
3232
32
level. 08 is factory set squelch level. Press [ENT][ENT]
[ENT][ENT]
[ENT] key to save the squelch
level setting.
MONITORING FUNCTIONMONITORING FUNCTION
MONITORING FUNCTION
You can monitor weaker signal levels than squelch setting
by using [SQL[SQL
[SQL[SQL
[SQL MONI]MONI]
MONI]MONI]
MONI] key.
1. Press [SQL MONI][SQL MONI]
[SQL MONI][SQL MONI]
[SQL MONI] key to put TRX-200 into monitoring
mode. Speaker iconSpeaker icon
Speaker iconSpeaker icon
Speaker icon is displayed on the LCD.

12
I.D.A.I.D.A.
I.D.A.I.D.A.
I.D.A.
In monitoring mode, the squelch level is virtually 00
00
0 and therefore the weak-
est signal can be monitored. If there is no signal coming in, white noise can
be heard.
2. Press [SQL MONI][SQL MONI]
[SQL MONI][SQL MONI]
[SQL MONI] key again to disable monitoring
function
BACK ILLUMINABACK ILLUMINA
BACK ILLUMINATION FOR NIGHT USETION FOR NIGHT USE
TION FOR NIGHT USETION FOR NIGHT USE
TION FOR NIGHT USE
This key is to toggle the LCD and keypad lamp on
and off. If the [LMP][LMP]
[LMP][LMP]
[LMP] is pressed, LCD lamp and the
keypad illumination will be turned on for about 5 sec-
onds.
INITIALSETTINGOFVARIOUS PARAMETERS: Following parameters can be
configured. To display configuration mode and its selection menu , press [F] followed
by [ENT/CONFIG] key.
Lamp: MANUAL or AUTO
Beep: ON or OFF
Contrast of LCD: 0 through 31
Power Save: OFF, 1:5, 1:10 or 1:15
Opening message: 3 lines of opening message can be edited
Cloning: Send, receive, setup of data speed of 19200bps or 9600bps
Version To display firmware version

13
I.D.A.I.D.A.
I.D.A.I.D.A.
I.D.A.
CONFIGURATION
In configuration mode, various parameters can be selected by pressing [UP][DOWN]
key or by rotating multifunction dial.
An arrow mark on LCD indicates your current selection Your choices on currently
selected parameter can be displayed by pressing [ENT] key. Select your preference by
pressing [UP][DOWN] key or by rotating multifunction dial and press [ENT] key to
confirm your selection.
+Lamp: Choices are MANUALandAUTO.
This parameter is to set the way you turn on the back light of LCD and keys. When
MANUALis selected, you have to turn on the backlight by pressing LMP key. When
AUTO is selected, the backlight automatically turns on whenever you press any of the
keys. In both modes, the backlight is to be turned off automatically 5 seconds after
turning on.
+Beep: Choices are ON or OFF.
Beep tone for key entry can be turned ON or OFF.
+Contrast of LCD: 0 through 31
The display contrast can be adjusted by pressing [UP][DOWN] key or by rotating mul-
tifunction dial and press ENT key to confirm your selection.
+Power Save: OFF, 1:5, 1:10 or 1:15

14
I.D.A.I.D.A.
I.D.A.I.D.A.
I.D.A.
+Opening message: 3 lines of opening message can be edited. The opening message at
turning on the radio can be edited. Select OPENING MG by pressing [UP][DOWN]
key or by rotating multifunction dial and press[ ENT] key.
+Cloning: Set up Sending data and Receiving data, selecting data speed of 19200bps
or 9600bps. To connect PC, Select +RECEIVE and display RECEIVE menu. Select
ON.
+Version: To display firmware version. Select Version and press [ENT] key to display
firmware version. You are only able to clone 2 TRX-200 when both radios are same
firmware version.

15
I.D.A.I.D.A.
I.D.A.I.D.A.
I.D.A.
Keys: Most of these keys have 2nd function when the key is pressed
after [FUNC][FUNC]
[FUNC][FUNC]
[FUNC] key located at the left top of the unit.
1. [PWR/BA[PWR/BA
[PWR/BA[PWR/BA
[PWR/BATT]TT]
TT]TT]
TT] key: Keep pressing the key more than 1 second to turn on
TRX-200. To turn off the radio, keep pressing the key more than 1 second.
Last status is to be save and the radio is to resume it when the radio is
turned on again.
Second function: To display battery status, press [FUNC] + [PWR/BA[FUNC] + [PWR/BA
[FUNC] + [PWR/BA[FUNC] + [PWR/BA
[FUNC] + [PWR/BATT]TT]
TT]TT]
TT]
key. To clear battery status bar, press [CLR/P[CLR/P
[CLR/P[CLR/P
[CLR/P. CLR]. CLR]
. CLR]. CLR]
. CLR].
2. [MAN/- >MANU][MAN/- >MANU]
[MAN/- >MANU][MAN/- >MANU]
[MAN/- >MANU] key: Press the key to place TRX-200 in manual mode.
Press the key again in the mode to start manual scan to find active signal.
Arrow mark next to receiving mode display indicates up or downward sweep-
ing direction. Press the key again to stop manual scan.You can change the
direction of sweeping using [UP][DOWN][UP][DOWN]
[UP][DOWN][UP][DOWN]
[UP][DOWN] key.
Second function: If you wish to use a active frequency found during
scan or search in manual mode, press [FUNC] +[MAN/- >MANU][FUNC] +[MAN/- >MANU]
[FUNC] +[MAN/- >MANU][FUNC] +[MAN/- >MANU]
[FUNC] +[MAN/- >MANU] key.
The frequency can be transferred to manual mode.
3. [SCN/MW][SCN/MW]
[SCN/MW][SCN/MW]
[SCN/MW] key: To start sweeping programmed channels, press [SCN/[SCN/
[SCN/[SCN/
[SCN/
MW]MW]
MW]MW]
MW] key. Press the key again to read programmed channel information.
To change channel, press [UP][UP]
[UP][UP]
[UP] or [DOWN][DOWN]
[DOWN][DOWN]
[DOWN] key or rotate the dial. Arrow
mark next to receiving mode display indicates upward or downward scan-
ning channel direction.

16
I.D.A.I.D.A.
I.D.A.I.D.A.
I.D.A.
Second function: Program frequency with name tag to scan memory
channel 000 to 999. When the keys are pressed TRX-200 initially
displays youngest bank and channel number combination which is not yet
used. You can enter bank and channel number directly from numeric keys
or select such by the dial or pressing [UP][DOWN][UP][DOWN]
[UP][DOWN][UP][DOWN]
[UP][DOWN] keys.
Current frequency is displayed and this can be changed from numeric
keys. Letters, marks and numbers for the name tag can be selected by the
dial and [DOWN][DOWN]
[DOWN][DOWN]
[DOWN] key can be used to confirm the selection. [UP][UP]
[UP][UP]
[UP] key can be
used to step back to prior letters. Press [ENT][ENT]
[ENT][ENT]
[ENT] key to confirm the input.
4. [SRC/S. PRG][SRC/S. PRG]
[SRC/S. PRG][SRC/S. PRG]
[SRC/S. PRG]: To start search sweeping, press [SRC/S. PRG][SRC/S. PRG]
[SRC/S. PRG][SRC/S. PRG]
[SRC/S. PRG] key.
Press [SCN/MW][SCN/MW]
[SCN/MW][SCN/MW]
[SCN/MW] key again to stop search function. To select search
bank, press numeric key 0 through 9 for the number of the bank you wish.
Second function: To program a search pair, press [FUNC]+[SRC/S. PRG][FUNC]+[SRC/S. PRG]
[FUNC]+[SRC/S. PRG][FUNC]+[SRC/S. PRG]
[FUNC]+[SRC/S. PRG].
Select program search bank number by pressing numeric key and [ENT][ENT]
[ENT][ENT]
[ENT]
key. Program STST
STST
STARTART
ARTART
ART frequency from numeric keys and press [ENT][ENT]
[ENT][ENT]
[ENT]
and program ENDEND
ENDEND
END frequency from numeric keys and press [ENT][ENT]
[ENT][ENT]
[ENT] . Select
receiving mode by pressing [UP] [DOWN][UP] [DOWN]
[UP] [DOWN][UP] [DOWN]
[UP] [DOWN] keys or rotating the dial
followed by [ENT][ENT]
[ENT][ENT]
[ENT] key. Select search step by pressing [UP] [DOWN][UP] [DOWN]
[UP] [DOWN][UP] [DOWN]
[UP] [DOWN] keys
or rotating the dial followed by [ENT][ENT]
[ENT][ENT]
[ENT] key. Then name tag menu is to be
prompted. To put name tag to the search pair, rotate multifunction dial to
select letters, marks or numbers for the name tag.

17
I.D.A.I.D.A.
I.D.A.I.D.A.
I.D.A.
[DOWN][DOWN]
[DOWN][DOWN]
[DOWN] key can be used to confirm the selection. [UP][UP]
[UP][UP]
[UP] key can be used
to step back to prior letters. Press [ENT][ENT]
[ENT][ENT]
[ENT] key to confirm the input.
5. [ESY/P[ESY/P
[ESY/P[ESY/P
[ESY/PASS]ASS]
ASS]ASS]
ASS]: To start factory pre-programmed 20 search pairs including
various FM broad castings, TV audio, Airband and many more other
interesting frequency ranges. [UP][DOWN][UP][DOWN]
[UP][DOWN][UP][DOWN]
[UP][DOWN] keys can be used to select
one of the pairs among P0 through P20. Press key again to stop automatic
search. Frequencies can be manually tuned by using the dial.
Second function: Press [ESY/P[ESY/P
[ESY/P[ESY/P
[ESY/PASS]ASS]
ASS]ASS]
ASS] to lock out displayed frequency to
exclude the frequency from search or scanning schedule. PASS is
displayed on LCD to indicate that frequency is lock out. In scan mode,
press [ESY/P[ESY/P
[ESY/P[ESY/P
[ESY/PASS]ASS]
ASS]ASS]
ASS] key again to unlock the memory channel. In search
mode, press [FUNC]+[CLR/P[FUNC]+[CLR/P
[FUNC]+[CLR/P[FUNC]+[CLR/P
[FUNC]+[CLR/P. CLR]. CLR]
. CLR]. CLR]
. CLR] to display the list of locked out
frequencies. Select the frequency to be unlocked by using the rotary
dial or [UP][DOWN][UP][DOWN]
[UP][DOWN][UP][DOWN]
[UP][DOWN] keys and press numeric key [0][0]
[0][0]
[0] to unlock the
frequency.
6. [CLR/P[CLR/P
[CLR/P[CLR/P
[CLR/P. CLR]. CLR]
. CLR]. CLR]
. CLR]: To clear key entry or step back to previous status.
Second function: See above to clear locked out memory channels or
frequencies in search mode.

18
I.D.A.I.D.A.
I.D.A.I.D.A.
I.D.A.
7. [ENT/CONFIG][ENT/CONFIG]
[ENT/CONFIG][ENT/CONFIG]
[ENT/CONFIG]: To confirm key entry.
Second function: To setup initial parameters of TRX-200. See page 13
for the detailed explanation.
8. [UP/.][UP/.]
[UP/.][UP/.]
[UP/.]: To make selection over the displayed menu or to change
scanning or searching direction to upward. This key is also used for
decimal point entry during frequency input from numeric keys.
Second function: The key combination can make faster frequency tuning in
1MHz, 10MHz or 100MHz in manual mode only. Press [FUNC][FUNC]
[FUNC][FUNC]
[FUNC] key to
display a cursor at beneath 100MHz, 10MHz or 1MHz digit frequency
display.
This cursor may goes away after 3 second due to the specification of theThis cursor may goes away after 3 second due to the specification of the
This cursor may goes away after 3 second due to the specification of the
function keyfunction key
function key..
..
. While you see the cursor, select 100MHz or 10MHz or 1MHz
digit by pressing [UP/.][DOWN.][UP/.][DOWN.]
[UP/.][DOWN.][UP/.][DOWN.]
[UP/.][DOWN.] key and rotate the dial to tune the se-
lected digit in such increment.As long as you use [UP] [DOWN][UP] [DOWN]
[UP] [DOWN][UP] [DOWN]
[UP] [DOWN] key or the
dial, the cursor stays on.
9. [DOWN/EDIT][DOWN/EDIT]
[DOWN/EDIT][DOWN/EDIT]
[DOWN/EDIT]: To make selection over the displayed menu or to change
scanning or searching direction to downward.
Second function in manual mode: See above [UP/.][UP/.]
[UP/.][UP/.]
[UP/.] key.

19
I.D.A.I.D.A.
I.D.A.I.D.A.
I.D.A.
Second function in search mode, [FUNC]+[DOWN/EDIT][FUNC]+[DOWN/EDIT]
[FUNC]+[DOWN/EDIT][FUNC]+[DOWN/EDIT]
[FUNC]+[DOWN/EDIT] can be used for
copy, move or delete of search banks. In scan mode, the key combination
can be used for copy, move or delete of its banks and channels.
11. [MOD/PMS][MOD/PMS]
[MOD/PMS][MOD/PMS]
[MOD/PMS]: Press the key to display receiving mode selection menu.
Make selection by using the dial or [UP][DOWN][UP][DOWN]
[UP][DOWN][UP][DOWN]
[UP][DOWN] key followed by [ENT][ENT]
[ENT][ENT]
[ENT]
key to confirm the selection. When you select AUTO, TRX-200 auto-
matically makes mode selection according to the current frequency range.
Or select AM, NFM, WFM, USB, LSB or CW at your preference.
Second function: To start Programmable Memory Scan. You can select
certain programmed channels and group such to Programmable Memory
Scan list where you can sort 20 programmed channel per bank. There
are total 10 banks of programmable memory scan for 200 programmed
channels all together. The key combination along with function key, you
are able to scan the list.
12. [STEP/S. PMS] : Press [STP][STP]
[STP][STP]
[STP] key to display available increments.
Following is the list of available increments. Select appropriate step by
rotating multifunction dial or pressing [UP] [DOWN][UP] [DOWN]
[UP] [DOWN][UP] [DOWN]
[UP] [DOWN] keys and confirm
the selection by pressing [ENT][ENT]
[ENT][ENT]
[ENT] key
AUTO STEPAUTO STEP
AUTO STEPAUTO STEP
AUTO STEP: TRX-200 automatically set frequency increment according
to selected frequency range when AUTO STEP is selected.

20
I.D.A.I.D.A.
I.D.A.I.D.A.
I.D.A.
PRE-PROGRAMMED STEPs arePRE-PROGRAMMED STEPs are
PRE-PROGRAMMED STEPs are:
50Hz, 100H, 200Hz, 500Hz, 1KHz, 2KHz, 6.25KHz, 8.33KHz, 9KHz, 10KHz,
12.5KHz, 15KHz, 20KH, 25KHz, 30KHz, 50KHz, 100KHz, 125KHz,
150KHz, 200KHz, 250KHz, 500KHz
+USER STEP: Customs frequency steps can also be programmed in 50Hz to
499.950KHz range in minimum of 50Hz increment. Select +USER STEP and press
[ENT] key and program appropriate step frequency from numeric keys and press [ENT]
key to confirm the increment.
Second function: TRX-200 has 10 banks for memory channels and 100
channels can be programmed per bank for total 1,000 memory channels.
Besides this conventional feature, you can sort 20 channels per bank times
10 banks for total 200 channels out of these programmed 1,000 channels
to special banks, Programmable Memory BanksProgrammable Memory Banks
Programmable Memory BanksProgrammable Memory Banks
Programmable Memory Banks. You have to be in
scan mode to use Programmable Memory Scan function.
Press [FUNC] + [STP/S. PMS][FUNC] + [STP/S. PMS]
[FUNC] + [STP/S. PMS][FUNC] + [STP/S. PMS]
[FUNC] + [STP/S. PMS] to place TRX-200 in programmable memory
bank entry display. Select one particular bank where you want to sort
pre-programmed memory channels out of 10 banks such as BANK 0BANK 0
BANK 0BANK 0
BANK 0
through BANK 9BANK 9
BANK 9BANK 9
BANK 9 by rotating multifunction dial or by pressing [UP][UP]
[UP][UP]
[UP]
[DOWN][DOWN]
[DOWN][DOWN]
[DOWN] keys.
Press [ENT][ENT]
[ENT][ENT]
[ENT] key to display the contents of the selected bank. The bank
number is displayed at top of the LCD.You can scroll PG00 through PG19
(total 20 PG channels).
Table of contents
Popular Radio manuals by other brands

Silvercrest
Silvercrest SWED 500 A1 User manual and service information

E-Tech
E-Tech IM101 Service manual

Eton
Eton Eton American Red Cross FR800 user manual

Silvercrest
Silvercrest KH 2029 operating instructions

Silvercrest
Silvercrest SWED 100 A1 User manual and service information

PERFECTPRO
PERFECTPRO Handsfree Quick start manual