IDT LHR-80 User manual

1
LHR-80/82 Marine Radio
Owner’s Manual

2
A. KEY FUN TION.................................................................................................................... 4
A.1 Front Panel Key ............................................................................................................... 4
A.2 Top Side Key..................................................................................................................... 4
A.3 Right Side Key.................................................................................................................. 4
A.4 Left Side Key .................................................................................................................... 4
A.5 Handmi e Key.................................................................................................................. 5
B. DIRE T KEY OPERATION................................................................................................... 6
B.1 Power ON/OFF................................................................................................................. 6
B.2 Volume Control ................................................................................................................ 6
B.3 Squelch .............................................................................................................................. 6
B.4 Hi/Lo Tx Power ................................................................................................................ 6
B.5 16 Channel ........................................................................................................................ 7
B.6 BAND................................................................................................................................. 7
B.7 Scan.................................................................................................................................... 7
B.8 Watch................................................................................................................................. 9
D
UAL
W
ATCH
.................................................................................................................................. 9
T
RI
W
ATCH
...................................................................................................................................... 9
B.9 CHANNEL UP/DOWN.................................................................................................... 9
B.10 Enter ................................................................................................................................ 9
B.11 Setup MENU................................................................................................................. 10
B.12 DISTRESS..................................................................................................................... 10
B.13 Navigation Mode .......................................................................................................... 10
B.14 WP Select Mode............................................................................................................ 10
B.15 Plotter Mode ................................................................................................................. 11
B.16 PTT ................................................................................................................................ 11
B.17 Exit................................................................................................................................. 11
B.18 3CH Mode ..................................................................................................................... 12
Notes :..................................................................................................................................... 13
. SPE IAL FUN TION OPERATION.................................................................................... 14
C.1 SETUP MENU................................................................................................................ 14
BUDDY
LIST ............................................................................................................................... 16
LOCAL/DISTANT ....................................................................................................................... 18
BACKLIGHT
A
DJUSTMENT
......................................................................................................... 18
CONTRAST
A
DJUSTMENT
.......................................................................................................... 19
GPS
/
TIME.................................................................................................................................. 19
RADIO SETUP ..................................................................................................................... 21
CHANNEL
NAME ....................................................................................................................... 21

3
RING
VOLUME
ADJUSTMENT ............................................................................................... 22
BEEP
VOLUME
ADJUSTMENT .............................................................................................. 22
RESET ......................................................................................................................................... 22
C.4 DISTRESS Operation.................................................................................................... 23
SENDING
AND
RECEIVING
DISTRESS
CALLS.................................................................. 23
SENDING
A
CALL
TO
CANCEL
A
TRANSMITTED
DISTRESS
CALL.............................. 24
RECEIVING
DISTRESS
CALLS .............................................................................................. 24
RECEIVING
A
DISTRESS
CALL
FROM
ANOTHER
VESSEL............................................ 24
RECEIVING
A
DISTRESS
ACK
SENT
FROM
A
COAST
STATION .................................. 25
RECEIVING
A
DISTRESS
RELAY
SENT
BY
ANOTHER
VESSEL ................................... 25

4
A. KEY FUN TION
A.1 Front Panel Key
Key Short Press ( < 3 sec ) Long Press ( > 3 sec )
Hi/Lo / Tx Hi/Lo powe cont ol
16 /9 Jump to Channel 16 o 9 Change the p io ity channel
3CH Change to 3CH mode Add/ Del 3CH
Go/ Mob Reset the oute to WP Ma k cu ent location as
MOB
Wx/Nav Change to weathe channel Save the selection
SQ Up/ Down
Squelch level up/down
Chan Up/Dn Change Channel # Repeat Key function
Dist ess Call up Dist ess Menu Make Dist ess Call
Soft Key
Watch DW o T iwatch All scan
Exit Cancel selection/ Back 1 level
A.2 Top Side Key
Powe Key lock / unlock Powe on/ off the adio
A.3 Right Side Key
Vol up/down Volume up/down
A.4 Left Side Key
Dist ess Call up Dist ess Menu Make Dist ess Call

5
A.5 Handmi e Key
Key Function
16 Jump to Channel 16
Hi/Lo Toggle the Tx powe f om Hi to Lo o vice ve sa
Up / Down Channel UP/DOWN and navigate the menu item selection
.

6
B. DIRE T KEY OPERATION
B.1 Power ON/OFF
P ess and hold the Powe key fo ove 3 sec, the unit will powe on.
The unit will sta t with No mal mode. .
- display the splash sc een info sto ed at EEPROM fo 2sec
- ecall the last channel # , TX powe settings and ope ational mode
- Go to Channel 16, Tx Powe be Hi
- Display the position and time if GPS data available
B.2 Volume Control
P ess volume up/ down to adjust the volume level. A volume sub-menu will appea
when p ess. And timeout afte 5 sec.
B.3 Squelch
P ess Sql up/ down to adjust the squelch level. A sql sub-menu will appea when
p ess. And timeout afte 5 sec.
B.4 Hi/Lo Tx Power
P ess the Hi/Lo key will toggle the Tx powe f om Hi to Lo o vice ve sa. The
co esponding Hi/Lo icon will tu n ON on the LCD.
Some of the channel has been limited to be low powe only o high powe only.
Thus, the softwa e need to check against the channel setting sto ed in the
EEPROM
If the ope ation equest is denied, wa ning beep tone ON fo 2 sec.

7
Fo some channel is allowed to ove - ule the est iction tempo a y such as CH 13
& 67. P ess and hold the PTT key and the Hi/Lo key to switch the Tx powe to Hi
powe tempo a ily until the eithe key is eleased.
B.5 16 Channel
Jump to eithe Channel 16 di ectly by p essing the 16 Key. Toggle between
Channel 16 at High Powe . P ess 16 key again will go back to last channel.
(channel befo e ente 16 mode )
16 key also can use to cancel all mode and switch to CH 16 HI powe mode
independent the cu ent Hi/Lo setting.
It will quit the menu mode and jump to CH16 di ectly when p essed.
B.6 BAND
Switch the ope ational channel band [USA, Inte national & Canada ] in the setup
menu, see C3 fo detail.
Please efe to the EEPROM channel table fo detail. The co esponding icon will
tu n on as indication.
B.7 Scan
In no mal mode, long p ess the ight soft key will act as Scan key function.
This is the function to scan fo b oadcasting channel. When available channel
detected, the eceive will stop at that channel and continue to sea ch when that
t ansmission ceased.
The e a e 2 Scan mode available – ALL Scan; 3 CH Scan.
Du ing the SCAN modes :
P ess Up/Down key ( CH knob clockwise/anti-clockwise ) will change the scan
di ection.
P ess SCAN key again will te minate the scan ope ation and stop at the last used
channel.
P ess EXIT key will also te minate the scan function and state at the last used
channel
WATCH o H/L key will be no function and sound an e o beep if p essed.

8
All Scan
In All Scan mode, all channels in the channel set a e scanned in sequences in
epeat cycle.
SCAN U
01
A
SCAN U
02
A
SCAN U
03
A
SCAN U
16
A
SCAN U
05
A
SCAN U
88
A
Du ing the all scan, CH 16 will be visit fo at least 2s a time.
3CH SCAN
In 3CH mode, when long p ess the SCAN key, it will ente 3 CH mode, only the
3CH and CH16 will be scan.
SCAN U
01
A
SCAN U
15
A
SCAN U
18
A
SCAN U
16
A
SCAN U
01
A
SCAN U
15
A
No function at Menu and DSC mode. E o Beep
P ess any othe keys will send e o Beep
To quit the SCAN mode, p ess the following keys :
- SCAN key state at the sea ched channel
- EXIT key to state at last used channel
- PTT go to tuned channel at Tx mode
- DISTRESS go to DISTRESS mode

9
P ess any othe keys will send e o Beep
B.8 Watch
Dual Watch
Sho t P ess Watch key to activate the DUAL WATCH mode. Monito the cu ent
channel and Ch 16 in cycle. Icon “DUAL” will be tu n ON.
Weathe Ale t is also activate automatically.
Cu ent Channel - CH 16 – Cu ent Channel – CH 16 –Cu ent Channel -…
Tri Watch
When select in the setup Menu. Sho t P ess Watch key to activate the TRI
WATCH mode instead. Monito the cu ent channel, Ch 9 and Ch 16 in cycle.
Icon “TRI” will be tu n ON.
Weathe Ale t is also activate automatically.
Cu ent Channel - CH 9 - CH 16 – Cu ent Channel – CH 9 - CH 16 –Cu ent
Channel -…
B.9 CHANNEL UP/DOWN
Unde non-menu mode, the Channel key knob ( up/down keys ) a e used as
Channel adjustment. The channel advance to p evious o next listed channel #
as eve y key st oke. The channel sequences should follow the band ( U,I, C o
Wx ) o memo y list.
Fo UP/DOWN key style, p essing the key ove 3sec will advance the channel
automatically in 5 channel/sec.
Unde menu mode, the key function will be switched to setting up / down function.
B.10 Enter
Unde the menu mode, the ight soft key will act as the ente key. When ente the
menu mode, push the will act as Ente key to confi m the selection and sto e up
the setting.
When in non-menu mode, ( while DIM key option is off ), it will call up the
DIMMER cont ol function as desc ibe on B.11
While DIM key option is off, it will be no action when key knob is pushed unde
no mal model.

10
B.11 Setup MENU
To activate the setup menu, p ess and hold the Hi/Lo/MENU key ove 3 sec.
The detail setup menu ope ation, efe to the MENU ope ation pa ag aph.
B.12 DISTRESS
Unde jeopa dy condition, Dist ess call should be t ansmitted. P ess the
DISTRESS key will activate the DISTRESS menu and enable DISTRESS call to
be send out. Detail DISTRESS menu and associated ope ation efe to the
DISTRESS Ope ation pa ag aph.
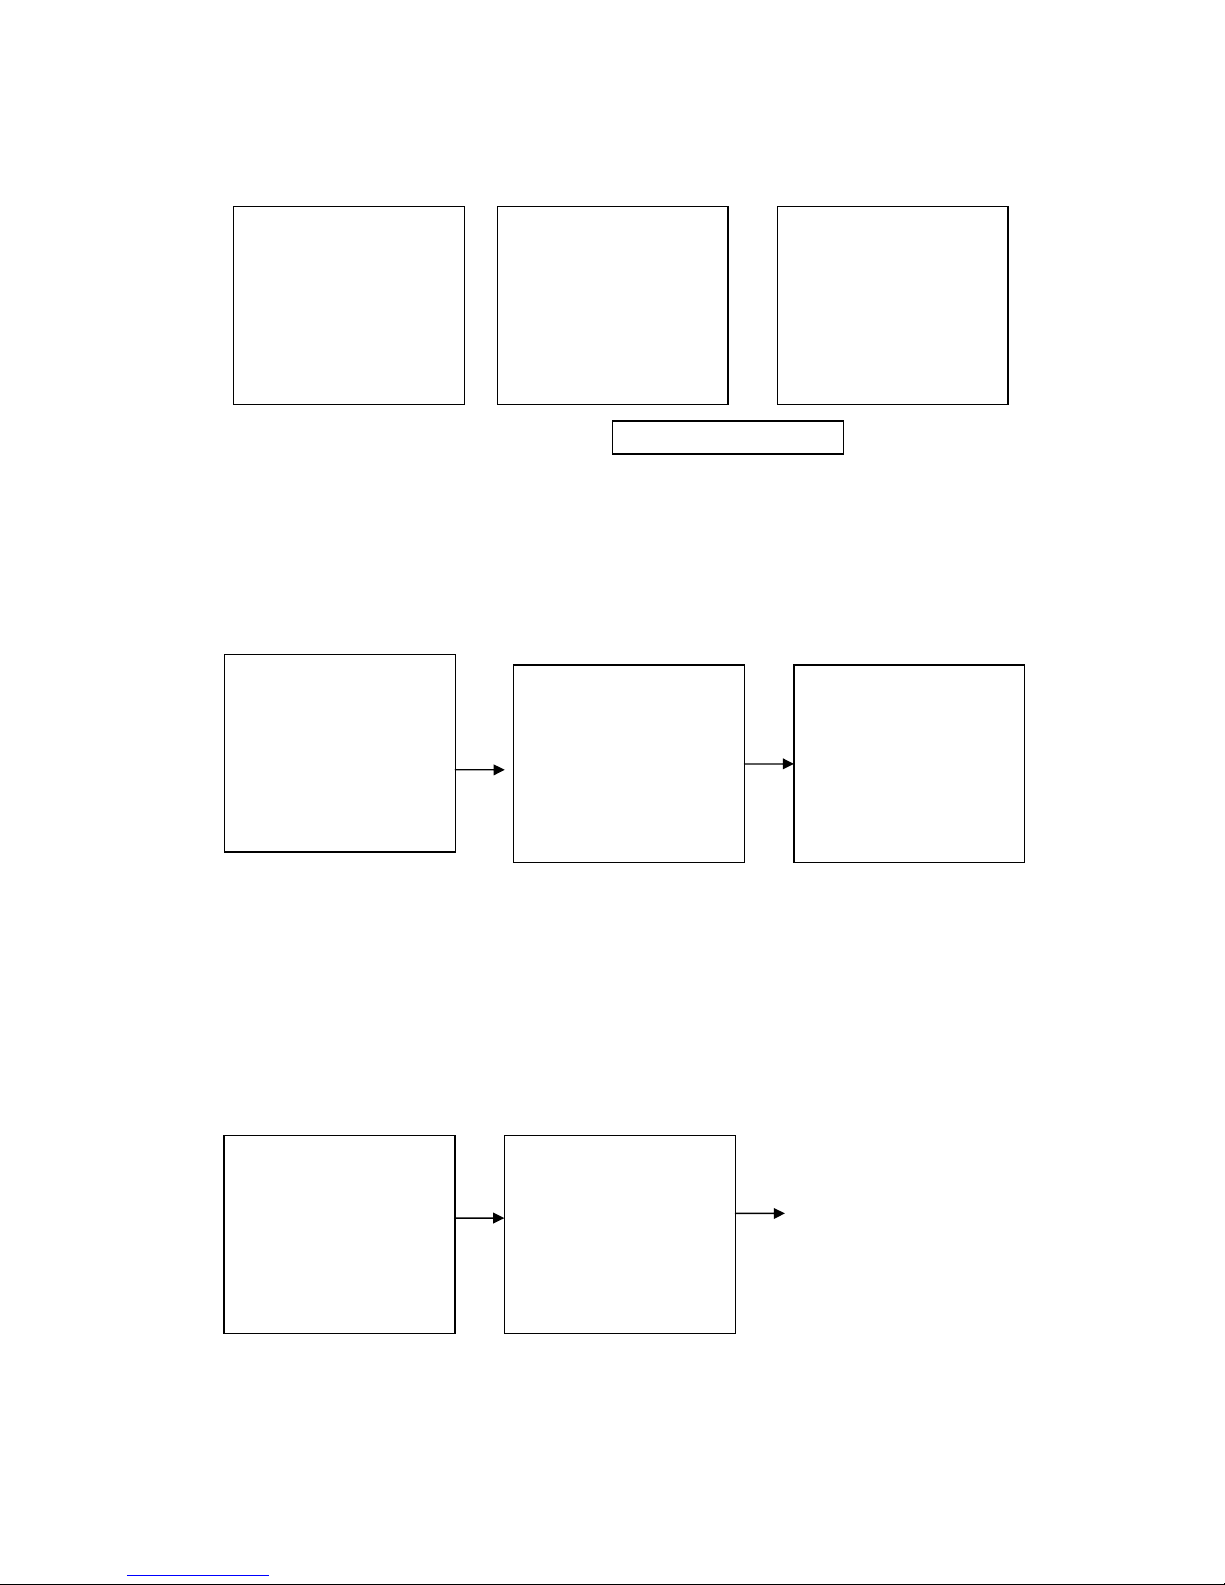
B.13 Navigation Mode
Short press the NAV key will enter the Na igation Mode, Bearing, Distance and cross
track error from the last select Way Point will display on the screen.
If no WP is set, it will go to WP select page mode.
During Na Mode:
Up/Down – It will go to WP select page mode.
PTT – return to normal mode and TX.
EXIT – return to normal mode
16/9 – return to normal mode and go to 16/9
NAV – go to Plotter mode
GO – Reset the cross track error (XTE)
Other key – error beep
B.14 WP Select Mode
The screen is di ided into two part, the left is the pointed WP information. The right is
the selection Menu.
During WP Select Mode:
Up/Down – Select the WP.
Enter – Choose the current WP and return to Na igation Mode.
Other key – Return toe Na igation Mode and act same as Na igation Mode.
>FISHY
10’23.2323N
123’12,5446W

11
B.15 Plotter Mode
During plotter Mode:
Up/Down – It will cycle and highlight the buddy in the surround .
Left/ right – It will zoom in/out the circle to see more/less area.
PTT – return to normal mode and TX.
EXIT – return to normal mode
Locate – acti ely transmit self location to other.
16/9 – return to normal mode and go to 16/9
NAV – go to normal mode
Other key – error beep
B.16 PTT
P ess the PTT key will sta t t ansmission. It also quit all menu mode when PTT
key p essed. Ack beep will be sound befo e Tx. The e is a 5-minute time that
shuts down the t ansmission in case of a stuck key. E o beep is emitted 10 sec
befo e the time out is t igge ed. Any PTT elease and p ess again eset the time
ove again.
B.17 Exit
In most cases, the left soft key will act as exit key. The Exit key to cancel last
selection o change without saving. It allows step back one level on menu mode.
It cancels DSC Dist ess calls & auto- et ansmission of DISTRESS calls.
P ess 16 key at menu mode to quit that mode same as EXIT function

12
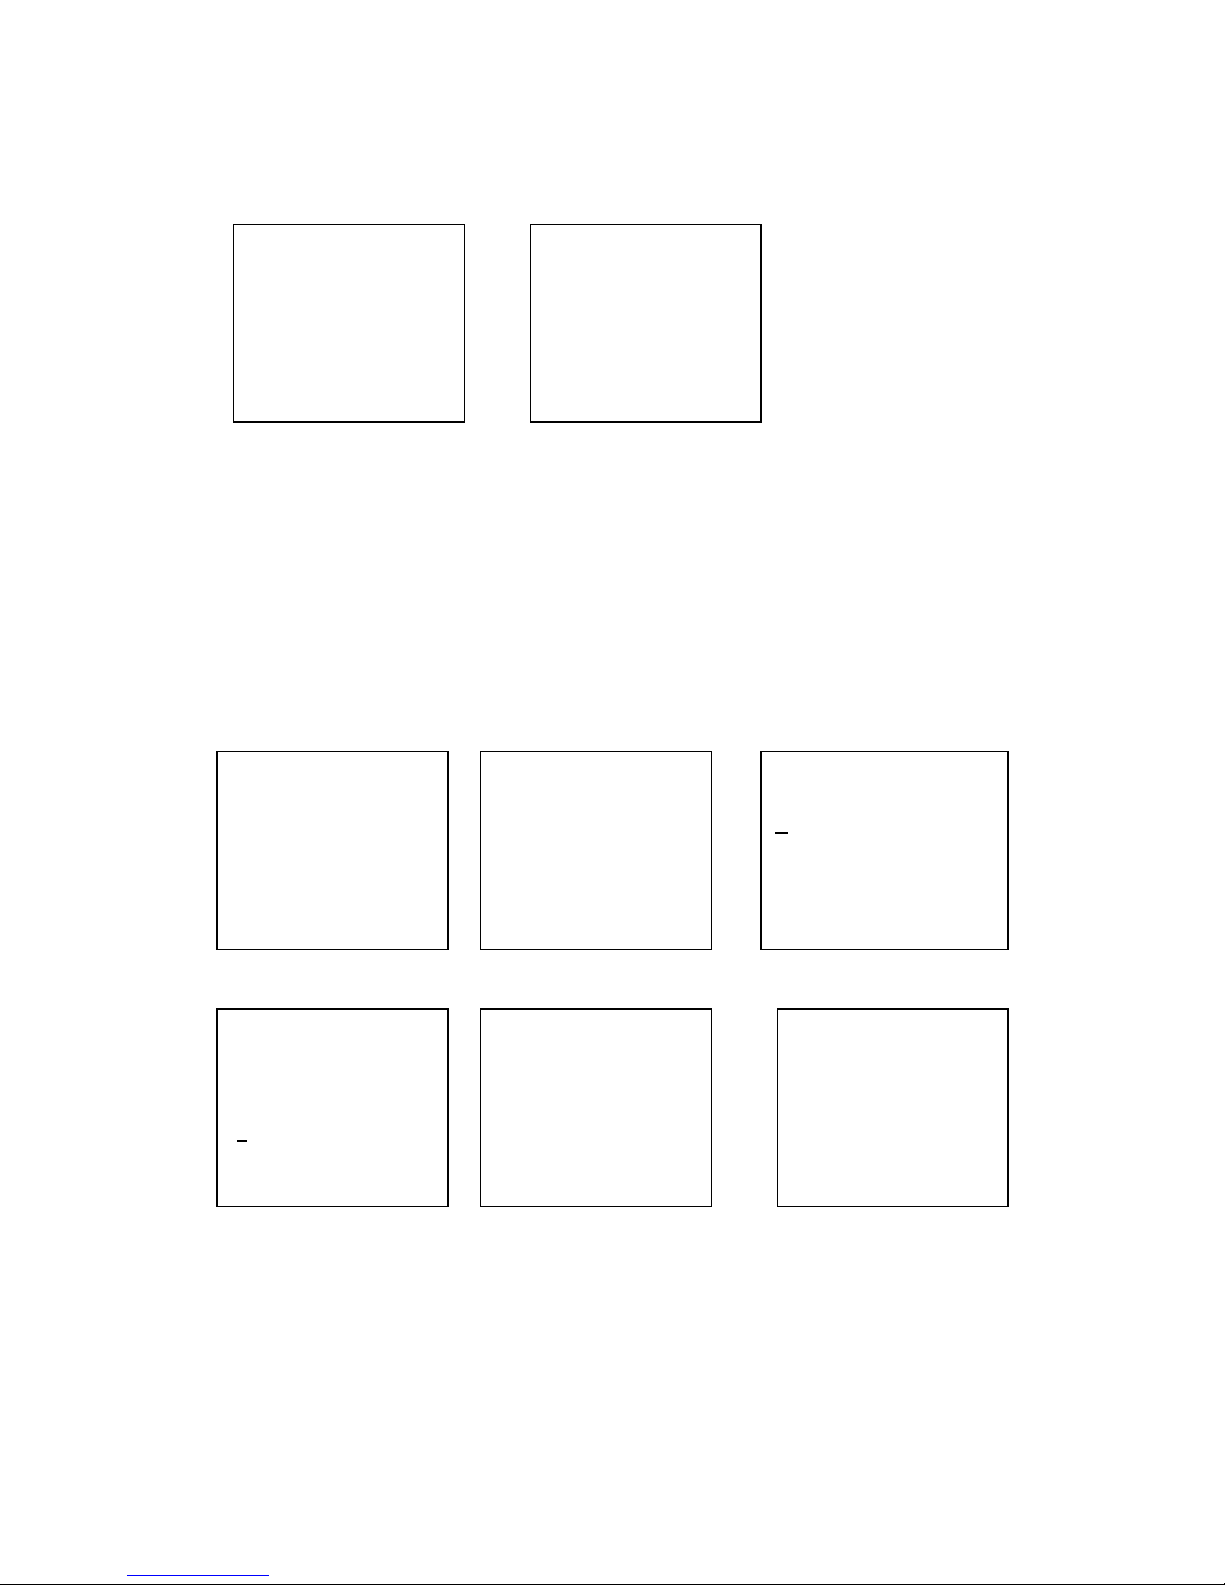
B.18 3CH Mode
When sho t p ess the 3CH key in no mal mode, it will ente 3CH mode and go to
CH1. If the e is no 3CH is sto ed, e o beep will sound and emain in no mal
mode.
When sho t p ess the 3CH key in 3CH mode, it will go as:
CH1 -> CH2 -> CH3 -> CH1.
If only 1 3CH is sto ed, e o beep will sound and emain in CH1.
If CH3 is not sto ed, the CH3 will be skipped.
When long p ess the 3CH key, it will b ing up a menu fo sto ed/delete the
cu ent channel as 3CH. If all 3 3CH is sto ed, e o beep and wa ning meesage
will be sounded and display.
When in 3CH mode:
- 16CH key will function as no mal and leave 3CH mode.
- channel up/down key will function as normal and lea e 3CH mode.
- Batt key will function as no mal and leave 3CH mode.
- Scan key will function as 3CH Scan.
ERROR MESSAGE IF NO FAV. HANNELS.
72
INTERSHIP
NO FAV
CHANNELS ARE
SAVED.

13
Notes :
BEEP TONE :
E o Beep ( Beep 1 fo Nav ) : 3-beep e o tone with 60ms ON @512Hz, then
20ms OFF fo 3 cycles. Sound out fo any e o ope ation. The tone f eq can be
ead out f om EEPROM
ACK Beep ( Beep 2 fo Nav ) : 100ms ON @ 1024Hz then OFF. Sound out
when any valid key p essed o new mode / sc een page ente ed. Tone f eq can
be ead out f om EEPROM
ALARM Beep ( Beep 3 fo Nav ) : 6 beep ala m wa ning tones followed by a 2
sec pause fo DSC Dist ess o U gency catego y eceived calls o se ious ala m
wa nings. Wa nings can neve be disabled in the MENU sc een and a e
cancelled by any keyp ess o afte a 2-min. du ation. 300ms ON @ 512Hz then
100ms OFF between each tone bu st. Read out tone f eq f om EEPROM.
RINGER Beep ( Beep 4 fo Nav ) : Ale t the use of an incoming DSC call. 60ms
1024Hz, then 60ms 512Hz then 20ms OFF. Cycle goes on until the timeout
cycle is eached o a key is p essed.

14
. SPE IAL FUN TION OPERATION
C.1 SETUP MENU
P ess the DSC / MENU key to ente adio set-up mode. This allows the following
functions to be accessed. Sc oll down the list and p ess ENTER. To exit the Menu
mode o sub-mode p ess 16 o EXIT.
Menu Buddy List
Way Point List
Setting Bea ing
Distance
SAME List
Local/Dist Local
Dist
Backlight
Cont ast
GPS/Time POS DISPLAY
TIME DISPLAY
TIME OFFSET
TIME FORMAT
COG/SOG
Radio Setup Band
CH Name
Ring Volume
Beep Volume
Watch Mode
Reset
Exit

15
• BUDDY LIST - Selects the Buddy List Ent y outine to ente Names and
MMSID's fo f equently called DSC stations. Up to 20
names could be sto ed.
• WP List - Select the WP List Ent y can ente names and LL position fo a
WP. Up to 500 WP can be sto ed.
• SAME List – Select the SAME List can ente \activated the SAME code,
up to 10 SAME code can be sto ed.
• LO AL/DST – “OFF” allows no mal eceive sensitivity. “ON” eliminates
eceive noise, but deg ades eceive sensitivity. The
LOCAL icon is displayed in LCD.
• BA KLIGHT - Set the backlight level, total 8 level be available.
• ONTRAST - Selects display cont ast setting: 1-4 levels.
• GPS/TIME - define the display POS and Time fo mat, Offset and
COG/SOG display..
• RADIO SETUP- The e a e 6 items could be use customized – Band, CH
Name, Ring Tone Volume, Beep Volume , Inte nal
Speake on/off and NMEA.
• RESET - ecall ex-facto y setting
• EXIT - quit the menu
MENU
>BUDDY LIST
LOCAL/DST
BACKLIGHT
16

16
BUDDY LIST
The Buddy List can sto e up to 20 ent ies with Name and MMSID#. Use can add,
edit o delete the eco d f om the list th ough this submenu.
Adding an Ent y
- Select Buddy List f om the MENU
- Select fi st line <NEW> fo adding ent y
- Ent y page p ompt up to allow ente Name and MMSID. 1
st
digit of NAME be
unde sco ed
- Use CH Knob to pick up the desi ed cha acte and push ENT to confi m. Then
shift ight to 2
nd
digit
- Push and hold the ENT ove 3sec. to finish the NAME ent y o fill up to max. 16
cha acte . Then the MMSID# 1
st
digit will be unde sco ed.
- Same as Name ent y using CH Knob to key in the digit ( only 0 –9 will be
chosen at this stage ). All 9 digits should be ente ed to finish the ent y, push
and hold CH knob will no effect to te minate the ent y
- P efix 00 will t eat as Coast Station
- Once 9 digit be ente ed, a new page p ompt in to ask fo confi mation to save.
- Then go back to Buddy List page no matte Save o Cancel
- P ess EXIT will te minate the p ocess without saving go back to Buddy list page
>BUDDY LIST
LOCAL/DST
BACKLIGHT
CONTRAST
><NEW>
SEA ROSE
FISHY #2
END OF LIST
ENTER NAME
- - - - - - - - - - - - - - -
ENTER MMSID#
- - - - - - - - -
ENTER NAME
HAPPY VESSEL - -
ENTER MMSID#
- - - - - - - - -
ENTER NAME
HAPPY VESSEL - -
ENTER MMSID#
0 - - - - - - - -
ENTER NAME
HAPPY VESSEL - -
ENTER MMSID#
123456789
Press & hold ENTER
CH Knob + ENT
ENTER
17
Edit Existing Ent y
- Pick up the one f om Buddy List fo edit
- Page p ompt up fo Edit o Delete. Choose EDIT
- Full eco d sc een shown up with 1
st
cha acte of NAME be unde sco ed fo
edit
- Use CH Knob to alte the cha acte o ENT to shift to next o skip.
- To edit the ID# should shift the cu so to end of NAME Ent y and push ENT to
1
st
digit of ID
- P ess and hold ENT to te minate the edit back to Buddy list
To Delete the Ent y
- select the one want to be deleted f om the list
- select the Delete option
- p ess and hold the ENT to confi m the delete action
- the eco d will be emoved and go back to Buddy List page
16
HAPPY VESSEL
123456789
>SAVE
CANCEL
16
><NEW>
SEA ROSE
FISHY #2
HAPPY VESSEL
FISHY#2
>EDIT
DELETE
NAME
FISHY#2 - - - - - - - - -
MMSID
123456789
NAME
FISHY#3- - - - - - - -
MMSID
123657894
<NEW>
SEA ROSE
>FISHY #2
HAPPY VESSEL
FISHY#3
123657894
>SAVE
CANCEL
><NEW>
SEA ROSE
FISHY #3
HAPPY VESSEL
18
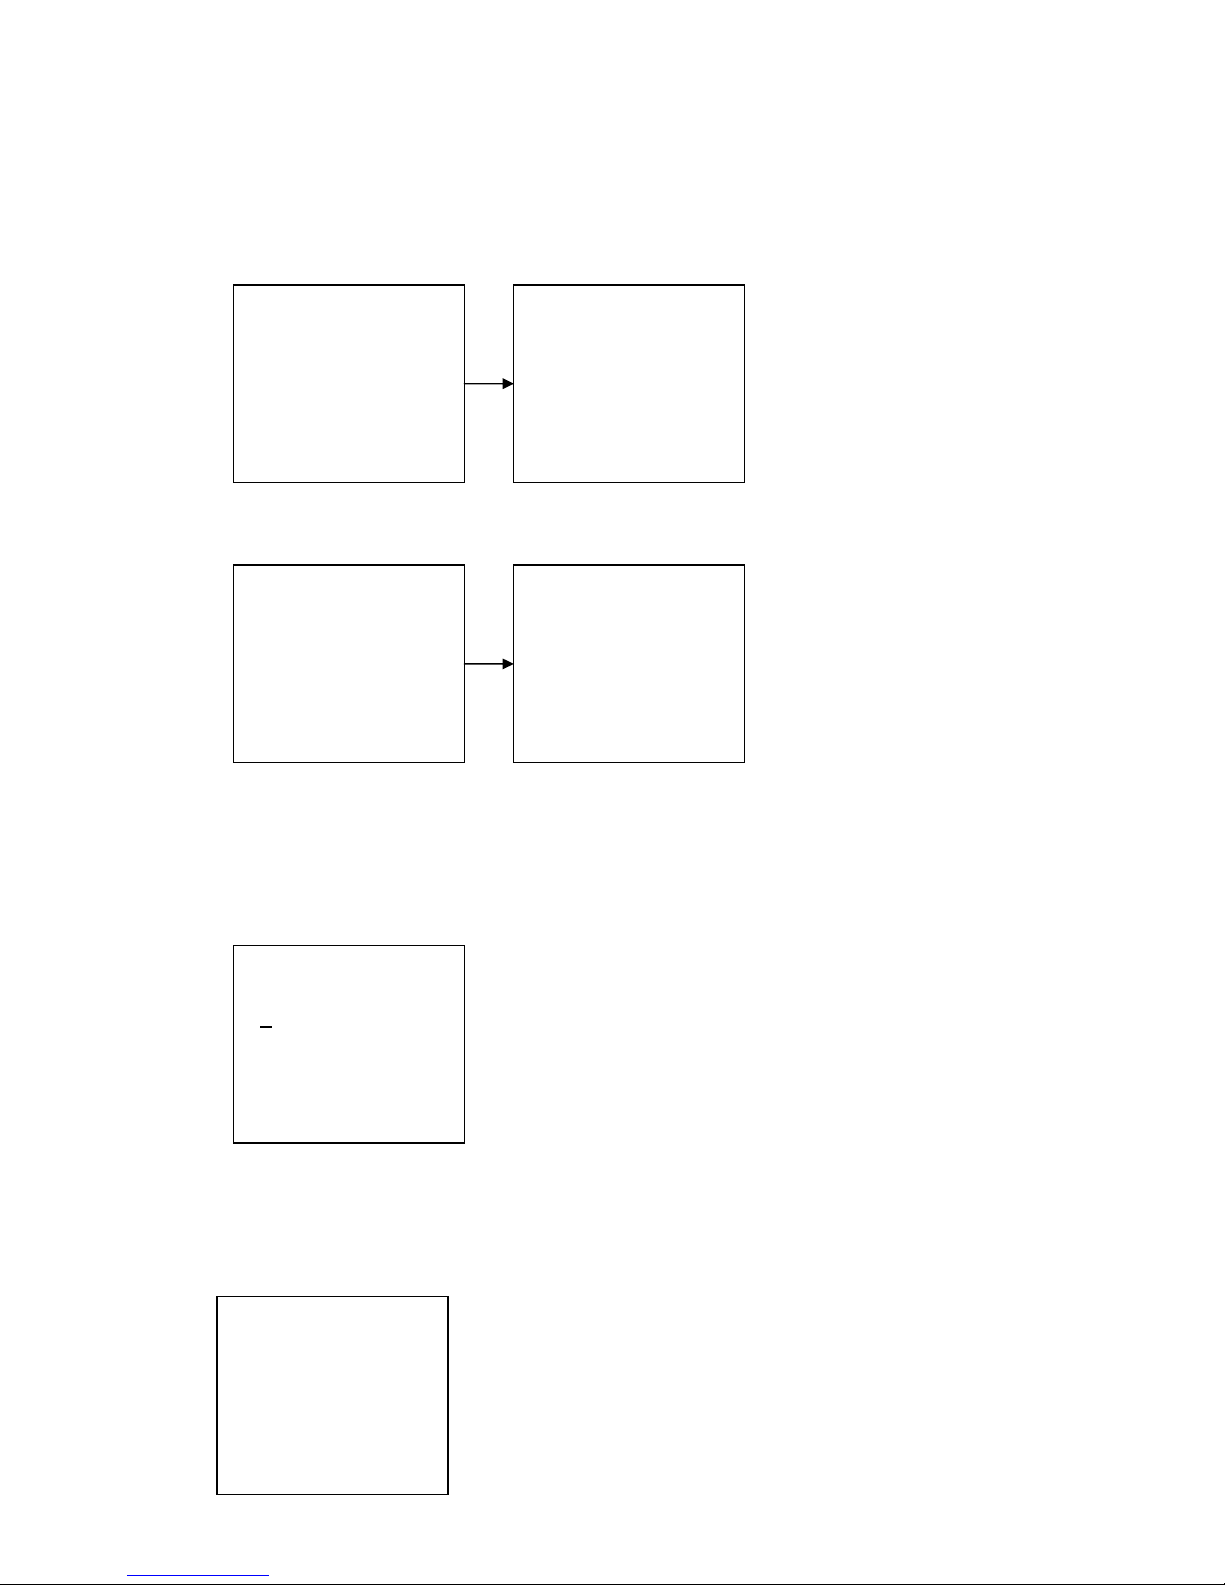
LOCAL/DISTANT
To set the Receive to LOCAL to eliminate noise & use the adio locally, select the
LOCAL/DST f om the MENU list and p ess ENTER. The value is sto ed when
sc een is exited. The LOCAL icon tu ns ON in the LCD. Default is DISTANT
MENU LIST SET SENSISTIVITY NORMAL DISPLAY
BACKLIGHT Adjustme t
Select BACKLIGHT and p ess ENTER. The BACKLIGHT has 8 levels fo the LCD.
The highe numbe s p oduce a b ighte backlight. The value is sto ed when
sc een is exited.
Sto ed on exiting mode.
MENU LIST SET
BUDDY LIST
>LOCAL/DST
CALL LOG
BACKLIGHT
SENSITVITY
>DISTANT
LOCAL
LOCAL
COAST GUARD
N 27º34.126
W 82º55.558
12:56am LOC
FISHY#3
EDIT
>DELETE
<NEW>
SEA ROSE
>FISHY #3
HAPPY VESSEL
><NEW>
SEA ROSE
HAPPY VESSEL
END OF LIST
Press & hold ENTER
LOCAL/DST
>BACKLIGHT
CONTRAST
GPS/TIME
CONTRAST
LO HI

19
CONTRAST Adjustme t
Select CONTRAST and p ess ENTER. The Cont ast has 4 levels fo the LCD. The
highe numbe s p oduce a da ke LCD. The cont ast value is sto ed when sc een
is exited.
Sto ed on exiting mode.
MENU LIST SET
GPS / TIME
Enable POSition Display
LOCAL/DST
BACKLIGHT
>CONTRAST
GPS/TIME
CONTRAST
LO HI
LOCAL/DIST
BACKLIGHT
CONTRAST
>GPS / TIME
>POS DISPLAY
TIME DISPLAY
TIME OFFSET
TIME FORMAT
TIME DISPLAY
TIME OFFSET
TIME FORMAT
> COG / SOG
20
POSITION DISPLAY to dete mine the position data displayed on the no mal mode o
not
TIME DISPLAY to tu n on / off the time display at no mal mode
TIME OFFSET to set the add/subt act value f om UTC time to equal to local time.
When offset value is added, the time will be displayed as LOC instead of UTC
Fi st to set the offset di ection + o – then value in ½ h . step. The update esult will
be displayed immediately to assist adjustment
TIME FORMAT setting indicate whethe the time is displayed in 12 h o 24 h fo mat.
POS DISPLAY
>ON
OFF
>POS DISPLAY
TIME DISPLAY
TIME OFFSET
TIME FORMAT
TIME DISPLAY
>ON
OFF
POS DISPLAY
>TIME DISPLAY
TIME OFFSET
TIME FORMAT
TIME OFFSET
>+1.5 Hrs
12:56am LOC.
TIME FORMAT
>12 Hr.
24 Hr.
12:56am LOC.
This manual suits for next models
1
Table of contents


