IDX CW-1dx User manual

CW-1dx
Instruction Manual
IDX Company, Ltd.

IDX thanks you for choosing the CW-1dx,
we are confident that you will benefit from its unique features.
Please read this instruction manual to ensure safe operation and to maximize
performance.
⚫The material contained in this manual consists of information that is the property
of IDX Company, Ltd. and is intended solely for the use by the purchasers of the
equipment described in this manual.
⚫IDX Company, Ltd. prohibits the duplication of any portion of this manual or the
use herein for any application other that the operation or maintenance of the
equipment described in this manual without the expressed written permission of IDX
Company, Ltd.

I. Introduction 3
1. Product overview 3
2. Safety Notes 3, 4
3. Notes on the radio waves 7
4. Packing list 8
5. Names of parts and function 9
II. Preparation 16
1. Installation of antenna 16
2. Setup- Smartphone APP 16
III. References 17
1. How to Access WEB Setup menu 17
2. Setup menu - Transmitter 19
3. Setup menu - Receiver 21
4. Setup -master (Access Point) /slave (Station) 23
5. Software Update 30
6. Specification 31
7. Important notice 32
IV. Warranty & Service33
1. Product warranty 33
2. About exemptions 33
3. Support & Service contact 34
2

3
I. Introduction
1. Product overview
⚫High-quality video
CW-1dx supports HDMI I/O and full HD video - up to 1920x1080 resolution.
This system utilizes H.264 compression and supports up to 25Mbps
transmission rate.
⚫Streaming
Streaming monitoring (RTSP mode) can be available by downloading
dedicated APP on your iPhone/iPad.
Safety Notes
Prior to using this product, please carefully study and follow the instructions and
recommendations outlined in this manual. Following instructions will guide you to use
this product safely and correctly. After reading, please keep the manual in a convenient
place for future reference. Incorrect usage may lead to injury, fire, electric shock and/or
product failure.
◼Explanation of displays
This display means "mishandling may cause death or
serious injury*1.
This display means "mishandling may cause injury*2, or
physical-loss-or-damage*3 is possible."
*1 A serious injury means the loss of sight, a physical injury, a burn (high
temperature and low temperature), electric shock, fracture, poisoning, etc.
requiring medical treatment and/or hospitalization for treatment.
*2 An Injury means a burn (high temperature and low temperature), an electric
shock, etc. which requires medical treatment but excludes hospitalization and
regular hospital attendance for treatment.
*3 Physical loss or damage means damage in connection with property,
household goods, livestock, pets, etc..
◼Explanation of signs
This display means prohibited action (must not be carried
out).
This display shows instructions (must be carried out).
Warning
Cautions
!
Prohibited
Instruction
Warning
If you notice smoke, strange smells, strange noises, or excessive heat coming from
this product, stop using it, turn off the power, and unplug the power cable.
Continued use under these conditions may cause a fire, electric shock, or injury.
Be careful not to touch the power supply plug if your hands are wet.
It may cause a fire, an electric shock, an injury, or failure.
Do not pour liquid or anything wet or moist over this product. Do not expose this
product to wetness.
It may cause a fire, an electric shock, an injury, or failure.
If liquid gets into the interior of this product, turn off the power immediately
and pull the power supply plug out of the electrical receptacle.
Continued use may cause a fire, an electric shock, an injury, or failure.
Do not insert or drop foreign substances and objects, such as metal or any
combustible or conductive material inside this product. If a foreign substance or
object enters, turn the power off immediately and pull the power supply plug out
of the electrical receptacle.
Continued use may cause a fire, an electric shock, an injury, or failure.
Do not dismantle or modify this product.
It may cause a fire, an electric shock, an injury, or failure.
Do not damage the power cable by bending it forcefully, using it to carry a heavy
item or exposing it to heat.
If the power cord is damaged it may cause a fire, an electric shock, an injury, or
failure.
Do not use this product if the power cable is damaged.
It may cause a fire, an electric shock, an injury, or failure.
Insert the plug and connector of the power cable completely.
Failure to insert them completely may cause a fire, electric shock, or injury.
Before using an external power supply, always check that the voltage is within
the specified range.
Input voltage out of specification can cause a fire, an electric shock, an injury, or
failure.
Before using an external power supply, always check that the polarity of the
connector is correct.
Reverse polarity connection can cause a fire, an electric shock, an injury, or failure
!
!
!
!
!
!
4

Caution
Keep this product away from direct sunlight, high temperatures and high
humidity.
It may cause a fire or failure.
Do not use this product in extremely low temperatures or in a place
subject to extreme changes in temperature. Keep this product away from
places where condensation is likely to occur, and do not use it with
condensation forming on it.
It may cause a failure. Use it within the ambient temperature limits 0℃ -
50℃ (32℉ - 138℉ ), and 20% - 80% humidity.
Keep this product away from dusty conditions and places where magnetic
fields are strong.
It may cause a fire or failure.
Do not place this product on an unstable surface, such as an unstable
tabletop or uneven surface.
It may collapse and fall or become unbalanced and fall and cause an injury
or failure.
Do not cover the ventilation holes of this product.
If the ventilation holes are plugged, the interior temperature of this
product will rise and it may cause a fire or failure.
Do not drop, collide with other hardware or apply a strong shock to this
product.
It may cause failure.
Do not place anything on this product.
It may cause failure.
Keep packing materials, such as plastic bags, out of the reach of children.
Children may choke if they put them in their mouths or over their heads.
Do not use this product if the fan stops.
Doing so may cause a fire or failure. Request service from your local
representative.
Keep all cables organized.
People tripping on cables may cause the product to fall or topple over and
injure someone. Be careful when connecting and positioning cables.
!
5

2. Notes of the radio waves
・You may only use the antennas supplied with this product. If non-approved
antennas are used, the radio specifications changes which can lead to a
violation of the law and regulations.
・This product complies with FCC, CE and RCM regulations.
・Select CH3 or CH4 by frequency setting when using in outdoor. If select
other frequency, it may be violated radio law (in Australia).
・This product uses 5GHz band radio frequencies and has been shown not to
interfere with medical devices. However, when in use, it is recommended to
keep at least 30cm (12in.) away from medical devices to ensure safety.
3. Packing list
Check the components in the package.
・CW-1dx TX
・CW-1dx RX
Supplied accessories
・Readme First x1
・Standard antenna x8
・DC Adaptor x1
・HDMI cable x1
・HDMI cable(mini) x1
・D-Tap Cable x1
・Hot-shoe Stand x1
・Soft case x1
6

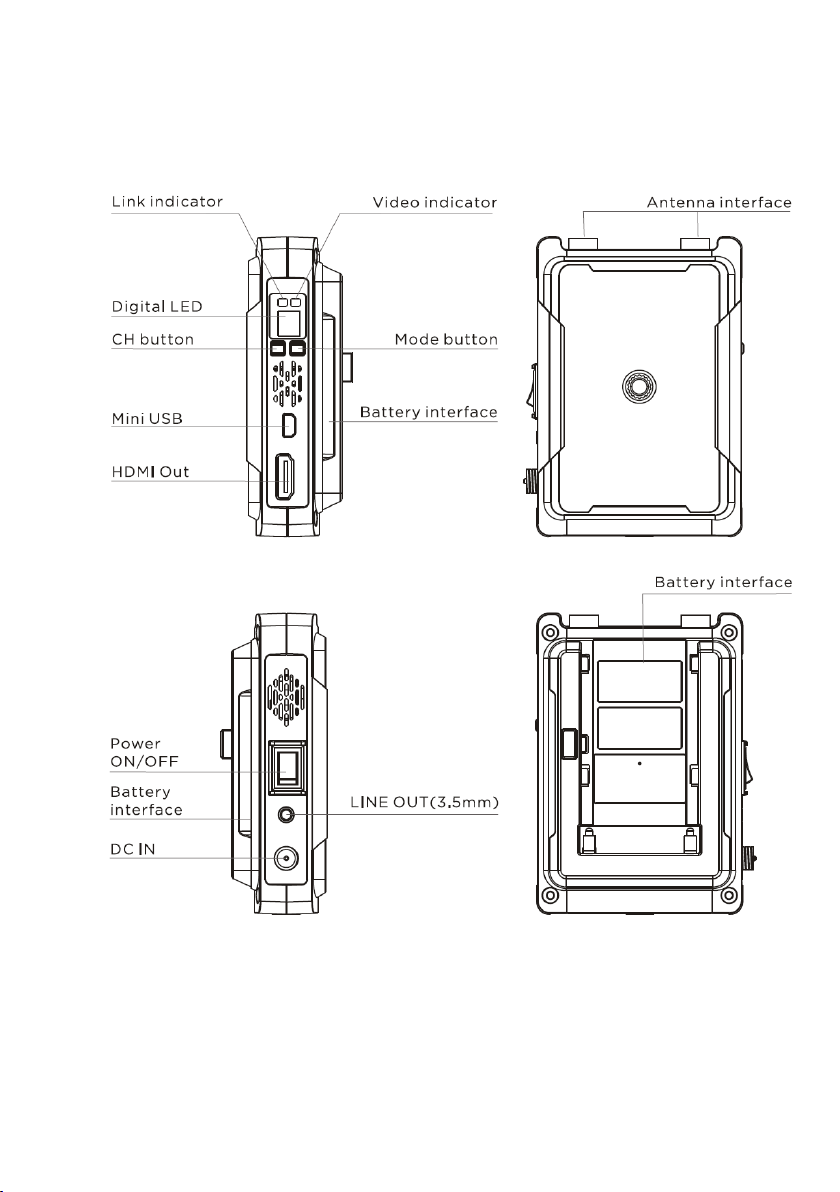
4. Name of parts and function
⚫TX - Transmitter
7

Explanation of each part
・Link indicator
This indicator shows Link status of Transmitter (TX) and Receiver (RX).
LED blink: searching
LED light lit: linked
・Video indicator
This indicator shows video status.
LED off: no video signal / abnormal status
LED blink: searching
LED light lit: linked
・Digital LED display
This digital LED shows current setup status.
H: under activation
U: under software upgrade
1: setup to 5180MHz
2: setup to 5240MHz
3: setup to 5765MHz
4: setup to 5805MHz
・CH Button
Press for 1sec.:
This is to change CH as below.
1→2→3→4→1→…→
Press and hold for 3sec.:
This is only required for service maintenance purpose,
and paring mode (pair up SSID and Password for each TX and RX).
8

⚫Mode Button
*Press for 1sec.: This is to change Audio ON/OFF from LINE IN
LINE IN dot shows its status as below.
Audio mode ON: dot light
Audio mode OFF: dot off
* Press and hold for 3sec.: This will change the MODE as below.
Normal Mode:HDMI Video Transmission Mode
*Link LED & Video LED turn to RED
RTSP Mode:Streaming Mode
*Link LED & Video LED turn to Yellow
**Video signal of HDMI output from RX is automatically regulated to
720P output only during RTSP Mode
The device reboots automatically when Mode change is made.
⚫Mini USB
This is only used for maintenance (software upgrade purpose).
⚫HDMI IN
HDMI video input interface
⚫Battery Interface
This battery interface accepts SONY NP-F Form Factor batteries.
IDX Brand SL-F50 and SL-F70 are recommend.
⚫Line IN
This accepts Audio input via 3.5mm Mini Jack.
9
⚫RX - Receiver
10

Explanation of each part
・Link LED
This indicator shows Link status of Transmitter (TX) and Receiver (RX).
LED blink: searching
LED light lit: linked
・Video LED
This indicator shows video status.
LED off: no video signal / abnormal status
LED blink: searching
LED lit: linked
・Digital LED display
This digital LED shows current setup status.
H: under activation
U: under software upgrade
1: setup to 5180MHz
2: setup to 5240MHz
3: setup to 5765MHz
4: setup to 5805MHz
・CH Button
Press for 1sec.: This is to change CH as below.
1→2→3→4→1→…→
Press and hold for 3sec.:
This is only required for service maintenance purpose,
and paring mode (pair up SSID and Password for each TX and RX).
・Mode Button
Press and hold for 3sec.: This will change the MODE as below.
Normal Mode:HDMI Video Transmission Mode
*Link LED & Video LED turn to RED
RTSP Mode:Streaming Mode
*Link LED & Video LED turn to Yellow
**Video signal of HDMI output from RX is automatically regulated to 720P
output only during RTSP Mode
The device reboots automatically when Mode change is made.
11

・Mini USB
This is only used for maintenance (for software upgrade purpose).
・HDMI OUT
HDMI video output interface
・Battery Interface
This battery interface accepts for SONY NP-F Form Factor batteries
IDX Brand SL-F50 and SL-F70 are recommend.
・Line OUT
This accepts Audio output via 3.5mm Mini Jack
*output sound depends on TX’s Audio mode.
12

II. Preparation
1. Installation of antenna
Attached the two supplied standard antennas firmly by rotating/screwing
in a clockwise direction.
2. Setup for Smartphone APP
The CW-1dx offers two types of video transmission mode. The normal mode
(HDMI video transmission) and the other RTSP mode (Streaming).
This section provides how to operates RTSP mode.
<Preparation for CW-1dx>
The Mode can be switched to RTSP mode by pressing and holding the Mode
Button for 3secs for both TX and TX. The RTSP mode commences once the
LED changes color to GREEN (Streaming mode) from RED (normal mode) for
both Link & Video LEDs.
<Application Software>
・iOS
The free application software [Crystal Vision] can be downloaded from App
Store.
・Android
App for Android smartphone is not available.
13

14
<Connection figure>
Please connect Wi-Fi by referring to SSID & Password, indicated on the rear
side of Receiver (RX).
<Illustration of the App display>
①Software version
②Live View
⇨Real time monitoring
③Configuration
⇨video bitrate can be selected
from 3 choices
④Browse
⇨browse recorded data within App.
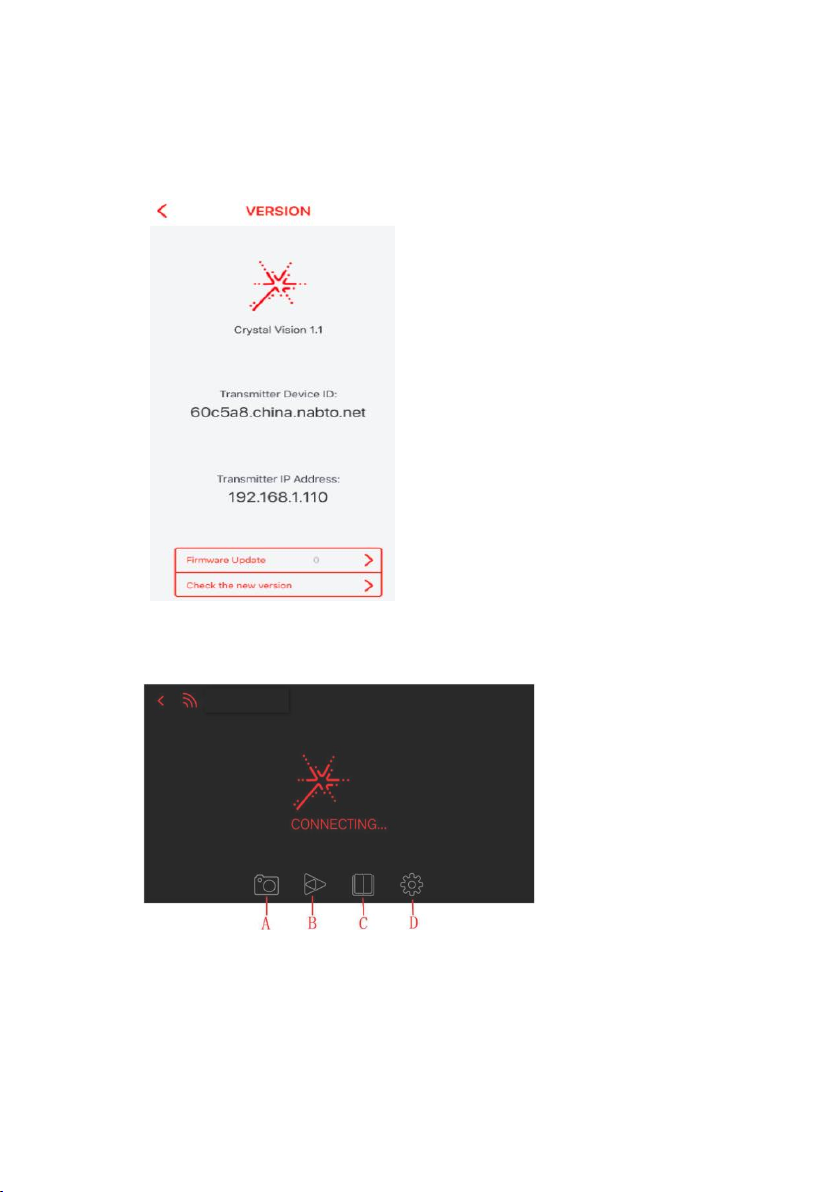
1) Software Version
2)Live View display
The following pictorial figures are located at bottom of Live View display.
A: Screen shot capture
B: Video shooting capture
C: Recorded photo/video library
D: Video image quality setup display
15
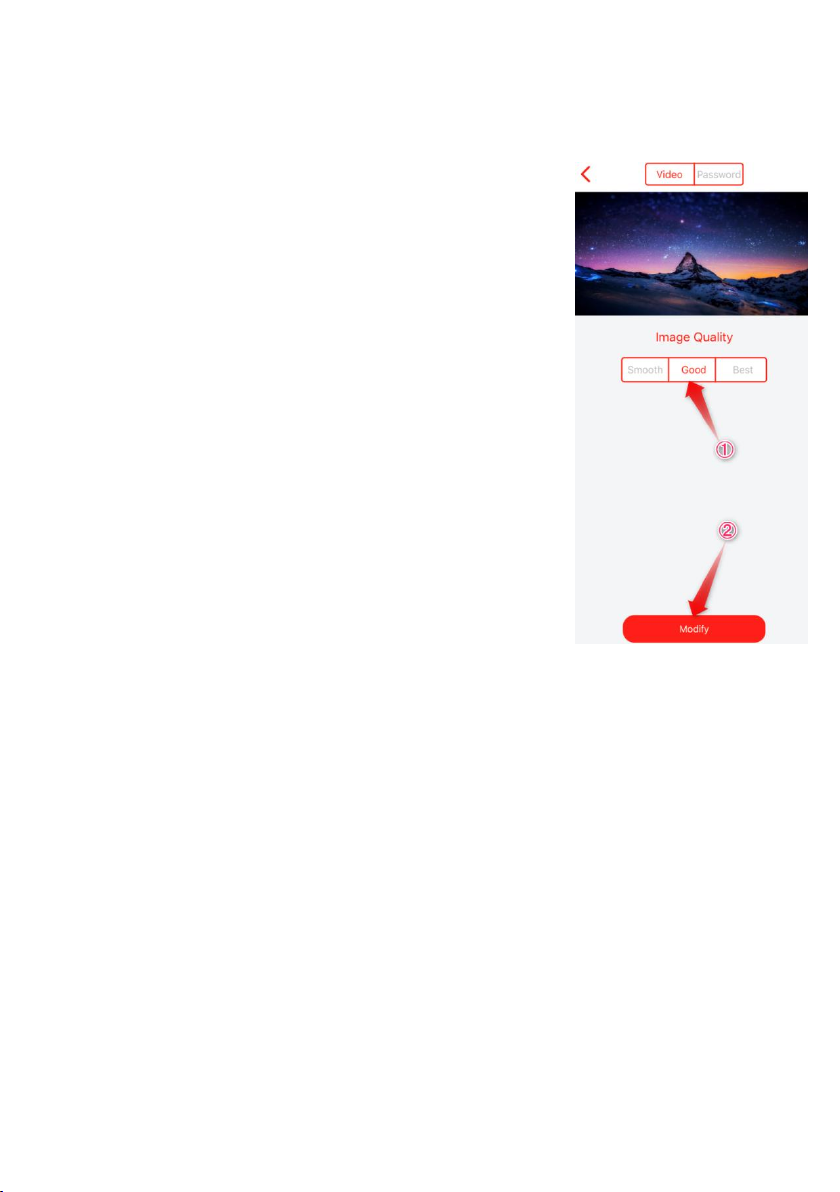
3)Configuration
1. Smooth / Good / Best
Video Bitrate can be selected from 3 choices
2. Modify
Configuration completes after choice of above,
and tapping “Modify” After tapping “Modify”,
the device reboots automatically to reflect
the change made, and it takes approx. 1 min.
4)Browse
Screen shoot images, and videos taken
at phase 2), can be browsed at this library.
<Remarks>
・Maximum distance of RTSP (streaming) mode is approximately 30M
depending on RX at access point mode. The transmission distance may vary
depending on the specification of the selected iPhone/iPad.
・Up to 3 to 4 devices (iPhone/iPad) can be connected simultaneously under
RTSP mode.
16

III. References
1. How to access to WEB Setup menu
This section illustrates this product’s WEB configuration menu, and how to
operate each feature.
Receiver (RX) consists of a Wi-Fi module that operates wireless transmission,
(follow as RX Wi-Fi) and decoder module that decodes video (follow as DEC).
Transmitter (TX) also consists of Wi-Fi module (follow as TX Wi-Fi), and
encoder module that encodes video (follow as ENC).
HOW TO SETUP
1)Connect to Wi-Fi.
Link the receiver (RX) and smartphone.
*Please make sure to turn on RX and TX first before linking up with
smartphones.
【Connection figure】
2) Start Web Browser
*Recommended Browser:Google Chrome, Safari
3) Display Setting page
Enter the following value in the address input field of the web browser to
display the setting page. *The following indicates the factory setting.
17

<RX>
・DEC
http:/192.168.1.120/
・RX Wi-Fi
http://192.168.1.100/login.php
<TX>
・ENC
http://192.168.1.110/
・TX Wi-Fi
http://192.168.1.200/login.php
NOTE
✓Please make sure to enter the Web address correctly. The web screen will
not be displayed if there are slight difference e.g. between http:// and
https://.
✓If the recommended Web browser is not used, the contents might not
work properly or may not be displayed.
18

Table of contents


