iFIT Vue IFVUEBD515.0 User manual
User’s Manual
Activity Tracker
IFACT115.0
IFACT215.0
IFVUEWM115.0
IFVUEWM215.0
IFVUEBD515.0
IFVUEBD615.0
Model No.
Model No.
Model No.
Model No.
Model No.
Model No.

Table of Contents
Important Precautions ............................................................................................ 1
Questions? .....................................................................................................2
What’s In The Box ...............................................................................................2
Getting Started . . . . . . . . . . . . . . . . . . . . . . . . . . . . . . . . . . . . . . . . . . . . . . . . . . . . . . . . . . . . . . . . . . . . . . . . . . . . . . . . . . . . . . . . . . . . . . . . . . 2
Install The iFit App And Set Up The Tracker Pod. . . . . . . . . . . . . . . . . . . . . . . . . . . . . . . . . . . . . . . . . . . . . . . . . . . . . . . . . . . . . . . . . . . . . 3
Charge The Tracker Pod .........................................................................................4
Wear The Tracker Pod ...........................................................................................5
Clean The Band . . . . . . . . . . . . . . . . . . . . . . . . . . . . . . . . . . . . . . . . . . . . . . . . . . . . . . . . . . . . . . . . . . . . . . . . . . . . . . . . . . . . . . . . . . . . . . . . . 5
Use The Tracker Pod. . . . . . . . . . . . . . . . . . . . . . . . . . . . . . . . . . . . . . . . . . . . . . . . . . . . . . . . . . . . . . . . . . . . . . . . . . . . . . . . . . . . . . . . . . . . . 6
Use The Chest Heart Rate Monitor. . . . . . . . . . . . . . . . . . . . . . . . . . . . . . . . . . . . . . . . . . . . . . . . . . . . . . . . . . . . . . . . . . . . . . . . . . . . . . . . . 8
Compliance Information .........................................................................................10
Recycling Information ............................................................................................11
Battery Information. . . . . . . . . . . . . . . . . . . . . . . . . . . . . . . . . . . . . . . . . . . . . . . . . . . . . . . . . . . . . . . . . . . . . . . . . . . . . . . . . . . . . . . . . . . . . . .11
Limited Warranty ......................................................................................Back Cover
Limited Warranty For Europe . . . . . . . . . . . . . . . . . . . . . . . . . . . . . . . . . . . . . . . . . . . . . . . . . . . . . . . . . . . . . . . . . . . . . . . . . . . . Back Cover

1
1. It is the responsibility of the owner to ensure that all
users of this product are informed of all precautions.
2. Before beginning any exercise program, consult
your physician. This is especially important for per-
sons over age 35 or persons with pre-existing health
problems.
3. Use this product only as described in this manual.
4. Keep this product away from children under age 12
and pets at all times.
5. Use only the included charger with a certified com-
puter, powered hub, or power supply to charge the
battery in the tracker pod.
6. Do not attempt to open or disassemble the tracker
pod; the battery is not replaceable or serviceable.
7. Do not use this product in a sauna or a steam room or
while showering or swimming; do not submerge this
product; and do not place this product in a washing
machine or clothes dryer.
8. If you experience any skin irritation while using
this product, see WEAR THE TRACKER POD on
page 5.
9. Over exercising may result in serious injury or death. If
you feel faint, if you become short of breath, or if you
experience pain while exercising, stop immediately
and cool down.
10. Do not use abrasive cleaners to clean this product.
11. Do not expose the tracker pod to extremely high or
low temperatures, to direct sunlight for an extended
period of time, or to open flames.
12. Some models include a chest heart rate monitor.
The chest heart rate monitor is not a medical device.
Various factors may affect the accuracy of heart rate
readings. The chest heart rate monitor is intended
only as an exercise aid in determining heart rate
trends in general.
13. If you have heart problems, or if you are over age 60
and have been inactive, do not use a chest heart rate
monitor for heart rate-driven workouts. Consult your
physician if you have an implanted medical device
such as a pacemaker, or if you are taking medication
regularly.
WARNING: To reduce the risk of serious injury, read all important precautions and instructions in this manual
before using this product. ICON assumes no responsibility for personal injury or property damage sustained by or
through the use of this product.
Important Precautions
2
1. Install the iFit app on your iOS® or Android™ device and set up the tracker pod.
Use the iFit app to set up an iFit account, pair and set up the tracker pod, customize settings for the tracker pod, set
goals, and enter and track information. See INSTALL THE IFIT APP AND SET UP THE TRACKER POD on page 3.
2. Learn how to charge the tracker pod.
Charge the tracker pod with the included charger. See CHARGE THE TRACKER POD on page 4.
3. Learn how to wear the tracker pod.
Wear the tracker pod in the included band or carry it independently. See WEAR THE TRACKER POD on page 5.
4. Learn how to use the tracker pod.
Use the tracker pod to track and sync calorie information, steps, distance, sleep, and exercise activity to the iFit app.
See USE THE TRACKER POD page 6.
Getting Started
If you have questions after following the instructions in this manual, PLEASE DO NOT CONTACT THE STORE. Please visit
Questions?
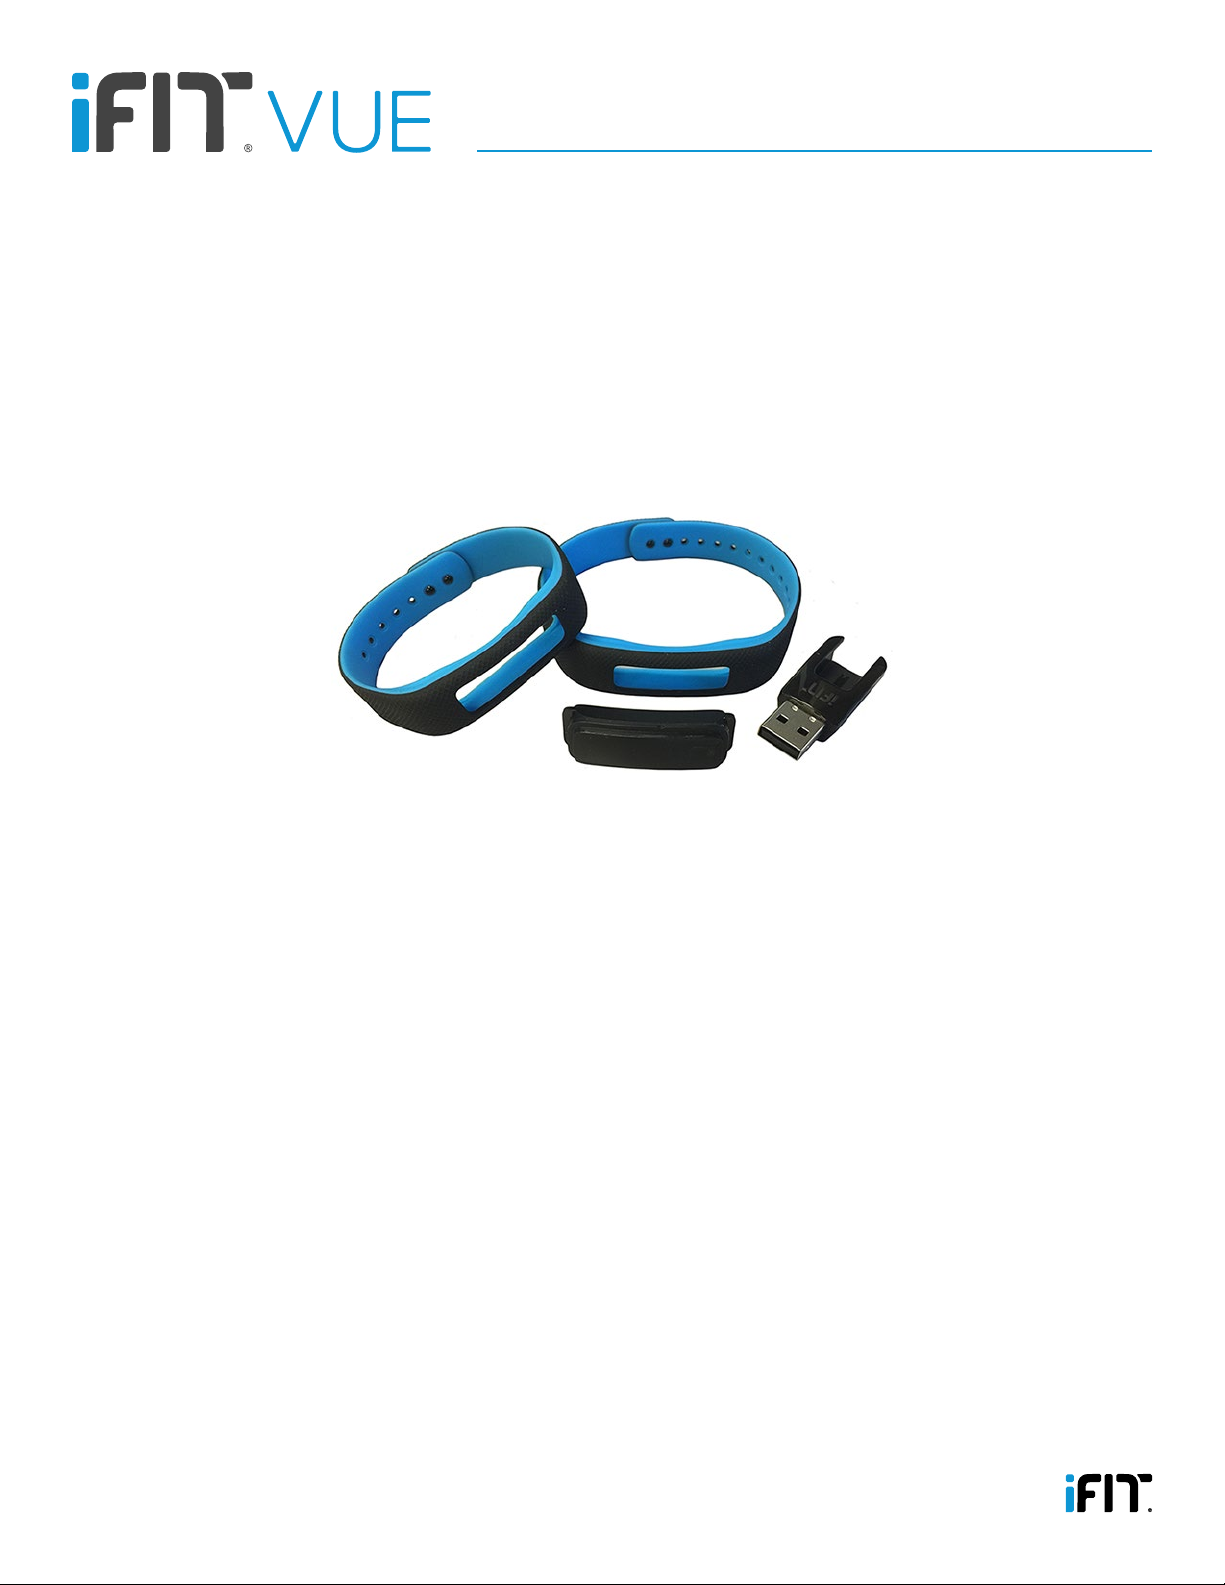
What’s In The Box
Tracker Pod, Band(s), Charger
(Some models include more than one band)

3
Install the iFit App
Pair, set up, and sync the tracker pod with your iOS device (iPhone® 4s and later) or your Android device (Android 4.3 and
later) that supports BLUETOOTH® 4.0 wireless technology.
On your iOS or Android device, open the App Store℠ or the Google Play™ store, search for the free iFit app, and then install
the app on your device. Make sure that the BLUETOOTH option is enabled on your device.
Activate the Tracker Pod
The first time you use the tracker pod, it may be necessary to activate it. To do this, touch the button on the tracker pod
once. If an instructional message appears in the display, touch and hold the button for 3 seconds until the time/date display
appears. (See EXIT SHIPMENT MODE on page 7.)
Pair, Set Up, and Sync the Tracker Pod
Open the iFit app and follow the instructions to set up an iFit account and pair the tracker pod to the iFit app on your device.
As part of the pairing process, touch the button on the tracker pod repeatedly until the time/date display appears, and then
touch and hold the button for 5 seconds until the word PAIR and an identification number appear in the display (see PAIR THE
TRACKER POD on page 7). Then, in the iFit app, select the tracker pod from the list of discoverable devices.
If the pairing is successful, the word SUCCESS will appear in the tracker pod display. After it is paired, the tracker pod will
sync automatically whenever the iFit app is open and the BLUETOOTH option is enabled on your device. You can also sync
the tracker pod manually in the iFit app.
Follow the instructions in the iFit app to customize settings for the tracker pod, enter and track information, and set
goals.
Install The iFit App And Set Up The Tracker Pod

4
Battery Life
The tracker pod contains a rechargeable lithium battery. With normal use, a fully charged tracker pod will run for
approximately 5 to 7 days before needing a charge. To check the battery level of the tracker pod, first touch the button on the
tracker pod repeatedly until the time and date display appears. Then, quickly double-touch the button and the battery level
display will appear.
When the battery level is at 20 percent and at 10 percent, the tracker pod will vibrate and a low battery warning will appear in
the tracker pod display to notify you that the battery needs to be charged. The tracker pod will shut down when the battery
level is at 5 percent. IMPORTANT: Make sure that the tracker pod syncs to the iFit app when the battery level is low; the
data recorded on the tracker pod will be deleted when the battery level is at zero percent.
Charge the Tracker Pod
To charge the tracker pod, first remove it from the band. Next, attach the
charger to the tracker pod by aligning the tab and the contacts on the tracker
pod with the slot and the contacts on the charger, and then inserting the
tracker pod into the charger.
Note: You cannot attach the charger to the tracker pod while it is inserted in
the band.
Then, plug the charger into a USB port on your computer. It will take
approximately 4 to 8 hours for the tracker pod to charge completely.
Note: To charge the tracker pod more quickly, plug the charger into a USB wall adapter (not included) or a USB car charger
(not included).
When the charger is first plugged in, the current battery level will appear in the tracker pod display for 10 seconds. To check
the battery level at any time while the tracker pod is charging, touch the button on the tracker pod. When the tracker pod is
fully charged, the battery level display will appear at 100 percent until the charger is unplugged.
Charge The Tracker Pod
5
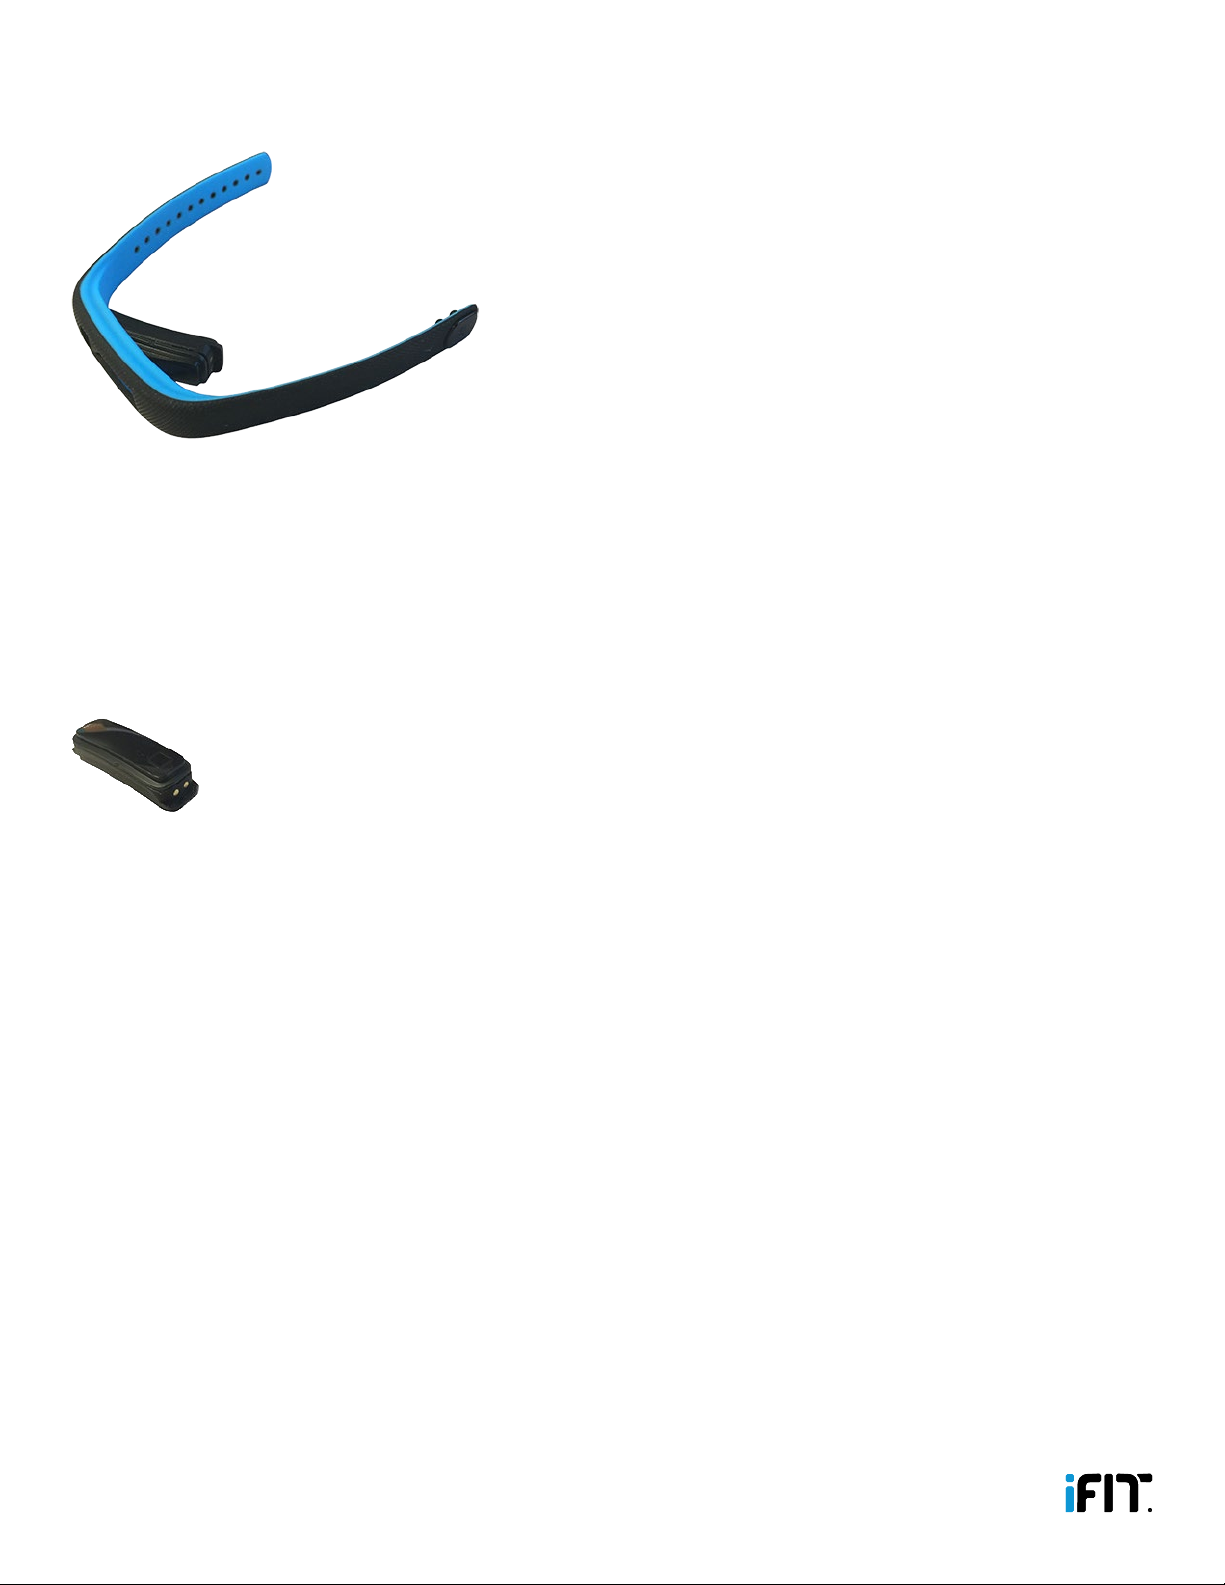
In The Band
How to Insert the Tracker Pod Into the Band
Flex the band and press the tracker pod into the opening in the inner
side of the band. Make sure that the display on the tracker pod is facing
outward. Reverse these actions to remove the tracker pod from the band.
Note: More than one band may be included with this model; select the
band that best fits your wrist.
How to Fasten the Band
Wrap the band around your wrist and press the pegs on the clasp firmly into the desired adjustment holes. Make sure that
the band is slightly loose on your wrist. Reverse these actions to unfasten the band.
Note: As with any watch or jewelry, a very small percentage of users may experience skin irritation while wearing the band.
If you experience any skin irritation, discontinue wearing the band and carry the tracker pod independently in your pocket. If
Independently
Simply place the tracker pod in your pocket to carry the tracker pod independently. Make sure that the
tracker pod will not fall out of your pocket as you move.
Wear The Tracker Pod
If you wear the tracker pod in the band, regularly remove the band and clean it with water and a few drops of mild liquid soap.
Do not place the band or the tracker pod in a dishwasher, washing machine, or dryer. Allow the band to dry thoroughly
before you put it back on your wrist.
Clean The Band

6
Use The Tracker Pod
Helpful Chart Information
While you view the chart on page 7, read the helpful information below.
Detect Activity
The tracker pod will detect automatically the type of activity you are performing, such as walking, running, sleeping, and so
forth. Allow 10 seconds for the tracker pod to detect the type of activity you are performing.
Enter Calories
You can enter calories into the tracker pod in increments of 50. When entering calories into the tracker pod, make sure to
double touch the button to confirm the total number of calories you entered. The maximum number of calories you can enter
at one time is 2,500.
Start a Workout
The tracker pod will detect your workouts automatically. You can also start a workout manually on the tracker pod. When you
start a workout manually, the tracker pod will remain in workout mode for 15 minutes. Then, if the tracker pod detects further
activity, it will continue in workout mode.
The tracker pod will record your average speed during each minute of your workout. This information will be displayed in
your workout history in the iFit app.
Measure Your Heart Rate
The tracker pod is compatible with all BLUETOOTH Smart heart rate monitors. During your workouts, the tracker pod will
display your heart rate when you wear a compatible heart rate monitor. When the tracker pod detects a heart rate monitor,
your heart rate will be shown in the display. When the tracker pod cannot detect a heart rate monitor, an instructional
message will appear in the display.
Some models include a chest heart rate monitor. To use an included chest heart rate monitor, see USE THE CHEST HEART
RATE MONITOR on page 8.
If your model does not include a chest heart rate monitor, you can visit www.shop.iFit.com to purchase a BLUETOOTH
Smart chest heart rate monitor.
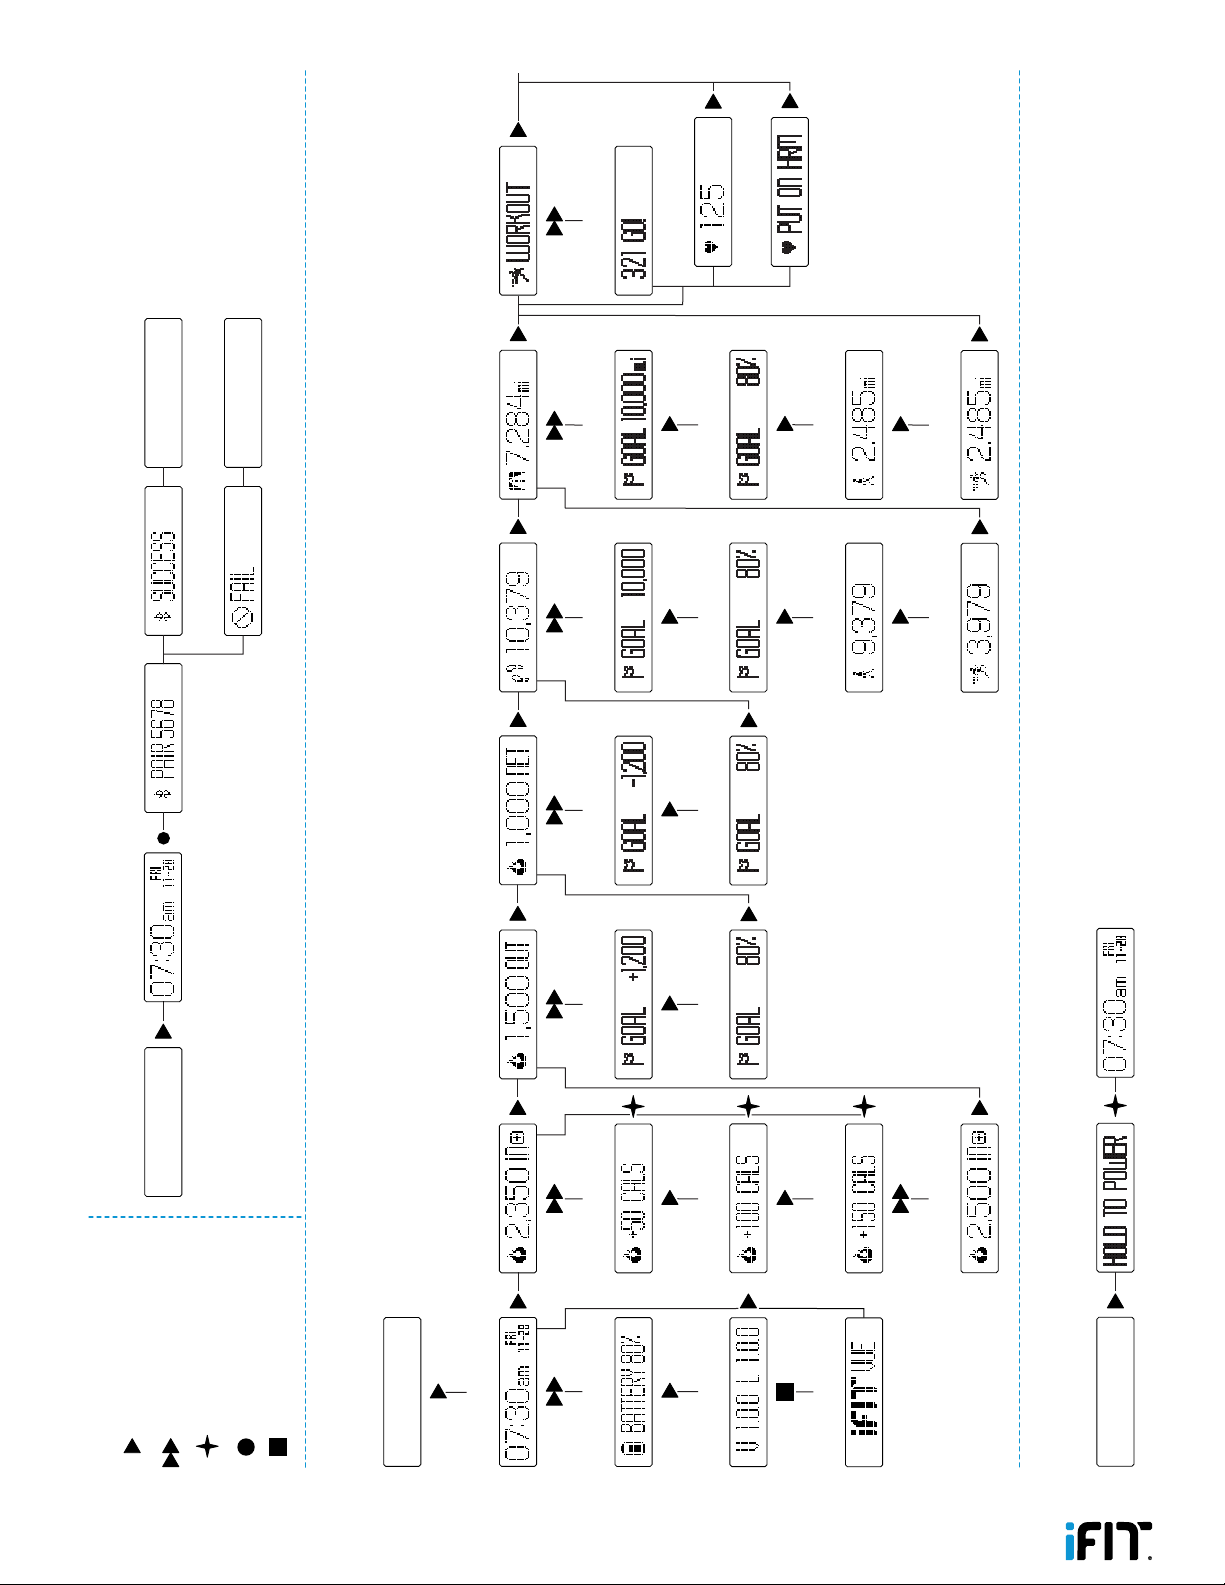
7
Key
Touch
Double Touch
Touch for 5 seconds
Touch for 10 seconds
Touch for 3 seconds
Pair the Tracker Pod
O O
O
Identification Number Success
Failure
Exit Shipment Mode
View and Use the Displays
O
Time/Date Calories Entered Calories Burned
Goal Status
Goal Status Goal Status
Goal Status Goal Status
Steps Walked
Steps Run
Distance Walked
Distance Run
Goal Status
Goal Status Goal Status
Net Calories Steps Distance
Battery Level Increments of 50
Increments of 50
Wear a heart rate monitor
Begin working out
Increments of 50
Version Number
Reset
Calories Entered
Workout
Heart Rate
Shipment Mode Time/Date
Activate the tracker pod
Time/Date
8
Some models include a chest heart rate monitor.
If your model does not include a chest heart
rate monitor, you can visit www.shop.iFit.com
to purchase a BLUETOOTH Smart chest heart
rate monitor.
Note: The tracker pod is compatible with all
BLUETOOTH Smart heart rate monitors.
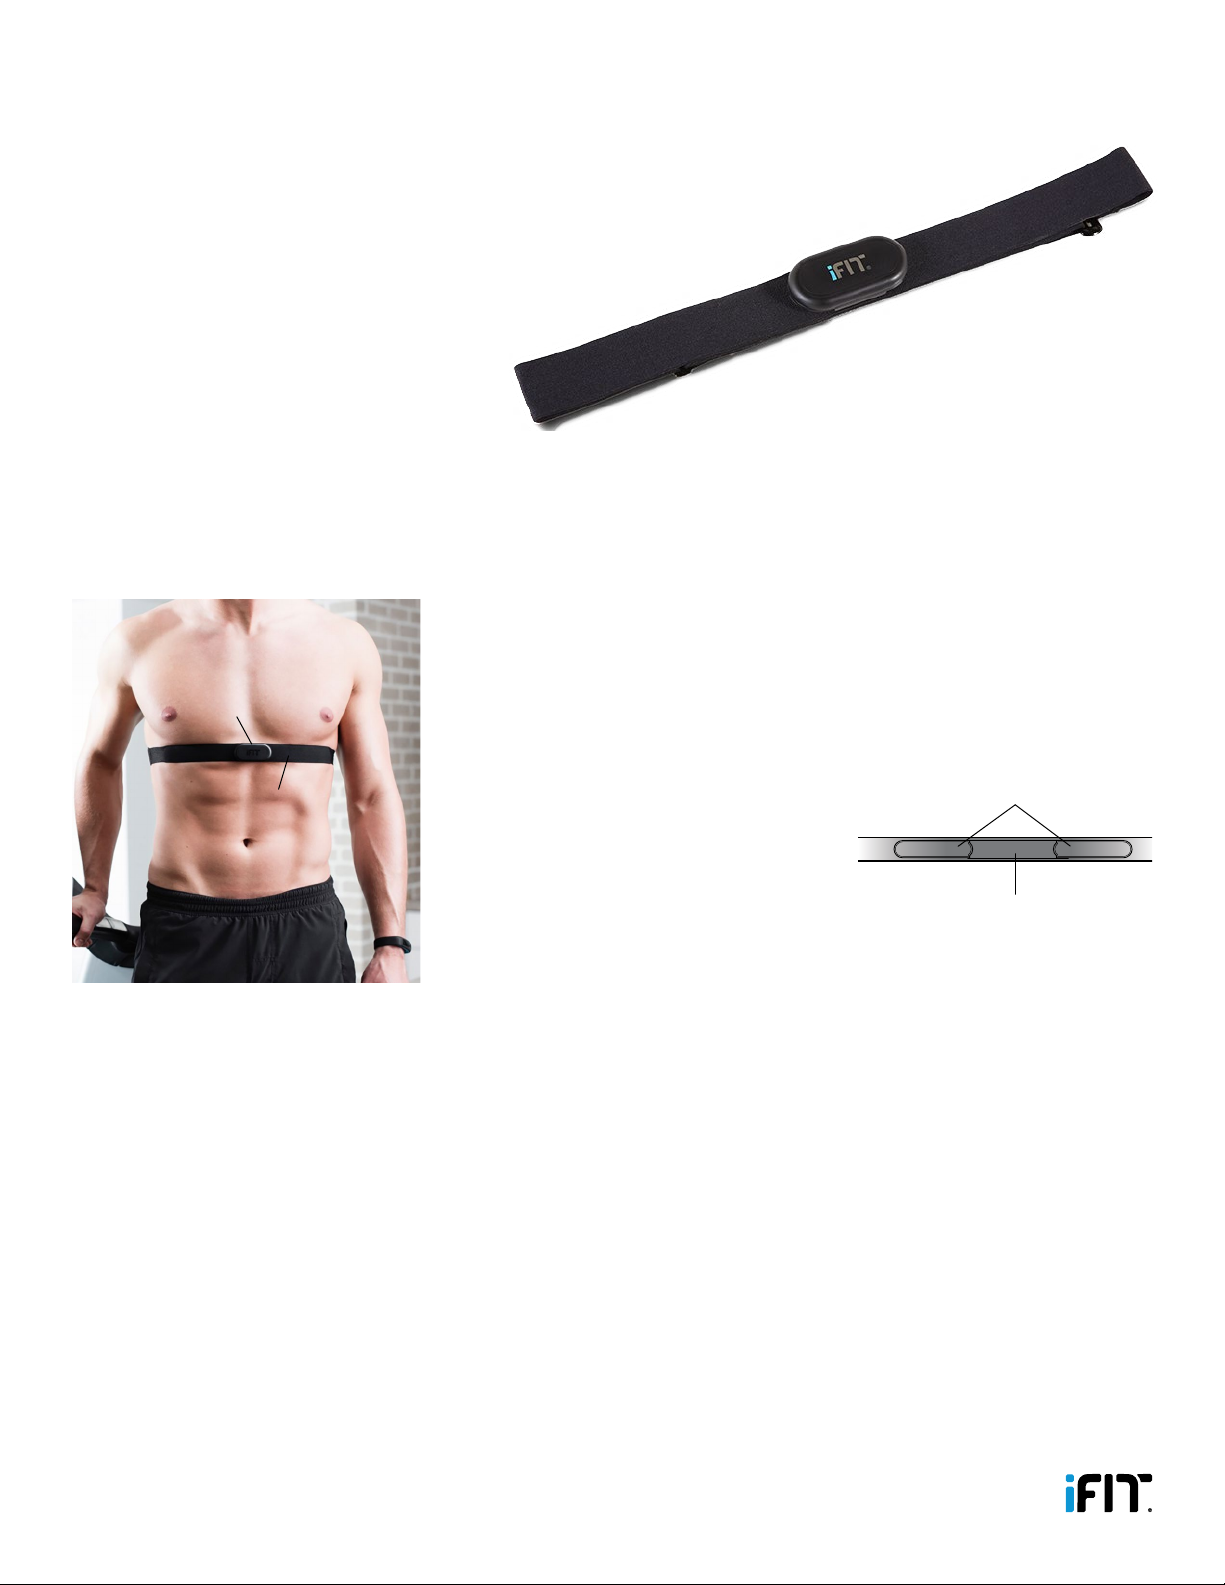
How to Put On the Heart Rate Monitor
The heart rate monitor consists of a chest strap (A) and a sensor (B). Attach the sensor to the chest strap by pressing the posts
on the sensor into the snap fasteners on the chest strap.
The heart rate monitor must be worn under your clothes, tight against your skin. To
put on the heart rate monitor, wrap the chest strap (A) around your chest, and slide
the loop on one end of the chest strap onto the clip on the other end of the chest
strap. Make sure that the logo on the sensor (B) is right-side-up. Then, adjust the
length of the chest strap, if necessary, and position the chest strap as shown.
Next, pull the chest strap (A) away from
your body a few inches and locate the two
electrode areas (C). Using a saline solution,
such as saliva or contact lens solution, wet
the electrode areas. Then, return the chest
strap to a position against your chest.
How to Care For the Heart Rate Monitor
• Thoroughly dry the electrode areas on the chest strap with a soft towel after each use. Moisture may keep the heart rate
monitor activated, shortening the life of the battery.
• Store the heart rate monitor in a warm, dry place. Do not store the heart rate monitor in a plastic bag or other container
that may trap moisture.
• Do not expose the heart rate monitor to direct sunlight for extended periods of time; do not expose it to temperatures
above 122° F (50°C) or below 14° F (-10°C).
• To clean the sensor, use a damp cloth and a small amount of mild soap. Then, wipe the sensor with a damp cloth and
thoroughly dry it with a soft towel. Never use alcohol, abrasives, or chemicals to clean the sensor. Hand wash and air
dry the chest strap.
A
B
C
A
Use The Chest Heart Rate Monitor
9
How to Troubleshoot the Heart Rate Monitor
If the heart rate monitor does not function properly, try the steps below.
• Make sure that you are wearing the heart rate monitor as described in HOW TO PUT ON THE HEART RATE MONITOR on
page 8. If the heart rate monitor does not function when positioned as described, move it slightly lower or higher on
your chest.
• If heart rate readings are not displayed until you begin perspiring, rewet the electrode areas.
• The heart rate monitor is designed to work with people who have normal heart rhythms. Heart rate reading problems may
be caused by medical conditions such as premature ventricular contractions (pvcs), tachycardia bursts, and arrhythmia.
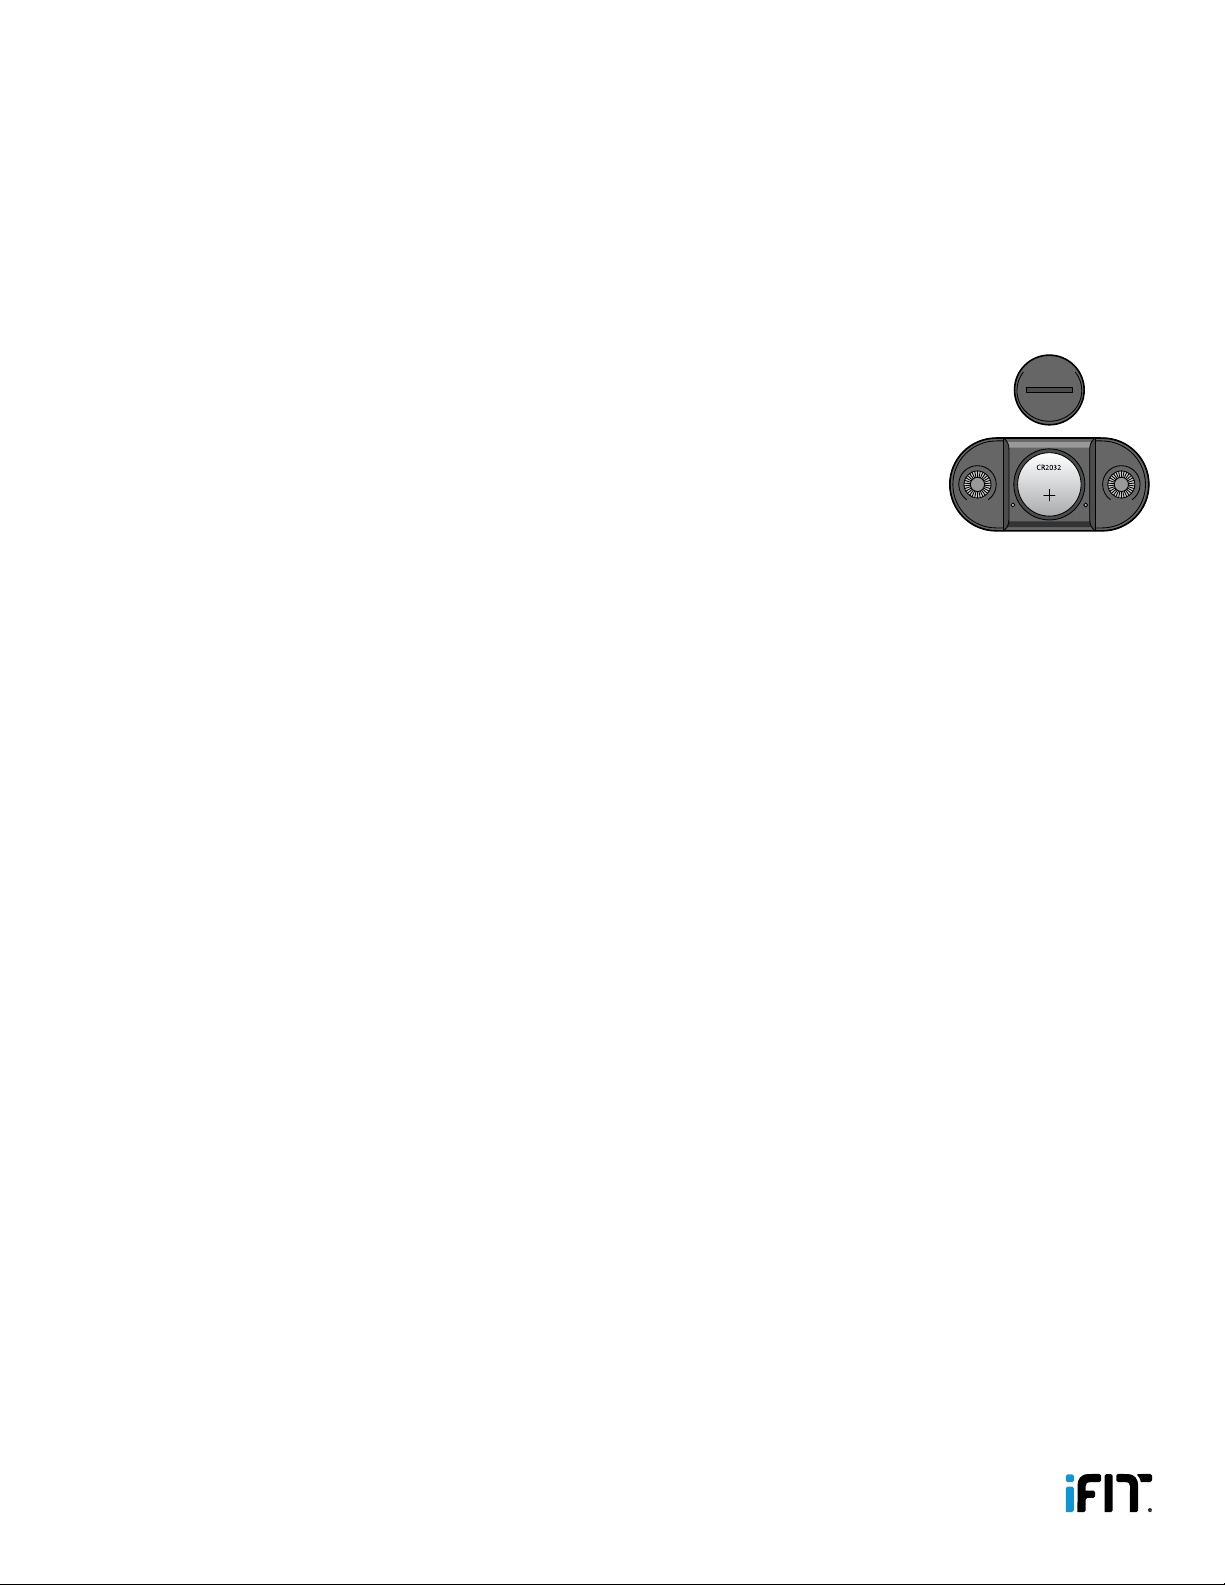
• If the heart rate monitor still does not function properly, remove the sensor from the chest
strap and locate the battery cover on the back of the sensor. Insert the edge of a coin into
the slot in the battery cover, turn the battery cover counterclockwise, and remove the battery
cover. Next, remove the old battery and insert a new CR 2032 battery; make sure that the
battery is oriented so that the text is facing away from the sensor. Then, reattach the
battery cover and turn it clockwise.
• The heart rate monitor can also transmit to compatible BLUETOOTH Smart fitness equipment
such as treadmills and ellipticals. To use the heart rate monitor with other fitness equipment,
make sure that a BLUETOOTH Smart receiver is included in the fitness equipment.
• For the console on other fitness equipment to display heart rate readings, you must be within arm’s length of the console.
• The operation of the heart rate monitor can be aected by magnetic interference from high power lines or other sources.
If you suspect that magnetic interference is causing a problem, try relocating the fitness equipment.

10
United States Compliance Information
FCC Statement. This device complies with Part 15 of the FCC Rules. Operation is subject to the following two conditions:
(1) This device may not cause harmful interference, and (2) this device must accept any interference received, including
interference that may cause undesired operation.
FCC Warning: Any changes or modifications not expressly approved by the party responsible for compliance could void
the user’s authority to operate this equipment.
Note: This equipment has been tested and found to comply with the limits for a Class B digital device, pursuant to Part 15
of the FCC Rules. These limits are designed to provide reasonable protection against harmful interference in a residential
installation. This equipment generates, uses, and can radiate radio frequency energy and, if not installed and used in
accordance with the instructions, may cause harmful interference to radio communications. However, there is no guarantee
that interference will not occur in a particular installation. If this equipment does cause harmful interference to radio or
television reception, which can be determined by turning the equipment o and on, the user is encouraged to try to correct
the interference by one of the following measures:
• Reorient or relocate the receiving antenna.
• Increase the separation between the equipment and the receiver.
• Connect the equipment into an outlet on a circuit dierent from that to which the receiver is connected.
• Consult the dealer or an experienced radio/TV technician for help.
This device meets the FCC and IC requirements for RF exposure in public or controlled environments.
Canada Compliance Information
IC Statement. This device complies with Industry Canada license exempt RSS standard(s). Operation is subject to the
following two conditions: (1) This device may not cause harmful interference, and (2) this device must accept any interference
received, including interference that may cause undesired operation.
This Class B digital apparatus complies with Canadian ICES-003.
Compliance Information

11
This electronic product must not be disposed of in municipal waste. To preserve the
environment, this product must be recycled after its useful life as required by law.
Use recycling facilities that are authorized to collect this type of waste in your area. In doing so,
you will help to conserve natural resources and improve standards of environmental protection.
For information about safe and correct disposal methods, please contact your local city oce or
waste disposal oce, or the establishment where you purchased this product.
This electronic product contains a rechargeable battery. A rechargeable battery has a long service life if treated properly. Do
not expose the battery to extreme temperatures. For maximum battery capacity, use the battery at room temperature. If the
battery is used in low temperatures, the battery capacity will be reduced.
Recycling Information
Battery Information

Part No. 371058 R0616A © 2016 ICON Health & Fitness, Inc.
ICON Health & Fitness, Inc. (ICON) warrants this product to
be free from defects in workmanship and material, under
normal use and service conditions. Parts are warranted for
one (1) year from the date of purchase.
This warranty extends only to the original purchaser
(customer). ICON’s obligation under this warranty is limited to
replacing this product. If a replacement product is shipped
while the product is under warranty, the customer will be
responsible for a minimal handling charge. No other warranty
beyond that specifically set forth above is authorized by
ICON.
ICON is not responsible or liable for indirect, special, or
consequential damages arising out of or in connection
with the use or performance of the product; damages with
respect to any economic loss, loss of property, loss of
revenues or profits, loss of enjoyment or use, or costs of
removal or installation; or other consequential damages
of any kind. Some regions do not allow the exclusion
or limitation of incidental or consequential damages.
Accordingly, the above limitation may not apply to the
customer.
The warranty extended hereunder is in lieu of any
and all other warranties, and any implied warranties of
merchantability or fitness for a particular purpose are limited
in their scope and duration to the terms set forth herein.
Some regions do not allow limitations on how long an
implied warranty lasts. Accordingly, the above limitation may
not apply to the customer.
This warranty provides specific legal rights; the customer
may have other rights that vary from region to region.
For claims, please visit our Customer Care website at
ICON Health & Fitness, Inc.
1500 S. 1000 W.
Logan, UT 84321-9813, USA
The warranty terms above may not apply to you. To receive information about your warranty, send email to support@iFit.com.
Limited Warranty
Limited Warranty For Europe
IFIT is a registered trademark of ICON Health & Fitness, Inc. App Store and iPhone are trademarks of Apple Inc., registered
in the U.S. and other countries. Android and Google Play are trademarks of Google Inc. The BLUETOOTH® word mark and
logos are registered trademarks of Bluetooth SIG, Inc. and are used under license. IOS is a trademark or registered trademark
of Cisco in the U.S. and other countries and is used under license.
This manual suits for next models
5
Table of contents
Other iFIT Fitness Tracker manuals


