iGenix IG355W User manual

说明书递交文档
设 计
DESIGN
林芳芳
2017.5.22
校 对
CO.BY 蒋卨敏 IGENIX IG355B(CE-BD83CM-SQ)说明书
刘翔
图号/物料编码 PART NO.
标准化
STANDARD
图纸名称 PART NAME
业务
seller
图样标记
REL
版本号
REV.NO.
重量(g)
WEIGHT
比例
scale
材料 MATERIAL
80g双胶纸
16131000A24730
4 1:1
批 准
A
UTHORIZE
共 页
TOTAL SHEETS
第 页
NO. OF SHEETS
美的冰箱事业部
MIDEA REFRIGERATION DIVISION
技术要求
标记
MARKER 变更内容 修改日期 签名
① 自订单MO-629088开始更新整体版面 2018.07.16 林芳芳
自订单MO-654838开始删除封面Batch code 字样 2018.08.17 林芳芳
自即日起开始更新整体版面 2019.04.20 林芳芳
自订单MO-865211开始更新第8页内容 2019.07.25 韩文静
②
③
④
⑤
1. 尺寸:16K;
2. 说明书印刷颜色:单色;
3. 样板需送设计部门封样;
4. 制件必须满足QMB-J53.005 产品说明书及其它类似印刷件技术规范。
5. 需要符合美的冰箱事业的最新版《QMB-GC08.007 有害物质管理规定》的限值要求。
客户版面, 不可随意更改
USER MANUAL
55cm Under Counter Freezer
Please read these instructions carefully before use and retain for future reference
Before switching on your appliance,
always check for any damage which may have been caused in transit
IG355W / IG355B

2
CONTENTS
Important Safety Instructions...............................................3-6
Appliance Overview...................................................................7
Specication .................................................................................8
Installation...............................................................................9-11
Operating Instructions............................................................ 11
Cleaning and Maintenance ............................................... 12-13
Trouble Shooting Guide.......................................................... 14
Disposal Information............................................................... 15
Fuse Replacement.................................................................... 15
Igenix Warranty Terms & Conditions ............................ 16-17

3
SAFETY INSTRUCTIONS
Important: This appliance is not intended for use by persons
including children with reduced physical, sensory or mental
capabilities, or lack of experience and knowledge, unless they
have been given supervision or instruction concerning use of the
appliances by a person responsible for their safety.
• This product is intended to be used in a household and similar
applications such as: staff kitchen areas in shops, ofces and other
working environments;
- farm houses and by clients in hotels, motels and other
residential type environments;
- bed and breakfast type environments;
- catering and similar non retail applications.
• Do not use mechanical devices or other means to accelerate
the defrosting process, other than those recommended by the
manufacturer.
• Do not use electrical appliances inside the food storage
compartments of the appliance, unless they are recommended
by the manufacturer.
• Do not store explosive substances such as aerosol cans with
a ammable propellant in this appliance.
• Ensure that the electricity supply in your home is rated at 220 -
240 volts before operating the appliance.
• Do not use the appliance if there is any damage to the power
cord.
• Use of an extension cord is not recommended with this product.
• This product is for indoor use only.
• Keep packaging material out of the reach of children! It can
become a choking or suffocation hazard.
• Always unplug the appliance before attempting to move it.
• Children should be supervised to ensure that they do not play
with the appliance.

4
• Ensure that the refrigerant circuit is not damaged.
• The refrigerant of this product is R600a which is ammable.
• Ensure when moving the appliance or during installation that the
cooling system does not get damaged.
• DANGER: Risk of child entrapment
- Before you dispose of your old refrigerator or freezer, remove
the doors and leave the shelves in place so that children cannot
easily climb inside.
• When disposing of the appliance, remove the plug so the
appliance is unusable.
IMPORTANT: Always allow 12 hours before turning on the
refrigerator to allow the coolant gases time to settle after the
refrigerator is in place.
Packaging: The cardboard packaging is recyclable and
should be disposed of according to local
regulations. Keep the packaging materials out of the reach of
children.
Before installation take care to remove all cardboard or other
packaging, including material from the condenser tubes and any
material surrounding the motor / compressor unit.

5
WARNING: Risk of re / ammable materials.
• When positioning the appliance, ensure the supply cord is
not trapped or damaged.
• Do not locate multiple portable socket-outlets or portable
power supplies at the rear of the appliance.
• Children aged from 3 to 8 years are allowed to load and
unload refrigerating appliances.
• To avoid contamination of food, pay attention to the
following:
• opening the door for long periods can cause a signicant
increase of the temperature in the compartments of the
appliance;
• clean regularly surfaces that can come in contact with
food and accessible drainage systems;
• clean water tanks if they have not been used for 48 hours;
ush the water system connected to a water supply if
water has not been drawn for 5 days;
• store raw meat and sh in suitable containers in the
refrigerator so that it is not in contact with or drip onto
other food;
• two-star frozen-food compartments are suitable for
storing pre-frozen food, storing or making ice-cream and
making ice cubes;
• one-, two- and three-star compartments are not suitable
for the freezing of fresh food;
• if the refrigerating appliance is left empty for long periods,
switch off, defrost, clean, dry and leave the door open to
prevent mould developing within the appliance.
6
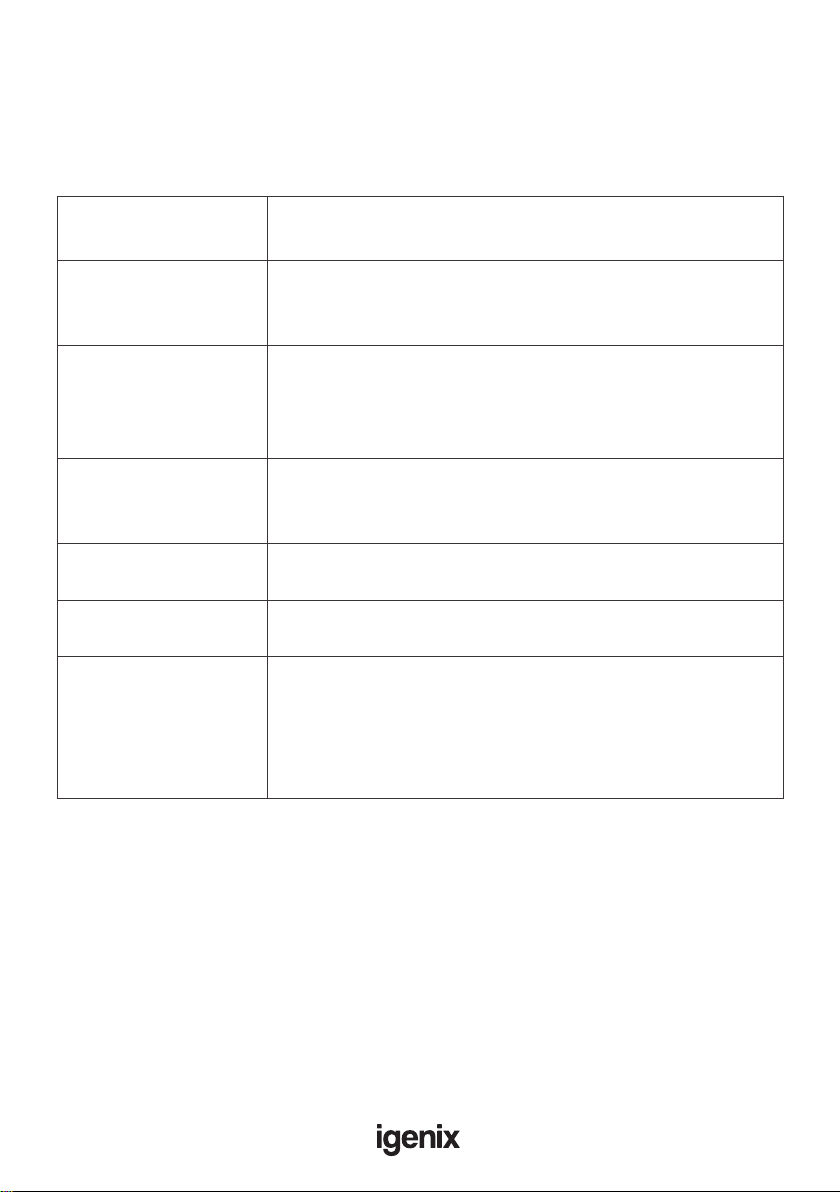
Refrigerator
location
Type of food
Fridge door • Foods with natural preservatives, such as jams,
juices, drinks, condiments.
• Do not store perishable foods.
Crisper bin (salad
bin)
• Fruits, herbs and vegetables should be placed
separately in the crisper bin.
• Do not store bananas, onions, potatoes, garlic in
the refrigerator.
Fridge shelf –
bottom
Chiller bin
• Raw meat, poultry, sh (for short-term storage)
Fridge shelf –
middle
• Dairy products, eggs
Fridge shelf – top • Foods that do not need cooking, such as ready-
to-eat foods, deli meats, leftovers.
Freezer drawer/
shelf
• Foods for long-term storage.
• Bottom drawer/shelf for raw meat, poultry, sh.
• Middle drawer/shelf for frozen vegetables, chips.
• Top drawer/shelf for ice cream, frozen fruit, fro-
zen baked goods.
The table below contains general guidelines on the storage of
food in the refrigerator.

7
APPLIANCE OVERVIEW
Thank you for purchasing your new Igenix under counter freezer.
We recommend that you spend some time reading this instruction manual in order that
you fully understand all the operational features it offers.
Read all the safety instructions carefully before use and keep this instruction manual for
future reference.
Unpacking
Remove all items from the packaging. Retain the packaging. If you dispose of it please do
so according to local regulations.
The following items are included:
Thermostat Control Dial
Freezer Drawers
Levelling Feet

83
42
66

9
Location and Air Circulation
• The appliance must stand vertically on a at, even surface, to level the appliance turn
levelling feet until the appliance is as level as possible.
• This appliance has been designed to operate in ambient temperatures between 16°C
and 38°C.
• It is not recommended to place this appliance in a room where the temperature is
likely to drop below 0°C for prolonged periods, as the internal appliance temperature
will not be maintained.
• The appliance should not be placed near to sources of heat e.g. cookers, radiators,
direct sunlight or in any unheated rooms e.g. garages, or outhouses, as extreme
temperatures will affect the performance of your appliance.
• Do not expose the appliance to damp conditions, open air or rain.
• Do not lift the appliance by the pipes or the door when moving.
• It is not recommended to place the appliance in a wall recess, tted cabinet or
furniture as this will not allow adequate ventilation and cause a potential re hazard.
• Allow 25mm of clearance space at the sides of the appliance and 20mm above the
appliance.
• It is not recommended to place the appliance directly against the wall, allow at least a
15mm clearance space at the rear.
• Do not place the appliance in a wall recess, tted cabinet or furniture as this will not
allow adequate ventilation and cause a potential re hazard.
Providing you follow the recommended ventilation requirements you will:
• Increase the life of the appliance.
• Minimise the risk of condensation on the outside of the appliance.
• Minimise operating noises caused by vibration.
Reverse the door
The appliance door can be tted to open to either the left or the right depending on its
location. The appliance will have to be tilted and supported in order to carry this out. It
is advisable to get some help during this procedure.
Important: Do not lay the appliance at as this may damage the coolant system. Take
care when tting and tightening screws.
INSTALLATION

10
1.
2.
4.3.
5.
6.
7.
8. 9.
To change the direction of the door, please follow these
instructions:
1. Ensure the appliance is unplugged and empty.
2. Remove the 2 Screws on the back of the top cover (Fig 1)
3. Lift the rear of the lid and push forward to remove from the
front locators.The top hinge now is accessible (Fig 2).
4. Unscrew the top door hinge located on the top of the door
and then remove the top hinge that is
holding the door in place. (Fig 3)
5. With help, carefully tilt the unit
backwards and rest the unit on
something solid to stop slipping.
6. Lift the door off the hinge pin and place
in a safe place where it will not get damaged
7. Remove the bottom bushing and bottom
bushing cap and t them on the opposite side
(Fig 4).
8. Unscrew the bottom hinge (Fig 5).
9. Remove the levelling foot and t on the
opposite side (Fig 6).
10.Screw the bottom hinge on the opposite side loosely (Fig 7).
11.Carefully slide the door on to the bottom hinge pin.
12.Screw the top hinge loosely (Fig 8).
13.Check the fridge door is aligned horizontally and
vertically so that the seals are closed on all sides.
14.Tighten the top hinge. Use a spanner to tighten it
if necessary (Fig 9).

11
15.Put the top cover back and screw it into place securely
(Fig 10)
16.With the door closed, check that the door is aligned
horizontally and vertically and that the seals are closed
on all sides before nally tightening the bottom hinge.
17.Re-adjust the levelling feet as needed.
18.Allow 5 hours for the appliance to stand upright before turning on the appliance to
allow coolant gases time to settle after the appliance is in place.
10.
Before using your appliance:
• This appliance must be left to stand in an upright position for at least 5 hours before
being switched on for the rst time to allow the coolant gases time to settle after the
refrigerator is in place.
• Before placing food in the appliance turn on and wait 24 hours, this is to make sure
it is working correctly and also to allow for the optimal internal temperature to be
reached.
• The interior of the appliance needs to be cleaned prior to use by wiping with a soft
cloth and using warm water.Wipe the appliance completely dry before replacing any
shelves or salad drawers.
• Once dry, plug the appliance into the mains socket.
• Avoid opening the door for long periods or unnecessarily.
• To maintain adequate air circulation, do not over ll the appliance.
• Allow hot or warm foods to cool to room temperature before storing in the
appliance.
• Keep the food packed, wrapped or covered.
• For hygiene reasons, always wrap food using a suitable packaging material, before
storing in your appliance to avoid contact with the surface of the appliance.
• Do not place food directly against the rear wall.
Adjusting the temperature
• There are 4 Settings, the Setting 4 is the coldest.
• Setting 2 is the recommended setting when operating at normal room temperature
between 16°C and 38°C.
Fast Freezing
• Fresh food should be frozen as quickly as possible. Setting 4 makes your appliance
operate at its coldest temperatures (approximately -28°C) continuously. It helps to
quickly freeze food as it retains more of the goodness.
• Freezing will be completed after 24 hours.After freezing your food turn the
thermostat control dial back to 2 (-18°C).
• It is not recommended to freeze large quantities of fresh food at once.
OPERATING INSTRUCTIONS

12
Switch off the electrical supply and remove the plug from the mains socket before
cleaning.
Interior
Note: The interior of the refrigerator should be cleaned regularly to avoid odor.
1. Remove all food from the appliance and cover to help keep cool.
2. Remove all the shelves and salad crisper carefully from the appliance and wash in
warm clean water with a soft cloth and dry thoroughly. Never replace the shelves or
salad crisper into the appliance if wet.
3. Use a soft cloth or sponge to clean the inside of the refrigerator, with two
tablespoons of baking soda and a quart of warm water. Rinse with water and wipe
clean.
4. For areas that are difcult to clean in the refrigerator (such as narrow sandwiches,
gaps or corners), it is recommended to wipe them regularly with a soft rag, soft
brush, etc. and when necessary, combined with some auxiliary tools (such as thin
sticks) to ensure no contaminant accumulation in these areas.
5. Open the door and allow the interior to dry naturally before replacing the shelves
and salad crisper.
6. Plug in and switch on and allow the temperature in the appliance to drop back to an
adequate temperature.
7. Replace the food in the appliance.
Important: Avoid getting water into the electric components of the appliance i.e. the
thermostat, as this may damage your appliance.
Defrosting
After a period of time frost will build up in the compartments. Regular defrosting will
therefore be necessary to maintain the efciency of the appliance.
• The best time to defrost your appliance is when the amount of food stored is low.
• To defrost the appliance, please follow the steps below:
• Take out the frozen food and store in a spare freezer, appliance or wrap well and store
in a cool dry place.
• Unplug the appliance from the mains supply, making sure not to pull the cord.
• Leave the door open.To speed up the defrosting process, bowls of warm water can be
placed inside the appliance to raise the temperature.
• Place a shallow bowl or pan below the freezer compartment to catch dripping water.
• Remove the ice with a plastic ice scrapper. DO NOT use pointed or sharp edged
objects such as knives, forks or screw drivers to remove the ice.
• When all traces of ice have been removed and defrosting is completed, clean away any
water and wipe your appliance dry.
Clean the appliance as described below:
1. Plug in and switch back on
2. Turn the temperature control to the Setting 2.
3. Allow at least 24 hours for the temperature to return to the adequate temperature
4. Put the food back into the appliance.
Important: Do not use any mechanical devices or other means to accelerate the
defrosting process other than those recommended by the manufacturer.
CLEANING AND MAINTENANCE

13
Exterior
• Use a clean, soft cloth dampened in soapy water to wipe the exterior surface of the
appliance and dry thoroughly.
• Use a vacuum cleaner to remove dust from underneath the appliance and from
around the compressor which is situated at the back of the appliance, regularly to
maintain adequate ventilation. Use caution not to damage the coolant system.
Important: Do not use abrasive cloths, powders, household cleaners, bleach or wax
polish to clean the appliance as these can leave a smell in the appliance and can damage
the exterior.
Door Seal
Check the door seal regularly to make sure there are no debris. Use a clean, damp soft
cloth to wipe the door seal and in between the creases, avoid damaging the door seal as
this will affect the performance of your appliance.
Going away
If you are going away and do not want to leave the appliance left on, switch off at the
mains socket and remove the plug from the mains sockets ensuring not to pull the cord.
Remove any food and follow the cleaning instructions in the “Cleaning and Maintenance”
section.
Important: Leave the door ajar as this will prevent odours and mould accumulating in the
appliance and will allow the appliance to dry completely.
Power Cut
In the event of a power cut keep the appliance door closed to maintain the temperature
inside.
Operating Sounds
The cooling gas which circulates in the cooling circuit may make a slight noise (bubbling
sound) even when the compressor is not running. Do not worry this is quite normal.
If these sounds are different check that:
• The appliance is well levelled
• Nothing is touching the rear.
• The stuffs on the appliance are vibrating.

14
TROUBLESHOOTING
If you are having problems with your appliance, please use our troubleshooting guide below. If you are
unable to resolve the issue using this guide please ring our Customer Service Department on 0844 848
5861. Please have the model code and purchase information available.
Appliance does
not work
Mains plug is not plugged in
or is loose
Insert mains plug.
Fuse has blown or is defective Check fuse, replace if necessary.
Socket is defective Mains malfunctions are to be
corrected by an electrician.
Temperature is not properly
adjusted.
Door was open for an extended
period.
Open the door only as long as
necessary.
A large quantity of warm food was
placed in the appliance within the
last 24 hours.
Turn the temperature regulation to
a colder setting temporarily.
The appliance is near a heat
source.
Please look in the installation
location section.
Temperature is set too cold.
Turn the temperature regulation knob
to a warmer setting temporarily.
Appliance is not level. Re-adjust the feet.
The appliance is touching the
wall or other objects.
Move the appliance slightly.
Water drain hole is blocked. See the Cleaning and care section.
It’s normal. Heat exchange parts
are in the sides.
Use gloves to touch sides.
A component, e.g. a pipe, on the
rear of the appliance is touching
another part of the appliance or the
wall.
If necessary, carefully bend the
component out of the way.
Fault Possible cause Solution
The food is too warm. Please look in the initial
Temperature setting section.
Appliance cools too
much
Unusual noises
Water on the oor
Side panels are hot.

15
Fuse Cover
Fuse Replacement (Class I)
This appliance must be eathed. Remove the fuse cover with a small
at head screw driver. Take out the fuse and replace with a new fuse
of the same Amp. Replace the fuse cover and push back into place.
MAINS PLUG FUSE REPLACEMENT
DISPOSAL INFORMATION
The European Directive 2012/19/EU on Waste Electrical and
Electronic Equipment (WEEE), requires that old household
electrical appliances must not be disposed of in normal unsorted
municipal waste.
Old appliances must be collected separately in order to optimise
the recovery and recycling of the materials they contain and reduce the impact
on human health and the environment.
The crossed out “wheeled bin” symbol on the product reminds you of your
obligation, that when you dispose of the appliance it must be separately collected.
Consumers should contact their local authority or retailer for information
concerning the correct disposal of their old appliance.

16
lgenix Warranty Terms & Conditions
This product is guaranteed for a period of 12 months as standard from the date of purchase
against mechanical and electrical defects.You can extend your warranty for a further 12 months by
registering your product.
Upon registration we will cover your product for a period of 24 months from the original purchase
date against any mechanical or electrical defects.
To qualify for the guarantee, the product must be used for domestic household use only and in
accordance with the instructions in the user manual.Any misuse of the product will result in the
warranty being void.
The guarantee does not cover accidental damage, misuse, neglect, tampering or incorrect
adjustment or installation.
The guarantee will be rendered invalid if the product is resold, has had its serial number removed
(or has an invalid serial number), or if an unauthorised person has carried out any repairs or
alterations.
The warranty does not cover accessories or consumable parts that require replacement under
normal use. This includes shelving, dials, lters, belts and trays etc.
In the unlikely event of a breakdown please refer to the Troubleshooting guide in your user manual
and check all plugs, fuses and the electricity supply.
If you still require assistance please contact our Customer Service department on
01473 271 272 or write to us at the following address:
Customer Service Department
38 Bluestem Road, Ransomes Europark
Ipswich, IP3 9RR
Please quote the Product Code which begins ‘IG’ or ‘DF’ and the Batch Coder beginning ‘5’ and give
details of the exact fault.We will then decide whether to repair or replace the item.
Before we arrange the repair or replacement you will be required to return a copy of your proof
of purchase. Please retain your original.
If an item is replaced within the agreed guarantee period, the guarantee for the replacement item
will be calculated from the purchase date of the original.
In the event that the product is inspected and no fault is found or the product is not within the
guarantee period you will be charged for the repair and any carriage costs.

17
Thank you for choosing lgenix
As a valued customer we would like to offer you a FREE 2 year warranty to cover your product
against any electrical or mechanical defects.
This means that in the unlikely event you develop a fault or problem with your product we will
happily repair or replace the item free of charge.
To qualify for the 2 year warranty you must register your product within 30 days of purchase.The
full Terms & Conditions of our warranty policy are shown on the opposite page.They are also
available on our website. www.igenix.co.uk
This manual suits for next models
1
Table of contents
Other iGenix Freezer manuals


