iGenix IG2070 User manual

Please read these instructions carefully before use and retain for future reference
Before switching on your appliance,
always check for any damage which may have been caused in transit
Batch code:
USER MANUAL
IG2070 - White
IG2807 - Silver
700W 20L Manual Microwave

2
CONTENTS
Important Safety Instructions...............................................3-6
Specication .................................................................................7
Appliance Overview...................................................................7
Setting up the Appliance............................................................8
Operating Instructions...............................................................9
Cleaning and Maintenance ..................................................... 10
Trouble Shooting Guide.......................................................... 11
Fuse Replacement.................................................................... 12
Disposal Information............................................................... 12
Terms and Conditions and Warranty Information...... 14-15

3
IMPORTANT SAFETY INSTRUCTIONS
Read and follow all of the instructions even if you feel you are familiar
with the product, and nd a place to keep this manual handy for future
reference.
Important: This appliance is intended for use in a domestic
environment only.Any other use is not recommended by the manufacturer
and may cause re, electrical shocks or other injury to user or property.
When using electrical appliances, basic safety precautions should always be
followed:
• Carefully read all instructions before operating and save for future
reference.
• This appliance is for normal domestic use only.
• This appliance can be used by children aged from 8 years and above if
they have been given supervision or instruction concerning the use of
the appliance in a safe way and understand the hazards involved.
• Cleaning and user maintenance shall not be made by children unless
they are older than 8 years and supervised.
• Keep the appliance and its cord out of reach of children aged less than
8 years.
• Children shall not play with the appliance.
• Appliances can be used by persons with reduced physical, sensory or
mental capabilities or lack of experience and knowledge if they have
been given supervision or instruction concerning use of the appliance
in a safe way and understand the hazards involved.
• If the supply cord is damaged, it must be replaced before further use
by the manufacturer, a service agent or similarly qualied persons in
order to avoid a hazard.
• Before using the appliance, ensure that the voltage of your electricity
supply is the same as that indicated on the rating plate of the appliance.
In the UK this is 220-240 Volts AC.
• It is hazardous for anyone other than a qualied service technician to
carry out any service or repair operation that involves the removal of
a cover which gives protection against exposure to microwave energy.
• Do not store or use this appliance outdoors.

4
• Do not use this microwave oven near water, in a wet basement or
near a swimming pool.
• Read and follow the specic section named “Precautions to avoid
possible exposure to excessive microwave energy”.
• When heating food in a plastic or a paper container, keep an eye on
the microwave oven due to the possibility of ignition.
• If smoke is emitted, switch off or unplug the appliance and keep the
door closed in order to stie any ames.
• Locate this oven only in accordance with the installation instructions
provided.
• Liquids and other foods must not be heated in sealed containers since
they are liable to explode.
• Only use containers suitable for use in microwave ovens.
• Do not overcook food
• Remove wire twist-ties and metal handles from paper or plastic
containers/bags before placing them in microwave oven.
• Eggs in the shell and whole hard-boiled eggs should not be heated in
microwave oven since they may explode, even after microwave heating
has ended.
• The oven should be cleaned regularly and any food deposits should be
removed.
• Failure to maintain the microwave oven in a clean condition could lead
to deterioration of the surface that could adversely affect the life of
the appliance and possibly result in a hazardous situation.
• Do not use the microwave oven cavity for storage purposes.
• The appliance is not intended to be operated by means of an external
timer or separate remote-control system.
• Steam cleaners should not be used to clean the microwave oven.
• The contents of feeding bottles and baby food jars should be stirred or
shaken and the temperature checked before consumption, in order to
avoid burns.
• Microwave heating of beverages can result in delayed eruptive boiling.
Care must be taken when handling the container.
• During use the appliance becomes hot. Care should be taken to avoid
touching hot surfaces and heating elements inside the microwave oven
and vents should not be covered.

5
• The microwave oven should not be placed in any cabinets or units
unless cabinet or unit has been approved to house a microwave.
• Touching some of the internal components can cause serious
injury. Do not disassemble this appliance.
Precautions to Avoid Possible Exposure to Excessive
Microwave Energy
1. Do not attempt to operate this microwave oven with the door open
since this can result in harmful exposure to microwave energy. It is
important not to break or tamper with the safety interlocks.
2. Do not place any object between the microwave oven front face and
the door or allow soil or cleaner residue to accumulate on sealing
surfaces.
WARNING: If the door or door seals are damaged, the microwave
oven must not be operated until it has been repaired by a qualied service
technician.

6
Suitable Cookware to use in Microwaves
Cookware Microwave Safe?
Heat-Resistant Glass Ye s
Non Heat-Resistant Glass No
Glass Jars Heat-resistant only and with lid removed
Heat-Resistant Ceramics Ye s
Microwave-Safe Plastic Dish Ye s
Kitchen Paper Ye s
Metal Tray No
Metal Rack No
Aluminium Foil & Foil Containers No
Cling-lm Ye s
Oven Cooking Bags Follow manufacturers guidelines
Thermometers Microwave-safe only. Follow manufacturers
guidelines
1. The ideal material for a microwave utensil is a microwave safe transparent
plastic dish.
2. Microwaves cannot pass through metal. Metallic utensils, dishes with metallic
trim and aluminum foil should not be used.
3. Do not use recycled paper products when microwave cooking as they may
contain small metal fragments which can cause sparks and/or res.
4. Round/oval dishes rather than square dishes are recommended, as food in
the corners tends to overcook.
7
Model IG2070 & IG2807
Brand Igenix
Power Consumption (Microwave) 1100-1150W
Power Output (Microwave) 650-700W
Frequency (Hz) 50Hz
Voltage (V) 230-240V
MAFF Rating D
Product Dimensions (mm) H258 x W439 x D334
Cavity Dimensions (mm) H208 x W306 x D307
Capacity (L) 20 L
Turntable Diameter (mm) 255mm
Net Weight (kg) 1.7
SPECIFICATION
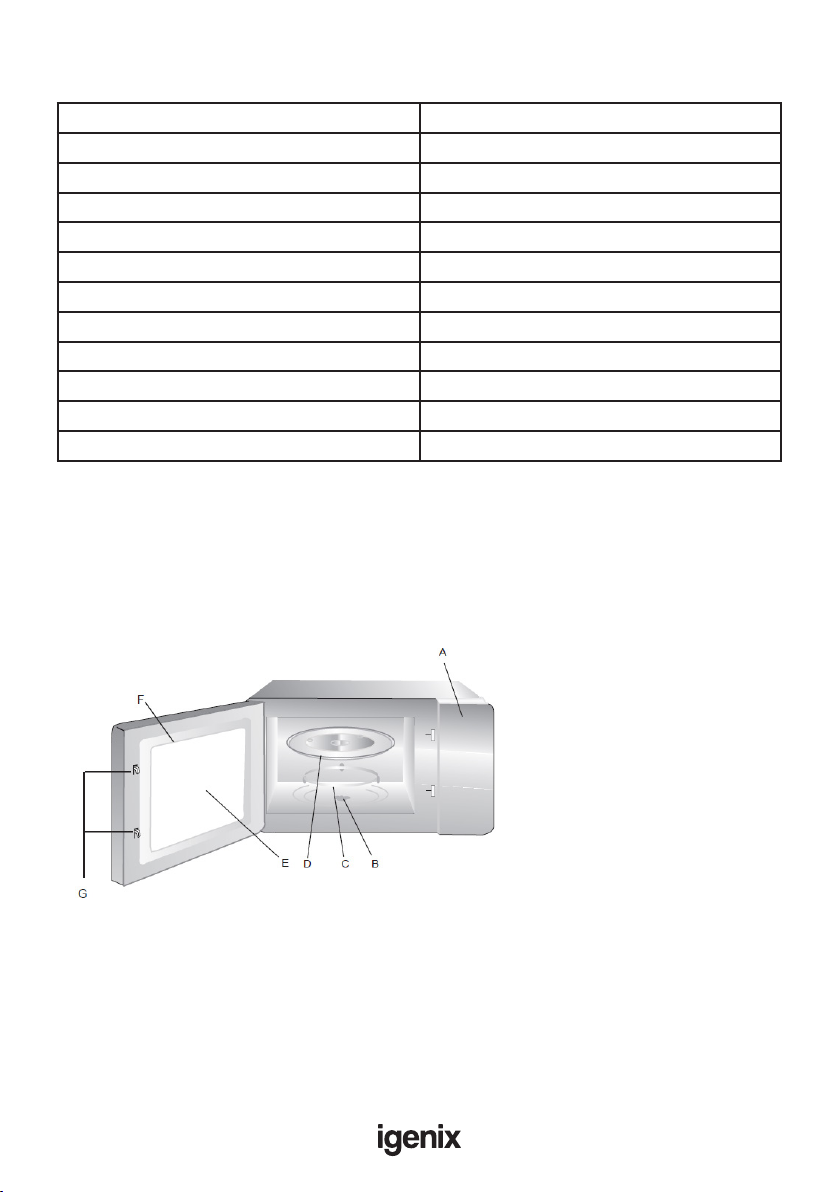
APPLIANCE OVERVIEW
A) Control Panel
B) Turntable Shaft
C) Turntable Ring Assembly
D) Glass Tray
E) Observation Window
F) Door Assembly
G) Safety Interlock System
WARNING:
Do not remove the light brown
wave guide that is attached to
the oven cavity.

8
1. Make sure that all the packing materials are removed from the inside of the
door.
WARNING: Check the oven for any damage, such as misaligned or bent door,
damaged door seals and sealing surface, broken or loose door hinges and latches
and dents inside the cavity or on the door. If there is any damage, do not operate
the oven and contact our Customer Service Dept.
2. This microwave oven must be placed on a at, stable surface to hold its
weight and the heaviest food likely to be cooked in the oven.
3. Do not place the oven where heat, moisture, or high humidity are generated,
or near combustible materials.
4. For correct operation, the oven must have sufcient airow. Allow 20cm
of space above the oven and a minimum of 10cm between all sides and any
adjacent walls. Do not cover or block any openings / vents on the appliance.
5. Do not remove feet.
6. Do not operate the oven without glass tray, turntable ring, and shaft in their
proper positions. Never place the glass tray upside down. A cracked glass tray
or turntable ring must be replaced before use.
7. Place the oven as far away as possible from radios and TV’s as it can cause
interference.
8. Make sure that the power supply cord is undamaged and does not run under
the oven or over any hot or sharp surface.
9. Plug the oven into a standard household power outlet. Ensure that the
voltage and frequency of the outlet is the same as the oven.
10. The socket must be readily accessible so that it can be easily unplugged in an
emergency.
WARNING: Do not install the oven over a range cooker top or other heat
producing appliance. If installed near or over a heat source the oven could be
damaged and the warranty will be void.
SETTING UP THE APPLIANCE

9
OPERATING INSTRUCTIONS
Power
Timer
1. Set the cooking power by turning the
Power dial to the required level according
to the food manufacturer’s guidelines.
2. Set the cooking time by turning the Timer
dial to the required time according to the
food manufacturer’s guidelines.
3. The microwave oven will automatically
start cooking after the power level and
time has been set.
4. When the timer has nished an audible
alert will be heard.
5. The oven can be stopped at any time by
manually returning the timer to ‘0’ or
opening the oven door.
• Always ensure that the oven is switched to the ‘0’ position when not in use
• Never operate the oven without food inside.
Power Levels
Power Setting Output Level
Low 17%
M. Low - Defrost 33%
Medium 55%
M. High 77%
High 100%

10
CLEANING AND MAINTENANCE
Be sure to unplug the appliance from the power socket.
1. Clean the cavity of the microwave oven with a slightly damp cloth.
2. Clean turntable and any accessories in warm soapy water.
3. The door frame, door seal and neighboring parts must be cleaning carefully
with a damp cloth.
4. Do not use harsh abrasive cleaners or sharp metal scrapers to clean the
microwave oven door since they can scratch the surface, which may result in
shattering of the glass.
5. Cleaning Tip – To easily clean the cavity walls of any food deposits: Place half
a lemon in a bowl, add 300ml (1/2 pint) water and heat on 100% microwave
power for 10 minutes.Then wipe clean using a soft, dry cloth.
11
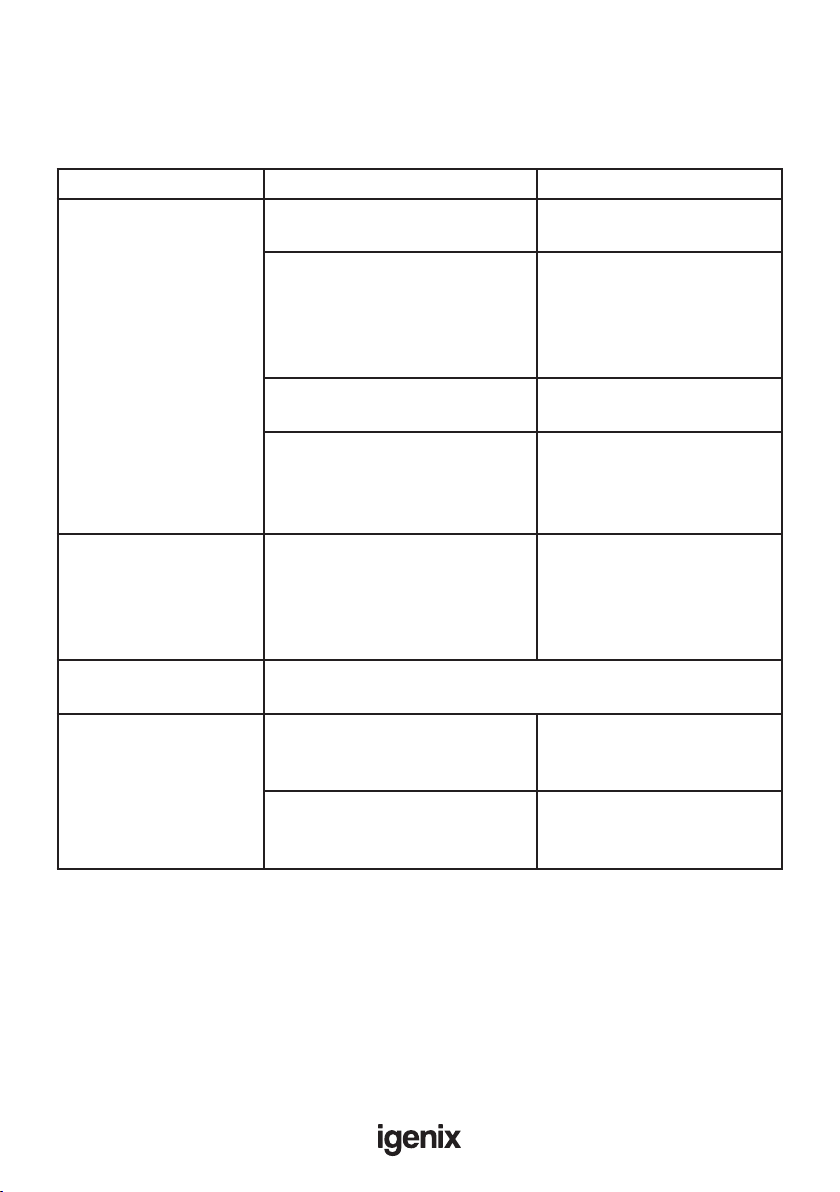
TROUBLE SHOOTING GUIDE
If you experience difculties with the appliance, please check the suggestions below
before contacting customer services on 01473 271272:
Problem Possible Cause Possible Solution
The appliance does not
work.
Not plugged in and/or switched
on at the mains power outlet.
Check that the appliance is
plugged in and switched on.
The door is not closed
correctly.
The appliance will not
operate unless the door is
sealed correctly. Check that
there is no obstruction to
the safety interlock.
Cooking time not set. Set the timer to the
required cooking time.
Fuse blown or tripped main
circuit breaker.
Check the fuse in the plug
top. Check the fuse board
in the house and reset if
necessary.
Sparking inside the
cavity.
There is metal inside the cavity. Remove any metal utensils.
Do not use tin foil to cover
food. Ceramic dishes with
a metallic trim should not
be used.
Steam accumulating
around door and vents.
It is normal for some foods to generate steam.This is not a
fault and will clear when the appliance cools down.
Glass turntable
making a noise whilst
operating.
The turntable shaft and
roller ring are not assembled
correctly.
Assemble correctly
according to the
instructions.
Dirt underneath roller ring
affecting movement.
Ensure the oven cavity is
kept clean and free of any
food debris.

12
DISPOSAL INFORMATION
The European Directive 2012/19/EU on Waste Electrical and
Electronic Equipment (WEEE), requires that old household
electrical appliances must not be disposed of in normal unsorted
municipal waste.
Old appliances must be collected separately in order to optimise
the recovery and recycling of the materials they contain and reduce the impact
on human health and the environment.
The crossed out “wheeled bin” symbol on the product reminds you of your
obligation, that when you dispose of the appliance it must be separately collected.
Consumers should contact their local authority or retailer for information
concerning the correct disposal of their old appliance.
MAINS PLUG FUSE REPLACEMENT
Fuse Cover
Fuse Replacement (Class I)
This appliance must be earthed. Remove the fuse cover
with a small at head screw driver. Take out the fuse and
replace with a new fuse of the same Amp. Replace the
fuse cover and push back into place.

13

14
lgenix Warranty Terms & Conditions
This product is guaranteed for a period of 12 months as standard from the date of purchase
against mechanical and electrical defects. You can extend your warranty for a further 12 months by
registering your product.
Upon registration we will cover your product for a period of 24 months from the original purchase
date against any mechanical or electrical defects.
To qualify for the guarantee, the product must be used for domestic household use only and in
accordance with the instructions in the user manual.Any misuse of the product will result in the
warranty being void.
The guarantee does not cover accidental damage, misuse, neglect, tampering or incorrect
adjustment or installation.
The guarantee will be rendered invalid if the product is resold, has had its serial number removed
(or has an invalid serial number), or if an unauthorised person has carried out any repairs or
alterations.
The warranty does not cover accessories or consumable parts that require replacement under
normal use. This includes shelving, dials, lters, belts and trays etc.
In the unlikely event of a breakdown please refer to the Troubleshooting guide in your user manual
and check all plugs, fuses and the electricity supply.
If you still require assistance please contact our Customer Service department on
01473 271 272 or write to us at the following address:
Customer Service Department
38 Bluestem Road, Ransomes Europark
Ipswich, IP3 9RR
Please quote the Product Code which begins ‘IG’ or ‘DF’ and the Batch Coder beginning ‘5’ and give
details of the exact fault. We will then decide whether to repair or replace the item.
Before we arrange the repair or replacement you will be required to return a copy of your proof
of purchase. Please retain your original.
If an item is replaced within the agreed guarantee period, the guarantee for the replacement item
will be calculated from the purchase date of the original.
In the event that the product is inspected and no fault is found or the product is not within the
guarantee period you will be charged for the repair and any carriage costs.

15
Thank you for choosing lgenix
As a valued customer we would like to offer you a FREE 2 year warranty to cover your product
against any electrical or mechanical defects.
This means that in the unlikely event you develop a fault or problem with your product we will
happily repair or replace the item free of charge.
To qualify for the 2 year warranty you must register your product within 30 days of purchase.The
full Terms & Conditions of our warranty policy are shown on the opposite page.They are also
available on our website. www.igenix.co.uk
To register your product, please complete all sections of the form below and return to us at the
following address: lgenix, 38 Bluestem Road, Ransomes Europark, Ipswich, IP3 9RR.
Alternatively you can visit the lgenix website and complete the form online.
Customer Details:
Title: First Name Surname:
Address:
Post Code:
Email:
Telephone:
Product Information:
Product Code (Beginning IG or DF): Product Description:
Batch Number (Beginning 5): Serial Number (If applicable):
Date of Purchase:
Retailer Name:
Retailer Location:
Please tick here to conrm you have read and accept our Terms & Conditions
Please tick here if you DO NOT wish to receive marketing information from us
Customer Signature: Date:

38 Bluestem Road, Ransomes Europark, Ipswich, IP3 9RR
Tel. 01473 271 272
Disclaimer: Igenix operate a policy of continual improvement and development.
We therefore reserve the right to change/alter the specication and appearance of our appliances without prior notice.
All diagrams and images shown in this manual are for illustration purposes only.
Other manuals for IG2070
1
This manual suits for next models
1
Table of contents
Other iGenix Microwave Oven manuals

iGenix
iGenix IG3095 User manual

iGenix
iGenix IG2810 User manual

iGenix
iGenix IGM0820SS User manual

iGenix
iGenix IGM0820W User manual

iGenix
iGenix IG2980 User manual

iGenix
iGenix IG2070 User manual

iGenix
iGenix IG2095 User manual

iGenix
iGenix IG1750 User manual

iGenix
iGenix IGM0821SS User manual

iGenix
iGenix IG2071 User manual


Popular Microwave Oven manuals by other brands


Kenmore
Kenmore 721.62752 Use & care guide

Kenmore
Kenmore SPACEMASTER 85210 Installation instructions manual

Daewoo
Daewoo KOR-220SDF Service manual

Sammic
Sammic MO-1000M instruction manual

Fulgor Milano
Fulgor Milano F6PSPD30S1 Instructions for installation and use

Kenmore
Kenmore 721.8758 Series Use & care guide


