IGM LAGUNA AFlux 12 User manual
Producer:
Laguna Tools Inc
744 Refuge Way, Suite 200
Grand Prairie, Texas 75050
USA
Phone: +1 800-234-1976
Website: www.lagunatools.com
Distributor:
IGM nástroje a stroje s.r.o.
Ke Kopanině 560, 252 67, Tuchoměřice
Czech Republic, EU
Phone: +420 220 950 910
Website: www.igmtools.com
2022-01-03
151-AFlux12 LAGUNA Air Filter Manual EN v1.8 A4ob
AFlux 12
www.igmtools.info
PDF ONLINE
Air Filter
Operating Instructions

-2-www.igmtools.com
I
/
�.

-3-www.igmtools.com
Contents
1. Declaration of Conformity
1.1 Warranty
2. Safety
2.1 Safety Guidelines - Denitions
2.2 Important Safety Instructions
2.3 General Safety Rules
2.4 Air Cleaner Safety Rules
2.5 Power Connections
3. Specications
3.1 Technical data
4. Setup
4.1 Contents
4.2 Unpacking
4.3 Setup Options
5. Operation
6. Maintenance
6.1 Cleaning Procedure
7. Service
7.1 Parts List
1. Declaration of Conformity
We declare that this product is in compliance
with the Directives and Standards on page 10
of this manual.
1.1 Warranty
IGM Tools & Machinery strives to always
deliver high-quality machinery. The warranty
is governed by the valid terms and conditions
of IGM Tools & Machinery available at
www.igmtools.com.
2. Safety
Read and understand all warnings and
operation instructions before using any tool
or equipment. Always follow basic safety
precautions to reduce the risk of personal
injury. Improper operation, maintenance or
modication of tools or equipment could
result in serious injury and property damage.
There are certain applications for which tools
and equipment are designed. This product
should NOT be modied and/or used for
any application other than for which it was
designed. It is important for you to read and
understand this manual. The information it
contains relates to protecting your safety and
preventing problems.
2.1 Safety Guidelines - Denitions
This manual contains information that is
important for you to know and understand.
This information relates to protecting your
safety and preventing equipment problems.
To help you recognize this information, we use
the symbols below. Please read the manual
and pay attention to these sections. These
could be information and recommendations on
dangerous situations that may occur. These
situations could result in death or serious
injury. The instructions also contain some
recommendations from our technicians.
2.2 Important Safety Instructions
Read and understand all warnings and
operating instructions before using this
equipment. Failure to follow all instructions
listed below, may result in electric shock, re,
and/or serious personal injury or property
damage. Woodworking can be dangerous
if safe and proper operating procedures are
not followed. As with all machinery, there are
certain hazards involved with the operation of
the product. Using the machine with respect
and caution will considerably lessen the
possibility of personal injury. However, if normal
safety precautions are overlooked or ignored,
personal injury to the operator may result.
Safety equipment such as guards, push sticks,
hold-downs, feather boards, goggles, dust
masks and hearing protection can reduce your
potential for injury. But even the best guard
won’t make up for poor judgment, carelessness
or inattention. Always use common sense
and exercise caution in the workshop. If a
procedure feels dangerous, don’t try it. Figure
out an alternative procedure that feels safer.
REMEMBER: Your personal safety is your
responsibility. This machine was designed
for certain applications only. We strongly
recommend that this machine not be modied
and/or used for any application other than that
for which it was designed. If you have any
questions relative to a particular application,
do not use the machine until you have rst
contacted the manufacturer to determine if it
can or should be performed on the product.
If you have any questions relative to its
application do not use the product until you
have contacted the manufacturer and we have
advised you.
2.3 General Safety Rules
Failure to follow these rules may result in
serious personal injury. For your own safety,
read and understand the instruction manual
before operating the unit. Learn the unit’s
application and limitations as well as the
specic hazards peculiar to it.
1. Approach your work with a safe attitude!
Focus. Concentrate on what you’re doing, and
don’t get distracted. Distraction causes injury
• Follow the proper safety procedures.
• Don’t rush. Take the time to do things correctly
and using the right guard or personal protective
equipment (PPE). Is saving a few minutes
worth a lifelong injury?
• Work responsibly.
• Don’t gamble. A one-in-a-thousand risk is
not worth the possible cost.
2. Give the work your undivided attention.
3. Wear safety glasses with side shields
when the shop is in operation, wherever you
are working, not just when you are using a
machine yourself. Glasses should be ANSI
Z87.1 rated.
4. Protect your hearing. Hearing protection is
required in the CNC Shop area. However, it is
a good idea to use hearing protection anytime
when working in the shop. Consider using
other personal protective equipment (PPE),
such as a mask or respirator when working in
dusty conditions.
5. Do not wear open-toed shoes, sandals, or
ip-ops when working in the shop.
6. Ask for help. Unless you are sure that you
know what you are doing and can handle it
yourself, ask the foreman or another member
for help.
7. If it’s broken, don’t use it. Replace all
broken parts.
8. Tidy up after you set up. Clear the work
area of any wrenches, chuck keys or other
adjustment tools before turning on a machine.
9. Don’t force it. If you need to use excessive
force with any woodworking machine,
something is wrong. Stop and consult the
shop foreman.
10. Unplug it. Always disconnect the power
before changing a blade or performing any
other maintenance operation.
11. Use the correct guard. Before using any
power tool, be sure all guards are in place
and working properly.
12. Clean up. When you are through with any
machine or hand tool, clean the work area
with brush, broom and dustpan or vacuum,
and put away whatever you took out.
2.4 Air Cleaner Safety Rules
Do not use this unit to dissipate fumes or
smoke. Explosions or re can result. This
dust collector is intended for use where only
dry airborne dust is present. Its use should
be limited to non- explosive, non-metallic
atmospheres.
Failure to follow these rules may result in
serious personal injury.
Do not use this unit to lter metal dust.
Combining wood and metal dust can create
an explosion or re hazard.
This unit is intended to lter non explosive
atmospheres only.
1. Do not operate this unit until it is
completely assembled and installed
according to the instructions. A unit incorrectly
assembled can cause injury.
2. Obtain advice from your supervisor,
instructor, or another qualied person if you
are not thoroughly familiar with the operation
of this unit. Knowledge is safety.
3. Follow all wiring codes and recommended
electrical connections to prevent electrical
shock or electrocution.
EN - English
Operating Instructions (Laguna Original)
Dear Woodworker,
Thank you for your purchase and welcome to the Laguna Tools group of discerning woodworkers. We understand that you have a
choice of where to purchase your machines and appreciate the condence you have in the Laguna Tools brand.
Every machine manufactured by Laguna Tools has been carefully designed and well thought through from a woodworker’s
perspective. Through hands-on experience, Laguna Tools is constantly working hard to make innovative, precision products.
Products that inspire you to create works of art, are a joy to run and work on, and encourage your performance.

-4-www.igmtools.com
4. Do not pull the machine by the power cord.
Don’t let that the power cord came in contact
with the sharp tools or edges, hot surfaces
or grease. On the power supply do not place
any heavy objects on the cable. Damage the
power cord may be injured electric current.
5. Support this unit or securely clamp it to the
work surface when it is used in a portable
application to eliminate potential injury and/or
damage from falling.
6. Ensure that the intake and exhaust areas
are clear prior to starting the unit. Clogged
intakes or exhausts can cause an explosion
and/or re.
7. Keep arms, hands, and ngers away from
the fan. Avoid all exposure to rotating parts to
prevent injury.
8. Do not operate this unit without the dust
lters in place and properly secured. Sawdust
and other debris can provide the potential
for re and/or explosion and can also cause
inhalation problems.
9. Maintain the unit in top condition. Clogged
lters can increase the potential for re or
explosion. Follow all instructions for changing
and cleaning lters.
10. Store this unit in a location that eliminates
the potential for damage to the power cord.
A damaged power cord can cause shock or
electrocution. Safely store power cord on the
unit to eliminate tripping hazards.
11. Turn the unit “o” and disconnect the unit
from the power source before installing or
removing accessories, before adjusting or
changing set-ups, or when making repairs.
An accidental start- up can cause serious
injury.
12. Turn the unit “o”, disconnect the unit
from the power source, and clean the table/
work area before leaving the area.
2.5 Electricity connection
We recommend connecting the machine to
electrical circuit with fuse 16A. Before
connect the machine to the mains to make
sure they are switches in the “OFF” position.
Do not expose or use the machine to rain
in humid places.
Noise Emissions
Given that there exists a relationship
between noise level and exposure times,
it is not precise enough to determine the
need for supplementary precautions. The
factors aecting the true level of exposure
to operators are clearly the amount of time
exposed, the characteristics of working
environment other sources of dust and noise
etc. For example, adjacent machines in
other words the level of ambient noise. It is
possible that exposure level limits will vary
from country to country.
Hazardous Dust Information
Drilling, sawing, sanding or machining wood
products can expose you to wood dust, a
substance known to the State of California
to cause cancer. Avoid inhaling wood dust
or use a dust mask or other safeguards for
personal protection. For more information go
to http://www.szu.cz/.
Save these instructions.
Refer to them often and use them to
instruct others.
3. Specications
3.1 Technical Data
Power requirements
230V / 50Hz / 1 Ph
Amperage 2.5 A
Dimensions W x L x H
(610mm x 712mm x 305mm)
Weight: 25,4 kg
Shipping weight: 28.6 kg
Motor: 150 W
Air ow 917, 1244, 2038 m3/hod
Noise 55.6, 56.1, 59.6 dB
Filter cycle
room 6x6x2,5 m - 10, 14, 22x/hour
Outer lter
5 micron - 310x610x25 mm
Inner lter
1 micron washable electrostatic
- 310x610x310 mm
Filter bag material Polyester
Timer settings 1/2, 2 and 4 hours
Control On Board Panel & Remote Control
2x batteries
4. Setup
3 Speed Ambient Air Cleaner with Electrostatic
Filter is specically designed to quietly circulate
and lter non- metallic dust which is generated
throughout the work area. The Air Cleaner is
furnished with two lters: an outer lter which
lters particles that are ve microns and larger,
and a secondary disposable lter that captures
91% of the dust particles that are one micron
and larger (one micron = one millionth of a
meter).
Because breathing microscopic particles
can be a potential health hazard, ltering
microscopic dust particles oers a cleaner and
safer environment. This Air Cleaner will lter
the air in a room measuring 6 x 6 x 2,5 m either
13, 16, or 18 times an hour, depending on the
setting. If desired, multiple units can be used to
lter larger areas. An occasional cleaning and/
or replacement of lters is the only required
maintenance.
4.1 Content
Air Filtration Unit
(4) Rubber Feet
(4) Ceiling Mount O-Screws
(4) Ceiling Mount nuts
(2) Batteries for Remote, Remote
4.2 Unpacking
Do not lift the air cleaner by the power cord.
The Air Cleaner is shipped complete in one
shipping container. Carefully unpack the Air
Cleaner and all loose items from the shipping
container.
Styrofoam blocks have been packed
inside the unit for protection. Remove
these blocks prior to use.
To Remove:
1. Disconnect unit from power source.
2. Remove outer lter by lifting on the bottom
and pulling out.
3. Remove inner lter by lifting on the bottom
and pulling out.
4. Remove Styrofoam blocks and replace
lters.
4.3 Setup Options
For operator safety, clamp the unit to a work
bench or position it securely on sawhorses.
IMPORTANT: When determining where
to mount the air cleaner, always select a
location where the air ow is unrestricted.
Do not locate the unit in a corner or near any
heating or cooling vents.
Locate (4) rubber feet supplied with the
unit. Carefully place the Air Cleaner on a
rm supporting surface with access to the
bottom of the cabinet. Apply a self- adhesive
rubber foot to the bottom at each corner of
the air cleaner cabinet. The rubber feet will
help eliminate vibration and will prevent the
possibility of the air cleaner “walking” across
the oor or work surface.
The air cleaner cabinet has convenient lifting
handles located on either side. To avoid
damage to the air lters, carry the air cleaner
with the lters positioned away from your
body.
Mounting air cleaner to the ceiling or
overhead support
This unit weighs approximately 29 kg.
When mounting overhead, be certain that the
unit is securely fastened and supported.
Never secure the air cleaner hardware to
drywall, drop ceiling tile/frame, or other non-
structural members.
Do not use rope, cable or power cord to
suspend the unit from the ceiling. Use chain
rated for a minimum of a 70 kg working load.
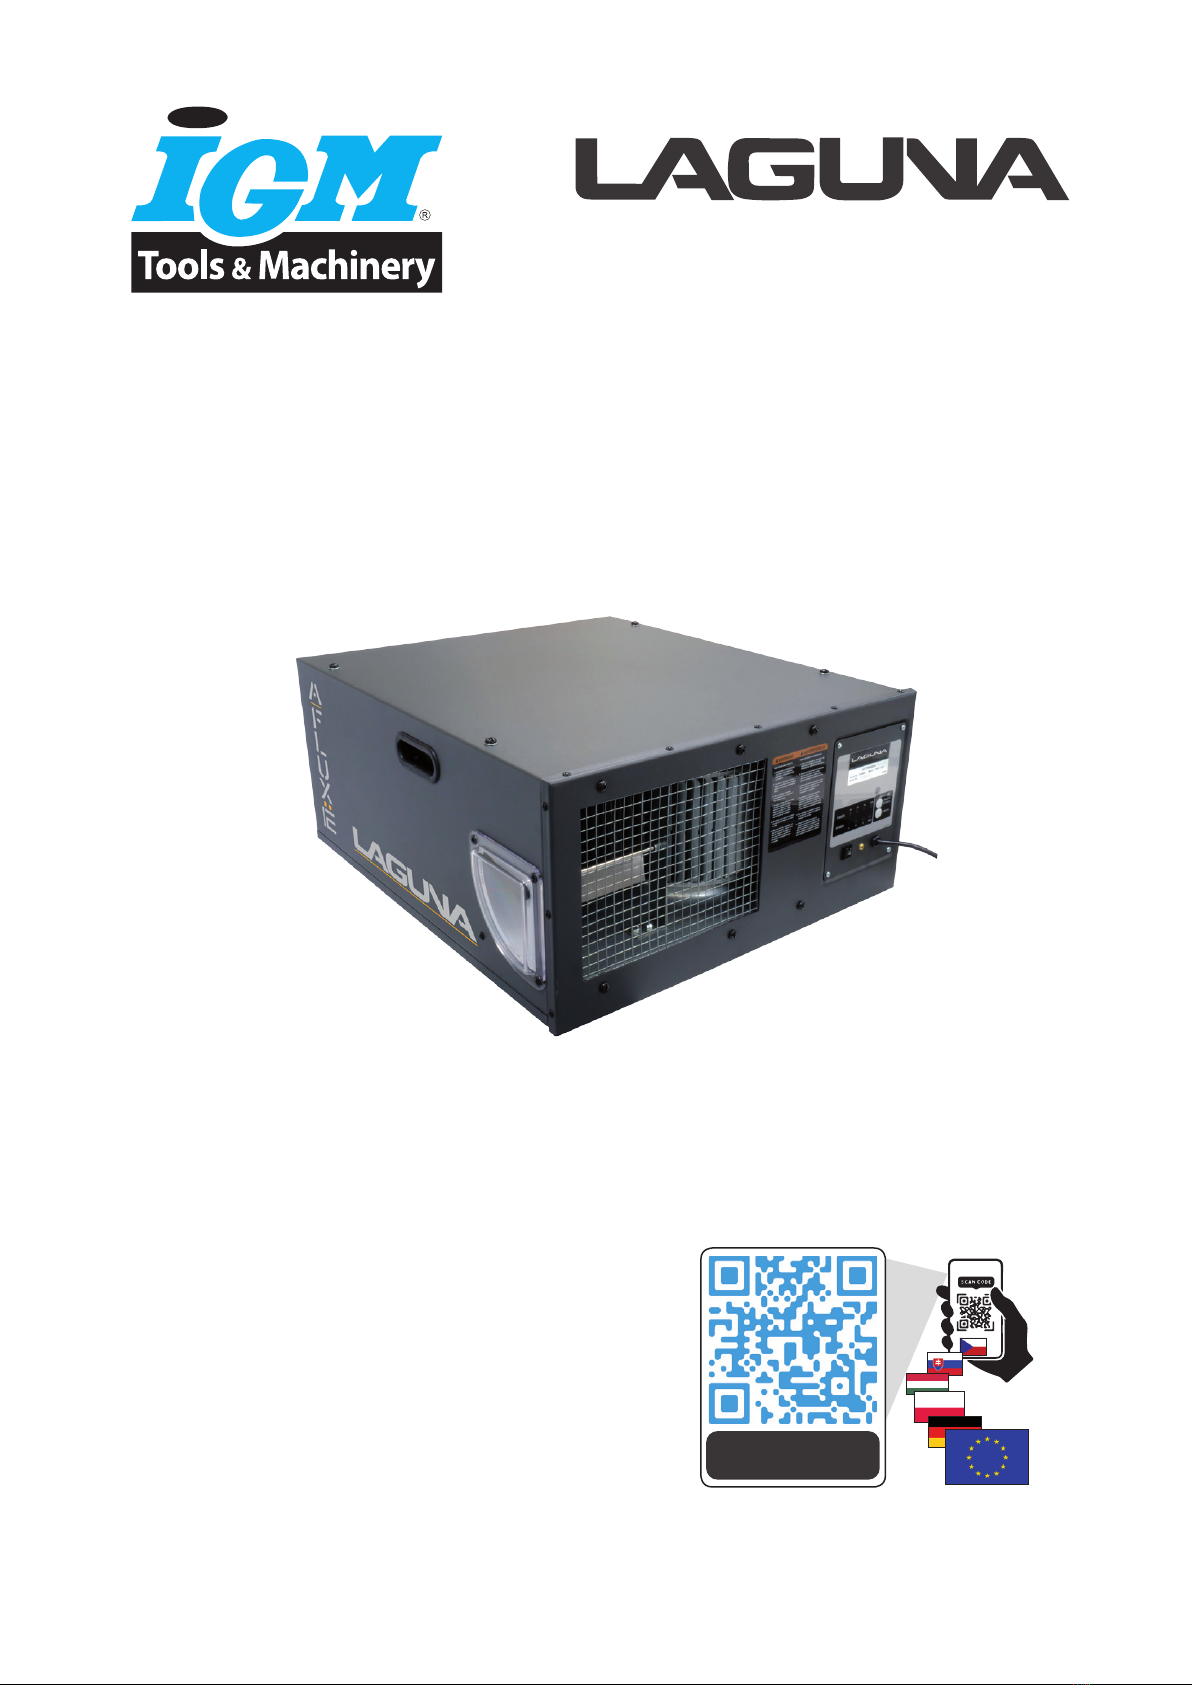
1. Locate the four eye bolts and the four
ange nuts supplied with the unit.
2. Use a at blade screwdriver (not supplied)
to remove the four screws from the top of air
cleaner.
3. Thread one ange nut on each bolt
approximately 1 cm.
-5-www.igmtools.com
151-AFLUXIF
3 BAG FILTER
151-AFLUXOF
ELECTROSTATIC FILTER
4. Thread the eye-bolts into the four holes
where the screws were removed in STEP 2.
Be certain that the ange nuts are tightened
against the surface of the air cleaner.
When suspending the air cleaner from the
ceiling or other overhead support, use steel
s-hooks that are a minimum of 1 cm.
Thread all lag hooks at least 4 cm into the
supporting structural members.
5. Operation
The air cleaner may produce a slight odour
for the rst few hours of operation due to the
protective coating which is applied to internal
components. This odour will dissipate and
should be disregarded. The 3 Speed Ambient
Air Cleaner with Electrostatic Filter can be
used in application where non-metallic dust
is a factor.
Onboard Control
To reduce the risk of re or electric shock, do
not use this unit with any solid-state speed
control device.
TIMER: Displays the current timing setting
SPEED: Displays the current speed setting
Manual – ON/OFF SPEED: Toggles between
on, low speed, medium speed, high speed,
o.
Manual – TIMER: Toggles between 1/2h, 1h,
2h, 4h, o.
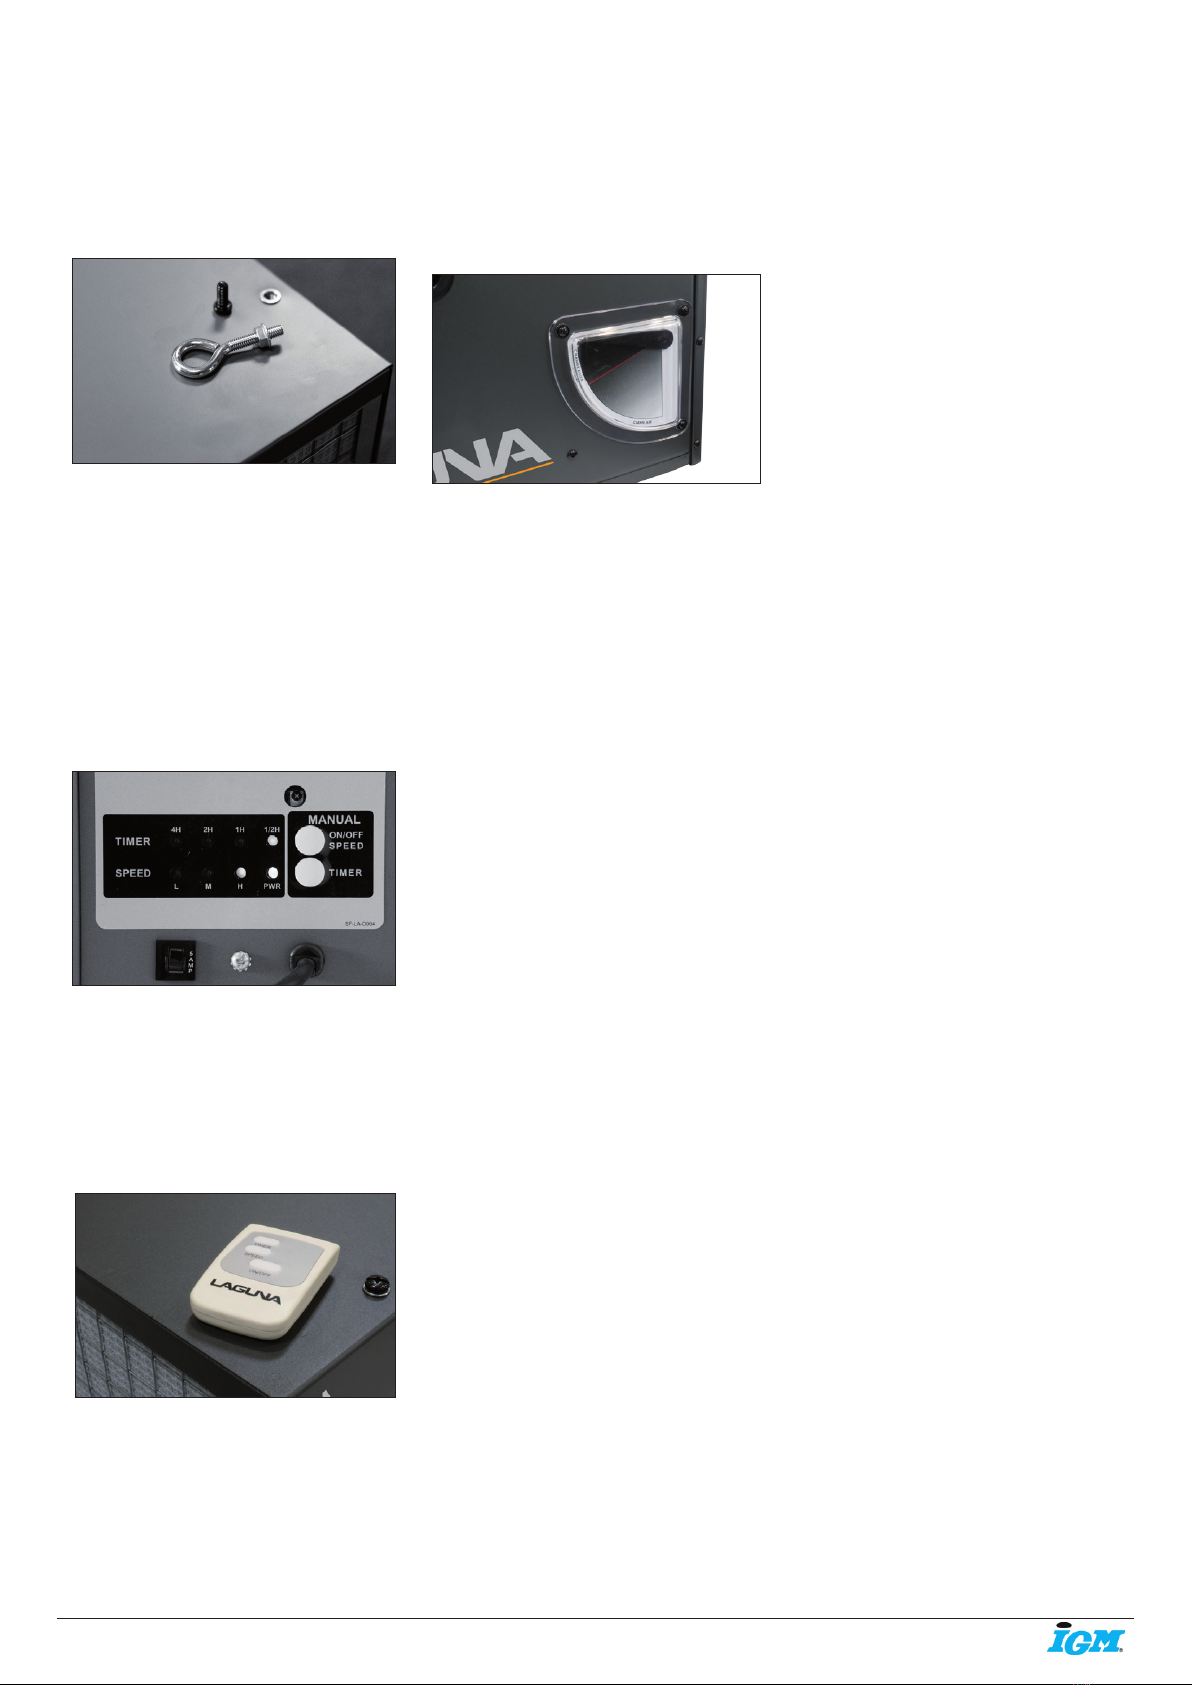
Remote Control
Timer: Toggles between 1/2h, 1h, 2h, 4h, o.
Speed: Toggles between low speed, medium
speed, high speed, o.
ON/OFF: Power
6. Maintenance
6.1. Changing an
d Cleaning Filters
When cleaned as directed, your electrostatic
air lter will give you many years of trouble-
free use. Failure to properly clean the lter
may lessen lter eectiveness, and as with
any air lter, it is possible for an excessive dirt
buildup to cause air ow resistance enough
to damage other ventilation components.
Depending on your specic situation the lter
should be cleaned every 4-6 weeks.
There is an “air ow” indicator located on the
left side of the unit. To check the lters, turn the
unit “ON”. If the indicator points to “green”, the
lters are clean.
6.2 Cleaning Procedure
1. Turn the unit “OFF”.
2. Remove the outer rst stage lter by lifting
and pulling out on the bottom of the lter.
3. Rinse thoroughly to remove remaining dirt.
4. Drain excess water, let air dry, and reinstall.
5. Replace the lter, turn the unit “ON”, and
check the air ow indicator again.
6. If the air ow indicator points to “green”, the
inner lter is still usable. If the indicator points
to “red”, remove the outer lter, then remove
the inner lter by lifting and pulling out on
the bottom of the lter. DO NOT try to clean
the inner lter. It is disposable and must be
replaced.
7. After replacing the inner lter, reinstall the
outer lter.
NOTE: The 3 bag lter is very durable. The
material is multiple layers synthetic microber.
The synthetic microber builds up in non-woven
layers to ensure multi-layers buildup and
eliminate ber shedding.
This bag lter is not washable. Clean it
up by compressed air periodically or by
vacuum light brush (recommended once per
month).
Then you can repeat to use it till it is clogged
up by the dusts and the air ow is reduced
obviously.
Replacement 3 bag lters (151-AFLUXIF) are
available from www.igmtools.com.
7. Service
To order parts, call the store you purchased
it from.
7.1 Parts List
P-6142422021
REMOTE CONTROL
P-603065326002
POWER CORD
P-6011110107001016120
MOTOR
P-2SF-C80-021
FAN/IMPELLER
P-2043154
PCB CONTROL BOARD
P-6020604102
5A RELAY

IGM nástroje a stroje s.r.o., Ke Kopanině 560,
Tuchoměřice, 252 67, Czech Republic, EU
+420 220 950 910,www.igmtools.com
© 2022 IGM nástroje a stroje s.r.o.
Other manuals for LAGUNA AFlux 12
1
Table of contents
Popular Air Cleaner manuals by other brands


AllerAir
AllerAir AirTube Junior Series Operation and maintenance manual

HealthWay
HealthWay NR-20600-3NR Operation manual

Sharper Image
Sharper Image 203182 user guide

GMC
GMC GMC500AP user manual

Surgically Clean Air
Surgically Clean Air DE 2.0 Operation manual

Periso
Periso SOLS Propacare JoyBion 400 User manual and maintenance