iGuardFire iGuardStove Owner's manual

User & Online Features Manual
For Electric Stoves
1
In order to take advantage of these features your
iGuardStove
must first be connected to your
home’s wireless Wi-Fi router and connected to your
iGuard
Online Account.
Please go to page 6 of this manual and follow the instructions on how to connect your
iGuardStove.
TABLE OF CONTENTS
Getting Started
Page 1
Basic Install & Specifications
Page 2
Quick Install
Page 3
Wireless Setup
Page 3
Device Menu Options
Page 4
Operating the iGuardStove
Page 5
ONLINE FEATURES
Register New Account Page 5
Sign In/Login Page 5
Home Page Page 6
Audio Visual Reminders Page 6
Add your
iGuardStove
to your Online Account Page 6
Identification Page 6
Auto Shut Off Timer Page 7
Manual Timer Page 7
Child Lock Page 7
Late Night Lock Page 8
Caregiver Lock Page 8
Additional Features Page 8
Shut Off Odometer Page 8
Room Temperature Alerts Page 9
History Calendar View Page 9
History Daily View Page 10
Activity Monitors –Daytime & Nighttime Page 10 & 11
Contacts List Page 11
Commercial Account Add a Manager Page 12
Manager Permission Page 12
Manager Permission (cont.) Page 13
What’s in the Box
1- Control Panel 1- Power
Box
1- Network Cable
& Ferrite donut
2- Screws
15” of Wire
Channel
WARNING
The iGuardStove must ONLY be connected to a 125-250 VAC grounded 4 prong range wall
outlet.
CAUTION
Do not mount control panel:
•Directly above the heat source where hot air or steam will come in contact
•On or above a microwave or toaster oven
•Directly on or above the stove
INSTALLATION REQUIREMENT
No electrician is required to install the device and only a Philips screwdriver is needed to mount
the Control Panel.
Operating Note:
Hidden Caregiver Lock -If you press and hold the middle button for 5seconds the device will
completely lock you out from all use.To unlock lock it press and hold the the button for 5seconds
again.You can use this to take control of the device so only you can activate the stove.Activate
this feature while no one is watching you, as you do not want them to figure out how to defeat this.
Menu Lock -There is also an option to LOCK access to the Menu.Please contact us and we will email
you instructions.We didn’t want to put the code in this manual in case it gets discovered by curious
eyes.
IMPORTANT
Read This Manual Before Installing
When properly cared for, your new iGuardStove has been designed to be safe and reliable.
Do not disassemble any of the components. There are no user serviceable parts inside.
Note:
The iGuardStove electric models were tested at above rated amperage and 115%above
rated voltages non-stop for 30,000 cycles over aperiod of 1.5 days straight while in aconstant
71C/160Fambient temperature.
Getting Started
NOTES
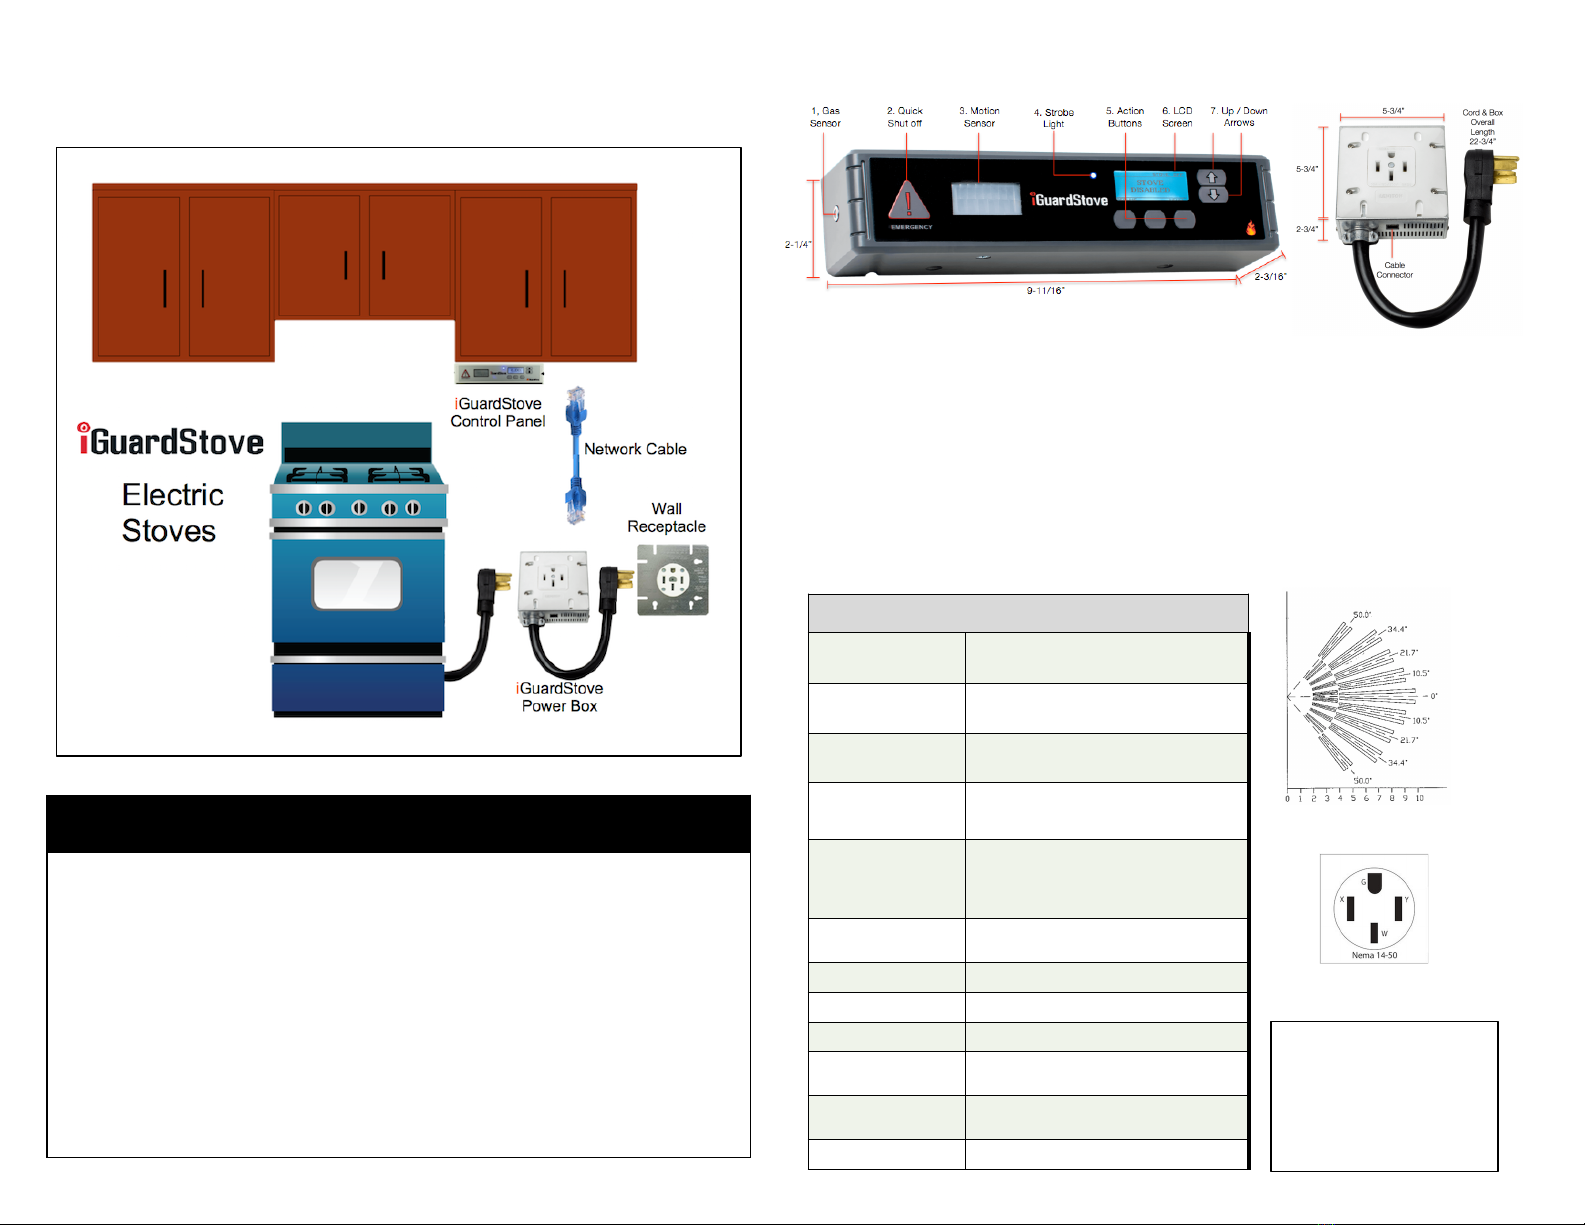
Basic Install Layout & Specifications
This is a pictorial of how the gas
iGuardStove
will install into the stove’s electrical and cupboards.
2
Control Panel
1. Gas Sensor –This sensor looks for unburned gas and will immediately shut off the valve,
Record an online event and send atext alert.(Gas iGuardStoves only)
2. Emergency Quick Shut Off –Will immediately shut the stove off and sends atext alert when
connected to the Internet
3. Motion Sensor -Looks for motion and controls the countdown timer
4. LED Strobe -For the Hearing Impaired (See Audio Visual Reminders section of the manual)
5. Action Buttons -Each button’s action is “Situational” and changes depending on the feature
that is displayed on the LCD screen directly above the button.(The middle button doubles as
the hidden “Caregiver Lock”. Also see Online Features manual)
6. LCD Display Screen –Shows various messages and the status of the iGuardStove
7. Up Down Arrows -These buttons allows you to move the screen cursor or for selecting the
amount of time in the Manual Timer.
Specifications
Control Panel 9-11/16"W x 2-1/4"H x 2-3/16"D
Electric Power Box 5-3/4"W x 5-1/2"H x 2-1/2"D
Wattage Draw 5 Watts
Supply Voltages Input: 125/250 VAC 50 Amp Max
Output: 125/250 VAC 50 Amp Max
Plugs and
Receptacles
NEMA 14-50 Standard Receptacle
Power Box has 12” cord plug
Operating
Temperature Approx. -40F -140F (-40C -60C)
Wi-Fi 2.4 GHZ ~ 2.5 GHZ
Cables Included 10’ Cat5e Cable with RJ45 ends.
Firmware Updateable: Requires a Wi-Fi connection
Default Settings 5 min. Auto Shut Off Timer & 4hr. Manual
Timer
Certifications CSA C22.2 No. 205 & UL 2017
QAI File # E10697
Warranty 1 Year Standard
Power Box
Motion Sensor Pattern
(Approx. Distances in feet)
50amp Wall Outlet
Pin Configuration
Contains Transmitter
Module:
FCC ID: AZY-HF-LPB100
IC ID: 12243A-HFLPT1001
This iGuardStove device
complies with ICES-003 and
FCC Part 15 rules.
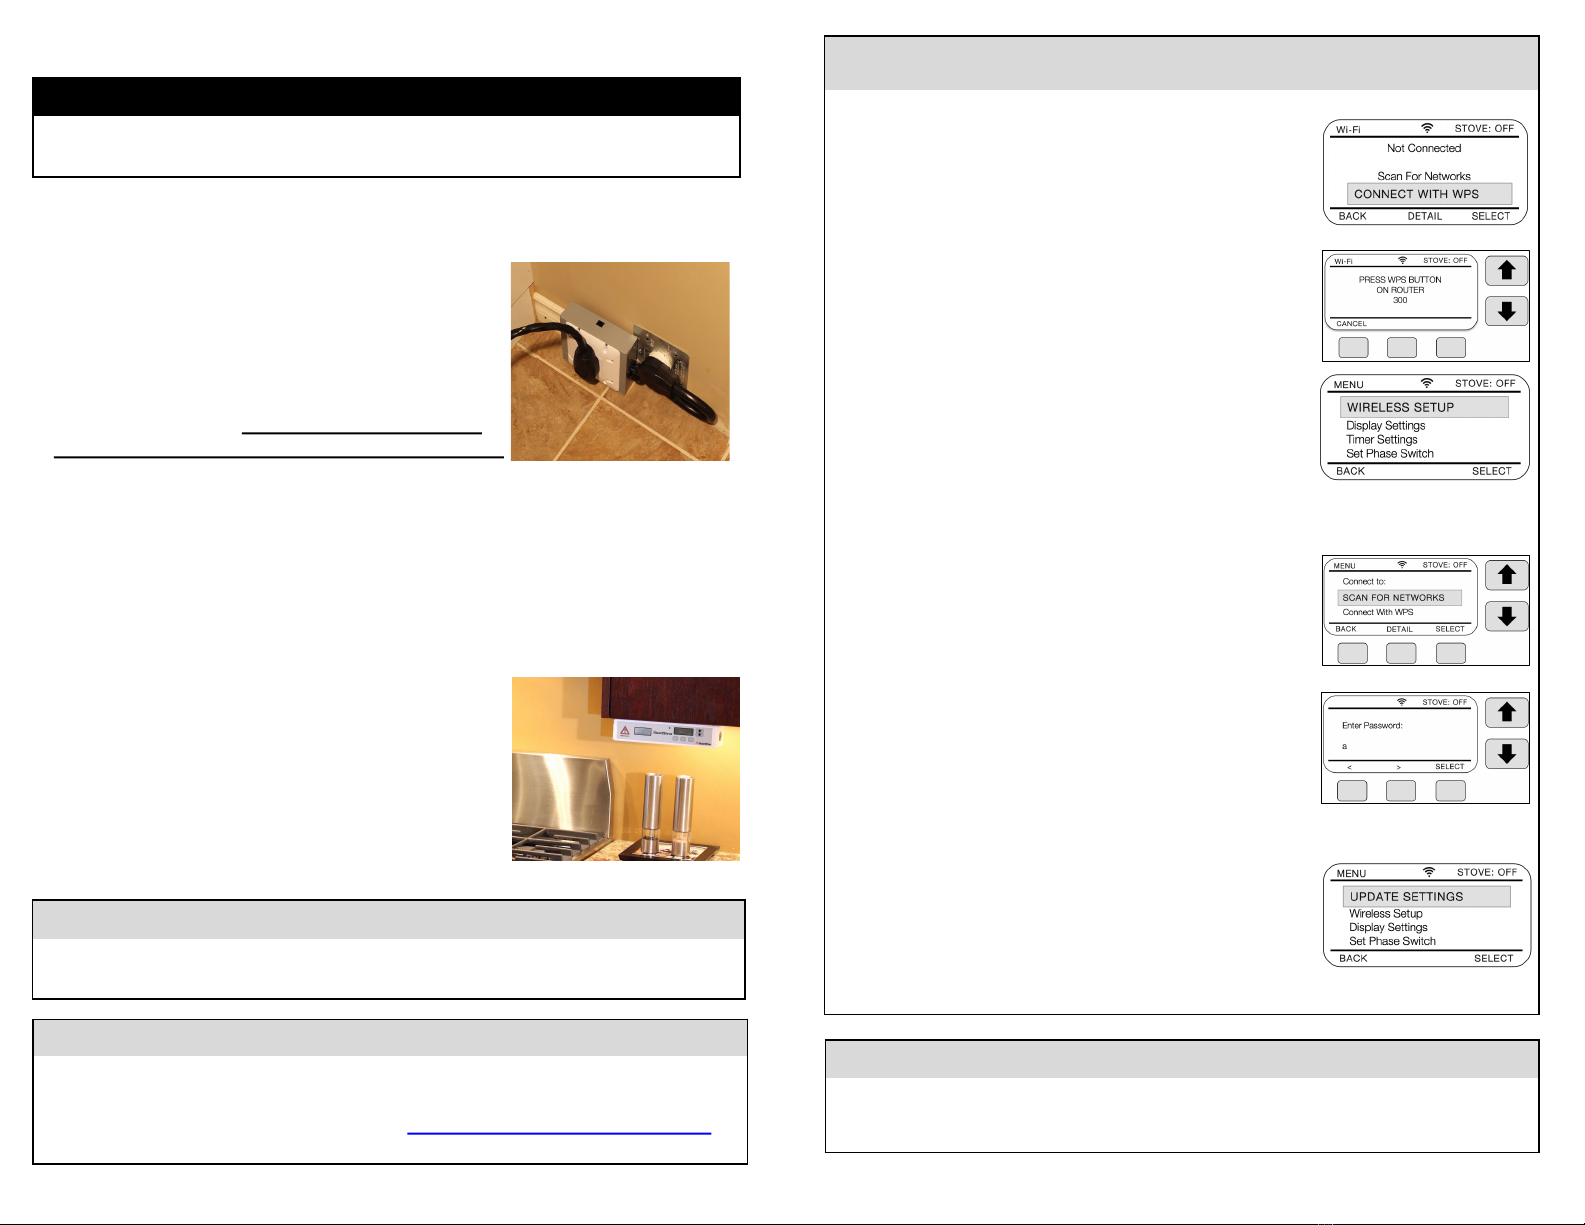
Quick Install Guide
1. Pull the stove away from the wall and unplug stove from wall outlet.
2. Plug
iGuardStove
power box into the wall outlet.
3. Plug the stove cord into the
iGuardStove
power box.
4. Connect one end of the network cable into the
iGuardStove
power box and connect the other end
of the network cable into the back of the
iGuardStove
control panel.Be sure to snap the included black
Ferrite donut around the network cable close to the control panel.
5. Make sure the
iGuardStove
power box and cables are out of the way and against the back
wall, and then slide the stove back into place.
6. If you need to secure the network cable against the wall from the countertop up to the
underside of the upper cabinet use the plastic wire channel with apeel and stick backing that’s
in the box.Its also works well if you can hide the wire behind the gyprock or inside the wall.
7. Use the 2screws to mount the
iGuardStove
control
panel underneath the upper kitchen cabinet beside the
stove and close to the front where the motion sensor
has agood view of the cooking area and is easy to
reach.
Do not mount above the stove or in other hazardous
spots.
8. Turn the stove’s main breaker back on and you
are ready to cook.
WARNING
Ensure that the stove is off and fully cooled down.
Turn off the stove’s main breaker.
FINAL STEP
The installation of your
iGuardStove Intelligent
is complete! To open your
ONLINE ACCOUNT
go to
our website www.iGuardFire.com and under the
Owners
tab on the main menu click on
How To
Set Up Your Online Account
or type in this address http://iguardfire.com/set-up-online-account/ in
your browser.
3
Wireless Setup
(A) WI-FI WPS AUTOMATIC CONNECTION
For newer routers you can use the very simple WPS
(Wi-Fi Protected Setup) feature.Simply press and hold the Menu
Button for 2seconds to enter into the Menu and down to Wireless
Setup and then chose Connect with WPS option.
Press “Select” and then press the WPS button on your router and
then wait until they connect.
(B) Wi-Fi MANUAL CONNECTION METHOD
Scroll to
Wireless Setup
using the !"arrows and choose “
Select
”.
Choose
Scan for Networks
.Choose your network and then “
Select
”.
Then enter your password using the !"arrows to select the digit or
number and then move to next digit using the >button of the left and
middle buttons.
Do not press ACCEPT until the final step. After a successful
connection use “
Back
” to get to Main screen
To confirm that the device is connected properly go back into the
Menu and now the very first Menu option should be “Update
Settings”.If you do not see this then you need to try to connect it
again but before you do that you could try to unplug the power to the
iGuardStove for 5seconds and then power it back up.If not then try
to reconnect using methods Aor Bagain.
Operating Note:
•After you turn the stove off the “
Protection Enabled
”mode will disappear in 3or 4minutes.
•Pressing the “
Emergency
”button will instantly shut the stove off.(To resume cooking press
“
Reset
”to turn the stove back on.)
Handy Tip:
The
iGuardStove
works best when the motion sensor has the best view of the highest traffic area in
the kitchen. Mount the control panel on the side of the stove that will see the most motion.

Device Menu Options
To access the settings press and hold the Menu button for 2 seconds
1. UPDATE SETTINGS
Once changes are made to the Settings in your Online Account it may
take up to 30 minutes to load the updates to the iGuardStove.
To do this immediately press and hold the Menu button for 2seconds to
enter the Menu.Then select
Update Settings
.
After it is confirmed that the update is successful you can back out by
using the
Back
button.
2. MANUAL TIMER
If you Have disabled the Manual Timer using the Online Account and the
button is hidden from the screen but you can still access it locally using
the devices Menu option.This is handy when you have the Menu locked.
3. WIRELESS SETUP –See page 6
4. DISPLAY SETTINGS
Choose Select to enter Display Settings
Adjust the settings to your desired effect using the !"arrows.Use
the “
Next
”button to move from Brightness to Contrast.
When you are happy with your choice use the “
Back
”button to return to
the
Main
screen
5. TIMER SETTINGS
*If you are connected to the Internet then refer to page 13
If you have NOT connected your device to the homes Wi-Fi you will see
this option in the Menu.The
Timer Settings
allow you to change the
default times of both
Manual
and
Auto
timers.While inside
Menu
use the
!"arrows to scroll down to
Timer Settings
and press “
Select
”.
There are two choices -Auto &Manual
To set the
Auto Shut Off
time select Set
Auto Time Out.
Use the ! " arrows to select between 1and 15 minutes for the
Auto
Shut Off
time.Use “
Back
”to accept the new time.
To set the maximum time the
Manual
timer can be adjusted to use
Maximum Timer.
Use the ! " arrows to select what ever time you
need.Use “
Back
”to accept the new time.
Note:If you choose to disable the Manual timer then press the
⬇
button
until the screen reads Timer Disabled.To re-enable press the
⬆
button.
Handy TIP:
There is away for you to LOCK the Menu from unwanted access.It involves asequence of button
presses to unlock it.We don’t put those instructions in this manual to prevent curious minds from
discovering the secret.
If you want the instructions simply email us and we will send them to you.
4
6. SET PHASE SWITCH
iGuardStove
has the ability to turn off the stove without killing power to the
clock.But each stove is different as to how this is accomplished.
The
Phase Setting
may have to be changed from
Phase A
to
Phase B
depending on the brand of stove you use.
Once the
iGuardStove
has shut off the stove check to see if the clock
remains on.If not then try the next setting and that should solve the issue.
If needed change the
Phase Setting
and retest the stove to see if the clock
stays on.
7. ALERT SETTINGS –(If connected to Wi-Fi refer to page 11)
If you have NOT connected your device to the homes Wi-Fi you will see
this option in the Menu.You can choose to have an
Alert Reminder
beep
5seconds before the device will shut off the stove.Go to
Alert Settings
and choose “
Select”
to toggle between on and off.The factory default is
Off
.The Intelligent model is customizable between 3and 30 seconds.
8. MENU ENTRY MODE
There are 3different ways for you to access the Menu including aLOCK.
It involves asequence of button presses to unlock it.We don’t put those
instructions in this manual in case the wrong eyes spot the secret.
If you want the instructions simply email us and we will send them to you.
9. ABOUT iGuardStove
This option tells you the
MAC address
and the software version
10.BYPASS iGuardStove
This allows you to disable the device and use your stove as if the
iGuardStove
was not connected.
11. RESTORE FACTORY DEFAULTS
This will erase any Internet settings and reset the device back to
Factory
Default
settings.
Handy Tip:
The
iGuardStove
works best when motion sensor has the best view of the highest traffic area in the
kitchen. Mount the control panel on the busiest side of the stove.
Operating Note:
•You can choose to activate the beep and strobe and it can warn the user before the
impending shut off of the stove.
•If the
iGuardStove
shut’s off the stove and the clock goes out then refer to “Set Phase
Switch” on page 6.
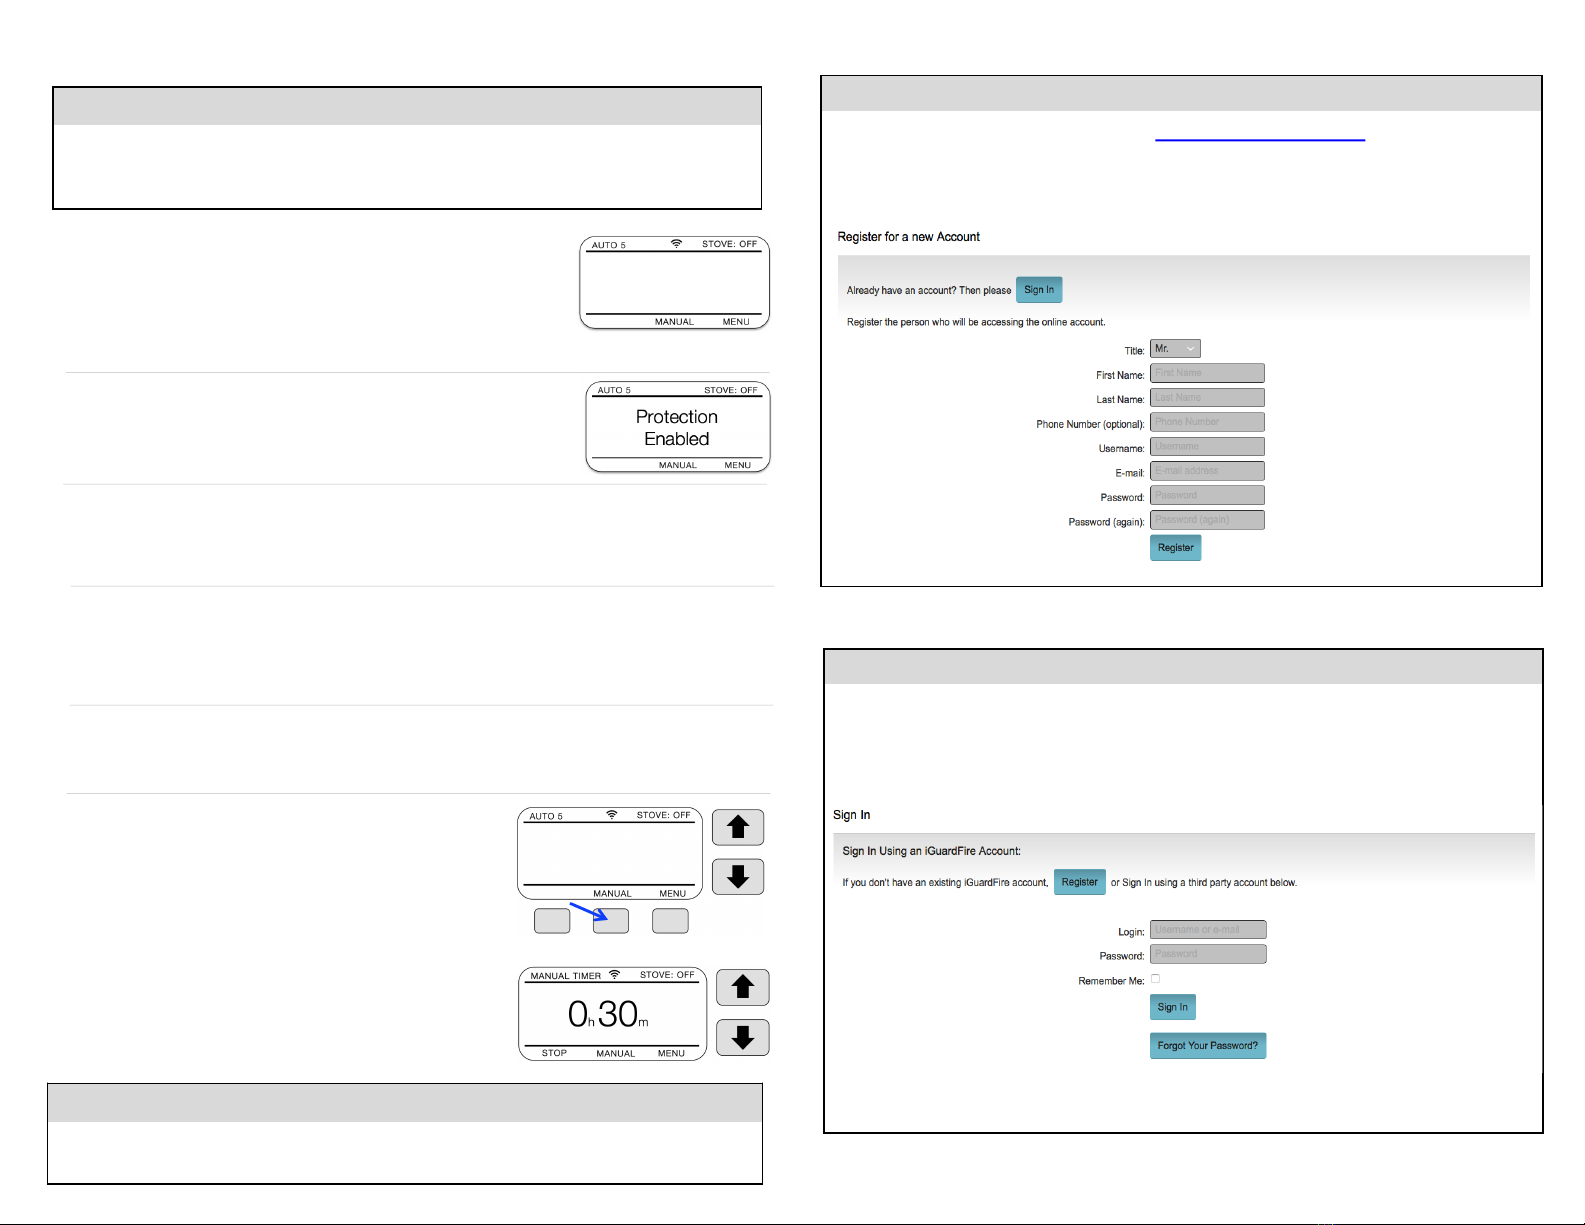
Register a New Account
To Register or Open your new account go to https://manage.iguardfire.com where you will see this
screen example below. Just fill in the information and then choose “Register” at the bottom.
When adding aPhone Number use your cell phone if you want to get text alerts.Otherwise leave it
blank.It can be added later.
Sign In After Account is Open
After your account has been created sign in using your newly created log in information.Check the
“Remember Me” box and then click “Sign In”.Once you arrive at the Home page don’t forget to
bookmark that page and then every time you go to the bookmark you will go directly to the Home
page without having to Login.
Online Features
5
Important Note:
The Manual Timer has the same effect as disabling the Auto Shut Off feature so be careful with its
use as there is no active safety feature.
1. POWER
When the
iGuardStove
is installed it is powered all the time.It draws only
5watts of power while in the standby mode so you will not need to shut it
off.In Standby/Sleep the screen is dark.
iGuardStove
will wake up and
the screen will come on when it senses you are in the area.If you are
simply coming into the kitchen for other reasons then it will work as amotion controlled night light.
2. START COOKING
Once you turn on the stove knob, the
iGuardStove
wakes up and switches
from standby into the
Automatic Shut Off
mode. The screen reads
“Protection Enabled”
. Your
iGuardStove
is now active and protecting you.
3. AUTOMATIC STOVE SHUT OFF
Your stove operates as it always did.The
iGuardStove
starts to count down when it doesn’t see you
in the sensor range (approximately 10-12 feet or 3-4m) and will shut off after the 5minutes times
out.
(Check pages 7 & 13to see how to adjust the shut off time)
4. RESUME COOKING
Upon returning to the kitchen, the motion sensor will see the user and automatically turn the stove
back on with no interaction required by the user. 2 sets of 3quick beeps will act as areminder to
the user that the device has turned the stove back on.The screen instruction will then read “
Turning
Stove Back On”
for 5seconds and then switch to “
Protection Enabled
”.
5. STOP COOKING
To stop cooking simply turn the stove knob off as you normally would and that’s it. After 4 minutes
of an inactive stove the iGuardStove will go to sleep to wait until the next time you start to cook.
6. MANUAL TIMER (This doesn’t rely on the motion sensor)
This timer allows both the oven and stovetop to be used
uninterrupted for longer cooking times than the
Automatic Shut
Off
of 5minutes.
When in
Manual
timer mode use the !"arrows to set the hours
and minutes that you want to have the stove or oven operate.
The manual timer will start to count down without pushing any other buttons. After the
Manual
timer
times out the screen instruction will display “
Timed Out Press
Reset
”. Press “Reset” puts the
iGuardStove
back to Standby.
If you don’t want someone to have the ability to override the
safety feature by using the Manual Timer then you can simply
disable the
Manual
Timer and it will disappear from the screen.
Operating the iGuardStove
BUTTON NAMES
Button names are found above the button on the LCD screen and are called “Situational” meaning
that one time the button may be labelled as a “
Back”
button and in adifferent situation it may be
labelled “
Reset”
.Look above the buttons to see the label description of how that button will react.

Home Page
Below is asample of your Home page.This sample is named Bill’s Home page and he has 3
iGuardStoves
added to his account.Each line will show from left to right the
•The name that you gave the the stove.
•The colored icon showing the current status or last action of the stove.
•The name of that status or last action.
•Then 3page buttons named History, Settings and Alerts &Contacts.
In this first stove it shows the name which is Mom’s
iGuardStove
.In the settings you can name each
stove.The colored icon shows the current status or the last action that had happened to the stove.
If you need to add devices then click the “
Add aDevice
”button at the bottom and follow the
instructions on the right side of this page.
Audio Visual Reminders
The Audio and Visual Alerts will remind you when the stove is about to shut off automatically due to
absence.If you did walk away for 5minutes it will remind you so that you can return to the cooking
area where the cooking can then continue.If you use an electric stove model the motion of you
returning will automatically turn the stove back on.If you have agas model you will need to press
the “
Resume
”button.
Typically the audio reminders are disabled from the factory and you can chose whether or not you
want the reminders turned on.
The Strobe is avisual alert which can be used for the hearing impaired.
6
Identification
On the Settings page you will find many different feature blocks. The first is the “
Identification
”
section.This is where you can change the name of your stove if needed.You also should set your
time zone of where the stove is located.This will help when you use the “
History
” tracking feature.
The dark boxes on the right are not editable and were set when you “
Added the Device
”.
Add Your iGuardStove to Your Online Account
When “
Adding
”or “
Registering
” a new device you will be asked 3 questions.The info needed for
questions #1 and #2 can be found on the box label, the back of the Control Panel or under the
“
Menu
”section in the on screen Menu and scroll down to “About
iGuardStove
”
1. The MAC address -This is similar to aserial number.Shown beside the green arrow in the
sample label)
2. The Security Code -This is the 3digit code found listed under the MAC Address.(Shown
beside the purple arrow in the sample label)
3. Name –This is where you will name your
iGuardStove
so you can identify it if you have multiple
devices.
7
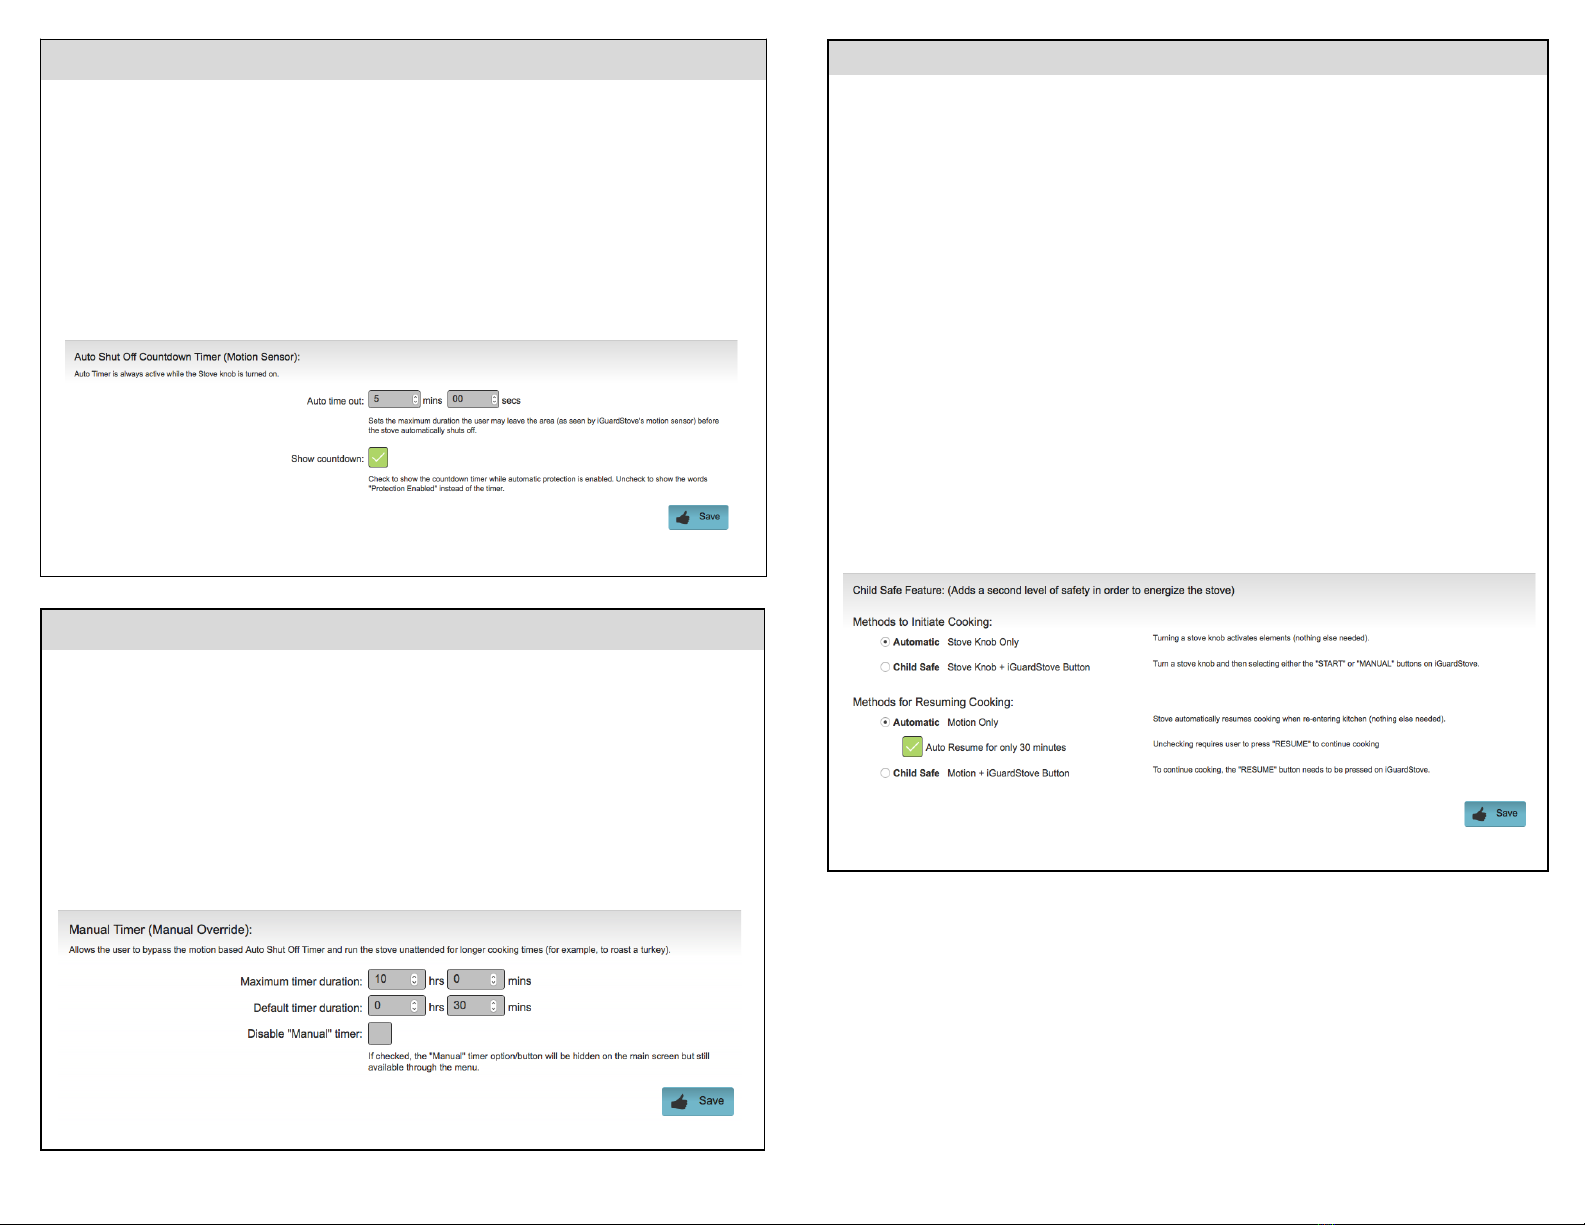
Auto Shut Off Timer
The Auto Shut Off Timer value is the amount of time you can be away from the cooking area before
the
iGuardStove
will shut off the stove automatically.The default from the factory is 5minutes.You
can adjust it anywhere between 1to 15 minutes.Please keep in mind that alot can happen when
your cooking is allowed to run unattended even for even 5minutes so keep the time shorter rather
than longer.Once this is set you won’t need to adjust it.
The “
Show Countdown
” checkbox allows the countdown timer to show on the screen instead of the
default wording of “
Protection Enabled
”. Sometimes avisible countdown timer can confuse people or
make then anxious not know what is going to happen once it zeros out.You can show the timer
initially to get used to where the motion sensor can and can’t see you by watching for the timer to
reset.
Manual Timer
The “
Manual
”timer will allow cooking to happen uninterrupted.
The “Maximum timer duration
”is any
time up to a10 hour maximum.This will allow for slow cooking times for doing a brisket or slow
roasted ribs but never more than the maximum time that you choose.
The Default time duration is simply the time that first appears when you first press “
Manual
”. The
default is 30 minutes but if you can set it to whatever time works best.Think of it as afavorite time
If you don’t want have anyone to have access to the “
Manual
”timer AT all then check the “
Disable
Manual Timer
”box and this feature will disappear from the screen and the user will be able to cook
using only the automatic safety features.
Child Lock
Typically the
iGuardStove
for electric stoves is automatic.When you turn the stove knob the stove
starts.When you return to the kitchen after its automatically shut off the stove the
iGuardStove
will
automatically turns the stove back on.In some instances you might not want the device to be so
automatic.Here are acouple examples to better explain.
To initiate cooking if you choose
“Child Lock
”, turning the stove knob will not energize the stove until
you press abutton on the Control Panel suggesting that YES you do want the stove to turn on.If
you have toddlers that like to turn knobs then this will be agreat feature to activate.
When returning to the kitchen the same action of pressing of abutton on the Control Panel will be
required EVERYTIME to resume cooking. If someone has wandered away for acouple hours and
has truly forgotten their cooking you might not want the stove to do something that they are not
suspecting which is to turn back on automatically.
The “
Auto Resume for only 30 minutes
”is part of the Auto Resume feature.This stove will only
automatically turn back on when they have returned WITHIN a30 minute period.AFTER the 30
minute period the “
Resume
”button will have to be pressed on the Control Panel.This in essence is
apartial “
Child Lock
”setting.You don’t have to press “
Resume
”every time but rather just AFTER a
30 minute period has elapsed.
Deselecting it means that the stove will “
Auto Resume
”whenever the person comes back to the
cooking area.Even after 2days as an example.Keep in mind that you might not want someone to
finish cooking something that is half cooked and has been sitting for long periods.
8
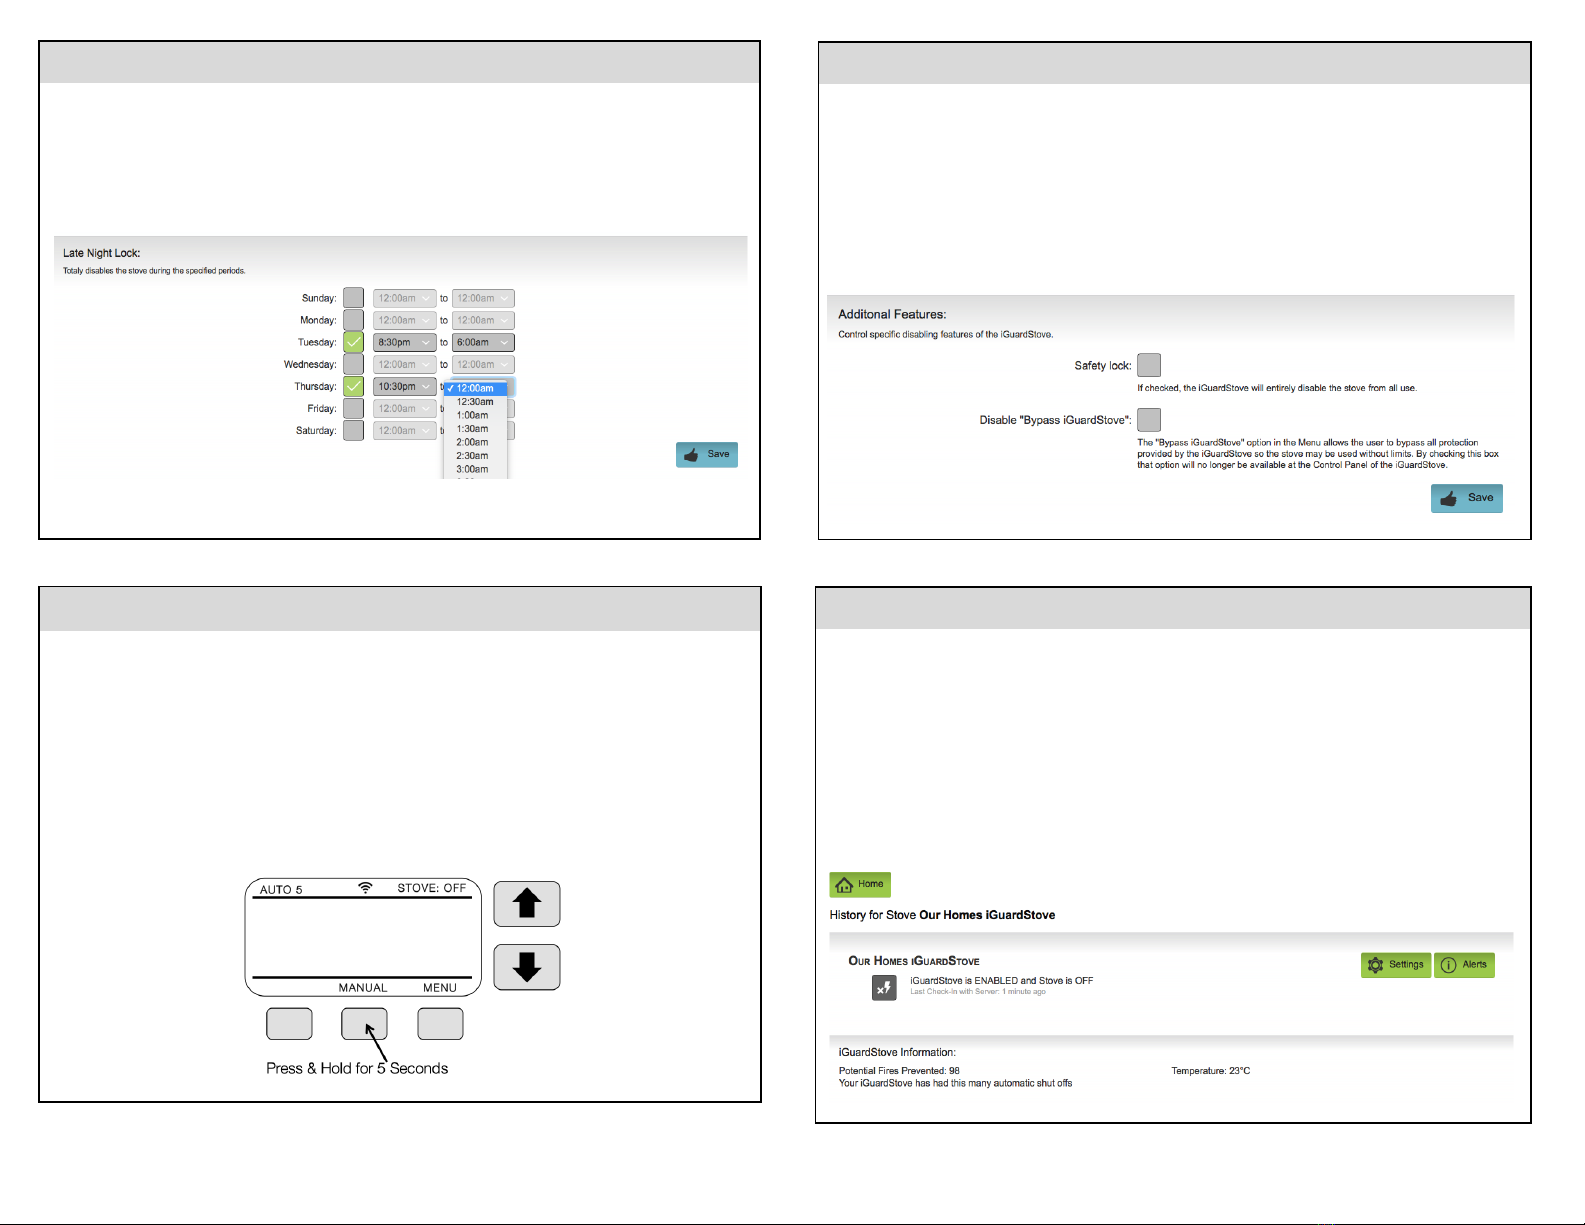
Late Night Lock
This feature allows you to disable the stove during certain hours of certain days of the week.This
will prevent someone from waking at 3am and then deciding to cook everyone breakfast and then
falling back asleep with the stove left on.
Just check the day of the week and then select to times you want the Lock to operate between.
Caregiver Lock
If at any point in time you want to lock out the device while in the home because you might have to
run out for an errand you can use this Lock.
The center of the 3buttons is labeled Manual.Press and hold that button for 5seconds to engage
the lock and the screen will now read Caregiver Lock On.
Pressing and holding the button again for 5seconds will release the lock.
NOTE:This is obviously not apassword protected lock so try to do this while no one is watching.If
you had apassword and forgot it then there is no way for that to be reversed.Typically people do
not press and hold buttons and so this level of security is sufficient.
Additional Features
There are 2additional settings:
1. Safety Lock –This will completely disable the stove from all use until you decide to
relinquish control back to the user in the kitchen.
2. Disable “
Bypass iGuardStove
” – In the devices screen Menu you will find a “
Bypass
iGuardStove
”option.This will in essence turn off our device from controlling the stove.
You MAY want to use this if you are doing big dinners and will be in the kitchen for long
periods of time.By checking this box in the Account Settings the Bypass feature will
disappear from the on screen Menu.This adds another level of protection by eliminating
the possibility that someone can override the safety features.
Shut Off Odometer
The Shut Off Odometer is an amazing feature.How it works is this.Every time the
iGuardStove
has to shut the stove off automatically it records that event here.It is arunning tally since you had
set up the device and had connected it to your online account.
In essence every time the
iGuardStove
shuts off the stove it has prevented apotential fire.As this
number grows you will begin to realize the value that the device is providing you.
Its also asimple way to see how your loved ones memory is.If this number is fairly consistent and
then starts to ramp up at some point then that would suggest that something has changed in their
lives.

9
Room Temperature Alerts
The temperature sensor is designed to warn you if the ambient temperature in the kitchen area is
getting to dangerous levels either too high or too low.This can alert you that maybe the furnace has
quit and the pipes are at risk of freezing or that the air conditioner has failed and the house is too hot
and your loved one needs to be removed from the home immediately.
Set the range that you would like by selecting the low temperature and the high temperature.Keep
in mind that it should have alarge enough spread to account for thermostats that lower the
temperature at night and other situations that affect temperature swings in the home.
The sensor is not immediate and could take up to an hour to register achange.Its not designed to
be aconstant monitoring item but rather an alert when the temperature gets drastically into an
unacceptable level.It can take many hours for outside temperatures to creep into ahome so the
one hour is fine.
The alert will appear on the Home Screen as aStatus Icon as well as in the Calendar of Events.If
you go to your Contacts in the Alert section and check off the Temperature Alert checkbox then it
will send that Contact and alert when either extreme is reached.
History –Calendar View
This Calendar view gives you aquick way to see what's been happening with the stove in the last
12 months.This example shows the “
Last 5 Weeks
”. Icons of concern are red or orange and less
important are in blues or other similar colors.Simple “
Power On
”icons are green.There is a
number in brackets beside each event telling the number of times that event occurred that day.
Clicking on aparticular day will expand the view so you can review aminute by minute detailed list
of events.Being able to monitor someone's activities with the stove can be agreat way to see how
their memory is changing so you can determine if changes in care are needed.
At aglance you can see how if loved ones are even using the stove.This is asimple way to make
sure they are eating hot meals every day.

History –Daily View
The Daily List of Events is very handy way to determine how people are interacting with the stove.
This is important as peoples memories change and can give you insights as to their activities that
no other device can.
You can see how often they are cooking and other helpful things.If you see that the stove is being
used at 3am then it is time to engage the Late Night Locks or other safety features.
Other handy indicators will show how often the cooking is being forgotten.You can also see
when the yellow “
Reset
”icon appears telling you how long they stayed away from the cooking. If
it’s 1- 6 minutes say then you can feel that they are simply being distracted maybe my the door or
phone.If you see that they are staying away for really long periods before the yellow “
Reset
”icon
appears then you know they are not just being distracted but are actually forgetting the cooking.
You can also see if they are using the “
Manual
”timer too often and can make decisions on
whether they should have that ability or you should disable it.
Lots of very helpful information can be pulled from this data over time you will find that there is no
other way to determine this information especially if you live in adifferent city.
10
Activity Monitor -Daytime
The
Daytime
and
Nighttime
Activity Monitors help you keep an eye on what's happening in the
heart of the home.We’ve heard of loved ones falling and unable to get up and going hours or
days before being discovered.Now you have amotion sensor in the heart of the home.(Keep in
mind this has nothing to do with the stove protection.Its just motion sensor based feature.)
The Daytime Monitor settings:
Choose the “
Wake Time
”that aloved one typically starts their day.
Choose aGrace Period which is the amount of time you want to expire before you are sent an
alert that there has been no motion.Example:If you set the “
Wake Tim
e” to 7:00am and the
Grace Period
to 3hours then if no motion is detected by 10:00am
an alert will be sent.
If motion is seen DURING the
Grace Period
then it simply
resets again and you will see this icon on the Event History.
If motion is seen AFTER the alert has been sent then you will see
this icon on the Event History and the Grace Period timer will reset.
Each time motion is seen the
Grace Period
gets pushed out throughout the day.In the previous
example if motion was seen at 8:45am then the
Grace Period
would continue for 3hours from
that point until 11:45am.If no motion is seen until 11:45am then an alert will be sent.If motion
was seen before the 3hour limit at say 11:30am then the 3hour
Grace Period
would start once
again until 2:30pm with no alert having been sent.
The reason it does this is because you never know when something might happen to aloved one
during the day and you don’t want only one chance to be notified.
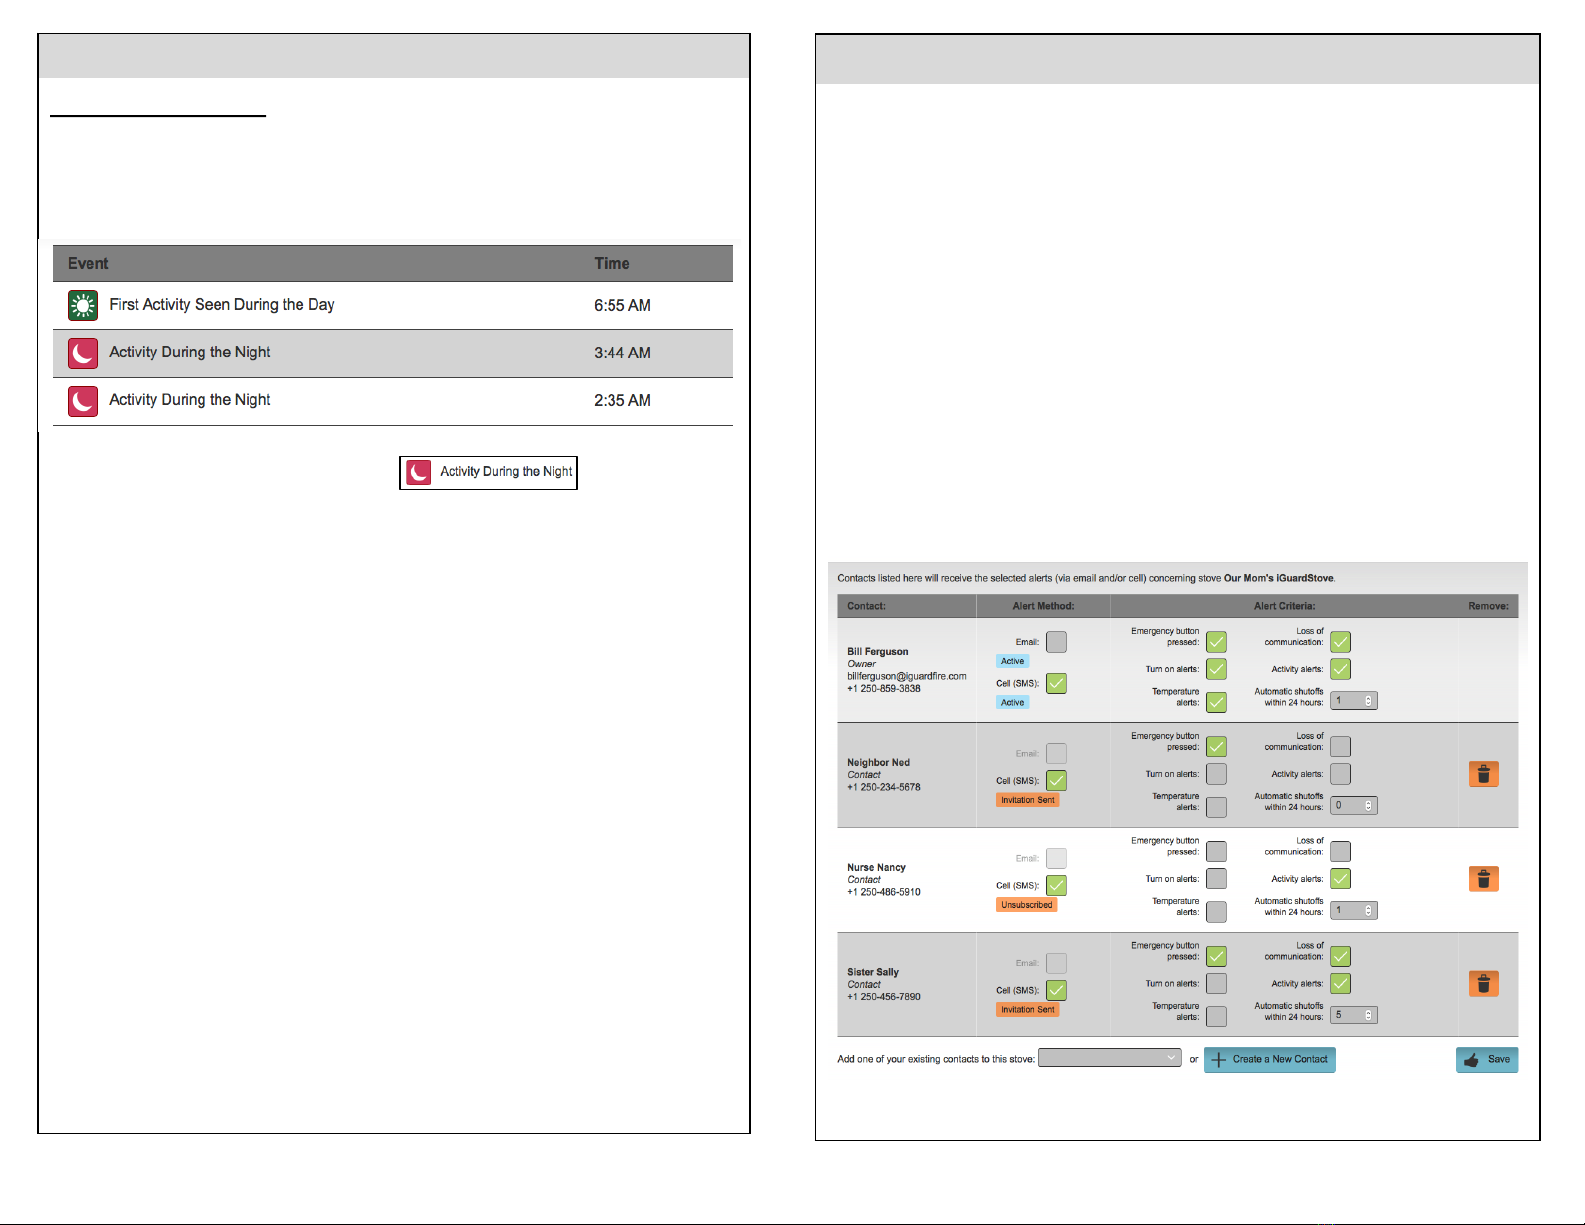
Activity Monitor -Nighttime
The Nighttime Monitor settings
:The
Nighttime
monitoring starts at the “
Sleep Time
”and ends at
the “
Wake Time
”. During the
Nighttime
the system will simply record motion that it sees.This can
help you determine if there are any sleep irregularities with your loved one.
All someone needs to do is pass through the sensor field to record an event.Only one event will
be recorded every 15 minutes.This will give you the information that you need without
overwhelming the
Events History
with too many recorded events.
For each event recorded you will see this icon
No alerts will be available for the
Nighttime
monitoring.
Tips:
-Don’t make the
Daytime Grace Period
too short or you could get alarge number of texts during
the day. 3 hours works nicely for most situations.
-If the
Grace Period
is longer than the time between
Wake
and
Sleep
then no alerts will be sent.
-You must first activate either the
Daytime
or
Nighttime
monitors in order to get the alerts, then you
must go to the
Alerts
page and select who will receive the alerts.The
Alerts
checkbox will not
appear until you activate one or both monitors.
-The times between the
Wake Time
and the
Sleep Time
is the Day hours.Everything outside those
hours are the Night times.
11
Contacts List –(Family, Friends & Care workers)
This area manages your Contacts List of who you want to receive which Alerts.They WILL NOT have
access to settings.(See Managers in next column.) In the example below you can pick certain
people to get these Alerts.The “
Alert Method
”allows to to choose the delivery method to each
person by either text, email or both.The “
Alert Criteria
”has 3choices.
1. Emergency Button
–When the Emergency button is pressed on the Control Panel the alert will
go out.If someone lives in adifferent city then it might not make sense that that person gets
this type of alert.People who might could be anext door neighbor, close friend or abuilding
manager etc.
2. Loss of Communication
–If your
iGuardStove
looses connection with the server it might be
because the router is offline or something else.The
iGuardStove
will go through aseries of
procedures over the next 6hours to re-establish communications with the server and if it can’t
restore communication the server will send out an alert stating the “
Loss of Communication
”.
The device will still operate the same manner but History will not be collected nor will you get
alerts.
3. Auto Shut Offs within 24 hours
–Someone might be having problems remembering their
cooking and getting an alert after they forget the stove 5times in one day could be helpful
information.You can roll this down to “1” if you want to get notified each time it’s forgotten.If
this is something that you don’t want then roll it up to 10 or more.
4. Turn On Alerts
–This will notify you each time the stove is turned on.
5. Temperature Alerts
–Alerts will be sent to your if either of the temperature extremes are exceed
for both hot or cold.
6. Activity Monitor
–This must be checked in order for Alerts from the Activity Monitor are to sent
to you.

Commercial Account-Add a Manager
With your Commercial Account you have the ability to add Managers who will have their own access
to the stoves and their settings.Managers can have access to settings where anormal Contact
can’t.The main profile is the account owner and the list of Managers is below that.In this example
Logan has been added as aManager
Once aManager has been added you can give them permission to either view the data, change the
settings or both.You can also choose which alerts they should receive.
12
Managers Permissions
When you click into Logan’s settings you can choose what to give him access to.In the left column
you can choose either
View Events
and/or
Change Settings.
This will limit what the
Managers
can
see and change.
You can also change which alerts they will receive and for which stoves.This will be handy if you
have different staff working different areas of the building.One staff member or manager will not get
alerts that do not relate to them.
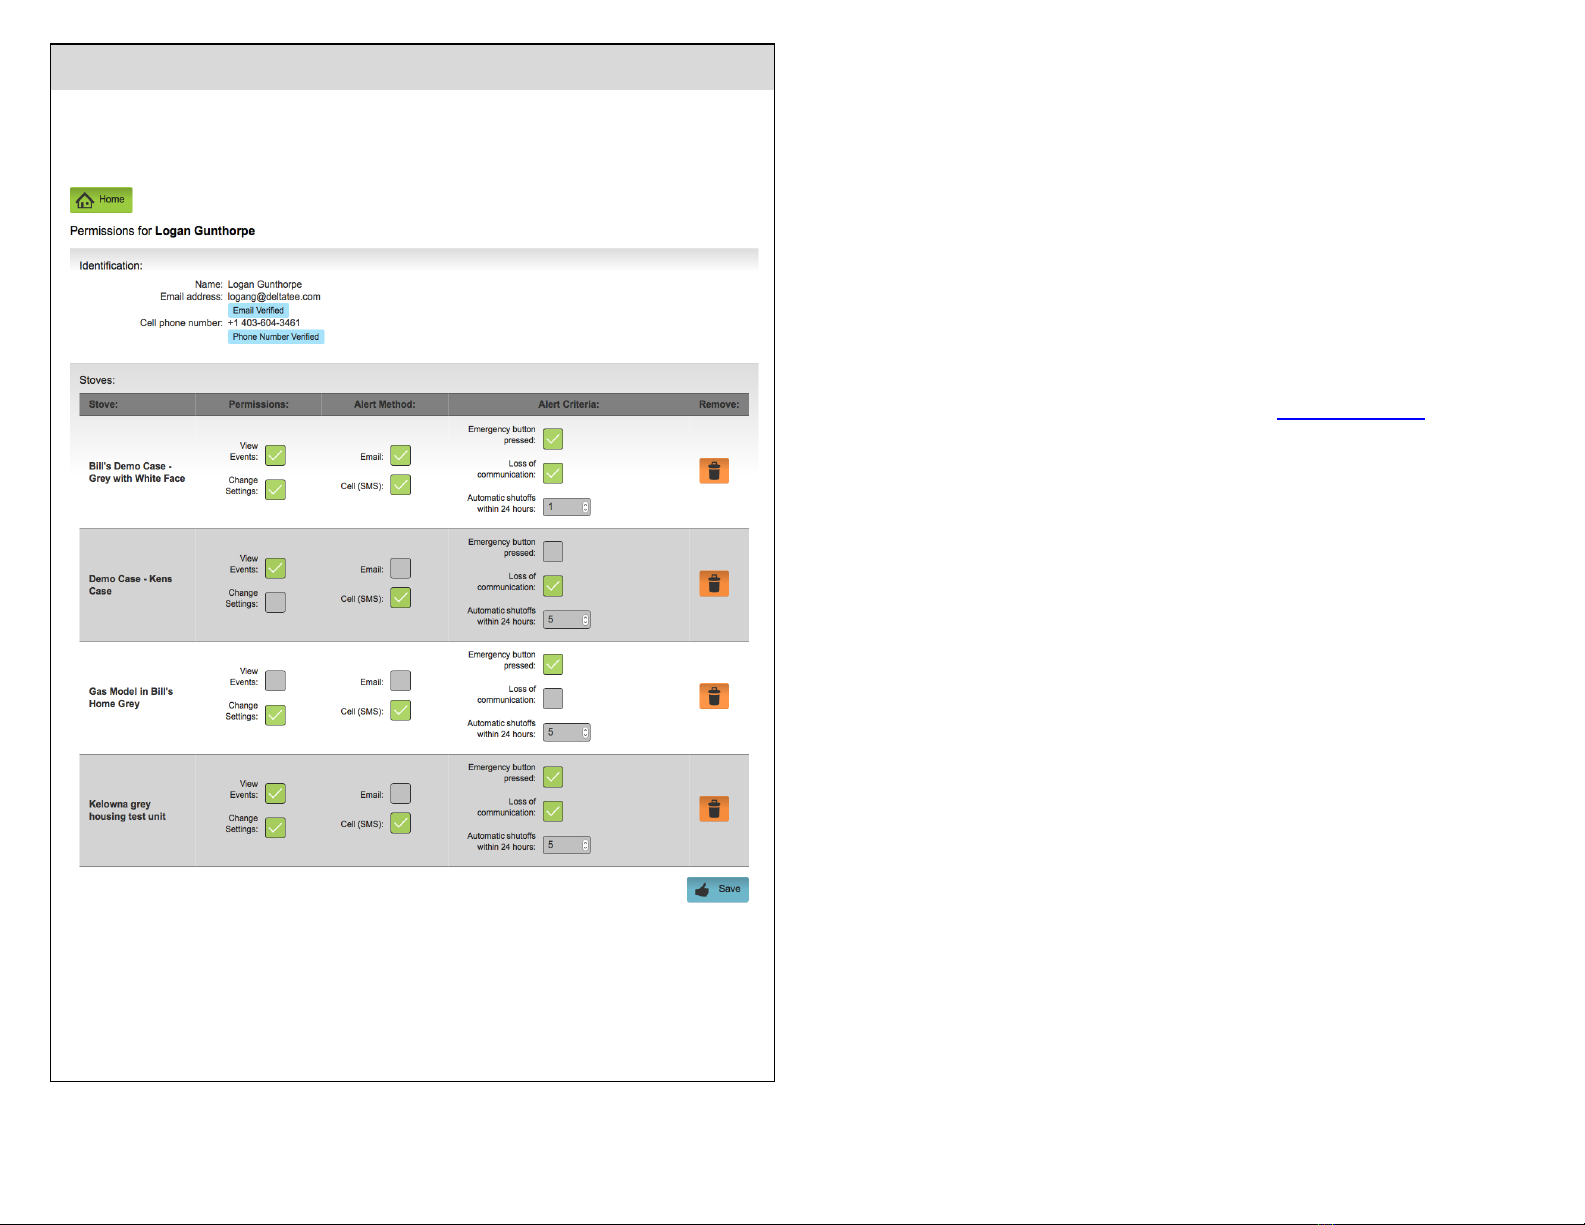
Managers Permissions (cont.)
Here is abetter look at the permissions settings for aManger.Here you can see how you can
customize the settings for each stove under each Manager.
13
Limited Warranty
1.
iGuardFire
Ltd.warrants, to the original purchaser, this product against defects in materials
workmanship for aperiod of one (1) year from the date of original purchase.
During this period
iGuardFire
Ltd.will repair or replace adefective product or part, at their discretion,
with anew or refurbished product at no charge other than shipping costs.
No warranty shall apply when damage is caused, or repair is required, due to any of the following;
•Use of the product for other than the intended purpose,
•Accident alteration abuse or misuse of the device
•Inaccurate mounting location or poor workmanship during installation
2. These warranties and remedies are exclusive and all other warranties, expressed or implied,
written or oral, including the implied warranties of merchantability or fitness for any particular
purpose are excluded
3. To receive warranty consideration aReturn Materials Authorization number (RMA#) must be
obtained by either phoning 844-859-3838 or email at sales@iguardfire.com.If awarranty
registration has not been received by
iGuardFire
Ltd.Via, aproof of purchase must accompany the
returned product once an
RMA# is received.
4. The defective product must be returned to the address included with the RMA#.All
transportation and insurance costs to return the device are the responsibility of the owner.
iGuardFire
Ltd.will pay for the return costs.Please include abrief description of the problem,
contact name, phone number, and RMA# with acomplete return address.
Product Liability
1.
iGuardFire
Ltd.shall not be liable for any loss damage (including without limitation direct or
indirect damages for personal injury property damage loss of business profits business interruption
or any other pecuniary loss) or expense arising directly or indirectly out of the purchase installation
or operation of the products.
2. In no event shall
iGuardFire
Ltd.be liable for special, indirect, incidental or consequential damage
of any kind or nature due any cause.
3.
iGuardFire
Ltd.neither assumes nor authorizes any representative or other person to assume for
it, any obligation or liability other then is expressly set forth herein.
4. This warranty does not cover any incidental or consequential damages and is in lieu of all other
warranties expressed or implied and no representative or person is authorized to assume for us, any
other liability in connection with the sale of our products.

Refund & Return Policy
We do not accept returns or exchanges unless the item you purchased is defective.If you receive a
defective item, please contact us at sales@iGuardFire.com or 844-859-3838 with details of the
product and the defect.An RMA# and shipping instructions will be given to you at that point.
Upon receipt of the returned product, we will fully examine it and notify you via e-mail, within a
reasonable period of time, whether you are entitled to arefund or areplacement as aresult of the
defect.If you are entitled to areplacement or refund, we will replace the product or refund the
purchase price, using the original method of payment.
Refunds Permitted:
We do accept returns if the item is unopened and in the original packaging within 30 days of your
purchase with proof of purchase.If 30 days or more have passed since your purchase, we cannot
offer you arefund or an exchange.
Shipping
To return the item you purchased, please contact us for an RMA# and the shipping address.
Call for RMA #first.No items shall be returned to us without an RMA# being issued by iGuardFire
Ltd.
Refunds do not include any shipping and handling charges shown on the packaging slip or invoice.
Shipping charges for all returns must be prepaid and insured by you.You are responsible for any
loss or damage to hardware during shipment.We do not guarantee that we will receive your
returned item.Shipping and handling charges are not refundable.Any amounts refunded will not
include the cost of shipping.
DELIVERY POLICY
Delivery Time
All orders are subject to product availability.An estimated delivery time will be provided to you
once your order is placed.Delivery times are estimates and commence from the date of shipping,
rather than the date of order.Delivery times are to be used as aguide only and are subject to the
acceptance and approval of your order.Unless there are exceptional circumstances, we make every
effort to fulfill your order within [15]business days of the date of your order.Business day means
Monday to Friday, except holidays.
Date of delivery may vary due to carrier shipping practices, delivery location, method of delivery,
and the items ordered.
Delivery Instructions
You can provide special delivery instructions on the checkout page of our website.
Shipping Costs
Shipping costs are based on the weight of your order and the delivery method.To find out how
much your order will cost, simple add the items you would like to purchase to your cart, and
proceed to the checkout page.Once at the checkout screen, shipping charges will be displayed.
Additional shipping charges may apply to remote areas and/or multiple devices.You will be advised
of all charges on the checkout page.
Federal Canadian GST/HST tax is charged according to the province or territory to which the item
is shipped.Provincial taxes are not charged.US taxes are not charged.
Damaged Items in Transport
If there is any damage to the packaging on delivery, immediately notify the carrier and then
contact us immediately at sales@iguardfire.com or 844-859-3838
Questions If you have any questions about the delivery and shipment or your order, please
contact us at 844-859-3838 14
IMPORTANT
If you have any questions please feel free to contact us;
Product Liability Disclaimer
iGuardFire
Ltd.shall not be liable for any loss, damage (including without limitation, direct or indirect
damages for personal injury, property damage, loss of business profits, business interruption, or
any other pecuniary loss) or expense arising directly or indirectly out of the purchase, installation or
operation of our products.
In no event shall
iGuardFire
Ltd.be liable for special, indirect, incidental or consequential damages
of any kind or nature due to any cause.
iGuardFire
Ltd.neither assumes or authorizes any
representative or other person to assume for it any obligation or liability other than is expressly set
forth herein.
Creating Peace of Mind Products for Families
iGuardFire Ltd.
2-3350 Watt Road
Kelowna, B.C.
Canada V1W 3C8
Software Version 2116
March 2019
Print 3/19
Table of contents
Popular Security Sensor manuals by other brands

ATS
ATS BULLSEYE user manual

Waeco
Waeco AirCon Oil Checker R134a Installation and operating manual

GREENLINE
GREENLINE GT-12 instruction manual

Honeywell
Honeywell Friedland FGGA03 Series Quick installation guide

Cooper
Cooper 1803 LED CG-S Fitting and operating instructions

Dräger
Dräger GS3 Instructions for use


Rielta
Rielta PYRONE-SH installation guide

NVC
NVC SPARTAN 3CCT instructions

RIEGLER
RIEGLER LS 200 operating manual

B+B Sensors
B+B Sensors PIR-STD Operation manual

B.E.G.
B.E.G. LUXOMAT Indoor 180-R Operating and mounting instruction

PCB Piezotronics
PCB Piezotronics 1203-15A Installation and operating manual