iHome TIMEBOOST iBTW41 User manual

Model iBTW41
QUESTIONS? visit www.ihome.com
Bluetooth Speaker + Wireless Charger
TIMEBOOST

1. iBTW41 2. AC adapter
WELCOME
Thank you for choosing the iBTW41 from iHome. This user guide will get
you up and running quickly. For more information about this and other
iHome products, please visit www.ihome.com
GETTING STARTED
This unit ships with the following items. Please check to see that all
items are present.
1. iBTW41 alarm clock
2. AC power adapter
CONNECTING THE IBTW41
Plug the included AC adapter into the DC jack on the back of the unit and
connect the plug to a working outlet not controlled by a light switch.

FEATURES & FUNCTIONS
Back
Top
DST
Switch
5V/1A USB Port
(for charging devices)
Time Set
9V/3.0A DC Jack
BATTERY
unscrew to open door
DST -1 +1 AUTO
Bottom*
Battery Back-Up
Compartment
Bluetooth
Pairing
Alarm
1
Volume
Set
Power/
Alarm
Reset
SNOOZE
DIMMER
Alarm
2
Play/Pause/
Speakerphone/Siri/Google
Snooze/
Display Dimmer
Wireless Charging Pad
*Remove battery pull tab
before use
Auto Dimmer Sensor
Display
PM Indicator
Wireless Charging
Alarm 1
Alarm 2
Low Battery
Bluetooth Mode
Bluetooth Pairing Icon

WIRELESS CHARGING
This unit will wirelessly charge Qi compatible wireless charging phones. Place
Qi compatible device face up on charging pad.
Check the lightning icon on the iBTW41 display for charging status:
Slow blinking iconDevice is charging properly.
Solid iconDevice is charged.
Rapid blinking iconDevice is not charging properly. Reposition device.
Note: The lightning icon may continue to blink slowly when iOS devices
are fully charged.
CAUTION: Remove metal protective or magnetic case from phone before
charging. When charging phone, do not place magnetic-striped or other
metal objects on the charger. Doing so could damage the object or this unit.
Qi compatible phones with metallic looking finishes will charge normally.

SETTING THE TIME
1. Press and hold the Time Set Button located on the back of the unit
for 2 seconds until the clock display flashes and a beep sounds.
2. Press the –or +Buttons to adjust the clock to the current time (hold
for rapid setting). Make sure you set the correct AM/PM time. The PM
indicator appears to the left of the display; there is no AM indicator.
3. To toggle the clock display between standard 12 hour time and 24 hour
(“military”) time display, press the Alarm or Alarm Button while
the display is flashing during time setting.
4. Press and release the Time Set Button to confirm the current time
setting. The YEAR will flash on the display. Press the –or +Buttons
to set the correct year.
5. Press and release the Time Set Button to confirm the current year
setting. The month will flash on the display. Press the –or +Buttons
to set the correct month.
6. Press and release the Time Set Button to confirm the current
month setting. The day will flash on the display. Press the –or +
Buttons to set the correct day.
7. Press and release the Time Set Button to confirm settings. 2 beeps
will sound to indicate time setting mode is complete.
DAYLIGHT SAVINGS (DST) SWITCH
This unit has a DST switch on the bottom of the unit to adjust the time
for daylight saving time and standard time. By default, it is set to Auto
and will automatically adjust the time at the start and end of daylight
saving time. If you wish to adjust manually, slide the switch to +1 to add
one hour or to –1 to subtract an hour.
SETTING AND USING ALARMS
This unit features dual alarms which can be set to dierent times and alarm
sources. Each is set in the same way. Instructions are given as “Alarm
Button”; use Alarm 1 Button or Alarm 2 Button to set respective alarms.
0QVG: Each step must be completed while display is flashing or setting will
time-out with any changes saved.
1. Press and hold the Alarm Button for 2 seconds until the alarm time display
and alarm icon flash. A beep sounds.
2. Press the – or + Buttons to adjust the alarm time to the desired time (hold
for rapid setting).
Make sure you set the correct AM/PM alarm time. The PM

SETTING AND USING ALARMS (CONTINUED)
3. Press the Alarm Button to confirm the alarm time setting. The alarm schedule will
flash: 7 (every day), 5 (weekdays) or 2 (weekend only). Press the – or + Buttons to
select the desired alarm schedule.
4. Press the Alarm Button to confirm the alarm schedule. The wake-to source will
flash.
5. Press the – or + Buttons to select the desired wake-to alarm source: Bluetooth or
To n e .
Wake to Bluetooth: You will wake to the currently linked Bluetooth device. If no
device is detected, the alarm will default to the last tone selected.
Wake to Tone: Press the Alarm Button to confirm. Press the – or + Buttons to
select the desired tone to wake to (Tone 1 -T
one 4).
6. Press the Alarm Button to confirm wake-to source. The alarm volume will flash.
7. Press the – or + Buttons to adjust the alarm volume.
8. Press the Alarm Button to confirm the alarm settings and exit alarm setting mode.
2 beeps will confirm alarm setting is complete. The alarm icon will remain on the
display, to show the alarm is armed.
*To preview the current alarm time, press and release the Alarm Button.
TURNING THE ALARM ON/OFF
1. Press the Alarm Button to toggle the alarm ON and OFF, indicated by the
related white alarm indicator.
2. When the alarm sounds, press the Power/Alarm Reset Button or the
corresponding Alarm Button (1 or 2) to disable the alarm and reset it to come
on at the same time the next day.
Snooze: When the alarm is sounding, press the Snooze/Dimmer Button to
snooze the alarm for 9 minutes.
Dimmer: Press the Snooze/Dimmer Button (when alarm is NOT sounding) to
adjust the display brightness.
SNOOZE/DIMMER

PROGRAMMABLE SNOOZE
To adjust the snooze duration:
1. Press and hold the Snooze/Dimmer Button. The unit will beep and the
snooze duration will appear on the display.
2. Use the + or - Buttons to adjust the snooze duration from 1-29 minutes.
Press the Snooze/Dimmer Button again - 2 beeps will confirm setting.
This unit is equipped with a sensor that will automatically adjust the
brightness of the clock display based on ambient light in your room. When
the room is well lit, the display will adjust to Hi brightness for better visibility.
In a dark room, it will dim to a lower brightness. You can adjust the “lower
limit” of the Auto-dimmer to fit your personal preference of display
brightness in a dark room.
The 3 options are:
“Auto 2” – minimum brightness setting will be level 2
“Auto 1” - minimum brightness setting will be level 1
“Auto 0” – clock display will turn FULLY OFF in a dark room
To adjust Dimmer settings:
Press the Snooze/Dimmer Button repeatedly to cycle through
brightness levels: Auto 1, Auto 2, Auto 0, Hi, 3, 2, 1, or OFF.
(Note: choosing Hi, 3, 2, 1, or OFF are fixed settings and will not
auto-adjust.)
AUTO DIMMER

BLUETOOTH PAIRING
Make sure your device is ‘discoverable’ by turning on Bluetooth mode. The
first time the iBTW41 is powered on, it will automatically enter pairing mode.
To manually pair your Bluetooth device:
1. Press and hold the Bluetooth Button on the back of the iBTW41 for
2 seconds.
2. Select ‘iHome TIMEBOOST’ on your device’s Bluetooth menu to connect.
3. If pairing is successful, the Bluetooth indicator appears solid, indicating the
iBTW41 is ready to play music.
4. To reset Bluetooth settings, press and hold the Bluetooth Button for 10
seconds.
Playing Bluetooth Audio: Press the Play/Pause/Speakerphone Button on
the unit to play or pause audio from your linked Bluetooth device. Use the
Volume Buttons to adjust the volume on the unit.
Using Speakerphone: The iBTW41 must be ON and connected to a
Bluetooth device in order to receive calls.
• Press the Play/Pause/Speakerphone Button to accept an incoming call.
• Press and hold the Play/Pause/Speakerphone Button to end/ignore a call.
Using Voice Commands: The iBTW41 must be ON and connected to a
Bluetooth device to use voice commands.
•Press and hold the Play/Pause/Speakerphone Button for 2 seconds to
activate Siri or Google Assistant.
2s
iHome
TIME
BOOST

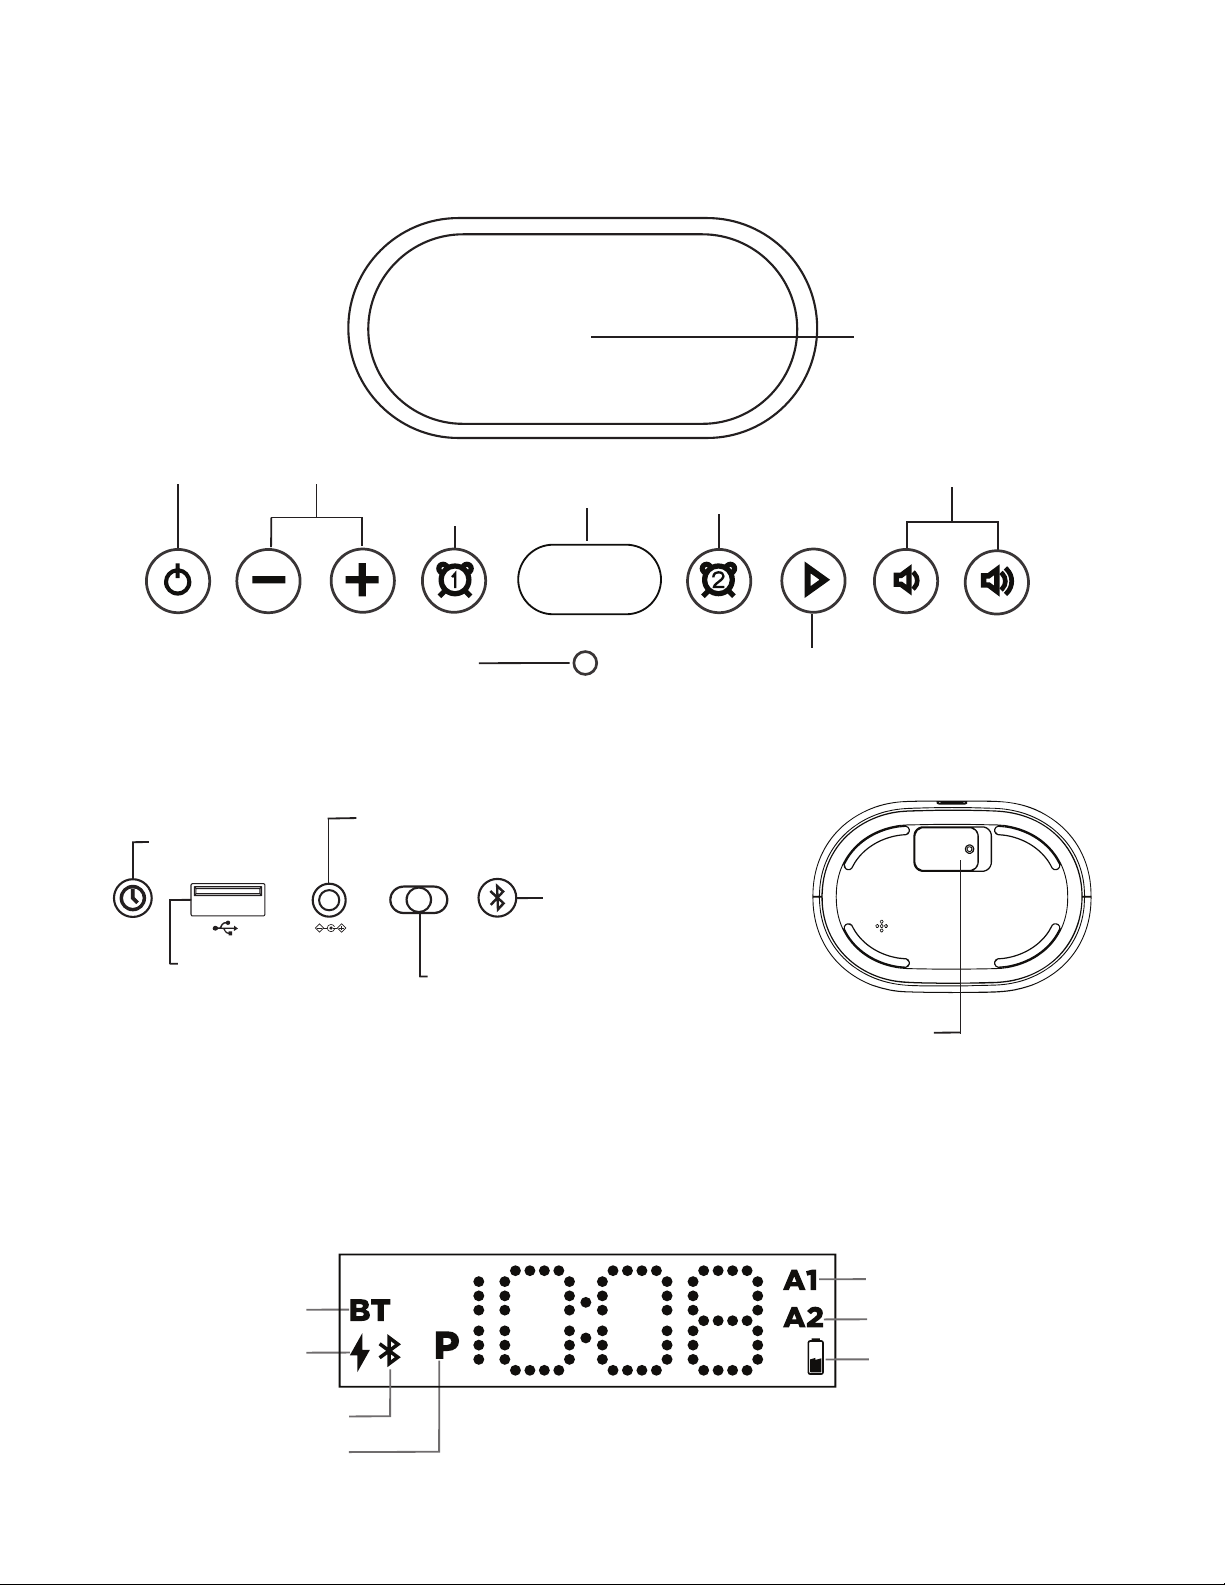
CHARGING DEVICES VIA USB
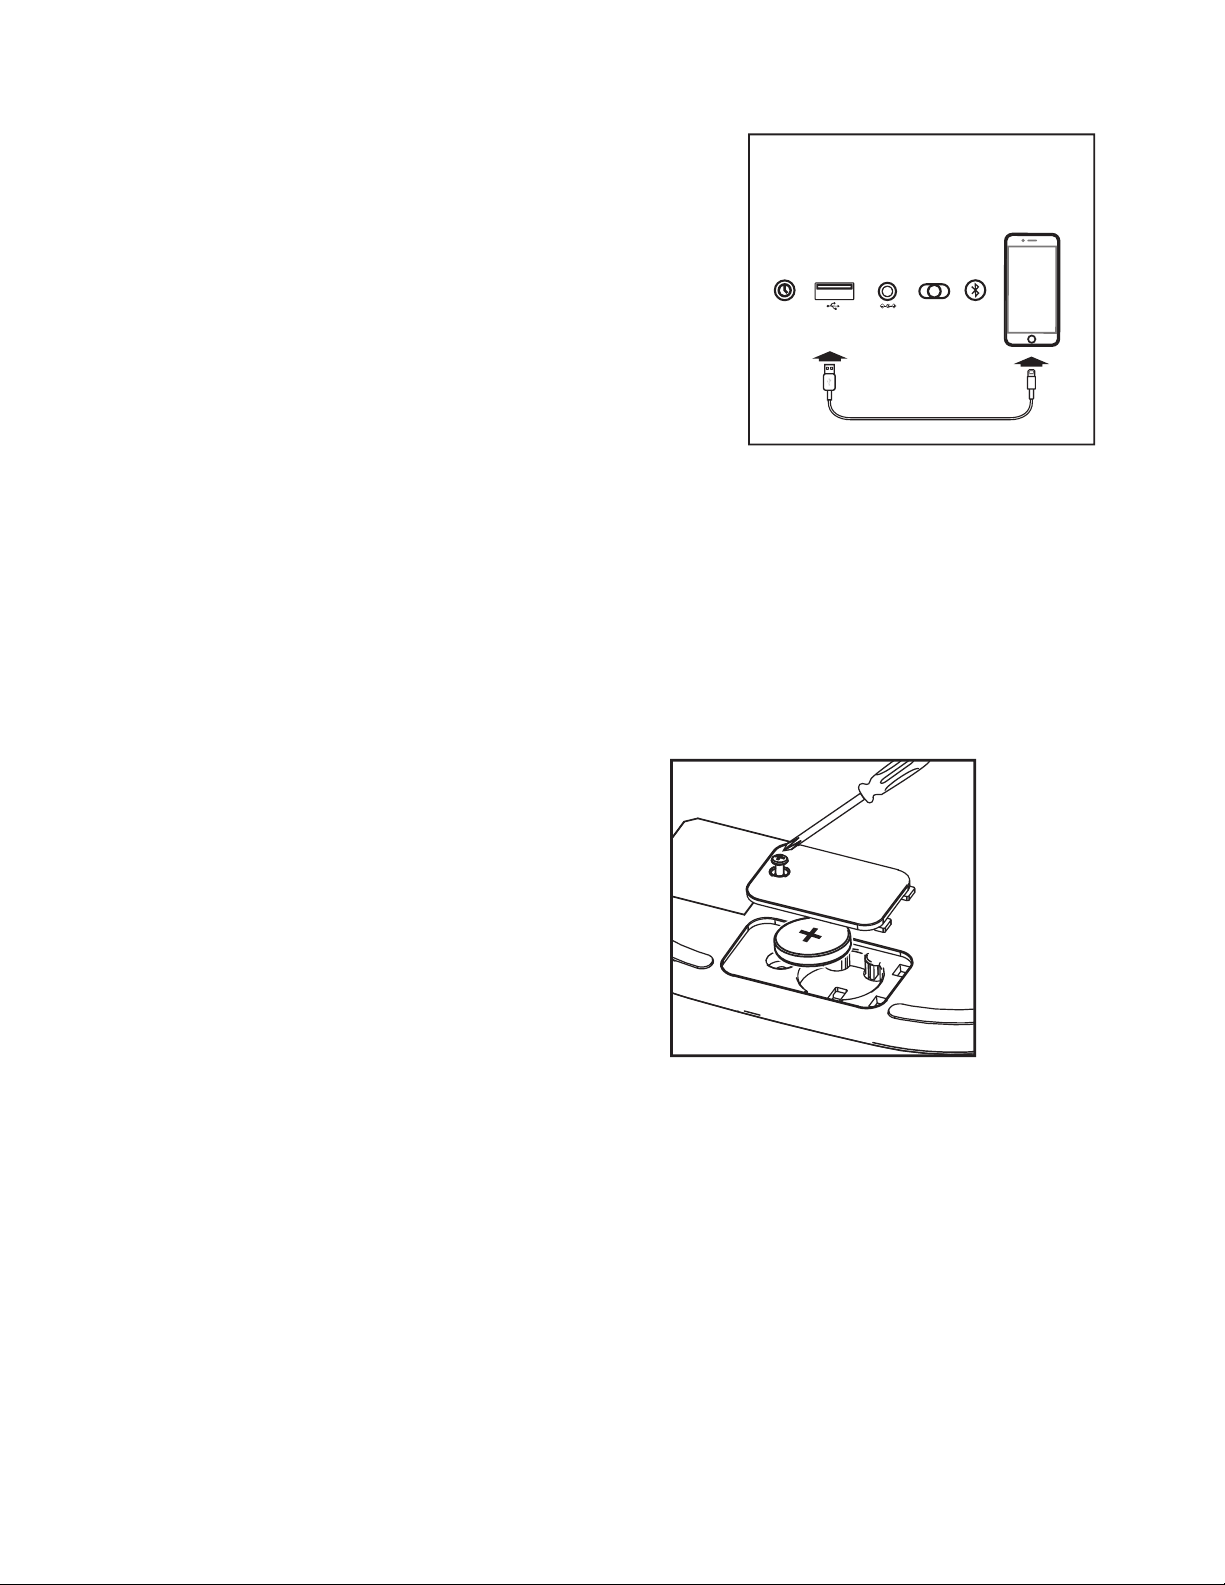
The unit comes with a CR-2450 back-up battery installed to maintain
clock settings in the event of a temporary power failure. Remove the
battery pull tab before use. When the battery icon on the display is
flashing, it is time to replace the back-up battery.
1. Make sure the AC adapter is
connected, or you will lose your
time and alarm settings during
battery replacement.
2. Use a Phillips screwdriver to open
the battery compartment door.
3. Remove the exhausted battery from
the compartment and insert 1
CR-2450 battery, checking that the
+ side is facing you. Replace the
compartment door. Do not
overtighten.
WARNING: Lithium batteries can explode or cause burns if disassembled, shorted,
recharged, exposed to water, fire, or high temperatures. Do not place loose batteries in
a pocket, purse, or other container containing metal objects, mix with used or other
battery types, or store with hazardous or combustible materials. Store in cool, dry,
ventilated area. Follow applicable laws and regulations for transport and disposal.
• Do not ingest the battery, Chemical Burn Hazard. This product contains a
coin/button cell battery. If the coin/button cell battery is swallowed, it can cause
severe internal burns in just 2 hours and can lead to death.
• Keep new and used batteries away from children. If the battery compartment does
not close securely, stop using the product and keep it away from children. If you
think batteries might have been swallowed or placed inside any part of the body,
seek immediate medical attention.
• Connect the standard size end of a USB cable
(not included) to the USB Charging Port on the
back of the unit. Connect the other end to the
charging port on your device.
• Monitor the charging on your device. Some
devices use a proprietary charging method and
will not charge using the USB port. If this
happens, you must charge your device using
the charger that came with it.
Unit must be plugged into a
working outlet to charge devices.
BATTERY BACK-UP
Bottom of Unit
DST -1 +1 AUTO

MAINTENANCE
• Place the unit on a level surface away from sources of direct sunlight or
excessive heat.
•Remove plastic protective film from the clock display.
• Protect your furniture when placing your unit on a natural wood and
lacquered finish. A cloth or other protective material should be placed
between it and the furniture.
• Clean your unit with a soft cloth moistened only with mild soap and water.
Stronger cleaning agents such as thinner or similar materials can damage
the surface of the unit.
IMPORTANT SAFETY INSTRUCTIONS
When used in the directed manner, this unit has been designed and manufactured to ensure your
personal safety. However, improper use can result in potential electrical shock or fire hazards. Please
read and follow all safety and operating instructions carefully before installation and use, and keep
these instructions handy for future reference. Take special note of all warnings listed in these
instructions and on the unit.
1. Do not use this product near water, and clean only with dry cloth.
2. Do not block any ventilation openings. Install in accordance with the manufacturer’s
instructions.
3. Heat – This product should be situated away from heat sources such as radiators, heat
registers, stoves or other appliances (including amplifiers) that produce heat.
4. Only use attachments/accessories specified by the manufacturer.
5. Unplug this product during lightning storms or when unused for long periods of time.
6. Damage Requiring Service – This product should be serviced by qualified service
personnel when:
-Plug has been damaged.
-Objects have fallen into or liquid has been spilled into the enclosure.
- The unit has been exposed to rain. The unit has been dropped or the enclosure
damaged.
-The unit exhibits a marked change in performance or does not operate normally.
7. No naked flame sources, such as lighted candles, should be placed on this product.
8. Attention should be drawn to the environmental aspects of battery disposal.
9. This product is suitable for use in tropical and/or moderate climates.
10. WARNING: To reduce the risk of fire or electric shock, do not expose this product to
rain or moisture.
11. Do not dispose of batteries in the household trash or fire.
12. The mains plug of power adaptor is used as the disconnect device, it shall remain
readily operable.

© 2020 SDI Technologies, Inc. All rights reserved
Questions? Visit www.ihome.com
LIMITED ONE YEAR WARRANTY
iHome Products, a division of SDI Technologies Inc. (hereafter referred to as SDI),
warrants this product to be free from defects in workmanship and materials, under
normal use and conditions, for a period of one (1) year from the date of original
purchase. Should this product fail to function in a satisfactory manner, it is best to first
return it to the store where it was originally purchased. Should this fail to resolve the
matter and service still be required by reason of any defect or malfunction during the
warranty period, SDI will repair or, at its discretion, replace this product without charge.
This decision is subject to verification of the defect or malfunction upon delivery of this
product to the Factory Service Center authorized by Customer Service.
If service is required, please contact Customer Service at ihome.com/support/contact to
obtain a Return Authorization Number and shipping instructions. A copy of the sales
receipt is required to validate in-warranty coverage.
Disclaimer of Warranty
NOTE: This warranty is valid only if the product is used for the purpose for which it was
designed. It does not cover (i) products which have been damaged by negligence or
willful actions, misuse or accident, or which have been modified or repaired by
unauthorized persons; (ii) cracked or broken cabinets, or units damaged by excessive
heat; (iii) damage to digital media players, CD’s or tape cassettes (if applicable); (iv) the
cost of shipping this product to the Factory Service Center and its return to the owner.
This warranty is valid only in the United States of America and does not extend to
owners of the product other than to the original purchaser. In no event will SDI or any of
its aliates, contractors, resellers, their ocers, directors, shareholders, members or
agents be liable to you or any third party for any consequential or incidental damages,
any lost profits, actual, exemplary or punitive damages. (Some states do not allow
limitations on implied warranties or exclusion of consequential damages, so these
restrictions may not apply to you.) This warranty gives you specific legal rights, and you
may also have other rights which vary from state to state. Your acknowledgment and
agreement to fully and completely abide by the above mentioned disclaimer of
warranty is contractually binding to you upon your transfer of currency (money order,
cashier's check, or credit card) for purchase of your SDI product.
Other manuals for TIMEBOOST iBTW41
1
Table of contents
Other iHome Speakers manuals

iHome
iHome iBT175 User manual

iHome
iHome iHPA-1500LT User manual

iHome
iHome iX360 User manual

iHome
iHome iBT682 User manual

iHome
iHome iDM8 Instruction Manual

iHome
iHome iBN10 User manual

iHome
iHome iDM15 User manual

iHome
iHome iDM11 Instruction Manual

iHome
iHome iZABT50 User manual

iHome
iHome iBT70 User manual

iHome
iHome iBT74 User manual

iHome
iHome iBT76 User manual

iHome
iHome IDM12 User manual

iHome
iHome Star Wars MILLENNIUM FALCON iHome Li-B17E7 User manual

iHome
iHome Beauty REFLECT TRIFOLD iCVBT4 User manual

iHome
iHome iHome iDM8N1 User manual

iHome
iHome iBT59 User manual

iHome
iHome iBT91 User manual

iHome
iHome iHRK-500LTMS User manual

iHome
iHome DF-M63 User manual