Ikan Beholder DS2-A User manual

2017 Beholder ®All Right Reserved
V1.0 2017.08
3-axis Handheld Stabilizer Gimbal
Beholder DS2-A
Instruction Manual
Before using the product, please read this manual carefully.
Be sure to keep this book in a safe place so that you can check it at any time in the future.
WARNING: This product comes from the factory tuned and ready to use. It is NOT meant to be user-serviceable.
Accessing and changing firmware settings and/or tuning settings will void warranty.

2
2017 Beholder ®All Right Reserved
Table of Contents
Introduction
•About the DS2-A 3
Product Description
•What ’s Included 4
•Charging the Batteries 5
•Installing the Battery Holder 7
•Camera Installation and Balance 8
Getting to Know the DS2-A
•Powering On 12
•Modes of Operation (Profiles) 12
•OLED Display 14
•Extensions and Extra Features 15
Compatible Camera Models
•List of Supported Cameras 15
Gimbal Working Angles
•Operable Camera Angles 15
Precautions and Safety
•Precautions 16
•Safety 16
Copyright
•Copyright/Trademark Statement 17
Product Specifications
•Technical Specifications 18
Frequently AskedQuestions
•FAQ 19

3
2017 Beholder ®All Right Reserved
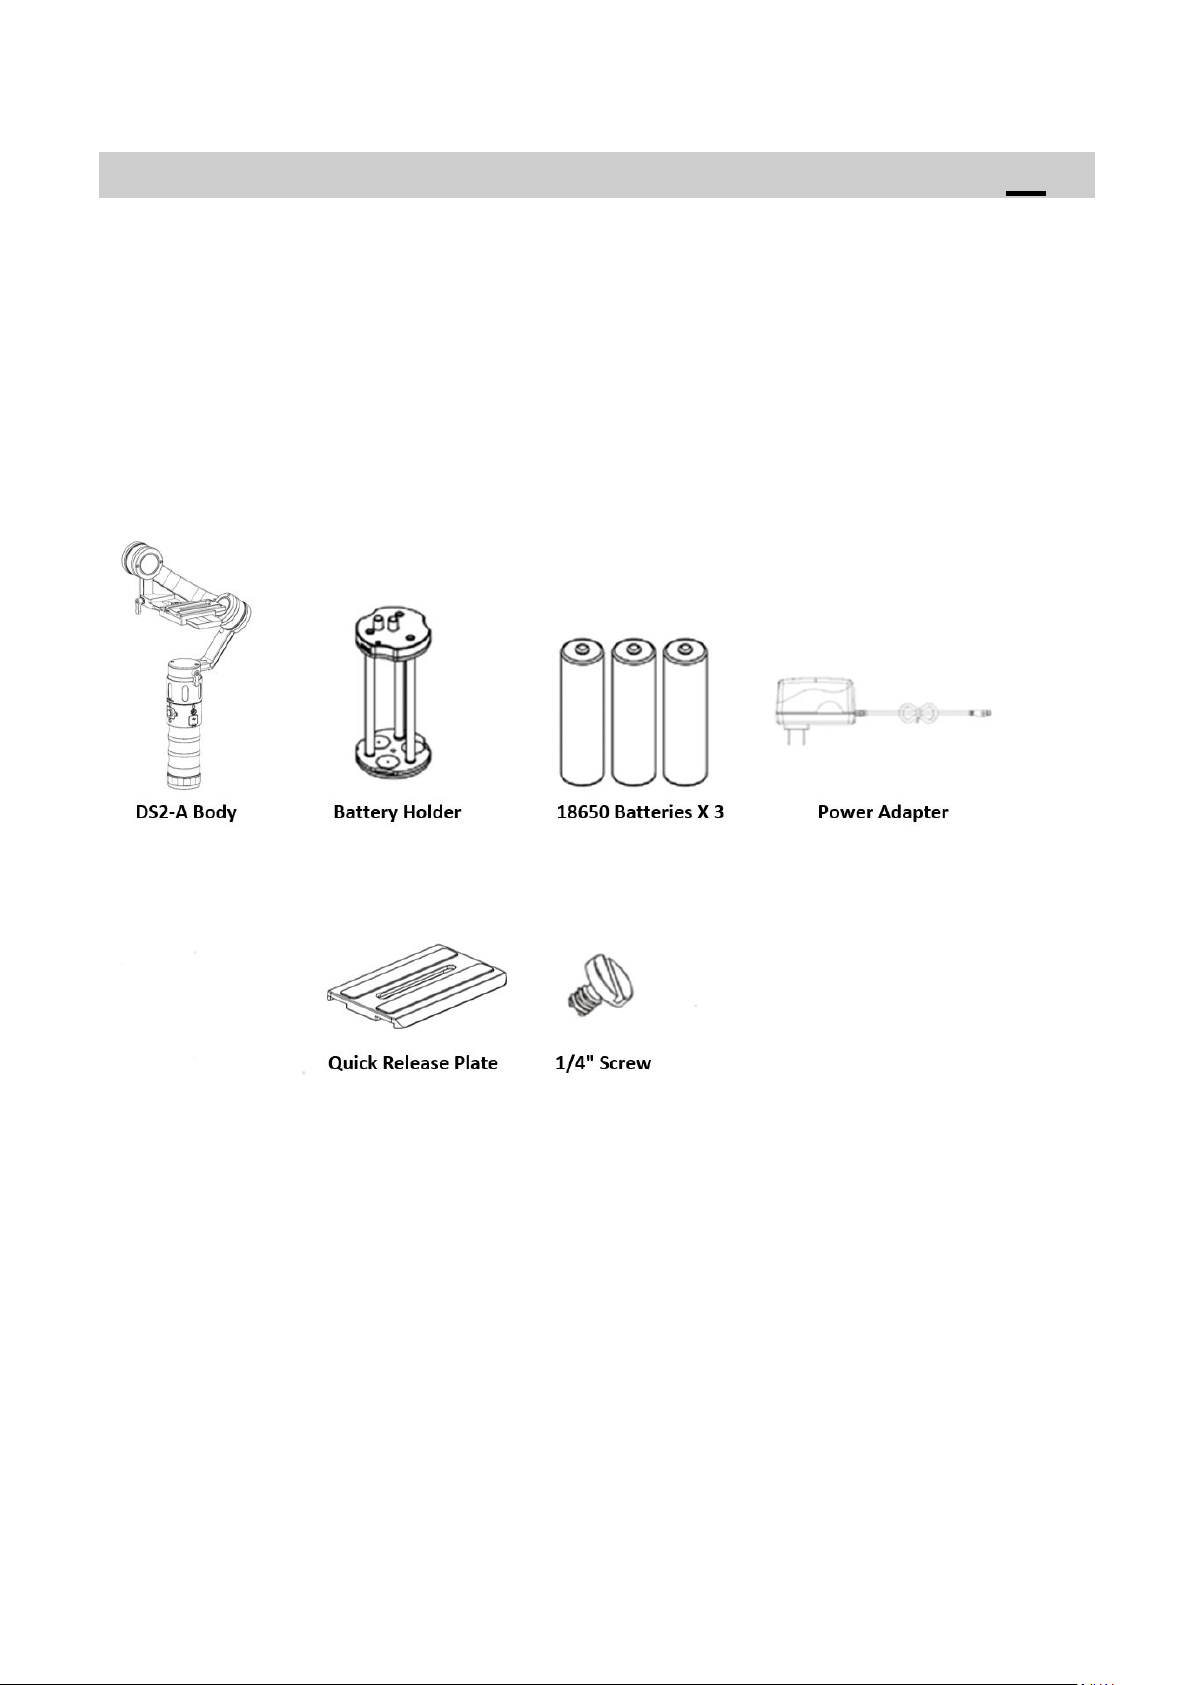
The Beholder DS2-A is designed specifically for professional filmmakers looking for a single handheld stabilizer for a
large range of small cameras weighing up to 4 lbs.
The DS2-A features a unique angled roll motor arm, which allows you to have a better view of the camera’s screen
while using the gimbal. In addition, the DS2-A also features a 60 second Auto-Sweep mode, which allows you to
program a 60 second camera movement.
The Beholder DS2-A is lightweight, easy to use, and can be carried in your camera bag. It is also versatile enough to
be used with a DSLR, mirrorless camera, GoPro, or smartphone.
Angled Motor Arm: The DS2-A is the first Ikan Beholder gimbal to feature an angled motor arm that gives you an
unobstructed view of the camera’s screen. This makes it easier to frame your shots and follow the action.
360 Motor: The DS2-A features a 360 degree rotation brushless motor on the yaw axis for a higher range of mobility.
Designed for Multiple Cameras With a payload of up to 4 lbs., the DS2-A has the ability to stabilize a wide range of
today’s popular DSLR and mirrorless cameras including the: Canon 5D Mark IV, Canon 6D, Canon 7D, Sony a6300, Sony
a7SII, Panasonic GH5, GoPro, or smartphone.
Advanced Stabilization: Using a 32-bit controller with a 12-bit encoder, the DS2-A uses an adaptive PID algorithm to
produce an efficient handheld stabilizer. This means that the gimbal will respond faster, balance easier, and have
greater battery life.
Lock Mode: In Lock Mode, the yaw, pitch, and roll axis work together to keep the camera pointed in one direction.
The camera’s composition will stay the same no matter how you move the handle.
Auto Inversion: Switch to Inverted Mode at any time by simply flipping the handle over the camera. Inverted Mode can
be operated in conjunction with any of the Lock and Follow Modes.
Multiple Follow Modes: The DS2-A features 3 different follow modes. In Yaw- Axis Follow Mode, the DS2-A will only
follow your pan movements. In Pitch and Yaw-Axis Follow mode, the DS2-A will follow your pan and tilt movements.
Finally, the 3-Axis Follow Mode gives you full control allowing you to pan, tilt, and roll.
60 Second Auto-Sweep: The DS2-A features a 60 Second Auto-Sweep function, which allows you to program a 60
second movement. Position the camera at the end point, and then press the mode button 5 times. Then, position the
camera at the start point and let the DS2-A do the rest! The camera will move from one point to the other in a 60
second time frame.
About the DS2-A ▲
To reduce fire or shock hazard, do not expose the unit to rain or moisture.
WARNING

4
2017 Beholder ®All Right Reserved
After you’ve received the product and before you use it, please make sure the package contains all the items
in the following inventory. If any item is missing, please get in touch with the dealer to resolve the situation.
1. DS2-A Body
2. The Battery Holder
3. 3 x 18650 Battery
4. Camera Quick Release Plate
5. ¼” Screw
6. Power Adapter or USB Cable (dependent on the country’s specifications)
What’s Included ▲

5
2017 Beholder ®All Right Reserved
Battery charging and inserting
For best performance, please use Ikan IB-18650-26 batteries. The LED indicator will turn red while
charging and green if the batteries are fully charged.
Connect the battery holder (Fig. 1) to the USB power supply before placing the batteries in the
holder. The LED will turn green to indicate the USB power can be used. Disconnect the battery holder and
insert the three batteries. Connect the battery holder to the charger again. The LED indicator will turn red to
indicate the batteries have started to charge. If less than three batteries are placed in the battery holder, the
indicator light displays green to indicate that charging has not started. The battery holder can only charge
all three batteries at once.
Note: The battery holder can only be used as a charger stand temporarily. When the battery LED
indicator turns green to indicate that charging is complete, the batteries are only charged to 80% of the
battery capacity. For 100% charge, please buy a professional charger adapter or use Ikan’s ICH-SC4 smart
charger.
The battery holder charge time is 3-4 hours.
Charging the Batteries ▲
WARNING
When using the battery holder as a charger, the USB power supply must meet the minimum requirements.
The common USB port may not supply enough power to charge the batteries. A USB adapter rated at a minimum
of 2.5A/12.5W or more may be needed.

6
2017 Beholder ®All Right Reserved
Charging the Batteries ▲
Recommendations
•We recommend using a dedicatedcharger like the Ikan ICH-SC4.
•If the product is not used for a long time, charge the batteries up to 70% of their capacity and store
them in a cool, dry place.
•If you need more batteries, try to purchase Ikan IB-18650-26-3PK official batteries or other reliable
batteries with a protection circuit to avoid overcharging and damaging the batteries. Using damaged
or different capacity batteries may result in the Ikan Beholder DS2-Afailing to start up.
•Hint: Currently, the maximum capacity of an 18650 battery is 3500mah. Try to avoid fake suppliers
that advertise a huge capacity.

7
2017 Beholder ®All Right Reserved
Instructions to use the battery holder
Mount the 18650 batteries with the negative electrode of the battery (-) towards the spring (Fig. 2). Push the three
18650 batteries inward.
Fig. 2. Inserting batteries into the battery holder
Install the battery holder into the battery compartment with the two electrical terminals toward the direction of
insertion (Fig. 3).
Fig. 3. Inserting the battery holder into gimbal handle
Installing the Battery Holder ▲
WARNING
Before starting the gimbal, make sure the camera is properly mounted on the stabilizer and perfectly
balanced.

8
2017 Beholder ®All Right Reserved
STEP 1
Mount the camera quick release
•Remove the quick release plate from the gimbal.
•Attach the quick release plate to the camera (Fig. 4). Be careful not to twist it too tight at this point.
•Make sure the quick release plate direction is facing forward toward the lens.
Fig. 4. The camera is attached to the quick release plate
Camera Installation and Balance ▲
WARNING
Before installing the camera and adjusting the balance, remove the camera lens cover, attach the lens hood,
and insert a memory card and camera batteries, as well as any other accessories. The camera should be fully
ready to shoot.

9
2017 Beholder ®All Right Reserved
STEP 2
Install the camera on gimbal base
•Install the camera with the quick release mounted into the Beholder DS2-A bottom mount base (Fig.5).
•Slightly adjust the position of the camera into the base until you find a horizontal balance.
•Shift the camera as close to the pitch motor as possible. Use the base plate positioning if needed.
•Tighten the thumb screws.
•Use a screwdriver to tighten the 1/4 quick release screw.
STEP 3
Adjust the gimbal roll – left and right balance
•Release the roll thumb M4 screw and make the arm the shortest. Then, tighten the M4 screw.
•Slide the roll arm left or right until the camera finds a balance position and doesn’t lean left or right.
•Tighten the thumb screws.

10
2017 Beholder ®All Right Reserved
STEP 4
Adjust the gimbal pitch - up and down balance
•Loosen the camera plate M4 thumb screw to adjust the pitch level (M4 thumb screw – in Fig. 7).
•Move the camera plate arm up and down, until the camera stays in place at any lens angle.
•Tighten the thumb screws.
STEP 5
Adjust the gimbal pan– forward and backward balance
•Loosen the pan motor left thumb screw.
•Tilt the gimbal handle 45 degrees forward.
•Move the pan arm to the left side or to the right side at 90 degrees and observe the direction it tends to move
when released.
•If the pan arm tends to go up/backward, then the gimbal is front heavy: move the pan arm back slightly and
repeat the side test.
•If the pan arm tends to move down/forward, it means the gimbal is back heavy: move the pan arm slightly
forward and repeat the side test.
•When in balance, the pan arm should stay at any position around the handle when the handle is tilted forward.
•Tighten the thumb screws.

11
2017 Beholder ®All Right Reserved
Recommendations
•After adjusting the camera installation, check that each knob is fully tightened.
•Do not overtighten the screw wrench to avoid stripping the screw.
•For very small cameras and lenses, if you cannot reach the balance as per the steps above, replace
the camera or lens.
TIP
•Before starting the gimbal, make sure the camera is properly mounted on the stabilizer and perfectly
balanced.
•The Ikan Beholder DS2-A uses the latest 32-bit systems, a multi-processor technology and inductive
motor technology, with greatly improved torque. Therefore, it's able to start and level the camera if
it is out of balance, but for shot stability, battery life and power saving, we strongly recommend you
find the best balance first and then power the gimbal on and shoot the video.

12
2017 Beholder ®All Right Reserved
Starting the gimbal in default profile
•Press the power button for two solid seconds to power the gimbal on.
•The gimbal starts in Pan follow mode. (Profile 2)
•Use the five-way joystick (Fig. 9 [1]) to control the camera tilt and pan direction.
Push the joystick up or down for tilt up and down.
Push the joystick to the left or to the right to pan the camera left or right.
The OLED shows the current condition.
Switching the gimbal to different modes of operation (profiles)
•Press the mode button one time, which is located under the OLED screen to enter Lock Mode (Profile 1):
the camera will hold the direction and not follow, pan, or tilt.
•Press the mode button twice to enter Pan-Follow Mode (Profile 2): The gimbal follows pan and holds the
tilt position.
•Press the mode button three times to enter Follow Mode (Profile 3): The camera follows the tilt and pan
directions.
•Press the mode button four times to enter Full Follow Mode (Profile 4): The gimbal will follow roll, pitch,
and pan.
•Press the mode button five times to enter 60 Second Auto Sweep Mode (Profile 5): This will start a 60
second sweep of the camera from the end point back to the starting point.
•Press the mode button and hold for six seconds to calibrate the gyroscope.
Power ON ▲
Modes of Operation (Profiles) ▲

13
2017 Beholder ®All Right Reserved
TIP
Any of the profiles can be set to hold a specific angle or position manually. Take the camera
with one hand and
hold it in the desired position for 2 seconds. The system will automatically save the desired angle.

14
2017 Beholder ®All Right Reserved
Boot interface with company logo
profile1: Press mode button once: Lock mode
profile2: Press mode button twice: Pan Follow mode
profile3: Press mode button three times: Follow mode
profile4: Press mode button four times: 3-Axis Follow mode
profile5: Press mode button five times: 60 Second Auto Sweep
1. Position camera at end point.
2. Press the mode button five times.
3. Within 10 seconds, position the camera at the start point.
4. After 10 seconds, the camera will automatically move to the chosen end point
within 60 seconds.
Note:
Press and hold the mode button for 6 seconds to start gyro calibration. Do not move the
gimbal while calibration is in process. In case the gimbal is moved, please start the
calibration over. Usually the calibration takes about 5 seconds. During this time, the gimbal
will shut off and restart the motors.
OLED Display ▲

15
2017 Beholder ®All Right Reserved
Extensions and extra features
•3/8 standard screw holes (connecting rods 1/4 or 3/8 turn screws sold separately)
•Mini USB for controlling the gimbal via wired joystick
•Handle screw for an external monitor and microphone, lights, etc.
•Genuine universal quick release plate Manfrotto 577 series, such as 501PL, 701,etc. 50mm width Quick Edition
Compatible camera models
•The Ikan Beholder DS2-A supports cameras up to 1.8kg including DSLR, mirrorless cameras, and larger
smartphones.
•List of supported cameras:
•DSLRs: Canon 5D Mark IV, t7i , Sony a99 II, Nikon D70, D5600
•Mirrorless: Panasonic GH5, GX8, Sony a7SII, A9, a6500, Canon M6, Fujifilm X-T2, X-T20
Handheld camera angle range
Extra Features ▲
Compatible Cameras ▲
Gimbal Working Angles ▲

16
2017 Beholder ®All Right Reserved
Things to consider before use
The Ikan Beholder DS2-A is shipped from the factory with perfect calibration. However, after a long period of unuse
or if the temperature difference is too large, it may cause the gyroscope to drift automatically or to tilt during use.
Gyro Correction:
Place the Ikan Beholder DS2-A horizontally on the table, power on the gimbal and press and hold the menu button for 6
seconds. The system automatically enters the gyroscope calibration mode. The motors lose power for 5 seconds. After
that, the automatic system calibration is complete and the stabilizer can resume normal use.
Note:
1. During the calibration process, hold the gimbal handle on the table as stable as possible.
2. The mini USB port is designed only for a wired joystick and can't be used for charging.
3. In order to obtain a better shooting experience when using the DS2-A, avoid any collision and do not use
excessive force.
Important safety instructions
1. Do not get too close to a magnetic field or a source of extreme heat and fire.
2. Using and storing this product under high temperature and humidity, water, or a highly corrosive environment
can cause the device internal damage.
3. Protect the power cord to avoid trampling or backlog, particularly at plugs, sockets and other parts.
4. Do not use an incompatible power supply, charger or batteries that may cause a fire, explosion or other hazard.
Use only manufacturer-approved equipment and matching accessories to meet safety standards. Other types of
accessories may cause problems with the product or a security incident.
5. When not using this product for long periods of time, please remove the battery, wrap it in dust-proof
packaging and place it in a dry environment.
6. Do not use the device during a thunderstorm or it may result in equipment malfunction or put you at risk of a
lightning strike.
7. Do not expose the battery to excessive heat in the environment, such as sunlight, fire or similar factors.
8. Do not expose this appliance to dripping or splashing liquids.
9. Do not place conductive objects at the battery holder electrical terminal, or contact the battery ends, in order
to not cause the battery to short-circuit or cause burns and other physical injuries due to the battery
overheating.
10. Do not expose the battery near any heat sources such as sunlight, heaters, microwave, oven, stove, radiator, or
other instruments that produce heat (including amplifiers).
11. If the battery is used improperly, there may be an explosion hazard. In order to reduce the risk of fire or burns,
do not disassemble, crush, puncture, short external connections, expose to heat or throw in fire.
12. If the batteries leak, do not allow the liquid to contact the skin or eyes. If your skin or eyes come in contact with
the battery liquid, wash with water immediately and go to the hospital for medical treatment.
13. If battery discoloration, deformation, abnormal heat and other phenomena occurs, please stop using and
replace the battery.
14. This product may contain small equipment and parts. Keep the device and its accessories out of reach of
children. Children may damage the device or swallow small parts - beware of choking.
15. Dispose of used batteries in accordance with local regulations.
Precautions ▲
Safety ▲

17
2017 Beholder ®All Right Reserved
Copyright/Trademark Statement
Beholder® and Ikan® are certified trademarks, which cannot be used without our permission for any
other purposes. The product has a number of patents so if copies of the product are found, the perpetrator
will hold the relevant legal responsibility.
A regular dealer must obtain marketing authorization documents. Please visit an authorized
dealer to purchase.
A list of distributors can be found on the website. In case the product is purchased on a non-
authorized channel, we will not provide after-sales service for the product.
Product features, appearance or other functions may change over time. The company is free to
implement and release any changes as desired.
Learn More:
More dynamic information at Ikan’s official website: www.ikancorp.com
Support:
Copyright/Trademark Statement ▲

18
2017 Beholder ®All Right Reserved
Beholder DS2-A technical specifications
Model: DS2-A 3-axis single handheld gimbal stabilizer
Load Capacity:4lbs (1.8kg)
Battery:3 x 18650 3.7v
Battery Operating Time:Approx. 8-10 hours
Battery Charging time:Approx. 3-4 hours
Operating temperature: 14°F to 158°F (-10°C to 70°C)
Working angles:
Pan: 360°
Roll: 310°
Pitch: 310°
Bottom Mounting Thread 3/8"-16
Side Mounting Threads 2 x ¼-20"
Dimensions Length 6.89 in. (17.5 cm)
Width 7.09 in. (18.0 cm)
Height 13.31 in. (33.8 cm)
Weight Without batteries 2.18 lbs (0.988kg)
Camera Support: DSLRs: Canon 5D Mark IV, t7i , Sony a99 II, Nikon D70, D5600
Mirrorless: Panasonic GH5, GX8, Sony a7SII, A9, a6500, Canon M6,
Fujifilm X-T2, X-T20
Product Specifications ▲

19
2017 Beholder ®All Right Reserved
Frequently asked questions and answers
1. How do you charge the gimbal?
The Ikan Beholder DSA can be charged in two ways: using the built-in battery holder micro USB or using a separate
authorized dedicated charger (recommended) such as the Ikan ICH-SC4.
Charging using the battery holder:
- Remove the battery cap cover on the bottom of the handle.
- Take the battery holder out.
- Connect the power cable to the Micro USB.
- Connect the other cable end to power supply.
Charging using a dedicated charger:
- Buy an authorized smart charger
- Release the battery holder.
- Take out the batteries and charge with a fast charger.
2. After mounting the quick release plate, sliding it into the stabilizer seems difficult. How do you fix this?
Release the 1/4 screw about two turns and then insert to the gimbal OR base.
3. After balancing the camera, adjusting the camera’s center of gravity, and tightening the screws, the camera is
still wobbly and unstable. Why?
You need to put the rubber stickers onto the quick release plate and then put the camera back on.
4. Why is my battery holder not charging?
When using the battery holder as a charger, the USB power supply must meet the minimum requirements. The
common USB port may not supply enough power to charge the batteries. A USB adapter rated at a minimum of
2.5A/12.5W or more may be needed. You can also purchase the Beholder multi-function intelligent charger.
5. When I start up the stabilizer, the camera’s center of gravity has been adjusted. Why is it always twisted to one
side?
This may be from gyro magnetic fields that are affecting the surrounding environment, leading to an incorrect gyro
direction. Solution: Press and hold the mode button for about 6 seconds to enter the calibration mode. It can be used
normally after calibration is complete.
TIP
Fully charged 18650 batteries measure 4.21V through a volt meter.
TIP
After balancing the camera, mark the position with a pen. This will help you find the balance faster the
next time you mount the same camera and lens.
Table of contents
Other Ikan Camera Accessories manuals

Ikan
Ikan STR-CINE-C500-RIG User manual

Ikan
Ikan SL100 User manual

Ikan
Ikan V8PBK-A User manual

Ikan
Ikan PT-ELITE-PRO2 User manual

Ikan
Ikan FLY-X3 User manual

Ikan
Ikan ELEMENTS DELUXE FLY User manual

Ikan
Ikan RECOIL-RLD User manual

Ikan
Ikan ELEMENTS X-CAGE User manual

Ikan
Ikan PBK-A-X User manual

Ikan
Ikan ELE-HVRFLY User manual

Ikan
Ikan PT2000 User manual

Ikan
Ikan HB160-GC User manual

Ikan
Ikan PT4500-TM-PEDESTAL User manual

Ikan
Ikan PT4500-PEDESTAL User manual

Ikan
Ikan PT4500-SDI-P2P User manual

Ikan
Ikan PD2 User manual

Ikan
Ikan OYB120 User manual

Ikan
Ikan IB 500 User manual

Ikan
Ikan ELE-EV3-FFSBP User manual

Ikan
Ikan V17PBK-A User manual