IKE 304 User manual

WELCOME TO YOUR ike
• Seamless GIS integration
• Easy to use
• Rugged and reliable
ABOUT THE ike
MAIN INTERFACE CABLE PORT: The main interface connector
cable connects to this port providing multi function capability. A USB
connection supports transferring data to and from a personal computer
using Microsoft® ActiveSync™ . The power connector connects with
ike compliant in-vehicle chargers, portable power pack and standard AC
adaptor. The RS232 connector provides a serial port to connect external
equipment, e.g. RTCM devices.
4
INCLINOMETER: Measures the pitch and roll. This means that ike can be
reliably used as a hand-held device, and does not need a tripod.
GPS ANTENNA CONNECTOR: For use with optional external GPS antenna.
3
2
WINDOWS MOBILE 5 COMPUTER: Forms can be tailor made using
ESRI® ArcPad Application Builder™. A Software Development Kit is
available, which allows further development in Microsoft® embedded
Visual Basic™ or embedded Visual C++™.
1
DIGITAL CAMERA:
A picture tells more than a thousand words.
Crosshairs show where the Laser Distance Meter is aiming, and
ensures the correct target is captured. The photo is locked together
with the target’s position and a timestamp in a GIS database.
10
LASER DISTANCE METER: Measures the distance to the target.
9
COMPASS: Measures the bearing to the target. Useful for storing the
directions from which photos are captured.
7
SEALED COVER: For access to removable memory card.
8
GPS: Captures the GPS position. When gathering data, ike’s position, or
the target position, can be used.
6
POWER:
Internal battery power for full day use.
Rechargeable with mains
adapter or vehicle charger.
5
Email: [email protected]
Web: www.survey-lab.com
HELPFUL HINTS
When capturing data, ensure you are standing in a location
with the clearest view of sky. This will allow a good GPS fix.
Always keep ike on charge when not in use. Recharge your
ike in the car using the car charger provided.
Make sure you are happy with your data before saving.
To ensure crosshairs are saved with the photo, go to
DCA initial screen > Settings > Image > ensure Save
image with crosshair box is checked.
To remove data off ike permanently, check the option
Remove source files from ike after copy in ikesync
settings on your PC.
If ike doesn’t respond after
30 seconds, perform a soft
reset by inserting the stylus tip
into the hole above the External
GPS Antenna Connector, this
will reboot ike.
MAIN INTERFACE CABLE & CONNECTOR
To insert or remove the interface cable,
take hold of the grooved connector
sleeve, do not hold or twist the cable.
To insert connector, hold with the red dot at the top and insert,
push to lock.
To remove, first pull the locking sleeve back, then pull out
connector to remove.
TO INSTALL THE SURVEYLAB SOFTWARE
ON YOUR PC
Insert the Surveylab software CD into your PC.
Run setup.exe.
Follow the on-screen instructions.
TRANSFERRING DATA TO AND FROM ike
USING YOUR PC
Important, please make sure both ArcPad and the DCA on
ike are fully closed before starting the download process.
(To close ArcPad tap ).
To transfer data between ike and your PC, you will need
to connect ike to your PC using the USB cable provided.
See the next page for cable connecting instructions.
Activesync will start automatically and ask if you want to set
up a partnership. Select Guest Partnership, click Next.
Start ikesync on the PC, Start > All Programs > Surveylab >
ikesync.
Within the ikesync menu click Tools > Settings to
select the directory where you want the data stored,
e.g. c:\ike\051231_exampledata.
Click the button ike Transfer to
Computer to start the download.
NOTE:
Users will need to have a licensed copy of ArcPad
installed on their desktop.
ACTIVATING DATA AND PHOTO CAPTURE
Push to activate the data capture initial screen:
You can now select the Shape File from the Data Type pull
down menu that you wish to use.
First time users select the Generic Shape File.
Once you have chosen the form, tap Capture Data.
NOTE:
The correct magnetic declination for your area
will need to be entered into ike. Use settings in the
DCA > Settings > General to enter a new value.
TURNING THE GPS ON
Before ike can capture an image, the GPS must be activated.
Tap icon to show GPS satellites.
Tap
Yes
to turn GPS on.
You will know you are getting a positive GPS
location when your GPS cursor looks like this:
GPS fix status appears directly
below the image.
Sometimes you have to wait for the GPS to get a reading.
Initially, red text will appear: GPS: Fix not available
Once a fix is available, green text will appear: GPS: PDOP: 2.1
(PDOP indicates the quality of a GPS fix, the lower the number
the more accurate the position, i.e. aim for 5.0 or below).
USING THE GPS IN THE DATA CAPTURE
APPLICATION (DCA)
The bar graph in the capture
screen gives a visual indication of
the current distance to the target.
The camera and laser are calibrated to meet at the point
shown in the preview screen which is ringed by the
Move the on and off the target and you will see the
range as shown in the bar graph change as the laser paints
the target. This change in distance will help you assess
when you are on target.
USING THE LASER DISTANCE METER
IN THE DCA
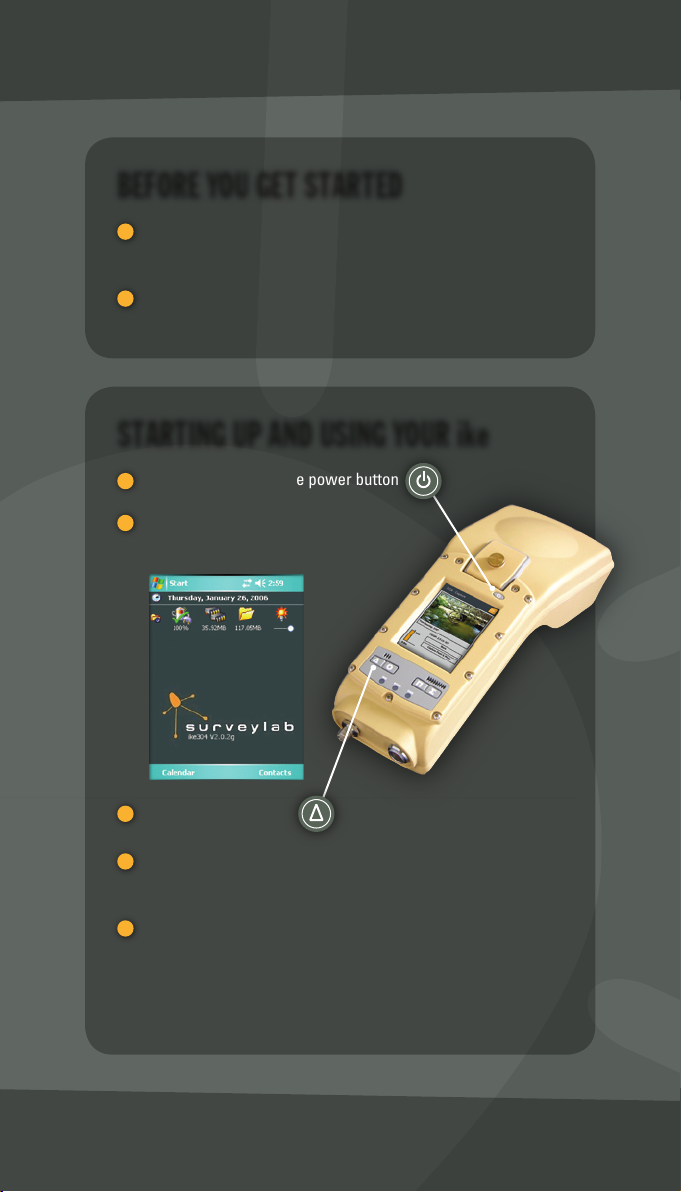
BEFORE YOU GET STARTED
Ensure you have received everything on the supplied
checklist. If not, contact support@survey-lab.com.
Put your ike on charge for at least 4 hours prior to use to
ensure that ike is fully charged.
STARTING UP AND USING YOUR ike
To turn on ike push the power button
The Surveylab screen
will appear:
To start ArcPad, push
If a message appears saying Arcpad.apm not found, tap Yes to
restore default file.
If you have not registered ArcPad, the registration screen will
appear. If you have the registration key, please enter it.
NOTE: You can either register or skip to activate ArcPad for
20 minutes.
When you are happy with the
GPS PDOP value and you are on
target, tap Capture. (Make sure
you keep ike steady when
capturing the point).
A window will appear that will
allow you to review information
recorded at the time of capture.
Check to see if you are satisfied
with the PDOP value, image
quality and distance to target.
If no, tap Retry to start again.
If yes, tap Finish to move on.
Enter image label and comments
in the display fields:
Tap OK to save the data.
ike will return to the ArcPad
screen where you simply push
to start to capture another point.
Further information is available in the ike user manual.
CAPTURING DATA AND PHOTOS
ArcPad ICONS
GPS active
GPS position window
Add layer
View layers
Select feature
Exit ArcPad
Zoom in
Zoom out
Zoom to full extent
Hyperlink
Identify feature
Launch DCA
Pan
Delete selected feature
Edit selected feature
© 2006 Surveylab Limited, all rights reserved, ike, “ike knows everything”,
the Surveylab satellite logo and Surveylab are trademarks of Surveylab Ltd.
ArcPad is the registered trademarks of Environmental Systems Research
Institute, Inc. Trademarks are the property of their respective owners.
New Zealand and International Patents Pending. SL00029 v0.9

ACTIVATING DATA AND PHOTO CAPTURE
Push to activate the data capture initial screen:
You can now select the Shape File from the Data Type pull
down menu that you wish to use.
First time users select the Generic Shape File.
Once you have chosen the form, tap Capture Data.
NOTE:
The correct magnetic declination for your area
will need to be entered into ike. Use settings in the
DCA > Settings > General to enter a new value.
TURNING THE GPS ON
Before ike can capture an image, the GPS must be activated.
Tap icon to show GPS satellites.
Tap
Yes
to turn GPS on.
You will know you are getting a positive GPS
location when your GPS cursor looks like this:
GPS fix status appears directly
below the image.
Sometimes you have to wait for the GPS to get a reading.
Initially, red text will appear: GPS: Fix not available
Once a fix is available, green text will appear: GPS: PDOP: 2.1
(PDOP indicates the quality of a GPS fix, the lower the number
the more accurate the position, i.e. aim for 5.0 or below).
USING THE GPS IN THE DATA CAPTURE
APPLICATION (DCA)
The bar graph in the capture
screen gives a visual indication of
the current distance to the target.
The camera and laser are calibrated to meet at the point
shown in the preview screen which is ringed by the
Move the on and off the target and you will see the
range as shown in the bar graph change as the laser paints
the target. This change in distance will help you assess
when you are on target.
USING THE LASER DISTANCE METER
IN THE DCA
BEFORE YOU GET STARTED
Ensure you have received everything on the supplied
checklist. If not, contact support@survey-lab.com.
Put your ike on charge for at least 4 hours prior to use to
ensure that ike is fully charged.
STARTING UP AND USING YOUR ike
To turn on ike push the power button
The Surveylab screen
will appear:
To start ArcPad, push
If a message appears saying Arcpad.apm not found, tap Yes to
restore default file.
If you have not registered ArcPad, the registration screen will
appear. If you have the registration key, please enter it.
NOTE: You can either register or skip to activate ArcPad for
20 minutes.
When you are happy with the
GPS PDOP value and you are on
target, tap Capture. (Make sure
you keep ike steady when
capturing the point).
A window will appear that will
allow you to review information
recorded at the time of capture.
Check to see if you are satisfied
with the PDOP value, image
quality and distance to target.
If no, tap Retry to start again.
If yes, tap Finish to move on.
Enter image label and comments
in the display fields:
Tap OK to save the data.
ike will return to the ArcPad
screen where you simply push
to start to capture another point.
Further information is available in the ike user manual.
CAPTURING DATA AND PHOTOS
ArcPad ICONS
GPS active
GPS position window
Add layer
View layers
Select feature
Exit ArcPad
Zoom in
Zoom out
Zoom to full extent
Hyperlink
Identify feature
Launch DCA
Pan
Delete selected feature
Edit selected feature
© 2006 Surveylab Limited, all rights reserved, ike, “ike knows everything”,
the Surveylab satellite logo and Surveylab are trademarks of Surveylab Ltd.
ArcPad is the registered trademarks of Environmental Systems Research
Institute, Inc. Trademarks are the property of their respective owners.
New Zealand and International Patents Pending. SL00029 v0.9

WELCOME TO YOUR ike
• Seamless GIS integration
• Easy to use
• Rugged and reliable
ABOUT THE ike
MAIN INTERFACE CABLE PORT: The main interface connector
cable connects to this port providing multi function capability. A USB
connection supports transferring data to and from a personal computer
using Microsoft® ActiveSync™ . The power connector connects with
ike compliant in-vehicle chargers, portable power pack and standard AC
adaptor. The RS232 connector provides a serial port to connect external
equipment, e.g. RTCM devices.
4
INCLINOMETER: Measures the pitch and roll. This means that ike can be
reliably used as a hand-held device, and does not need a tripod.
GPS ANTENNA CONNECTOR: For use with optional external GPS antenna.
3
2
WINDOWS MOBILE 5 COMPUTER: Forms can be tailor made using
ESRI® ArcPad Application Builder™. A Software Development Kit is
available, which allows further development in Microsoft® embedded
Visual Basic™ or embedded Visual C++™.
1
DIGITAL CAMERA:
A picture tells more than a thousand words.
Crosshairs show where the Laser Distance Meter is aiming, and
ensures the correct target is captured. The photo is locked together
with the target’s position and a timestamp in a GIS database.
10
LASER DISTANCE METER: Measures the distance to the target.
9
COMPASS: Measures the bearing to the target. Useful for storing the
directions from which photos are captured.
7
SEALED COVER: For access to removable memory card.
8
GPS: Captures the GPS position. When gathering data, ike’s position, or
the target position, can be used.
6
POWER:
Internal battery power for full day use.
Rechargeable with mains
adapter or vehicle charger.
5
Email: [email protected]
Web: www.survey-lab.com
HELPFUL HINTS
When capturing data, ensure you are standing in a location
with the clearest view of sky. This will allow a good GPS fix.
Always keep ike on charge when not in use. Recharge your
ike in the car using the car charger provided.
Make sure you are happy with your data before saving.
To ensure crosshairs are saved with the photo, go to
DCA initial screen > Settings > Image > ensure Save
image with crosshair box is checked.
To remove data off ike permanently, check the option
Remove source files from ike after copy in ikesync
settings on your PC.
If ike doesn’t respond after
30 seconds, perform a soft
reset by inserting the stylus tip
into the hole above the External
GPS Antenna Connector, this
will reboot ike.
MAIN INTERFACE CABLE & CONNECTOR
To insert or remove the interface cable,
take hold of the grooved connector
sleeve, do not hold or twist the cable.
To insert connector, hold with the red dot at the top and insert,
push to lock.
To remove, first pull the locking sleeve back, then pull out
connector to remove.
TO INSTALL THE SURVEYLAB SOFTWARE
ON YOUR PC
Insert the Surveylab software CD into your PC.
Run setup.exe.
Follow the on-screen instructions.
TRANSFERRING DATA TO AND FROM ike
USING YOUR PC
Important, please make sure both ArcPad and the DCA on
ike are fully closed before starting the download process.
(To close ArcPad tap ).
To transfer data between ike and your PC, you will need
to connect ike to your PC using the USB cable provided.
See the next page for cable connecting instructions.
Activesync will start automatically and ask if you want to set
up a partnership. Select Guest Partnership, click Next.
Start ikesync on the PC, Start > All Programs > Surveylab >
ikesync.
Within the ikesync menu click Tools > Settings to
select the directory where you want the data stored,
e.g. c:\ike\051231_exampledata.
Click the button ike Transfer to
Computer to start the download.
NOTE:
Users will need to have a licensed copy of ArcPad
installed on their desktop.
Table of contents
Other IKE Measuring Instrument manuals


