IKEA LAGAN User manual

LAGAN en
el


ENGLISH 5
ΕΛΛΗΝΙΚΑ 18


5
Table of contents
Safety Information
Before using the appliance, read these
safety instructions. Keep them nearby for
future reference.
These instructions and the appliance itself
provide important safety warnings, to be
observed at all times. The manufacturer
declines any liability for failure to observe
these safety instructions, for inappropriate
use of the appliance or incorrect setting of
controls.
Very young children (0-3 years) should
be kept away from the appliance. Young
children (3-8 years) should be kept away
from the appliance unless continuously
supervised. Children from 8 years old and
above and persons with reduced physical,
sensory or mental capabilities or lack of
experience and knowledge can use this
appliance only if they are supervised or
have been given instructions on safe use
and understand the hazards involved.
Children must not play with the appliance.
Cleaning and user maintenance must
not be carried out by children without
supervision.
PERMITTED USE
CAUTION: the appliance is not intended
to be operated by means of an external
switching device, such as a timer, or
separate remote controlled system.
This appliance is intended to be used
in household and similar applications
such as: sta kitchen areas in shops,
oces and other working environments;
farm houses; by clients in hotels, motels,
bed & breakfast and other residential
environments.
This appliance is not for professional
use. Do not use the appliance outdoors.
The maximum number of place settings
is shown in the product sheet.
The door should not be left in the
open position - risk of tripping. The open
appliance door can only support the
weight of the loaded rack when pulled out.
Do not rest objects on the door or sit or
stand on it.
WARNING: Dishwasher detergents are
strongly alkaline. They can be extremely
dangerous if swallowed. Avoid contact
with the skin and eyes and keep children
away from the dishwasher when the
door is open. Check that the detergent
receptacle is empty after completion of the
wash cycle.
WARNING: Knives and other utensils
with sharp points must be loaded in the
basket with their points down or placed in
a horizontal position - risk of cuts.
Do not store explosive or ammable
substances (e.g. gasoline or aerosol cans)
inside or near the appliance - risk of re.
The appliance must be used only to wash
domestic dishes in accordance with the
instructions in this manual. The water
in the appliance is not potable. Use only
detergent and rinse additives designed for
an automatic dishwasher. When adding
a water softener (salt), run one cycle
immediately with the machine empty, to
avoid corrosion damage to internal parts.
Store the detergent, rinse aid and salt out
of reach of children. Shut o the water
supply and unplug or disconnect the
power before servicing and maintenance.
Disconnect the water and electricity supply
in the event of any malfunction.
INSTALLATION
The appliance must be handled and
installed by two or more persons - risk of
injury. Use protective gloves to unpack and
install - risk of cuts.
Installation, including water supply (if
any), electrical connections and repairs
must be carried out by a qualied
technician. Do not repair or replace any
part of the appliance unless specically
stated in the user manual. Keep children
ENGLISH
Safety Information 5
Product description 7
Control panel 7
First Use 8
Loading the racks 9
Daily Use 10
Programs table 11
Cleaning and maintenance 12
What to do if ... 13
After-Sales Service 14
Technical Data 15
Environmental concerns 15
Installation 16
IKEA GUARANTEE 17

6ENGLISH
away from the installation site. After
unpacking the appliance, make sure that it
has not been damaged during transport.
In the event of problems, contact the
dealer or your nearest After-sales Service.
Once installed, packaging waste (plastic,
styrofoam parts etc.) must be stored out of
reach of children - risk of suocation.
The appliance must be disconnected from
the power supply before any installation
operation - risk of electrical shock. During
installation, make sure the appliance does
not damage the power cable - risk of re or
electrical shock. Only activate the appliance
when the installation has been completed.
Connect the dishwasher to the water
mains using only new hose sets. The old
hose sets should not be reused. All hoses
must be securely clamped to prevent them
coming loose during operation.
All local waterboard regulations must be
complied with.
Water supply pressure 0.05 - 1.0 MPa.
The appliance must be placed against
the wall or built into furniture to limit the
access to its rearside.
For dishwashers having ventilation
openings in the base, the openings must 6
not be obstructed by a carpet.
If installing the dishwasher at the end
of a row of units making the side panel
accessible, the hinge area must be covered
to avoid risk of injury.
The inlet water temperature depends on
the dishwasher model. If the installed inlet
hose is marked “25°C Max”, the maximum
allowed water temperature is 25°C. For all
other models the maximum allowed water
temperature is 60°C. Do not cut hoses
and, in the case of appliances tted with
a waterstop system, do not immerse the
plastic casing containing the inlet hose
in water. If hoses are not long enough,
contact your local dealer. Make sure the
inlet and drain hoses are kink-free and are
not crushed. Before using the applinace
for the rst time, check the water inlet
and drain hose for leaks. Make sure that
the four feet are stable and resting on
the oor, adjusting them as required, and
check that the dishwasher is perfectly
levelled using a spirit level.
Use the appliance only when the covers
shown on diagram 19 in the Assembly
instruction are correctly assembled - risk
of injury.
ELECTRICAL WARNINGS
The rating plate is on the edge of the
dishwasher door (visible when the door is
open).
It must be possible to disconnect the
appliance from the power supply by
unplugging it if plug is accessible, or by
a multi-pole switch installed upstream of
the socket in accordance with the wiring
rules and the appliance must be earthed in
conformity with national electrical safety
standards.
Do not use extension leads, multiple
sockets or adapters. The electrical
components must not be accessible to
the user after installation. Do not use the
appliance when you are wet or barefoot.
Do not operate this appliance if it has
a damaged power cable or plug, if it is
not working properly, or if it has been
damaged or dropped.
If the supply cord is damaged, it must
be replaced with an identical one by the
manufacturer, its service agent or similarly
qualied persons in order to avoid a
hazard - risk of electrical shock.
If the tted plug is not suitable for your
socket outlet, contact a qualied technician.
Do not pull the power supply cable. Do not
immerse the mains cord or plug in water.
Keep the cord away from hot surfaces.
ELECTRICAL CONNECTION FOR GREAT
BRITAIN AND IRELAND ONLY
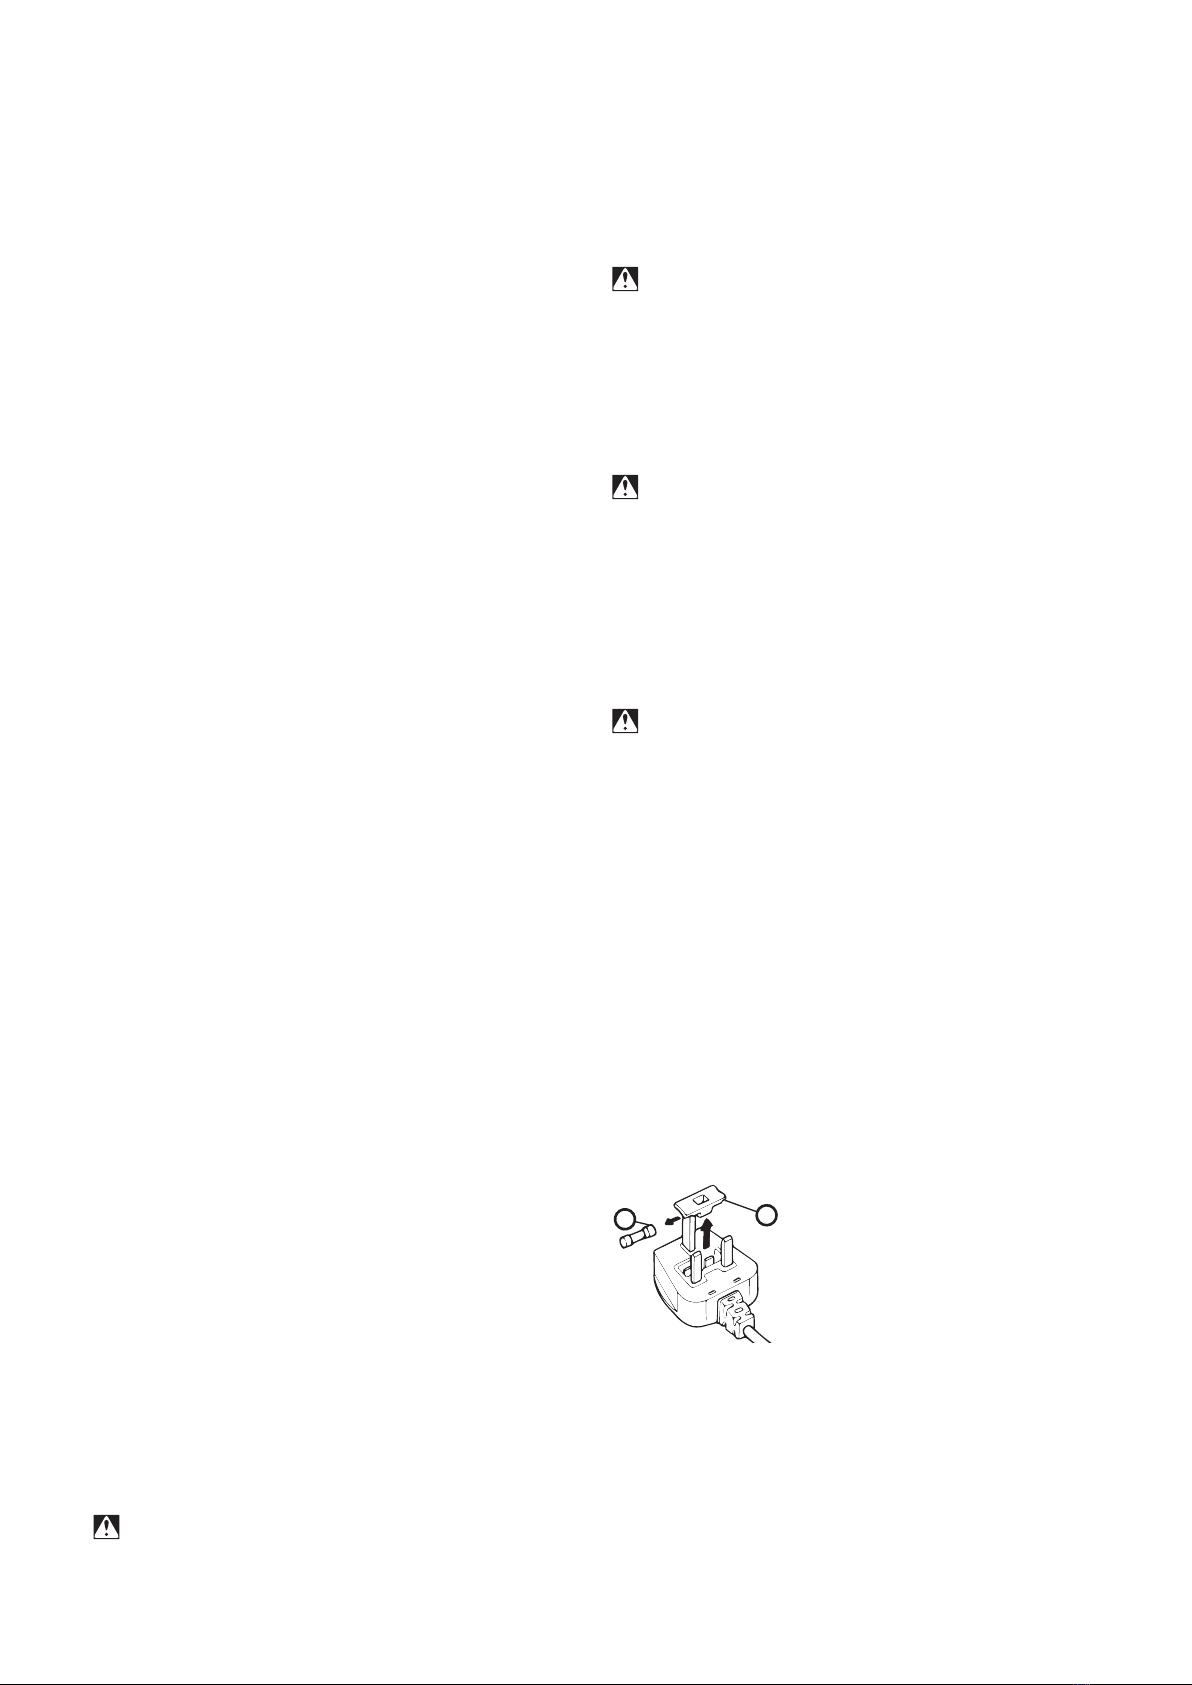
Fuse replacement.
If the mains lead of this appliance is tted
with a BS 1363A 13amp fused plug, to
change a fuse in this type of plug use an
A.S.T.A. approved fuse to BS1362 type and
proceed as follows:
1. Remove the fuse cover
(A) and fuse (B).
2.Fit replacement 13A
fuse into fuse cover.
3.Ret both into plug.
Important:
The fuse cover must be retted when
changing a fuse and if the fuse cover is lost
the plug must not be used until a correct
replacement is tted.
Correct replacement are identied by the
colour insert or the colour embossed in
words on the base of the plug.
Replacement fuse covers are available
from your local electrical store.
BA

7ENGLISH
For the Republic of Ireland only
The information given in respect of Great
Britain will frequently apply, but a third
type of plug and socket is also used, the
2-pin, side earth type.
Socket outlet / plug (valid for both
countries)
If the tted plug is not suitable for your
socket outlet, please contact After-sales
Service for further instruction. Please do
not attempt to change plug yourself. This
procedure needs to be carried out by a
qualied technician in compliance with
the manufactures instructions and current
standard safety regulations.
CLEANING AND MAINTENANCE
WARNING: Ensure that the appliance
is switched o and disconnected from
the power supply before performing any
maintenance operation. To avoid risk
of personal injury use protective gloves
(risk of laceration) and safety shoes (risk
of contusion); be sure to handle by two
persons (reduce load); never use steam
cleaning equipment (risk of electric shock).
Non-professional repairs not authorized
by the manufacturer could result in a
risk to health and safety, for which the
manufacturer cannot be held liable.
Any defect or damage caused from
nonprofessional repairs or maintenance
will not be covered by the guarantee,
the terms of which are outlined in the
document delivered with the unit.
Product description
1Upper rack
2 Foldable aps
3Upper rack height adjuster
4Upper sprayer arm
5Lower rack
6Cutlery basket
7Lower sprayer arm
8Filter Assembly
9Salt reservoir
10 Detergent and Rinse Aid dispensers
11 Control panel
2
1
5
4
3
6
10
11
7
8
9
Control panel
1 On-O/Reset button with indicator light
2Program selection button
3 Salt rell indicator light
4Program indicator lights
5 START/Pause button with indicator light
50° 65° 45°
55°
45°
4
5PROGRAMS
1 2 3 4 5

8ENGLISH
Water Hardness Table
Level °dH German
degrees
°fH French
degrees
°Clark English
degrees
1Soft 0 - 6 0 - 10 0 - 7
2Medium 7 - 11 11 - 20 8 - 14
3Average 12 - 16 21 - 29 15 - 20
4Hard 17 - 34 30 - 60 21 - 42
5Very hard 35 - 50 61 - 90 43 - 62
Water Softening System
Water softener automatically reduces water hardness, conse-
quently preventing scale buildup on heater, contributing also
to better cleaning eciency. This system regenerates itself with
salt, therefore it is required to rell salt container when empty.
Frequency of regeneration depends on water hardness level
setting - regeneration takes place once per 6Eco cycles with
water hardness level set to 3.
Regeneration process starts in nal rinse and nishes in drying
phase, before cycle ends.
• Single regeneration consumes: ~3.5 L of water;
• Takes up to 5 additional minutes for the cycle;
• Consumes below 0.005 kWh of energy.
Filling the rinse aid dispenser
Rinse aid makes dish DRYING easier. The rinse aid dispenser A
should be lled when when the dark optical indicator on the
dispenser door Cbecomes transparent.
1. Open the dispenser Bby pressing and pulling up the tab on
the lid.
2. Carefully introduce the rinse aid as far as the maximum (110
ml) reference notch of the lling space - avoid spilling it. If this
happens, clean the spill immediately with a dry cloth.
3. Press the lid down until you hear a click to close it.
NEVER pour the rinse aid directly into the tub.
Adjusting the dosage of rinse aid
If you are not completely satised with the drying results, you
can adjust the quantity of rinse aid used.
• Switch the dishwasher on using the ON/OFF button.
• Switch it o using the ON/OFF button.
• Press button three times - a beep will be heard.
• Switch it on using the ON/OFF button.
• The program indicator light of the current set level ashes.
• Press button to select the level of rinse aid quantity to be
supplied.
• Switch it o using the ON/OFF button.
Setting is complete!
B A
C
First Use
Advice regarding the rst time use
Before installation and rst usage of the appliance please read
carefully „ SAFETY INSTRUCTION” and „ASSEMBLY INSTRUCTION”
available in the product literature bag. Please remember to
remove all transport protection parts from the dishwasher.
Filling the salt reservoir
The use of salt prevents the formation of LIMESCALE on the
dishes andon the machine’s functional components.
• It is mandatory that THE SALT RESERVOIR BE NEVER EMPTY.
• It is important to set the water hardness.
The salt reservoir is located in the lower part of the dishwasher
(see PRODUCT DESCRIPTION) and should be lled when the
SALT REFILL indicator light in the control panel is lit.
1. Remove the lower rack and unscrew
the reservoir cap (anticlockwise).
2. Position the funnel (see gure) and
ll the salt reservoir right up to its
edge (approximately 1 kg); it is not
unusual for a little water to leak out.
3. Only the rst time you do this: ll
the salt reservoir with water.
4. Remove the funnel and wipe any
salt residue away from the opening.
Make sure the cap is screwed on tightly, so that no detergent
can get into the container during the wash program (this could
damage the water softener beyond repair).
As soon as this procedure is complete, run a program without
loading. The “Pre-Wash” program alone is NOT sucient.
Residual saline solution or grains of salt can lead to corrosion,
irreparably damaging the stainless steel components.
The guarantee is not applicable if faults are caused by such
circumstances.
Only use salt that has been specically designed for
dishwashers. If the salt container is not lled, the water
softener and the heating element may be damaged
as a result of limescale accumulation. Using of Salt is
recommended with any type of dishwasher detergent.
Whenever you need to add salt, it is mandatory to complete
the procedure before the beginning of the washing cycle to
avoid corrosion.
Setting the water hardness
To allow the water softener to work in a perfect way, it is
essential that the water hardness setting is based on the actual
water hardness in your house. This information can be obtained
from your local water supplier. The factory sets the default value
for the water hardness.
• Switch on the appliance by pressing the ON/OFF button.
• Switch o the appliance by pressing the ON/OFF button.
• Hold down button for 5 seconds, until you hear a beep.
• Switch on the appliance by pressing quickly the ON/OFF
button.
• The program indicator light of the current set level ashes.
• Press button to select the desired hardness level (see
WATER HARDNESS TABLE).
• Switch o the appliance by pressing the ON/OFF button.
Setting is complete!

9ENGLISH
If the rinse aid level is set to 1(ECO), no rinse aid will be
supplied. The LOW RINSE AID indicator light will not be lit if you
run out of rinse aid. A maximum of 5 levels can be set according
to the dishwasher model. The factory setting is specic to the
model, please follow instruction above to check this for your
machine.
• If you see bluish streaks on the dishes, set a low number (2-3).
• If there are drops of water or limescale marks on the dishes,
set a high number (4-5).
Filling the detergent dispenser
Usage of detergent not designed for dishwashers may cause
malfunction or damage to the appliance.
To achieve the best washing and drying results, the combined
use of detergent, rinse aid liquid and rened salt is required.
We recommend using detergents that do not contain
phosphates or chlorine, as these products are harmful to the
environment.
Good washing results also depend on the correct amount of
detergent being used.
Exceeding the stated amount does not result in a more eective
wash and increases environmental pollution.
The amount can be adjusted to the soil level. In the case of
normally soiled items, use approximately either 35g (powder
detergent) or 35ml (liquid detergent) and additional tea spoon
of detergent directly inside the tub. If tablets are used, one
tablet will be enough.
If the crockery is only lightly soiled or if it has been rinsed
with water before being placed in the dishwasher, reduce the
amount of detergent used accordingly (minimum 25 g/ml) e.g.
skip the powder/gel putted inside the tub.
To open the detergent dispenser press button D.
Introduce the detergent into the dry dispenser Eonly.
Place the amount of detergent for pre-washing directly
inside the tub.
1. When measuring out
the detergent refer to
the mentioned earlier
information to add the
proper quantity. Inside
the dispenser Ethere are
indications to help the
detergent dosing.
2. Remove detergent
residues from the edges
of the dispenser and
close the cover until it
clicks.
3. Close the lid of the detergent dispenser by pulling it up until
the closing device is secured in place.
The detergent dispenser automatically opens up at the right
time according to the program.
D
E
Loading the racks
TIPS
Before loading the baskets, remove all food residues from
the crockery and empty the glasses. You do not need to rinse
beforehand under running water.
Arrange the crockery so that it is held in place rmly and does
not tip over; and arrange the containers with the openings
facing downwards and the concave/convex parts placed
obliquely, thus allowing the water to reach every surface and
ow freely.
Warning: lids, handles, trays and frying pans do not prevent the
sprayer arms from rotating.
Place any small items in the cutlery basket. Very soiled dishes
and pans should be placed in the lower basket because in this
sector the water sprays are stronger and allow a higher washing
performance.
After loading the appliance, make sure that the sprayer arms
can rotate freely.
Upper rack
Load delicate and light dishes: glasses, cups, saucers, low salad
bowls.
(loading example for the upper rack)
Foldable aps with adjustable
position
The side foldable aps can be fold or
unfold to optimize the arrangement of
crockery inside the rack.
Wine glasses can be placed safely in the
foldable aps by inserting the stem of
each glass into the corresponding slots.
Depending on the model:
• to unfold the aps there is needed to
slide it up and rotate or release it from
the snaps and pull it down.
• to fold the aps there is needed to
rotate it and slide aps down or pull it
up and attach aps to the snaps.
Adjusting the height of the upper rack
The height of the upper rack can be
adjusted: high position to place bulky
crockery in the lower basket and low
position to make the most of the tip-
up supports by creating more space
upwards and avoid collision with the
items loaded into lower rack.
The upper rack is equipped with a
Upper Rack height adjuster (see gure), without pressing the
levers, lift it up by simply holding the rack sides, as soon as the
rack is stable in its upper position.
To restore to the lower position, press the levers Aat the sides
of the rack and move the basket downwards.
We strongly recommend that you do not adjust the height
of the rack when it is loaded.
NEVER raise or lower the basket on one side only.

10ENGLISH
Lower rack
For pots, lids, plates, salad bowls, cutlery etc. Large plates and
lids should ideally be placed at the sides to avoid interferences
with the spray arm.
(loading example for the lower rack)
Cutlery basket
The basket is equipped with top grilles for improved cutlery
arrangement. The cutlery basket should be positioned only at
the front of the lower rack.
Knives and other utensils with sharp edges must be placed
in the cutlery basket with the points facing downwards
or they must be positioned horizontally in the tip-up
compartments on the upper rack.
Unsuitable crockery
• Wooden crockery and cutlery.
• Delicate decorated glasses, artistic handicraft and antique
crockery.
Their decorations are not resistant.
• Parts in synthetic material which do not withstand high tempera-
tures.
• Copper and tin crockery.
• Crockery soiled with ash, wax, lubricating grease or ink.
The colours of glass decorations and aluminium/silver pieces can
change and fade during the washing process. Some types of glass
(e.g. crystal objects) can become opaque after a number of wash
cycles too.
Damage to glass and crockery
• Only use glasses and porcelain guaranteed by the manufac-
turer as dishwasher safe.
• Use a delicate detergent suitable for crockery
• Collect glasses and cutlery from the dishwasher as soon as
the wash cycle is over.
Hygiene
To avoid odour and sediment which can be accumulated in the
dishwasher please run a high temperature program at least once
a month. Use a tea spoon of detergent and run it without the
loading to clean your appliance.
TIPS ON ENERGY SAVING
• When the household dishwasher is used according to the
manufacturer’s instructions, washing tableware in a dish-
washer usually consumes less energy and water than hand
dishwashing.
• In order to maximize dishwasher eciency it is recommended
to initiate the wash cycle once dishwasher is fully loaded.
Loading the household dishwasher up to the capacity indicated
by the manufacturer will contribute to energy and water savings.
Information on correct loading of tableware can be found in
Loading chapter. Incorrect loading or overloading the dish-
washer may increase resources usage (such as water, energy
and time, as well as increase noise level), reducing cleaning and
drying performance.
• Manual pre-rinsing of tableware items leads to increased wa-
ter and energy consumption and is not recommended.
Daily Use
1. CHECK WATER CONNECTION
Check that the dishwasher is connected to the water supply
and that the tap is open.
2. SWITCH ON THE DISHWASHER
Open the door and press the ON/OFF button.
3. LOAD THE RACKS (see LOADING THE RACKS)
4. FILLING THE DETERGENT DISPENSER
(see FILLING THE DETERGENT DISPENSER).
5. CHOOSE THE PROGRAM AND CUSTOMISE THE CYCLE
Select the most appropriate program in accordance with
the type of crockery and its soiling level (see PROGRAMS
DESCRIPTION) by pressing the button.
6. START
Start the wash cycle by pressing START/Pause button (led
is lit) and closing the door within 4 sec. When the program
starts you hear a single beep. If the door was not closed with-
in 4sec., the alarm sound will be played. In this case, open the
door, press START/Pause button and close the door again
within 4 sec.
7. END OF WASH CYCLE
The end of the wash cycle is indicated by beeps and by the
ashing of the indicator light of the selected program. Open
the door and switch o the appliance by pressing the ON/OFF
button.
Wait for a few minutes before removing the crockery - to
avoid burns. Unload the racks, beginning with the lower one.
The machine will switch o automatically during certain ex-
tended periods of inactivity, in order to minimise electricity
consumption. If the crockery is only lightly soiled or if it has
been rinsed with water before being placed in the dishwash-
er, reduce the amount of detergent used accordingly.

11ENGLISH
Modifying a running program
If a wrong program was selected, it is possible to change it, provided
that it has only just begun: open the door, press and hold the ON/
OFF button, the machine will switch o. Switch the machine back on
using the ON/OFF button and select the new wash cycle; Start the
wash cycle by pressing START/Pause button and closing the door
within 4 sec.
If it takes more than 4 seconds the appliance automatically pauses
and you must restart the appliance again by repeating the last
operation.
Adding extra crockery
Without switching o the machine, open the door (START/Pause led
starts blinking) (be aware of HOT steam!) and place the crockery
inside the dishwasher. Press the START/Pause button and close the
door within 4 sec., the cycle will resume from the point at which it
was interrupted.
Accidental interruptions
If the door is opened during the wash cycle, or if there is a power cut,
the cycle pauses. Press the START/Pause button and close the door
within 4 sec., the cycle will resume from the point at which it was
interrupted.
ECO program data is measured under laboratory conditions according to European Standard EN 60436:2020.
Note for Test Laboratories: For information on comparative EN testing conditions, please send an email to the following address:
Pre-treatment of the dishes is not needed before any of the programs.
*) Values given for programes other than the eco program are indicative only. The actual time may vary depending on many factors such as
temperature and pressure of the incoming water, room temperature, amount of detergent, quantity and type of load, load balancing, additional
selected options and sensor calibration.
1. ECO - Eco program is suitable to clean normally soiled tableware, that for this use, it is the most ecient program in terms of its combined
energy and water consumption, and that it is used to assess compliance with the EU Ecodesign legislation.
2. FAST WASH 40’ - Program for limited quantity of normally soiled crockery. Ensures optimal cleaning performance in shorter time.
3. INTENSIVE - Program recommended for heavily soiled crockery, especially suitable for pans and saucepans (not to be used for delicate
items).
4. MIXED - Mixed soil. For normally soiled dishes with dried food residues.
5. GLASS - Program for delicate items, which are more sensitive to high temperatures, for example glasses and cups.
Program Drying
phase
Duration of
wash program
(h:min)*)
Water
consumption
(litres/cycle)
Energy
consumption
(kWh/cycle)
1 Eco 50°
9
ENGLISH
1.Press the DELAY button: the corresponding «h» symbol
appears on the display; each time you press the button,
the time (1h, 2h, etc. up to max. 12h) from the start of
the selected wash cycle will be increased.
2.Select the wash program, press the START/PAUSE
button and within 4 seconds close the door: the timer
will begin counting down.
3.Once this time has elapsed, the indicator light «h»
switches off and the wash cycle begins.
To adjust the delay time and select a shorter period of time,
press the DELAY button. To cancel it, press the button
repeatedly until the selected delayed start indicator light
«h» switches off.
The DELAY function cannot be set once a wash cycle
has been started.
NaturalDry
Door opening system NaturalDry is a convection drying system
which automatically opens the door during/after drying phase to
ensure exceptional drying performance every day. Door opens at
the temperature that is safe to your kitchen furniture.
As additional steam protection, special designed protection foil is
added together with the dishwasher. To see how to mount protec-
tion foil please refer to (INSTALLATION GUIDE).
NaturalDry functionality could be disabled by the user as follows:
1.Go to the Dishwasher software menu pressing and holding
button (6 sec).
2.You switched to NaturalDry Control Menu, you could change
status of NaturalDry functionality by pressing button:
E– enabled d– disabled
To conrm the change and exit from the Control Menu please
press and hold button (3 sec).
DELAY
The start time of the program may be delayed for a period
of time between 1and 12 hours.
Program
Drying
phase
Natural
Dry
Available
options *)
Duration of
wash pro-
gram
(h:min)**)
Water
consumption
(litres/cycle)
Energy
consumption
(kWh/cycle)
50° 2:45 12.0 0.92
1 Eco
2 Conventional
wash and dry 55° 2:00 15.0 1.35
3Intensive 65° - 2:30 15.0 1.50
4Fast 50° -- 0:55 11.5 1.10
5Sanitizing 65° - 1:40 11.5 1.30
6Pre-Wash
-
-- 0:10 4.5 0.01
7Self-Clean 65° --0:50 8.0 0.80
ECO program data is measured under laboratory conditions according to European Standard EN 60436:2019.
Note for Test Laboratories: For information on comparative EN testing conditions, please send an email to the following
Pre-treatment of the dishes is not needed before any of the programs.
*) Not all options can be used simultaneously.
**) Values given for programes other than the eco program are indicative only. The actual time may vary depending on many
factors such as temperature and pressure of the incoming water, room temperature, amount of detergent, quantity and type of
load, load balancing, additional selected options and sensor calibration.
Standby consumption: Left-on mode consumption: 5 W - Off mode consumption: 0.5 W
PROGRAMS DESCRIPTION
3:35 9.5 0.95
2 Fast Wash 40’ 45° - 0:40 9.0 0.50
3 Intensive 65°
9
ENGLISH
1.Press the DELAY button: the corresponding «h» symbol
appears on the display; each time you press the button,
the time (1h, 2h, etc. up to max. 12h) from the start of
the selected wash cycle will be increased.
2.Select the wash program, press the START/PAUSE
button and within 4 seconds close the door: the timer
will begin counting down.
3.Once this time has elapsed, the indicator light «h»
switches off and the wash cycle begins.
To adjust the delay time and select a shorter period of time,
press the DELAY button. To cancel it, press the button
repeatedly until the selected delayed start indicator light
«h» switches off.
The DELAY function cannot be set once a wash cycle
has been started.
NaturalDry
Door opening system NaturalDry is a convection drying system
which automatically opens the door during/after drying phase to
ensure exceptional drying performance every day. Door opens at
the temperature that is safe to your kitchen furniture.
As additional steam protection, special designed protection foil is
added together with the dishwasher. To see how to mount protec-
tion foil please refer to (INSTALLATION GUIDE).
NaturalDry functionality could be disabled by the user as follows:
1.Go to the Dishwasher software menu pressing and holding
button (6 sec).
2.You switched to NaturalDry Control Menu, you could change
status of NaturalDry functionality by pressing button:
E– enabled d– disabled
To conrm the change and exit from the Control Menu please
press and hold button (3 sec).
DELAY
The start time of the program may be delayed for a period
of time between 1and 12 hours.
Program
Drying
phase
Natural
Dry
Available
options *)
Duration of
wash pro-
gram
(h:min)**)
Water
consumption
(litres/cycle)
Energy
consumption
(kWh/cycle)
50° 2:45 12.0 0.92
1 Eco
2 Conventional
wash and dry 55° 2:00 15.0 1.35
3Intensive 65° - 2:30 15.0 1.50
4Fast 50° -- 0:55 11.5 1.10
5Sanitizing 65° - 1:40 11.5 1.30
6Pre-Wash
-
-- 0:10 4.5 0.01
7Self-Clean 65° --0:50 8.0 0.80
ECO program data is measured under laboratory conditions according to European Standard EN 60436:2019.
Note for Test Laboratories: For information on comparative EN testing conditions, please send an email to the following
Pre-treatment of the dishes is not needed before any of the programs.
*) Not all options can be used simultaneously.
**) Values given for programes other than the eco program are indicative only. The actual time may vary depending on many
factors such as temperature and pressure of the incoming water, room temperature, amount of detergent, quantity and type of
load, load balancing, additional selected options and sensor calibration.
Standby consumption: Left-on mode consumption: 5 W - Off mode consumption: 0.5 W
PROGRAMS DESCRIPTION
2:40 18.0 1.60
4 Mixed 55°
9
ENGLISH
1.Press the DELAY button: the corresponding «h» symbol
appears on the display; each time you press the button,
the time (1h, 2h, etc. up to max. 12h) from the start of
the selected wash cycle will be increased.
2.Select the wash program, press the START/PAUSE
button and within 4 seconds close the door: the timer
will begin counting down.
3.Once this time has elapsed, the indicator light «h»
switches off and the wash cycle begins.
To adjust the delay time and select a shorter period of time,
press the DELAY button. To cancel it, press the button
repeatedly until the selected delayed start indicator light
«h» switches off.
The DELAY function cannot be set once a wash cycle
has been started.
NaturalDry
Door opening system NaturalDry is a convection drying system
which automatically opens the door during/after drying phase to
ensure exceptional drying performance every day. Door opens at
the temperature that is safe to your kitchen furniture.
As additional steam protection, special designed protection foil is
added together with the dishwasher. To see how to mount protec-
tion foil please refer to (INSTALLATION GUIDE).
NaturalDry functionality could be disabled by the user as follows:
1.Go to the Dishwasher software menu pressing and holding
button (6 sec).
2.You switched to NaturalDry Control Menu, you could change
status of NaturalDry functionality by pressing button:
E– enabled d– disabled
To conrm the change and exit from the Control Menu please
press and hold button (3 sec).
DELAY
The start time of the program may be delayed for a period
of time between 1and 12 hours.
Program
Drying
phase
Natural
Dry
Available
options *)
Duration of
wash pro-
gram
(h:min)**)
Water
consumption
(litres/cycle)
Energy
consumption
(kWh/cycle)
50° 2:45 12.0 0.92
1 Eco
2 Conventional
wash and dry 55° 2:00 15.0 1.35
3Intensive 65° - 2:30 15.0 1.50
4Fast 50° -- 0:55 11.5 1.10
5Sanitizing 65° - 1:40 11.5 1.30
6Pre-Wash
-
-- 0:10 4.5 0.01
7Self-Clean 65° --0:50 8.0 0.80
ECO program data is measured under laboratory conditions according to European Standard EN 60436:2019.
Note for Test Laboratories: For information on comparative EN testing conditions, please send an email to the following
Pre-treatment of the dishes is not needed before any of the programs.
*) Not all options can be used simultaneously.
**) Values given for programes other than the eco program are indicative only. The actual time may vary depending on many
factors such as temperature and pressure of the incoming water, room temperature, amount of detergent, quantity and type of
load, load balancing, additional selected options and sensor calibration.
Standby consumption: Left-on mode consumption: 5 W - Off mode consumption: 0.5 W
PROGRAMS DESCRIPTION
2:15 16.0 1.40
5 Glass 45°
9
ENGLISH
1.Press the DELAY button: the corresponding «h» symbol
appears on the display; each time you press the button,
the time (1h, 2h, etc. up to max. 12h) from the start of
the selected wash cycle will be increased.
2.Select the wash program, press the START/PAUSE
button and within 4 seconds close the door: the timer
will begin counting down.
3.Once this time has elapsed, the indicator light «h»
switches off and the wash cycle begins.
To adjust the delay time and select a shorter period of time,
press the DELAY button. To cancel it, press the button
repeatedly until the selected delayed start indicator light
«h» switches off.
The DELAY function cannot be set once a wash cycle
has been started.
NaturalDry
Door opening system NaturalDry is a convection drying system
which automatically opens the door during/after drying phase to
ensure exceptional drying performance every day. Door opens at
the temperature that is safe to your kitchen furniture.
As additional steam protection, special designed protection foil is
added together with the dishwasher. To see how to mount protec-
tion foil please refer to (INSTALLATION GUIDE).
NaturalDry functionality could be disabled by the user as follows:
1.Go to the Dishwasher software menu pressing and holding
button (6 sec).
2.You switched to NaturalDry Control Menu, you could change
status of NaturalDry functionality by pressing button:
E– enabled d– disabled
To conrm the change and exit from the Control Menu please
press and hold button (3 sec).
DELAY
The start time of the program may be delayed for a period
of time between 1and 12 hours.
Program
Drying
phase
Natural
Dry
Available
options *)
Duration of
wash pro-
gram
(h:min)**)
Water
consumption
(litres/cycle)
Energy
consumption
(kWh/cycle)
50° 2:45 12.0 0.92
1 Eco
2 Conventional
wash and dry 55° 2:00 15.0 1.35
3Intensive 65° - 2:30 15.0 1.50
4Fast 50° -- 0:55 11.5 1.10
5Sanitizing 65° - 1:40 11.5 1.30
6Pre-Wash
-
-- 0:10 4.5 0.01
7Self-Clean 65° --0:50 8.0 0.80
ECO program data is measured under laboratory conditions according to European Standard EN 60436:2019.
Note for Test Laboratories: For information on comparative EN testing conditions, please send an email to the following
Pre-treatment of the dishes is not needed before any of the programs.
*) Not all options can be used simultaneously.
**) Values given for programes other than the eco program are indicative only. The actual time may vary depending on many
factors such as temperature and pressure of the incoming water, room temperature, amount of detergent, quantity and type of
load, load balancing, additional selected options and sensor calibration.
Standby consumption: Left-on mode consumption: 5 W - Off mode consumption: 0.5 W
PROGRAMS DESCRIPTION
1:40 11.5 1.20
Programs table

12ENGLISH
ATTENTION: Always unplug the appliance when cleaning it and
when performing maintenance work. Do not use ammable
liquids to clean the machine.
Cleaning the dishwasher
Any marks on the inside of the appliance may
be removed using a cloth dampened with water
anda little vinegar.
The external surfaces of the machine and the
control panel can be cleaned using a non-
abrasive cloth which has been dampened with
water. Do not use solvents or abrasive products.
Preventing unpleasant odours
Always keep the door of the appliance ajar in order to avoid
moisture from forming and being trapped inside the machine.
Clean the seals around the door and detergent dispensers
regularly using a damp sponge. This will avoid food becoming
trapped in the seals, which is the main cause behind the
formation of unpleasant odours.
Cheking the water supply hose
Check the inlet hose regularly for brittleness and cracks. If
damaged, replace it by a new hose available through our After-
Sales Service or your specialist dealer. Depending on the hose
type:
If the inlet hose has a transparent coating, periodically check
if the colour intensies locally. If yes, the hose may have a leak
and should be replaced.
For water stop hoses: check the small safety valve inspection
window (see arrow). If it is red, the water stop function was
triggered, and the hose must be replaced by a new one.
For unscrewing this hose, press the release button while
unscrewing the hose.
Cleaning the water inlet hose
If the water hoses are new or have not been used for an
extended period of time, let the water run to make sure it is
clear and free of impurities before performing the necessary
connections. If this precaution is not taken, the water inlet could
become blocked and damage the dishwasher.
Cleaning the lter assembly
Regularly clean the lter assembly so that the lters do not clog
and that the waste water ows away correctly.
Using dishwasher with clogged lters or foreign objects inside l-
tration system or sprayarms may cause unit malfunction resulting
in lose of performance, noisy work or higher resources usage.
The lter assembly consists of three lters which remove food
residues from the washing water and then recirculate the water.
The dishwasher must not be used without lters or if the
lter is loose.
Cleaning and maintenance
At least once per month or after each 30 cycles, check the lter as-
sembly and if necessary clean it thoroughly under running water,
using a non-metallic brush and following the instructions below:
1. Turn the cylindrical lter Ain an anti-clockwise direction and
pull it out (Fig 1).
2. Remove the cup lter Bby exerting a slight pressure on the
side aps (Fig 2).
3. Slide out the stainless-steel plate lter C(Fig 3).
4. In case you nd foreign objects (such as broken glass,
porcelain, bones, fruit seeds etc.) please remove them
carefully.
5. Inspect the trap and remove any food residues. NEVER
REMOVE the wash-cycle pump protection (black detail) (Fig 4).
After cleaning the lters, replace the lter assembly and x it in
position correctly; this is essential for maintaining the ecient
operation of the dishwasher.
Cleaning the spray arms
On occasions, food residue may become encrusted onto the
spray arms and
block the holes
used to spray the
water. It is therefore
recommended that
you check the arms
from time to time
and clean them with
a small non-metallic
brush.
To remove the upper
spray arm, turn the
plastic locking ring in a
clockwise direction. The upper spray arm should be replaced so
that the side with the greater number of holes is facing
upwards.
The lower spray arm may be
removed by pulling it upwards
and rotating it anti-clockwise.
21
43
A
C
A
B

13ENGLISH
What to do if ...
In case your dishwasher doesn’t work properly, check if the problem can be solved by going through the following
list. For other errors or issues please contact authorized After-sales Service which contact details can be found in
the guarantee booklet. Spare parts will be available for a period of either up to 7 or up to 10 years, according to the
specic Regulation requirements.
The spare parts can be found: https://parts-selfservice.whirlpool.com/en/landing
Problems... Possible causes... Solutions...
Salt indicator
is lit
Salt reservoir is empty. (After rell the salt
indicator may remain lit for several wash
cycles).
Rell reservoir with salt (for more information - see page 8).
Adjust water hardness - see table, page 8.
The dishwasher
won’t start or
does not respond
to commands.
The appliance has not been plugged in
properly. Insert the plug into the socket.
Power outage.
For safety reasons, dishwasher will not re-start automatically when
power returns. Open dishwasher door, press START/Pause button
and close the door within 4 seconds.
The dishwasher door is not closed. Vigorously push the door until you hear the “click”.
Cycle is interupted by door opening for
more than 4 seconds. Press START/Pause and close the door within 4 seconds.
It does not respond to commands.
Switch o the appliance by pressing the ON/OFF button, switch it
back on after approximately one minute and restart the program.
If problem persists, unplug the appliance for 1 minute, then plug it
back in.
The dishwasher
won’t drain.
The wash cycle has not nished yet. Wait until the wash cycle nishes.
The drain hose is bent. Check that the drain hose is not bent (see INSTALLATION).
The sink drain pipe is blocked. Clean the sink drain pipe.
The lter is clogged up with food residues. Clean the lter (see CLEANING THE FILTER ASSEMBLY).
The dishwasher
makes excessive
noise.
The dishes are rattling against each Position the crockery correctly (see LOADING THE RACKS).
An excessive amount of foam has been
produced.
The detergent has not been measured out correctly or it is not
suitable for use in dishwashers (see FILLING THE DETERGENT
DISPENSER). Restart the current cycle by switching OFF the
dishwasher, then switch it on again, select a new program, press
START/Pause and close the door within 4 seconds. Please do not
add any detergent.
The dishes are
not clean.
The crockery has not been arranged
properly. Arrange the crockery correctly (see LOADING THE RACKS).
The spray arms cannot rotate freely, being
hindered by the dishes. Arrange the crockery correctly (see LOADING THE RACKS).
The wash cycle is too gentle and/or
detergent eciency is low. Select an appropriate wash cycle (see PROGRAMS TABLE).
An excessive amount of foam has been
produced.
The detergent has not been measured out correctly or it is not suita-
ble for use in dishwashers (see FILLING THE DETERGENT DISPENSER).
The cap on the rinse aid compartment has
not been shut correctly. Make sure the cap of the rinse aid dispenser is closed.
The lter is soiled or clogged. Clean the lter assembly (see CLEANING AND MAINTENANCE).
There is no salt. Fill the salt reservoir (see FILLING THE SALT RESERVOIR).
Dishwasher
nishes the cycle
prematurely.
Drain hose positioned too low or siphoning
into home sewage system.
Check if end of drain hose is placed at correct height (see
INSTALLATION). Check for siphoning into home sewage system,
install air admittance valve if necessary.
Air in water supply. Check water supply for leaks or other issues letting air inside.
The dishwasher
does not ll the
water.
All LEDs are
blinking rapidly
No water in the water supply or the tap is
closed. Make sure there is water in the water supply or the tap running.
The inlet hose is bent. Make sure the inlet hose is not bent (see INSTALLATION) reprogram
the dishwasher and reboot.
The sieve in the water inlet hose is clogged;
it is necessary to clean it
After having carried out the verication and cleaning, turn o and
turn on the dishwasher and restart a new program.

14ENGLISH
Problems... Possible causes... Solutions...
Dishes have not
been dried.
Selected program has no drying phase. Verify in the programs table if the selected program has drying
phase.
Rinse aid has run out or the dosage is not
adequate.
Add the rinse aid or adjust the dosage levels higher (see FILLING
THE RINSE AID DISPENSER).
Dishes are made of non-stick or plastic. The presence of drops of water it is normal (see TIPS).
Dishes and
glasses show
limescale or a
whitish lm.
Salt level is too low. Fill the salt reservoir (see FILLING THE SALT RESERVOIR).
Adjustment of the water hardness is not
adequate. Increase the values (see WATER HARDNESS TABLE).
Cap of the salt reservoir is not properly
closed. Check the salt reservoir cap.
Rinse aid has run out or the dosage is
insucient. Add the rinse aid or adjust the dosage levels higher.
Dishes and glas-
ses have a bluish
tinge or blue
streakes.
Rinse aid dosage is excessive. Adjust the dosage rates to lower values.
After-Sales Service
If, after carrying out the above checks, the fault persists, discon-
nect the mains plug and turn o the water tap. Contact the
After-sales Service (see guarantee).
Before contacting our After-Sales Service, take note of the
following:
• the description of the fault,
• the appliance type and model,
• the service code (the number indicated on the adhesive
rating plate) inside the door on the right-hand side:

15ENGLISH
Technical Data
Product dimen-
sions (mm)
Height mm 820
Width mm 598
Depth mm 555
Performances
Voltage V 220/240
Frequency Hz 50
Energy eciency class E
Cleaning performance index 1.13
Drying performance index 1.07
Water supply pressure, max Bar 10
Water supply pressure, min Bar 0.5
Energy consumption kWh/100 cycles 95
Water supply, max inlet water temp. °C 60
Number of place settings 14
Power consumption in delay start W 4
Power consumption in standby mode W 0.5
Water consumption l/cycle 9.5
Noise level dB(A) re 1 pW 46
Noise class C
Environmental concerns
Disposal of packaging materials
The packaging material is 100% recyclable and is marked with
the recycle symbol . The various parts of the packaging
must therefore be disposed of responsibly and in full
compliance with local authority regulations governing waste
disposal.
Disposal of household appliances
This appliance is manufactured with recyclable or reusable
materials. Dispose of it in accordance with local waste disposal
regulations. For further information on the treatment, recovery
and recycling of household electrical appliances, contact your
local authority, the collection service for household waste or
the store where you purchased the appliance. This appliance
is marked in compliance with European Directive 2012/19/EU,
Waste Electrical and Electronic Equipment (WEEE) and with
the Waste Electrical and Electronic Equipment regulations
2013 (as amended). By ensuring this product is disposed of
correctly, you will help prevent negative consequences for the
environment and human health.
The symbol on the product or on the accompanying
documentation indicates that it should not be treated as
domestic waste but must be taken to an appropriate collection
center for the recycling of electrical and electronic equipment.
Energy saving tips
ECO programme is suitable to clean normally soiled tableware,
that for this use, it is the most ecient programme in terms of
its combined energy and water consumption, and that it is used
to assess compliance with the EU Ecodesign legislation.
Loading the household dishwasher up to the capacity
indicated by the manufacturer will contribute to energy and
water savings. The manual pre-rinsing of tableware items
leads to increased water and energy consumption and is not
recommended. Washing tableware in a household dishwasher
usually consumes less energy and water in the use phase than
hand dishwashing when the household dishwasher is used
according to the manufacturer’s instructions.

16ENGLISH
ATTENTION: If the appliance must be moved at any time, keep
it in an upright position; if absolutely necessary, it may be tilted
onto its back.
Connecting the water supply
Adaptation of the water supply for installation should only be
performed by a qualied technician.
The water inlet and outlet hoses may be positioned towards the
right or the left in order to achieve the best possible installation.
Make sure the dishwasher does not bend or squash the hoses.
Connecting the water inlet hose
• Run the water until it is perfectly clear.
• Screw the inlet hose tightly into position and turn on the tap.
If the inlet hose is not long enough, contact a specialist store or
an authorised technician.
The water pressure must be within the values indicated in the
Technical Data table - otherwise the dishwasher may be function
properly.
Make sure the hose is not bent or compressed.
Specications for the connection of the water supply hose:
Connecting the water outlet hose
Connect the outlet hose to a drain duct with a minimum
diameter of 2 cm A.
The outlet hose connection must be at a height ranging from
40 to 80 cm from the oor or surface where the dishwasher
rests.
Before connecting the water outlet hose to the sink drain,
remove the plastic plug B.
Water supply cold or hot (max. 60°C)
Water intake 3/4”
Power of water pressure 0.05 ÷ 1 MPa (0.5 ÷ 10 bar)
7.25 – 145 psi
MIN 40 cm
MAX 80 cm
Installation
Electrical connection
WARNING: Under no circumstances should the water inlet
hose be cut as it contains live electrical parts.
Before inserting the plug into the electrical socket, make sure
that:
• The socket is earth and complies with current regulations;
• The socket can withstand the maximum load of the
appliance as shown on the data plate located on the inside of
the door (see PRODUCT DESCRIPTION).
• The power supply voltage falls within the values indicated on
the data plate on the inside of the door.
• The socket is compatible with the plug of the appliance.
If this is not the case, ask an authorised service only to replace
the certied power cord with a correctplug dedicated for this
appliance (see AFTER-SALES SERVICE). Do not use extension cab-
lesor multiple sockets or not authorized power cords with plugs.
Once the appliance has been installed, the power supply cable
and the electrical socket should be easily accessible.
The cable should not be bent or compressed.
If the power supply cable is damaged, have it replaced by the
manufacturer or its authorised Technical Assistance Service in
order to prevent all potential hazards.
The Company shall not be held responsible for any incidents, if
these regulations are not observed.
Positioning and levelling
1. Position the dishwasher on a level sturdy oor. If the oor is
uneven, the front feet of the appliance may be adjusted until
it reaches a horizontal position. If the appliance is levelled
correctly, it will be more stable and much less likely to move
or cause vibrations and noise while it is operating.
2. Before recessing the dishwasher, stick the adhesive transparent
strip under the wooden shelf in order to protect it from any
condensation which may form.
3. Place the dishwasher so that its sides or back panel are in
contact with the adjacent cabinets or the wall. This appliance
can also be recessed under a single worktop.
4. To adjust the height of the rear foot, turn the red hexagonal
bushing on the lower central part at the front of the
dishwasher using a hexagonal spanner with an opening of 8
mm. Turn the spanner in a clockwise direction to increase the
height and in an anticlockwise direction to decrease it.
DIMENSIONS AND CAPACITY:
Width 598 mm
Height 820 mm
Depth 555 mm
Capacity 14 standard place-settings

17ENGLISH
How long is the IKEA guarantee valid?
The guarantee is valid 2 years from purchase date unless
otherwise specied in national legislation. In Norway, Portugal
and Spain the guarantee is valid for 3 years from delivery
date to the customer unless otherwise specied in national
legislation. The original sales receipt, is required as proof of
purchase. If service work is carried out under guarantee, this will
not extend the guarantee period for the appliance.
Who will execute the service?
IKEA Service Provider will provide the service through its own
service operations or authorized service partner network.
What does this guarantee cover?
The guarantee covers faults of the appliance, which have been
caused by faulty construction or material faults from the date
of purchase from IKEA. This guarantee applies to domestic use
only. The exceptions are specied under the headline “What is
not covered under this guarantee?” Within the guarantee period,
the costs to remedy the fault e.g. repairs, parts, labour and
travel will be covered, provided that the appliance is accessible
for repair without special expenditure. On these conditions the
EU guidelines (Nr. 99/44/EG) and the respective local regulations
are applicable. Replaced parts become the property of IKEA.
What will IKEA do to correct the problem?
IKEA appointed Service Provider will examine the product
and decide, at its sole discretion, if it is covered under this
guarantee. If considered covered, IKEA Service Provider or its
authorized service partner through its own service operations,
will then, at its sole discretion, either repair the defective
product or replace it with the same or a comparable product.
What is not covered under this guarantee?
• Normal wear and tear.
• Deliberate or negligent damage, damage caused by failure
to observe operating instructions, incorrect installation or
by connection to the wrong voltage, damage caused by
chemical or electrochemical reaction, rust, corrosion or
water damage including but not limited to damage caused
by excessive lime in the water supply, damage caused by
abnormal environmental conditions.
• Consumable parts including batteries and lamps.
• Non-functional and decorative parts which do not aect
normal use of the appliance, including any scratches and
possible color dierences.
• Accidental damage caused by foreign objects or substances
and cleaning or unblocking of lters, drainage systems or
soap drawers.
• Damage to the following parts: ceramic glass, accessories,
crockery and cutlery baskets, feed and drainage pipes, seals,
lamps and lamp covers, screens, knobs, casings and parts of
casings. Unless such damages can be proved to have been
caused by production faults.
• Cases where no fault could be found during a technician’s visit.
• Repairs not carried out by our appointed service providers
and/or an authorized service contractual partner or where
non-original parts have been used.
• Repairs caused by installation which is faulty or not according
to specication.
• The use of the appliance in a non-domestic environment i.e.
professional use.
• Transportation damages. If a customer transports the
product to his home or another address, IKEA is not liable
for any damage that may occur during transport. However, if
IKEA delivers the product to the customer’s delivery address,
then damage to the product that occurs during this delivery
will be covered by IKEA.
• Cost for carrying out the initial installation of the IKEA appliance.
• However, if an IKEA appointed Service Provider or its
authorized service partner repairs or replaces the appliance
under the terms of this guarantee, the appointed Service
IKEA GUARANTEE
Provider or its authorized service partner will reinstall the
repaired appliance or install the replacement, if necessary.
• This does not apply within Ireland, customer should contact
the local IKEA dedicated after sales line or the appointed
Service Provider for further information.
(just for GB)
These restrictions do not apply to fault-free work carried out by
a qualied specialist using our original parts in order to adapt
the appliance to the technical safety specications of another EU
country.
How country law applies
The IKEA guarantee gives you specic legal rights, which cover
or exceed all the local legal demands. However these conditions
do not limit in any way consumer rights described in the local
legislation.
Area of validity
For appliances which are purchased in one EU country and taken to
another EU country, the services will be provided in the framework
of the guarantee conditions normal in the new country.
An obligation to carry out services in the framework of the
guarantee exists only if the appliance complies and is installed
in accordance with:
• the technical specications of the country in which the
guarantee claim is made;
• the Assembly Instructions and User Manual Safety Information
.
The dedicated AFTER SALES for IKEA appliances
Please don’t hesitate to contact IKEA appointed Authorized
Service Centre to:
• make a service request under this guarantee;
• ask for clarications on installation of the IKEA appliance in
the dedicated IKEA kitchen furniture;
• ask for clarication on functions of IKEA appliances.
To ensure that we provide you with the best assistance, please
read carefully the Assembly Instructions and/or the User Manual
before contacting us.
How to reach us if you need our service
In order to provide you a quicker service, we recommend
to use the specic phone numbers listed on this manual.
Always refer to the numbers listed in the booklet of the
specic appliance you need an assistance for. Please also
always refer to the IKEA article number (8 digit code) and
12 digit service number placed on the rating plate of your
appliance.
SAVE THE SALES RECEIPT!
It is your proof of purchase and required for the guarantee
to apply. The sales receipt also reports the IKEA name and
article number (8 digit code) for each of the appliances you
have purchased.
Do you need extra help?
For any additional questions not related to After Sales of your
appliances please contact your nearest IKEA store call centre.
We recommend you read the appliance documentation carefully
before contacting us.
Spare parts will be available for a period of either up to 7 or up to
10 years, according to the specic regulation requirements.
The spare parts can be found:
https://parts-selfservice.whirlpool.com/en/landing
Please refer to the last page of
this manual for the full list of
IKEA appointed After Sales
Service Provider and relative
national phone numbers.

18
Πίνακας περιεχομένων
Πληροφορίες ασφαλείας
Πριν χρησιμοποιήσετε τη συσκευή,
διαβάστε αυτές τις οδηγίες για την
ασφάλεια. Φυλάξτε τις οδηγίες σε κοντινό
σημείο για μελλοντική αναφορά.
Αυτές οι οδηγίες και η συσκευή
περιλαμβάνουν σημαντικές
προειδοποιήσεις σχετικά με την ασφάλεια,
τις οποίες πρέπει να τηρείτε σε κάθε
περίπτωση. Ο κατασκευαστής δεν φέρει
καμία ευθύνη για τη μη τήρηση αυτών των
οδηγιών ασφαλείας, για ακατάλληλη χρήση
της συσκευής ή λανθασμένη ρύθμιση των
χειριστηρίων.
Τα πολύ μικρά παιδιά (0-3ετών)
πρέπει να διατηρούνται μακριά από τη
συσκευή. Κρατήστε τα μικρά παιδιά
(3-8ετών) μακριά από η συσκευή εκτός εάν
επιτηρούνται διαρκώς. Η συσκευή μπορεί
να χρησιμοποιηθεί από παιδιά ηλικίας
8 ετών και άνω ή άτομα με μειωμένες
σωματικές, αισθητηριακές ή διανοητικές
ικανότητες ή με έλλειψη εμπειρίας και
γνώσης της συσκευής, μόνο εφόσον
βρίσκονται υπό επιτήρηση ή έχουν λάβει
οδηγίες σχετικά με την ασφαλή χρήση της
συσκευής και κατανοούν τους κινδύνους
που συνεπάγεται.
Τα παιδιά απαγορεύεται να παίζουν με τη
συσκευή.
Ο καθαρισμός και η συντήρηση από τον
χρήστη δεν πρέπει να εκτελούνται από
παιδιά χωρίς επιτήρηση.
ΕΠΙΤΡΕΠΟΜΕΝΗ ΧΡΗΣΗ
ΠΡΟΣΟΧΗ: Η συσκευή δεν προορίζεται
για χρήση σε συνδυασμό με εξωτερικό
χρονοδιακόπτη ή ξεχωριστό σύστημα
απομακρυσμένου ελέγχου.
Η συσκευή αυτή έχει σχεδιαστεί για
οικιακή χρήση καθώς και για παρόμοιες
χρήσεις όπως: χώροι κουζίνας προσωπικού
σε καταστήματα, γραφεία και σε άλλους
χώρους εργασίας, αγροκτήματα, από
πελάτες σε ξενοδοχεία, μοτέλ, bed &
breakfast και άλλους χώρους κατοικίας.
Αυτή η συσκευή δεν προορίζεται για
επαγγελματική χρήση. Μην χρησιμοποιείτε
τη συσκευή σε εξωτερικό χώρο.
Ο μέγιστος αριθμός ρυθμίσεων θέσης
αναγράφεται στο φύλλο του προϊόντος.
Η πόρτα δεν πρέπει να παραμένει σε
ανοιχτή θέση - κίνδυνος να σκοντάψετε.
Η ανοιχτή πόρτα της συσκευής μπορεί να
στηρίξει μόνο το βάρος του φορτωμένου
καλαθιού όταν είναι τραβηγμένο προς τα
έξω. Μην ακουμπάτε αντικείμενα στην
πόρτα, μην κάθεστε και μην στηρίζεστε
επάνω της.
ΠΡΟΕΙΔΟΠΟΙΗΣΗ: Τα απορρυπαντικά
πλυντηρίου πιάτων είναι εξαιρετικά
αλκαλικά. Μπορεί να είναι εξαιρετικά
επικίνδυνα εάν καταποθούν. Αποφεύγετε
την επαφή με το δέρμα και τα μάτια
και φυλάξτε τα παιδιά μακριά από το
πλυντήριο πιάτων όταν η πόρτα είναι
ανοιχτή. Μετά την ολοκλήρωση του
κύκλου πλύσης, βεβαιωθείτε ότι το δοχείο
απορρυπαντικού είναι άδειο.
ΠΡΟΕΙΔΟΠΟΙΗΣΗ: Τα μαχαίρια και
άλλα εργαλείων με αιχμηρά άκρα πρέπει
να τοποθετούνται στο καλαθάκι με τις
μύτες προς τα κάτω ή να τοποθετούνται σε
οριζόντια θέση - κίνδυνος να κοπείτε.
Μην αποθηκεύετε εκρηκτικές ή
εύφλεκτες ουσίες (π.χ. δοχεία βενζίνης ή
αερολυμάτων) μέσα ή κοντά στη συσκευή -
κίνδυνος πυρκαγιάς.
Η συσκευή πρέπει να χρησιμοποιείται
μόνο για το πλύσιμο οικιακών σκευών
σύμφωνα με τις οδηγίες στο παρόν
εγχειρίδιο. Το νερό στη συσκευή δεν
είναι πόσιμο. Χρησιμοποιείτε μόνο
απορρυπαντικό και πρόσθετα ξεπλύματος
που έχουν σχεδιαστεί γι ένα αυτόματο
πλυντήριο πιάτων. Όταν γεμίζετε το δοχείο
αφαλάτωσης νερού (αλάτι), ενεργοποιήστε
έναν κύκλο αμέσως με τη συσκευή άδεια
για να αποφύγετε τη διάβρωση των
εσωτερικών μερών.
Αποθηκεύστε το απορρυπαντικό, το
λαμπρυντικό και το αλάτι μακριά από τα
ΕΛΛΗΝΙΚΑ
Πίνακας περιεχομένων 18
Πληροφορίες ασφαλείας 18
Περιγραφή προϊόντος 21
Πίνακας ελέγχου 21
Πρώτη χρήση 21
Γέμισμα καλαθιών 23
Καθημερινή χρήση 24
Πίνακας προγραμμάτων 25
Καθαρισμός και συντήρηση 26
Τι να κάνετε εάν… 27
Σέρβις 28
Τεχνικά χαρακτηριστικά 29
Περιβαλλοντικά θέματα 29
Εγκατασταση 30
ΕΓΓΥΗΣΗ IKEA 31

19ΕΛΛΗΝΙΚΑ
παιδιά. Κλείστε την παροχή νερού και
αποσυνδέστε την τροφοδοσία πριν κάνετε
σέρβις και συντήρηση.
Αποσυνδέστε το νερό και το ρεύμα σε
περίπτωση δυσλειτουργίας.
ΕΓΚΑΤΆΣΤΑΣΗ
Ο χειρισμός και η εγκατάσταση
της συσκευής πρέπει να γίνονται από
δύο ή περισσότερα άτομα - κίνδυνος
τραυματισμού. Χρησιμοποιείτε γάντια
προστασίας για να αφαιρέσετε τη
συσκευασία και να κάνετε την εγκατάσταση
- κίνδυνος να κοπείτε.
Η εγκατάσταση, η σύνδεση της
παροχής νερού (εφόσον προβλέπεται),
οι ηλεκτρικές συνδέσεις και επισκευές
πρέπει να πραγματοποιούνται από
εξειδικευμένο τεχνικό. Μην επισκευάζετε
και μην αντικαθιστάτε κανένα εξάρτημα
της συσκευής, εκτός εάν αναφέρεται ρητά
στο εγχειρίδιο χρήσης. Κρατήστε τα παιδιά
μακριά από το χώρο εγκατάστασης. Μετά
από την αποσυσκευασία της συσκευής,
βεβαιωθείτε ότι δεν έχει προκληθεί ζημιά
σε αυτήν κατά τη μεταφορά.
Εάν παρουσιαστεί κάποιο πρόβλημα,
επικοινωνήστε με τον αντιπρόσωπο ή με το
πλησιέστερο Kέντρο Σέρβις.
Μετά την εγκατάσταση, τα υλικά
συσκευασίας (πλαστικά, φελιζόλ, κ.λπ.)
πρέπει να φυλάσσονται μακριά από τα
παιδιά - κίνδυνος ασφυξίας.
Η συσκευή πρέπει να αποσυνδέεται από
την τροφοδοσία πριν από κάθε εργασία
εγκατάστασης - κίνδυνος ηλεκτροπληξίας.
Κατά την εγκατάσταση, βεβαιωθείτε
ότι η συσκευή δεν προκαλεί φθορά στο
καλώδιο ηλεκτρικής τροφοδοσίας -
κίνδυνος ηλεκτροπληξίας. Ενεργοποιήστε
τη συσκευή μόνο όταν ολοκληρωθεί η
εγκατάσταση.
Συνδέστε το πλυντήριο πιάτων στην
παροχή νερού χρησιμοποιώντας μόνο
καινούργιο σετ εύκαμπτων σωλήνων.
Τα παλιά σετ σωλήνων δεν πρέπει να
επαναχρησιμοποιούνται. Όλοι οι σωλήνες
πρέπει να σφιχτούν σωστά ώστε να μην
αποσυνδεθούν κατά τη λειτουργία.
Απαιτείται τήρηση των κανονισμών που
καθορίζονται από τον εταιρία ύδρευσης.
Πίεση παροχής νερού 0,05 - 1,0 MPa.
Η συσκευή πρέπει να τοποθετηθεί κόντρα
στον τοίχο ή εντοιχισμένη σε έπιπλο
προκειμένου να περιοριστεί πρόσβαση
στην πίσω πλευρά.
Για πλυντήρια πιάτων με ανοίγματα
εξαερισμού στη βάση, τα ανοίγματα δεν 6
πρέπει να εμφράζονται από το χαλί.
Εάν το πλυντήριο πάτων τοποθετείται
στο τέλος μιας σειράς από συσκευές και
συνεπώς υπάρχει πρόσβαση στην πλαϊνή
επιφάνεια, η περιοχή των μεντεσέδων
πρέπει να καλυφθεί για την αποτροπή
τυχόν τραυματισμού.
Η θερμοκρασία του νερού εισόδου
εξαρτάται από το μοντέλο του πλυντηρίου
πιάτων. Αν ο εγκατεστημένος σωλήνας
εισόδου φέρει την ένδειξη "25 °C max",
η μέγιστη επιτρεπόμενη θερμοκρασία
είναι 25 °C. Για όλα τα άλλα μοντέλα
η μέγιστη επιτρεπόμενη θερμοκρασία
είναι 60 °C. Μην κόβετε τους σωλήνες
και, σε περίπτωση συσκευών με σύστημα
διακοπής νερού, μη βυθίζετε στο νερό
το πλαστικό κουτί του σωλήνα εισόδου.
Αν το μήκος των σωλήνων δεν επαρκεί,
απευθυνθείτε στην αντιπροσωπεία.
Βεβαιωθείτε ότι οι σωλήνες παροχής
και αποχέτευσης του νερού δεν είναι
τσακισμένοι ή βουλωμένοι. Πριν από την
πρώτη χρήση, ελέγξτε τη στεγανότητα
των σωλήνων παροχής και αποχέτευσης.
Βεβαιωθείτε ότι και τα τέσσερα πόδια
είναι σταθερά και στηρίζονται στο
δάπεδο. Ρυθμίστε τα όπως απαιτείται και
βεβαιωθείτε ότι η συσκευή βρίσκεται σε
απόλυτα οριζόντια θέση (χρησιμοποιήστε
αλφάδι).
Χρησιμοποιείτε τη συσκευή μόνο όταν
τα καπάκια που φαίνονται στο διάγραμμα
19 στο βιβλιαράκι εγκατάστασης είναι
σωστά συναρμολογημένα - κίνδυνος
τραυματισμού.
ΗΛΕΚΤΡΙΚΕΣ ΠΡΟΕΙΔΟΠΟΙΗΣΕΙΣ
Η πινακίδα ονομαστικών χαρακτηριστικών
βρίσκεται στη γωνία της πόρτας του
πλυντηρίου πιάτων (φαίνεται με την πόρτα
ανοιχτή).
Πρέπει να είναι δυνατή η αποσύνδεση
της συσκευής από την ηλεκτρική
τροφοδοσία με αφαίρεση του φις εάν
η πρίζα είναι προσβάσιμη ή με χρήση
του πολυπολικού διακόπτη που έχει
εγκατασταθεί πριν από την πρίζα σύμφωνα
με τα εθνικά πρότυπα ηλεκτρικής
ασφάλειας και η συσκευή πρέπει να
διαθέτει γείωση με βάση τα εθνικά
πρότυπα ασφαλείας.
Μη χρησιμοποιείτε καλώδια
προέκτασης (μπαλαντέζες), πολύπριζα ή
προσαρμογείς. Μετά την ολοκλήρωση της
εγκατάστασης, δεν πρέπει να είναι δυνατή

20ΕΛΛΗΝΙΚΑ
η πρόσβαση στα ηλεκτρικά εξαρτήματα.
Μην χρησιμοποιείτε τη συσκευή όταν είστε
βρεγμένος ή με γυμνά πόδια.
Μη χρησιμοποιήσετε τη συσκευή εάν έχει
φθαρεί το ηλεκτρικό καλώδιο ή το φις, εάν
δεν λειτουργεί κανονικά, εάν έχει πέσει ή
εάν έχει υποστεί άλλη ζημιά.
Εάν το καλώδιο τροφοδοσίας έχει
υποστεί ζημιά, πρέπει να αντικατασταθεί
από τον κατασκευαστή, τον αντιπρόσωπο
τεχνικής υποστήριξης ή άλλα καταρτισμένα
άτομα, ώστε να αποφευχθούν τυχόν
κίνδυνοι - κίνδυνος ηλεκτροπληξίας.
Αν το φις της συσκευής δεν ταιριάζει
με την πρίζα σας, απευθυνθείτε σε έναν
εξειδικευμένο τεχνικό.
Μην τραβάτε το καλώδιο τροφοδοσίας. Μη
βυθίζετε το ηλεκτρικό καλώδιο ή το φις
στο νερό.
Το καλώδιο δεν πρέπει να έρχεται σε
επαφή με ζεστές επιφάνειες.
ΚΑΘΑΡΙΣΜΟΣ ΚΑΙ ΣΥΝΤΗΡΗΣΗ
ΠΡΟΕΙΔΟΠΟΙΗΣΗ: Βεβαιωθείτε ότι
η συσκευή είναι απενεργοποιημένη και
αποσυνδεδεμένη από το τροφοδοτικό
πριν εκτελέσετε οποιαδήποτε εργασία
συντήρησης. Για να αποφύγετε τον
κίνδυνο τραυματισμού, χρησιμοποιήστε
προστατευτικά γάντια (κίνδυνος
σχισίματος) και παπούτσια ασφαλείας
(κίνδυνος για μώλωπες), φροντίστε
ο χειρισμός να γίνεται από δύο
άτομα (μειώστε το φορτίο), ποτέ μην
χρησιμοποιείτε εξοπλισμό καθαρισμού με
ατμό (κίνδυνος ηλεκτροπληξίας).
Οι επισκευές από μη επαγγελματίες που
δεν εγκρίνονται από τον κατασκευαστή θα
μπορούσαν να οδηγήσουν σε κίνδυνο για
την υγεία και την ασφάλεια, για τα οποία
ο κατασκευαστής δεν μπορεί να θεωρηθεί
υπεύθυνος. Τυχόν ελάττωμα ή ζημιά που
προκλήθηκε από επισκευές ή συντήρηση
που έγιναν από μη επαγγελματίες δεν
καλύπτονται από την εγγύηση, οι όροι της
οποίας περιγράφονται στο έγγραφο που
παραδίδεται με τη μονάδα.
Other manuals for LAGAN
70
Table of contents
Other IKEA Dishwasher manuals