IKI-Kiuas 4,5 kW User manual

SUOMI
ENGLISH
ASENNUS- JA KÄYTTÖOHJE
INSTALLATION INSTRUCTIONS
Sähkökiukaat kiinteällä ohjauksella
Electric heaters with mounted control unit
4,5 kW, 6 kW, 7,5 kW, 10 kW

Sisällysluettelo
Ennen aloittamista
Kiukaan asennus
Asennuskuvat
Liittäminen sähköverkkoon
Lämpötilarajoitin
Termostaatin käyttö
Kellokytkin
Kytkentäkaavio
Kiukaan tukeminen
Kiuasmallitaulukko
Suojaetäisyydet
Saunomisohjeet
Löylyveden vaatimukset
Ongelmatilanteissa
Takuu
Saunan ilmanvaihto
Varoitukset
Before installation
Installation
Installation pictures
Electrical Connections
Temperature restrictor
Temperature control
Preset-timer
Circuit connector diagram
Supporting the heater
Model table
Safety distances
Instruction for bathing
Requirements for water quality
Trouble-shooting
Warranty
Ventilation in sauna
Warnings
Table of contents
Sivu Page
1
4
5
7
7
7
7
9
10
11
11
13
13
15
16-17
18
19
1
2
3
6
6
6
6
8
10
11
11
12
12
14
14-15
18
19

Huomioi seuraavat asiat ennen kiukaan asennustyön
aloittamista:
Before you begin installing the heater, pay attention to the
following points:
Lue asennus- ja käyttöohjeet ennen kiukaan asennusta.
Tässä kiuasmallissa termostaatin ja lämpötilanrajoittimen
tuntoelimet asennetaan kiukaan verkkoon ohjeiden mukaisesti.
Varo kiukaan rst-verkon teräviä osia. Käytä pitkähihaista paitaa
ja suojakäsineitä kiukaan asennuksen ja kivityksen ajan
Takuu ei kata asennus- tai käyttövirheestä johtuvia vikoja.
Read through this installation manual before you begin
the installation of the heater.
With this heater model the sensors for the thermostat and
temperature restrictor (overheat protector) are installed in
to the heater's mesh frame according to instructions.
Beware of the sharp edges of the stainless steel mesh.
Use a long-sleeved shirt and protective gloves during the
installation.
The warranty does not cover defects caused by faulty
installation or misuse of the heater.
IKI-Kiuas Oy
Tekninen tuki / Technical support
p: (0600 550 133 (1,49 €/min + pvm)
email: [email protected]
IKI-Kiuas Oy
Hakaniemenkatu 11
00530 HELSINKI
email: [email protected]
1

Kiukaan asennus
1.
2.
3.
4.
5.
6.
7.
8.
9.
10.
11.
Valitse kiukaalle paikka noudattaen suojaetäisyyksiä. Asennus tapahtuu paikassa, jonne kiuas
sijoitetaan. Kiukaan suojaetäisyydet verkkokehikon ulkoreunasta joka suuntaan sivuille ja
taakse palava-aineisiin materiaaleihin ovat 100mm ja ylös kattoon 600-800mm (kts.sivu 11).
Suojaetäisyyksien noudattamatta jättäminen saattaa aiheuttaa palovaaran.
Poista kiukaan suojamuovit.
Irroita pohjalevy, joka on kiinni kiukaan alaosassa kolmella ruuvilla. Rullaa kapillaarianturikerät
auki ja tuo ne ulos pohjaosasta (KUVAT 1, 2 ja 3.) Yhdistä viisinapainen voimajohto (sähkö-
kaapeli) kotelon sisältä löytyvään riviliittimeen kytkentäkaavion mukaisesti (SIVUT 8-9).
Testaa tässä vaiheessa kaikkien vastusten toimivuus kääntämällä ajastin asentoon 1-4 tunnin
käyttöajalle. Mikäli, kaikki vastukset kuumenevat sulje pohjalevy. (Mikäli jokin vastus ei kuu-
mene tai ilmenee jokin muu ongelma, ota yhteys valmistajaan).
Sijoita seuraavaksi alempi RST-verkko vastusryhmän ympärille siten, että verkkokehikko on
symmetrisesti vastusten ympärillä, toisin sanoen verkko on yhtä kaukana jokaisesta vastuk-
sesta. Kiukaan vastustasossa on metallitapit, joiden mukaan verkkokehikko keskitetään tasoon
ja vastuksiin nähden.
Kiinnitä kapillaarianturit RST-verkkokehikon ulkopuolelle (KUVAT 4, 5 ja 6.) Anturit tulevat noin
kiukaan puoliväliin.
Varmista, että vastukset ovat suoria. Taivuta varovaisesti ne suoriksi, jos ne ovat taipuneet
esim. kuljetuksen aikana.
KIUKAAN KIVITYS: Pese kiuaskivet tarvittaessa ennen kivitystä. Irrota 2-osainen RST-verkko-
vaippa toisistaan (ei kaikissa malleissa). Lado aluksi kivet kiukaan alaosaan. Alaosan kivityksen
jälkeen kiinnitä verkkovaipat verkon takaosassa olevan listan avulla. Tämän jälkeen lado kivet
kiukaan kehikon yläosaan. Vastukset tulee peittää mahdollisimman huolellisesti. Kiuaskiviksi
suositellaan oliviini, oliviinidiabaasi ja peridiootti (esim. Parhaat Löylyt tms.) kiviä läpimitaltaan
alle 10 cm. Kivet tulee asettaa siten, että ne jättävät riittävästi ilmavälejä esteettömälle ilman-
kierrolle. Jos kiuas on ammatti- / yleisessä käytössä, IKI-Kiuas Oy suosittelee vastusten kanssa
kosketuksiin joutuvien kivien olevan KERKES-keraamisia kiuaskiviä. Kerkes-kivet tukevat ja
säästävät vastuksia, eivätkä rapaudu kuumuuden johdosta ennenaikaisesti. HUOM! Vuolukiven
tai luonnonkiven käyttö kiukaassa on sallittu vain pintakivien joukossa.
Lopuksi kiinnitä ”RST-tukitikut” kiukaan verkkokehikon yläreunan tai keskikohdan ja seinän
välille, sopivaan kulmaan, suojaetäisyyksiä noudattaen (SIVU 10). Varmista kokeilemalla, että
kiuas on tukevasti paikallaan ennen käyttöönottoa.
IKI-Kiuas Oy suosittelee turvallisuussyistä, että kiukaan ympärillä on suojakaide. RST-verkko-
kehikko ei kuitenkaan kuumene samalla tavalla polttavaksi kuin normaali umpinainen kiuas.
Kiuaskivet laskeutuvat kiuasta käytettäessä. Lisää tarvittaessa kiviä kiukaaseen. Kivien
vaihtoväli riippuu kivilaadusta ja kiukaan käyttöasteesta. Tarkista kivien kunto normaali-
käytössä vuosittain, poista tarvittaessa rikkoontuneet kivet ja vaihda ne uusiin.
2

Asennuskuvat
- Asennuksen saa tehdä vain valtuutettu sähköasentaja.
- HUOM! Käytä suojahansikkaita ja pitkähihaista paitaa kiukaan verkkoa
käsiteltäessä ja kivityksen aikana verkon ja muiden terävien osien takia.
Kapillaarianturit
KUVA 1. Avaa pohja ja tarkista,
että kapillaarianturit ovat ehjät. KUVA 2. Vedä kapillaari-
antureiden johto suoraksi. KUVA 3. Tuo johto läpi pohja-
levyn ja tukijalan välisestä
reiästä.
KUVA 4. Aseta kapillaarianturit
kuvan mukaisesti pidemmän
suojalevyn taakse.
KUVA 5. Aseta pidempi suoja-
levy verkon ulkoreunaan,
ulkoapäin katsottuna vastuksen
keskikohdalle.
KUVA 6. Aseta lyhyempi suojalevy
verkon sisäpuolelle vastakappa-
leeksi ennen kiukaan kivitystä.
Vastus
Suojalevy
3

Installation
Choose the place for the heater according to the required safety distances. The installation
must be carried out in the place where the heater will be situated. The safety distances are
measured from the heater's mesh frame outwards. Minimum safety distance to inflammable
surfaces is 100 mm on the sides and the back of the heater and 600-800 mm to the ceiling
(pageX). Negligence of the safety distances may cause fire hazard.
Remove the protective plastic covering from the heater.
Open the element box located at the underside of the heater by unscrewing the screws.
Unwind the sensor cords (pictures 1, 2, 3). Connect the five pole electric cable to the
connection strip according to the circuit connector diagram (pages 8-9).
Test that all the heating elements function properly by switching the timer on for 1–4 hours'
usage. If all the resistors heat up, close the element box panel. (If one or more of the heating
elements fails to heat up or another problem occurs , contact the manufacturer).
Place the lower part of the stainless steel mesh frame around the heating elements, so that it
is an equal distance from all the heating elements. The steel pegs in the base of the heater
help center the mesh frame.
Attach the sensors to the outside of the stainless steel mesh frame (pictures 4–6). The sensors
should be located in the middle of the heater's frame.
Check that the heating elements stand up straight. if they have been bent, carefully straighten
them.
Before piling the she stones, check that the heater stand up straight, balance heater with
adjustable legs if it´s needed. Piling of the stones: Wash the stones before piling. Check that
the safety distances are complied. The aim is to pile a dense layer of stones against the
stainless steel mesh and pile the rest of the stones loosely. Carefully pile the stones on to the
heater, do not drop stones into the heater. Detach the two parts of the mesh frame from one
another. Carefully pile the stones on to the bottom part of the heater. Attach the upper part of
the frame to the lower part with the strip on the back of the heater. Pile stones on to the upper
part of the heater. Check that the heating elements are not visible from any angle of the heater.
The heating elements should be covered up as carefully as possible. Pile the stones so that they
support each other instead of lying their weight on the heating elements. In ordinary use we
recommend olivine, olivine-dolerite and peridotite stones smaller than 10 cm in diameter. The
stones should not be placed too tightly together allowing for free air flow between the stones.
In communally or publicly used saunas we recommend the use of ceramic Kerkes stones around
the heating elements (www.kerkes.fi). Note that the use of soapstone and natural stones is
allowed only on the outer edges and on the top of the heater.
Affix the steel supporters between the upper rim or middle of the heater's frame and the wall
(Page 10).
We recommend the use of safety railings around the heater. However, the stainless steel mesh
frame does not over-heat the way ordinary steel-cased heaters do.
The surface of the stones sinks in a little after the heater has been in use for a while. Frequently
check that the heating elements do not become exposed. If this should happen, pile in more
stones. The disintegration of the stones depends on the type of stones and the frequency of use.
The condition of the stones should be checked yearly and broken stones should be replaced by
new ones. If the heater output is suitable for the sauna room, it will take about an hour for a
properly insulated sauna to reach the required bathing temperature.
1.
2.
3.
4.
5.
6.
7.
8.
9.
10.
11.
12.
4

Installation pictures
- The installation must be performed by a qualified electrician.
- Beware of the sharp edges of the stainless steel mesh. Use a long-sleeved shirt
and protective gloves during the installation.
Sensors
PICTURE 1. Open the element
box panel and check that the
sensor cables are intact.
PICTURE 2. Straighten the
sensor cables. PICTURE 3. Run the sensor
cables through the hole bet-
ween the panel and suppor-
ting leg.
PICTURE 4. Attach the sensor
cables to the back of the
longer protective plate.
PICTURE 5. Attach the longer
protective plate to the outside
rim of the mesh frame so that
it is placed to the middle of
the heating elements.
PICTURE 6. Attach the shorter
protective plate to the inside
of the mesh frame against the
longer plate. This must be done
before piling the stones.
Heating
element
Protective plate
5

Kiukaan liittäminen sähköverkkoon
Kiuas liitetään sähköverkkoon puolikiinteästi H07RN-F- tai vastaavalla kumikaapelilla. PVC-
eristeisen johdon käyttö kiukaan liitosjohtona on kielletty sen lämpöhaurauden takia.
Sähköasennustyön saa suorittaa vain työhön oikeutettu sähköasentaja voimassa olevien
määräysten mukaisesti. Rasian maksimietäisyys lattiasta on 400 mm rasian yläkulmaan.
Liitäntäjohto tulee asentaa siten, ettei se pääse alttiiksi lämpösäteilylle eikä mekaaniselle
rasitukselle. Jos kumikaapeli tulee saunan seinien sisään yli 1000 mm korkeudelle lattiasta, sen
tulee kestää 170C (esim. SSJ). Sähkölämmityksen tehon rajoitus kytketään liittimeen 33. (LIITE 2 ja
LIITE 3: Taulukko 2)
Lämpötilarajoitin
Lämpötilanrajoitin katkaisee kiukaan tehon, jos sauna häiriö- tai vikatapauksessa saavuttaa
vaarallisen korkean lämpötilan. Kun lämpötila saunassa on laskenut normaaliksi, voidaan kiuas
kytkeä uudelleen päälle kiukaan etulevystä löytyvää palautuspainiketta painaen. Jos rajoitin laukeaa
uudelleen, on syynä muu kuin tilapäinen häiriö. Vian selvittämiseen ja korjaamiseen on oikeus vain
ammattitaitoisella sähköasentajalla. HUOM! Ennen palautuspainikkeen kytkemistä on liian
korkea lämpötilan syy selvitettävä!
Termostaatin käyttö
Lämpötilan säätö tapahtuu termostaatin kytkimellä. Aseta kytkin ensimmäisellä lämmityskerralla
alussa maksimiasentoon noin tunniksi. Totea saunan lämpötila (esim. 50 - 60 astetta) noin
tunnin kuluttua. Tämän jälkeen käännä termostaattia vastapäivään kunnes termostaatti ”naksahtaa”
pois päältä. Jos lämpöä on liikaa tai liian vähän, säädä asetusta haluamaasi suuntaan. Termostaatin
uudet asetukset vaikuttavat seuraavan lämmityksen aikana, mikäli näin halutaan.
Kellokytkin
Kellokytkimen esiajastus-aika on 1 - 8 h ja varsinainen toiminta-aika on 1 - 4 h. Kello toimii kiukaan
pääkytkimenä ja se katkaisee virran automaattisesti säädetyn ajan kuluttua. Esiajastusajan jälkeen
kiuas on päällä 4 tuntia, ellei kytkintä käännetä nollaan.
VAROITUS! Varmista aina saunomisen jälkeen, että kiukaan virta katkeaa ja ettei vastukset
lämpiä, kun kytkin on kääntynyt nollaan.
6

Electrical Connections
The heater is connected to the electrical network semi-stationarily with a H07RN-F rubber cable or its
equivalent. The use of PVC-insulated cable as a connecting cable is prohibited due to thermal
embrittlement. The maximum distance of the junction box from the floor is 400 mm, measured from
the upper corner of the box. Make sure that the connecting cable will not be exposed to thermal
radiation or mechanical strain. If the rubber cable running inside the wall of the sauna is above 1000
mm from the floor, it needs to endure temperatures up to 170 degrees Celsius (for example SSJ).
The control cable for electrical heating is brought directly into the junction box of the heater, and from
there to the terminal block of the heater along a rubber cable with the same cross-section area as
that of the connecting cable. (Appendix 2 and Appendix 3: Table 2)
Temperature restrictor (overheat protector)
The temperature restrictor switches off the power if the temperature in the sauna climbs dangerously
high due to a malfunction. The temperature restrictor can be reset after the heater has cooled down.
The reset button is located in the front panel. If the restrictor cuts the power off again, it is caused by
something other than a temporary malfunction. The cause of the malfunction needs to be determined
by a qualified electrician before resetting.
Temperature control
IKI mounted heater models are equipped with a timer and a thermostat. The timer is for setting the
ontime for the heater and the thermostat is for setting a suitable temperature. Before switching the
heater on always check that there isn’t anything on top of the heater or inside the given safety
distance. The temperature is controlled by a knob in the control panel. When heating the sauna for
the first time, rotate the knob to its maximum position for one hour. Check the temperature in the
sauna. It should be approximately 50–60 degrees Celsius. Turn the temperature knob anti-clockwise
until it clicks off. Adjust the temperature to whichever direction you wish. The new settings will come
to effect the next time you use the heater.
Preset-timer
The timer is pre-set for 1 to 8 hours. The heater's continuous operating time is from 1 to 4 hours.
The timer operates as the main power switch of the heater and it switches the heater on and off
according to your settings. Pre-setting Time (timed switch-on) Turn the timer switch to the ”pre-setting”
section. The heater starts heating when the timer has turned the switch back to the ”on” section. After
this, the heater will be on for about four hours. Example: You are going to work for eight hours and
have a sauna bath after that. Turn the timer switch to the "pre-setting" section at number 7. The timer
starts. After seven hours, the heater starts heating. Because it takes about one hour for the sauna to
be heated, it will be ready for bathing after about eight hours, that is, when you come back from work.
The heater switches off, when the timer turns the switch back to zero. You can switch the heater off at
any time by turning the timer switch to zero yourself. Switch the heater off after bathing. Sometimes it
may be advisable to leave the heater on for a while to let the wooden parts of the sauna dry properly.
NOTE! Always check that the heater has switched off and stopped heating after the timer has turned
the switch to zero.
7

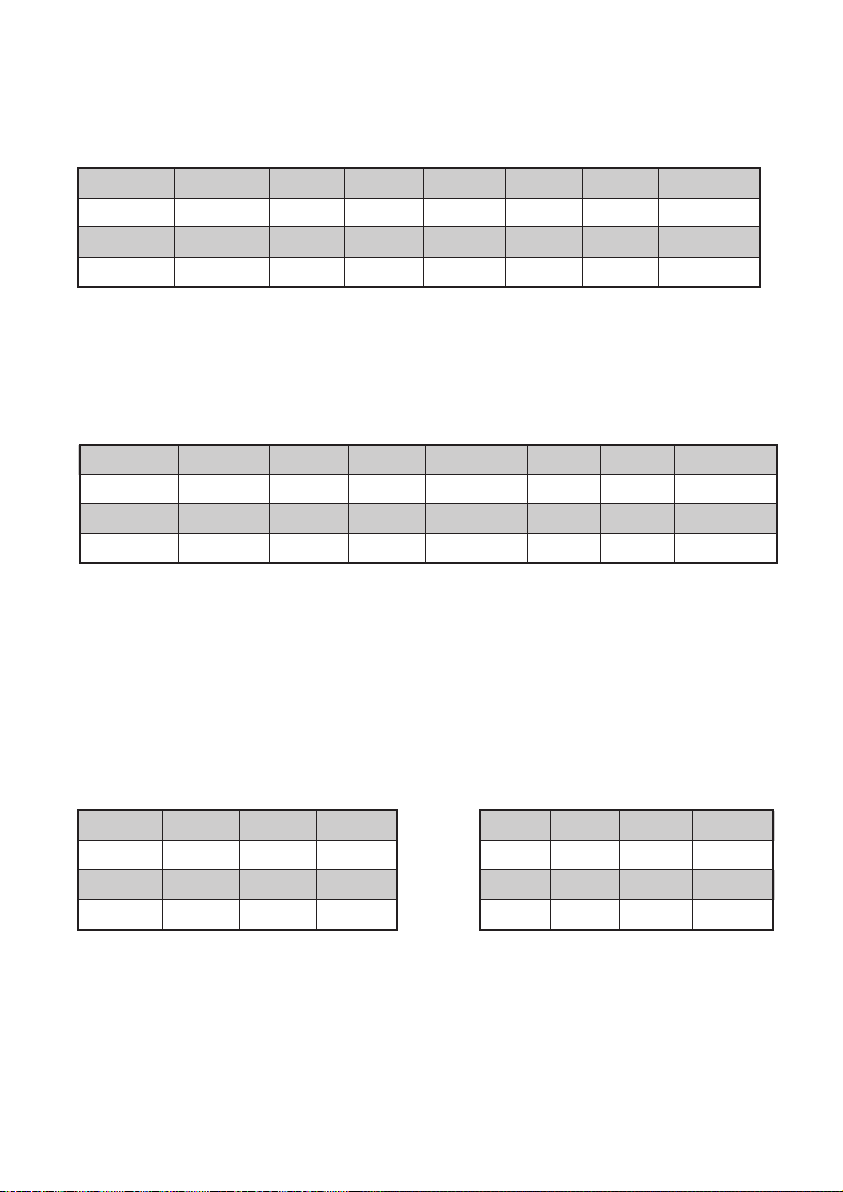
Syöttö 3*400V, N , PE
5*1,5mm² - 5*2,5mm²
kiukaasta riippuen
Kellokytkin 8+4 H
Termostaatti/ylilämpösuoja
40 - 95 °C / 115 °C
Vastukset
4,5kW kiukaassa 3*1500W
6kW kiukaassa 3*2000W
7,5kW kiukaassa 6*1250W
10kW kiukaassa 6*1667W
Liitin 33, tehonrajoitus
1
2
3
4
5
=
=
=
=
=
Kytkentäkaavio / kiinteä ohjaus
8

Circuit connector diagram / mounted control unit
Power input 3*400V, N , PE
5*1,5mm² - 5*2,5mm²
depending on heater
Timer switch 8+4 H
Thermostat / overheating switch
40 - 95 °C / 115 °C
Heating elements
4,5kW heater 3*1500W
6kW heater 3*2000W
7,5kW heater 6*1250W
10kW heater 6*1667W
Connector 33, Power restrictor
1
2
3
4
5
=
=
=
=
=
9

Kiukaan tukeminen seinään
Supporting the heater against a wall
Vaihtoehto 1: Nurkka-asennus
Option 1: Istallation in a corner
Kiuas
Heater
Kiuas
Heater
Vaihtoehto 2: Seinäasennus
Option 2: Installation against a wall
Kiinnitystuki 1
Supporting beam 1
Kiinnitystuki 2
Supporting beam 2
Kiinnitystuki 2
Supporting beam 2
Kiinnitystuki 1
Supporting beam 1
HUOM! kiukaan verkkokehikon etäisyys tulenarkoihin rakenteisiin min 100mm.
Note that the heater's safety distance from the mesh frame to inflammable materials is
minimum of 100 mm.
Tulenarka rakenne
Inflammable material
Tulenarka rakenne
Inflammable material
10
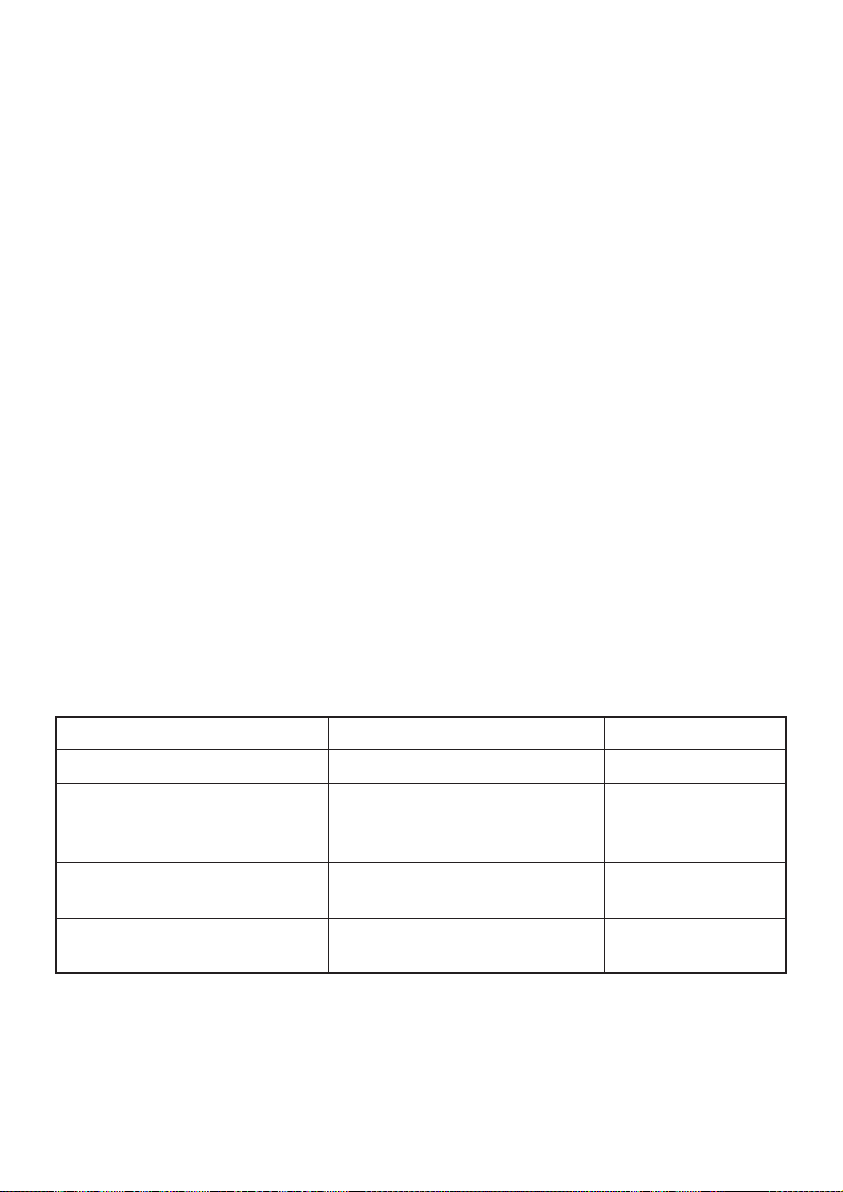
Kiuasmallitaulukko
Saunan
koko
4,5kW
6kW
7,5kW
10kW
3-6 m³
5-9 m³
7-12 m³
10-18 m³
Kiukaan
korkeus
122cm
148cm
108cm
128cm
Kiukaan
halkaisija
24cm
24cm
34cm
34cm
Max
kivimäärä
90kg
120kg
140kg
180kg
Kiukaan
teho Sulake Johto
4,5kW
6kW
7,5kW
10kW
3x10A
3x10A
3x16A
3x16A
5x1,5mm²
5x1,5mm²
5x2,5mm²
5x2,5mm²
Eteen
4,5kW
6kW
7,5kW
10kW
10cm
10cm
10cm
10cm
Sivulle
ja taakse
10cm
10cm
10cm
10cm
Ylös
kattoon
60cm
60cm
80cm
80cm
Suojaetäisyydet
tulenarkoihin materiaaleihin
Safety distances
to inflammable materials
To the
front
4,5kW
6kW
7,5kW
10kW
10cm
10cm
10cm
10cm
To the
sides
and back
10cm
10cm
10cm
10cm
Upwards
60cm
60cm
80cm
80cm
Model table
Size of
sauna
4,5kW
6kW
7,5kW
10kW
3-6 m³
5-9 m³
7-12 m³
10-18 m³
Height
of heater
122cm
148cm
108cm
128cm
Diameter
of heater
24cm
24cm
34cm
34cm
Max amount
of stones
90kg
120kg
140kg
180kg
Capacity Fuse Cable
4,5kW
6kW
7,5kW
10kW
3x10A
3x10A
3x16A
3x16A
5x1,5mm²
5x1,5mm²
5x2,5mm²
5x2,5mm²
11

Löylyveden laatuvaatimukset
Saunomisohjeet
Ennen kiukaan varsinaista käyttöönottoa on hyvä lämmittää kiuasta suojaavien suoja-
aineiden poistamiseksi. HUOM! Huolehdi tällöin saunan riittävästä tuuletuksesta.
Saunaa lämmittäessä on kivipilarin ja saunan lämmitysaika löylykuntoon noin 45 – 75
minuuttia saunan koosta ja ilmanvaihdosta riippuen. Kiukaan kiville vettä kaatamalla
nostetaan saunan lämpötila ja kosteus halutulle tasolle. Löylyn määrää ja laatua pystyy
säätelemään kaatamalla / valuttamalla vettä kiukaan eri kohtiin.
Kiuasta käytetään normaalisti jatkuvalämmitteisenä termostaatin lämpötilaa säätämällä.
Suositeltu saunomislämpötila kiukaalla on n. 50 - 70 astetta.
Varmista, etteivät vastukset tule näkyviin, sillä kivet liikkuvat lämpötilavaihtelun vuoksi.
Tarkista kivien kunto ja puhdista kivitila vähintään vuoden välein.
Älä heitä kiukaalle vettä, mikäli kiukaan vieressä on ihmisiä, sillä kiukaasta irtoava
vesihöyry on polttavan kuumaa. Älä myöskään heitä kiukaalle kerrallaan liikaa vettä
(yli 0,5 litraa kerrallaan).
1.
2.
3.
4.
5.
Veden ominaisuus Vaikutukset Suositus
Humuspitoinen vesi Väri, maku, saostumat <12 mg/l
Rautapitoinen vesi Väri, haju, maku, saostumat <0,2 mg/l
Kovuus: tärkeimmät aineet
mangaani (Mn) ja kalkki
eli kalsium (Ca)
Saostumat Mn: <0,05 mg/l
Ca: <100 mg/l
Klooripitoinen vesi Terveysriski Käyttö kielletty
Merivesi Nopea korroosi Käyttö kielletty
12
Instructions for Bathing
Before bathing for the first time heat up the heater once to burn off the protective
oil solvents. Note that you need to air the sauna room efficiently afterwards.
The heating time is about 45–75 minutes depending on the size of the room
and its ventilation. Throwing water on the heater increases temperature and
humidity. The top of the pillar creates more heat, while the sides create a gentler
steam.
The temperature should be set by the temperature control in the control unit.
A recommended temperature for the sauna is 50–70 degrees.
Maintenance: Due to large variation in temperature, the sauna stones disintegrate in use.
Pay attention especially to the gradual settling of the stones. Be sure that the heating
elements do not appear with time. The stones settle most rapidly within two months of
piling. Rearrange the stones at least once a year or even more often if the sauna is in
frequent use. At the same time, remove any pieces of stones from the bottom of the
heater and replace any disintegrated stones with new ones. By doing this, the heating
capability of the heater stays optimal and the risk of overheating is avoided.
NOTE! The maximum volume of the ladle is 0.5 litres. If an excessive amount of water is
poured on the stones, only part of it will evaporate and the rest may splash as boiling hot
water on the bathers. never throw water on the stones when there are people near the
heater, because hot steam may burn their skin.
1.
2.
3.
4.
5.
Requirements for water quality
Water property Effects Recommendation
Humus concentration Color, taste, precipitates <12 mg/l
Iron concentration Color, smell, taste, precipitates <0,2 mg/l
Hardness: most important
substances are manganese
(Mn) and lime, i.e. calsium (Ca)
Precipitates Mn: <0,05 mg/l
Ca: <100 mg/l
Chlorinated water Risk to health Use is completely
forbidden
Seawater Fast corrosion Use is completely
forbidden
13

Ongelmatilanteissa
Mikäli kiuas ei lämpene tarkista, että:
a. Virta on kytketty
b. Aikakytkin on säädetty alueelle 1-4 h, jossa kiuas lämpenee
c. Termostaatti on säädetty saunan lämpötilaa korkeammalle tasolle
d. Sulakkeet ovat ehjät
e. Ettei lämpötilanrajoitin ole lauennut. Jos rajoitin laukeaa, on laukeamisen syy
selvitettävä ennen kuin kiuasta käytetään uudelleen.
f. Kivet ovat ladottu oikein.
Mikäli saunan puuosat tummenevat nopeasti, tarkista suojaetäisyydet sekä kivien ladonta.
Tämä kiukaan asennus- ja käyttöohje luovutetaan kiukaan omistajalle asennuksen
jälkeen.
14
Takuu
IKI-Kiuas Oy (valmistaja) antaa valmistamilleen tuotteille näiden ehtojen mukaisen takuun.
Valmistaja takaa tuotteidensa laadun ja toiminnan takuuaikana. Takuu koskee Suomessa myytyjä
ja käyttöön otettuja tuotteita. Takuu edellyttää, että ostaja noudattaa tuotteiden sijoituspaikkaa,
asennusta, käyttöä ja huoltoa sekä kiuaskiven ominaisuuksia koskevia valmistajan antamia ohjeita.
Takuu on voimassa 24 kuukautta tuotteen ostopäivästä tai tuotteen sijoituspaikkana olevan
rakennuskohteen vastaanottopäivästä lukien, riippuen siitä kumpi on myöhäisempi, kuitenkin
enintään 30 kuukautta ostopäivästä. Kylpyläsaunoissa ja muissa julkisissa saunoissa takuuaika
on 12 kuukautta tai määräytyy käyttöasteen mukaan. Lisätietoja valmistajalta.
Sähkökiukaan takuu edellyttää, että:
Vian ilmetessä tulee aina ottaa yhteyttä valmistajaan tai tuotteen myyjään ennen vian
etsimistä tai korjausta.
Huoneistokäytössä olevan kiukaan kivitila ladotaan takuuaikana uudelleen vähintään kerran
vuodessa ja rapautuneet kivet uusitaan.
Laitos- / ammattikäytössä olevan kiukaan kivet ladotaan takuuaikana uudelleen vähintään
kolme kertaa vuosittain. Lisäksi kiuaskivet on vaihdettava vähintään kerran vuodessa.
Vaihdosta on tarvittaessa esitettävä selvitys. Takuutositteena on tuotteen ostokuitti,
rakennuskohteen vastaanottopöytäkirja tai vastaava selvitys. Keraamisten kiuaskivien käyttö
on kielletty (pois lukien KERKES keraamiset kiuaskivet)! Mikäli niitä on käytetty, takuu ei
sido valmistajaa.
Takuu ei kata lauteen purkua ja uudelleen asennusta tai kiukaan kivien purkua ja uudelleen-
latomista. IKI-Kiuas Oy suosittelee laudemallistoja, joissa alalaude ja sen runko voidaan
nostaa pois ilman työkaluja.
1.
2.
3.
4.

15
Varaosan takuu on voimassa 12 kuukautta ostopäivästä lukien. Rikkoutunutta osaa vastaava
korvaava osa toimitetaan maksutta tuotteen myyjälle. Varaosan asentajana on käytettävä
valmistajan valtuuttamaa asentajaa. Valmistaja ei vastaa rikkoutuneen osan irrottamisen ja
uuden osan asentamisen aiheuttamista kuluista. Rikkoutunut osa on valmistajan pyynnöstä
ja kustannuksella palautettava. Valmistaja ilmoittaa oman rahtisopimusnumeron ennen
palauttamista. Takuutositteena on myyjäliikkeen kuitti tai valtuutetun asentajan antama todistus.
STUL - Sähkö ja teleurakoitsijaliiton ehtojen mukainen takuu STUL takuuta sovelletaan sähkö-
kiukaisiin ja ohjauskeskuksiin, kun siitä on erikseen kirjallisesti sovittu. STUL – takuuehdot
liitetään niissä tapauksissa näihin takuuehtoihin. Kun STUL- takuuehtojen käytöstä on erikseen
kirjallisesti sovittu, ne syrjäyttävät nämä takuuehdot, jos ehdot ovat keskenään ristiriidassa.
Katso täältä STUL ehdot: http://www.stul.fi/Download.ashx?id=3081&type=1
Takuuvastuun rajoitukset. Ostajan on hoidettava tuotetta huolellisesti. Ostajan on tuotteen
vastaanottaessaan tarkastettava, ettei siinä ole kuljetus- tai varastointivaurioita. Havaituista
vaurioista on heti ilmoitettava tuotteen myyjälle tai kuljetusliikkeelle. Valmistaja ei ole vastuussa
tuotteen virheistä, toiminnan häiriöistä tai puutteista, jotka aiheutuvat kuljetuksesta tai
virheellisestä varastoinnista, valmistajan ohjeiden vastaisesta asennuksesta, käytöstä, huollon
laiminlyönnistä tai tuotteen sijoittamisesta sellaiseen tilaan, jossa olosuhteet eivät vastaa
valmistajan suositusta.
Virheestä ilmoittaminen. Ostajan on ilmoitettava tuotteen virheestä tai häiriöstä heti sen
ilmaannuttua ja viimeistään 14 päivän kuluessa. Ilmoitus voidaan tehdä valmistajalle, tuotteen
myyjälle tai valmistajan valtuuttamalle asennusliikkeelle. Takuuta koskevat vaatimukset on
tehtävä viimeistään 14 päivän kuluessa kyseistä tuotetta koskevan takuuajan umpeutumisesta.
Valmistajan toimenpiteet takuun yhteydessä - takuun jatkuminen Aiheelliseksi todetun takuu-
ilmoituksen perusteella valmistaja korjaa tai vaihtaa virheellisen tuotteen. Korjaus tai vaihto
tapahtuu valmistajan kustannuksella. Valmistaja on oikeutettu käyttämään itselleen edullisinta
vaihtoehtoa. Varaosan takuu on määritelty edellä kohdassa 4. Vaihdetulle osalle annetaan
kohdan 4 mukainen varaosatakuu. Korjatun tuotteen takuu säilyy muilta osin ennallaan.
Valmistaja ei korvaa tuotteen virheen tai häiriön ostajalle aiheuttamia kuluja, liiketoiminnan
estymisen aiheuttamaa tappiota eikä muutakaan välitöntä tai välillistä vahinkoa.
5.
6.
7.
8.
9.
Laatutakuu / Rahtitakuu
Materiaalitakuu. Valmistaja takaa RST-osien (vastuspöytä ja verkko) kestävyyden kotikäytössä
10 vuodeksi. Takuuaikana ilmenneet raaka-aineesta tai valmistusvirheistä johtuvat viat korjataan
veloituksetta. Esim. suolaveden käyttö kiukaan löylyvetenä on kielletty. Katso kohta: löylyveden
laatuvaatimukset.
Takuu ei kata luonnonkivelle ominaisia värivaihteluita, lustoisuutta ja hiushalkeamia, jotka eivät
vaikuta turvallisuuteen ja toimintaan. Kuljetusvahingoista on tehtävä merkintä rahtikirjaan
tavaraa vastaanotettaessa tai seitsemän päivän kuluessa tavaran saapumisesta vastaanottajalle.
Kuljetusvahingoista on myös ehdottomasti ilmoitettava kuljetusliikkeen viimeiselle toimipisteelle.
Vahingoittunut osa on säilytettävä tarkastusta varten. Vakuutus korvaa vahingoittuneen osan
tilalle uuden. Osa toimitetaan yleisiä kuljetusvälineitä kuten Matkahuoltoa käyttäen. Takuuasiat
on hoidettava aina liikkeen kautta, josta tuote on ostettu.

Trouble-shooting
If the heater or sauna room does not heat up, check that:
a. The power is on.
b. The timer is set to heating time of 1–4 hours.
c. The temperature knob is set to a higher temperature than the temperature in
the sauna room.
d. The fuses are intact.
e. The temperature restrictor (overheat protector) has not gone off. If temperature
restrictor has gone off, the reason must be solved before using heater again.
f. The stones are piled correctly.
If the wooden walls / parts darkens soon, check safety distances and piling of the stones.
This installation and operation manual is given to the owner/user of the heater after
the installation.
Warranty
IKI-Kiuas Ltd. (the manufacturer) grants its products warranty according to the following conditions.
The manufacturer guarantees the quality and functionality of its products for the duration of the
warranty period. The warranty applies to products sold and in use within EU Region and Russia.
The warranty requires that the buyer of the product follows the manufacturer’s instructions regarding
the placement of the heater, its installation, use and maintenance as well as those regarding the
qualities of the stones used in the heater.
The length of the warranty period is 24 month from the day of purchase or from the day of reception
of the build site in which the heater is situated, depending on which of the dates is later, but no more
than 30 months from the day of purchase. The warranty period for spa saunas and other public-use
saunas is 12 months, or determined according to the frequency of use. Contact the manufacturers
for more details.
The warranty for electric heaters requires that:
In case of defect or malfunction, the buyer must always contacts the manufacturer or sales
agent first before searching for the cause or attempting to repair it.
In private apartment use, the heater’s stone space needs to be re-piled at least once a year and
weathered stones need to be replaced with new ones.
In institutional or professional use, the heater’s stones must be re-piled at least three times
a year during the warranty period. In addition, the stones must be changed to new ones at least
once a year. Proof of the operation must be presented at request. The product’s purchase receipt
or build site’s acceptance certificate or similar report functions as the warranty certificate. The use
of ceramic heater stones (other than Kerkes ceramic heater stones) is prohibited. In case of use
of ceramic stones, the manufacturer’s warranty does not apply.
The warranty does not cover dismantlement or reinstallation on sauna benches, removal of
sauna stones nor re-piling them. IKI-Kiuas Ltd. recommends using for the lower levels sauna
benches that can be moved without using tools to dismantle structures.
1.
2.
3.
4.
16

17
The warranty for replacement parts is 12 months from the day of purchase. The replacement
for a damaged part will be delivered to the reseller cost free. The use of an authorized
mechanic is required for installation of the replacement part. The manufacturer is not liable to
reimburse any costs occurred during the removal of the faulty part or the installation of the
replacement. The faulty part must be returned to the manufacturer at request and at the expense
of the owner. The manufacturer will issue its freight contacts number before return of the part.
Receipt from the reseller or certificate from a manufacturer’s authorized mechanic will function
as a warranty certificate.
Limitations to warranty: The product owner must take good care of the product. On receiving the
product, the owner is expected to check that it does not show signs of damage caused during
shipping or storage. In case of such damage, they must contact the sales agent or transport
company immediately. The manufacturer is not liable for any damages caused during shipping,
or by inappropriate storage, installation or use against manufacturer’s instructions, neglect of
maintenance, or damage caused by placement of the heater in a place which does not meet
the recommendations made by the manufacturer.
Damage notifications: The owner is responsible for notifying the manufacturer, the sales agent,
or manufacturer’s authorized mechanic of any damage or malfunction as soon as it appears and
within 14 days. Any warranty related claims must be submitted within 14 days from the closing
date of the product’s warranty period.
Manufacturer’s actions regarding warranty, continuation of warranty: In receipt of a
substantiated warranty claim, the manufacturer will repair or change the product. This is done
in the manufacturer’s expense, and the manufacturer is free to select the most cost-effective
alternative. The warranty for replacement parts is outlined above in section 5. The replacement
part is granted warranty according to specifications in section 5. The warranty for a repaired part
continues as before. The manufacturer is not liable for reimbursing any expenses, business loss
or other direct or indirect harm occurred to the buyer from damages or malfunction.
5.
6.
7.
8.
Quality guarantee and Freigh warranty
Guarantee of materials. The manufacturer guarantees the durability of the stainless steel parts
(resistor platform and frame) in private home use for 10 years. During the warranty period any
defects that appear in the heater's raw materials or are production-based will be repaired free
of charge. For example, the use of sea water on the heater is forbidden. Read through the
requirements for water quality in the installations instructions. The warranty does not cover colour
changes, slipping or hair-line fractures, characteristic to natural stones, which do not affect the
use or the safety of the heater.
Damages occurred while shipping must to be recorded in the waybill when the product is
received or within 7 days of delivery. Shipping damage must also always be reported to the
shipping company’s last contact. The damaged part needs to be stored for inspection. Insurance
compensates for the new part, which will be delivered by a public transporter. In all issues
concerning warranty contact the store the product was bought from.

Koneellinen ilmanvaihto sähkökiukaalla varustetussa saunassa
Mechanical ventilation in a sauna with an electric heater
Tuloilma 1
Supply air
option 1
Tuloilma 2
Supply air
option 2
Poistoilma
Exhaust air
Tuloilma kohdasta 1 tai 2.
Supply air from option 1 or 2.
18
This manual suits for next models
3
Table of contents
Popular Heater manuals by other brands

EINHELL
EINHELL KH 1500/1 Original operating instructions

Dyna-Glo
Dyna-Glo Delux KFA400DGD User's manual and operating instructions

TriangleTube
TriangleTube Phase III HM Series Installation and maintenance manual

Verine
Verine Marcello NBFP00RP Installation, user and servicing instructions

Home
Home FK 1 PRO instruction manual

Dryfast
Dryfast DEH15 instruction manual


Dimplex
Dimplex Quantum quick start guide

EOS
EOS P1 W Installation and operation manual

NARVI Oy Finland
NARVI Oy Finland Velvet installation, user and maintenance instructions

Goldair
Goldair GECO200 Ecosave operating instructions

wallas
wallas 1300 Operation and installation instructions

VONROC
VONROC EH513AC Original instructions