IKONNIK ET4 User manual

Quick-Start
Guide
Product specications are subject to change without notice. Due to ongoing development, the
actual product may vary from images shown.
This product contains chemicals known to the State of California to cause cancer, birth defects
and other reproductive harm.
This product is not a toy! (14+) Recommended for ages 14 and up. Adult supervision required
for ages under 18 years old. Contains small parts, keep out of reach of children 3 years of age
and younger.
To download the full Owner’s Manual & Technical Information
Guide, please visit www.ikonnik-rc.com or scan the QR code with
your smart phone.
MADE IN CHINA
www.ikonnik-rc.com
000480-003 (REV B) IKONNIK ET4 (LED) Radio System Quick Start Guide.indd 1 2015-08-11 08:33:00

1. Steering Wheel: Controls left/right motion (note that
the wheel can be re-positioned and/or congured for
left-hand use.
2. Throttle Trigger: Controls forward/reverse/brake motion
(designed to be operated with index nger).
3. Adjustable Grip: For holding the transmitter. Use
included grip sizes to adjust for your hand size.
4. Antenna: Transmits signal to the receiver located in
the vehicle. Flip up when transmitter in use. Fold for
storage.
5. ON/OFF Switch: Turns the power ON/OFF for the
transmitter.
6. Multifunction Red Indicator LED.
a. Power indicator.
b. Low battery voltage warning, batteries should be
replaced/recharged before continued use when
ashing.
c. Model Indicator
7. REV/Pair:
a. Use to reverse servo/channel operation.
b. Use to put the transmitter into pairing mode.
8. Digital Trim: All switches are digital so there is no need
to readjust trim position for different models after
initial setup.
a. Steering: Controls the “hands-off” left/right
direction of the vehicle.
b. Throttle: Adjusts the motor speed to STOP when
trigger is in ‘hands-off’ (neutral) position.
9. Dual Rate Adjustment / Memory Reset: Adjusts total
travel of servo in both directions.
10. Battery compartment: Houses [4] AA batteries or a
NiMH rechargeable battery pack for powering the
transmitter.
11. Ch. 4 / Fail-Safe: Toggle Ch. 4 ON/OFF. Use to set the
Fail-Safe in case of signal loss.
12. Mode Switch:
a. Standard Mode: All functions are fully operational.
b. Feature Lock: Disables all buttons except Steering
Trim.
c. Beginner Mode: Reduces throttle output to 50%.
13. Channel 3 adjustment knob.
14. Model Select: Use to select a model when powering ON
the transmitter.
Battery Installation
4 x AA size alkaline batteries are the standard conguration
and recommended for ease of use when getting started.
Upgrading to a rechargeable battery pack can be done at
any time.
WARNING: DO NOT ATTEMPT TO CHARGE NON-RECHARGEABLE
BATTERIES, YOU MAY CAUSE AN EXPLOSION.
1. Remove the battery cover from the transmitter.
2. Insert four new AA batteries according to the polarity
markings on the battery holder.
3. Reinstall the battery cover.
Quick-Start Guide
www.ikonnik-rc.com
000480-003 (REV B) IKONNIK ET4 (LED) Radio System Quick Start Guide.indd 2 2015-08-11 08:33:00

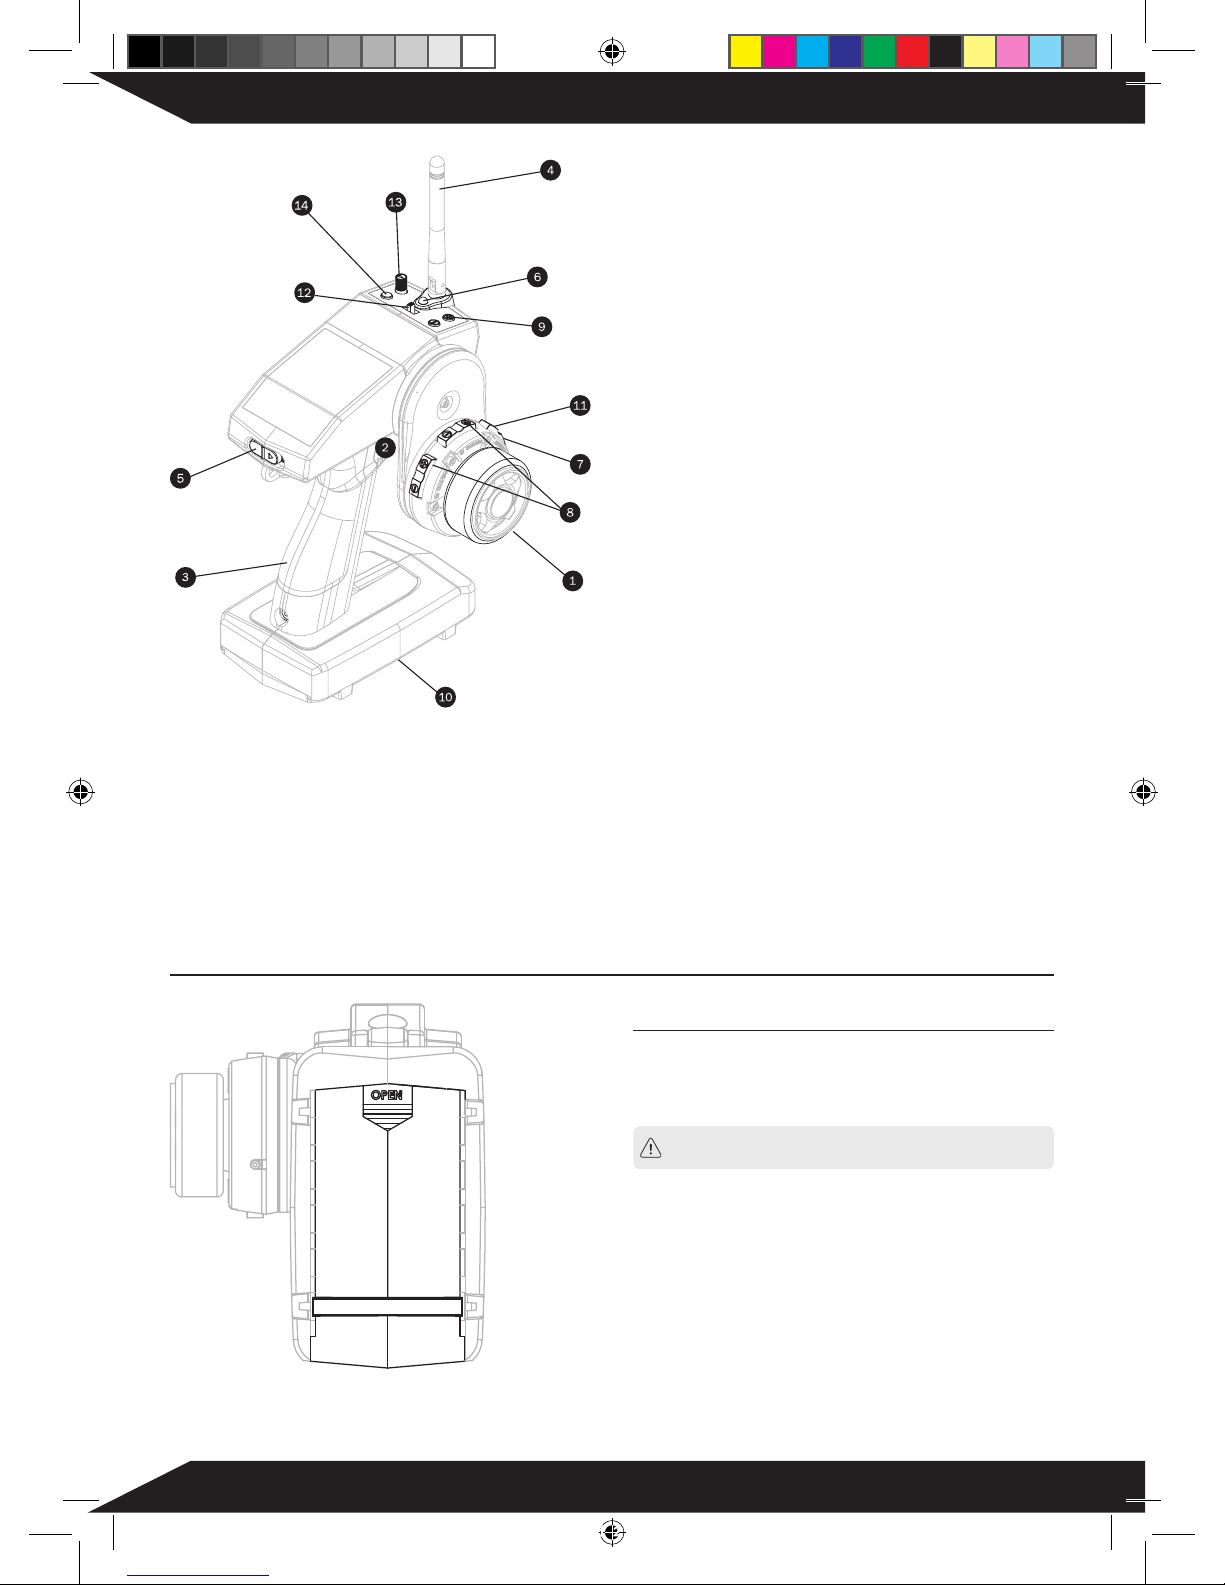
Receiver Installation & Connection
Installation
To achieve full operating range with your radio system, it
is critical that the receiver antenna be installed properly
and undamaged. It should be installed with as much of
the antenna as possible in a vertical position. The end of
the antenna should be contained inside an antenna tube.
When installing:
• Ensure there are no kinks in the antenna or antenna
tube.
• Never fold the end of the antenna over the tube, this
will reduce the operating range of the system and
damage the antenna.
• Ensure the receiver is mounted securely or padded
against hard impacts.
Connection
• Channel 1: Controlled by the wheel, connect to a servo
for steering.
• Channel 2: Controlled by the trigger, connect to the
ESC or a servo for throttle/brake.
• Channel 3: Controlled by the adjustment knob
(0-100%) for optional use. This port can also be used
to connect a transponder device used in racing.
• AUX (Channel 4): Controlled by button (ON/OFF) for
CAUTION: NEVER CONNECT A BATTERY WITH VOLTAGE
HIGHER THAN 6.0V TO THE RECEIVER, DOING SO COULD
DAMAGE THE ELECTRONICS.
Pairing The Transmitter & Receiver
The process of allowing communication to occur between
a 2.4GHz transmitter and receiver is called “pairing”
(sometimes referred to as “matching” or “binding”). The
radio system comes pre-congured and paired from the
factory. In the event your system loses pairing, or one of the
components has been replaced, you will need to pair the
transmitter and receiver. Follow the below steps for pairing
your radio system. Always ensure both transmitter and
receiver batteries are fully charged or new when performing
this process for best results.
WARNING: AS A SAFETY PRECAUTION, PERFORM THE PAIRING
PROCESS WITH ALL PARTS OF YOUR VEHICLE OFF THE GROUND.
1. With the transmitter in close proximity but not closer
than 1ft to the receiver, turn ON the transmitter
rst, then the vehicle. The LED on the receiver will
blink, indicating that the receiver is not paired to a
transmitter that is on.
2. Ensure you are using the correct or desired model for
your vehicle, re-check then continue if necessary.
3. Turn the transmitter OFF, hold the REV/Pair button
and turn the power back ON to put the transmitter into
pairing mode.
4. Push the button on the receiver once, the LED will start
to blink faster indicating it is searching for a transmitter
to pair with. This may take up to 10 seconds.
5. Once the transmitter and receiver are paired, the
receiver’s LED will turn solid red. If the receiver’s LED
does not turn solid red, turn off both the transmitter
and receiver and repeat steps 3-4.
Quick-Start Guide
www.ikonnik-rc.com
optional use. This port is most commonly used for LED
light kits. Use this port to connect an external battery
for use gas powered vehicles.
6. Once pairing is complete, ensure normal operation of
throttle and steering before placing the vehicle back on
the ground.
7. When using the transmitter with multiple vehicles, it
may be necessary to reverse Channel 1 (Steering) to
have proper steering operation.
8. If you experience anything other than normal
operation, repeat the process or consult the
troubleshooting guide.
Fail-Safe - Channel 2 (Throttle)
WARNING: AS A SAFETY PRECAUTION, PERFORM THE PAIRING
PROCESS WITH ALL PARTS OF YOUR VEHICLE OFF THE GROUND.
1. Turn the transmitter and vehicle ON and move the
throttle trigger to the desired position.
2. Press the Fail-Safe button (Ch. 4) for 4 seconds
to program the throttle Fail-Safe setting. It is
recommended and common to set the throttle
Fail-Safe as full brake, i.e. the throttle trigger is pressed
completely forward applying full brakes. This ensures
that if the receiver cannot receive a signal from the
transmitter, the servos or ESC will default to full brake
causing the vehicle to stop.
3. To test the Fail-Safe settings, turn the transmitter OFF
while the receiver is ON. The servo/ESC will default
to its programmed positions and the motor should not
spin (assuming you have set the Fail-Safe to full brake).
000480-003 (REV B) IKONNIK ET4 (LED) Radio System Quick Start Guide.indd 3 2015-08-11 08:33:00

Using Transmitter for the First Time
1. Turn the transmitter ON and ensure the LED is lit SOLID
and no audible alarms are heard, thus indicating the
batteries are supplying adequate voltage for proper
operation.
2. Ensure the battery in your vehicle is secured, charged
and plugged in with proper polarity and turn your
vehicle ON.
When operating the steering, orient yourself and the
transmitter so that you are looking at the face of the
transmitter wheel. We don’t recommend normal operation
like this due to comfort but it is a good place to start for
new users.
• Turning the top of the transmitter wheel to the left from
center should make the wheels on the vehicle turn left.
• Turning the top of the transmitter wheel to the right
from center should make the wheels on the vehicle
turn right.
Note: If the wheels turn the opposite direction from what they
should, turn the steering wheel completely to the left (or right)
and press the “REV” button for at least 3 seconds to reverse
channel 1. Consult the full manual for more information.
Pushing the transmitter trigger forward away from the
handle will typically apply brakes. However some ESCs are
congured to go immediately into reverse. Check with your
ESC owner’s manual for specic operation details.
Feature List
• 4 channels
• 10 model memory
• Pair Safe Technology
• 2.4GHz operation avoids conicts with other users
• Easily pairs with vehicles pre-equipped with Ikonnik
Xenon technology
• Ergonomic trigger and grip, includes 3 grip sizes to suit
all ages
• Drop-down wheel with adjustable position
• Left and Right-hand compatible operation
• Adjustable wheel tension
• Proportional steering and throttle control
• Digital steering trim
• Digital throttle trim
• End-Point Adjustment (EPA)
• Steering Dual Rate (D/R)
• Servo reversing
• Proportional 3rd channel knob
• 4th channel toggle
• Beginner mode (50% throttle)
• Feature lock
• Factory reset (each model and full memory)
• Folding antenna for storage
• Uses 4 AA batteries and compatible with NiMH battery
packs
• All-Weather micro receiver
Distributed in the UK by:
J Perkins Distribution Ltd,
Lenham,
Kent,
UK
ME17 2DL.
www.jperkins.com
Distributed in Australia by:
Model Engines (Aust.) Pty. Ltd.,
Unit 1, 158-168 Browns Road,
Noble Park,
Victoria,
3174,
Australia.
www.modelengines.com.au
Ph (03) 8793 5555
Distributed in the US by:
Firelands Customer Service/Product Support
1133 Libra Drive, Lincoln, NE 68512
www.relandsgroup.com
1-800-205-6773
customerservice@relandsgroup.com
General Care
1. Always use clean, dry cloth or soft bristle brush to
clean your equipment.
2. Never use chemical cleansers to avoid damage to the
sensitive electronics and plastics.
Selecting a Model Memory
Your transmitter can store up to 10 models in memory,
where all of the settings are stored independently for each
model. This enables you to use one transmitter with up to
10 different vehicles.
Incorporating Pair Safe technology ensures the transmitter
will only control the receiver that is paired to the currently
selected model.
When your transmitter powers ON, it will produce a signal by
ashing the LED beeping a number of times corresponding
to the currently selected model (1-10). As an example, if you
are in model 3 when the transmitter turns on, the LED will
ash 3 times and you will hear 3 beeps.
To change the current model follow these steps.
1. Hold down the “Model Select” button while powering
ON the transmitter.
2. The transmitter will emit the signal corresponding to
the current model. Press the “Model Select” button to
scroll through the available models.
3. When the model you want is selected, simply power
OFF and back ON the transmitter and the model will
be loaded into memory. If you do not press the “Model
Select” button before powering OFF when in the model
select mode, the same model will be kept in memory.
A full Owner’s Manual & Technical Information Guide is
available to download at: www.ikonnik-rc.com
www.ikonnik-rc.com
000480-003 (REV A)
Quick-Start Guide
000480-003 (REV B) IKONNIK ET4 (LED) Radio System Quick Start Guide.indd 4 2015-08-11 08:33:00
Other manuals for ET4
2
Table of contents
Other IKONNIK Remote Control manuals