Elan HHR HR10 Quick start guide

ELAN | SpeakerCraft | Gefen | Furman | Niles | Panamax | Sunfire | BlueBOLT | Proficient | Xantech
1800 South McDowell Blvd., Petaluma CA 94954 • Toll Free: 800.472.5555 • Fax: 707.283.5901
Integration Note
Manufacturer:
ELAN Home Systems
Model Number(s):
HHR: HR10 Wi-Fi Handheld Remote Control
Minimum Core Module Version:
ELAN 8.2
Comments:
Main Application Version: 0.7.8.0
Boot Version: 0.7.8.0
USB MSD Version: 0.7.8.0
Document Revision Date:
1/11/2018
OVERVIEW AND SUPPORTED FEATURES
The HHR (Hand Held Remote) family of Handheld Remote Controls utilize instant-on WiFi technology to
provide a quick and seamless interface to an Elan Home Control system for control of media devices and
various subsystems in the home. The HR10 model remote includes a LCD screen interface with 6 hard
buttons for customizable control plus adds several of the most common hard buttons found on typical
universal remotes.
Important! The HHR remotes are not compatible with controllers running versions prior to the minimum
core version listed above.
THE HR10 HANDHELD REMOTE CONTROLS SUPPORT THE FOLLOWING FEATURES:
Wireless Connectivity: The HHR connects via 2.4 GHz Wi-Fi and can be used up to 30’ from its WAP.
See the Wi-Fi connections section below for details on the HHR compatibility.
System Mode Control: The home interface may be optionally configured to provide system mode status
and control.
Current Weather and Forecast information: The home interface may be optionally configured to
display basic weather conditions and forecast information. Press the home icon on the HHR main menu
page to access the house mode and weather pages. The next page button will scroll through the
configured pages.
Lighting Control: The lighting interface can be configured to display one or more custom lighting
keypads and/or custom lighting pages on the remote interface for 2-way control of scenes or lighting
devices. Lighting scheduling is not supported on the remote interface. Press the lighting icon on the
HHR main menu page to access the lighting keypad and lighting custom pages. The next page button
will scroll through the configured pages.
Climate Control: The climate interface displays status of one or more climate zones and provides mode
and fan control plus heating and cooling set point adjustments. Scheduling and custom tabs are not
supported. Press the climate icon on the HHR main menu page to access the climate page. The next
page button will scroll through the configured pages.
Media Control: The media interface displays status of one media zone and provides an interface for
source selection and control. Press the Media hard button or the media icon on the HHR main menu
page to access the media zone page. The interface provides metadata feedback for supported two way
devices or customizable single or multi-page interfaces for one way device control. Custom controls that
are supported for use on the remotes UI are: Audio Button, Audio Keypad, Audio Keypad Text View,
Audio Mode Control, Audio Sound Adjust, Channel Favorite Button, & Static Text control. See other
limitations below.

2 of 12
OSD Control: The HHR remote can be used to navigate the On-Screen Display. If the zone is
configured with an OSD there will be an OSD button on the main menu to activate it. Press the OSD
button HR10 main menu page to activate the OSD then use the remote directional controls to navigate
the OSD pages. Pressing the lower screen side buttons next to the Exit button will de-activate the OSD
control.
Zone Settings Page: Media zones can be configured to have a zone settings page on the HHR remote.
The page is customizable in the configurator and is accessed on the HHR by pressing and holding the
MEDIA hard button. The next page button will scroll though all configures settings pages. Press the
MEDIA button again to get back to the media interface page.
All Zones Off: Optionally, an ‘All Media Zones Off’ macro can be executed by pressing and holding the
power button at the top of the HHR.
Sleep Timer: Optionally the HHR can be configured to allow the power button to activate a sleep timer.
Custom Quick Action Buttons: There are three custom buttons that provide quick controls for lighting,
TV, and music. These may also be used with the Event Mapper for additional functionality.
THE HHR FAMILY OF HANDHELD REMOTE CONTROLS DO NOT SUPPORT THE FOLLOWING FEATURES:
Security Control: The security interface is not supported on the HR10 remote.
Unsupported Subsystems: The HHR does not include feedback or control for Video, Messaging,
Irrigation, and Pool/Spa subsystems.
Various custom controls: Not all custom controls are supported on the HHR interface. Any custom
controls other than those listed above are not supported. The result of this may be limited source control
of various 3rd party AV sources.
Custom Homepages: Custom Homepages are not supported on the HHR.
IR Blaster: The HR10 does not include an onboard IR emitter.
Stand-alone remote control: The HHR family of Hand-Held Remotes are an interface to an ELAN
system controller and are not supported for stand-alone control. It does not learn or store IR and a
compatible ELAN system controller is required for operation.
5GHz Wi-Fi: The HR10 does not support 5 GHz Wi-Fi connectivity.
Any feature not specifically noted as “supported” is not supported.
INSTALLATION OVERVIEW
Install and test the system controller and all subsystems.
Verify that the supported Elan Home Control System is configured with a static IP address. If it is not
then stop and configure the controller with a static IP address and retest the system functionality and
remote access to the system.
Fully charge then power up the HHR remote. Refer to the HHR Quick Reference guide for details.
Verify proper minimum controller software per above and HHR firmware versions as described in the
HHR configuration section below.
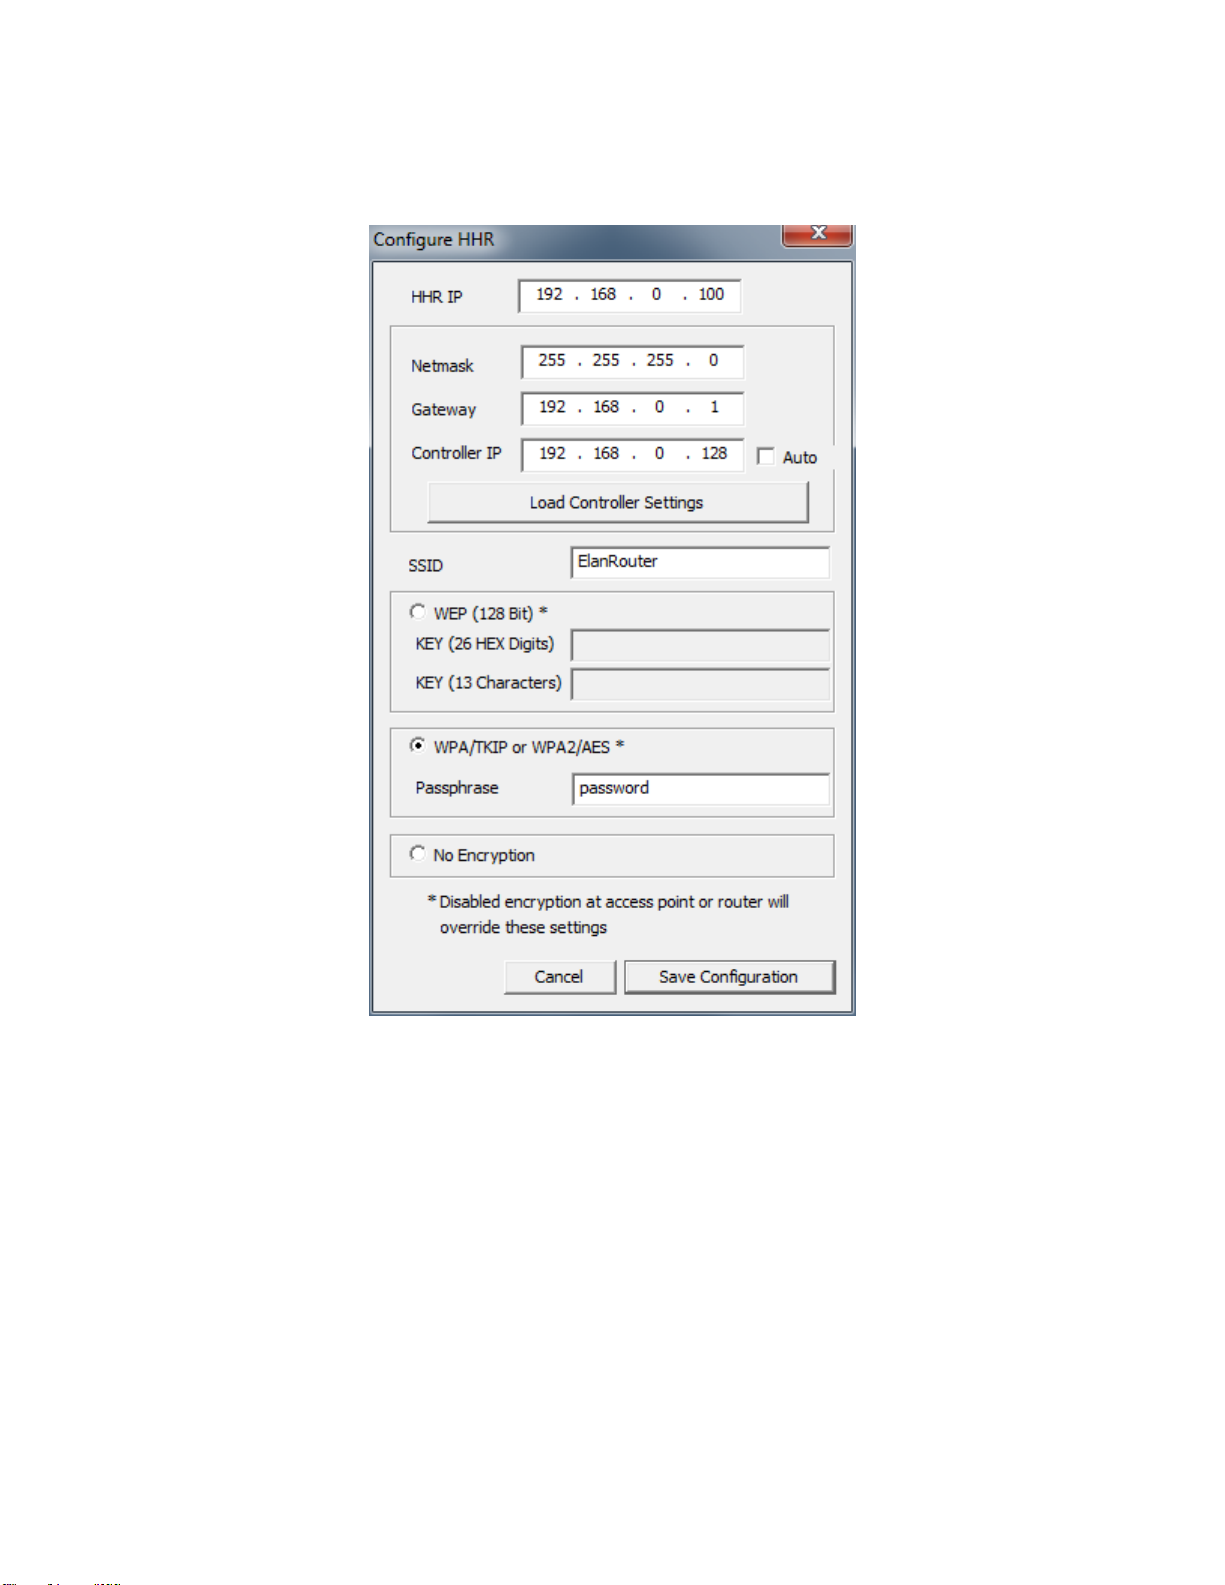
Use the Configurator to assign the Wi-Fi properties and connect the remote to the wireless network
and the system controller. Refer to HHR Configuration below.
Use the Configurator to select all pages and options for subsystem control. This includes defining
what zone and subsystems are available for control on the HHR.
Configure and test all subsystems for proper operation. In some cases, this may include editing or
creating custom UI pages for desired control.

3 of 12
HHR CONFIGURATION
The following steps will configure the HHR remote to communicate with the system controller via your
wireless network. Setup the remote(s) one at a time using the following procedure. For detailed
information about the HR10 wireless compatibility refer to the Wi-Fi Connections section later in this
document.
Notes:
•The HHR remotes may have issues connecting to the ELAN Configurator if you are using a MAC
with a windows emulator. If this is the case then use a Windows PC to configure the remote.
•You will need to have the wireless network SSID, encryption type and password, and a
predefined static IP address for each remote you are setting up. If you do not have this
information you will need to consult with the network administrator to get it.
•If you have trouble getting your HHR to connect to the wireless network refer to the Wi-Fi
Connections section below for tips and troubleshooting steps.
•Conflicts have been reported with the Spectralink Series 3640 WiFi Telephone. Both the Remote
and the phone system use Port 2000. Using these 2 systems on the same port will result in the
Remote dropping from the network, hang/lockups in the Remote, and rapid discharge of the
remote’s battery.
1. Check the system tab, system in the Configurator to verify the system controller software version is
as indicated in this document header or newer.
2. Verify the HHR firmware is as indicated in this document header or newer. If the firmware is not the
minimum from this document header then stop and contact ELAN tech support for details on
updating.
a. Power up the remote
b. Simultaneously press the –CLR button, the HOME button, and the MUSIC button located
directly above the HOME button to access the SETUP MENU.
c. Use the arrow buttons to navigate the menu to Code version then click OK to view the HHR
version information.
3. Connect to your system controller with the Configurator application.
4. Add the HHR Com device on the interface tab as shown in the Configuration Details table below.
NOTE: Only one COM device is required for a system even if you have multiple HHR remotes.
5. Switch the HHR remote OFF using the power switch located under the bottom endcap.
6. Connect the remote to your PC with the included USB-USB micro cable.
7. Let the remote boot up to the “Enter password” screen.
8. On the remote press digits 3526 then press ENTER. The remote’s screen should display “Correct”
and switch to “USB active”.
9. If a window pops up saying there are disk / file errors, click on the “Fix” or “Run Scan” button, then
close the window after it runs.
10. If any other window notifications or explorer windows open on your PC close them now.

4 of 12
11. In the Configurator, Right-click on the HHR communication device added in step 4 above and select
“Configure Attached HHR” from the menu. This will bring up the Configure HHR dialog box as shown
below.
12. Click the Load Controller Settings to automatically set the net mask, Gateway address, and Controller
IP address. This will also set the HHR IP address to a default value based on the Gateway address
loaded from the Controller. (Note: Your Elan Home Controller must be assigned a static IP for this
function!)
13. Enter your predetermined static IP address for the HHR in the HHR IP field. Note the static IP must
be outside of the network DHCP range, and not currently in use by another device. If you do not
know this address you will need to get it from your network administrator.
14. Enter the SSID for the wireless access point that the HHR will be connecting to.
15. Select the encryption type and enter the wireless password in the appropriate field.
16. Click Save Configuration to write the information down to the remote. Once complete you will get the
notification below that it is safe to disconnect the USB.

5 of 12
17. Click OK to close the dialog box
18. Switch the remote power switch to ON, remove the USB cable and replace the remote endcap.
19. The remote will display “Configuring Radio”then connect to the access point and finally the system
controller. Once connected to the system controller it will automatically log an entry under Interface
Devices as shown below.
20. Click + next to the remote to expand its options and configure the remote’s display for each
subsystem. The choices include selecting subsystem visibility, hidden or shown. Click Apply when
done.
21. Wake up the remote to let it reconnect to the controller and download all the interface pages. Note
that this may take a few minutes and it is recommended to download to one remote at a time.
22. Once the remote is online and associated you can check the remotes name by pressing the Menu
and Info button at the same time. The HHR Screen will display the name as it is in the configurator
on the interface tab. This is useful to identify which remote you are working on if you have multiple
remotes in one install.
23. Optionally configure the custom quick action buttons. Use the configurator to select the desired
button functionality:
a. Favorite –allows end user to save supported media now playing favorites for single button
press recall
b. Favorite Locked –same as above but configurator set only
c. Event Map Only –Set this to enable event map only functionality
d. Jump to Lighting - Jumps to a specified lighting page
e. Jump to Now Playing –Jumps to the HR10 zone now playing page
f. Light Scene/Link –Activate a light scene/link or map to an existing lighting keypad button
g. Light Switch –Toggle lighting load

ELAN | SpeakerCraft | Gefen | Furman | Niles | Panamax | Sunfire | BlueBOLT | Proficient | Xantech
1800 South McDowell Blvd., Petaluma CA 94954 • Toll Free: 800.472.5555 • Fax: 707.283.5901
ELAN CONFIGURATION DETAILS
The following table provides settings used in the ELAN Configurator. Please refer to the Configurator Reference Guide for more details.
o“<Select>” Select the appropriate item from the list (or drop-down) in the Configurator.
o“<User Defined>”, etc. Type in the desired name for the item.
o“<Auto>” This field will automatically populate during configuration
Devices Variable Name Setting Comments
Communication Devices Device Name <User Defined> Onlyone comm device required formultiple HHR
Device Type Ethernet / Elan HHR Controller
IP Address <Auto> Editable to allowformulticast address
Port <Auto> Default: 2000
Interface Devices <Auto Discover> Name <User Defined> Default: ELANHR@xxx.xxx.xxx.xxx See Note #1
Device Type Elan HHR
COM Device <Auto> See Note #2
Model <Auto> See Note #3
Power Button <Select> See Note #4
Power Press and Hold <Select> See Note #5
Auto-Return to Media <Select> See Note #6
Timeout <Select> See Note #7
Notes:
1. The HHR Remotes are automaticallydiscovered;referto initial ConfigurationNotes above
2. If Not alreadychosen, select the COM device that refers to the HHRComm devices set above
3. Automaticallydiscovered
4. Select the desired Power Buttonbehavior
5. Select the desired Press and Hold behavior (AllZones off or Sleep Timer)
6. Select the desired returnto media control time
7. Select the desired timeout to returnthe HHR to sleep mode

7 of 12
WI-FI CONNECTIONS
What type of access point is required?
Any 2.4 GHz wireless access point capable of one or more of the supported encryption types listed below
should work. The access point MUST also allow connections from 802.11g devices.
What encryption types are NOT supported. These options are not supported because the radio
module in the HHR doesn’t implement them.
1) 64 bit WEP
2) WPA-PSK + AES
3) WPA2-PSK + TKIP
4) WPA-Enterprise
5) WPA2-Enterprise
What encryption types are supported:
1) No encryption
2) 128 bit WEP
3) WPA-PSK + TKIP
4) WPA2-PSK + AES
There are a few terms here which can appear with different names on different access points. For
instance, WPA-PSK can also be referred to ask WPA-Personal. Similarly, WPA2-PSK can also be called
WPA2-Personal. Some access points may refer to AES as CCMP instead.
There is an additional limitation on the 128 bit WEP option. The actual key needed for 128 bit WEP is 26
hexadecimal
1
characters. The Configurator software allows you to enter either the 26 hexadecimal
characters or 13 ASCII
2
characters. The Configurator will convert the 13 ASCII character into the 26 hex
characters as you type. However, this conversion is unusual and may not be supported by most access
points. If the WEP key in the WAP is not 13 or 26 characters, please try using the tool that can be found
at http://www.wepkey.com/.
Also note that many access points support “auto” modes for WPA+WPA2 or TKIP+AES. Some access
points are known to not work if these “auto” options are used.
If an access point claims to implement all of the requirement listed here, but still does not work, then
Engineering should be informed. The important information is the manufacturer, model number, and
software version.
1
Hexadecimal characters are 0 through 9 and A through F.
2
Without getting too technical, ASCII characters are basically anything on your keyboard.

8 of 12
Below are some basic guidelines for HHR Wi-Fi configuration. This information is for reference only and
is provided to try to help if you are having trouble with the radio encryption configuration on a router or
AP.
WPA Mode
Cipher Type
Notes
WPA
TKIP
Ok
WPA
AES
Not recommended
WPA
TKIP and AES
Not recommended
WPA2
TKIP
Not recommended
WPA2
AES
Ok
WPA2
TKIP and AES
Ok
Auto (WPA or WPA2)
TKIP
Not recommended
Auto (WPA or WPA2)
AES
Not recommended
Auto (WPA or WPA2)
TKIP and AES
Not recommended
Basic Wi-Fi best practices:
•Do not use a router as an access point unless you have verified that it is running in access point
mode. This typically includes assigning a static IP to it outside the DHCP range, disabling the
DHCP server on it, and disabling the UPNP functionality.
•Install the WAP in a location open to the area where the remote will be used, it should be located
high (not on the floor) and not adjacent to any other devices that may interfere with it.
•Use only the antennas supplied with the WAP or Router. There are several aftermarket antennas
that are available but they may not be compatible with your device.

9 of 12
Recommended HHR Wi-Fi Connectivity troubleshooting steps:
1. Review all of the information under Wi-Fi Connections above.
2. Download one of the free wireless site analysis tools (such as “inSSIDer”) and perform a basic
Wi-Fi site survey. Check the site for other Wi-Fi networks. Determine all of the SSIDs in use and
which channel they are using. You will want to use a SSID that is not in use and set the channel
as far from any utilized channels as possible.
3. Configure your AP or Router using the SSID and channel determined in the steps above with no
encryption.
4. Configure the HHR for this SSID with no encryption as described in HHR Configuration Above.
5. Verify the radio configuration on the HHR completes successfully by watching the remote screen
when it is disconnected from the configurator. There will be notification such as “configuring
radio” on the HHR screen during this process.
6. Test the HHR connectivity now with encryption disabled:
a. If this test succeeds and the HHR connects to the system then the encryption settings or
encryption type may be causing the problem. Refer to the pages above for compatible
encryption settings.
b. If this test fails then check the following:
i. Verify the HHR communication device is added to the Configurator Interface tab
as described above.
ii. Verify the remote is within 30’ of the AP
iii. Verify the IP address that the HHR is set to is a valid address on your network
and is outside of the DHCP range.
iv. Verify your computer can connect to the controller while it is connected to the AP.
v. With the remote OFF use your computer to ping the network for the HHR remote
IP to verify there is not another device using that address.
vi. Reconfigure the HHR radio; check the SSID for typos and verify the controller IP
is correct (this is the ELAN system controller IP address)
vii. On the remote simultaneously press the –CLR button, the HOME button, and the
MUSIC button located directly above the HOME button to access the SETUP
MENU. Scroll to Network Information then click the OK button. Verify the remote
SSID and IP address are correct.
7. Once the issue is resolved be sure to reconfigure the AP and remote with compatible encryption
settings then verify connection and proper operation.

10 of 12
COMMON MISTAKES:
1. No Wi-Fi Connectivity. See Wi-Fi connections above.
2. Incorrect Wi-Fi configuration. If you enter the wireless access point information incorrectly you
will get an error message when configuring the radio. If you see an error message, verify all the
Wi-Fi settings and repeat the remote configuration.
3. HHR USB not connecting. There may be issues with USB connections to ELAN Configurator
when running on a MAC with an emulated windows environment. Use a Windows PC for reliable
USB connection to the HHR.
4. HHR On Screen status messages:
a. Connecting to controller –The remote has a Wi-Fi connection to the network but is not
connecting to the system controller. Verify the AP is on the same network as the system
controller and the system controller is powered on and connected to the network at the
“Controller IP” address designated the HHR Configuration steps above.
b. Wireless connection not available –The remote does not have connection to the wireless
network.
i. Verify the wireless access point is powered on and within range of the remote.
ii. Check for other devices that may be interfering with the wireless network.
iii. Re-connect the HHR to the configurator and verify all Wi-Fi and network settings.
iv. Confirm the HHR IP is not conflicting with another network device.
v. Refer to the HHR Wi-Fi troubleshooting steps above.
5. Incorrect universal function mapping for source control. Verify your button mapping on your
source device page.
6. Spectralink Series 3640 WiFi Phone System interference: Spectralink and the Hand-Held
remote both default to port 2000. If attempting to use the Hand-Held Remote and see issues
such as: HHR dropping off the network repeatedly; HHR Locking up/Freezing when the phone
rings; AND HHR rapidly depleting its battery; resolve the port conflict.

11 of 12
INFORMATION ABOUT HHR COMMUNICATIONS AND PROGRAMMING:
1. Disrupted Communications
Communications between the Elan Controller and HHR may be disrupted when the Configurator
is being used to configure certain data. This is analogous to all Viewers (TP4/7/12) jumping to the
Home Page when certain modifications are performed. Communications to and from the HHRs
are disrupted from one to thirty seconds (or longer) depending on the number of HHRs in the
system and the change being made.
The worst case scenario is making changes (adding, deleting, changing size) to TV Icons being
used on the HHR. For example, when using all TV Icons and having 20+ HHRs in the system,
HHR communications will be lost for 2 minutes or more while the changes are being applied.
When communications is lost, HHR button pushes will not work and the HHR may display
“Connection to controller”.
Once the Configurator has completed its calculations, the HHRs will resume normal operations.
2. Heavy traffic may affect download times
When a download to an HHR is in progress, the amount of traffic on the Wireless Router / Access
Point may affect the download times. Under extremely heaving traffic, downloads may fail and will
be restarted.
If experiencing problems downloading to multiple HHRs at the same time with heavy traffic, try
waking fewer HHRs at the same time.
3. Downloading new / modified TV Icons to the HHR
When TV Icons are changed, the system needs to recalculate data for each HHR in the system.
A status message is displayed on the bottom status bar of the Configurator for each HHR once its
data has been recalculated. The HHRs are processed in the order they appear on the Interface
Tab. When the last one has been processed, the system is now ready to download the new data
to the HHRs.
If all TV Icons are in use, it will take approximately 5 seconds to perform the calculations for each
HHR.
Be sure to wait till all calculations have been completed!
As each HHR is awakened (by shaking or by key press), it will initiate a download of the new
data. On a wireless network with light traffic, there should be no problem downloading to eight
HHRs at the same time. If a download experiences problems, it will attempt the download again
until it succeeds.
In the worst case, if a download is not successful due to heavy traffic, the HHR will abort the
download at this time. It will re-try either the next time it wakes up or when the TV Icons are
needed for display on the HHR (“just-in-time downloading”).

12 of 12
4. Roaming –having two or more Access Points
If there are two or more Access Points, the HHR will connect to the Access Point with the
strongest signal (usually the closest one). The only exception to this is if there is heavy traffic on
the closest Access Point, the HHR may connect to the next closest (strongest signal) Access
Point. Access Points with heavy traffic may not respond quick enough to the HHR request for
connection so the HHR will seek out another Access Point.
While connected to the weaker signal, the HHR performance may be degraded. Once the HHR
goes to sleep and is awoken at a later time, it will attempt to connect to the stronger signal. If the
nearest Access Point is not under heavy traffic at this time, the HHR will connect to this Access
Point.
Table of contents
Other Elan Remote Control manuals