Illuminated Mirrors Diamond X Series Operation manual
Bathroom
Cabinet
Illuminated Mirrors
The UK’s Largest LED Mirror Supplier to Trade and Retail
www.illuminated-mirrors.uk.com
Installation
& User Guide
2Instruction manual Illuminated Bathroom Mirrored Cabinets
Bathroom Cabinet
Installation & User Guide
Thank you for purchasing our illuminated Cabinets.
To avoid product damage or personal injuries, carefully read,
understand, and follow all the Instructions in this installation
guide before installing the product.
Save this manual for future reference.

3Instruction manualIlluminated Bathroom Mirrored Cabinets
WARNING!
To avoid the risk of electrocution,
please turn o the electricity supply mains
before commencing the installation.

CONTENT
IMPORTANT INFORMATION
Installation
1 Positioning
2,3 Aluminium Cabinet Installation
4 Fitting Non-Demister Doors With Soft Close Hinges
5 Fitting of Demister Doors
6 Fitting Non-Demister Doors With Pivot Hinges
7 Shelf Adjustment
8 Oak Cabinets
Operation
1 On/O Infrared Sensor
2 Shaver Socket
3 Ambient Lighting
4 RGB Colour Change Lighting
5 Bluetooth Audio
FAQs
Instruction manual Illuminated Bathroom Mirrored Cabinets
4

5
Instruction manualIlluminated Bathroom Mirrored Cabinets
IMPORTANT INFORMATION
This product should only be installed by a fully qualied
electrician in accordance with the current IEE wiring regulations
(UK) or the equivalent national wiring regulation outside of the
UK. This light tting is a Class I product and therefore must be
earthed. Always switch o the electricity supply at the mains
before and during installation of this product.
Our Class II Solid Oak cabinets do not require an earth
connection
1. This product is IP44 rated so can be safety tted in Zones 2
and 3. Position the cabinet in a suitable location with at least
15cm clearance between the proximity sensor and the
nearest surface and according to the zonal diagram show
below, ensuring that the domestic electrical mains supply is
within reach of the electrical entry point of the product.
60 cm
60 cm
Radius
60 cm
225 cm 75 cm
75 cm
75 cm
60 cm 60 cm
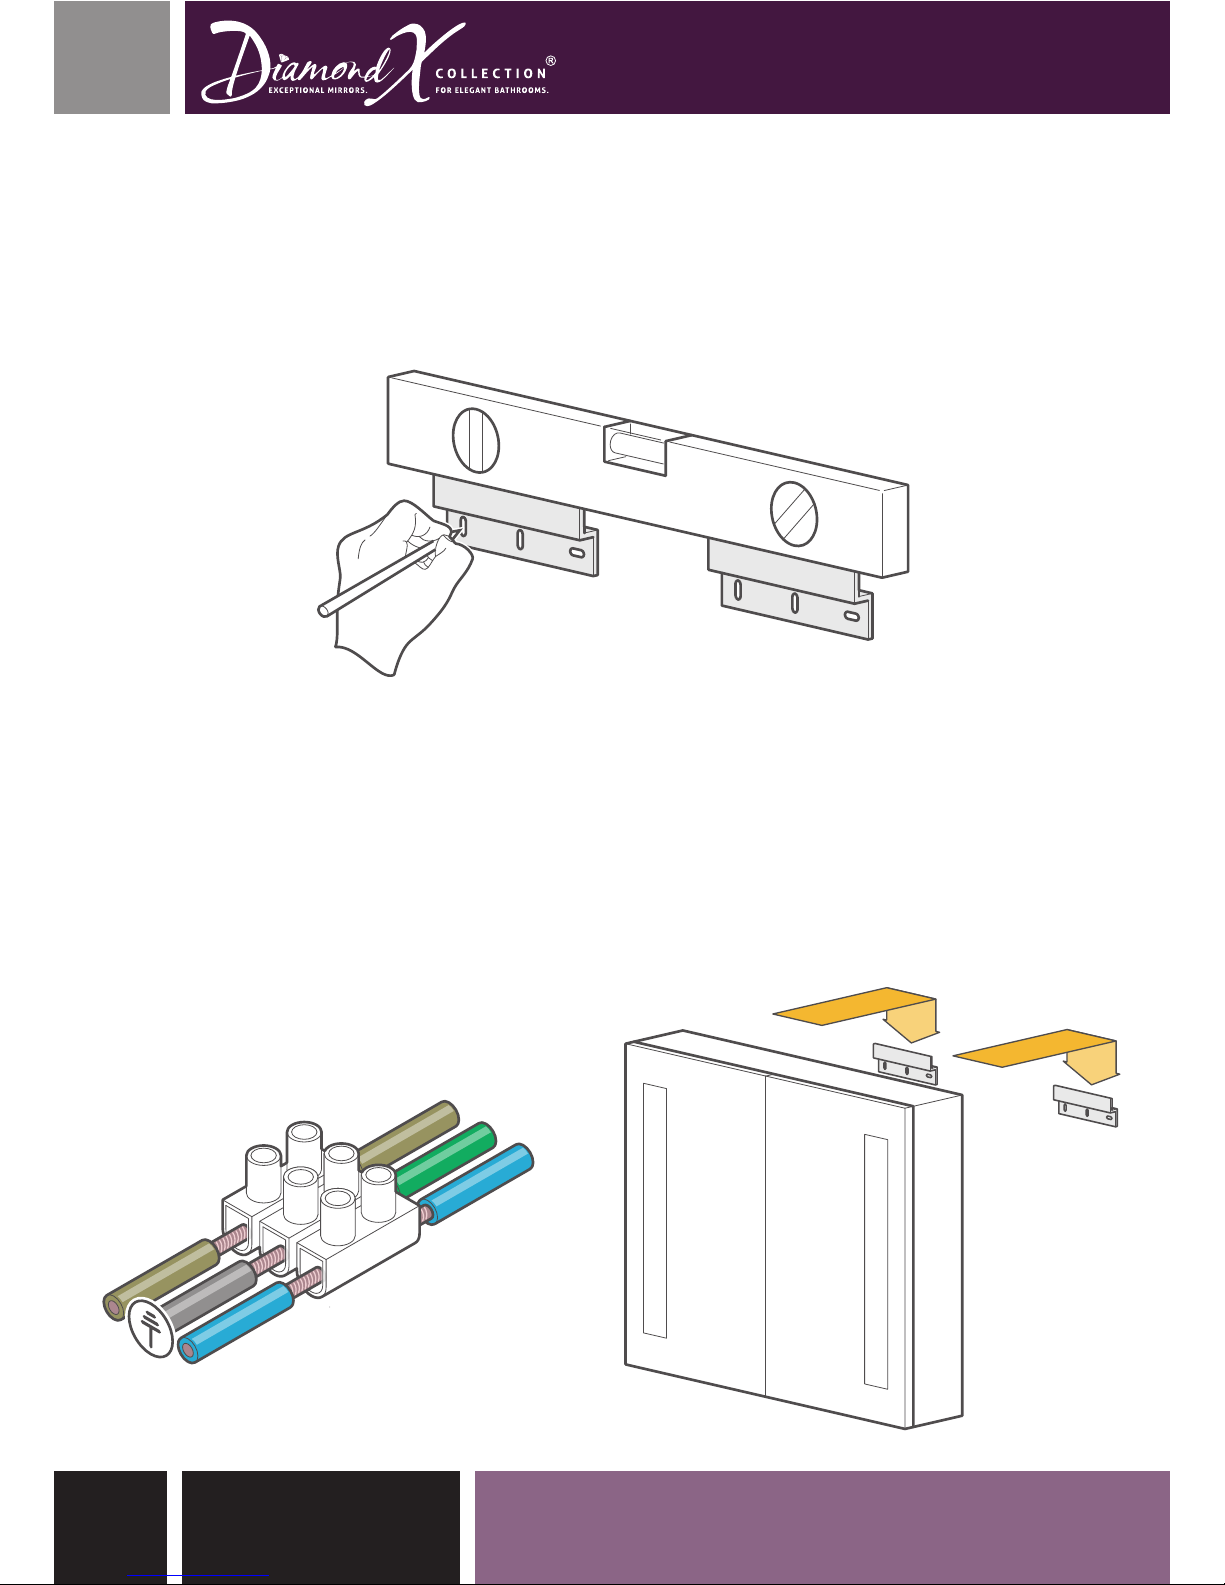
2. Using a spirit level make sure that the supplied mounting brackets
are level and mark the position of the bracket mounting points. The
spacing of the brackets will vary depending on the model you have
chosen and can be found within the cabinets packaging.
Instruction manual Illuminated Bathroom Mirrored Cabinets6
3. Using an appropriate drill bit for your wall drill the mounting holes
and t wall plugs. The plugs supplied are suitable for brick walls only,
if in doubt please consult your local DIY store for advice on alternative
suitable xings. Wire the cabinet to your mains supply. For models
that are supplied with the door(s) already tted simply hang the
cabinet on the wall. For all other models please refer to the next
sections.
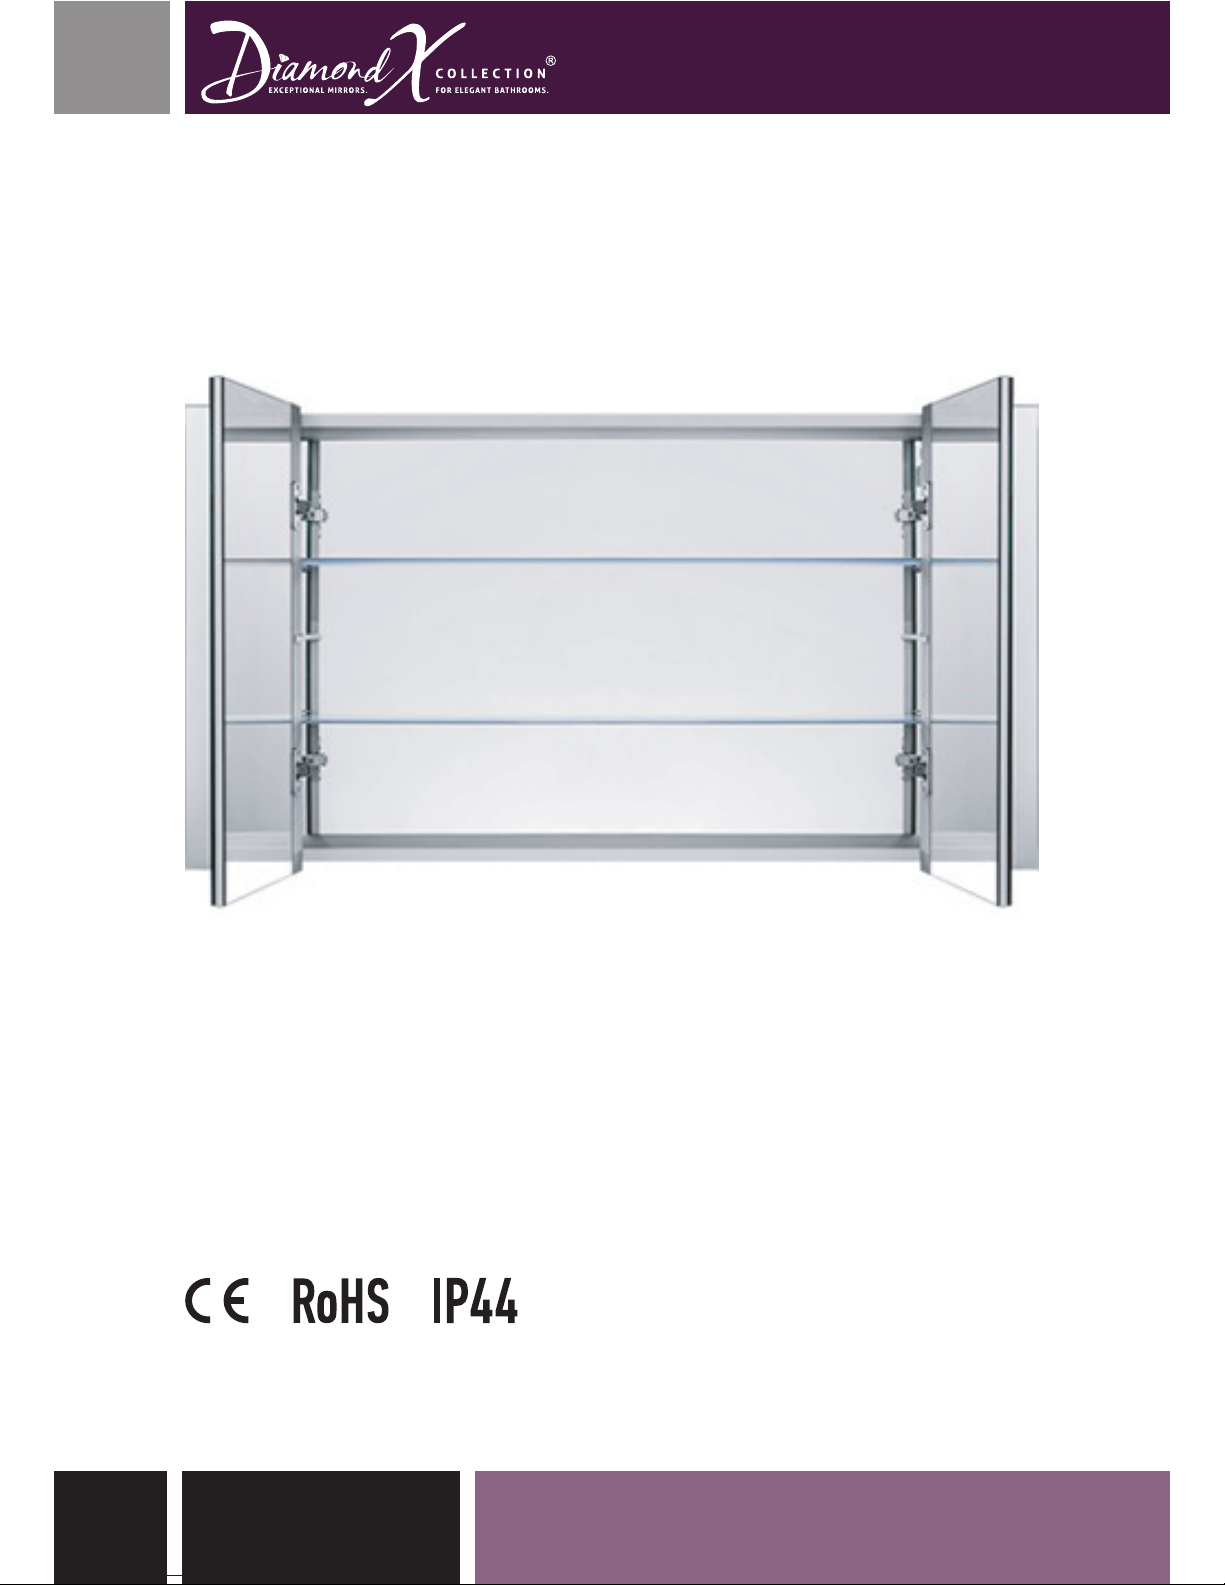
Aluminium Cabinet Installation
Live Earth Natural
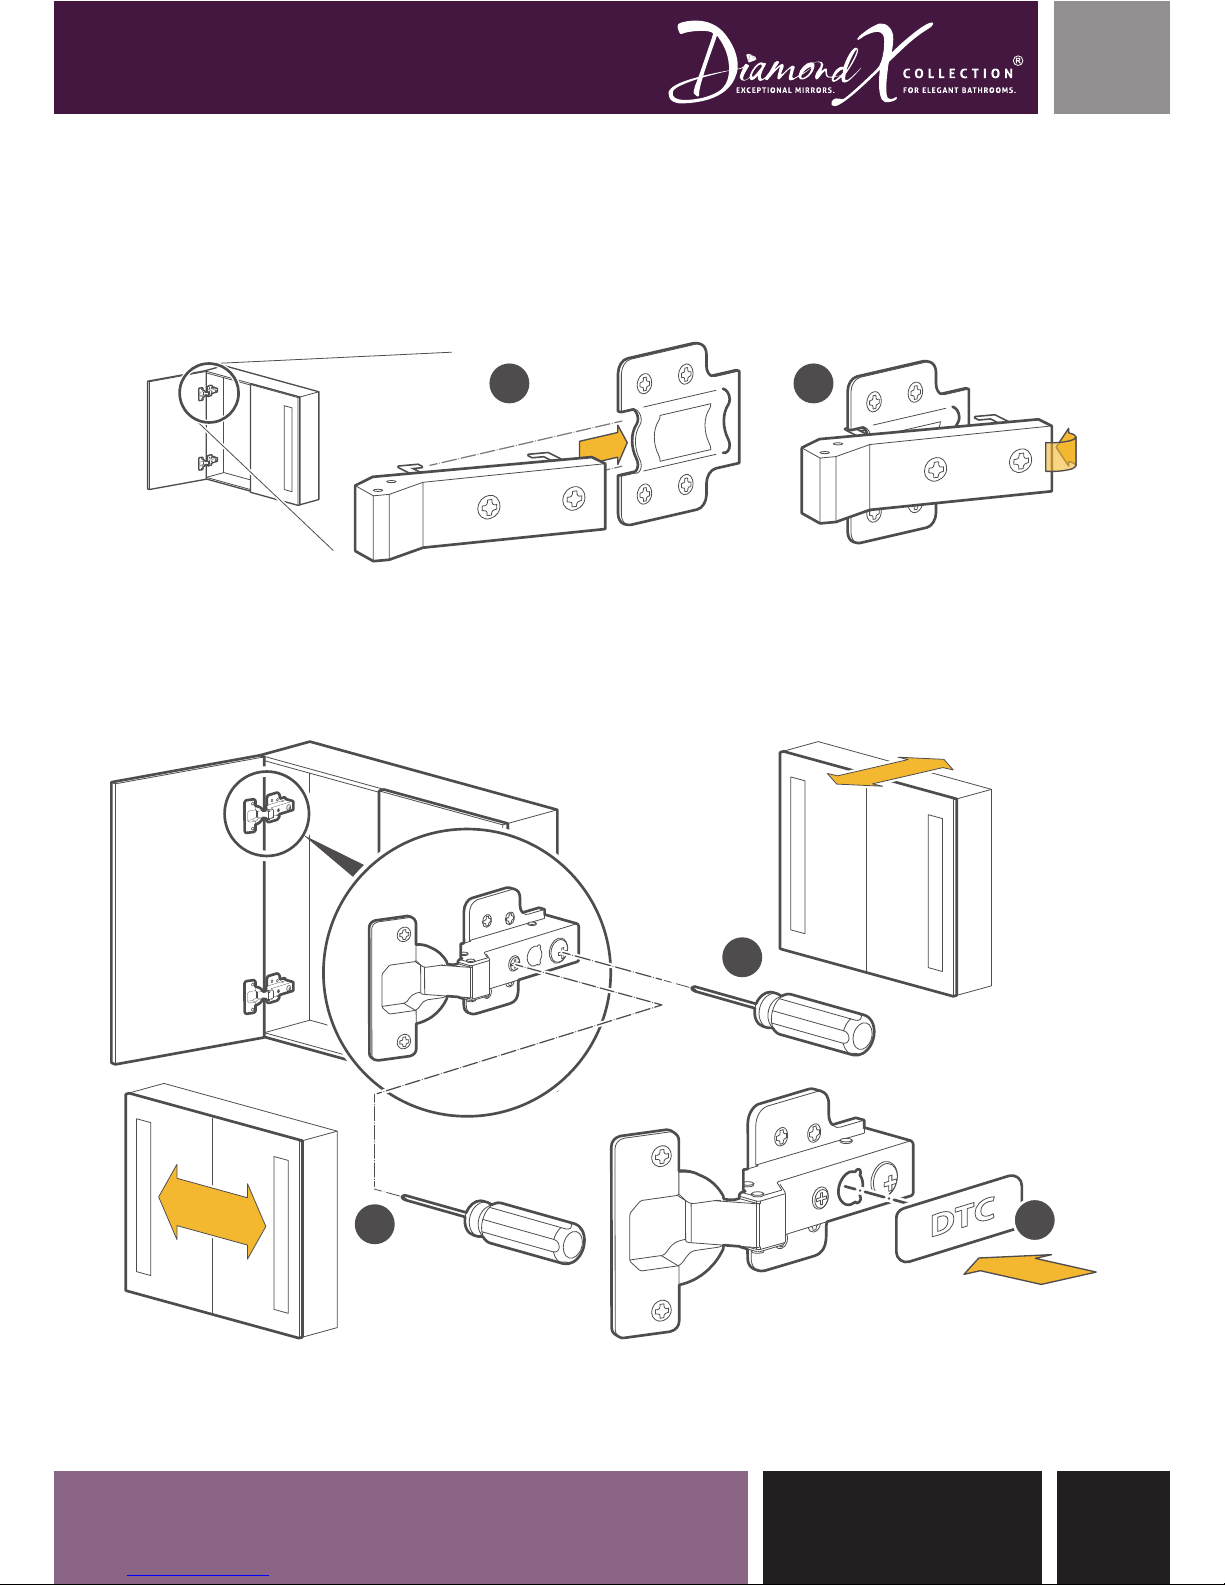
To t the doors simply clip the sort close hinges into place. This is
achieved by locating the front of the hinge into to cabinet mounting
plate a) and pushing in the rear of the hinge until it clicks into place b).
Door Adjustment
There are two adjustments that can be made a) will adjust the door
left to right b) will adjust the gap between the door and the cabinet.
Once you have correctly adjusted the door(s) simply clip on the hinge
cover c)
7Instruction manualIlluminated Bathroom Mirrored Cabinets
4. Fitting Non-Demister Doors With Soft Close Hinges
аb
а
b
c

Instruction manual Illuminated Bathroom Mirrored Cabinets8
5. Fitting of Demister Doors
There are four main styles of cabinet, please identify your cabinet
type from the images below and follow the appropriate tting
guidelines. (Please note that your specic cabinet size may be
dierent to those shown in the images).
Type A
Soft Close Hinge With Side
or Top Panel
Type B
Soft Close Hinge With Curved Electrics
Cover, and Side Illumination Panels
Type C
Fixed Hinge with Transparent
Windows in the Door
Type D
Soft Close Hinge with LED Illumination
Built Into the Door
9Instruction manualIlluminated Bathroom Mirrored Cabinets
Type A
Remove the four panel mounting screws, disconnect the panel, and
set aside.
Carefully push the door demister cable through the grey grommet.
The entry position will depend on the model.
Locate the demister cable connection block and connect the wires
from the demister door.
Ret the mirror panels.

Instruction manual Illuminated Bathroom Mirrored Cabinets10
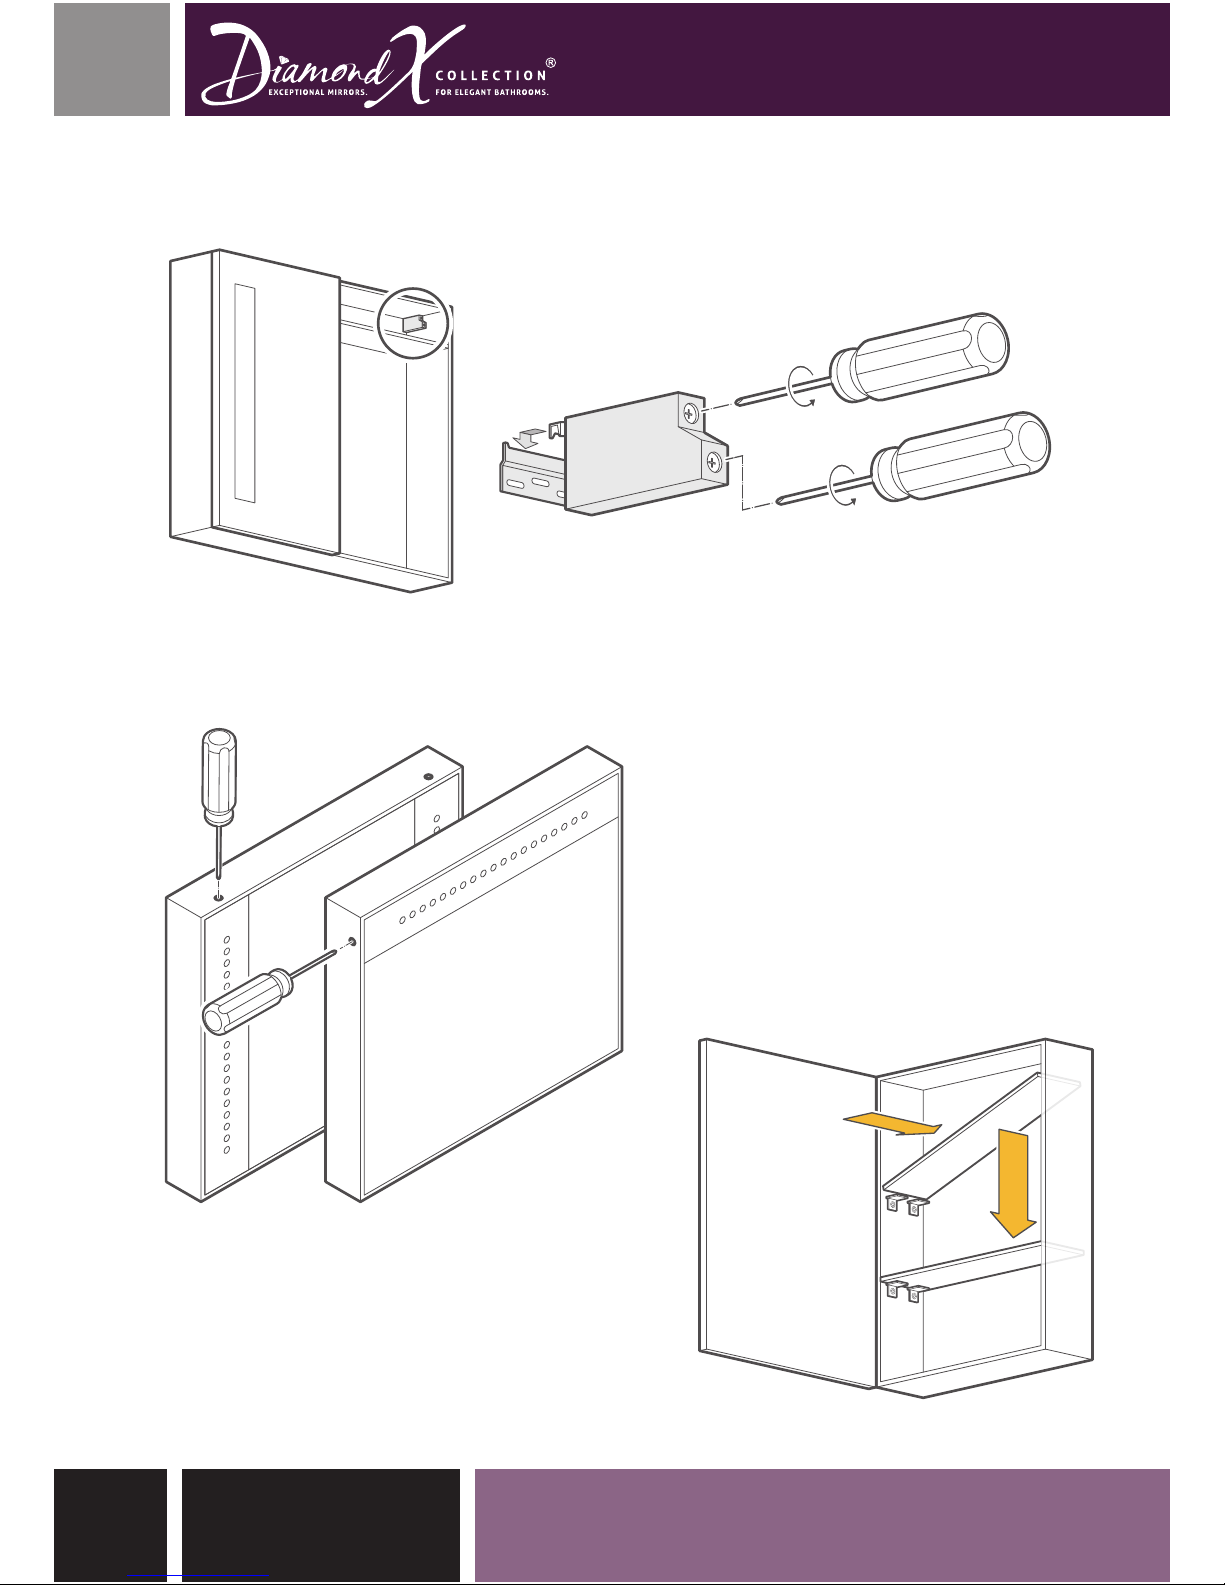
Type B
Begin by removing the electrics cover mounting screws. Carefully
lower the front of the cover to gain access to the demister cable
terminal block.
Feed the door demister cable through the grey grommet located on
the electrics cover.
Connect the demister cable and replace the electrics cover.

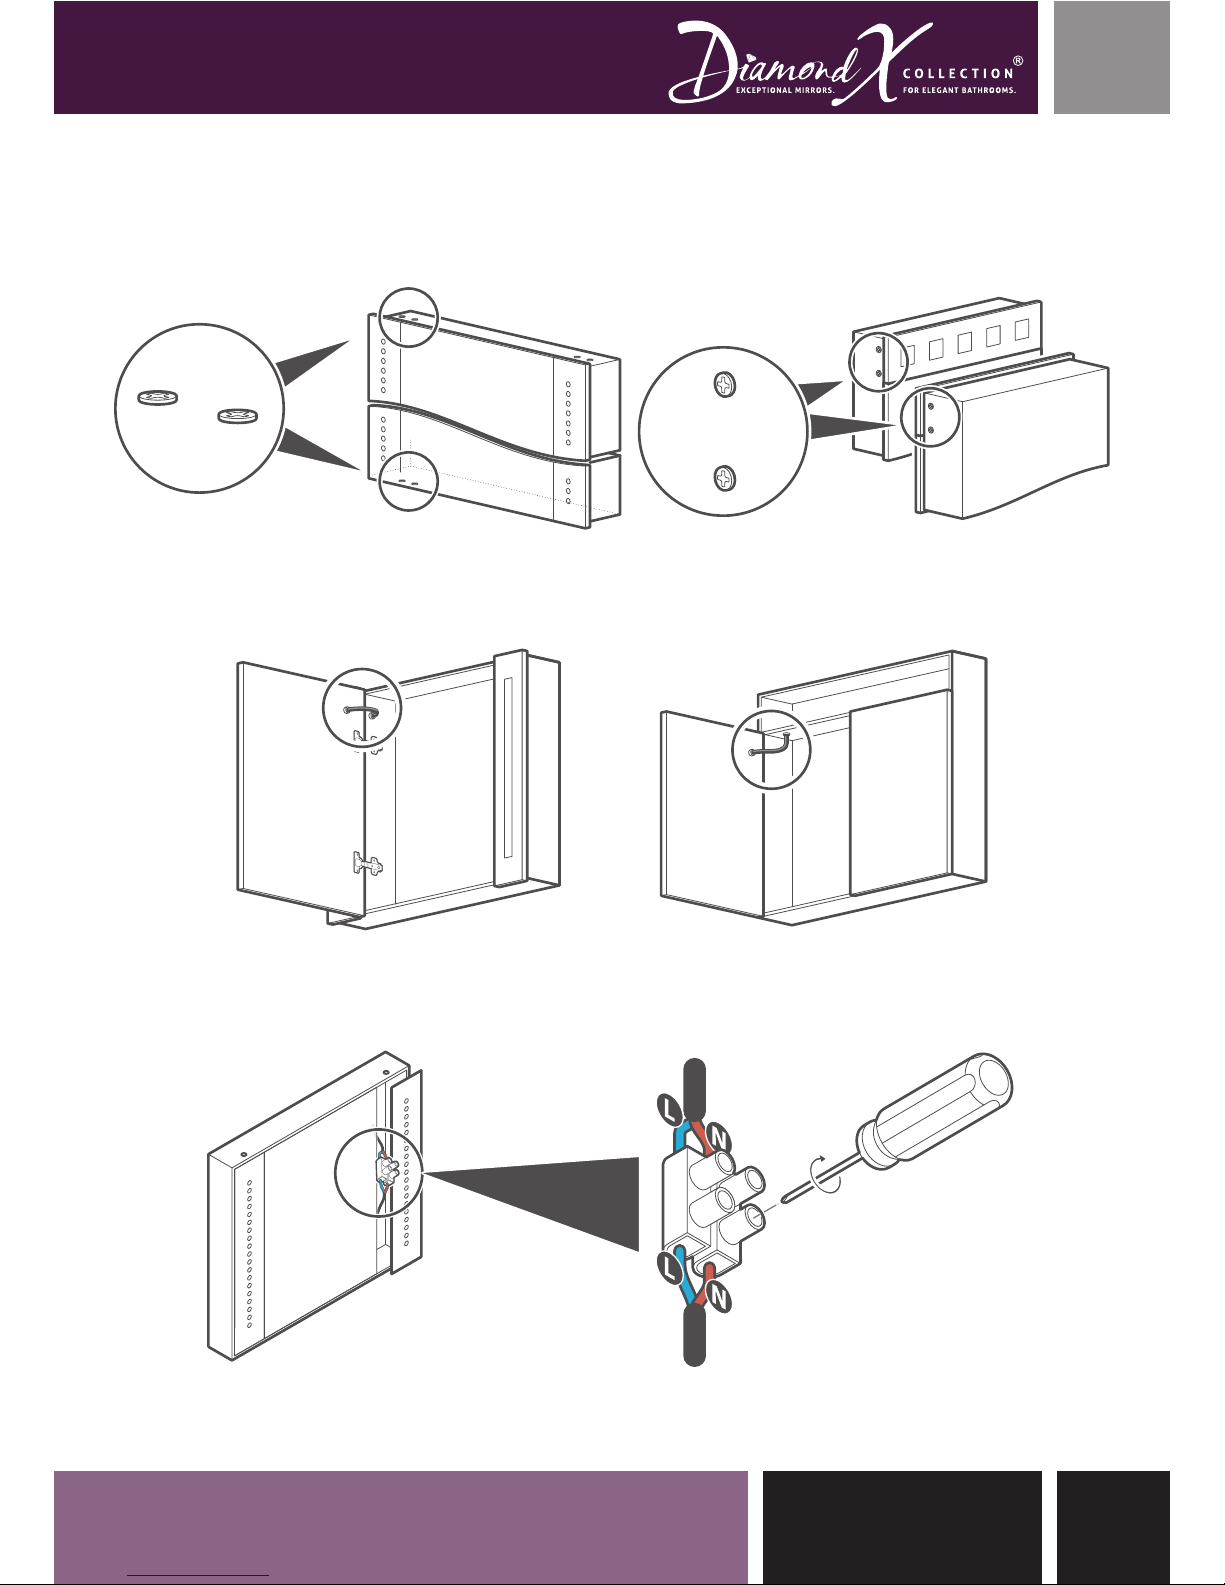
Type C
Remove the panel mounting screws located on the top or sides of
the cabinet (depending on the light orientation) and carefully
remove and set aside.
Carefully align and push the door demister cable through the gap in
the side of the cabinet a) until the door is fully positioned under the
hinge plate b).
Attach the door at the top and bottom using the bolts and washers
provided.
11Instruction manualIlluminated Bathroom Mirrored Cabinets
WASHER
BOLT

Instruction manual Illuminated Bathroom Mirrored Cabinets12
Type D
This range is available with a single, double or treble doors. The tting
is basically the same for Type B products but with the additional
requirement to connect the door’s lighting harness as follows:
With the cover loosened locate the terminal block for the demister
pad a) and the terminal block for the door lighting b). Secure the
door harness c)
Locate the demister cable connection block and connect the wires
from the demister door.
LED POWER SUPPLY
Cables from the
middle mirror door
For LED
For Demister Pad The two-way
terminal block
for the demister pad
220V-240V
220V-240V
a
c
b

Type D Cabinets are also available with a digital clock. To set the time
on the clock use the buttons located on the edge of the mirror door.
6. Fitting Non-Demister Doors With Pivot Hinges
The following describes how to secure the non-demister doors of
the circular diuser range of cabinets.
13Instruction manualIlluminated Bathroom Mirrored Cabinets
Press and hold down the Hours button until the numbers on
the clock start to ash.
Press the Hours button until the correct Hours time is reached.
Press and hold down the Hours button until the numbers on
the clock start to ash.
Press the Minutes button until the correct Hours time is
reached.
a)
b)
c)
d)

Instruction manual Illuminated Bathroom Mirrored Cabinets14
7. Shelf Adjustment
Depending on your model there will be either four or two shelf
brackets per shelf. Each type adjust in the same way. For height
adjustment loosen the bracket screw a) and move the bracket to
required height and retighten. Slot in your shelf and secure by
screwing in the plastic grommets b).
There are two types of door spacer supplied a), the drilled through
spacer should be tted to the top part of the door by simply pushing
into position b), and the solid based spacer to the bottom should be
held into place whilst you position the door on the cabinet. Use the
pointed grub screws c) provided and attach the door to the cabinet.
If adjustment door height adjustment is required this can be
achieved by screwing the bottom grub screw in or out.
а
bа
b

8. Oak Cabinets
Using a spirit level make sure that the supplied mounting brackets
are level and mark the position of the bracket mounting points. The
spacing of the brackets will vary depending on the model you have
chosen and can be found within the cabinets packaging.
Using an appropriate drill bit for your wall drill the mounting holes
and t wall plugs. The plugs supplied are suitable for brick walls only,
if in doubt please consult your local DIY store for advice on alternative
suitable xings.
Depending on your model, should be remove both side panels or
top panel of your cabinet by removing the xing screws located on
the frame. This will allow you to gain access to the cabinets mains
connection terminal block and mounting adjustors.
15Instruction manualIlluminated Bathroom Mirrored Cabinets
Instruction manual Illuminated Bathroom Mirrored Cabinets16
Connect your cabinet to the mains supply and hang onto the wall
brackets.
Adjustments can be made using the two screws on the cabinet
hangers.
Replace the side or top panels.
Finally t the shelves by slotting
in at an angle.
For Height Adjustment
For Depth Adjustment

Operating Instructions:
bottom of the frame, simply wave your hand across the sensor and it
will instantly power up the lights and demister pad. Repeat the action
2. Shaver Socket
All cabinets include a 240 Volt shaver socket for the use of electric
rocker switch which works separately from the lights and demister
pad.
3. Ambient Lighting
Please note that the ambient single colour or white lighting turns ON
and OFF on the actuation of the proximity sensor along with the
main mirror lights and the mirror demister.
4. Bluetooth Audio
To activate the internalBluetooth Audio System simply turn on
the internal Shaver Socket/Bluetooth switch. You will hear an
activation tone coming from your cabinet speakers.
For Bluetooth operation, the internal Audio System will
automatically become available for your device to pair to,
appearing as Diamond X on your mobile’s Bluetooth available
devices list. Depending on your portable device and your settings,
subsequent pairing will be automatic.
17Instruction manualIlluminated Bathroom Mirrored Cabinets

5. RGB Colour Change Lighting
Simply point you remote towards the small black sensor located
on either the bottom or side of the mirror frame. Select you Static
Colour option from the keypad. The brightness of the light can be
adjusted in steps by pressing the top left two UP and DOWN
control buttons. The ON - OFF function will only operate if the
main mirror lights are turned on using the remote sensor as
described in Section 1.
There are four MODE buttons giving the eects described in the
table show below. To operate these simply point your remote
towards the black sensor and select the required function and
click once. The speed of the transitions can be increased or
decreased by pressing the UP or DOWN buttons. Simply select a
static colour to cancel the function.
MODE DESCRIPTION
FLASH Flashes between 7 Colours
STROBE Strobes the chosen Static Colour
FADE Fades the Static Colour, On and O.
SMOOTH Fades between Red, Green and Blue.
SMOOTH
FADE
STROBE
FLASH
ONOFF
WBGR
ONOFF
DOWN
UP
SMOOTH
FADE
STROBE
FLASH
WhiteBlueGreenRed
Light
Green Dark
Blue
Orange
PinkCyan
Dark
Yellow
Purple
Light
Blue
Yellow
Magenta
Sky
Blue
Light
Yellow
Static Colours
Eects
Light Brightness &
Eects Speed
UP - DOWN
Instruction manual Illuminated Bathroom Mirrored Cabinets18

Infra-Red
SWITCH
INPUT
OUTPUT
LED
CONVERTER
INPUT OUTPUT
Wired For IR Sensor
Infra-Red
SWITCH
INPUT
OUTPUT
LED
CONVERTER
INPUT OUTPUT
IR Sensor Bypassed
FAQs
1. What is a LED Cabinet?
A LED Cabinet uses Energy Saving LED light bulbs. They are
Waterproof Rated IP44 for use in bathrooms and include clever
technology like, Infra-Red on/o sensors, Anti-Mist demister
pads and a shaver socket.
2. On/O Infrared Sensor?
All our LED Cabnets include Infra-Red on/o Sensor, simply
wave your hand to the sensor and it will instantly powers up the
lights and demister pad. You need to wave your hand 3-6
inches away to On/O your mirror cabinet.
3. Where is the sensor located?
The sensor is located on the bottom of the Cabinet and not on
the front of the glass.
4. Can I isolate the sensor so the Cabinet Lights come on with
my bathroom lighting?
Yes this can easily be done by a qualied electrician by
bypassing the Infra-Red switch as shown below:
5. How do I activate the demister pad?
The demister pad works automatically when the lights are
turned on and o.
6. Is the Cabinet tinted glass?
No, the mirror is perfectly clear reective mirror glass.
7. Is the Cabinet CE & ROHS certied?
Yes!
19Instruction manualIlluminated Bathroom Mirrored Cabinets
Table of contents
Other Illuminated Mirrors Indoor Furnishing manuals

Illuminated Mirrors
Illuminated Mirrors DiamondX Operation manual

Illuminated Mirrors
Illuminated Mirrors Diamond X 100877K72 User manual

Illuminated Mirrors
Illuminated Mirrors 100877K5 User manual

Illuminated Mirrors
Illuminated Mirrors Diamond X Large Operation manual

Illuminated Mirrors
Illuminated Mirrors 100877K99 User manual
Popular Indoor Furnishing manuals by other brands


Safavieh Furniture
Safavieh Furniture Aliyah CNS5730 quick start guide

Kimball
Kimball XSEDE Assembly instructions

KEUCO
KEUCO Royal Modular 2.0 800400DDEG0 00 Series Instructions for use

Harmony
Harmony STUDY CARREL manual

Allen + Roth
Allen + Roth FCM90274A manual

Homelegance
Homelegance 194S1104BR-2 Assembly instruction


